Emilia EMCER64E User manual

60cm 4 Zone Ceramic Cooktop
Instruction book and installation manual
MODEL: EMCER64E
Congratulations on the purchase of your new cooktop.
We recommend that you spend some time to read this manual to fully
understand how to use the cooktop. The manual contains the installation guide
for use by a qualified installer to ensure installation meets regulatory
requirements and manufacturer’s specifications.

2
SAFETY WARNINGS
Please read this user manual thoroughly before
attempting to use this appliance for the first time.
This manual contains valuable information on the
safe installation, use and care of the appliance.
Keep these instructions for reference and pass them
on to future user.
Installation
Electrical Shock Hazard
• Disconnect the appliance from the mains
electricity supply before carrying out any work or
maintenance.
• Connection to a good earth wiring system is
essential and mandatory.
• Alterations to the domestic wiring system must
only be made by a qualified electrician.
• Failure to follow this advice may result in electrical
shock or death.
Cut Hazard
Take care - panel edges are sharp. Failure to use
caution could result in injury or cuts.
Important safety instructions
• Read these instructions carefully before installing
or using this appliance.
• No combustible material or products should be
placed on this appliance at any time.
• Please make this information available to the
person responsible for installing the appliance as
it could reduce your installation costs.

3
• To avoid a hazard, this appliance must be installed
according to these installation instructions.
• This appliance must be properly installed and
earthed, only by a suitably qualified person.
• This appliance should be connected to a circuit
which incorporates an isolating switch providing full
disconnection from the power supply.
• Failure to install the appliance correctly could
invalidate any warranty or liability claims.
Operation and maintenance
Electrical Shock Hazard
• Do not cook on a broken or cracked cooktop. If
the cooktop surface is broken or cracked, switch
the appliance off immediately at the mains power
supply (wall switch) and contact a qualified
technician.
• Switch the cooktop off at the wall before
commencing any cleaning or maintenance.
• Failure to follow this advice may result in electrical
shock or death.
Health Hazard
This appliance complies with electromagnetic safety
standards.
Hot Surface Hazard
• During use, accessible parts of this appliance will
become hot enough to cause burns.
• Do not let your body, clothing, or any item other
than suitable cookware contact the ceramic glass
until the surface is cool.

4
• Metallic objects such as knives, forks, spoons, and
lids should not be placed on the cooktop surface as
they can become extremely hot
• Keep children away.
• Handles of saucepans may be hot to touch. Check
saucepan handles do not overhang other cooking
zones. Keep handles out of reach of children.
• Failure to follow this advice could result in burns
and scalds.
Cut Hazard
• The razor-sharp blade of a cooktop scraper is
exposed when the safety cover is retracted. Use
with extreme care and always store safely and out
of reach of children.
• Failure to use caution could result in injury or cuts.
Important safety instructions
• Never leave the appliance unattended when in
use. Boil overs create smoke and greasy
spillovers may ignite.
• Never use your appliance as a work or storage
surface.
• Never leave any objects or utensils on the
appliance.
• Never use your appliance for warming or heating
the room.
• After use, always turn off the cooking zones and
the cooktop as described in this manual (i.e., by
using the touch controls).
• Do not allow children to play with the appliance or
sit, stand, or climb on it.

5
• Do not store items of interest to children in
cabinets above the appliance. Children climbing
on the cooktop could be seriously injured.
• Do not leave children alone or unattended in the
area where the appliance is in use.
• Children or persons with a disability which limits
their ability to use the appliance should have a
responsible and competent person to instruct
them in its use. The instructor should be satisfied
that they can use the appliance without danger to
themselves or their surroundings.
• Do not repair or replace any part of the appliance
unless specifically recommended in the manual.
All other servicing should be done by a qualified
technician.
• Do not use a steam cleaner to clean your cooktop.
• Do not place or drop heavy objects on your
cooktop.
• Do not stand on your cooktop.
• Do not use pans with jagged edges or drag pans
across the glass surface as this can scratch the
glass.
• Do not use scourers or any other harsh abrasive
cleaning agents to clean your cooktop, as these
can scratch the ceramic glass.
• If the supply cord is damaged, it must be replaced
by the manufacturer, its service agent, or similarly
qualified persons to avoid a hazard.
This appliance is intended to be used in a domestic
household environment only! Commercial use of any kind is
not covered under the manufacturer's warranty!

6
WARNING: The appliance and its accessible parts
become hot during use.
• Care should be taken to avoid touching heating
elements. Children less than 8 years of age shall
be kept away unless continuously supervised.
• Children shall not play with the appliance.
• Cleaning and user maintenance shall not be made
by children without supervision.
WARNING: Unattended cooking on a cooktop with
fat or oil can be dangerous and may result in fire.
NEVER try to extinguish a fire with water but switch
off the appliance and then cover flame e.g., with a lid
or a fire blanket.
WARNING: Danger of fire: do not store items on the
cooking surfaces.
WARNING: If the surface is cracked, switch off the
appliance to avoid the possibility of electric shock, for
cooktop surfaces of glass-ceramic or similar material
which protect live parts
• A steam cleaner is not to be used.
• The appliance is not intended to be operated by
means of an external timer or separate remote-
control system.
7
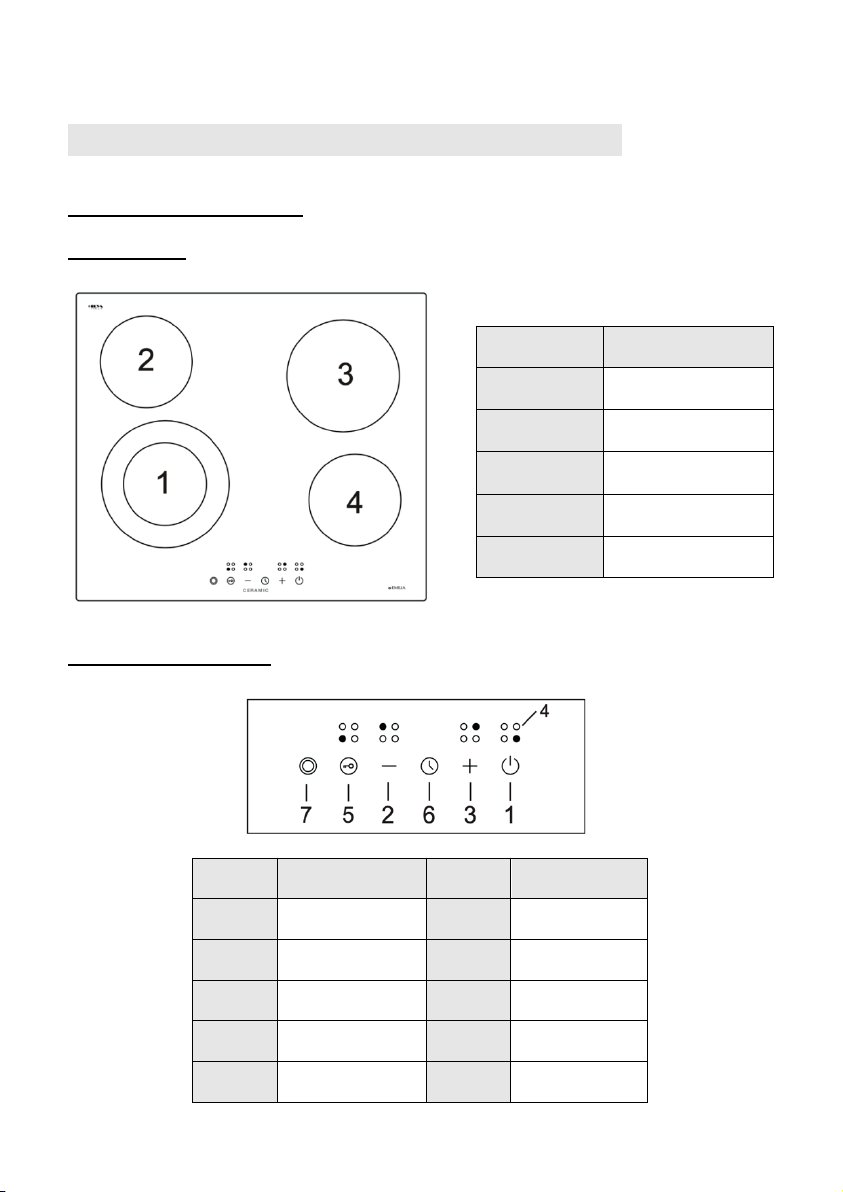
GUIDE TO FEATURES OF THE COOKTOP
Model EMCER64E
Power Zones
Control Panel Symbols
KEY # FUNCTIONS KEY # FUNCTIONS
Key 1. ON/OFF Key 6. Timer
Key 2. MINUS Key 7. Dual zone
Key 3. PLUS /
Key 4. Zone selection /
Key 5. Child lock /
Model # EMCER64E
Power of
zone - 1
1100/2200W
Power of
zone - 2
1200W
Power of
zone - 3
1800W
Power of
zone - 4
1200W
Total Power 6400W
8
Before using your New Cooktop
• Read this guide, taking special note of the ‘Safety Warnings’ section.
• Remove any protective film that may still be on your cooktop.
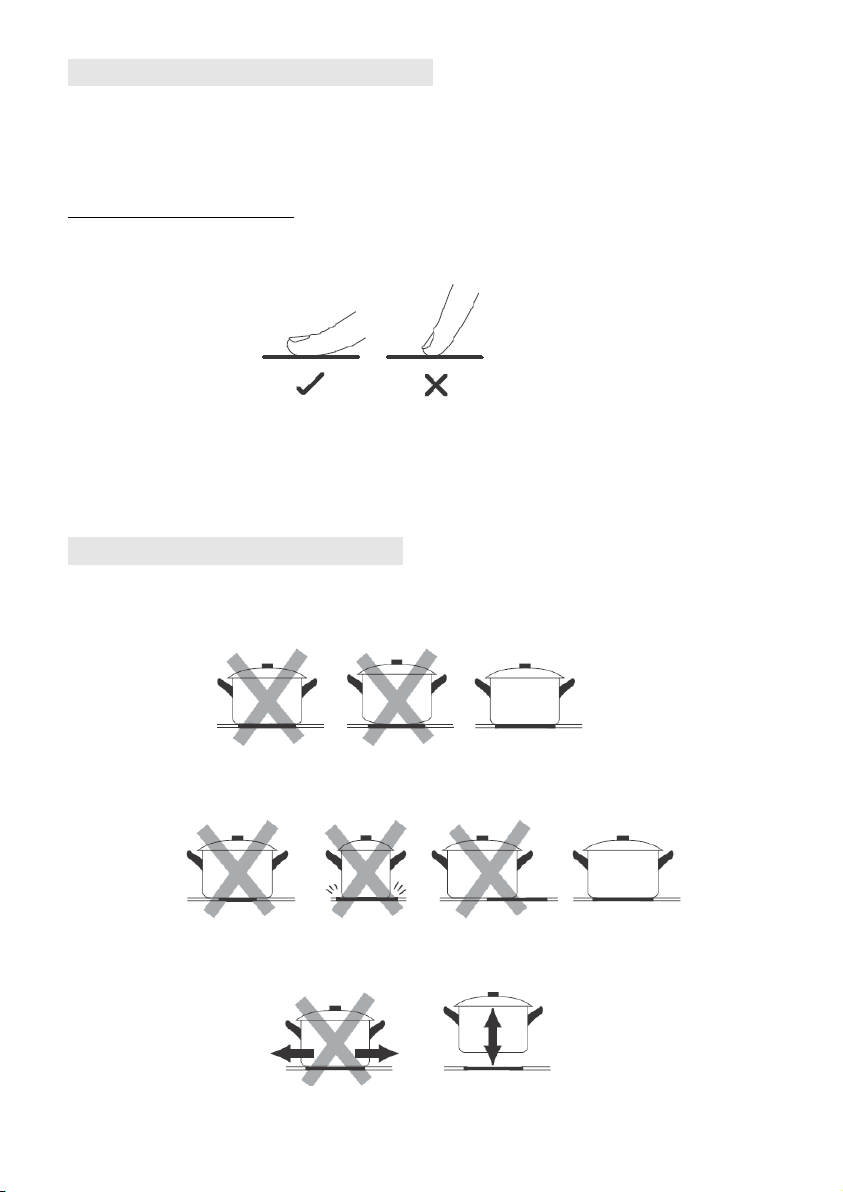
Using the Touch Controls
• The controls respond to touch, so you don’t need to apply any pressure.
• Use the ball of your finger, not its tip.
• You will hear a beep each time a touch is registered.
• Make sure the control panel is always clean, dry, and that there is no object, for
example a utensil or a cloth covering them. Even a thin film of water may make the
controls difficult to operate.
Choosing the right Cookware
Do not use cookware with jagged edges or with a curved base.
Make sure that the base of your pan is smooth, sits flat against the glass, and is the
same size as the cooking zone. Always centre your pan on the cooking zone.
Always lift pans off the cooktop – do not slide, or they may scratch the glass.

9
Using your Cooktop
Switching the cooktop on and off
Switch the cooktop power on and off by using the separate main switch.
1. Touch the ON/OFF key (1). All the indicators show “- “.
2. Place a suitable pan on the cooking zone that you wish to use.
Make sure the bottom of the pan and the surface of the glass are clean and dry.
3. Select zone (4), an indicator next to the key will flash.
4. Select power level by touching the MINUS (2) or PLUS key (3). The power can be
increased during cooking as required.
NOTE If you don’t choose a heat setting within 1 minute, the cooktop will
automatically switch off. You will need to start again from Step 1.
When you have finished cooking
1. Select the zone that you wish to switch off by pressing the zone selection key (4).
2. Turn the cooking zone off by touching MINUS key (2) until power level reduce to ”0”.
3. To turn the whole cooktop off, touch the ON/OFF key (1).
Beware of hot surfaces
“H” will show which cooking zone is too hot. It will disappear when the surface
has cooled down to a safe temperature.
Using the extendable zone
Your cooktop is equipped with an extendable zone, it can be used in the following
modes:
A: Center zone – only first heating unit is turned on
B: Extended zone (Center + Outer) – both first & second heating circuits are turned on

10
Upon selecting the cooking zone, only the center zone will be turned on, to activate the
outer zone:
1. Select a cooking zone with the extendable zone function.
2. Touch the extendable zone key (7), the indicator display will show “ = ”
To cancel the outer zone, press the extendable zone key (7) to turn off the second
heating circuit, then select the desired power level by touching the power adjusting keys.
Child Lock Function
You can use Child lock function to prevent unintended use (for example children
accidentally turning the cooking zones on).
To lock the controls
Touch the Child lock key (5) until the indicator shows “Lo”.
To unlock the controls
1. Make sure the cooktop is turned on.
2. Touch and hold the Child lock key (5) for 3 seconds.
3. You can now start using your cooktop.
When the cooktop is in Child lock mode, all the controls are disabled except the main
switch key, you can always turn the cooktop off with the main switch in an emergency,
but you will need to unlock the cooktop first to use it again.
Residual Heat Warning
When the cooktop has been operating for some time, there will be some residual heat.
The power indicator will appear “H” to warn you to keep away from that zone.
Auto Shutdown
A safety feature of the cooktop is auto shut down. This occurs whenever you forget to
switch off a cooking zone. The default shutdown times are shown in the table below:
Power level 1 2 3 4 5 6 7 8 9
Default working time (hours) 8 8 8 4 4 4 2 2 2
11
Using the Timer
You can use the timer in two different ways:
1. You can use it as a minute minder. In this case, the timer does not turn any cooking
zone off when the set time is up.
2. You can use it as a cut off timer to turn one or more cooking zones off when the set
time is up.
You can set the timer up to 99 minutes.
Using the Timer as a Minute Minder
Make sure the cooktop is turned on, and that no cooking zones are in selecting mode.
Note: you can use the minute minder before or after a cooking zone setting is finished.
1. Touch timer key (6), “10” will show in the timer display. and single digit “0” flashes.
2. Set the desired minutes by touching the MINUS key (2) or PLUS key (3).
3. Touch timer key again, then number to represent tens digit will flash.
4. Set the desired dozens of minutes by touching MINUS key (2) or PLUS key (3).
5. When the time is set, it will begin to count down immediately. The display will show
the remaining time.
6. A signal sound will beep for 10 seconds and the timer indicator shows “” when
the setting time finished.
Setting the timer to turn one or more cooking zones off
If the timer is set on one zone:
1. Selecting the heating zone key (4) that you want to set timer.
2. Touch timer key (6), the digits “10” will show in the timer display and the “0” flashes.
3. Set the desired time in the control panel.
4. When the time is set, it will begin to count down immediately. The display will show
the remaining time.
NOTE: The red dot next to power level indicator (eg. ) will illuminate indicating that the
zone is in timer mode.
5. When the cooking time expires, the corresponding cooking zone will switch off
automatically.
NOTE: Other cooking zones will keep operating if they were turned on previously.

12
If the timer is set on more than one zone:
1. When you set the time for several cooking zones simultaneously, decimal dots of
the relevant cooking zones are on. The minute display shows the remaining time.
The dot of the corresponding zone flashes.
2. Once the countdown timer expires, the corresponding zone will switch off. Then it
will show the remaining time on the other zone and the dot of that zone will flash.
3. To check the remaining time set on a particular zone, touch the zone (4) and the
corresponding timer will be shown in the timer indicator.
Cancel the timer
1. Select the zone that you want to cancel the timer.
2. Touch the timer key (6), the indicator will flash.
3. Set the timer to ”00”, the timer is cancelled.
Cooking Guidelines
Take care when frying as the oil and fat heat up very quickly. At extremely high
temperatures oil and fat can ignite spontaneously presenting a serious fire risk.
Cooking Tips
• When food comes to the boil, reduce the power setting.
• Using a lid will reduce cooking times and save energy by retaining the heat.
• Minimise the amount of liquid or fat in the cooking to reduce cooking times.
• Start cooking on a high power and reduce it when the food has been well heated.
Care and Cleaning
What?
How?
Dirty glass (fingerprints,
marks, residual stains, or
non-sugary spill overs on
the glass).
1. Switch off the power of the cooktop.
2. Apply a cooktop cleaner while the glass is still warm (but not hot!)
3. Rinse and wipe dry with a clean cloth or paper towel.
4. Switch the power to the cooktop back on.
Boil overs, melts, and hot
sugary spills on the glass
Remove these immediately with a razor blade scraper suitable for
ceramic glass cooktops but beware of hot cooking zone surfaces.
1. Switch the power to the cooktop off at the wall.
2. Hold the blade or utensil at a 30° angle and scrape the soiling or
spill to a cool area of the cooktop.
3. Clean the soiling or spill up with a dish cloth or paper towel.
Spill overs on the touch
controls
1. Switch off the power of the cooktop.
2. Remove the spill overs
3. Wipe the touch control area with a clean damp sponge or cloth, then
wipe the area completely dry with a paper towel.
4. Switch the power to the cooktop back on.
13
Important!
• When the cooktop is switched off at the main switch, there will be no ‘hot surface’
indicator, but the cooking zone may still be hot! Take extreme care!
• Heavy-duty scourers, some nylon scourers and harsh/abrasive cleaning agents may
scratch the glass. Always read the label to check if your cleaner or scourer is
suitable.
• Never leave cleaning residue on the cooktop: the glass may become stained.
• Remove stains left by melts and sugary food or spill overs as soon as possible. If
left to cool on the glass, they may be difficult to remove or even permanently
damage the glass surface. Sugar can etch into the glass.
• Cut hazard: when the safety cover is retracted, the blade in a scraper is razor-
sharp. Use with extreme care and always store safely and out of reach of children.
• The cooktop may beep and turn itself off, and the touch controls may not function
while there is liquid on them. Make sure you wipe the touch control area dry before
turning the cooktop back on.
Questions and quick check
Problem
Possible causes and What to do
The cooktop cannot be
turned on – no power.
1. Check the connection to the power supply and make sure it is switched on.
2. Check whether there is a power outage in your home or area.
3. If the problem persists, call a qualified technician.
The touch controls are
unresponsive.
The control panel is locked by Child lock function.
Unlock the controls. See section ‘Using your cooktop’ for instructions.
The touch controls are
difficult to operate.
There may be a slight film of water over the controls, or you may be using the
tip of your finger when touching the controls.
Make sure the touch control area is dry and use the ball of your finger when
touching the controls.
The glass is being
scratched.
Rough-edged cookware. Unsuitable, abrasive scourer or cleaning products
being used.
Use cookware with flat and smooth bases. See ‘Choosing the right cookware’.
See ‘Care and cleaning’.
After sales service 1 300 307 917

14
Error Code
If an abnormality arises, the cooktop will enter the protective state automatically and
display corresponding protective codes:
Error Codes
Problem
Possible causes
What to do
E0 & repeated
beep sound
warning.
Overheating protection: the
cooktop is over heated.
Stop cooking till the internal temperature back to
normal. Please contact after sales service to
check the cooktop if there is PCB failure.
E1 Open circuit failure of
thermocouple Please contact after sales service.
The above are the judgment and inspection of common failures.
AFTER SALES SERVICE 1 300 307 917
ATTENTION! To avoid danger, please do not disassemble the unit by yourself!
Installation
Selection of installation equipment
•Be sure the thickness of the kitchen bench is at least 30mm. The bench must be a
heat-resistant material that can withstand the heat radiation from the cooktop.
•A minimum of 50mm bench space must be preserved around the hole to allow
installation.
Cut out the work surface according to the sizes shown in the drawing. Be accurate.
Model L(mm) W(mm) H(mm) D(mm) A(mm) B(mm) X(mm)
EMCER64E 590 520 62 58 560 490 50 min.

15
ATTENTION: In all circumstances, make sure the cooktop is well ventilated and the air
inlet and outlet are not blocked. Ensure the cooktop is in good working state.
Note: The safety distance between the cooktop and the cupboard above should be
at least 760mm. The minimum height for a rangehood above the cooktop is 650mm.
A (mm)
760
B (mm)
50 minimum
C (mm)
20 minimum
D
Air intake
E
Air exit 5mm
Weight and Dimensions are approximate. Because we continually strive to improve our products, we
may change specifications and designs without prior notice.
Before you install the cooktop, make sure that:
• the work surface is square and level, and that no structural members interfere with
space requirements.
• the work surface is made of a heat-resistant material.
• if the cooktop is installed above an oven, the oven must have a built-in cooling fan.
• the installation complies with all clearance requirements and applicable standards
and regulations.
• a suitable isolating switch providing full disconnection from the mains power supply
is incorporated in the permanent wiring, mounted, and positioned to comply with the
local wiring rules and regulations.
• The isolating switch must be of an approved type and provide a 3mm air gap contact
separation in all poles (or in all active [phase] conductors if the local wiring rules allow
for this variation of the requirements). The isolating switch will be easily accessible to
the customer with the cooktop installed.
X(mm)
100 minimum
Y(mm)
20 minimum
16
• you consult local building authorities and by-laws if in doubt regarding installation.
• you use heat-resistant and easy-to-clean finishes (such as ceramic tiles) for the wall
surfaces surrounding the cooktop.
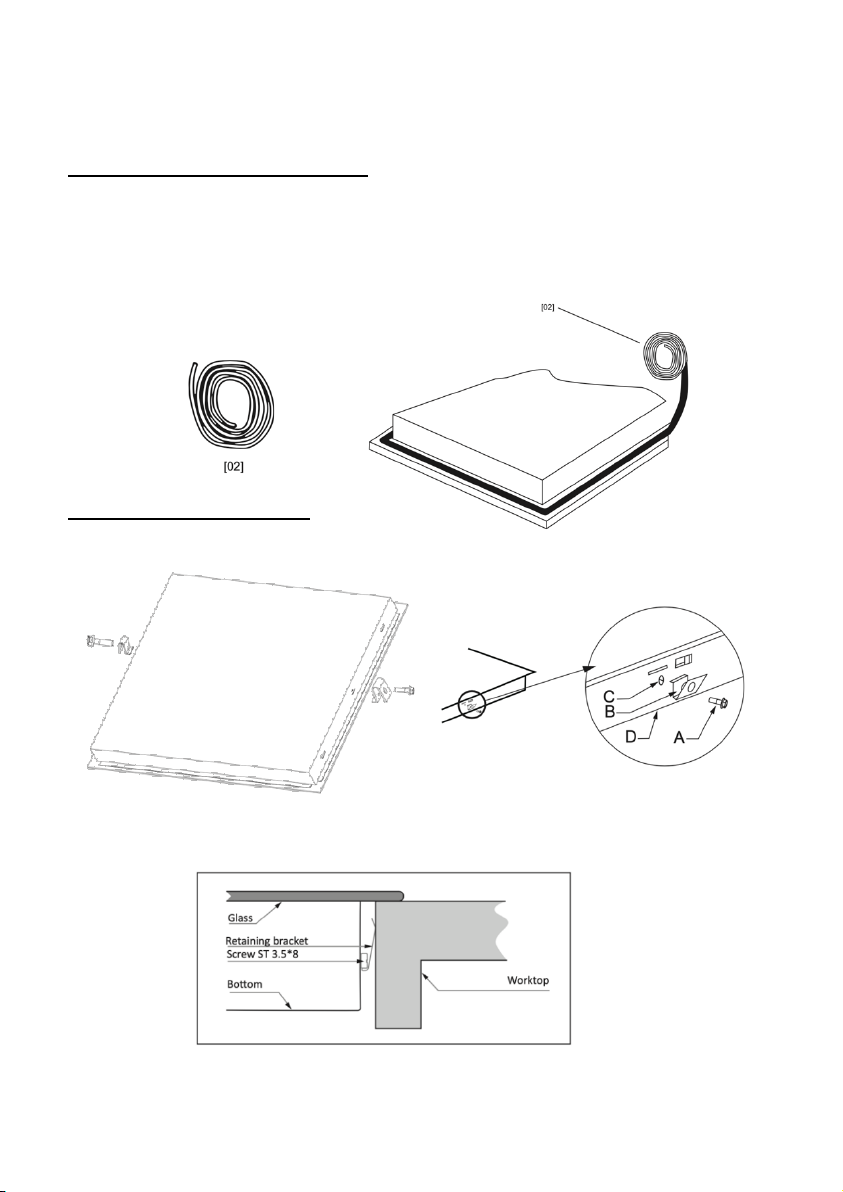
Before locating the fixing brackets
The unit should be placed on a stable, smooth surface (use the packaging). Do not apply
force onto the controls protruding from the cooktop.
Stretch out and stick the supplied tape [02] along the underside edge of the cooktop,
ensure the ends overlap. Trim off any excess tape and dispose of it.
Locating the fixing brackets
Fix the cooktop brackets by screw two brackets on the bottom of cooktop (see picture).
Then install the cooktop into the cutout of the worktop. Apply gentle downwards pressure
onto the cooktop to push it into the worktop.
17
When you have installed the cooktop, make sure that
• the power supply cable is not accessible through cupboard doors or drawers.
• there is adequate flow of air from outside the cabinetry to the base of the cooktop.
• if the cooktop is installed above a drawer or cupboard space, a thermal protection
barrier is installed below the base of the cooktop.
• the isolating switch is easily accessible by the customer.
Cautions
1. The cooktop must be installed by qualified personnel or technicians. Please never
conduct the operation by yourself.
2. The cooktop shall not be wired on the same circuit as cooling equipment,
dishwashers, and rotary dryers.
3. The cooktop shall be installed with adequate ventilation to enhance its reliability.
4. The wall and induced heating zone above the work surface shall withstand heat and
be nonflammable.
5. To avoid any damage, the sandwich layer and adhesive must be resistant to heat.
6. A steam cleaner is not to be used.
7. This cooktop can be connected only to a supply with system impedance no more
than 0.427 ohm. In case necessary, please consult your supply authority for system
impedance information.
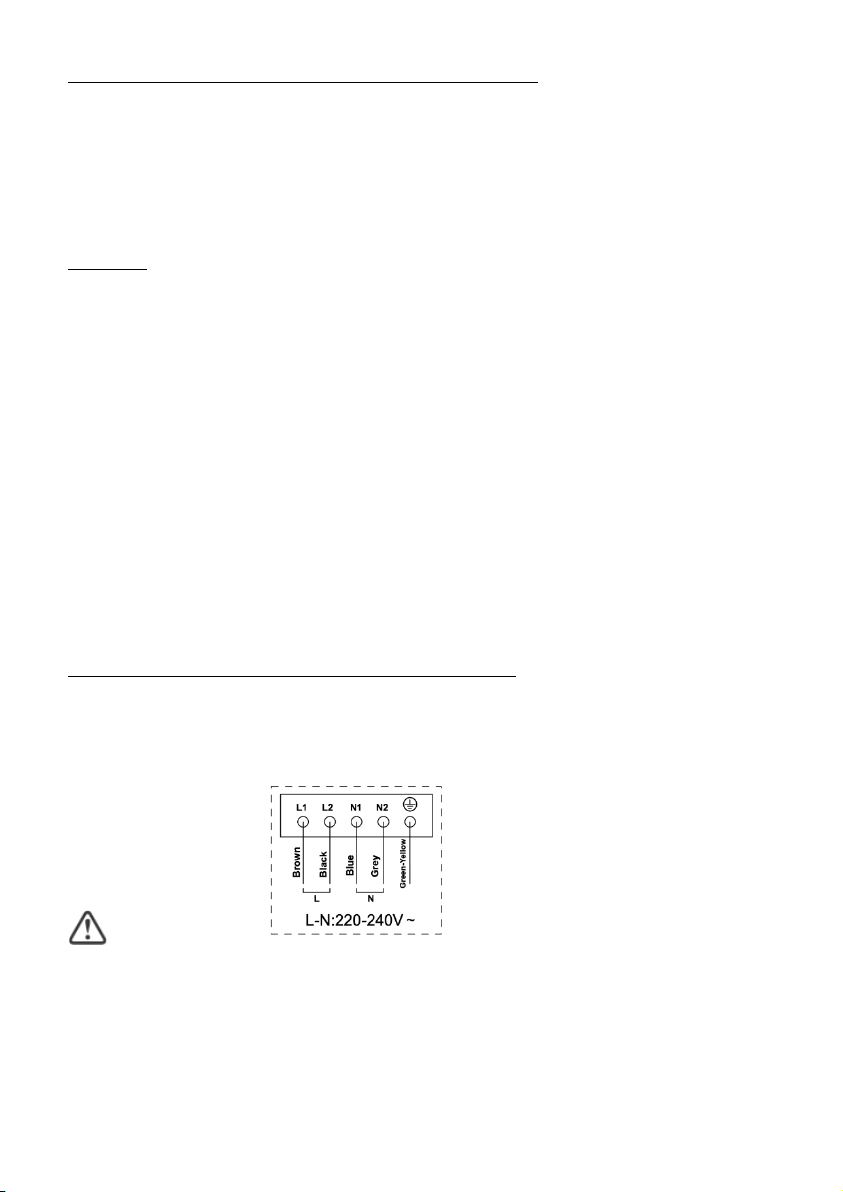
Connecting the cooktop to the mains power supply
The power supply should be connected in compliance with the relevant standard, or a
single-pole circuit breaker. The method of connection is shown as the diagram.
EMCER64E
This cooktop must be connected to the mains power supply only by a suitably qualified
person. Before connecting the cooktop to the mains power supply, check that:
1. The domestic wiring system is suitable for the power drawn by the cooktop.
2. The voltage corresponds to the value given in the rating plate
3. The power supply cable sections can withstand the load specified on the rating plate.
18
To connect the cooktop to the mains power supply, do not use adapters, reducers, or
branching devices, as they can cause overheating and fire.
The power supply cable must not touch any hot parts and must be positioned so that its
temperature will not exceed 75˚C at any point.
The electrician must confirm whether the domestic wiring system is suitable without
alterations. Any alterations must only be made by a qualified electrician.
Cable maintenance
1. If the cable is damaged or needs replacing, this should be done by an after-sales
technician using the proper tools, to avoid any accidents.
2. If the appliance is being connected directly to the mains supply, an omni polar circuit
breaker must be installed with a minimum gap of 3mm between the contacts.
3. The installer must ensure that the correct electrical connection has been made and that
it complies with safety regulations.
4. The cable must not be bent or compressed.
5. The cable must be checked regularly and only replaced by a proper qualified person.
WARRANTY FORM
Please complete this form and return to:
Glem Gas Australasia Pty. Ltd, PO Box 63 Blaxcell PO South Granville NSW 2142
One way to send it to us is to fill in the form, take a photo and email it to [email protected]
MODEL___________________SERIAL NUMBER________________________________
PURCHASED FROM ______________________ DATE OF PURCHASE _____________
CUSTOMER NAME ___________________________EMAIL _______________________
ADDRESS _______________________________________________________________
INSTALLERS NAME _______________________________________________________
INSTALLERS LICENCE NO. _________________________________________________
INSTALLERS SIGNATURE __________________________________________________
INSTALLERS COMPLIANCE NO. _____________________________________________
INSTALLERS SIGNATURE __________________________________________________
DATE OF INSTALLATION ___________________________________________________

19
PRODUCT WARRANTY DETAILS
Thank you for choosing an Emilia Appliance, the purchase of this appliance is an important
investment in your home and so to protect your investment we urge you to complete the
registration card attached, please return it immediately.
IT IS A WARRANTY REQUIREMENT THAT PROOF OF PURCHASE BE PROVIDED PRIOR TO
REQUESTING A SERVICE CALL.
THIS WARRANTY SHALL NOT APPLY IF THE APPLIANCE WAS NOT INSTALLED BY A
LICENSED TECHNICIAN AND PROOF IS NOT SUPPLIED.
The benefits conferred by this warranty are in addition to all other conditions and warranties in
respect of this product which the consumer may have under the Trade Practices Act 1874 of the
Commonwealth of Australia and/or similar State or Territory Laws.
Our goods come with guarantees that cannot be excluded under the Australian Consumer Law.
You are entitled to a replacement or refund for a major failure and for compensation for any other
reasonably foreseeable loss or damage. You are also entitled to have the goods repaired or
replaced if the goods fail to be of acceptable quality and the failure does not amount to a major
failure.
Glem Gas Australasia Pty Ltd warrants, this appliance to be free from defects in workmanship and
materials for a period of:
a) Where the appliance is intended to be used and is used for
DOMESTIC USE – 24 MONTHS FROM DATE OF DELIVERY TO THE ORIGINALPURCHASER.
b) Where the appliance is intended to be used and is used for
COMMERCIAL USE – 90 DAYS FROM DATE OF DELIVERY TO THE ORIGINAL PURCHASER.
Glem Gas Australasia Pty Ltd, during the period of warranty, will at its option, and subject to the
terms and conditions stated below, repair or replace free of charge this appliance or any
component part, which upon examination by Glem Gas Australasia Pty Ltd is found to be
defective.
THIS WARRANTY SHALL NOT APPLY:
a) If the rating plate has been removed or the serial number or other details on it have been
removed or rendered illegible.
b) If the appliance is connected to any voltage other than shown on rating plate.
c) If the appliance has been subjected to misuse, abuse accident or want of care.
d) If the appliance has been installed, operated, or maintained contrary to the instructions
supplied by Glem Gas Australasia Pty Ltd.
e) If any defect or failure is due to connection to an inadequate power supply.
f) If damage is caused by foreign objects on the appliance or because of its use for purposes
other than that for which it was delivered.
g) If a repair has been made or attempted by the purchaser.
h) Where the oven is installed outside an 80km radius from the GPO of any Australian Capital
City to freight and travel costs beyond that radius. This warranty does not cover any glass
damage.
i)
This Warranty is given by Glem Gas Australasia Pty Ltd and no other person or organisation is
authorised to vary its provisions and conditions.
20
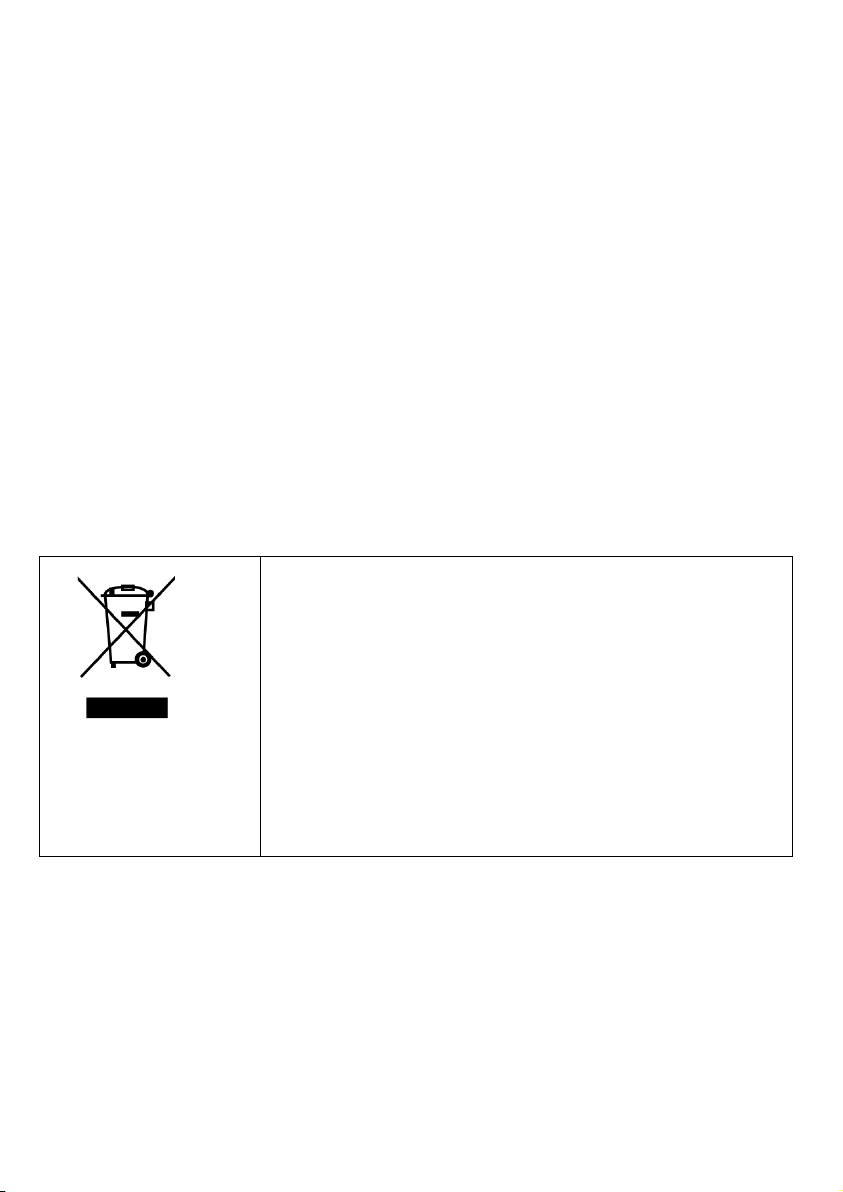
DISPOSAL: Do not dispose
this product
as unsorted
municipal waste. Collection
of such waste separately for
special treatment is
necessary.
This appliance is labeled in compliance with European directive
2002/96/EC for Waste Electrical and Electronic Equipment (WEEE). By
ensuring that this appliance is disposed of correctly, you will help prevent
any possible damage to the environment and to human health, which
might otherwise be caused if it were disposed of in the wrong way.
The symbol on the product indicates that it may not be treated as normal
household waste. It should be taken to a collection point for the recycling
of electrical and electronic goods.
This appliance requires specialist waste disposal. For further information
regarding the treatment, recovery and recycling of this product please
contact your local council, your household waste disposal service, or the
shop where you purchased it.
For more detailed information about treatment, recovery, and recycling
of this product, please contact your local city office, your household waste
disposal service, or the shop where you purchased the product.
AFTER SALES SERVICE 1 300 307 917
Table of contents
Popular Cooktop manuals by other brands

Gorenje
Gorenje ECS63EHL Instructions for use, mounting and connection

Thermador
Thermador Professional PCG30 installation manual

Frigidaire
Frigidaire GLGC30S8AB Specifications

Dacor
Dacor Discovery DYTT305N user manual

Empava
Empava JZT-HQ4B67AAZXA instruction manual

Fisher & Paykel
Fisher & Paykel GC912 user guide


SEVERIN
SEVERIN DK 1014 Instructions for use

Venini
Venini VCG9555 user manual

Wolf
Wolf ICBIM15 Use & care information

Bosch
Bosch NIT3065 Series installation instructions

GE
GE JGP963CEKCC - Profile: 36'' Sealed Burner Gas... Dimensions and installation information

Hoover
Hoover HV-C60CC Quick start up guide