Emmes EVA 14-WIN User manual

USER’S MANUAL
Indications for Use Statement: The Emmes EVA product/device family is intended to assess visual acuity
performance and to be operated by healthcare professionals.
Manual Revised April 2020

Emmes EVA User’s Manual Model 14 WIN, v9.0
April 2020
i
TABLE OF CONTENTS
1. QUICK START GUIDE ................................................................................................................ 1
2. MODEL HIGHLIGHTS ................................................................................................................ 3
3. SYSTEM DESCRIPTION.............................................................................................................. 4
4. TERMS AND DEFINITIONS........................................................................................................ 4
5. EMMES EVA SYSTEM COMPONENTS....................................................................................... 6
6. PRE-TEST HARDWARE AND SOFTWARE SETUP....................................................................... 7
6.A Physical/Environment Setup 7
6.B EVA Study/Data Profile Setup 7
7. PRE-TEST EVA DISPLAY VERIFICATION..................................................................................... 8
7.A EVA Display Size Verification 8
7.B EVA Display Luminance Verification 8
8. TIPS FOR SUCCESSFUL USE ...................................................................................................... 9
9. BASIC USE OF THE EMMES EVA............................................................................................... 9
9.A Perform a Visual Acuity Test 9
9.B Data Validation Codes 10
9.C View Previous Test Results 10
9.DElectronically “Print” (e-Print) Test Results 10
10. OTHER FEATURES OF THE EMMES EVA................................................................................. 11
10.A Retrieve/Bulk Export Of Study Data 11
10.B Sleep/Wake-Up The Emmes EVA 12
10.C Shut Down The Emmes EVA 12
11. EMMES EVA SEMI-AUTOMATED VISUAL ACUITY TESTING MODES...................................... 12
11.A e-ETDRS Visual Acuity Test 12
11.B e-HOTV (ATS-HOTV) Visual Acuity Test 13
11.C Low-Contrast E-ETDRS Visual Acuity Test 13
11.D Low-Contrast ATS-HOTV Visual Acuity Test 13
12. VISUAL ACUITY CHART ACCESS.............................................................................................. 14
13. FREQUENTLY ASKED QUESTIONS .......................................................................................... 14
13.A System Questions 14
14. TROUBLSEHOOTING GUIDE................................................................................................... 16
14.A EVA iPod cannot connect to the internet. (See Figure 1) 16
14.B The Emmes EVA will not turn on. 17

Emmes EVA User’s Manual Model 14 WIN, v9.0
April 2020
Table of Contents Cont’d.
ii
14.C Cannot remember EVA iPod Passcode 17
14.D The EVA Display is distorted or not functioning 17
14.E EVA Program Flash Drive Error (See Figure 2) 18
APPENDIX A: EVA Lux Meter......................................................................................................................................19
APPENDIX B: Regulatory Information ........................................................................................................................21

Emmes EVA User’s Manual Model 14 WIN, v9.0
April 2020
1
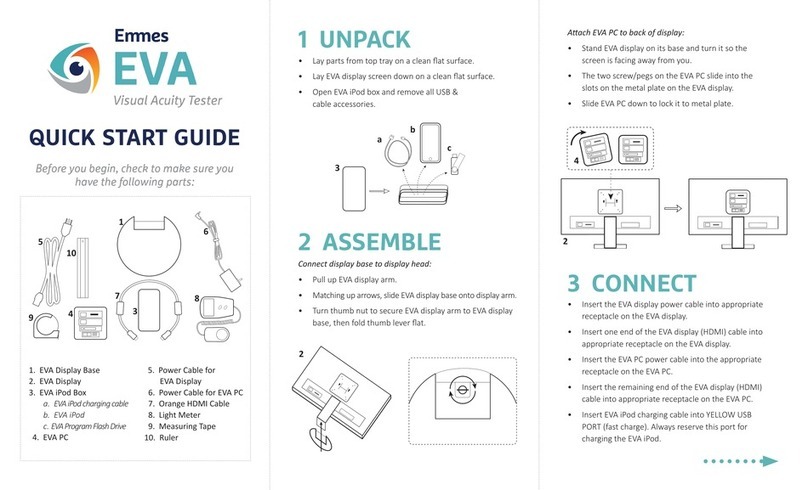
1. QUICK START GUIDE
A. Unpack:
1. Lay all the parts from the top tray on a clean, flat surface.
2. Lay the EVA Display screen down on a clean, flat surface.
3. Open the EVA iPod box and remove the EVA Program Flash Drive EVA iPod
charging cable
B. Assemble:
1. EVA Display –connect display base to display head
a. Pull up EVA Display arm.
b. Matching up arrows, slide EVA Display base onto EVA Display arm.
c. Turn thumb nut to secure EVA Display arm to EVA Display base, then folder
thumb lever flat
2. EVA PC –attach the EVA PC to the back of the EVA Display
a. Stand EVA Display on its base and turn it so the screen is facing away from
you.
b. The two screw/pegs on the EVA PC slide into the slots on the metal plate on
the EVA Display.
c. Slide EVA PC down to lock it to metal plate.
C. Connect
1. Insert the EVA Display power cable into appropriate receptacle on the EVA
Display.
2. Insert one end of the EVA Display (HDMI) cable into appropriate receptacle on the
EVA Display.
3. Insert the EVA PC power cable into the appropriate receptacle on the EVA PC.
4. Insert the remaining end of the EVA Display (HDMI) cable into the appropriate
receptable on the EVA PC.
5. Insert the EVA iPod charging cable into YELLOW USB PORT (fast charge). Always
reserve this port for charging the EVA iPod.
6. Insert the EVA iPod charging cable into the EVA iPod
7. Insert EVA Program Flash Drive into USB port next to the one reserved for the
EVA iPod.
D. Orient:
1. Turn entire connected assembly around so the screen is facing you.
2. Organize all cables as necessary, being mindful of where available power outlets
are located.
3. Plug wall-side ends of power cables into available receptacles.

Emmes EVA User’s Manual Model 14 WIN, v9.0
April 2020
2
E. Turn on:
1. Power on the EVA Display –single press once the right-most button on the EVA
Display until it lights up any color (orange or blue).
2. Power on the EVA PC –single press the power button until blue light turns on.
3. Power on the EVA iPod –single press and briefly hold the power button
F. Wait:
1. **NOTE** This step is important every time the device is restarted
or powered on
2. Once ALL components are on and fully booted (EVA iPod shows lock-screen;
display shows “Testing Requirements”) WAIT at least 30 seconds BEFORE
launching the EVA App on the EVA iPod.
G. Launch:
1. Single-tap the EVA App on the EVA iPod screen below the arrow.
2. WAIT for the EVA App to load: it may take several moments.
3. Once the EVA App loads, you should see the following sub-applications:
a. E-EDTRS
b. ATS-HOTV
c. Low Contrast E-ETDRS
d. Low Contrast ATS-HOTV
e. Chart
f. Test Results
g. Settings
h. Sleep/Wake Up
i. Shutdown.
4. Try an E-ETDRS Test
a. In the EVA App, tap E-ETDRS, select NON STUDY, proceed and familiarize
yourself with the prompts.
b. Complete/finish the test and note the results screen.
5. Look up the previous NON STUDY test result
a. In the EVA App, tap “Test Results”, select NON STUDY, proceed as necessary
to look up the previous test.
6. Enable Study Study/Data Profiles
a. In the EVA App, tap Settings > Manage Studies and scroll through available
Study/Data Profiles. If you don’t see the study you’re looking for, contact
Emmes EVA Support
•IMPORTANT: Regardless of any error messages you see…
oDO NOT re-configure the EVA iPod WiFi settings.

Emmes EVA User’s Manual Model 14 WIN, v9.0
April 2020
3
oDO NOT connect the EVA iPod WiFi to any network.
oFor example: DO NOT connect the EVA iPod to your local WiFi network.
•Electrical Safety: Inspect all cords before operating the Emmes EVA. If any cords
look damaged,
oDO NOT power on the Emmes EVA and contact Emmes EVA Support.
•The Emmes EVA is a turn-on-and-go design!
•If the Quick-Start Guide was followed and the Emmes EVA is not working,
DO NOT attempt to troubleshoot a solution, please contact Emmes EVA Support:
Web: eva.emmes.com
Phone: 1.888.315.4039 (toll free)
oInclude the following information in the request for support:
▪Study
▪Site Number
▪Serial Number (e.g. T002000)
▪Issue
2. MODEL HIGHLIGHTS
•Model 14-WIN is a desktop Emmes EVA capable of Low Contrast visual acuity testing.
•System controlled remotely via iPod Touch.
•Able to display letters down to 20/10.
•E-ETDRS algorithm available in 5% and 2.5% low contrast levels.
•Sleep option to make the Display dark without turning it off.
•System is ~8.50” deep and ~16” to top of Display with PC mounted on the back of the
Display (Display is ~22.25” wide).
•Test results are stored as encrypted files per HIPAA requirements.
Model 14-WIN Emmes EVA is configured and calibrated for low contrast testing.
DO NOT adjust the Display settings. If the Display does not fall within range
(greater than 106 lux on the EVA Lux Meter) contact Emmes EVA Support.

Emmes EVA User’s Manual Model 14 WIN, v9.0
April 2020
4
3. SYSTEM DESCRIPTION
The Emmes Electronic Visual Acuity (Emmes EVA) Tester features wireless proctor control to
administer semi-automated visual acuity tests.
For normal (high contrast) testing, stimuli are high-contrast, black letters with luminance of
95 cd/m2or higher and contrast of 98%. The system can present single letters or lines of letters.
Single letters are framed with crowding bars around the letter. For low contrast testing, stimuli
are gray letters with a contrast of either 2.5% or 5% compared to the white background. Letters
are framed with crowding bars of the same contrast.
For lines of letters in the Chart application, five (5) letters are displayed for sizes smaller than
20/100; a decreasing number of letters is displayed as letter size increases. With a 23.6-inch
LCD/LED Display at 1920 x 1080 pixels, the system is capable of displaying letters from 20/800 (1.6
logMAR) to 20/6 (-0.5 logMAR), at a test distance of 3 meters. Letter size corresponds to the
logMAR progression of the ETDRS charts.
The EVA iPod provides direct, wireless control of the Emmes EVA. The EVA iPod provides
information to the technician and displays the letter that is being shown on the EVA Display. For
the semi-automated tests (ATS-HOTV, E-ETDRS) the size and sequence of letter presentations is
determined from a computer algorithm based on the recorded subject’s responses.
Model 14-WIN automatically saves test results as encrypted records in a database on the Emmes
EVA hard drive and can be configured to also save results to an external removable storage (e.g.
a USB flash drive).
4. TERMS AND DEFINITIONS
The Emmes EVA (EVA)
All core components that make up the Emmes EVA: the EVA PC, the EVA Display, the EVA iPod.
EVA PC
The personal computer (PC) sent with the Emmes EVA.
EVA Display
The primary/large display that displays optotypes/letters to the test subject
EVA iPod
The iPod Touch that is used as the controller for the Emmes EVA.

Emmes EVA User’s Manual Model 14 WIN, v9.0
April 2020
5
EVA Study/Data Profile
Customized data entry profile created by the Emmes EVA Team for a specific study or testing
effort. The EVA Study/Data Profile determines what data will be collected for each test and
enforces format entry of values, such as “Subject ID” or “Technician ID”.
EVA Study/Data Profile PIN
Study/Data Profile-specific four-digit value required to retrieve study test results from the
database.
EVA Lux Meter
Used to ensure Emmes EVA Display can provide sufficient luminance prior to running a test.
EVA Program Flash Drive
Portable memory device used to store printable test results (optional) and retrieved data. The
flash drive must be inserted in a USB port to run a visual acuity test.
EVA Retrieval Flash Drive
Used to retrieve study data from the Emmes EVA database. The flash drive must be inserted
before the data can be retrieved.
EVA Testing Requirements Screen
The initial screen when Emmes EVA starts up. Emmes EVA Testing Requirements are displayed
with a white square outlined in black in the middle of the screen. The square is used for EVA
Display verification.
Serial Number (Txxxxxx)
Unique identifier for the Emmes EVA. This has also been referred to in the past as “TowerID”, but
this is a serial number uniquely identifying the device. This unique identifier is printed on a label
attached to the Emmes EVA PC; example “T000123”. This unique identifier also appears in the
name of the wireless connection between the EVA iPod and Emmes EVA PC.
Data Validation Codes
Coded values representing test date, identifier (e.g., patient ID), eye, and test result that can be
used during data entry to confirm test results are correctly entered on the case report forms.

Emmes EVA User’s Manual Model 14 WIN, v9.0
April 2020
6
5. EMMES EVA SYSTEM COMPONENTS
The shipment should include the components listed below:
EVA PC (bears Serial Number)
EVA iPod (bears Serial Number)
Power adapter, EVA PC
EVA iPod USB charging cable
EVA Display (23.6” Flat-Panel Display) (bears
Serial Number)
EVA Program Flash Drive
Power adapter, EVA Display
EVA Lux Meter
HDMI cable
Plastic Ruler
Power Adapter(s) (Non-US units only)
EVA Tape Measure
Note: *Components may vary slightly in appearance from figures referenced in this manual*
*A keyboard and mouse are not used with the Emmes EVA and are not included*

Emmes EVA User’s Manual Model 14 WIN, v9.0
April 2020
7
6. PRE-TEST HARDWARE AND SOFTWARE SETUP
Follow these instructions to set up the Emmes EVA.
6.A Physical/Environment Setup
1. Follow the Quick-Start Guide in its entirety before proceeding.
2. Ensure the front-center of the EVA Display and/or subject chair are such that the line
of sight from the front-center of the EVA Display to the front surface of the subject’s
eyes, is 3-meters (118 inches) in length. If the surface for the Emmes EVA and the
seating surface for the subject are height-adjustable, this 3-meter line-of-sight
distance can be achieved in a variety of configurations.
3. Double-check: Confirm testing distance is 3-meters (118 inches) from the subject’s
eyes to the EVA Display.
4. Testing room ambient lighting should be dim and diffuse. No light source should be
competing with the EVA Display. The EVA Display should be the brightest source of
light in the room by a good margin.
6.B EVA Study/Data Profile Setup
The Emmes EVA ships with a base package of studies that have data entry programs for patient
testing. Before using the Emmes EVA, you must enable the studies in which your clinical site is
participating. The enabled studies will be displayed when an E-ETDRS or ATS-HOTV test is
performed. The package also includes a “NON STUDY” profile (no custom data entry) that is
always enabled. The NON STUDY profile is NOT valid for use in clinical trials.
Enable the Emmes EVA Study/Data Profiles relevant for the testing to be performed. This
enablement is a one-time configuration and the EVA Study/Data Profile will remain in its last saved
state (e.g. enabled).
•On the EVA iPod, tap Settings on the EVA App Home screen, then tap Manage
Studies.
•Under Current Studies, tap the switch to activate the study
•When finished activating studies for your site, tap Save.

Emmes EVA User’s Manual Model 14 WIN, v9.0
April 2020
8
IMPORTANT
An EVA Program Flash Drive is required to perform Visual Acuity Tests or retrieve
data on this Emmes EVA.
You should never need to adjust the EVA iPod’s wireless network connection. Do
NOT connect the EVA iPod to any network other than the Serial Number network
(e.g., the EVA iPod for Serial Number T000123 is connected to the WiFi network named
T000123.
7. PRE-TEST EVA DISPLAY VERIFICATION
The EVA Display must be verified to ensure valid testing. The “calibration square”is the image
displayed on the Emmes EVA “Testing Requirements” screen. Two EVA Display verification checks
are performed at regular intervals: (1) size verification check to confirm optotype dimensions are
accurately displayed and (2) luminance verification check to confirm the EVA Display is sufficiently
bright for testing. Procedures to verify the EVA Display are as follows:
7.A EVA Display Size Verification
•Place a ruler with millimeter scale against side of the “calibration square”
and confirm the length of each side is 114 mm.
When viewing, use only one eye and adjust your head as necessary so your eye is
directly on line with side.
•If any side is not 114 mm, contact support for assistance.
7.B EVA Display Luminance Verification
For valid testing, the center white area of the “calibration square”should be 95 cd/m2or greater
(106 lux or higher on the EVA Lux meter). See appendices for instructions and figures.
Allow EVA Display to warm up.
•For High-Contrast (standard) testing, the EVA Display should be on for at least 10
minutes.
•For Low-Contrast testing, the EVA Display should be on for at least 45 minutes.
Turn room lights OFF and follow instructions in Appendix A for the EVA Lux meter.

Emmes EVA User’s Manual Model 14 WIN, v9.0
April 2020
9
Use Sleep to darken the screen but keep the EVA Display warmed up so you do not
have to repeat the warm up. You should still perform verification checks before
testing.
8. TIPS FOR SUCCESSFUL USE
Keep the EVA iPod battery charged by connecting it to the USB charging cable plugged into
the Emmes EVA after each use. To charge the EVA iPod while the Emmes EVA system is
off, first connect the EVA iPod to the EVA PC via the USB charging cable before powering
down the EVA PC. Then, when the EVA PC is powered down, the EVA iPod will remain in a
topped-up state.
Use the YELLOW USB port on the EVA PC; it offers the fastest charge times for the EVA
iPod.
Do not tamper with or change the EVA iPOD network settings (i.e. Bluetooth or WiFi). This
will render the Emmes EVA inoperable.
The EVA Program Flash Drive is required to run a test.
To shut down the EVA PC, use either the Shutdown feature on the EVA iPod or press-and-
release the power button on the Emmes EVA. Do NOT press-and-hold the EVA PC power
button or the system may take longer to boot the next time.
Do not adjust the volume level or adjust any other EVA Display controls. The beep heard
during testing is a signal to the subject that the test has advanced to the next displayed
optotype/letter.
If you experience any issues, please contact The Emmes EVA Support.
9. BASIC USE OF THE EMMES EVA
9.A Perform a Visual Acuity Test
Follow these instructions to perform visual acuity testing with the Emmes EVA.
Ensure the Quick Start Guide was followed.
Ensure all previous sections of this User Manual were followed.
On the EVA iPod, tap a test icon (E-ETDRS, ATS-HOTV, Low-Contrast E-ETDRS, Low-
Contrast ATS-HOTV) to start a test.
High-Contrast E-ETDRS and ATS-HOTV
a. Select the appropriate EVA Study/Data Profile (e.g. NON STUDY). Tap Next.
b. Confirm Date and Time are correct. If not, tap Change Date & Time, enter the
correct date and time and tap Save Changes.

Emmes EVA User’s Manual Model 14 WIN, v9.0
April 2020
10
c. Tap Next, verify testing distance and calibration, tap Next.
d. Enter data for study subject, tap Next. NON STUDY tests will skip this step.
e. Choose the eye to be tested, tap Next.
f. Confirm data entry and follow directions on EVA iPod screen to continue to the
test.
Low Contrast E-ETDRS and ATS-HOTV
a. Select the appropriate EVA Study/Data Profile (e.g. NON STUDY). Tap Next.
b. Confirm Date and Time are correct. If not, tap Change Date & Time, enter the
correct date and time and tap Save Changes.
c. Tap Next, verify testing distance and calibration, tap Next.
d. Verify all ten (10) ‘Light’ boxes are visible. Tap Next.
e. Verify all ten (10) ‘Dark’ boxes are visible. Tap Next.
f. Enter data for study subject. (NON STUDY tests will skip this step.)
g. Choose the eye to be tested and the contrast level (scroll down to select contrast
level), tap Next.
h. Confirm data entry and follow directions on EVA iPod screen to continue to the
test.
9.B Data Validation Codes
Emmes EVA test results data output includes coded values that represent the test score and eye
tested, and optionally for other identifiers such as subject ID and test date. These codes are
displayed on the EVA iPod with the test results to help validate data transcription into an EDC.
Contact your study management organization if applicable. Otherwise, contact the Emmes EVA
Support for questions relating to this.
9.C View Previous Test Results
You can view the results of a previous study subject test.
Select Test Results on the EVA iPod Home page then select the study.
Tap either View by Date or View by Subject ID.
Select the test you want to view and the test results will be displayed.
9.D Electronically “Print” (e-Print) Test Results
If the study management center chose to enable e-Print functionality a printable copy of a test
result can be created. (Some study management centers may choose to disable printing to avoid
creating documents with unencrypted study test results.)

Emmes EVA User’s Manual Model 14 WIN, v9.0
April 2020
11
If the study management has chosen to enable e-Print functionality, proceed with the following
to e-Print a test result:
If Automatic e-Printing is enabled a printable file is automatically placed on the EVA
Program Flash Drive at the end of each test.
If Manual Printing is enabled:
a. Select Test Results on the EVA iPod Home page then select the study.
b. Tap either View by Date or View by Subject ID.
c. Select the test of interest and test results will be displayed.
d. At the bottom of the screen tap Print and a printable file is placed on the EVA
Program Flash Drive.
Remove the EVA Program Flash Drive and insert in a PC with printer access
On the EVA Program Flash Drive Navigate to \\Eva\AutoPrint\TestResults\<Name of
Study>.
Identify the file you want to print. Format is <subjectID and date time>.txt
Open the file in Notepad or similar and print.
Return the EVA Program Flash Drive to the Emmes EVA.
10. OTHER FEATURES OF THE EMMES EVA
10.A Retrieve/Bulk Export Of Study Data
Periodically your coordinating center may want you to download stored test data from the EVA
PC hard drive. The Emmes EVA will retrieve the data, decrypt it, and save it to the EVA Retrieval
Flash Drive.
You will need the EVA Study/Data Profile PIN and an EVA Retrieval Flash Drive from
to retrieve/bulk export data. If the data to be exported is associated with a study
management organization, contact them for these materials. Otherwise, contact the Emmes
EVA Team.
Confirm the EVA Retrieval Flash Drive is inserted.
Select Settings on the EVA App Home page, then select Retrieve Study Data.
Select the study to retrieve and enter the EVA Study/Data Profile PIN. The data will
be retrieved and placed on the EVA Retrieval Flash Drive as an XML file.

Emmes EVA User’s Manual Model 14 WIN, v9.0
April 2020
12
The XML file placed on the EVA Retrieval Flash Drive is not encrypted. Take care to
protect the drive from unauthorized access.
10.B Sleep/Wake-Up The Emmes EVA
The Sleep/Wakeup feature allows you to darken the EVA Display but keep it warmed up. If you
turn off the EVA Display the screen will cool down and you must repeat the warmup process (10
minutes for high-contrast, 45 minutes for low-contrast) before performing subject tests.
Tap Sleep on the EVA App Home page to darken the EVA Display without turning it
off.
Tap Wakeup on the EVA App to awaken the EVA Display.
10.C Shut Down The Emmes EVA
To shut down the Emmes EVA, tap Shutdown on EVA App Home page. You can also press and
quickly release the EVA PC power button and the EVA PC will safely shut itself down. (Do NOT
press and hold the power button or system will crash and require several minutes to restart.) To
turn off the EVA iPod, press and hold the power button at the top until the screen turns black.
11. EMMES EVA SEMI-AUTOMATED VISUAL ACUITY TESTING MODES
11.A e-ETDRS Visual Acuity Test
The Electronic Early Treatment of Diabetic Retinopathy (ETDRS) is a visual acuity testing workflow
for subjects 7 years of age or older. It was developed to provide a visual acuity letter score
comparable to the ETDRS chart testing score.
The e-ETDRS Visual Acuity Testing protocol consists of an initial screening phase to obtain an
approximation of the visual acuity threshold followed by a testing phase to obtain the visual acuity
score.
The E-ETDRS application outputs the test result as a letter score (number of letters correctly
identified) and as a Snellen approximation.

Emmes EVA User’s Manual Model 14 WIN, v9.0
April 2020
13
11.B e-HOTV (ATS-HOTV) Visual Acuity Test
The e-HOTV is the electronic version of the Amblyopia Treatment Study H-O-T-V (ATS-HOTV)
workflow developed to facilitate the standardization of visual acuity testing in clinical trials of
pediatric eye disease involving children in the 3 to less than 7 years old range.
The e-HOTV consists of the presentation of single-surrounded optotypes (letters H, O, T, and V) in
4 steps: a screening phase, a first threshold determination (Phase I), reinforcement phase, and a
second threshold determination (Phase II).
The ATS-HOTV application displays the test result as a Snellen value. Also displayed are data
validation codes for the test result, subject ID, and test date. These codes can be used to validate
correct entry when the data are entered into a case report form.
11.C Low-Contrast E-ETDRS Visual Acuity Test
The Low-Contrast E-ETDRS uses the same algorithm as the E-ETDRS Visual Acuity Test. The Low-
Contrast version of the test allows the user to select from two different low contrast levels: 2.5%
and 5%. The contrast levels represent the percentage of difference in luminance between the
foreground (letter image) and background.
Two low-contrast verification screens are used to check EVA Display before low contrast testing.
The first screen displays a white background with squares that progress from light gray to white.
The second screen displays a black background with squares that progress from gray to black. If
the EVA Display’s performance changes outside of specification, one or more of the squares will
not be visible. If that occurs, technicians are advised to contact support at the Emmes Corporation
and to not perform any low contrast testing with the system.
11.D Low-Contrast ATS-HOTV Visual Acuity Test
The Low-Contrast ATS-HOTV uses the same algorithm as the ATS-HOTV Visual Acuity Test. The
Low-Contrast version allows the user to select from two different low contrast levels: 2.5% and
5%. The contrast levels represent the percentage of difference in luminance between the
foreground (letter image) and background.
Two low-contrast verification screens are used to check EVA Display before low contrast testing.
The first screen displays a white background with squares that progress from light gray to white.
The second screen displays a black background with squares that progress from gray to black. If
the EVA Display’s performance changes outside of specification, one or more of the squares will

Emmes EVA User’s Manual Model 14 WIN, v9.0
April 2020
14
not be visible. If that occurs, technicians are advised to contact support at the Emmes Corporation
and to not perform any low contrast testing with the system.
12. VISUAL ACUITY CHART ACCESS
An application that can be used for manual vision testing. Chart displays individual letters or
lines of letters using HOTV or Sloan letters sets.
13. FREQUENTLY ASKED QUESTIONS
13.A System Questions
How much space do I need to properly operate the Emmes EVA?
The system is calibrated for a 3-meter (118 inches) testing distance from the subject to the
front of the EVA Display screen.
Why does the testing distance need to be 3 meters?
Standard logMAR charts (e.g. ETDRS and HOTV) are valid for testing at 4-meters. The Emmes
EVA brings this distance to 3-meters to assist clinics in managing space for test lanes, while
still providing a valid scenario for distance vision testing. A fixed distance of 3-meters is
required for valid distance testing with the Emmes EVA.
I have an LCD Display that didn’t come with the Emmes EVA; can I use it?
No. Emmes EVAs are carefully calibrated and validated with specific hardware. Any
variation of this hardware could cause the testing to be invalid. Only the EVA Display that
came with the Emmes EVA can be used.
Can I use a display from a different Emmes EVA or interchange components from
other Emmes EVAs?
No. Using a different EVA Display would result in non-valid performance of the Emmes EVA.
Where are the keyboard and mouse?
The Emmes EVA does not require a keyboard or a mouse to operate so this equipment is not
included. The only equipment required are those defined in previously in this User Manual.
How do I find out the version of the Emmes EVA?
The version of each Emmes EVA is electronically displayed on the bottom of the “Testing
Requirements” screen.

Emmes EVA User’s Manual Model 14 WIN, v9.0
April 2020
15
Why do I have to let the Emmes EVA Display warm up? When do I do it?
All Emmes EVA Displays need to warm up to achieve luminance stability. For high contrast
testing, this can be achieved in 10 minutes. For low contrast testing, this requires 45 minutes.
After the warm up period the EVA Display’s luminance is stable and all optotypes displayed
will be consistent.
The warm-up period should be followed any time the EVA Display is off for longer than a
reboot. If you need to turn the EVA Display off to make the lane dark for other use, consider
using the Sleep/Wakeup function on the EVA App Home page. You do not need to wait for
the warm-up period if the EVA Display has already warmed up and you use the Sleep/Wakeup
function.
I need to look up a previous score for a subject. How do I do that?
There are two ways to view previous subject test results; by subject and by date. On the EVA
iPod, select Test Results from the EVA App Home page, then tap the appropriate study for
the subject and tap Next. Tap View by Date or View by Subject ID. Select the appropriate
date or Subject ID to view previous tests.

Emmes EVA User’s Manual Model 14 WIN, v9.0
April 2020
16
14. TROUBLSEHOOTING GUIDE
In case of any issue with the device, please follow the steps below.
14.A EVA iPod cannot connect to the internet. (See Figure 1)
IMPORTANT: Regardless of this error message…
•“Internet” access is NOT required for functionality.
•DO NOT connect the EVA iPod to any local WiFi network
and instead, read the guide below…
If the Emmes EVA cannot connect after 5 minutes, check the
following:
Confirm the EVA iPod is connected to the WiFi network
“TXXXXXX” Serial Number network. Press the EVA iPod
home button, tap Settings, then Wi-Fi. The top section
should show a network with a check mark () next to it.
Note: It is normal to see the message “No internet
connection” when connected to the “TXXXXXX”
network.
If the EVA iPod is connected to another network that is
NOT the “TXXXXXX” network, proceed with the
following.:
a. Select the network that is NOT the “TXXXXXX” network and tap Forget This
Network. When prompted, tap Forget.
b. Go back to the “Choose a Network” list and wait a minute; the EVA iPod should
automatically re-connect to the “TXXXXXX” network after forgetting the other
network
c. If the EVA iPod does not automatically connect to the “TXXXXXX” network,
manually select the network that matches your Serial Number (label on front of
EVA PC), tap the name of the correct network (Serial Number) and it should
automatically connect.
d. Do NOT connect the EVA iPod to other WiFi networks that are not “TXXXXXX”.
If Wi-Fi connection is unable to be established with the EVA iPod, contact the EVA
support team.
Figure 1

Emmes EVA User’s Manual Model 14 WIN, v9.0
April 2020
17
14.B The Emmes EVA will not turn on.
Confirm the power strip is turned on (if applicable).
Confirm that everything is properly plugged in.
Confirm the EVA is NOT in sleep mode:
a. Tap Sleep/Wakeup on the EVA App Home screen.
b. Close the EVA App on the EVA iPod and restart the app if the above does not
resolve the issue.
14.C Cannot remember EVA iPod Passcode
The EVA iPods are not configured with a passcode as new. If your model was
configured with a passcode, the passcode to unlock the EVA iPod is the last four digits
of your EVA Serial Number. The EVA Serial Number can be found on the EVA PC on
the label with the barcode in the format “T000123”.
(Be sure you are using the EVA iPod that came with the EVA. Each EVA iPod is
configured for a specific individual EVA and will not work with another EVA system.)
IMPORTANT: If the EVA iPod passcode cannot be remembered or accessed after only
one or two attempts with the above instructions, contact support. Any further
attempts will lock the EVA iPod and will require it to be sent to the Emmes EVA
Support for repair.
14.D The EVA Display is distorted or not functioning
HDMI cable is securely connected. Turn off EVA, unplug and re-insert HDMI cable.
Turn EVA on.
Input source on the EVA Display is set to HDMI. On the EVA Display, press the
button to the left of the Power button to see what the Input is currently set to. Press
that button successive times to change the Input until it is on HDMI.
Table of contents
Other Emmes Test Equipment manuals
Popular Test Equipment manuals by other brands

Matrix
Matrix 620B user manual
GESTRA
GESTRA NRG 16-19 installation instructions
Rohde & Schwarz
Rohde & Schwarz R&S RT-ZC10B user manual
TSI Incorporated
TSI Incorporated PORTACOUNT PRO+ 8038 Operation and service manual
Tektronix
Tektronix TBS1000C Series user manual
VOLTCRAFT
VOLTCRAFT DSO-5072H user manual
