Emotiva RMC-1 User manual

Page 1
Dirac Live for Emotiva Processors
Dirac Live for Emotiva ProcessorsAutomatic Room on
RMC-1
STANDBY
Differential Reference
HDMI 1 Reference Stereo Volume -35.0dB
A: HDMI 1 PCM 2.1 44kHz 20bits
V: HDMI 1 1080P/60 8bits 4:2:2 SDR
Volume -35.0

Page 2
Dirac Live for Emotiva Processors
We STRONGLY urge you to read this entire manual
at least once before using the Dirac Live automatic
room correction software included with your Emotiva
processor.
It includes many important details that you will
need to know in order to enable Dirac Live to work
properly and deliver excellent results.
NOTE:
CURRENT EMOTIVA PROCESSORS, INCLUDING THE RMC-1, RMC-1L, AND
XMC-2, USE THE CURRENT VERSION OF DIRAC LIVE.
THE VERSION OF THE DIRAC LIVE SOFTWARE WHICH WAS CUSTOMIZED
TO WORK WITH OUR XMC-1 PROCESSOR WILL NOT WORK WITH OUR
CURRENT PROCESSORS.
THE NEW VERSION OF THE DIRAC LIVE SOFTWARE, WHICH WORKS WITH
OUR CURRENT PROCESSORS, WILL NOT WORK WITH OUR LEGACY XMC-1
PROCESSOR.
(If you have an XMC-1 you must download or purchase the correct version
of Dirac Live LE for Emotiva or Dirac Live FULL for Emotiva that will work
with your XMC-1.)
NOTE:
THE DIRAC LIVE SOFTWARE IS UPDATED PERIODICALLY.
When you download the DIrac Live software you will receive the latest
version. Once it is installed, the software may automatically update itself,
or it may instruct you to manually download and install updates.
Newer versions of the Dirac Live software may include additional
features or controls, may enable the addition of optional new features
or capabilities, and may include other changes that cause their user
interface to dier slightly from the illustrations shown in this manual.

Page 3
Dirac Live for Emotiva Processors
Automatic Room Correction
Audio recordings themselves, and modern audio playback and amplication equipment, both
achieve very high levels of accuracy; the weakest links in a modern audio system are the speakers
and the room. The limitations of speakers themselves, and the complex ways in which they
interact with various characteristics of the listening room, can cause the way music sounds in your
listening room or home theater to be quite dierent from what you expect, and from what the
recording engineer intended. Simple variations in frequency response - as experienced at your
listening position - can make the music you’re listening to sound bright or dull, or change the
tonal balance in more subtle ways, and errors in timing and phase can transform the sound stage
from a precise recreation of the original recording venue to a blurry and jumbled mess.
In the early days of audio, you could use a test disc and a sound pressure level (SPL) meter to
graph the frequency response of your audio system, then manually adjust the gain at various
frequencies using some sort of equalizer to produce a relatively at frequency response. While
this process was usually carried out by experts who had the necessary equipment and expertise,
the basic principle was really quite simple. Most modern pre/pros incorporate automatic room
correction systems like Audyssey™, and our own EmoQ™, which will perform the entire process
for you. If you prefer the manual approach, our high-end processors include powerful parametric
equalization controls, and built-in programs to generate test tones. Together they give you far
more accuracy and control than even the most experienced expert had at his or her disposal a
few years ago. However, while performing frequency response corrections manually can be quite
eective, it can also be somewhat dicult and time consuming.
Also, while correcting the frequency response of the audio signal at the listening position can
often produce a marked improvement in sound quality, because of the complex ways in which
speakers and rooms interact, simple frequency response correction may not be enough. Even
if the measured frequency response is quite accurate, dierences in the precise times at which
dierent frequencies reach the listener can interfere with proper imaging - resulting in vocalists
and instruments seeming to be spread out and blurred, or shifting location when dierent notes
are played. Timing and phase errors can also cause transients to be rendered incorrectly, which
may result in drumbeats and other transients sounding blurred in time, or other similar errors,
which can make your music sound slow, or lacking in “liveliness”.
Dirac Live® Automatic Room Correction
Dirac Live takes the correction process a step further than other room correction systems. Because
Dirac Live uses mixed-phase lters, it is able to calculate lters that not only correct the frequency
response, but also compensate for errors in time response. This allows Dirac Live to correct more
of the dierences between how your speakers perform in your room, and how ideal speakers,
in an ideal room, would sound - and enables Dirac Live to correct both frequency response
and transient response. In simplest terms, because Dirac Live is not limited to correcting only
problems related to frequency response, it does a better job of making your room sound more
like it theoretically should.

Page 4
Dirac Live for Emotiva Processors
In addition to an extensive set of manual adjustment and calibration tools, our RMC-1, RMC-1L,
and XMC-2 processors now include the latest version of Dirac Live automatic room correction. The
latest version of Dirac Live now oers an improved user interface that is easier to use, full software
compatibility with both current Apple and Microsoft Windows computers, and a consistent user
interface across all processor makes and models.
Overview
The current version of Dirac Live, which works with our current processors, consists of three main
components:
The Dirac Live lter engine is an integral part of the rmware in our RMC-1, RMC-1L, and XMC-2
processors. This is the part of the room correction system that actually applies the precision digital
corrections to your music and movie sound tracks. The current version oers two independent
Speaker Presets, each of which can store up to three Dirac Live room correction proles, along
with one manual EQ prole. Various menu options allow you to choose a default prole, associate
particular proles with specic inputs, or manually switch between proles on the y.
The part of Dirac Live that controls the test tones, takes the measurements, analyzes the results,
and calculates the correction lters, is a software program that runs on your Apple or Microsoft
Windows computer. The current version of this software is standardized between all current
processor models that oer Dirac Live automatic room correction. Because of this, as updates
and new features are added to the Dirac Live software, they will immediately become available to
everyone who uses Dirac Live. (New versions of Dirac Live going forward will work with our
RMC-1, RMC-1L, and XMC-2 processors. They will not work on our older XMC-1 processor - which
uses an older version of the Dirac Live software.)
The third component of the automatic room correction system is the Emotiva Dirac Network
Interface. This module is a small hardware unit, which contains its own independent processor
and software, and facilitates communication between our processors and the Dirac Live software.
The package included with our processors includes a license for the
Dirac Live software, the Emotiva Dirac Network Interface unit, and a high quality calibrated
measurement microphone. It also includes a digitizer cable, which enables the microphone to
connect directly to your computer, a desktop microphone stand, and a miniature Ethernet switch
and cables which you may use to connect your processor and the Network Interface to your
network.
Your processor, the Network Interface unit, and your computer, will only need to be connected
to your network when you are actually taking measurements and calibrating your system. After
calibration if performed the resulting lters are transferred to your processor, where they are
stored internally, and may be selected whenever you wish to use them.

Page 5
Dirac Live for Emotiva Processors
Your Listening Room
Even though Dirac Live is the most powerful automatic room correction system available today,
and it will produce a dramatic improvement in your listening experience in virtually every room,
you will still get the best results if you optimize your room and system conguration before you
run Dirac Live. We will be releasing several instructional videos covering this subject in detail, but
here are a few guidelines you can follow that will help you achieve the best results:
• In order to achieve a focused sound stage and proper imaging, it is very helpful if your room
and seating arrangements are as symmetrical as possible - from right to left. Ideally, your front
speakers should be the same distance from the wall behind them, the same distance from
their respective side walls, and at the same height. The ideal listening position will be located
along a line drawn from the center of the front of the listening room to the center of the rear,
and about one third to one half of the way back. Likewise, ideally the surrounds and rear
surrounds will be located symmetrically, and your center will actually be located in the center
of the front wall. While your particular listening room may limit your options, the closer you
can get to this goal the better.
• Ideally, your room itself should also be as symmetrical as possible acoustically. For example, if
you have a large window on your left wall, and a large tapestry on the right wall, you should
consider adding heavy curtains over the window.
• Listening positions directly against the rear wall, or in corners, should be avoided
• Your speakers should be positioned and angled so they produce the best imaging and the
smoothest sound before you run Dirac Live. (By avoiding obvious major problems, you will
enable Dirac Live to better focus on the smaller issues, and will end up with a more precise
room correction.)
• It is especially important that your subwoofer (or subwoofers) be properly positioned before
using any type of room correction. While Dirac Live will do a great job of evening out response
issues caused by room eects, it may not be possible for even the best room correction to
entirely eliminate strong nulls or room modes, and attempting to do so may cause other
issues. (Some locations, in some rooms, are just plain bad spots to locate a sub, and no
amount of room correction can correct them entirely.)

Page 6
Dirac Live for Emotiva Processors
Measurement and Microphone Positions
Note: Dirac Live relies on having multiple sets of measurements, taken at dierent physical
locations, to produce the most accurate room corrections. Dirac Live oers several dierent
room measurement options, optimized for dierent seating arrangements, each of which
includes a recommended number of measurement locations. While you can calculate a set of
correction lters after taking fewer measurements, and may choose to do so to save time, for
best results we recommend that you allow Dirac Live to take the full set of measurements is
suggests.
The Dirac accessories that you received with your Emotiva processor include a convenient
tabletop microphone stand which will allow you to position the microphone in many locations.
However, you may nd it easier to position the microphone accurately at all of the recommended
locations if you purchase your own fully adjustable microphone stand.
If it isn’t convenient to take measurements at the positions shown by the Dirac Live software,
do your best to take the full set of measurements in the relative pattern of locations shown,
even if the individual locations must be closer together. It is also critical that, when taking the
measurement at the location shown as the “center position” or “sweet spot”, the microphone be
positioned accurately where your head is normally located while listening critically.
Note: The calibrated microphone provided with your processor is intended to be used vertically
- with the point facing vertically towards the ceiling - regardless of how many speakers you
have. The frequency response of the microphone has been calibrated to be correct in this
orientation. DO NOT position the microphone facing the front speakers for two channel
systems, and DO NOT try to reposition the microphone to face each individual speaker as it is
measured.
Target Curves
Dirac Live works by taking a series of measurements, analyzing the results to calculate the current
response of your room and speakers, comparing those results to a selected Target Curve, and
calculating a set of Correction Filters. When applied to the music you’re playing the Correction
Filters adjust the response of your system to match the Target Curve. If you wish to adjust the way
your room and system sound with a specic set of Correction Filters, you can do so by editing the
Target Curve.
The measured frequency response of a given room and set of speakers will vary depending on
which measurement method you use. Because of this, the default Target Curve used by Dirac Live
is not at; instead, it has been carefully chosen to produce a perceived neutral frequency response
in a typical listening room with typical speakers. If you prefer a dierent sound signature, we
encourage you to edit the Target Curve to suit your personal preferences.
It’s your system... so make it sound the way you like!

Page 7
Installing The Dirac Live Software
Preparing To Run Dirac Live
Along with your Emotiva processor you will receive the following:
• A precision calibrated microphone.
• A USB digitizer cable - for connecting the microphone to your computer.
• The Emotiva Dirac Network Interface - which connects to your network to facilitate the
network connection between the Dirac Live software and your processor.
• A small 5-port Ethernet switch and some Ethernet cables.
• (Depending on how your network is congured you may need to purchase one or more
additional low cost Ethernet cables of various lengths.)
• AC adapters for the Network Interface and the Ethernet switch.
Soon after receiving your unit you will receive an e-mail that includes instructions about where to
activate your Dirac Live user account and download the latest version of the Dirac Live software.
Here are the steps required to use Dirac Live:
• UPDATE THE FIRMWARE ON YOUR PROCESSOR TO THE CURRENT VERSION.
• Create your Dirac User Account.
• Download the microphone calibration le onto your computer and place it where you
will be able to nd it.
• Download the software and install it on your computer.
• Connect your processor, the Network Interface box, and your computer, to your network.
• Connect the microphone to your computer via the provided USB digitizer cable.
• Run the software.
• Follow the onscreen directions in the software, take your measurements, and download the
lter or lters you create to you processor.
• (At this point, if you prefer, you may disconnect your processor, the Network Interface box,
and your computer, from your network.)
• Set up the conguration options in your processor to instruct it which Dirac Live lters to use
with which Inputs.

Page 8
Connecting Everything To Your Network
Connecting Everything To Your Network
There are a variety of dierent ways in which the necessary components can be connected to
each other and your network. In this manual we’re going to show you the simplest ways in which
this can be accomplished. These are the ways we recommend and which we know will work for
most of our customers.
Those of you who are familiar with network architecture will realize that there are many
other network connection options which will also work - but many of which will require extra
conguration settings on your other network equipment. Note that the RMC-1, RMC-1L, and
XMC-2 processors do not have internal WiFi adapters and so require a wired Ethernet connection
or equivalent to your network.
The basic requirement is that your processor, your computer, and the Emotiva Dirac Network
Interface box, must all be connected to the same network segment, which must also have
access to the Internet. A signicant amount of data is transferred across your network between
your computer, the Network Interface box, and your processor, so we recommend a high speed
network connection with relatively low latency. The Internet connection is only used to validate
your Dirac Live license each time the software is run.
The following page shows three dierent ways in which you can connect your computer,
processor, and the Emotiva Dirac Network Interface box. The rst - fully wired - connection will
work consistently for most users, and so is the recommended option.
The second option, with the processor and Network Interface directly wired, and the computer
connected via WiFi, will work for most users who have a fast stable WiFi connection. If you have
multiple routers or access points you must ensure that the computer and other components are
connected to the same one. The third option is equivalent to the second, and will allow you to
avoid using the separate Ethernet switch if you have a cable modem that is conveniently located
and has multiple Ethernet ports.
Note: The Network Interface box may be located at a dierent location from your computer and
processor - as long as it resides on the same logical network segment. However, if you have any
doubts about how your network is logically arranged, the easiest way to ensure that this is true
is to connect the computer, processor, and Network Interface box to the same switch, as shown
in the rst example.
Note: We STRONGLY recommend that the Network Interface box be shut down after
each calibration session. After doing so, the Network Interface box must be rebooted by
disconnecting, then reconnecting, its AC power adapter. The easiest way to accomplish this is
to shut down and then unplug the Network Interface box when you nish a calibration session,
then plug it back in when preparing to start the next calibration session. This will be much
easier if you locate the Network Interface box in an accessible location.
Note: The RMC-1, RMC-1L, and XMC-2 must be connected to your network via Ethernet cable
because they do not have built-in Ethernet WiFi capabilities. There are a variety of third-party
wireless adapters and access devices which can be used to connect the Ethernet port on your
processor to your network, many of which will work. (But, because they vary considerably, and
can be complex to congure, we cannot recommend or support any particular one.)

Page 9
Connecting Everything To Your Network
Ethernet Switch
Emotiva
Dirac
Network
Interface
Desktop
or
Laptop
Computer
RMC-1
RMC-1L
XMC-2
To network
and Internet
(cable modem
or main router)
Simplest Wired Network Connections
All connections
shown are
Ethernet
except
microphone
(USB)
Ethernet Switch
Emotiva
Dirac
Network
Interface
Desktop
or
Laptop
Computer
RMC-1
RMC-1L
XMC-2
Simplest Wireless Network Connections
All wired
connections
shown are
Ethernet
except
microphone
(USB)
Cable Modem or
Wireless Router
Internet
WiFi
Cable Modem With Built-In Switch And WiFi
Emotiva
Dirac
Network
Interface
Desktop
or
Laptop
Computer
RMC-1
RMC-1L
XMC-2
Wireless Connection With One-Piece Cable Modem
All wired
connections
shown are
Ethernet
except
microphone
(USB)
Internet
WiFi
Suggested network connection options:

Page 10
Installing The Dirac Live Software
Installing The Dirac Live Software On Your Computer
The Dirac Live software which performs all of the measurements, calculates the correction
lters, and downloads the correction lters to your Emotiva processor, can be installed on any
reasonably current Microsoft Windows or Apple computer.
Note: The Dirac Live software is an actual Microsoft Windows or Apple IOS program and must
be run on a fully capable desktop or laptop computer. While it can be run on computers which
use a touch screen rather than a keyboard, it CANNOT be run on tablets or smart phones
which run a limited operating system, or which are only capable of running a specic subset
of specialized “Apps”. For example, it will NOT run on an Android tablet, or an iPhone. You may
refer to the Dirac website, or to www.emotiva.com, for a list of supported hardware.
Activating Your Dirac Live Software License
Your Dirac Live software license is linked to the unique hardware identity of your processor.
If you received your Dirac Live software license separately from your processor, before
downloading your Dirac Live software and using it for the rst time you must visit the web page
link included in your welcome letter (and on the product page) and follow the instructions to
enter some basic information about your processor to activate your Dirac Live product license.
If you received your Dirac Live software at the same time as your processor then the license may
be preactivated. If so then you may skip this step.
Downloading And Installing The Dirac Live Software
In order to install the latest version of the Dirac Live software, simply follow the provided
download link, and install the program on your computer as you would any other software
program.
Note: Depending on the other software and settings on your computer, you may be asked
whether to allow the Dirac Live software to make changes to your computer, or asked if your
security software should allow it to connect to or send data to your network or the Internet.
YOU MUST GIVE THE DIRAC LIVE SOFTWARE FULL PERMISSION TO MAKE CHANGES TO YOUR
COMPUTER AND TO ACCESS YOUR NETWORK AND THE INTERNET. IF YOU FAIL TO DO SO THEN
THE DIRAC LIVE SOFTWARE WILL NOT BE ABLE TO FUNCTION PROPERLY.
The rst time you run the Dirac Live software you will be asked to enter the User Name and
Password you created when you activated your license.
Note: The User Name and Password are CASE SENSITIVE and must be entered exactly.

Page 11
Preparing To Run Dirac Live
Downloading The Microphone Calibration File
Every high quality maeasurement microphone includes a calibration le which is used by the
measurement software to correct for variations between individual microphones. When you
run the Dirac Live software, and select which microphone to use, you will be asked to select the
calibration le associated with it.
Your activation e-mail will include a link where you can download the calibration le for the
calibrated microphone we provide. We suggest that you download this le and save it in a
location on your computer where you will be able to nd it easily. On Microsoft Windows
computers you may simply save this le to the Windows Desktop.
If you choose to purchase a dierent calibrated microphone, it will include its own calibration le,
so be sure to save or copy that le to a location where you will be able to locate it easily.
Preparing To Run Dirac Live
Connecting Everything Together
Before running the Dirac Live software to calibrate your system you must ensure that everything
is connected to your network and is operating properly. Refer to the section entitled Connecting
Everything To Your Network for details.
• Your processor should be connected to your network and turned on.
(We suggest that you select an unused or inactive input.)
• Your computer should be connected to your network and turned on.
(We assume you have already downloaded and installed the DIiac Live software.)
• Your microphone should be plugged into your computer via the included USB digitizer cable.
• The Emotiva Dirac Network Interface box must be connected to your network and running.
Note: The Emotiva Dirac Network Interface box is actually a fully functional Raspberry Pi
computer, running its own custom software, which facilitates communications between
the Dirac Live software on your computer and your processor. EACH TIME THE NETWORK
INTERFACE BOX IS POWERED ON IT WILL AUTOMATICALLY GO THROUGH A BOOT-UP
SEQUENCE, WHICH WILL TAKE ABOUT TWO MINUTES, BEFORE IT IS READY TO OPERATE. WHEN
YOU ARE DONE WITH A CALIBRATION SESSION YOU WILL BE ASKED TO SHUT DOWN THE
NETWORK INTERFACE AND UNPLUG IT FROM ITS AC POWER.
If you fail to unplug the Network Interface box after issuing it the ShutDown command, or if
you simply fail to shut it down, and there is an AC power uctuation, the Network Interface box
may end up in a state where it is powered on but NOT running. IF THIS HAPPENS, THE NETWORK
INTERFACE BOX WILL NOT WORK, AND YOU WILL BE UNABLE TO PERFORM A DIRAC LIVE
CALIBRATION, UNTIL YOU RESTART AND REBOOT THE NETWORK INTERFACE BOX.
To Reboot the Network Interface box, simply remove AC power from it by unplugging the AC
adapter from the Network Interface box, leave it disconnected for about thirty seconds, then
plug it back in. It will then take a minute or two for the Network Interface box to reboot itself
and be ready for normal operation. (You will observe a lot of ickering of the status LEDs
during the boot-up process.)

Page 12
Using Speaker Presets And Dirac Filters
Using The Speaker Presets On The RMC-1, RMC-L, and XMC-2
PLEASE READ THIS SECTION CAREFULLY AND MAKE SURE YOU UNDERSTAND IT.
Failure to do so may cause you to end up with unexpected and unsatisfactory results.
The following illustration shows the Speaker Presets section of the Setup Menu on our current
processors. Note that this section of the menu has been changed to include three Dirac Filter
presets for EACH of the main speaker presets.
Speakers Preset 1
Dirac 2
Dirac 1
Dirac 3
User
Distance
Levels
Size
Name
Equalization
Dirac Live Enable
Shutdown Remote
(Set Distances)
(Set Levels)
(Set Speaker Sizes)
(Set Custom Name)
Preset 1
Settings
Preset 2
Dirac 2
Dirac 1
Dirac 3
User
Distance
Levels
Size
Name
Equalization
Dirac Live Enable
Shutdown Remote
(Set Distances)
(Set Levels)
(Set Speaker Sizes)
(Set Custom Name)
Preset 2
Settings
Setup
(to other Setup Menu options)
Manual And Automatic Room Correction Menu
( Manual EQ Options
including Filters 1-11 )
( Manual EQ Options
including Filters 1-11 )
(Choose One)
(Choose One)

Page 13
Using Speaker Presets And Dirac Filters
Your processor includes two separate Speaker Presets which are independent and can be
congured dierently.
For each Speaker Preset, you can congure the following:
• The Name of the preset itself (the default names are Preset 1 and Preset 2).
• Which speakers are active in thet Speaker Preset and their sizes.
(Speakers whose Size is set to None will NOT be active when that Speaker Preset is selected.)
• The Distance settings for each speaker.
• The Trim Levels for each set of speakers.
Note: Because the Size settings for each speaker include the option of None you can congure
the two Speaker Presets to recognize entirely dierent speaker layouts and congurations.
For example... You could congure Preset 1 with a full 7.1.4 Dolby Atmos setup, with a
subwoofer, for watching movies, and you could congure Preset 2 with only your Front
Speakers, congured as Large, for listening to stereo music. You could then associate Preset 1
with your Blu-Ray player and Preset 2 with your stereo CD player, or switch between them using
your remote control.
HERE ARE THE IMPORTANT DETAILS TO REMEMBER...
THE TWO SPEAKER PRESETS ARE ENTIRELY SEPARATE.
Each Speaker Preset has one Manual EQ slot and three Dirac Correction Filter slots.
You will congure which of these four slots is the default for each Speaker Preset.
You can then associate either Speaker Preset with a particular input or manually switch
between the two Speaker Presets using the Menu or the remote control.
When you select one of the Speaker Presets in the Setup Menu, and enable Dirac Live from THAT
Speaker Preset, Dirac Live will read the current system conguration from the conguration
you currently have set for THAT Speaker Preset, and it will use THAT conguration for taking
measurements, and for creating Correction Filters. Then, when you create a new set of
Correction Filters, you will have the opportunity to save your new Correction Filters ONLY to
THAT Speaker Preset.
In order to create Dirac Correction Filters in the other Speaker Preset you must exit your current
session, Disable Dirac Live on the processor, exit the current Speaker Preset, switch to the other
Speaker Preset, then re-Enable Dirac Live from the other Speaker Preset.
WHEN YOU CHOOSE TO USE A DIRAC FILTER SET IN ONE OF THE SPEAKER PRESETS IT IS VERY
IMPORTANT THAT THE CONFIGURATION YOU HAVE SET IN THE SPEAKER PRESET MATCH THE
CONFIGURATION THAT WAS USED TO CREATE THAT DIRAC CORRECTION FILTER SET.
Failure to do so may result in some speaker sets failing to play entirely or playing with incorrect
correction lters applied to them. You may change speakers from Small to Large, or from Large
to Small, but you should not add or remove speakers from the conguration.
Because of this we STRONGLY suggest that, when you name your Dirac Correction Filter sets,
you use a descriptive name that includes this information.
You might, for example, use names like: “FilterSet1-714” and “FilterSet2b-200”.

Page 14
Performing A Dirac Live Room Calibration
Performing A Dirac Live Room Calibration
Preparations
At this point you have nished all of the preparations necessary to perform a Dirac Live automatic
room calibration:
• You’ve connected the RMC-1, RMC-1L, or XMC-2 to your network.
• You’ve connected the Emotiva Dirac Network Interface box to your network
(you’ve turned it on and, if necessary, waited for it to boot up).
• You’ve downloaded the Dirac Live software and installed it on your computer.
• You’ve downloaded the microphone calibration le that goes with your measurement
microphone onto the computer somewhere you can nd it when asked to do so.
• You’ve connected the microphone to your computer, connected the computer to your
network, and started up the computer.
• You’ve temporarily turned o any noisy air conditioners, put the children and pets safely out
of the way, and turned o anything else that makes a lot of noise.
Starting The Dirac Live Room Calibration Process On Your Processor
On the RMC-1, RMC-1L, or XMC-2 processor:
• Select Menu | Setup | Speakers | Preset 1 (or Preset 2) to enter one of the Speaker Presets.
• In the Speaker Preset check the box to Enable Dirac.
Note: If the Dirac Enable box displays UNAVAILABLE it means that the Emotiva Dirac Network
Interface box is not responding. This could be because the Network Interface box is not
connected to your network, has been shut down and has not since been restarted, or has
stopped running and will need to be rebooted. It could also indicate that there is some sort of
problem with your network or that your processor is not properly connected to your network .
Do not proceed until the Network Interface can be enabled.
Note: The Dirac Live calibration software will now read the speaker conguration from
THIS SPEAKER PRESET and save the correction lters it creates to THIS SPEAKER PRESET.
All future operations will now be controlled by the Dirac Live software on your computer.

Page 15
Performing A Dirac Live Room Calibration
Starting The Dirac Live Software On Your Computer
At this point we have nished all of the preparations necessary to perform a Dirac Live
automatic room calibration. Click on the appropriate icon or select the program from the Start
Menu on your computer to run The Dirac Live software program.
The rst time you run the Dirac Live software you may see the following screen.
If so, enter the User Name and Password you seleted when you activated your Dirac license and
created your account and press the Login button to continue.
You will then be asked to select the processor you wish to calibrate. If you have assigned a
Friendly Name to your processor it will be displayed here. You will only be shown the processors
that are currently attached to your network and have the Enable Dirac box enabled.
Page 16
Performing A Dirac Live Room Calibration
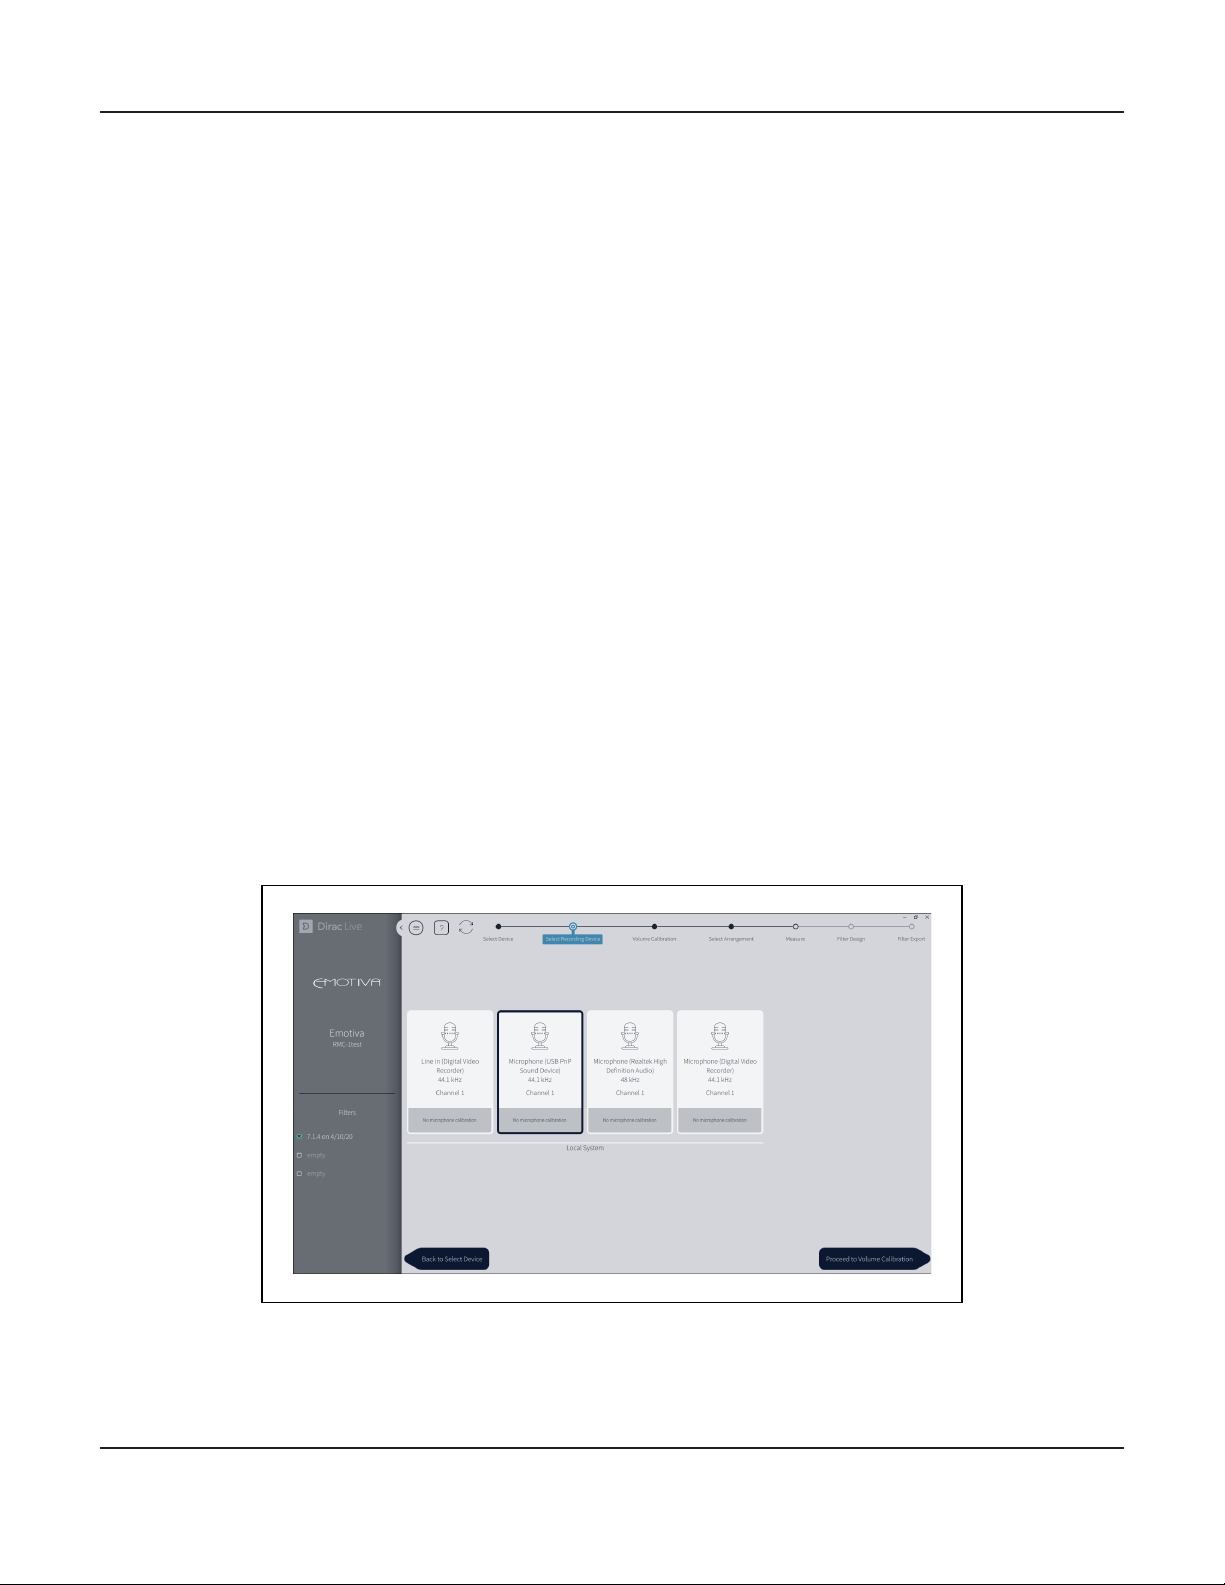
Select Recording Device
On the next screen you will be prompted to select the calibrated measurement microphone you
wish to use. The calibrated microphone and digitizer set provided by Emotiva will identify itself
as “Microphone (USB PnP Sound Device)”. If you have purchased a dierent third-party calibrated
microphone then you should select it instead.
After selecting the correct microphone by highlighting it, click on the button directly underneath
it to select the calibration le that goes with it. (In a previous step we had you copy the calibration
le that goes with the microphone we provide to a convenient location.)
Note: Always be sure to use the specic calibration le that has been provided with the
microphone you are using. All of the current batch of calibrated measurement microphones
provided by Emotiva use the same calibration le - and each microphone is individually tested
to ensure that they t the calibration curve it contains quite closely. With some other brands
of microphone a separate calibration le may be provided with each individual microphone.
In either case, using the wrong calibration le, or simply not using one at all, will result in
inaccurate results.
Note: The internal microphones included on many laptop computers are often extremely
inaccurate and are NOT appropriate for taking system calibration measurements.
After selecting the proper microphone calibration le click the button labelled Proceed To
Volume Calibration.

Page 17
Performing A Dirac Live Room Calibration
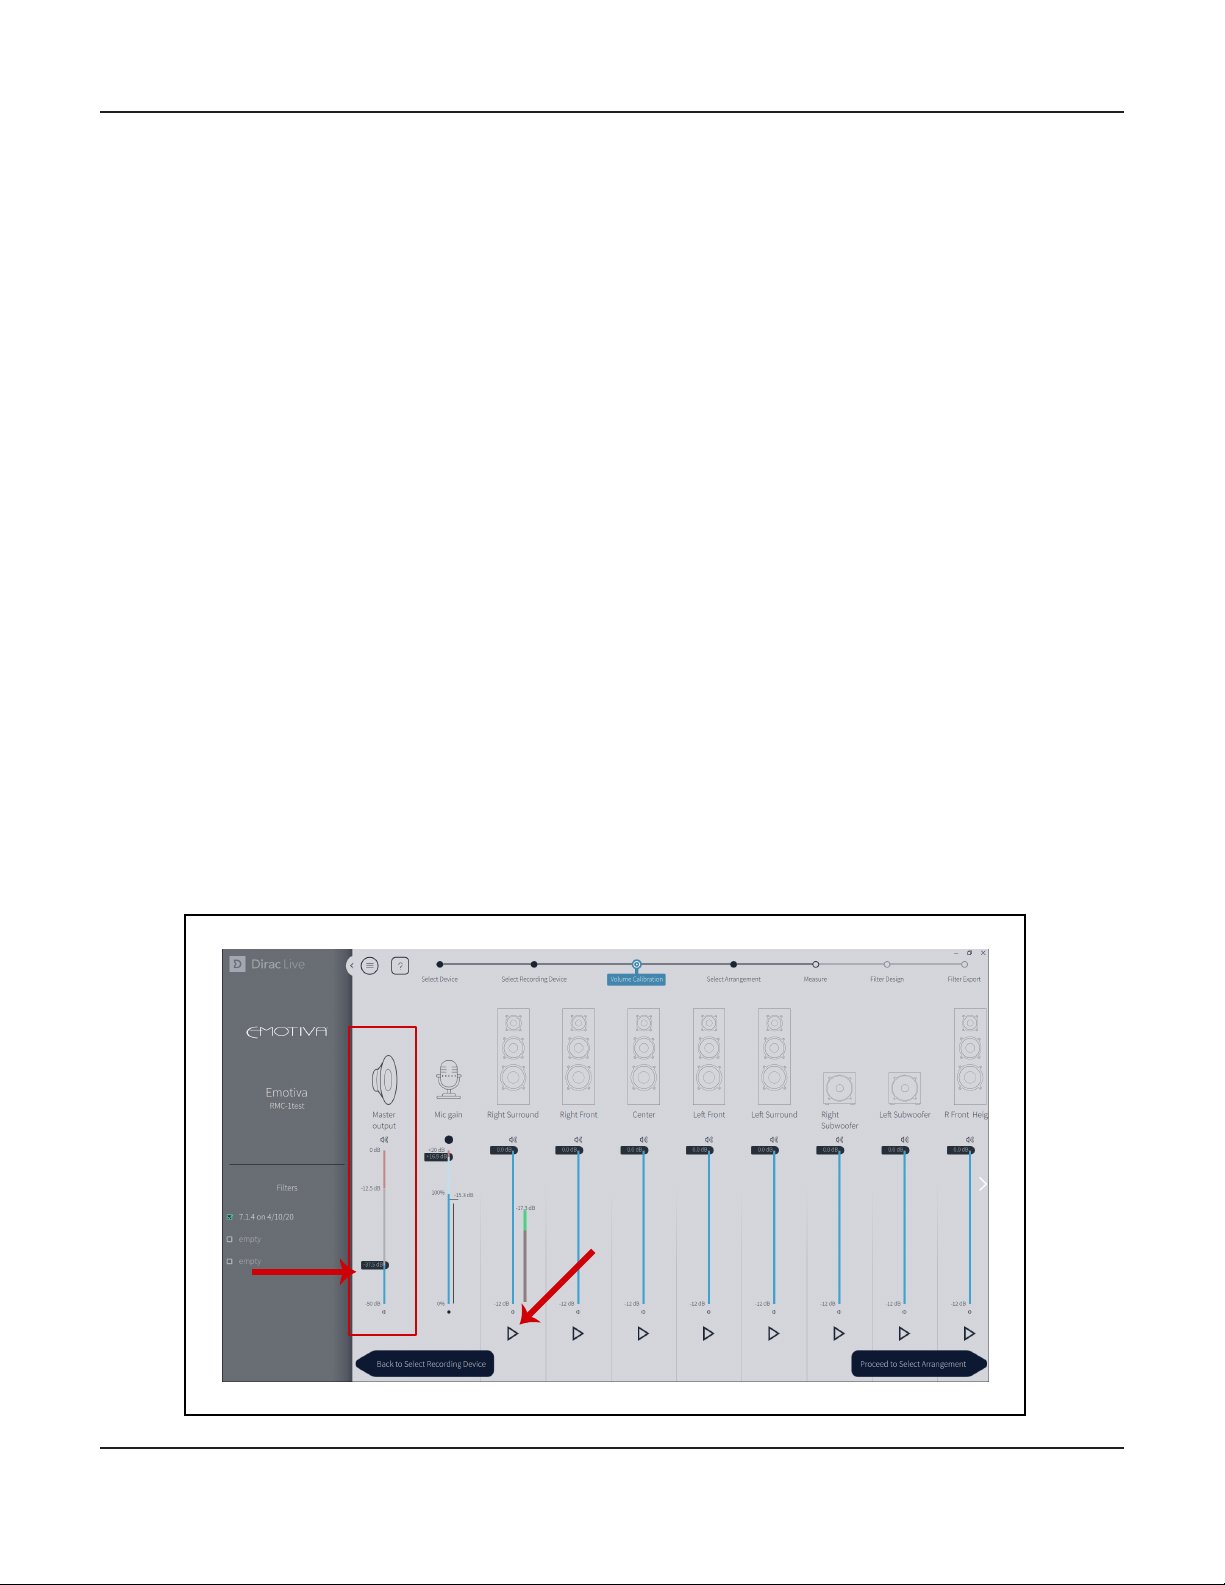
Volume Calibration - Microphone Gain
On the next screen you will set the Microphone Gain and Master Output levels.
The object of this setting is to set the Microphone Gain as high as possible while being careful
to avoid allowing the background noise in the room to interfere with the accuracy of our
measurements. So, while being as quiet as possible, raise the Mic Gain slider (the small black tab)
up until the meter bar to the right of the blue line reads close to but just below -30 dB. If the slider
reaches the top before the meter reads -30 dB then simply leave it set at the top.
Page 18
Performing A Dirac Live Room Calibration
Volume Calibration - Master Output Level
Now we are going to set the overall Master Output level for our test tones.
In order to do this we are going to play a test tone through one of our speakers and adjust the
Master Output level, which is the small black tab on the Master Output bar. Start by selecting the
speaker that you believe has the lowest eciency or generally plays the least loudly. This isn’t
critical so, if you’re unsure, simply select the Right Surround as shown in the illustration.
Note: In the next step we’re going to be playing test tones. The test tone used for full range
speakers is a type of hiss called pink noise while a sweep tone is used for subwoofers. These
tones may be somewhat annoying but should not be loud enough to damage your speakers.
If the test stones seem EXCEPTIONALLY loud, or you hear no test tones, stop the test, and call
Emotiva Technical Support.
Start by sliding the Master Output level tab all the way down. Now click on the small triangle
under the speaker you’ve chosen (it looks like a “Play” button) observe the level indicated by the
meter bar next to the speaker you’ve chosen. DO NOT ADJUST THE BLACK TAB THAT GOES WITH
THE SPEAKER THAT YOU HAVE CHOSEN. Gradually move the Master Output level tab up. As you do
so the sound will get louder and the meter bar next to the speaker will show a higher level. Stop
raising the level when the meter bar shows an indication about halfway up the green zone - at
about -15 dB. You may then press the button under the speaker (which now looks like a square
“Stop”button) to stop the test tone.
Note: While the test tone is playing a small line will start lling in a circle around the button...
and the test tone will shut o when the line reaches the end. Try to make your adjustment
before the test tone stops playing. If you need more time you may simply press the button
again to repeat the test tone.
Other manuals for RMC-1
1
This manual suits for next models
2
Table of contents


