Emtec WI200 User manual

COPYRIGHT
Copyright 2007/2008 by this company. All rights reserved. No part of this
publication may be reproduced, transmitted, transcribed, stored in a retrieval system,
or translated into any language or computer language, in any form or by any means,
electronic, mechanical, magnetic, optical, chemical, manual or other ise, ithout the
prior ritten permission of this company.
This company makes no representations or arranties, either expressed or implied,
ith respect to the contents hereof and specifically disclaims any arranties,
merchantability or fitness for any particular purpose. Any soft are described in this
manual is sold or licensed "as is". Should the programs prove defective follo ing
their purchase, the buyer (and not this company, its distributor, or its dealer) assumes
the entire cost of all necessary servicing, repair, and any incidental or consequential
damages resulting from any defect in the soft are. Further, this company reserves
the right to revise this publication and to make changes from time to time in the
contents hereof ithout obligation to notify any person of such revision or changes.
All brand and product names mentioned in this manual are trademarks and/or
registered trademarks of their respective holders.

Federal Communication Commission
Interference Statement
This equipment has been tested and found to comply ith the limits for a Class B
digital device, pursuant to Part 15 of FCC Rules. These limits are designed to
provide reasonable protection against harmful interference in a residential
installation. This equipment generates, uses, and can radiate radio frequency energy
and, if not installed and used in accordance ith the instructions, may cause harmful
interference to radio communications. Ho ever, there is no guarantee that
interference ill not occur in a particular installation. If this equipment does cause
harmful interference to radio or television reception, hich can be determined by
turning the equipment off and on, the user is encouraged to try to correct the
interference by one or more of the follo ing measures:
1. Reorient or relocate the receiving antenna.
2. Increase the separation bet een the equipment and receiver.
3. Connect the equipment into an outlet on a circuit different from that to hich the
receiver is connected.
4. Consult the dealer or an experienced radio technician for help.
FCC Caution
This device complies ith Part 15 of the FCC Rules. Operation is subject to the
follo ing t o conditions: (1) this device may not cause harmful interference, and (2)
this device must accept any interference received, including interference that may
cause undesired operation.
Any changes or modifications not expressly approved by the party responsible for
compliance could void the authority to operate equipment.
The antenna(s) used for this transmitter must not be co-located or operating in
conjunction ith any other antenna or transmitter.
Federal Communications Commission (FCC) Radiation Exposure Statement
This equipment complies ith FCC radiation exposure set forth for an uncontrolled
environment. In order to avoid the possibility of exceeding the FCC radio frequency
exposure limits, human proximity to the antenna shall not be less than 20cm (8
inches) during normal operation.

R TTE Compliance Statement
This equipment complies ith all the requirements of DIRECTIVE 1999/5/EC OF
THE EUROPEAN PARLIAMENT AND THE COUNCIL of March 9, 1999 on radio
equipment and telecommunication terminal Equipment and the mutual recognition of
their conformity (R&TTE)
The R&TTE Directive repeals and replaces in the directive 98/13/EEC
(Telecommunications Terminal Equipment and Satellite Earth Station Equipment) As
of April 8, 2000.
Safety
This equipment is designed ith the utmost care for the safety of those ho install
and use it. Ho ever, special attention must be paid to the dangers of electric shock
and static electricity hen orking ith electrical equipment. All guidelines of this and
of the computer manufacture must therefore be allo ed at all times to ensure the
safe use of the equipment.
EU Countries Intended for Use
The ETSI version of this device is intended for home and office use in Austria,
Belgium, Denmark, Finland, France, Germany, Greece, Ireland, Italy, Luxembourg,
the Netherlands, Portugal, Spain, S eden, and the United Kingdom.
The ETSI version of this device is also authorized for use in EFTA member states:
Iceland, Liechtenstein, Nor ay, and S itzerland.
EU Countries Not intended for use
None.

CONTENTS
1 INTRODUCTION ........................................................................................1
1.1 Features.............................................................................................................................1
1.2 Specifications....................................................................................................................1
1.3 Package Contents..............................................................................................................2
2 INSTALLATION PROCEDURE ..............................................................3
3 SETUP WIZARD........................................................................................10
4 CONFIGURATION UTILITY ................................................................14
3.1 Utility Overview.............................................................................................................15
3.2 Availa le Network...........................................................................................................17
3.3 General............................................................................................................................18
3.4 Profile..............................................................................................................................20
3.4.1 Configure the Profile...................................................................................................................21
3.5 Advanced.........................................................................................................................25
3.6 Status...............................................................................................................................28
3.7 Statistics..........................................................................................................................29
3.8 Wi-Fi Protected Setup.....................................................................................................30
3.9 Software AP....................................................................................................................31
3.8.1 AP Properties Setting..................................................................................................................32
3.8.2 AP Advanced.................................................................................................................................33
3.8.3 AP Statistics..................................................................................................................................34
3.8.4 ICS..................................................................................................................................................35
5 TROUBLESHOOTING.............................................................................36

1 Introduction
Thank you for purchasing EMTEC 802.11g Wireless LAN USB Adapter. This adapter complies ith
IEEE 802.11g standard, hich supports up to 54Mbps high-speed ireless net ork connections. It can
also ork ith IEEE 802.11b devices. When the adapter connects to 11b devices, the link speed ill
be up to 11Mbps.
For WLAN security issues, this adapter supports 64/128-bit WEP data encryption that protects your
ireless net ork from eavesdropping. It also supports WPA (Wi-Fi Protected Access) feature
technology. Client users are required to authorize before accessing to APs or AP Routers, and the
data transmitted in the net ork is encrypted/decrypted by a dynamically changed secret key.
Furthermore, this adapter supports WPA2 function, WPA2 provides a stronger encryption mechanism
through AES (Advanced Encryption Standard), hich is a requirement for some corporate and
government users.
The po er consumption of the adapter is also very lo . Furthermore, this adapter provides several
levels of po er saving modes allo ing user customizes the ay of saving the po er from his/her
portable or handheld devices.
This adapter is cost-effective, together ith the versatile features; it is the best solution for you to build
your ireless net ork.
1.1 Features
•Works ith both IEEE 802.11b and IEEE 802.11g products.
•High-speed transfer data rate - up to 54Mbps.
•High throughput supports multi-media data band idth requirement.
•Supports 64/128-bit WEP Data Encryption, WPA/WPA2 (TKIP ith IEEE 802.1x) and AES.
•Automatic fallback increases data security and reliability.
•Supports the most popular operating system: Windo s 98SE/Me/2000/XP/Vista.
•Supports USB 2.0 interface.
1.2 Specifications
•Standard: IEEE 802.11b/g
•Interface: USB 2.0 Type A
•Frequency Band: 2.4000 ~ 2.4835GHz (Industrial Scientific Medical Band)
•Modulation: OFDM ith BPSK, QPSK, 16QAM, 64QAM (11g)
BPSK, QPSK, CCK (11b)
•Data Rate: 54/48/36/24/18/12/11/9/6/5.5/2/1Mbps auto fallback
•Security: 64/128-bit WEP Data Encryption, WPA/WPA2 (TKIP ith IEEE 802.1x) and AES
1

•Antenna: Printed Antenna
•Drivers: Windo s 98SE/Me/2000/XP/Vista
•LEDs: Link/Activity
•Transmit Po er: 11g: 14±1dBm, 11b: 17±1dBm
•Dimension: 9(H) x 27(W) x 87(D) mm
•Temperature: 32~131°F (0 ~55°C)
•Humidity: Max. 95% (NonCondensing)
•Certification: FCC, CE
1.3 Package Contents
Before you begin the installation, please check the items of your package. The package should include
the follo ing items:
•One USB Adapter
•One CD (Driver/Utility/User’s Manual)
•One User Manual
If any of the above items is missing, contact your supplier as soon as possible.
2
2 Installation Procedure
Before you proceed ith the installation, please notice follo ing descriptions.
Note 1: The following installation was operated under indows Vista. (Procedures are similar
for indows 98SE/Me/2000/XP.)
Note 2: If you have installed the ireless Adapter driver & utility before, please uninstall the
old version first.
I. Ins all he Driver and U ili y
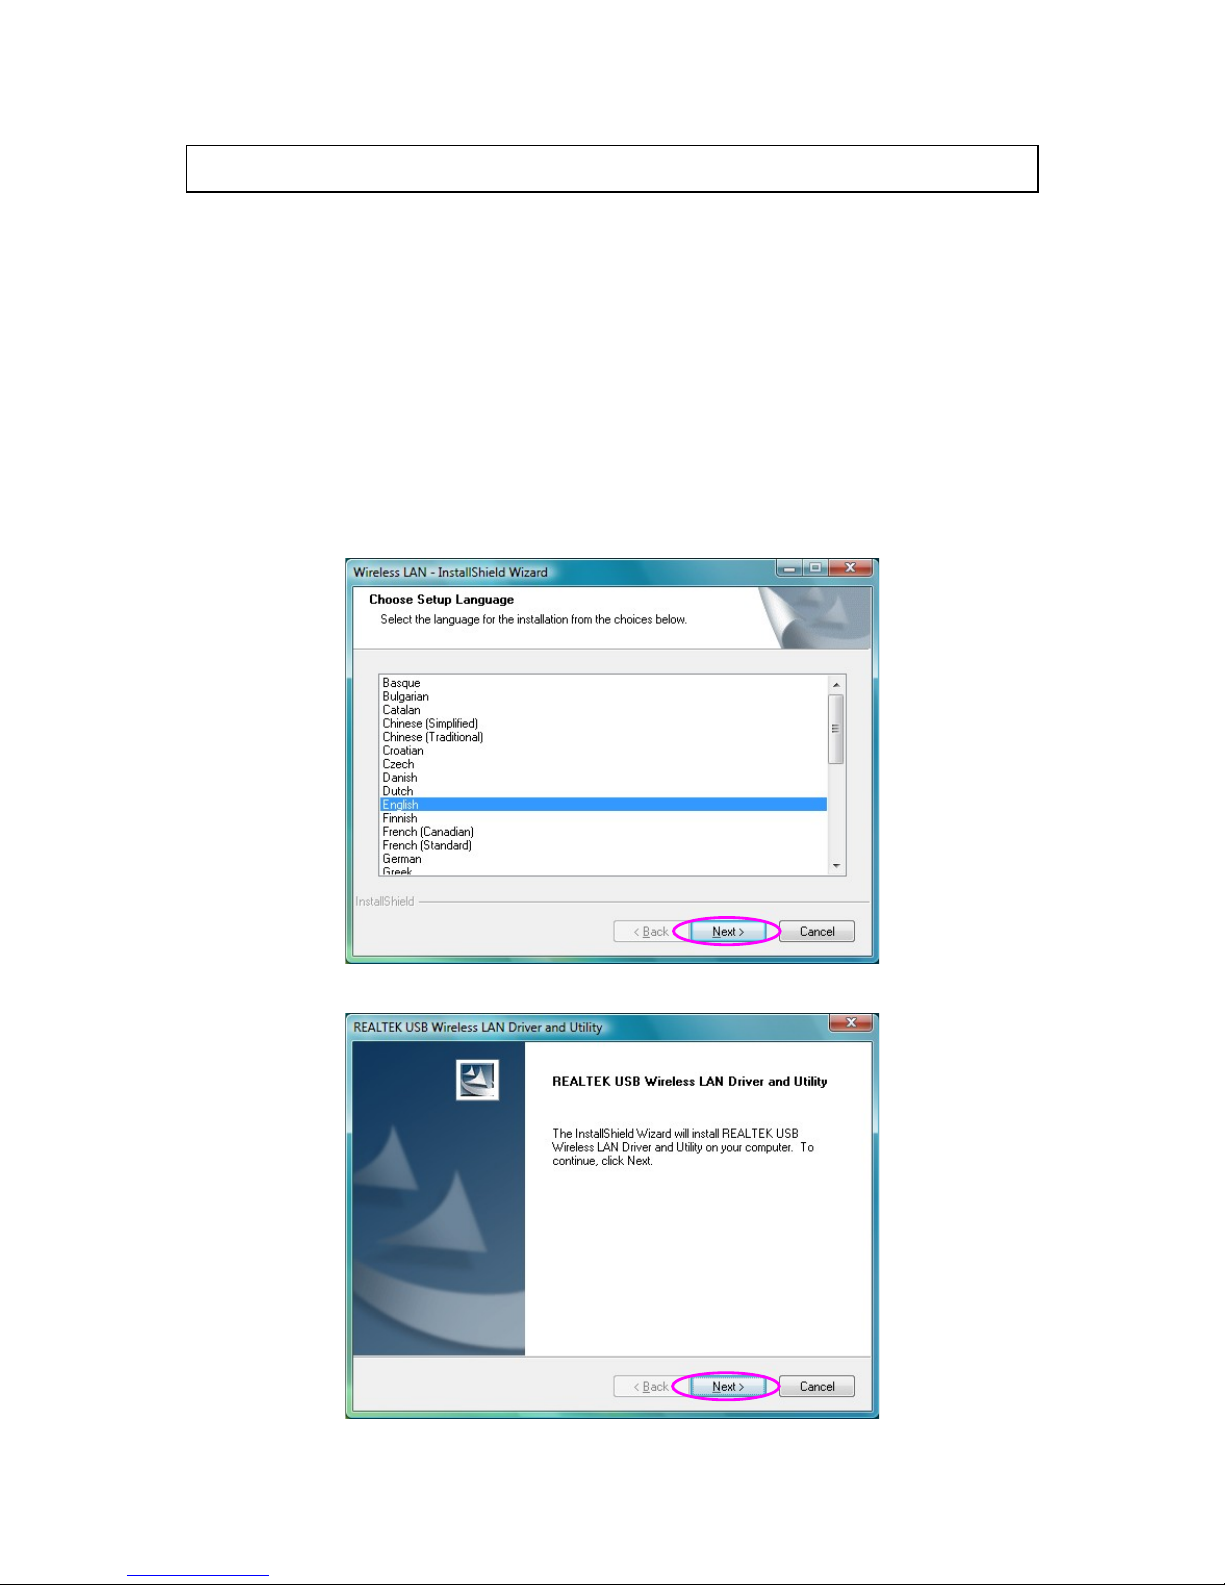
A. Insert the Installation CD to your CD-ROM Drive. Execute the “Setup.exe” program.
B. Select the Setup Language and click “Next” to proceed.
C. Click “Next” to start installing driver and utility.
3
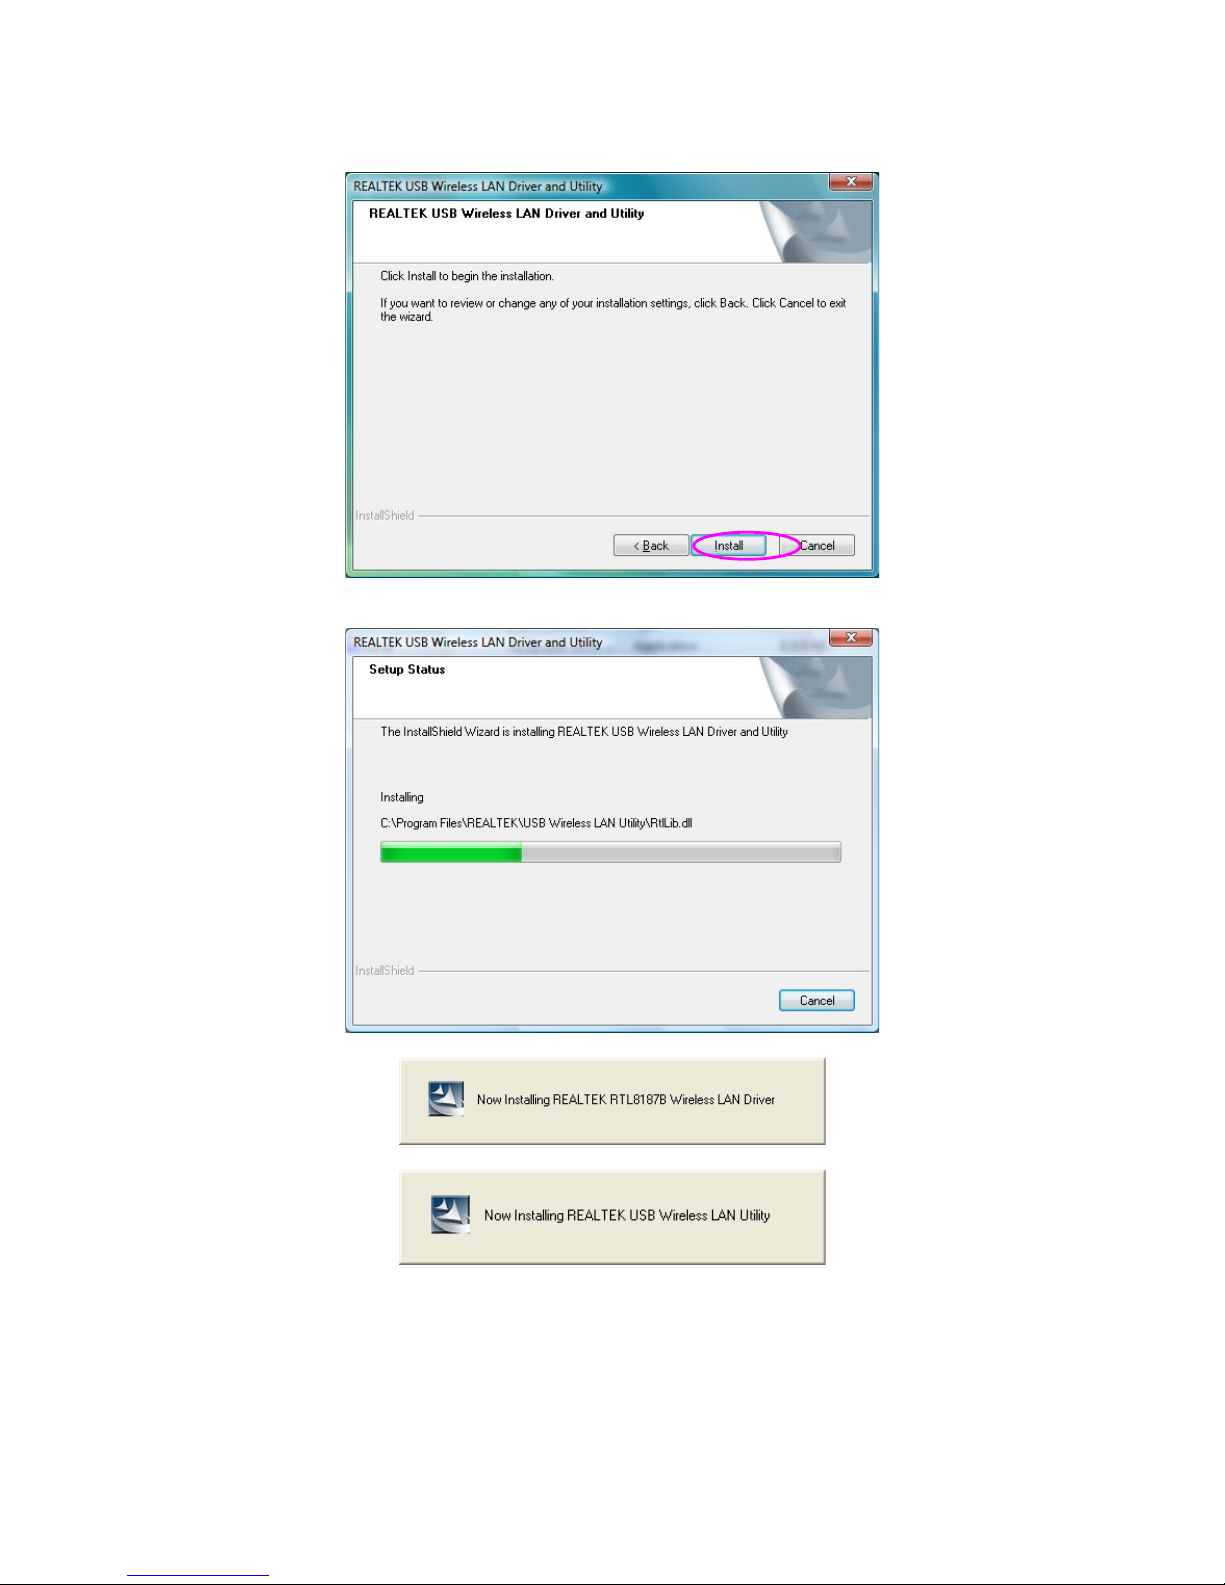
D. Click “Install” to start the installation.
E. The system starts to install the driver and utility.
4

F. Click “Finish” to complete the soft are installation.
G. Please plug the USB adapter into the USB port of the computer.
H. The system ill auto detect the USB adapter and complete the drivers installation for the adapter
automatically.
I. You are no able to use the USB adapter.
II. Connec o Wireless Access Poin
A. To start configuring the adapter, double click the icon in the system tray.
5

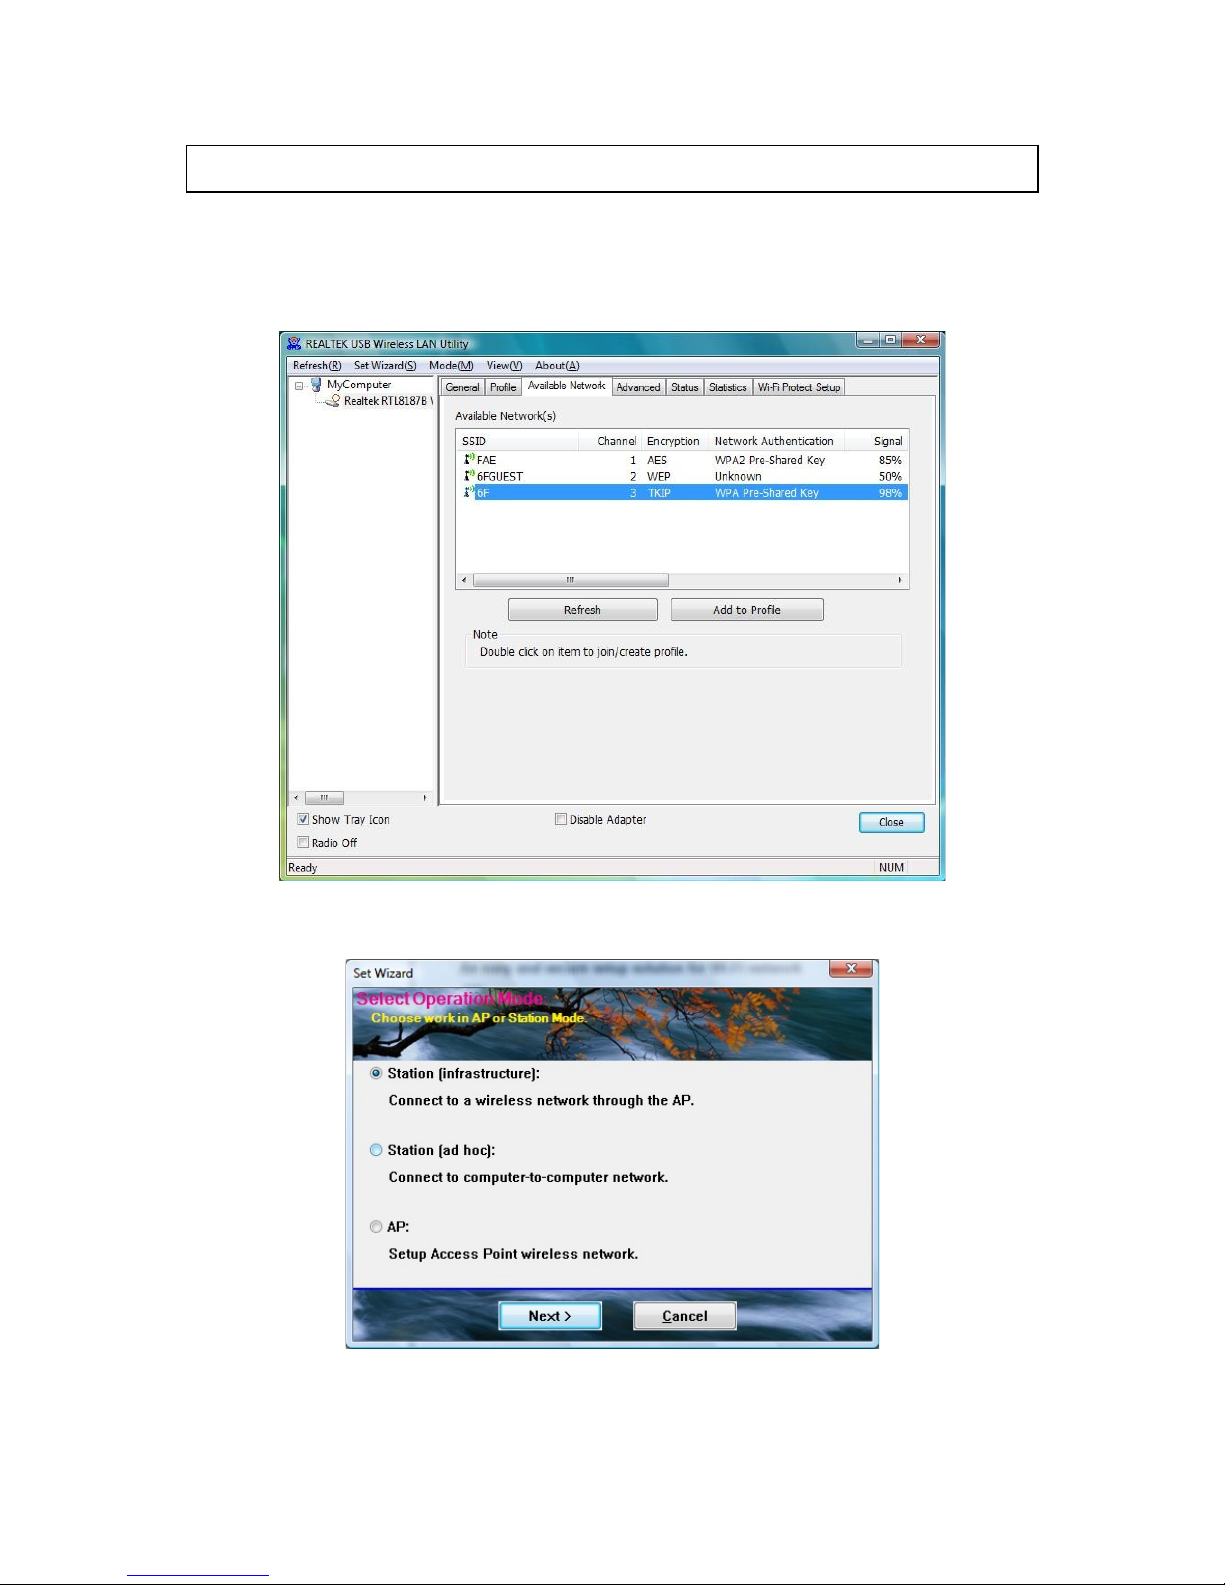
B. The utility of the adapter is displayed. Click “Available Net ork” and double-click on the ireless
access point you ant to connect to.
C. Input the security setting if the Access Point has enabled the security and click “OK” to start
net ork connection.
6
* Use indows Zero Configuration on indows Vista:
For Windo s Vista user, you can use Windo s Zero Configuration to connect to ireless access point.
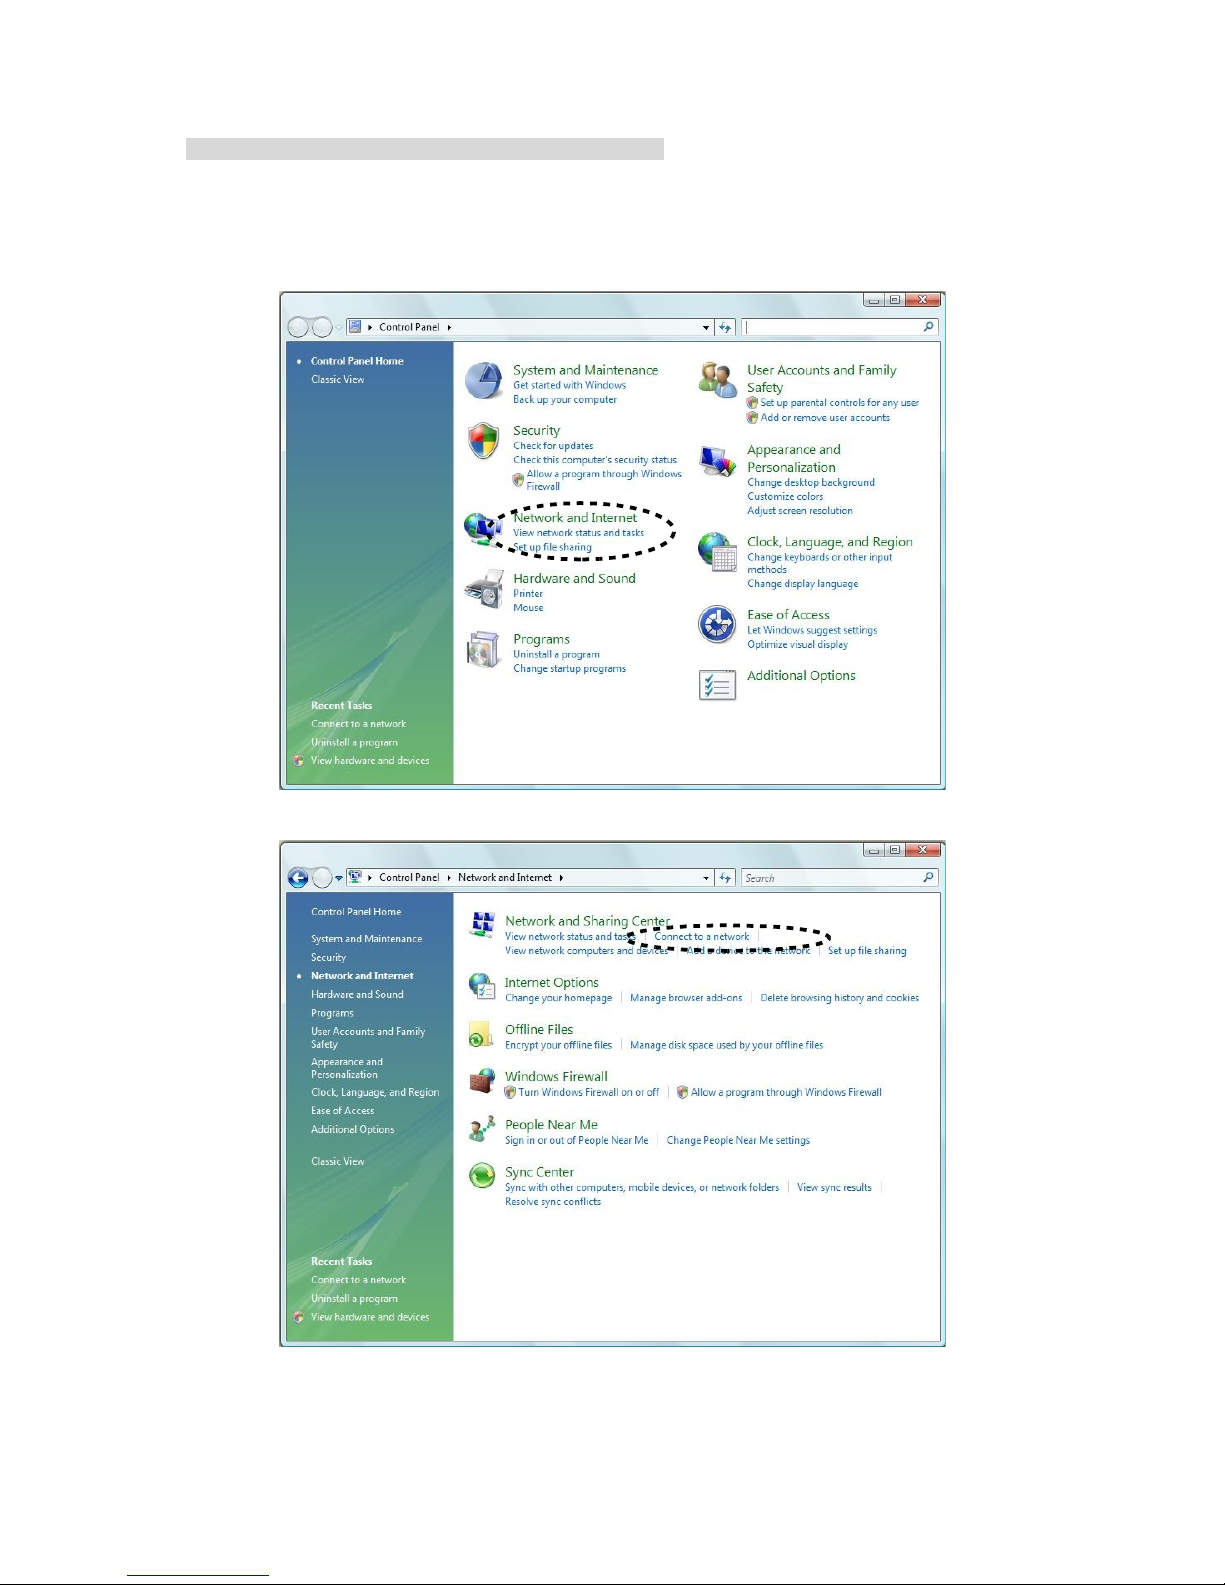
A. Click ‘Start’ button, then click ‘Control Panel. Click ‘Net ork and Internet’ in Control Panel.
B. Click ‘Connect to a net ork’ under ‘Net ork and Sharing Center’.
7

C. Click the access point you ant to use if it’s sho n, then click ‘Connect’.
D. If it’s an unnamed access point (i.e. the SSID of this ireless access point is hidden), you’ll be
prompted input it’s name, and the name must be identical to the SSID setting of the ireless
access point you’re connecting to. Click ‘Next’.
8

E. If the access point is protected by encryption method, you have to input its security or passphrase
here. It must match the encryption setting on the access point. Click ‘Connect’.
F. If you can see this image, the connection bet een your computer and ireless access point is
successfully established. Click ‘Close’ to start net ork connection.
9
3 Setup izard
The utility supports a quick setup izard for you to connect to the ireless net ork simply. Please
follo the step belo to run the setup izard.
A. From the menu in the utility, select “Set Wizard”.
B. Select “Station (Infrastructure)” if you ant to connect to the ireless net ork through access point
or select “Station (ad hoc)” to connect to a peer-to-peer net ork. Click “Next”.
10
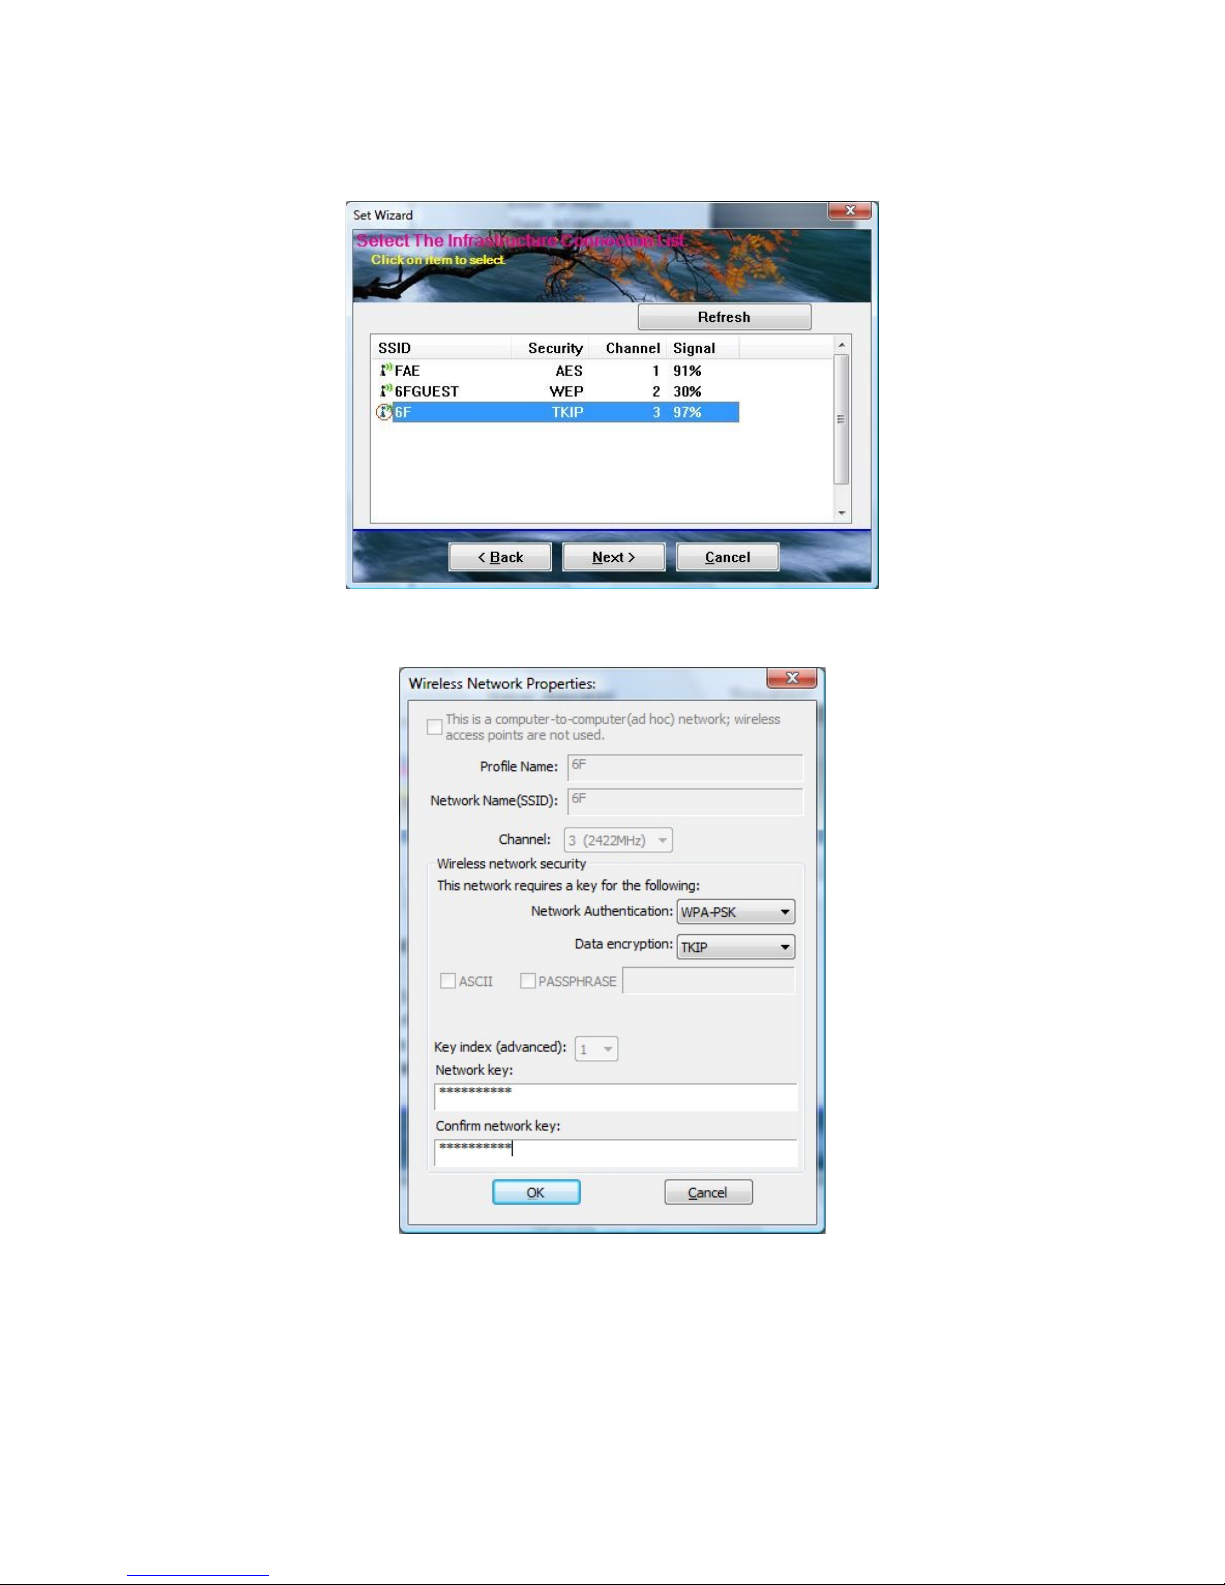
C. The site survey results ill sho up. Please select the one you’d like to connect to and click the
“Next” button.
D. In the Wireless net ork properties dialog, please fill in the security settings for this ireless net ork
you’d like to connect to and click “OK”.
11
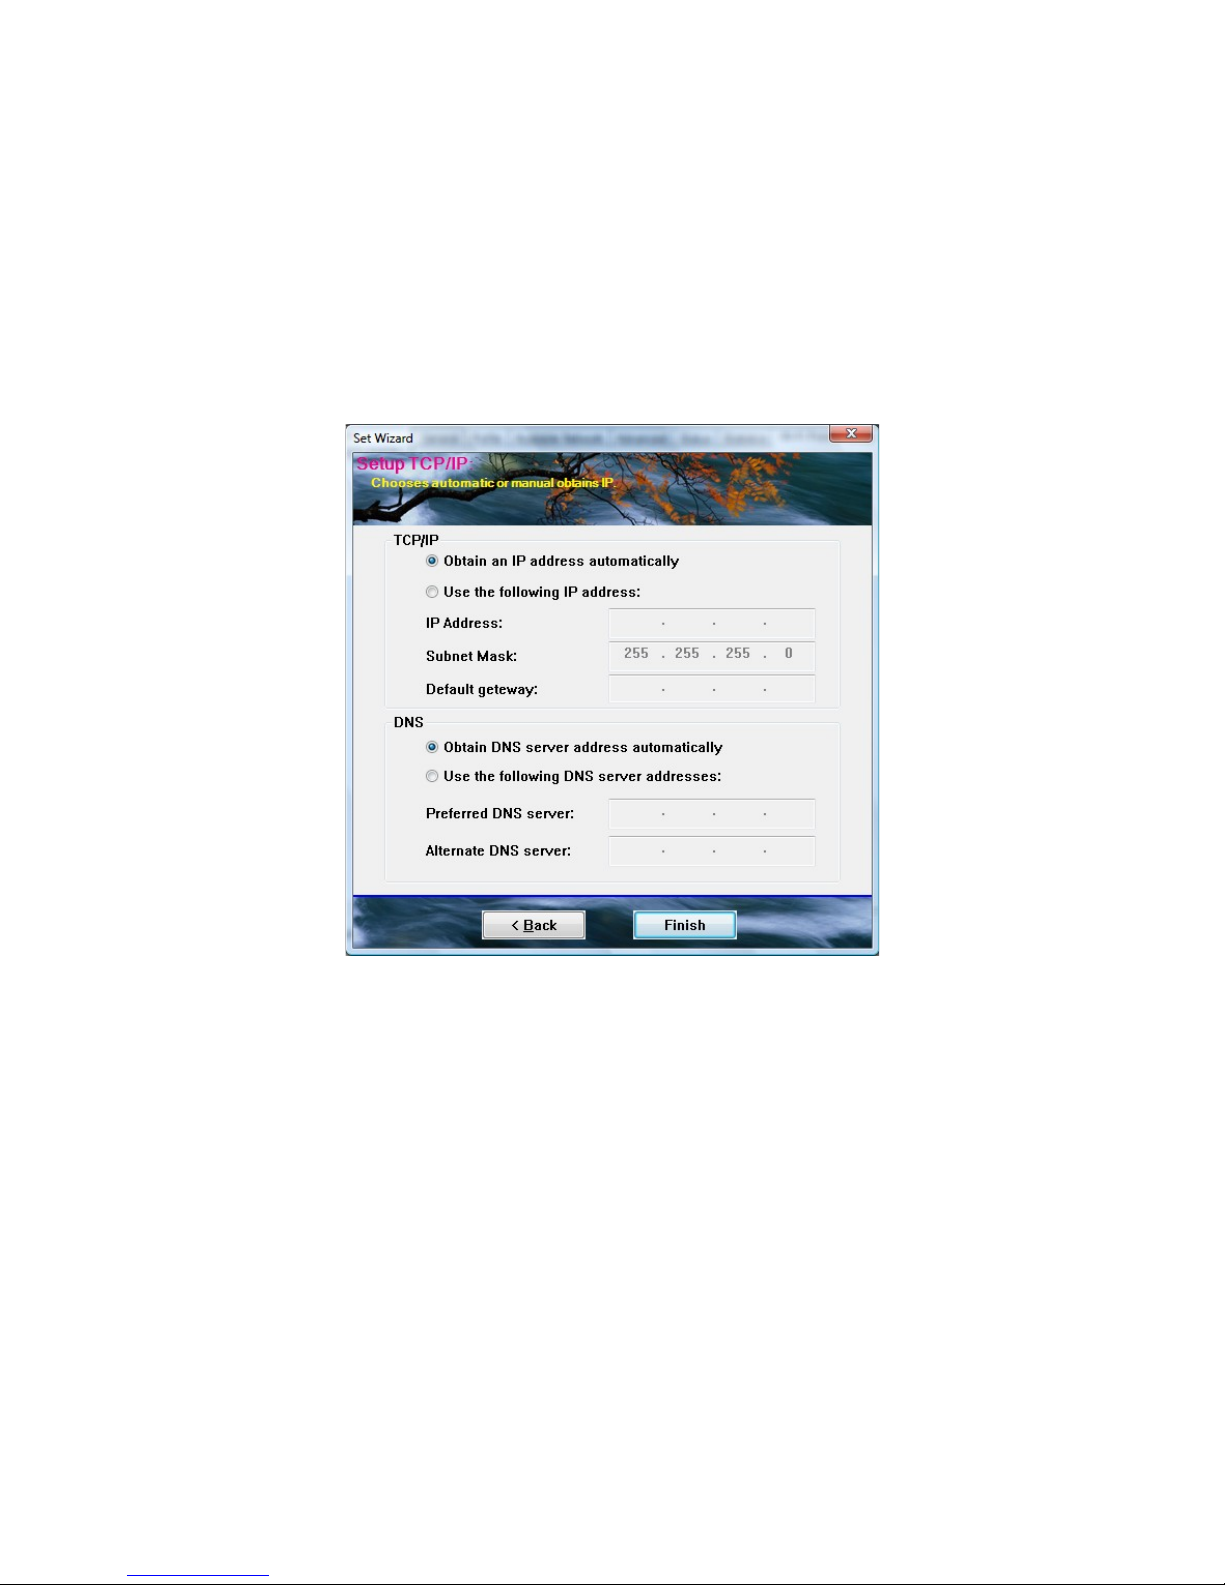
E. Please specify the IP settings for this ireless net ork or select to obtain the IP Address from the
ireless access point directly. It is recommended to select “Obtain an IP address automatically” and
“Obtain DNS server address automatically”. Please be sure that the IP Address of the adapter is in
the same net ork segment ith the ireless access point and click the “Finish” button.
For example: Assume that the ireless access point’s IP Address is 192.168.2.1 and the subnet
mask is 255.255.255.0. Your computer can be configured to obtain IP Address automatically through
the DHCP Server of the access point or a fixed IP Address in order to be in the same subnet as the
router. The available IP Address for your computer ill be 192.168.2.2 to 192.168.2.254 and the
subnet mask is 255.255.255.0.
12
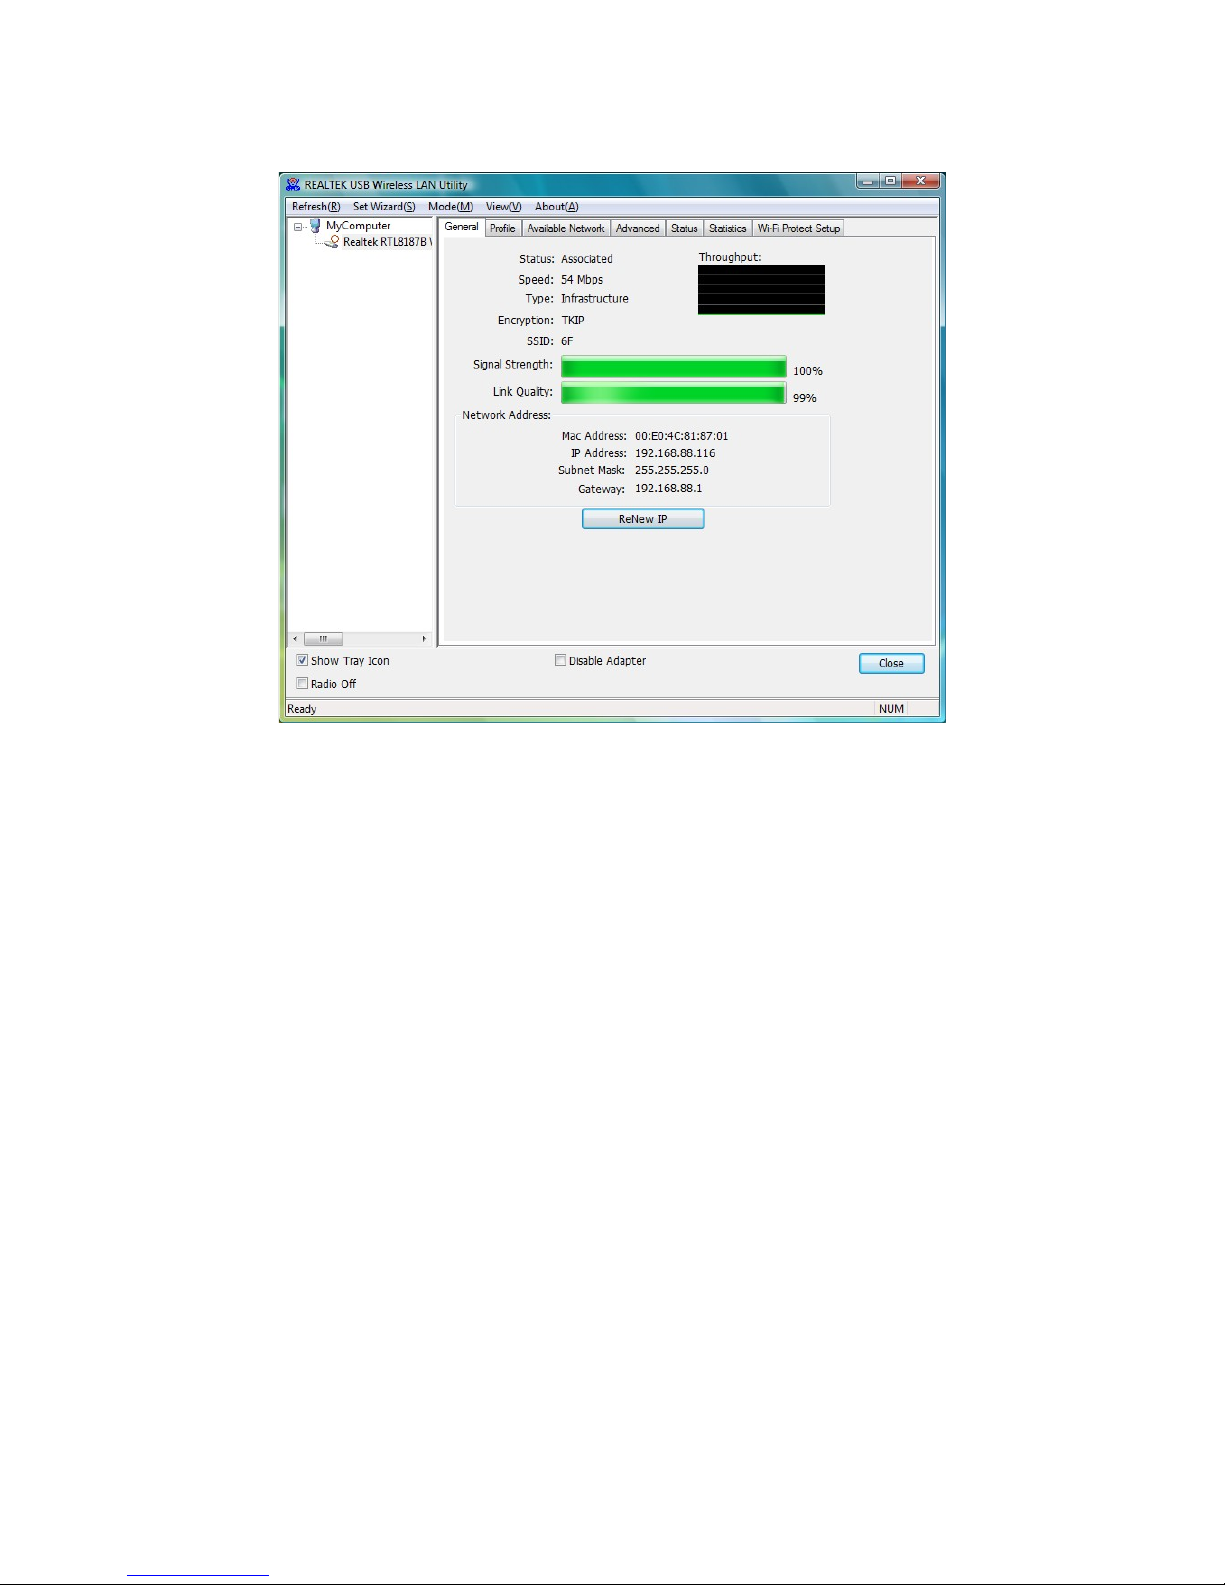
F. No you can connect to the ireless net ork successfully.
13

4 Configuration Utility
The Configuration Utility is a po erful application that helps you configure the Wireless LAN USB
Adapter and monitor the link status and the statistics during the communication process.
The Configuration Utility appears as an icon on the system tray and desktop of Windo s. You can
open it by double-click on the icon.
In the Desktop In the System Tray
Right click the icon in the system tray there are some items for you to operate the configuration utility.
Open Config Utility
Select “Open Config Utility” to open the configuration utility.
Setup Wizard
Select “SetupWizard” to open the setup izard.
About
Select “About” to sho the utility information.
Hide
Select “Hide” to hide the utility in the system tray.
Quit
Select “Quit” to close the utility.
14
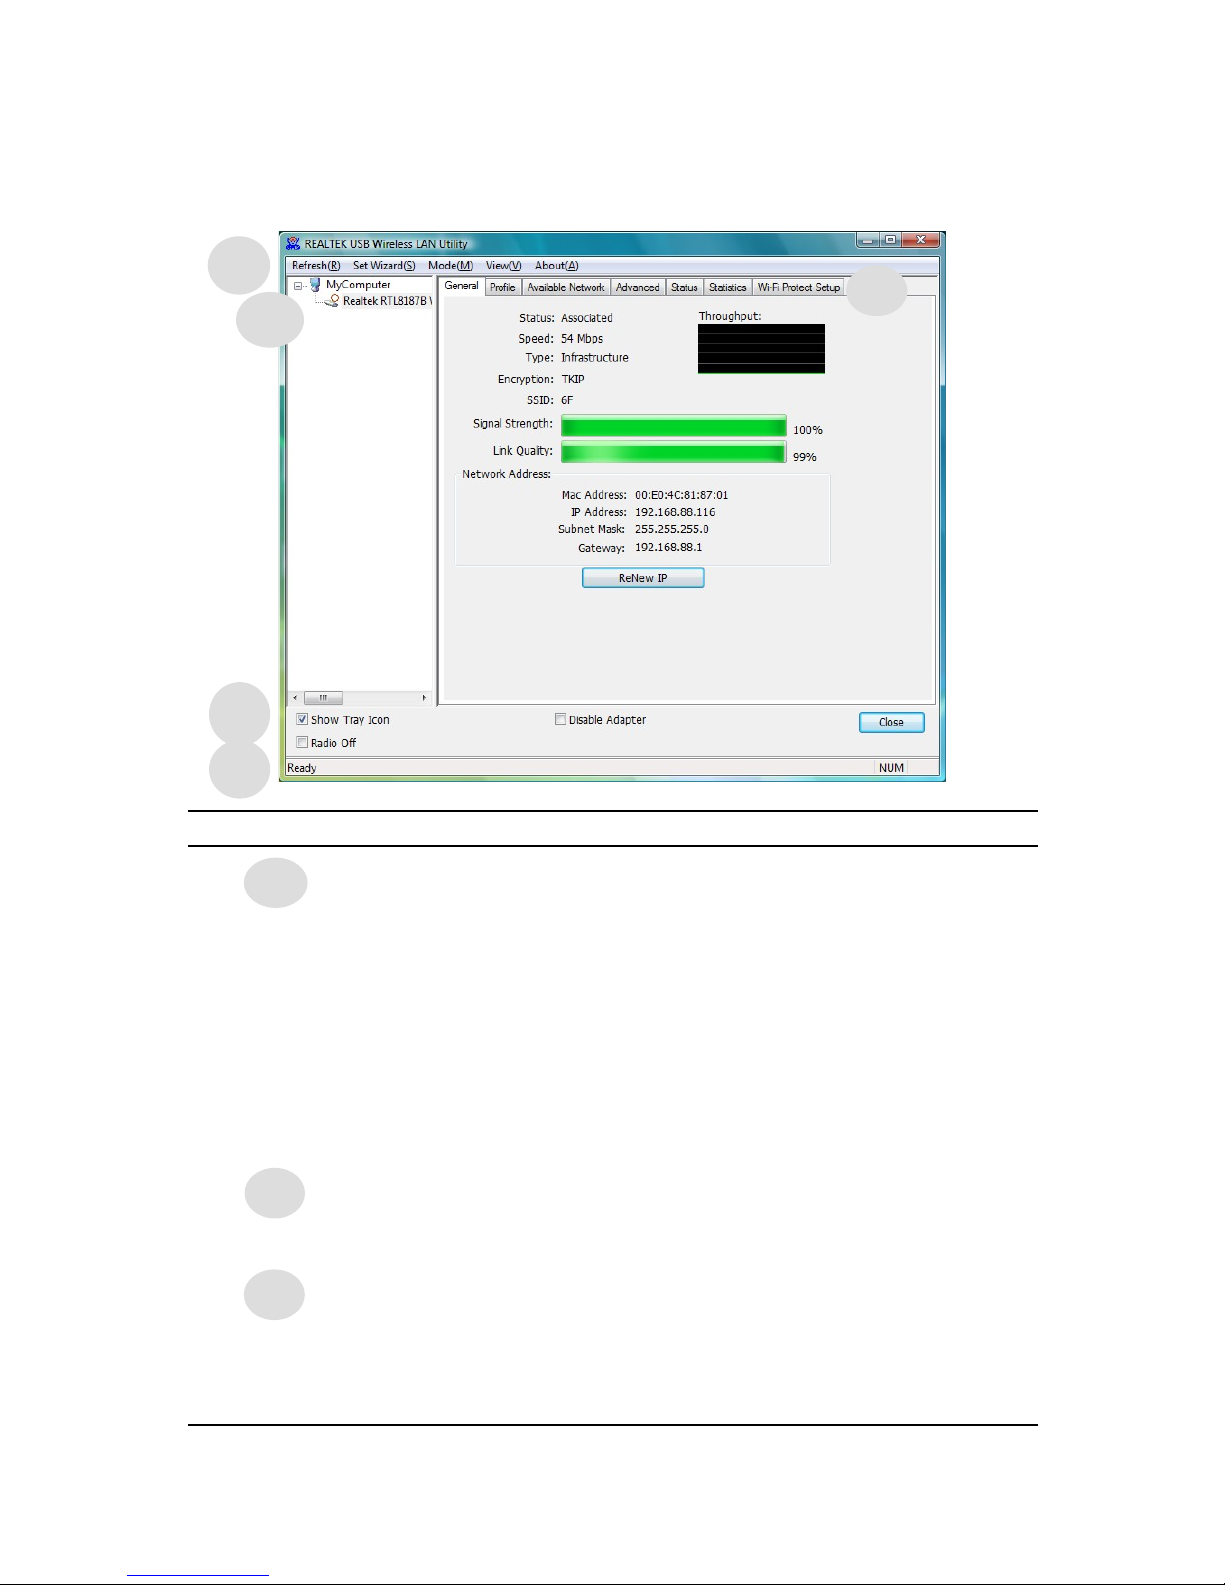
3.1 Utility Overview
There are several parts in the utility screen. Please refer to the follo ing table for the description.
Parameter Description
Refresh – Refresh adapter list in the “B“ block.
SetWizard – Open the setup izard for quick start the ireless
connection.
Mode – There are t o modes: Station and Access Point. If
“Station“ is selected, the adapter orks as a ireless adapter. If
“Access Point“ is selected, the adapter ill orks as a ireless
AP.
View – Enable “Status Bar“ and the “D“ block in the utility ill
display the current status of the utility.
About – To check the version of the utility, select this item.
This is a list for you to configure several adapters in your PC from
the utility.
Show Tray Icon – To sho the icon in the system tray, select the
item.
Radio Off – This function is for you to turn off or turn on the radio
of the adapter. If the radio is turned off, the adapter ill not ork.
Disable Adapter – This function is for you to disable or enable
the adapter.
15
A
B
C
D
A
B
C
E

Parameter Description
It is the status bar that displays the current status of the utility. To
close it, please disable the “Status Bar“ in the “Vie “ item.
There are several tabs in the block for you to setup the function of
the adapter. Please refer to the description in the follo ing
sections.
16
D
E
Table of contents
Other Emtec Adapter manuals


