EMUGE FRANKEN DEU-00/1 User manual

DEU –00/1
DEU –00
DEU –10/1
DEU –10
DEU –20/1
DEU –20
Torque wrench DEU
Operating instruction

Torque wrench DEU
2 Operating instruction edition: 01.04.2018
Contents:
1Determined use................................................................................4
1.1 Safety instructions........................................................................................ 5
1.2 Proprietary rights.......................................................................................... 6
2Technical Data.................................................................................7
2.1 Scope of delivery.......................................................................................... 9
3Handling.........................................................................................10
4Storage when not in use ...............................................................11

Torque Wrench DEU
Operating instruction edition: 01.04.2018 3
Warnings, symbols
In this operating instruction the following symbols are used:
Attention
Marks special instructions, rules and prohibitions which are important in order to avoid
any damage.
Please observe these instructions!
Note
Marks application instructions and other useful information.
Torque wrench DEU
4 Operating instruction edition: 01.04.2018
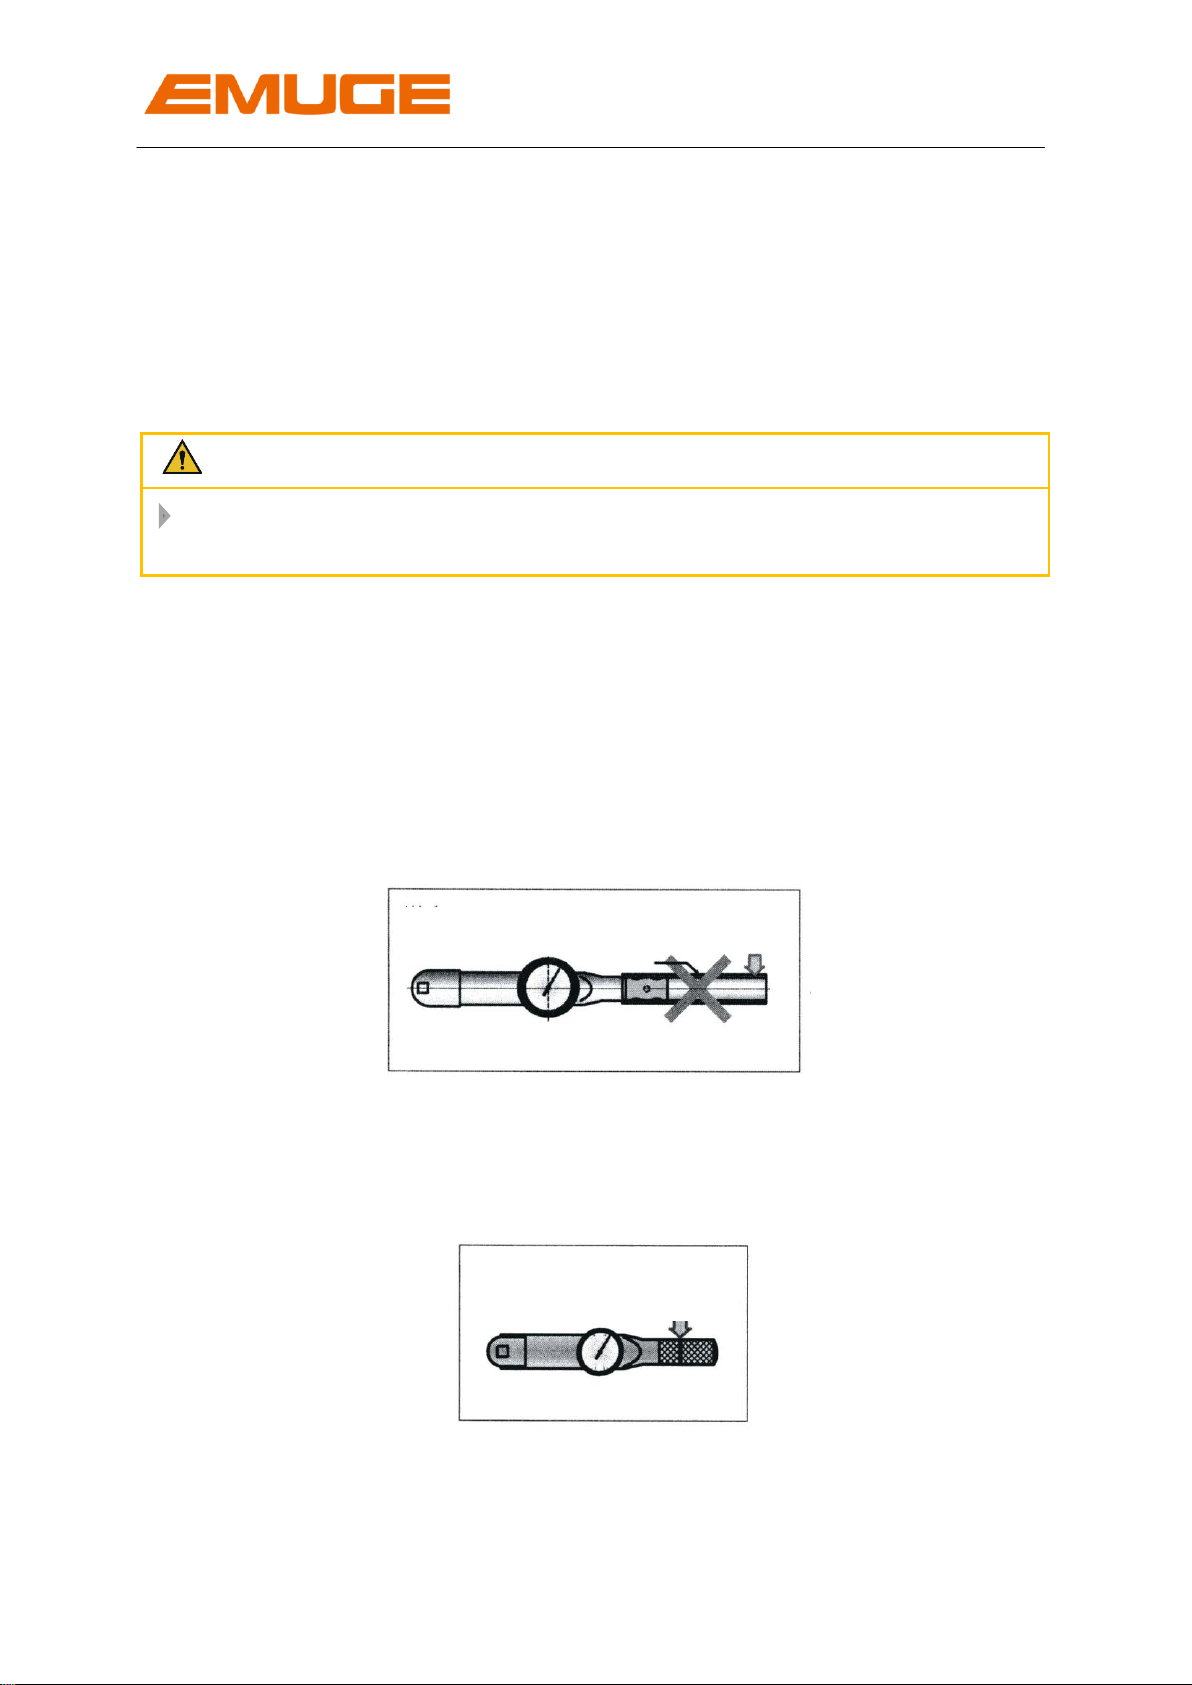
1 Determined use
Do not use the torque wrench for any other purpose than to tighten screws or
bolts.
Do not use the torque wrench beyond the maximum measuring range; measuring
range see Table 1, page 8.
Attention
Please make sure to use the appropriate wrench for the torque to be
measured.
Do not use loosen rusty and / or corroded screw fittings as the tool may be
overloaded.
Ensure the correct adapters are used, size and adaptation see Table 1, page 8.
Do not reduce the square adaptation on the torque wrench by using adapter.
Do not lengthen the handles by using additional aids e.g. plug the handle into a
pipe. This may damage the torque wrench and/or disturb the calibration.
Only activate the torque wrench at the handle. A marking at the handle shows the
position where the force appears.
Only pull and push the handle smoothly, never jerkily.
The non-determined use exempts the manufacturer from any liability!
Tube
Ring-marking for force
starting point

Torque Wrench DEU
Operating instruction edition: 01.04.2018 5
1.1 Safety instructions
For all works, i.e. putting into operation, production or maintenance, please observe
the details given in the operating instruction.
Attention
Make sure the handles of the torque wrench are free of oil or grease. Hands
slipping from the handle while tightening could lead to injuries.
Make sure there is enough room to work in to avoid injuries.
Check the torque wrench for cracks, scratches and rust. If those exist, have a
functional test carried out and repair if necessary.
Use the torque wrench over-head to make sure that it cannot drop and cause
injuries or damages.
Do not drop the torque wrench or use it as a hammer. Both could cause damage or
effect the calibration.
Protect the wrench against impacts and / or beats.
Do not use if any parts are missing.
Do not carry out any changes in the set-up of the torque wrench. This may cause
errors in accuracy, as well as, cause an accident or injury.
If a repair is necessary use only genuine parts.
Always keep the torque wrench clean; remove any dirt after each use.
Protect the torque wrench from moisture. Do not use the torque wrench under
water.
Do not make the torque wrench stand its grip end. It may drop and cause an injury
or damage.

Torque wrench DEU
6 Operating instruction edition: 01.04.2018
1.2 Proprietary rights
The entire contents of these operating instructions are subject to German proprietary
rights legislation.
Any form of multiplication, processing, broadcasting, passing on to third parties - also
in the form of extracts - and any kind of use outside the boundaries of proprietary
rights requires the written consent of EMUGE GmbH&Co.KG.
Torque Wrench DEU
Operating instruction edition: 01.04.2018 7
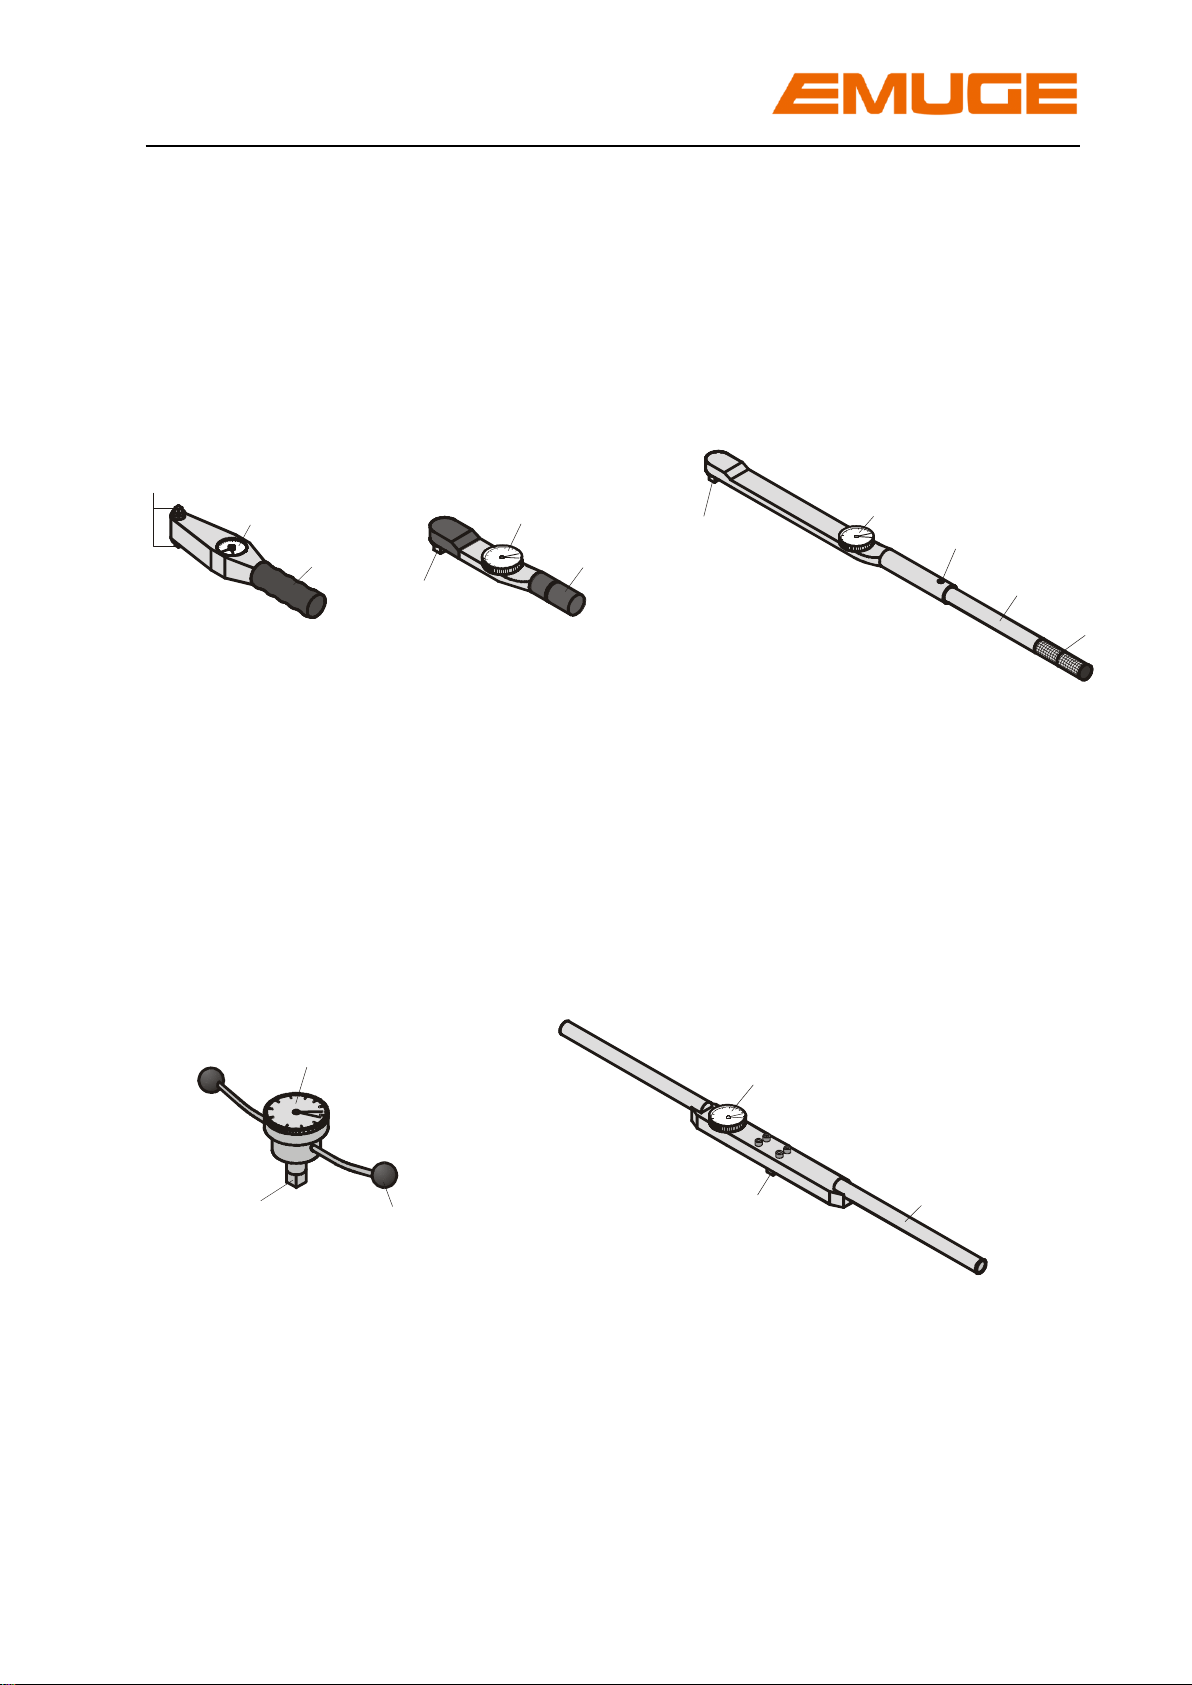
2 Technical Data
The following types of torque wrenches are available:
One-armed torque wrench (Type „A“)
A1) Measuring range:
0 –6 Nm
A2) Measuring range:
3 –25 Nm
20 –200 Nm
A3) Measuring range:
70 –700 Nm
A) Two-armed torque wrench (Type „B“)
B1) Measuring range:
3 –23 Nm
20 –180 Nm
B2) Measuring range:
70 –700 Nm
Dial gage
Handle
Square adaptation
Handle extension
Pin engaged in
the bore
Dialgage
Handle
Squareadaptation
Dialgage
Handle
Squareadaptation
Dialgage
Handle
Squareadaptation
Dial gage
Square adaptation Handle
Torque wrench DEU
8 Operating instruction edition: 01.04.2018
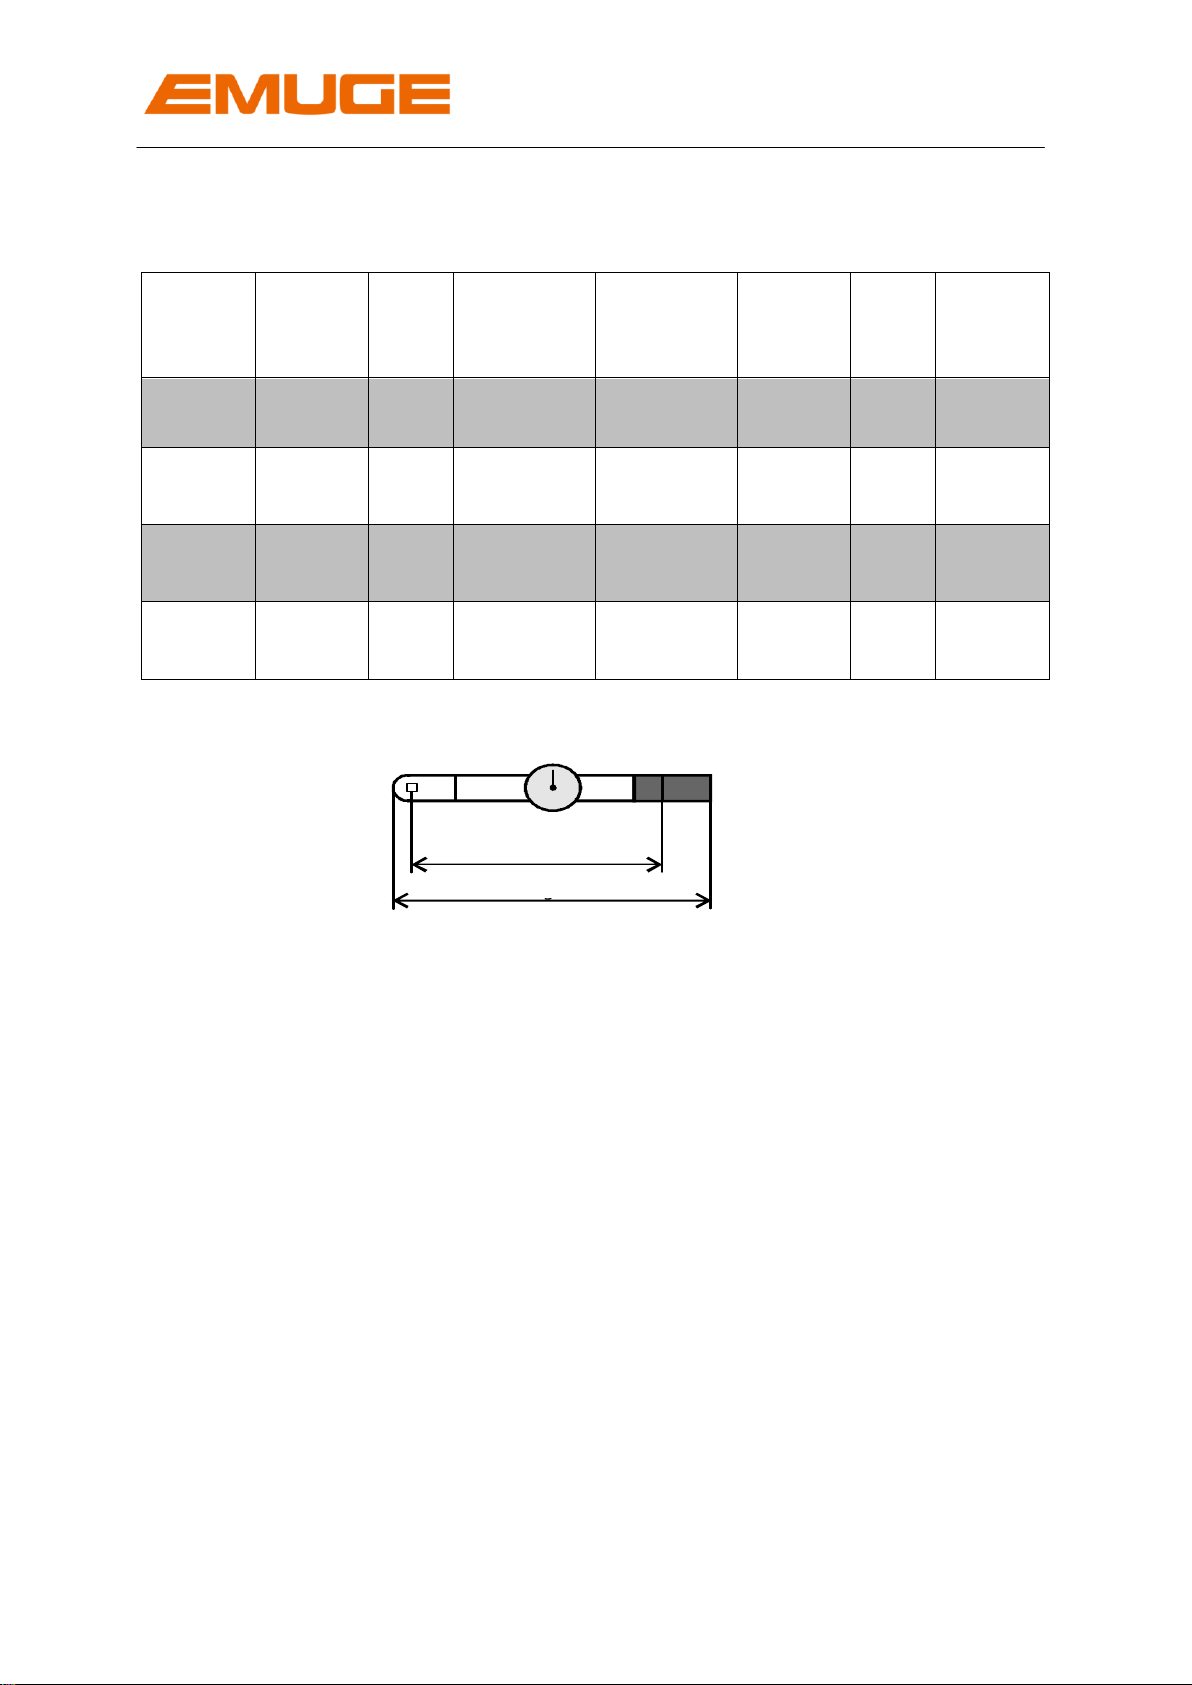
Table 1: Technical data of the torque wrenches
Type
For adapter
size
Model
Torque range
[Nm]
Measuring
range
Effective
length
[mm]
Overall
length
[mm]
Square
adaptation
[inch]
DEU-00/1
00
A
0 - 6
M2 –M6
(No.2 –12)
220
260
1/4
DEU-00/1
DEU-00
00/01(03)
A
B
3 - 25
3 - 23
M6 –M12
(No.10 –7/16)
200
180
245
205
3/8
DEU-10/1
DEU-10
03/04
A
B
20 - 200
20 -180
M12 –M27
(7/16 –1“)
410
620
500
656
1/2
DEU-20/1
DEU-20
04/05
A
B
70 - 700
M24 –M52
(7/8–1 ¾)
1150
1260
1300
3/4
Effektive Länge
Gesamtlänge
Effective length
Overall length
Torque Wrench DEU
Operating instruction edition: 01.04.2018 9
2.1 Scope of delivery
The torque wrenches are equipped with a main pointer and a drag pointer. During
measuring the drag pointer follows the main pointer and stops at the maximum
torque.
Attention
All torque wrenches, except type A1 with torque range 0 –6 Nm, can be used in
both turning directions.
The delivery contains an intermediate piece, suitable for the square adaptation of the
torque wrench and for the square bolts for the appropriate adapter size.
For further data regarding the square bolts and further tools required for the
adjustment of the overload clutch at EM-U and EM-UL adapters please refer to the
appropriate operating instruction, furthermore data for adjustment.
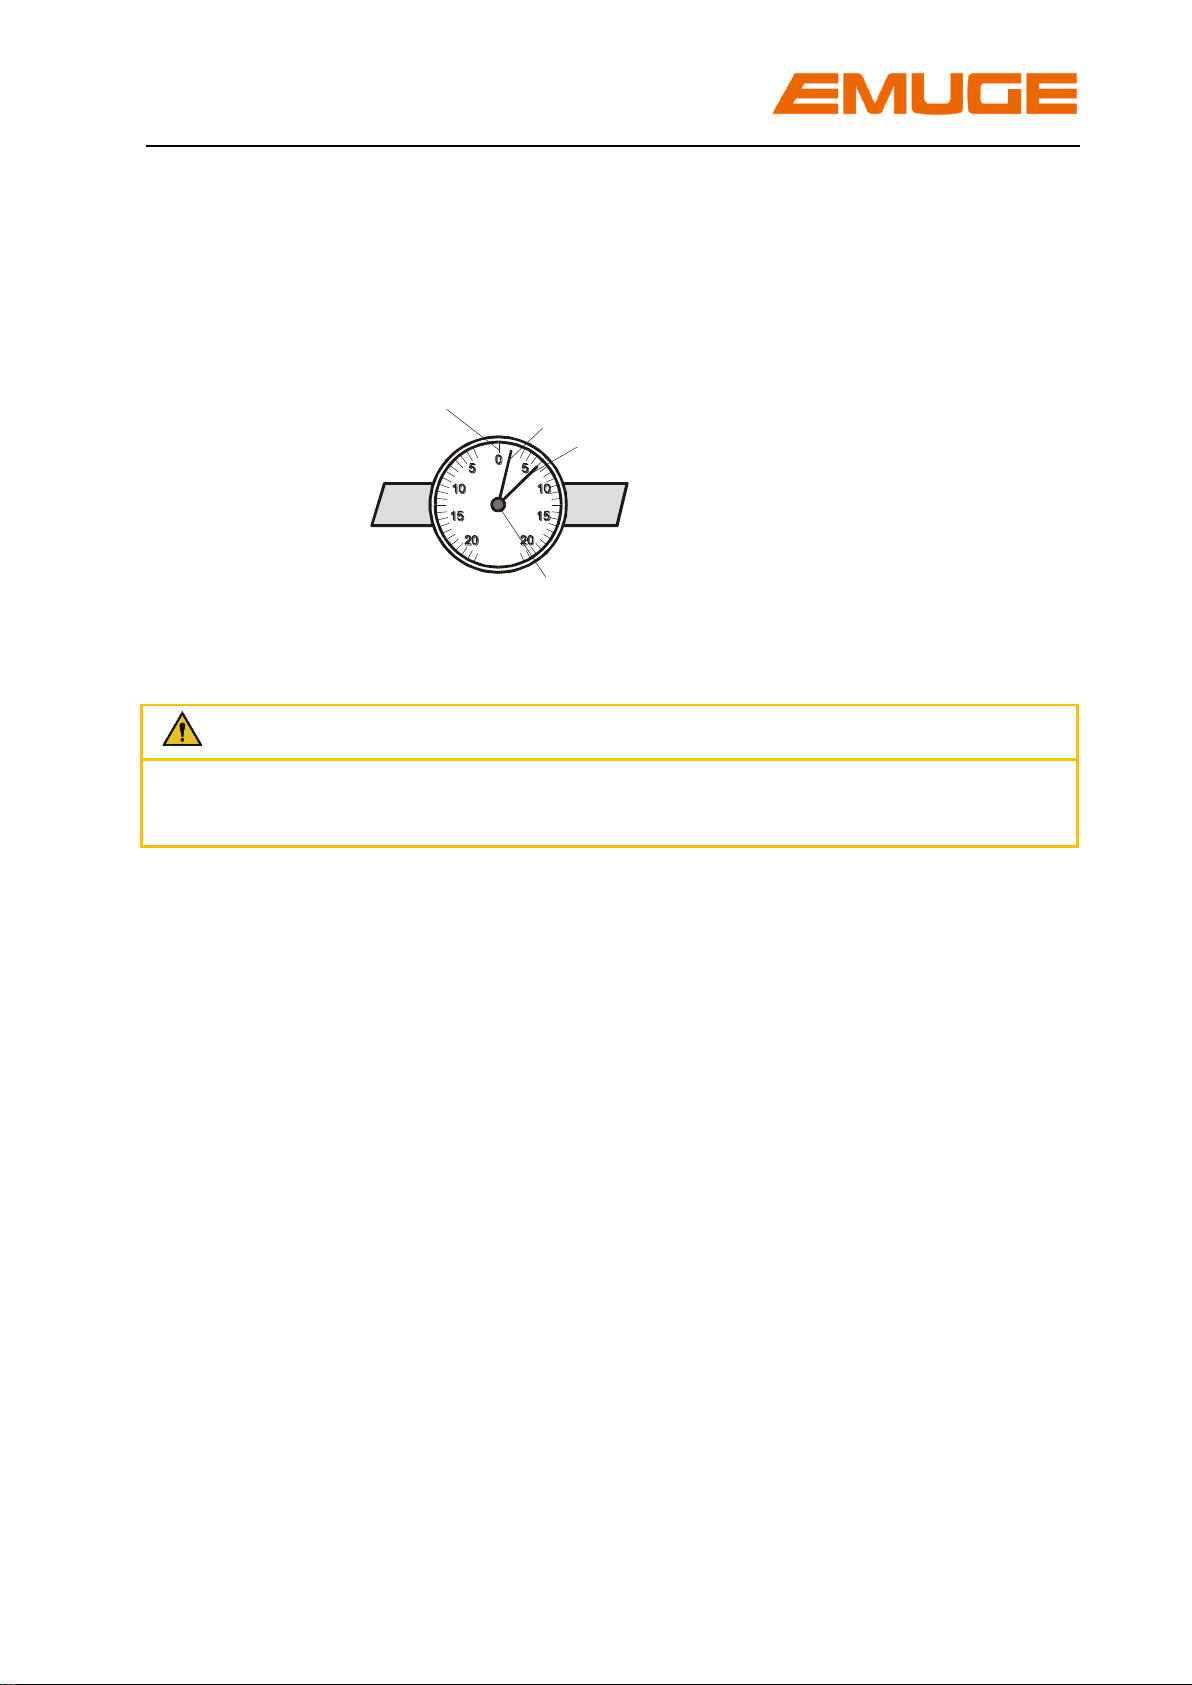
"0"-Position Main pointer
Drag pointer
Adjustment screw for drag pointer
Torque wrench DEU
10 Operating instruction edition: 01.04.2018
correct wrong
correct wrongwrong
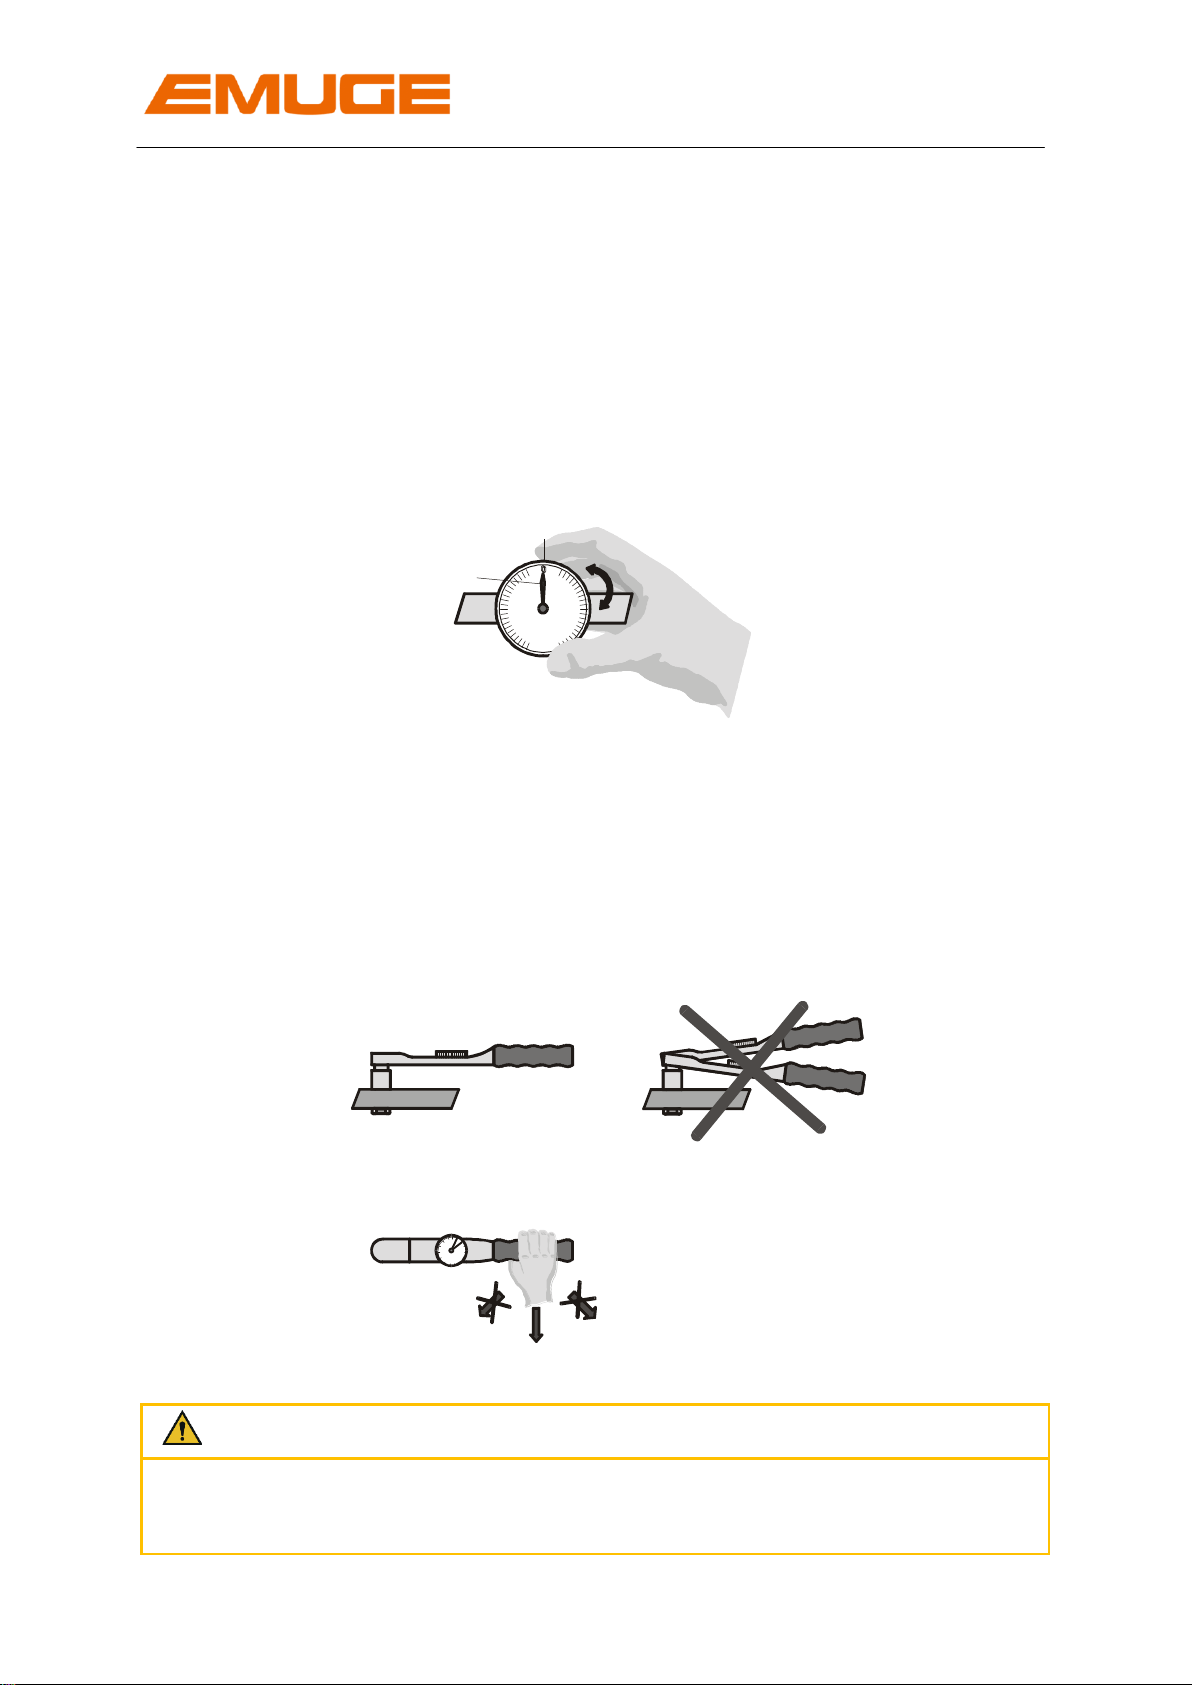
3 Handling
Type A3 with torque range 70-700 Nm:
- First push the handle extension in the holding pipe of the torque wrench. Make
sure the pin of the handle extension engages in the bore of the torque wrench.
All types:
- Adjust main pointer to „0“ by twisting the scale at the housing until the main
pointer is flush with the „0“-position of the scale.
- Adjust drag pointer to „0“ against the measuring direction.
- Put the according intermediate piece and/or socket wrench onto the square
adaptation of the torque wrench.
- Put the torque wrench with the intermediate piece on the square pin.
Measure the torque. The starting tightening power must be introduced at the
marking, see picture.
Attention
The load direction must be in right angle against the torque wrench, in horizontal
and vertical direction (tolerance ±15°)
"0"-Position
Main pointer

Torque Wrench DEU
Operating instruction edition: 01.04.2018 11
Attention
Make sure there is enough clearance for your hand and elbow using to prevent
injury.
Note
The measurement may also be executed by first adjusting the main pointer to the
required torque (by twisting of the scale). If the main pointer is flush with the “0”-
position during measurement, then the required torque is adjusted.
4 Storage when not in use
If the torque wrench is taken out of service for a longer period, please go through the
following steps:
1. Unload the torque wrench
2. Clean the torque wrench, ie with a duster from any dirt just like dust, chips, oil,
coolant
Note
Do not use any aggressive solvents.
Do not use any fibrous materials, i.e. steel wool.
3. Spray the torque wrench with a protection oil
4. Store the torque wrench at a dry place

EMUGE Torque wrench DEU
Operating instruction
Article number: ZB10035.GB 10385923
Original in German, Edition: 4, last change: 01.09.2017, change stage: 3
Please keep this for future use!
EMUGE-Werk Richard Glimpel GmbH & Co. KG
Fabrik für Präzisionswerkzeuge
Nürnberger Straße 96-100
91207 Lauf
GERMANY
+49 9123 186-0
+49 9123 186-230
info@emuge-franken.com www.emuge-franken.com
This manual suits for next models
5
Table of contents
Popular Power Tools manuals by other brands


BLACK DECKER
BLACK DECKER ALLIGATOR LLP120 instruction manual

BLACK DECKER
BLACK DECKER KFBES410 manual

EGAmaster
EGAmaster 56095 operating instructions

CustomCrimp
CustomCrimp CC60 Operator's manual

Thomas&Betts
Thomas&Betts BCT840 INSTALLATION AND GAUGING PROCEDURE

Far Tools
Far Tools DPC 35C Original manual


