ENAiKOON locate-15 Technical Document

Page 1
ENAiKOON tree-guard
Equipment Operation
1Contents
1Contents ............................................................................................................................. 1
2A word in advance.............................................................................................................. 4
2.1 General terms and conditions of business. ................................................................. 4
2.2 Trademarks.................................................................................................................. 5
2.3 Notes on this handbook .............................................................................................. 5
3Safety advice ...................................................................................................................... 6
4General hardware information .......................................................................................... 7
4.1 SIM card....................................................................................................................... 7
4.2 Battery ......................................................................................................................... 7
4.3 Movement of devices from one tree trunk to another............................................... 7
5Suitable ENAiKOON devices for tracking trees .................................................................. 8
5.1 ENAiKOON locate-15 ................................................................................................... 8
5.1.1 Installation inside the tree ................................................................................... 8
5.1.2 Uninstalling the device......................................................................................... 9
5.2 ENAiKOON locate-18 ................................................................................................... 9
5.2.1 Installation inside the tree ................................................................................. 10
5.2.2 Uninstalling the device....................................................................................... 10
6ENAiKOON inViu web portal ............................................................................................ 11
6.1 Assignment of the tracking devices to your inViu web account ............................... 11
6.2 Detection of timber theft .......................................................................................... 12
6.2.1 Motion sensor .................................................................................................... 12
6.2.2 Geofence ............................................................................................................ 12

Page 2
6.3 Login........................................................................................................................... 13
6.4 Main inViu web features ........................................................................................... 13
6.5 inViu web settings...................................................................................................... 14
6.5.1 Menu option ‘general’........................................................................................ 14
6.5.1.1 Language.................................................................................................................... 14
6.5.1.2 Colour theme............................................................................................................. 14
6.5.1.3 Sub account handling ................................................................................................ 14
6.5.1.4 Default settings ......................................................................................................... 15
6.5.1.5 Remove inViu web account....................................................................................... 15
6.5.2 Menu option ‘measures‘ .................................................................................... 15
6.5.3 Menu option ‘portlets‘ ....................................................................................... 15
6.6 Configuration of devices in inViu web ....................................................................... 15
6.6.1 Registration of ENAiKOON devices in the portal................................................ 15
6.6.2 Naming the trackable ......................................................................................... 15
6.6.3 Display options ................................................................................................... 16
6.6.3.1 Icons........................................................................................................................... 16
6.6.3.2 Actions....................................................................................................................... 16
6.6.4 Display of the position in the map ..................................................................... 17
6.6.5 Configuration of the location modules .............................................................. 18
6.6.5.1 general....................................................................................................................... 18
6.6.5.2 position logging ......................................................................................................... 19
6.6.5.3 misc............................................................................................................................ 20
6.7 Display of the pushpin on the map in inViu web....................................................... 20
6.7.1 Display information ............................................................................................ 21
6.7.2 Actions................................................................................................................ 21
6.8 Setting up geofences ................................................................................................. 23
6.8.1 Creation of geofences ........................................................................................ 23
6.8.2 Managing geofences .......................................................................................... 24
6.8.3 Assigning trackables to geofences ..................................................................... 25
6.8.4 Edit geofences .................................................................................................... 25
7Smartphone app inViu routes .......................................................................................... 26

Page 3
7.1 Download................................................................................................................... 26
7.2 The app inViu route provides this information ......................................................... 28
7.2.1 Individual design................................................................................................. 28
7.2.2 Information directly on the map........................................................................ 28

Page 4
2A word in advance
Thank you very much for deciding on the ENAiKOON locate-15 or ENAiKOON locate-18
for the location of tree trunks!
These GSM/GPS location modules are easy to localise via the web application inViu web
irrespective of which trackables are equipped with them.
Trackables can be any kind of mobile objects: tree trunks, vehicles, trucks, construction
machinery, packages, people or animals.
These devices enable you to determine the exact position of the trackable equipped at
any time. Data like speed, the time of the last position message, direction of movement,
battery status and the self-defined name of the device are transmitted at the same
time.
The built-in acceleration sensor turns the devices into personal guards for theft monitor-
ing.
We wish you plenty of fun and success when using the devices!
All the information in this documentation was compiled after careful examination, but is
not to be regarded as assurance of the product properties.
ENAiKOON is liable solely to the extent specified in the terms of sale and delivery.
Forwarding and duplication of the documentation and software belonging to this prod-
uct and the use of its contents are only permitted with written permission of ENAiKOON
GmbH.
2.1 General terms and conditions of business.
The general terms and conditions of business that can be downloaded from the web-
site
https://www.enaikoon.com/fileadmin/enaikoon/Dateien/pdf/Vertraege/deutsch/ENAi
KOON_AGB.pdf apply.

Page 5
2.2 Trademarks
The ENAiKOON logo and the names ENAiKOON, inViu web , inViu pro, ENAiKOON
M2M-commserver, ENAiKOON data-forwarder, ENAiKOON time-29, ENAiKOON locate,
ENAiKOON inmarsat, ENAiKOON can-66, ENAiKOON staff-tracker, ENAiKOON messen-
ger, ENAiKOON fuel-tracker, ENAiKOON tour-checker, ENAiKOON locate-15, ENAiKOON
locate-18, inViu routes, inViu NFC-tracker are registered trademarks of ENAiKOON
GmbH.
All other names and designations used may be trademarks or registered trademarks of
their respective owners.
ENAiKOON reserves the right to change the data mentioned without notice and does
not assume any guarantee for technical inaccuracies and/or omissions.
2.3 Notes on this handbook
This documentation is addressed to users of the GSM / GPS location modules ENAi-
KOON locate-15 and ENAiKOON locate-18 for tree trunk location.
Several employees from various parts of the company cooperated in producing this
documentation in order to offer you the best possible support in using your ENAiKOON
product.
Should it nevertheless contain errors or you would simply like to submit criticism or
suggestions regarding the documentation, please send an e-mail directly to
This documentation is intended to assist in making the best use of the location mod-
ule’s wide range of functions. Please read it carefully.
Berlin, January 2016 © 2002-2016 ENAiKOON GmbH, Berlin

Page 6
3Safety advice
The device may not be disassembled. If the device is damaged, it should
be brought to a specialist company for further inspection and if neces-
sary for repair.
The device may only be operated with the batteries included in delivery
or an original ENAiKOON replacement battery. There is a risk of explo-
sion if the wrong or defective batteries are used.
The location module or batteries may not be thrown into a fire under
any circumstances or be exposed to heat above 60°C.
The battery may not be wantonly disassembled. Do not continue to use
damaged batteries under any circumstances!
Batteries should not be disposed of in household refuse. After their ser-
vice life has expired, they must be brought to the corresponding return
point.
The location unit should not be used in the immediate vicinity of cardiac
pacemakers or other electric devices that react sensitively to electro-
magnetic radiation.
Only accessories authorised by the manufacturer should be used.
Only spare parts authorised by the manufacturer should be used.
The device must be switched off in environments where mobile phone
operation (e.g. aircraft) is forbidden.
The device should not be placed within the reach of babies and infants.

Page 7
4General hardware information
4.1 SIM card
The data-optimised SIM card has already been installed in the devices and is function-
al. Consequently, there is no need to open the housing. We therefore recommend
keeping the housing closed.
If it should nevertheless be opened, there is a risk of damaging the internal electronics
and wiring and of the device no longer being waterproof.
The guarantee claims lapse in the event of the housing not being opened professional-
ly by ENAiKOON.
4.2 Battery
The device comes from ENAiKOON fully equipped and configured according to your
needs. There are different types of primary batteries available:
Medium endurance, low price, relatively high self-discharge rate
not suitable for more than 1-2 years of operation without replacing the battery
Very long endurance, expensive, very low discharge rate
can operate the device for up to 10 years without replacing the battery
Rechargeable batteries are not recommended because, due to their high self-discharge
rate, they cannot provide the long-time endurance which is required for this use case.
4.3 Movement of devices from one tree trunk to another
You can move the device at any time from one tree to another: just remove the device
from one tree and insert it into another tree.
We recommend updating the trackable name in inViu web at the same time for your
records (see chapter Fehler! Verweisquelle konnte nicht gefunden werden. below).
Page 8
5Suitable ENAiKOON devices for tracking trees
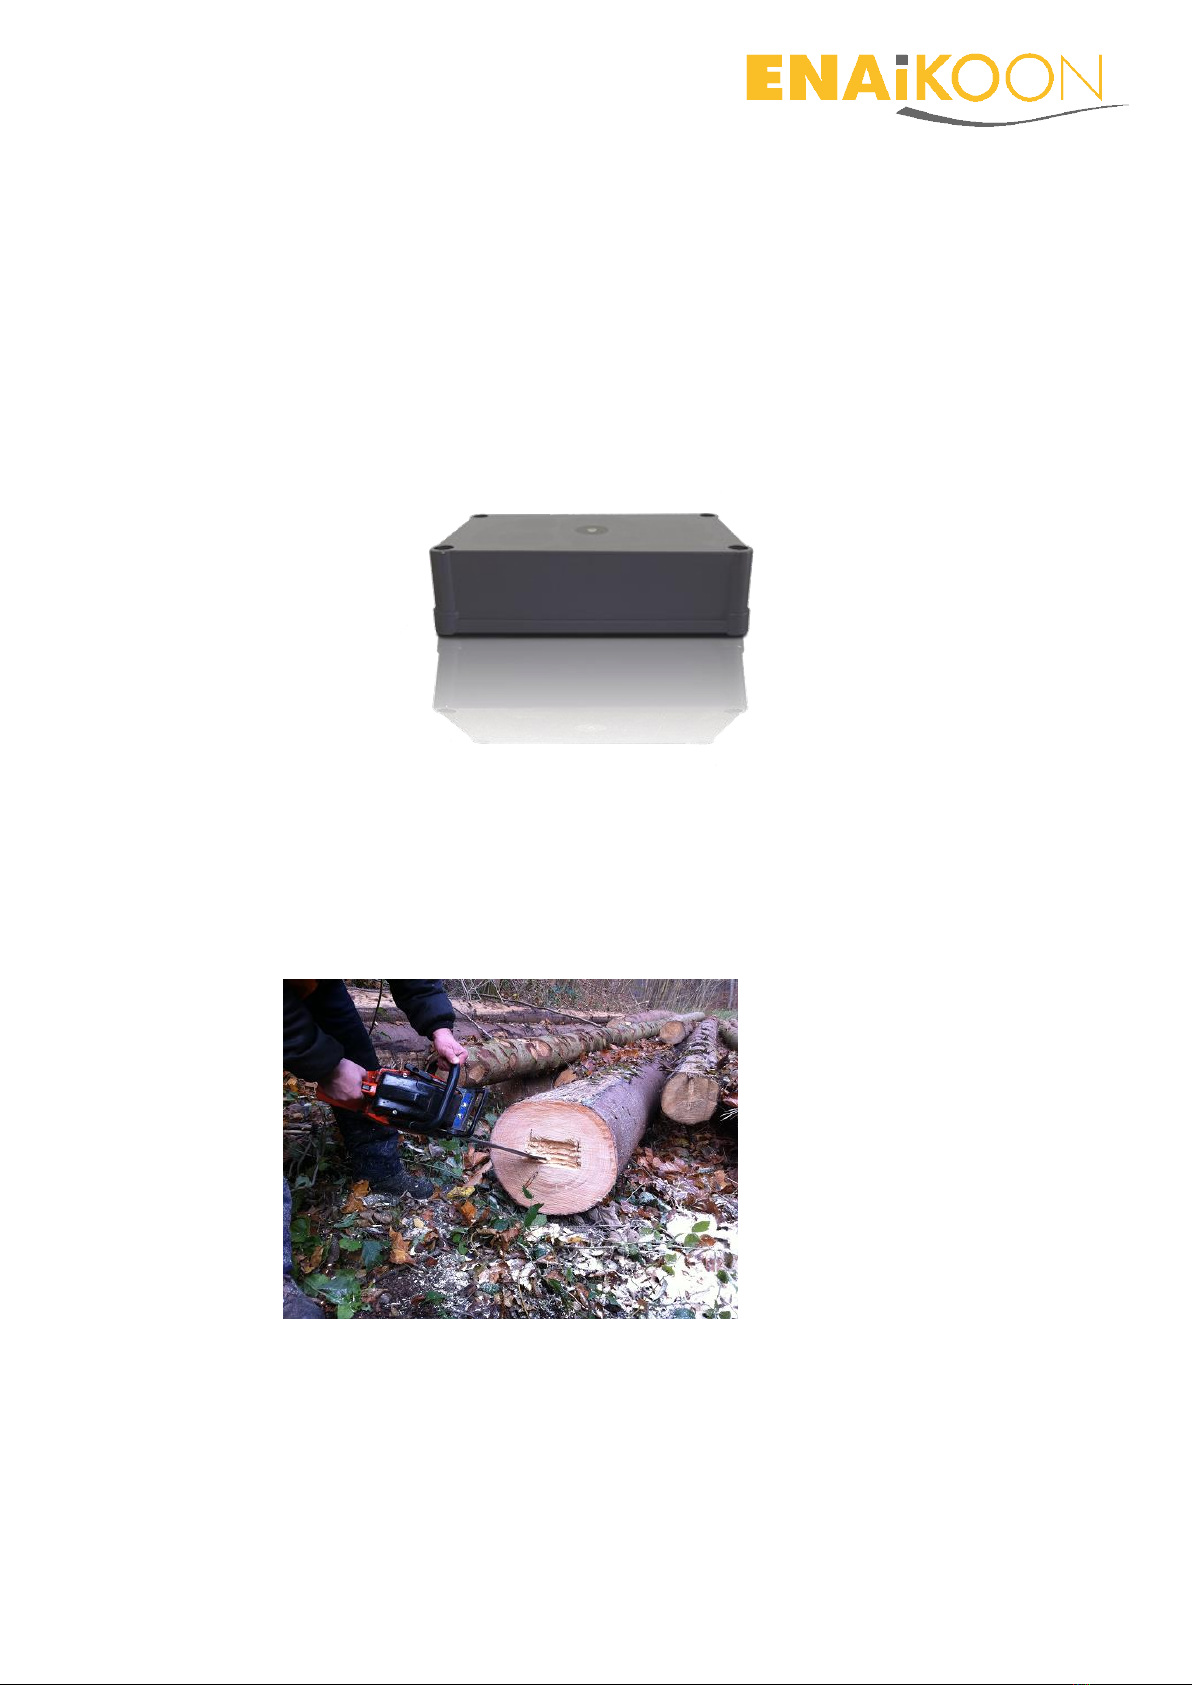
5.1 ENAiKOON locate-15
Most ENAiKOON clients who want to equip cut trees with a GPS tracking device
decide to use ENAiKOON locate-15.
The main reason is that it is much easier to cut a hole with a chain saw for ENAiKOON
locate-15 than drilling a 30mm hole for ENAiKOON locate-18.
5.1.1 Installation inside the tree
1) Cut a small cover slice off the tree (approx. 10 mm thick; if it is thicker then GPS
reception might be limited or prevented)
2) Cut a hole for the device with the chain saw as follows:
3) Insert the device into the hole with the top of the housing pointing to the out-
side of the tree (axial)

Page 9
4) Put the previously cut slice onto the end of the tree to cover the device
5) Use some dirt to cover the freshly cut areas of the tree
6) Make sure that the sawdust is not showing potential thieves where the device
was installed
5.1.2 Uninstalling the device
Just remove the cover slice from the tree and remove the device.
Nothing else is required.
We recommend cutting the piece of the tree, which has the space for locate-15 in-
side, from the tree trunk and dumping it somewhere where it cannot be found or
burning it.
This ensures that unauthorized people will not notice that you are using tracking
devices inside trees.
5.2 ENAiKOON locate-18
In rare cases, customers prefer the
ENAiKOON locate-15 technology in-
side a tube-like housing.
This version of the device is called
ENAiKOON locate-18.
The different housing is the ONLY
difference between ENAiKOON locate-
15 and ENAiKOON locate-18.
Battery, technology, endurance etc. is
exactly the same.

Page 10
5.2.1 Installation inside the tree
Preparation:
1) Prepare a piece of wood with a diameter of 30mm and a length of 10-30 mm.
2) Drill one 30mm hole into the tree as follows:
3) Insert the ENAiKOON locate-18 device into the hole. The side with the sticker
must point to the outside of the tree (axial), because this is where the GPS re-
ceiver is mounted.
4) Insert the 30mm diameter piece of wood into the hole to close and hide it.
5) Use some dirt to cover the freshly drilled / covered area of the tree
6) Make sure that the sawdust is not showing potential thieves where the device
was installed
5.2.2 Uninstalling the device
Just remove the 30mm diameter piece of wood from the tree and remove the de-
vice.
Nothing else is required.
We recommend cutting the piece of the tree, which has the hole for ENAiKOON lo-
cate-18 inside, from the tree trunk and dumping it somewhere where it cannot be
found or burning it.
This ensures that unauthorized people will not notice you are using tracking devices
inside trees.

Page 11
6ENAiKOON inViu web portal
The ENAiKOON inViu web portal allows you to see the current position of each trackable
on a map and receive alerts in case timber is stolen. It also allows you to configure some
parameters of operation.
6.1 Assignment of the tracking devices to your inViu web account
Once ENAiKOON delivers the devices to you, each of them has been fully tested and
the battery in each device is activated.
Depending on your agreement with ENAiKOON, you may need to insert your SIM cards
into the devices. In case you are using ENAiKOON SIM cards, they will already be in-
stalled and fully functional.
On delivery, each of the devices has been assigned to your inViu web account with its
unique serial number.
This means that after logging in to your inViu web account, you will immediately see all
your devices as well their GPS map positions in a table as.
The devices come with a software configuration that has been agreed with you during
the purchasing phase.
In most cases, the devices send one report per day, which is called the “Still-Alive-
Report”. This report provides current GPS position, battery level and some other data. It
also indicates that the device is fully functional.
Normally the configuration of the devices also includes a feature to detect motion, so as
soon as the timber is moving (e.g. it is in the process of being loaded onto a truck or the
truck itself is moving) this will be detected and an alert will be generated.
If a device has not reported back for a period significantly longer than 24 hours, then it is
possible that the device is no longer functional and some predefined action must be
taken.
The main reasons for such situation are:
Device has been destroyed by thieves, in a sawing mill etc.
Battery is empty
Device is in an area without GSM coverage
SIM card is not functional
(e.g. SIM card contract has ended, prepaid SIM card has not been re-charged, etc.)
All timber theft email alerts are sent to the email account that is used to access your inViu
web account.

Page 12
If you have decided to use the inViu pro portal instead of inViu web, then there are addi-
tional automatic alerts in case
The battery is low
The device is not sending any still-alive-reports anymore
6.2 Detection of timber theft
There are two options to detect timber theft:
6.2.1 Motion sensor
Both devices have a so-called 3D G-sensor, sometimes also called motion sensor or
shock sensor.
If these sensors detect some motion or shock (e.g. because the timber is loaded on
a truck or because a truck is moving), then the device will send appropriate infor-
mation to the web portal and the web portal will then send an alert to the prede-
fined email address or SMS phone number.
6.2.2 Geofence
A geofence is a virtual fence around some geographic area. Such a geographic area
can be for example the area where the timber is stored until it is picked up.
You can create an unlimited number of geofences by simply drawing them on the
inViu web map. Each time one of the devices enters or leaves such a geofence area
you, will be immediately notified by email or SMS.

Page 13
6.3 Login
Open your browser and go to URL https://sso.enaikoon.de/
Enter user name and password and click on the ‘log in’ button.
You will receive both together with the devices from ENAiKOON.
Click on the inViu web icon:
Now you will see the inViu web main screen.
6.4 Main inViu web features
Position display on the map in inViu web
Display with pushpin directly on the online map
E-mail with link to online map
Twitter report with GPS coordinates for display on the online map
GPS details on the current position (speed, direction, time information)
Own user account
with access to one or more location devices using the ENAiKOON iD
Alarms and notifications
Geofence messages upon crossing any number of individually adjustable
geofences; a geofence is a closed multi-polygon with any number of corners
(depending on the creation and administration of geofences)
Battery alarm (when the battery level is low); this function is unavailable with
the SIM cards provided by ENAiKOON
Configuration of the devices conveniently via the web portal
Adjustable tracking rate
Distance between two positions / still-alive messages (time-, route-, angle-
dependent)
Name of the trackable
Setting of the time zone

Page 14
Memory management –used to determine the number of position messages
that are to be stored in the device if no GSM data transmission is possible
Entry of a mobile phone number for SOS alarms; this function is unavailable
with the SIM cards provided by ENAiKOON
Permit / forbid roaming; the SIM cards included in delivery from ENAiKOON
provide free roaming within most European countries and various non-
European countries.
You can find details on the country coverage at the web site
https://www.enaikoon.com/de/geraete/zubehoer/sim-card/
Acceleration sensor
Sensitivity setting from 1 (low) to 10 (high)
6.5 inViu web settings
The name of the user account filed upon registration of the ENAiKOON iD can be seen
in the upper right-hand corner. Move the cursor over the name and click on “Settings”
in the window that opens.
The settings menu now opens. The following data can be set.
6.5.1 Menu option ‘general’
6.5.1.1 Language
The following languages are available:
German
English
French
Spanish
6.5.1.2 Colour theme
Apart from the set standard colour theme, a green or red colour theme can be
set.
6.5.1.3 Sub account handling
This option allows you to add and remove sub accounts.
For each sub account you can decide if the user should have full rights or if this
should be a read-only account. This allows you, for example, to assign an account
to a security firm.

Page 15
In order to assign an ENAiKOON account to inViu web as a sub account, such an
account must be registered first. In order to do so please click on “sign up!“ on
the login screen and follow the instructions.
6.5.1.4 Default settings
This option allows you to reset the entire account back to factory default set-
tings.
6.5.1.5 Remove inViu web account
This option allows you to remove your account from inViu web. This will NOT de-
lete the ENAiKOON iD, so if you are using other ENAiKOON services, this will still
be possible.
6.5.2 Menu option ‘measures‘
This option allows various settings to be made to the dimensions of measured val-
ues.
For the timber theft application, only the ‘show speed in’ parameter is relevant.
It can be set either to ‘km/h’ or ‘mph’.
6.5.3 Menu option ‘portlets‘
This menu option does not provide any relevant parameters for the timber theft so-
lution.
6.6 Configuration of devices in inViu web
6.6.1 Registration of ENAiKOON devices in the portal
Normally the devices have already been registered in the portal upon delivery.
If this has not yet been done, it can easily be done subsequently after logging on.
To do so, click in a free space in the column “serial number,” type in the serial num-
ber shown on the device and confirm with the enter key.
6.6.2 Naming the trackable
By clicking a free space in the column “trackable name” you can add a name of your
choice for each device by typing the name and confirming it with the enter key.
Page 16
For example, this could be ‘Wood pile plot R318.’ This name is used in the alarm
messages, among other things, and as a result you immediately know which wood
pile is being stolen
Keywords can be added in the same way. This can help the users of multiple devices
to filter the desired devices quickly out of the device list.
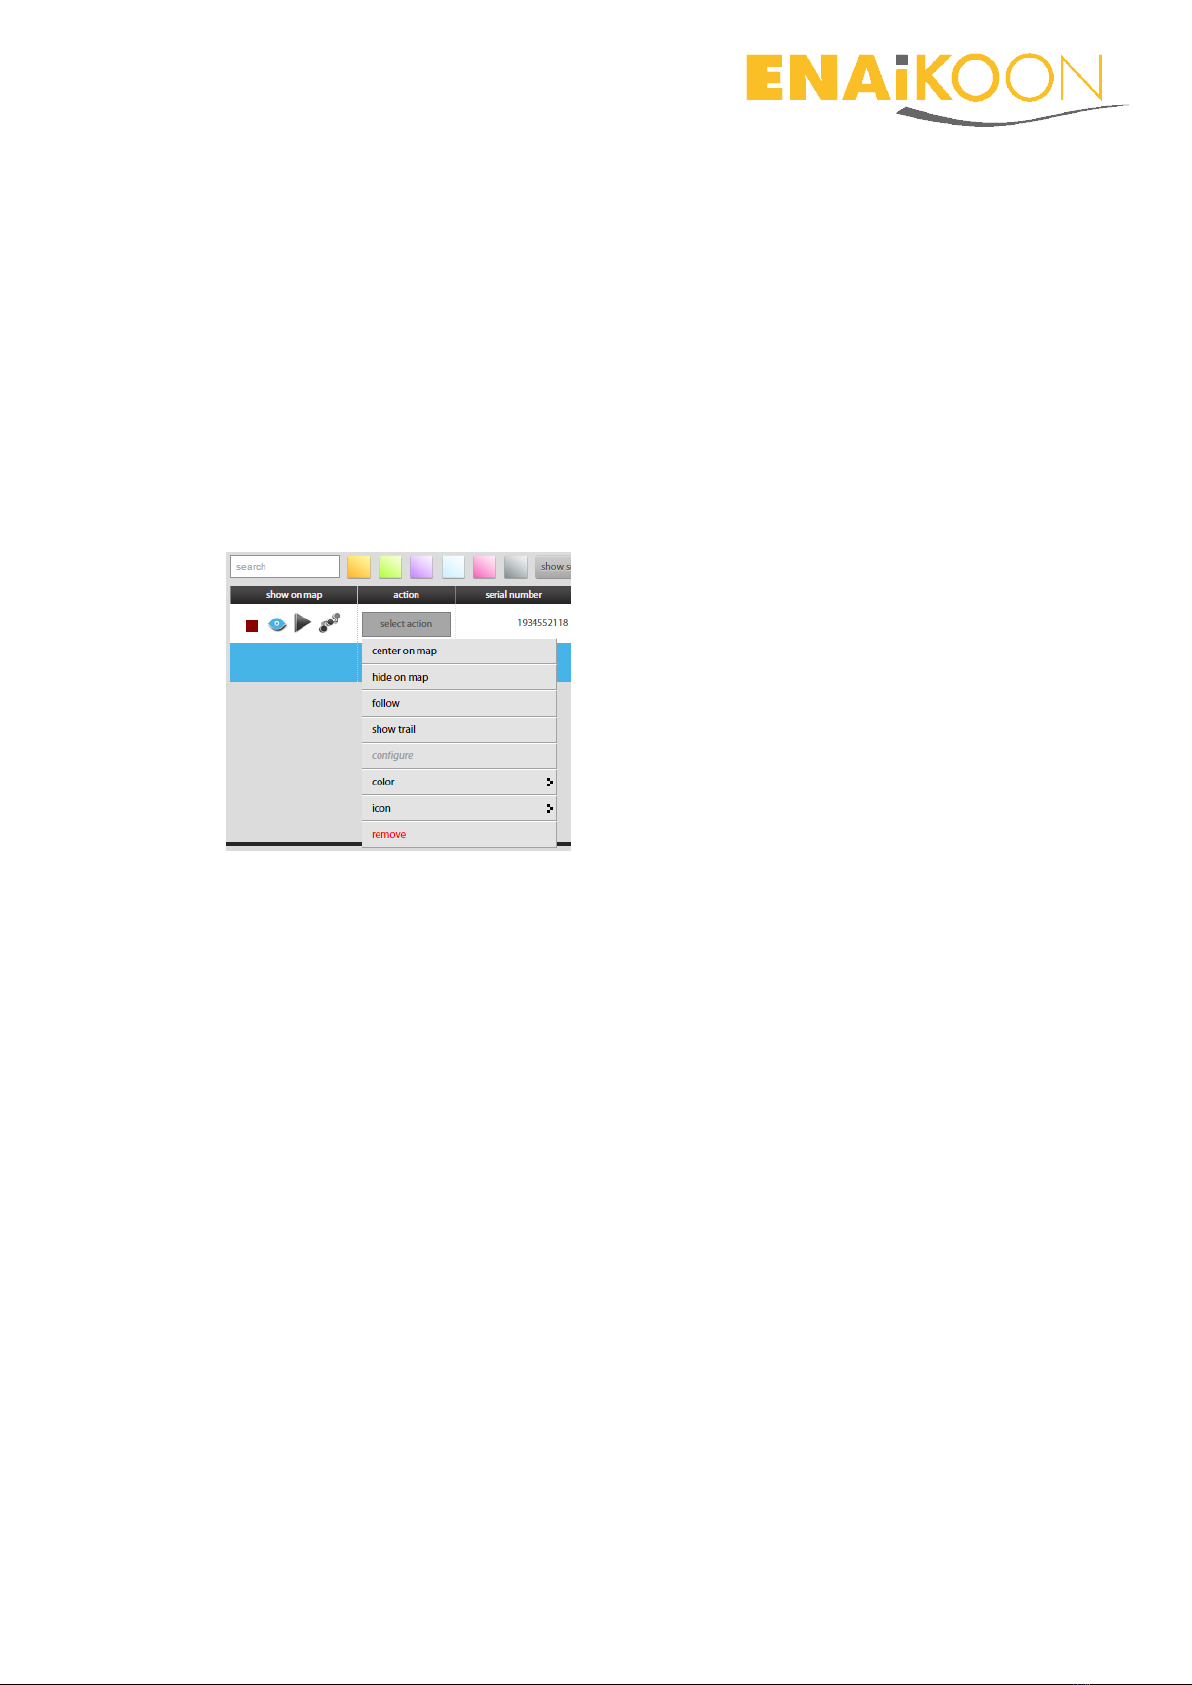
6.6.3 Display options
Various actions can be carried out via the icons to be found in each line via the
trackable list and via the button “select action” in the line of the particular device.
Activated icons or actions are displayed by colour change or by “greying out.”
6.6.3.1 Icons
Green / red square: indicates the configuration status.
Green: device configuration via the web portal is possible.
Red: device configuration via the web portal is not possible.
Eye: displays/conceals the current location as pushpin on the map.
Triangle: activates / deactivates ‘Follow' – the map section selected moves
when the location module position changes / the map stays the same when
the position of the location module changes.
Route: display / conceal trail –the last 100 position messages sent are dis-
played / concealed
6.6.3.2 Actions
Center on map: the pushpin moves to the centre of the selected map section
hide on map / show on map: the pushpin is not displayed / is displayed on
the map
follow / unfollow: the map section selected does not move when the posi-
tion of the location module changes
Page 17
show trail / hide trail: the last 100 position messages sent are shown / hid-
den
configure (see chapter Fehler! Verweisquelle konnte nicht gefunden wer-
den.)
colour: select the colour of the pushpin. If a colour is selected, the colour se-
lected is simultaneously visible in a thin strip on the left edge. By clicking a
square colour area on the upper edge of the trackable list, a tick becomes
visible and the selection of the displayed trackables is filtered according to
this colour. When you click in this field again, the tick disappears and all the
lines are once again visible.
icon: select which symbol is to be displayed within the pushpin
remove: the location module is permanently removed from the trackable
list.
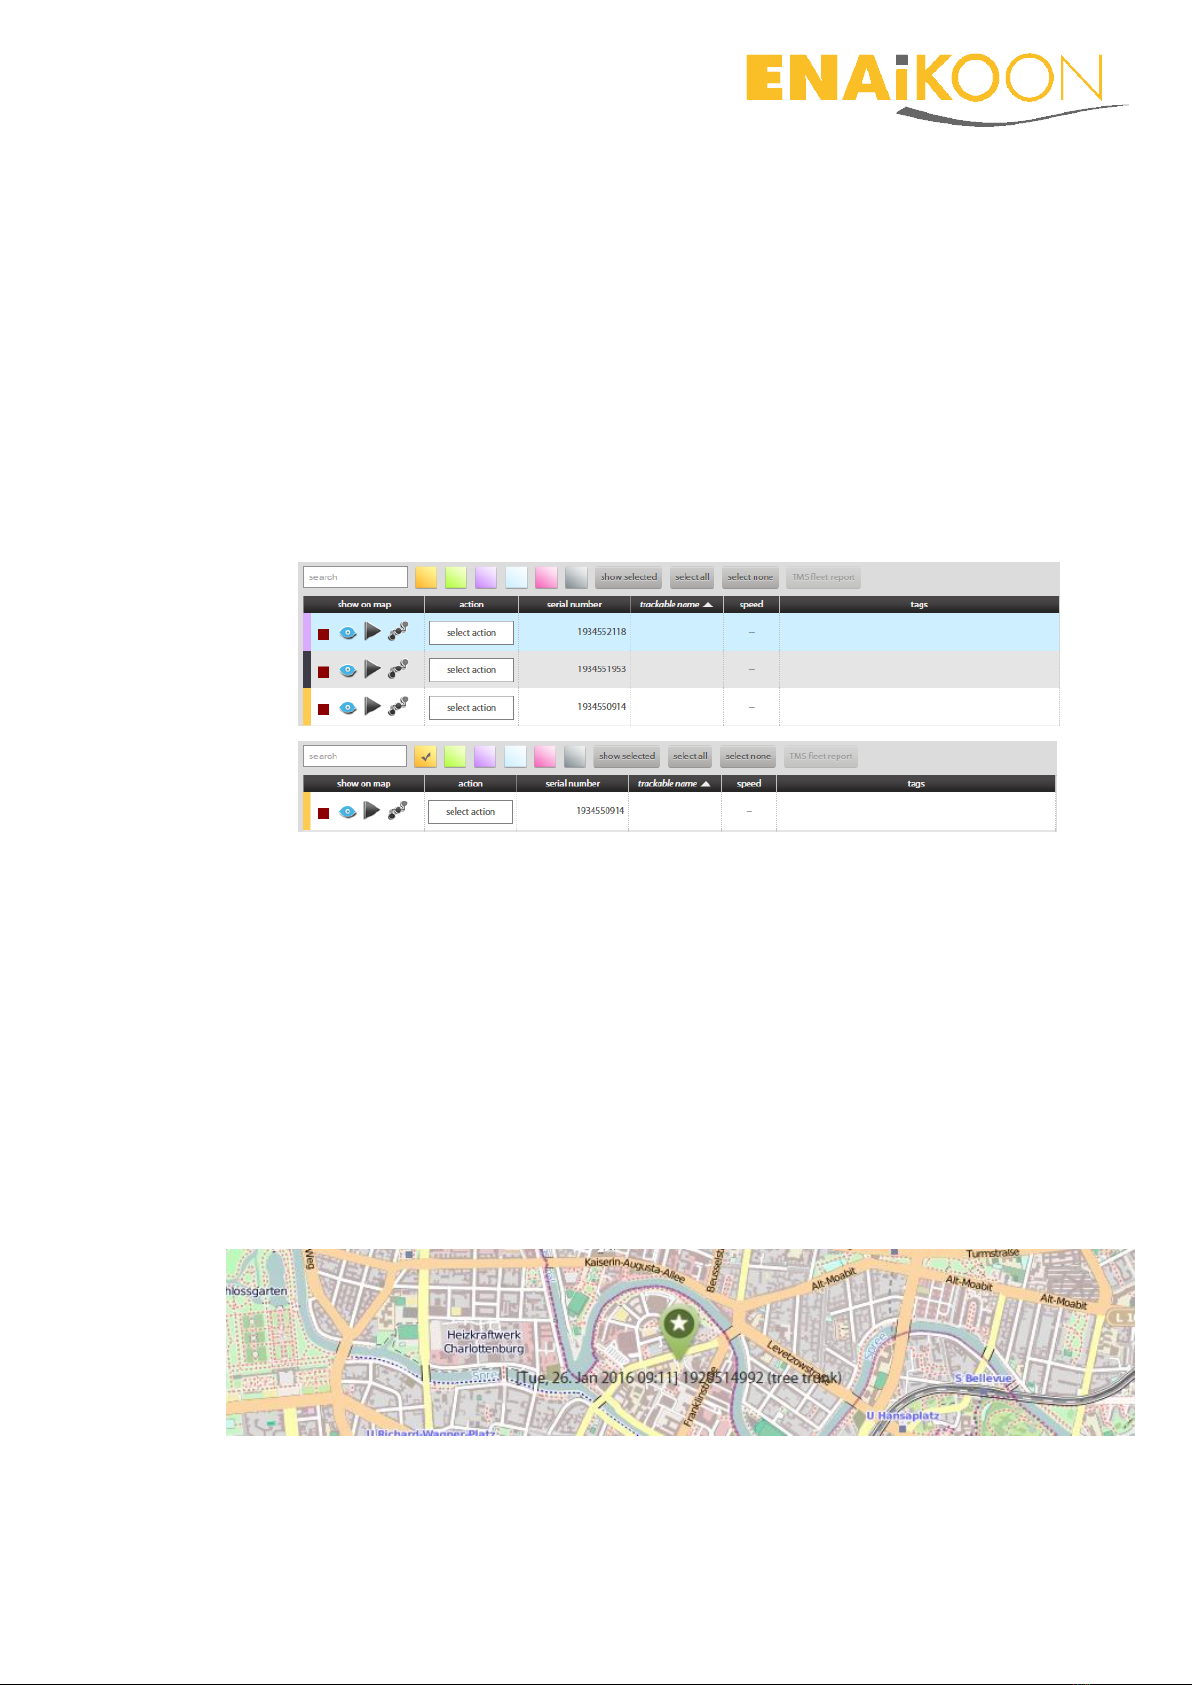
6.6.4 Display of the position in the map
As soon as a location module sends data, a pushpin is displayed on the map with
the current position of the trackable. In addition the current time stamp, serial
number and self-selected name of the location module are displayed for each posi-
tion. This is dependent on the “Eye” icon being activated.
If you click in a line in the list of the trackables, the line is highlighted in blue and –
as soon as the Eye icon has been activated –the pushpin is displayed on the map.
Page 18
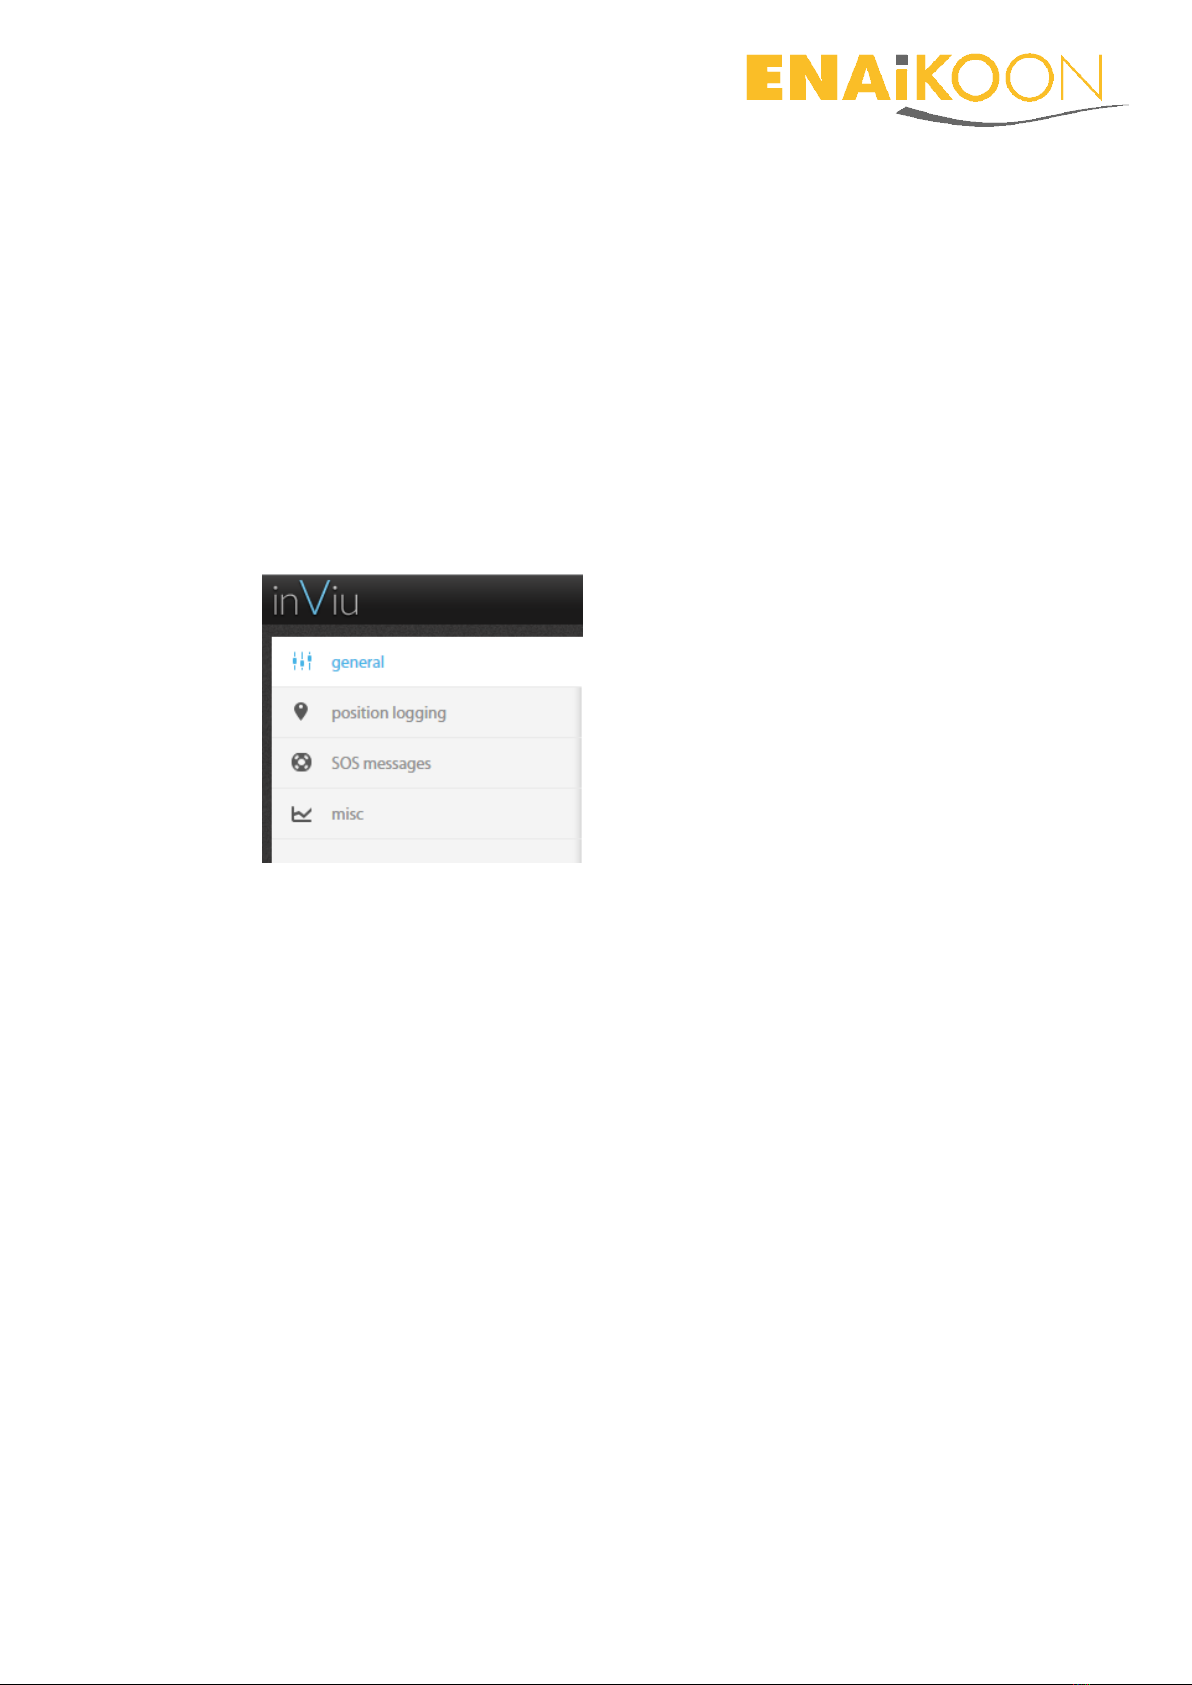
6.6.5 Configuration of the location modules
The configuration menu can only be retrieved if the icon square in the trackable list
is “green.” Other colours indicate the upload or download status of configuration
settings.
After clicking “Configure” a menu opens with the tabs
general
position logging
SOS messages
misc
6.6.5.1 general
The following data is displayed after clicking “general”:
serial number
IMEI number
The following data can be entered or changed:
name of the trackable
password of the trackable
time zone (GMT offset)
max waiting time for the transmission of a new configuration to the
trackable
By clicking “reset trackable to factory settings”, the factory settings are
restored in the device. Self-selected configuration settings can be saved
and retrieved later on.
Standard settings: different individual configuration settings can be stat-
ed and saved. The settings can be selected via the window that opens.

Page 19
By clicking “save changes”, the changes made are transferred to the location
module.
6.6.5.2 position logging
The following settings can be made after clicking the tab “Position messages”:
The maximum number of position messages to be saved in the location
module if no GSM data transmission is possible.
The saved position messages are forwarded as soon as GSM data trans-
mission is available.
Time-dependent position messages: entry in seconds
Distance-dependent position messages: entry in metres
Angle-dependent position messages: entry in ° (degrees)
Page 20
The “OFF” and “ON” icons indicate the current status. This status can be changed
by clicking this icon.
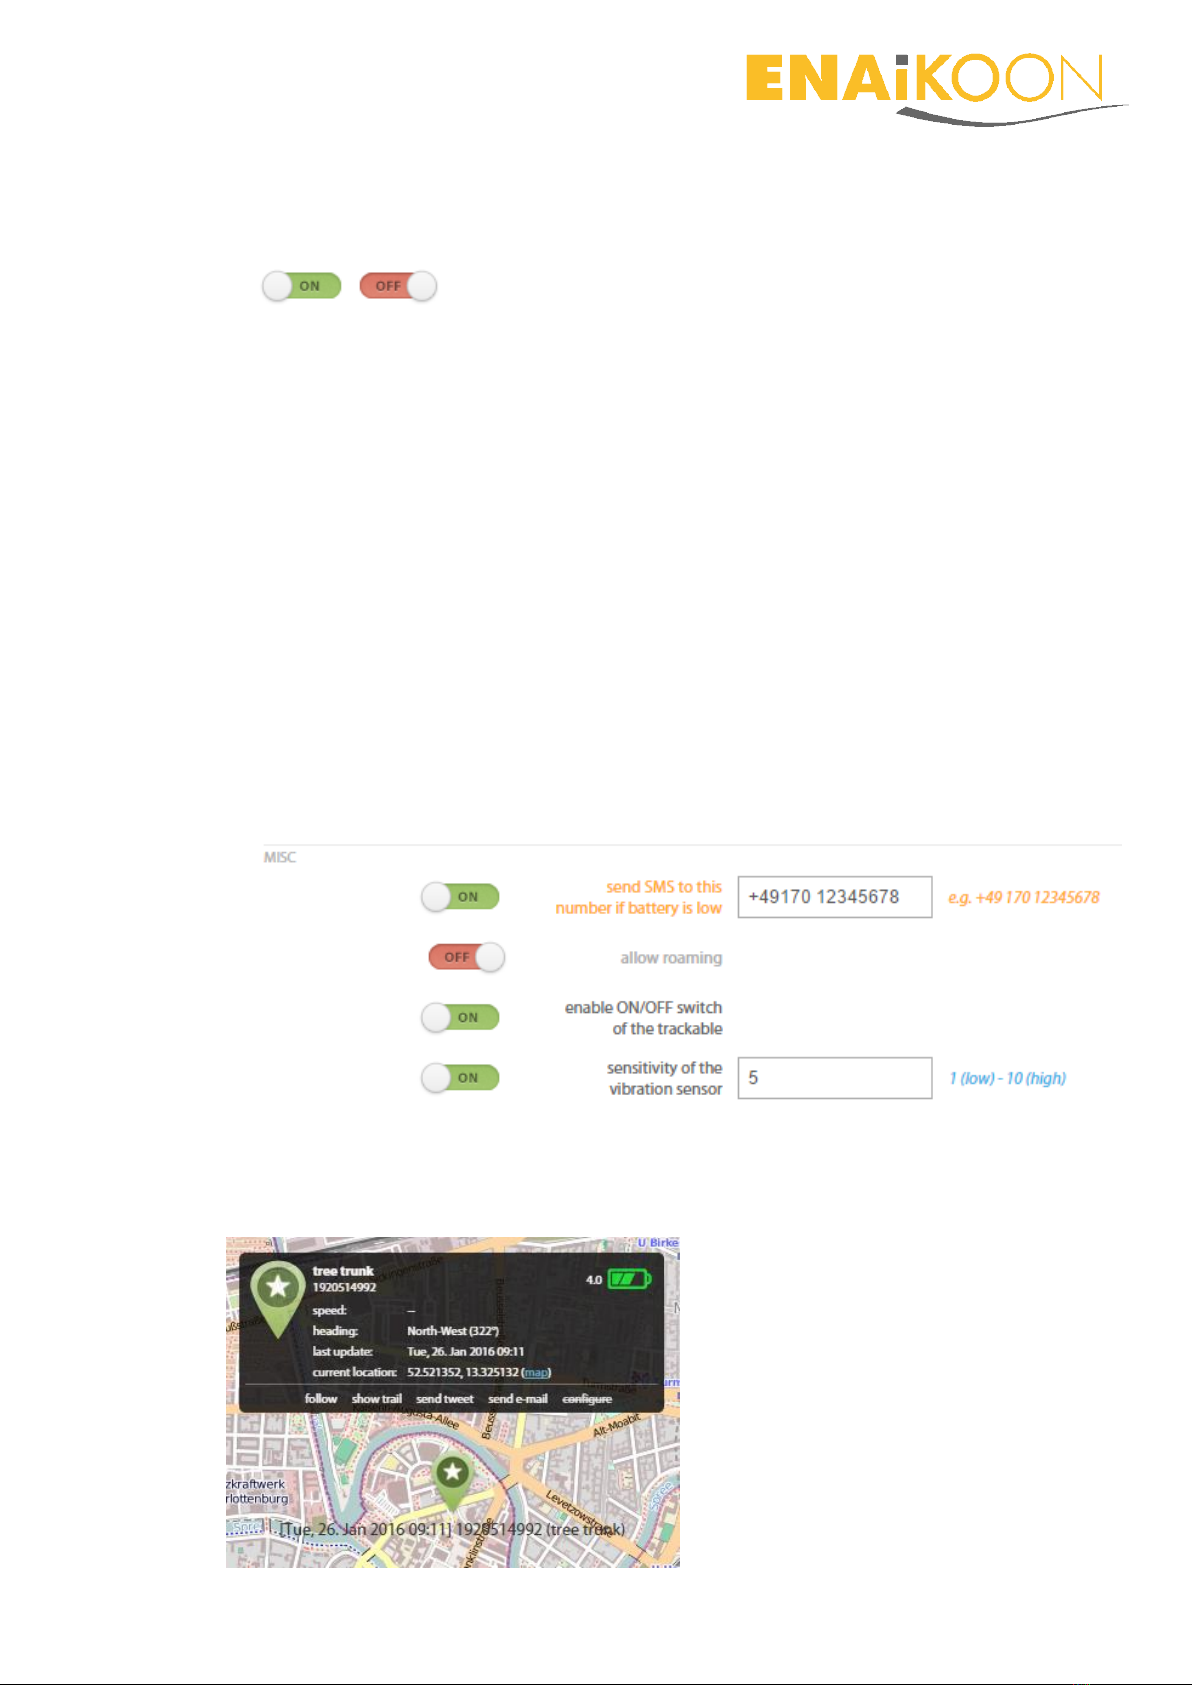
6.6.5.3 misc
The following settings can be made after clicking the tab “misc”:
Battery alarm: an alarm is sent to the telephone number defined when the
charge status of the battery is low. This function is unavailable with the SIM
cards supplied by ENAiKOON.
Permit roaming: the SIM card may dial into a third party mobile communica-
tions network to send data, which can lead to increased data transmission
costs. The SIM cards provided by ENAiKOON offer free roaming within most
European countries.
Details can be found in chapter Fehler! Verweisquelle konnte nicht gefun-
den werden..
Activate ON / OFF switch of the trackables: unavailable for ENAiKOON lo-
cate-15 and ENAiKOON locate-18.
Sensitivity of the shake sensor from 1 (low) to 10 (high)
6.7 Display of the pushpin on the map in inViu web
When you click a pushpin on the map, a small window opens:
This manual suits for next models
1
Table of contents


