ENER-J S-71918 User manual

Monitor your Home,
Remotely!
Installation
Guide
Languages
Make your home smart & connected in simple steps with ENER-J
ENERJSMART
ANDROID iOS
Download our
app from
To download,
scan the QR code

1
Please read it carefully before using the product, and keep this handy.
Smart LED Floodlight Camera Accessories User Manual
ENGLISH
1) What’s in the box?
2) Specication
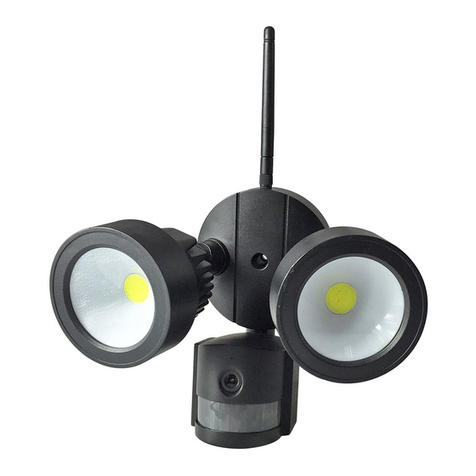
Floodlight
Camera Lens
Motion Sensor Back view with
Junction Box

2
SKU SHA5293-94
Model S-71918
Power 35W (whole light),
30W (LED power)
Material Aluminum + PC + ABS
Input Voltage 100-240V
LED 96*2835
Luminous Flux 2200lm (+/-10%)
Color Temp 6500k (+/-500K)
Protection Grade IP44
Motion Sensor Detection Angle 270°
Max Sensor Distance 12m
PIR Sensor 20-20000lux
Light time 3s-7mins
Night Vision 11 IR LED
Resolution 1920*1080(HD), 640*480(VGA)
Image Sensor 1/4 HD CMOS
Lens 3.6mm f2.0 (270°(H), 100°(V))
TF Card Support Upto 128GB
Colour White / Black
Weight 920gm
Size 153*231*303mm
• Crystal-clear HD Video.
• Two ultra-bright LED oodlight. Motion-activated camera and
oodlights.
• Security siren alarm.
• Ultra wide-angle motion sensors.
• App controlled camera, lights & siren.
• Smart zoom with panning.
3) Key Features

3
5) Set up
6) Install App
Connect the Smart Floodlight Camera to the mains:
Kindly power the oodlight camera. After 10 seconds, the speaker
starts; after 15 seconds, the infrared sensor starts detecting; after 20
seconds, the infrared PCBA red LED lights up and blinks rapidly; after
30 seconds, the PTZ starts detection, rst left and right, then Up and
down; after 40 seconds, you will hear the message Device Ready to
Pair.
Open App Store (for iOS) or Google Play (for Android) on your
device, search “ENERJSMART” or scan the QR code as folllowing to
download the right App for your device.
Please follow below instruction to setup and use your Smart LED
Floodlight Camera device.
1. Downloading and installing the APP
4) Light Operation
The spotlight has 2 dierent control dials which allows you to adjust
the settings, these control dials are located underneath the light body.
1) Turn the control knob TIME to adjust the duration of the
illumination. The lighting duration can be adjusted from approx.
3 seconds to 7 minutes (+/-10%).
2) Turn the control knob LUX to adjust the daylight level: At the
position , the motion detector only reacts at night. In the
position , the motion detector only reacts at daylight.
• Add other ENER-J smart products on the same app.
• Supports up to 128GB MicroSD card that never lets you miss any
thing (TF card not included).

4
ENERJSMART
ANDROID iOS
This device only supports 2.4GHz frequency band router (5G not
supported). When you set your WiFi password, please ensure you
do not use any special characters such as ~!@#$%^&*(). At the time
of pairing the device, please ensure your smart phone and Smart
Floodlight Camera are both in close proximity to your WiFi router to
enable Quick Pairing.
Before you begin;
► Make sure the ENERJSMART App is installed to you device.
► Make sure that your device is connected to a 2.4GHz Wi-Fi
networkds, 5GHz network is NOT compatible.
New users need to register according to the steps advised. Existing
users need to login using their registeration details.
Setup router
2. Setting up the APP
User Register
Please keep network available

5
1. Please follow the instructions and make sure the password is
entered correctly.
2. One device can only be added with one App account, if the device
has been added with another account already, then it can’t be
added to any another account again.
3. The device will unbind from previous account after being deleted
from App. Further, the device will reset automatically once from
blue light to red light.
7) QR Code Conguration
Getting Started
Process

6
Step 1: Open the ENERJSMART App, click “+” or “Add Device”. Then
select “All” on the “Select Device Type” page.
Step 2: Select “Security Camera”. Power the device on and wait till
you hear the prompt ‘Device in Conguration Mode’.

7
Step 3: Input your Wi-Fi password and click “Conrm”, scan the QR
Code on your phone screen by aiming at the device camera.
(Ensure the WiFi Network Selected is your WiFi Router
Name).
About 20cm

8
Step 4: Click “I heard the beep” when the device makes a Beep
Sound or you hear the message Device connected
successfully. Once you press Complete, device will pair in a
few seconds.
Step 5: The device is added, and the device nickname can also be
changed in the interface.
Each camera can only be connected to one ENERJSMART account
(for example, if the A camera has been bound to the A account, the
8) Note

9
Q : The device cannot be previewed properly?
A : Check whether the network is normal (2.4GHz). Ensure that you
have placed the camera close to the wi router, and still if you
face issues then it is recommended to reset the device and add
it again.
Q : Why is it still in the list of devices after resetting?
A : The reset device only resets the network conguration of the
camera, but cannot change the conguration on the App, remove
the camera, and must be deleted by the App.
Q : How to cut the camera network to another router?
A : First remove and reset the device on the App and then congure
the device again by the App.
Q : Why doesn’t the device identify the SD card?
A : It is recommended to plug in SD card after the power to the
camera is o. Conrm whether the SD card is normally available
and the format is FAT32. Please note that the TF card can’t be
identied when the internet connection speed is not good.
Q : Why I can’t get the notications on my phone App?
A : Please conrm that the App has been running on the phone,
and the relevant reminder function has been opened; Message
notication and authority conrmation in the mobile phone
system have been opened.
9) FAQ
A camera will not be able to bind to the B account or the C account).
If other users want to connect to the Smart Floodlight camera, the
primary user needs to share the camera with other users. If you wish
to change the account, the corresponding camera in the A account
needs to be deleted, restore the camera to the factory settings, then
follow the same steps for connecting from the beginning.

10
Rotate your camera by sliding on you smartphone, providing you with
270° degrees of vision.
Flip your video stream up or down for maximum exibility.
Built-in motion sensors detect movement, and the camera will send
you push notications and app alerts.
Support 24hrs continuous recording with high capacity SD storage.
Never miss a moment, even in complete darkness, with powerful
night-vision technology.
10) Functions
Pan / Tilt
Daytime Night
Video Flip
Motion detection
Record
Day & Night

11
If you’re new to Echo, it’s a super smart speaker from Amazon that
responds to your voice.
Once you’ve bought Amazon Echo and downloaded the
ENERJSMART App, you’ll need to enable...
1. Enable the ENERJSMART App
In your Alexa app, tap Skills in the menu and search for
ENERJSMART. Tap Enable.
2. Link Account
Enter your ENERJSMART App username and password and
follow the onscreen instruction.
3. Talk to Alexa
Now the fun part Ask Alexa to control your ENERJSMART
device. Check a full list of things you can control by clicking here.
11) Third Party Control Overview
Now you can use Google’s voice-activated speaker to control your
Smart Home Sockets and adaptors. With the Google Assistant, you
can turn on lights without pressing a button.
1. Setup
Start by getting the Google Home app and setting up your
Google Home if you have not done this already.
2. Add ENERJSMART Action
In the Google Home app, tap the menu icon and select Home
Control. Then tap the + button to see a list of Action tapping
ENERJSMART to select the Action.

12
Thank you for choosing ENER-J!
Customer satisfaction is our TOP priority, please let us know how you felt about your
experience. Happy? We are so happy that you are pleased with our product. Feel
free to express your newfound joy! Share your experience by writing a review.
Not Happy? If you are not fully satised with the item you received, have any
problems like damages, or questions, please contact us. We typically respond within
24-48 hours.
Products should be installed as per the instructions mentioned in this manual and
also as per current electrical codes National Electric Code (NEC).To avoid the
risk of re, electrical shock or injury, it is advisable that the installation is done by
a trained Electrician. Also it is important that mains power supply is switched o
before the product is installed or repaired.It is advisable to keep the manual for
future reference.
Wi-Fi frequency is 2.4GHz and not 5GHz (5GHz not supported). You can do this
by contacting your broadband service provider and requesting to either switch to
2.4GHz entirely or split it between 2.4GHz and 5GHz.
If despite following the process as instructed above, you still fail to add the device,
then possibly there is a rewall on your Wi-Fi router blocking this device to be
connected to your Wi-Fi Router. In such a case you would need to disable the
rewall, add this device following above process and once the device is added,
enable the rewalls back again.
Caution
Please Note
Stuck? Confused?
Contact our Technical Support team on:
T: +44 (0)2921 252 473
Lines are open Mon - Fri (8am to 4pm)
3. Link you ENERJSMART Account
Now follow the in-app instructions to link you ENERJSMART App
account. Once complete you’ll be able to say “Okey Google, turn
my lamp on” or “Okay Google, set hallway to ON/OFF”.

Guide
d’installation
Appareil photo de
projecteur MENÉ
intelligent
ENERJSMART
ANDROID iOS
Téléchargez notre
application de
Télécharger, lisez le
code de QR rapidement
Langues
Rendez votre maison intelligente & connectée dans les pas simples avec ENER-J
Contrôlez votre
Maison, À distance !

1
2) Specication
Projecteur
Lentille d'appareil
photo
Détecteur de
mouvement Arrière vue avec la
Boîte de raccordement
Lisez-le s’il vous plaît soigneusement avant d’utiliser le produit et
gardez-le commode.
FRANÇAISE
1) Qu’est-ce qui est dans la boîte ?
Appareil photo de projecteur MENÉ intelligent Accessoires Manuel d’utilisateur

2
SKU SHA5293-94
Modèle S-71918
Pouvoir 35W (lumière entière),
30W (pouvoir MENÉ)
Matériel Aluminum + PC + ABS
Tension d'entrée 100-240V
MENÉ 96*2835
Flux lumineux 2200lm (+/-10%)
Température en couleur 6500k (+/-500K)
Qualité de protection IP44
Angle de détection de détecteur
de mouvement 270°
Distance de détecteur de Max 12m
Détecteur de PIR 20-20000lux
Temps clair 3s-7mins
La vision nocturne 11 IR a MENÉ
La résolution 1920*1080(HD), 640*480(VGA)
Détecteur d'image 1/4 HD CMOS
Lentille 3.6mm f2.0 (270°(H), 100°(V))
Soutien de carte de TF Upto 128GB
Colorez Blanc & Noir
Poids 920gm
Grandeur 153*231*303mm
• Vidéo HD nettement dénie.
• Deux projecteur MENÉ ultra-brillant. Appareil photo activé du
mouvement et projecteurs.
• Sirène de sécurité d'alarme.
• Détecteurs de mouvement de large angle hyper.
• Appareil photo contrôlé par l'application, lumières & sirène.
• Zoom intelligent avec le fait de faire un panoramique.
3) Traits clés

3
5) S'établir
6) Installez l’application
Raccordez l'Appareil photo de Projecteur Intelligent au réseau :
Pouvoir gentil l'appareil photo de projecteur. Après 10 secondes,
les débuts d'orateur ; après 15 secondes, le détecteur infrarouge
commence à découvrir ; après 20 secondes, le rouge PCBA
infrarouge MENÉ illumine et cligne de l'œil rapidement ; après 30
secondes, le PTZ commence la détection, d'abord gauche et le droit,
ensuite En haut et en bas ; après 40 secondes, vous entendrez
l'Appareil de message Prêt à Former un couple.
Suivez s’il vous plaît au-dessous de l’instruction à l’organisation et
utilisez votre appareil d’Appareil photo IP.
4) Opération claire
Le projecteur a 2 diérents cadrans de contrôle qui vous permet de
régler les paramètres, ces cadrans de contrôle sont localisés au-
dessous du corps clair.
1) Tournez le TEMPS de bouton de commande pour régler la durée
de l'illumination. La durée s'allumant peut être réglée d'approx.
3 secondes à 7 minutes (+/-10%).
2) Tournez le LUX de bouton de commande pour régler le niveau
de lumière du jour : À la position , le détecteur de mouvement
réagit seulement la nuit. Dans la position , le détecteur de
mouvement réagit seulement à la lumière du jour.
• Ajoutez d'autres produits intelligents ENER-J sur la même
application.
• Les soutiens jusqu'à 128GB la carte de MicroSD qui ne vous
permet jamais de manquer toute chose (la carte de TF non
incluse).

4
ENERJSMART
ANDROID iOS
Cet appareil soutient seulement 2.4GHz le routeur de bande de
fréquence (5G non soutenu). Quand vous mettez votre mot de
passe de WiFi, garantissez s'il vous plaît que vous n'utilisez pas
de caractères spéciaux tel comme ~!@#$%^&*(). Au moment de
l'appariement de l'appareil, garantissez s'il vous plaît que votre
Appareil photo de Projecteur téléphonique et Intelligent intelligent est
tous les deux dans la proximité à votre routeur de WiFi pour permettre
l'Appariement Rapide.
Avant que vous commencez;
► Assurez-vous que l’Application ENERJSMART vous est installée
l’appareil.
► Assurez-vous que votre appareil est raccordé à un 2.4GHz Wi-Fi
networkds, 5GHz le réseau n’est pas compatible.
Routeur d’organisation
2. Le fait de monter l’APPLICATION
Gardez s’il vous plaît le
réseau disponible
Le Magasin d’Application ouvert (pour iOS) ou le de Google Play
(pour Android) sur votre appareil, cherchez « ENERJSMART » ou
lisez le code de QR rapidement comme suite à télécharger la bonne
Application pour votre appareil.
1. En téléchargeant et en installant l’APPLICATION

5
1. Suivez s’il vous plaît les instructions et assurez-vous que le mot
de passe est entré correctement.
2. Un appareil peut seulement être ajouté avec un compte
d’Application, si l’appareil a été ajouté avec un autre compte déjà,
donc il ne peut être ajouté à aucun autre compte de nouveau.
3. L’appareil déliera du compte précédent après avoir été eacé de
l’Application. De plus, l’appareil réglera automatiquement une fois
de la lumière bleue au feu rouge.
7) Conguration codée de QR
Être commencé
Processus
De nouveaux utilisateurs ont besoin de s’inscrire selon les pas
conseillés. Les utilisateurs existants ont besoin à l’ouverture de
session en utilisant leurs détails d’enregistrement.
Registre d’utilisateur

6
Le pas 1 : Ouvrez l'Application ENERJSMART, faites un déclic « + »
ou “All Device”. Choisissez alors « Tous » sur la “page” de
Type d'Appareil Privilégiée.
Le pas 2 : Choisissez “Security Camera”. Propulsez l'appareil sur
et attendez avant que vous entendiez le ‘Appareil rapide
dans le Mode de Conguration’.
This manual suits for next models
1
Table of contents
Languages:
Other ENER-J Digital Camera manuals
