ER-HM650
Congratulations on your new Energizer® ER-HM650 UPS Power Protection system.
This product is specifically designed for personal computer and workstation applications. With the newest
technology, this series can operate under a wide range of input utility power while maintaining steady output
voltage. Why is this important? Some equipment requires consistent backup power under high utility
fluctuation. Because the number of computer peripherals increase, additional surge protected outlets are
provided to protect your printer, scanner or other peripheral devices from surges, spikes, and electromagnetic
interference.
Features:
Compact light weight design
Option to install upright or flat
Intelligent microprocessor control
Unparalleled communication with your computer
Provides accurate information for control and
monitoring power
Overload protection and alarm
Smart AVR for low and high input line voltage
Fax/modem surge suppression port
Site-Wiring-Fault indicator
Easy battery replacement mechanism
Your box should include the following:
UPS unit and Input Power Cord
User's Manual
Telephone Line Communication Connection Cord
Remote Monitoring Software
Specifications
1~6 minutes
4:4
2 years
RJ11/45 1in/1out
650
300
115V 25%/115V 5%
50/60Hz 10% / 50/60Hz 0.5%
USB
Simulated Sinewave
90
Yes
8hrs to 90%
4
4
2 years
10.9" x 7.2" x 3.7"
CUL
6 feet
Color
Run Time
Surge Protected vs.
Battery Backup Outlets
Warranty
Internet Ready/Phone/Fax
Modem hookups
VA Rating
Watts
Input/Output Voltage
Input/Output Frequency
Interface Port (USB or Serial)
Waveform Type
Joules (surge capacity)
Overload Protection
Recharge Time (typical)
Visual Indicators (lights)
Audible Indicators
Connected Equipment
Guarantee
Unit Dimensions
Compliance
Cord Length
Black
-
+/-
+/
-
+/-
+/
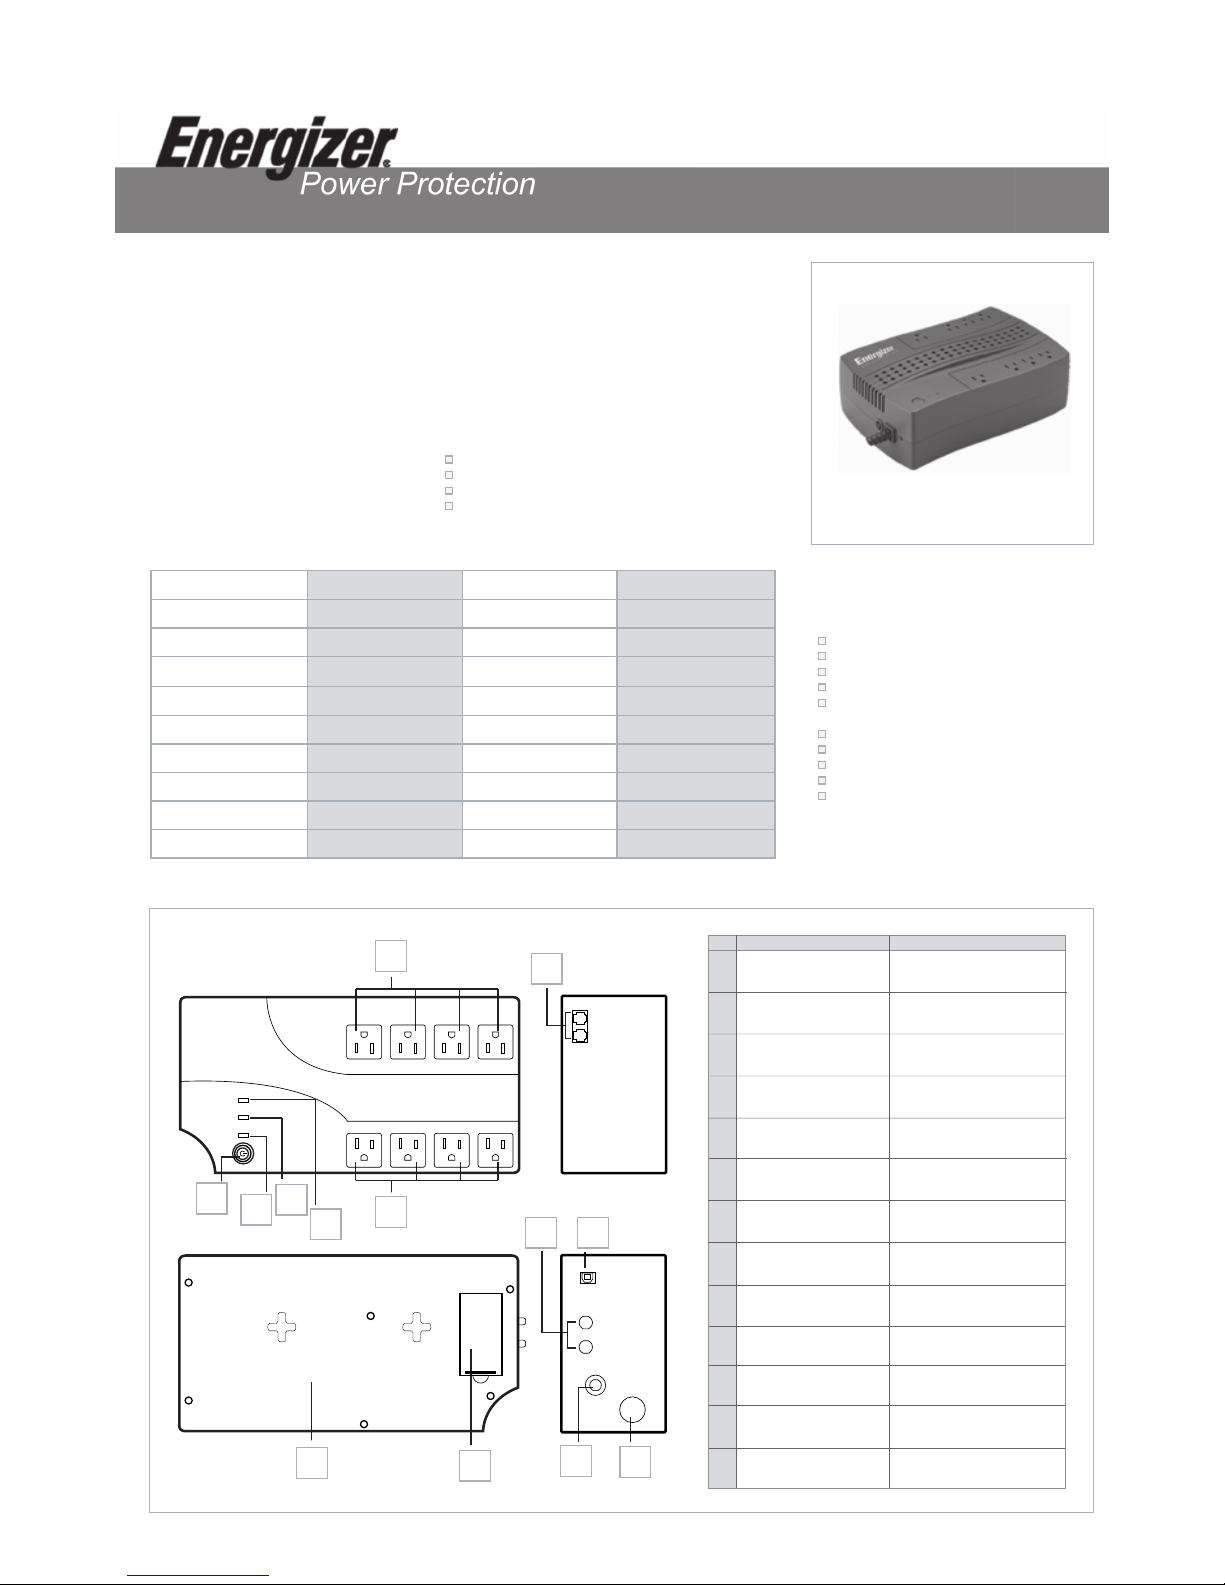
Item Panel Indicator Description
1
2
3
4
5
6
7
8
9
10
On/Off Switch
AC Normal/On
Battery Indicator (green)
Overload/Abnormal Indicator
(red)
Input Circuit Breaker
Backup Power Outlets
Surge Protection Outlets
USB port
Telephone Surge
Protection Port
AC Power/Inlet
Battery Cover
Turns UPS system on & off
Indicates the AC is normal or
that the UPS is in battery mode
Indicates the UPS output is
overloaded or that there is
UPS failure
Protects against UPS
system overload
Provides output power
to computer device
Provides a noise filtering function
to computer peripherals
Suppresses the spoke voltage
on the telephone line
Connects to input utility power
through the input power cord
1237
5
6
48
9
10
Allows remote monitoring and
control via computer USB port
Provides access to battery
for replacement
Boost Mode Indicator
(yellow)
Indicates the UPS is in
backup mode
11
11
Coax Surge Protection Port Provides protection for
cable/satellite inputs
Surge Module Indicates a high-level
of surge
12
13
13
13
Backup mode
Battery replace
AC mode
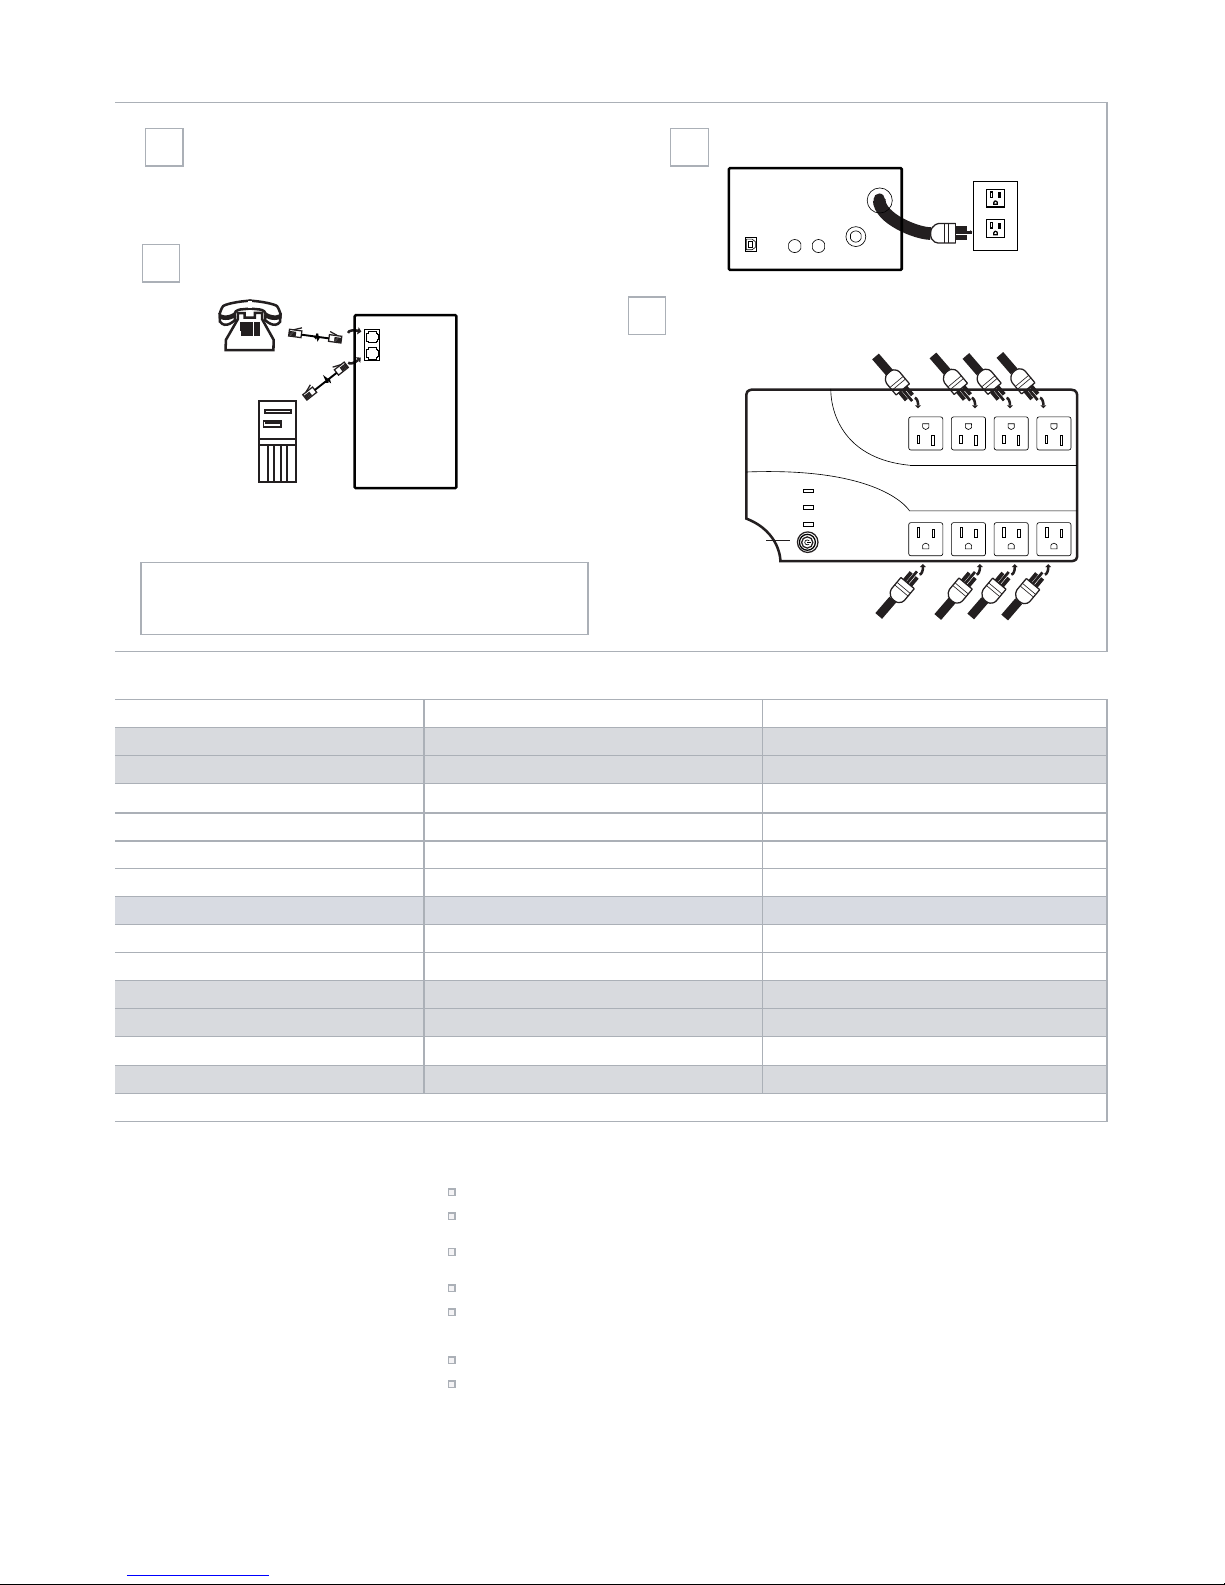
Installation
1Plug your Energizer® ER-HM650 UPS
Power Protection system into a wall outlet.
Plug your modem or fax line into the UPS "OUT" line
and your computer into the "IN" line.
2
4
3
Plug all equipment to the plugs in the back of the UPS.
Turn power on by pressing and holding "On/Off" switch
until UPS stops beeping.
Insert FileSaver software in CD-ROM drive on computer
and follow instructions.
Modem or fax line to
UPS OUT plug
Computer phone line
to UPS IN plug
computer monitor other other
computer monitor other other
Push On/Off button
2-3 seconds.
Warranty
What does the warranty cover?
We warrant this product to be free from defects in material and
workmanship during the warranty period. If a product proves to be
defective in material or workmanship during the warranty period, we
will, at our option, repair or replace the product with an equivalent
model.
How long is the warranty effective?
Energizer® Power Protection products are warranted for 2 years for
all parts and labor from the date of the first consumer purchase.
What does the warranty NOT cover?
1. Any product on which the serial number has been defaced, modified
or removed.
2. Damage, deterioration or malfunction resulting from: accident,
misuse, neglect, fire, water, lightening, or other acts of nature,
unauthorized product modification, or failure to follow instructions
supplied with the product.
3. Repair, or attempt to repair, by anyone who is not authorized.
4. Any damage of the product that occurred during shipping.
5. Installation of the product.
6. Any damage that results from the installation of the product.
7. Use of supplies or parts not meeting indicated specifications.
8. Normal wear and tear.
9. Any other cause which does not relate to a product defect.
How do you get service?
Call 1-877-267-4687 for help.
Can I use this product for life support?
We do not recommend the use of our products for life support equipment
or direct care where failure of the product could cause failure or
diminished effectiveness of the life support equipment or patient care.
Software installation:
1. Insert FileSaver CD into CD-ROM
The software will execute the automatically.
2. If the software can not perform properly, please press Start and
execute the "D:\setup.exe"
Servicing and Replacing the Battery
Routine Maintenance:
Use dry soft cloths to clean the front panel and plastic parts. Do not
use any detergent that contains any alcohol ingredient.
The expected lifetime of the internal battery is around three (3)
years. Improper operation and/or exposure to a harsh environment
will reduce the actual lifetime.
Charge the internal battery every three (3) months to recover the
self-discharge capacity that is caused when the unit is in extended
storage.
When replacing your battery, ensure that your new battery meets
the required specifications.
Proper disposal of batteries is required. Refer to your local codes
for disposal requirements.
Battery Replacement:
Lay the unit on its side. Use a screwdriver to open the battery
cover on the bottom of the unit.
Grasp the tab attached to the battery and slide the battery out.
Storage Instructions:
Your unit should be stored in a cool, dry location.
Make sure that the internal battery is fully charged before storage.
For extended storage in moderate climates, the battery should be
charged for 12 hours every three (3) months by plugging the power
cord into the wall outlet and turning on the main switch.
Repeat every two (2) months in high temperature locations.
Use your battery backup sockets for: computer, monitor, and external storage devices (i.e. zip drive).
For surge protection, plug in: non-essential equipment such as printers, scanners, and speakers.
Do NOT use your UPS for: laser printers, vacuums, space heaters, copiers, or shredders.
Problem Cause Solution
UPS will not turn on; LED is not lit. Your On/Off switch was not pushed in completely. Press and hold the On/Off switch for 3 seconds,
or until you hear a beeping sound.
Your battery voltage is too low. Call 1-877-267-4687 for help.
UPS system is remaining on battery mode. Your power cord is loose. Ensure that the cord is plugged in firmly.
Your input fuse has been blown. Remove some loads (devices) and replace fuse with similar rating.
Your circuit breaker has been tripped. Reset circuit breaker.
Your line voltage is too high or too low. Check your input voltage.
UPS is functioning normally, but the computer will not turn on. Your computer input power cord is loose or disconnected. Reconnect your computer input power cord.
Available backup time is less than the indicated rating. Your battery is not fully charged or your battery is dead. Recharge the battery for 6 hours and retest the backup time.
If problem persists, call 1-877-267-4687 for help.
Your UPS system is slightly overloaded. Remove the least critical load (device).
The UPS system is continually beeping. Your UPS system is overloaded. Remove the non-critical loads (devices).
Your UPS system has automatically defaulted to battery mode. Remove non-critical loads (devices) and restart the UPS system.
The Site Wiring Fault LED is on. Your polarity is reversed or another electrical issue. Call an electrician to check and service your wiring.
Ensure that you have the correct interface cable,
or obtain one from your local retailer.
You are using the wrong interface cable.Your communication function is not working.
Troubleshooting
For any additional questions, or questions concerning the FileSaver software, please visit www.energizerups.com or call 1-877-267-4687


 Plus Startup manual")


