Energy Cube AP4050 User manual

3
PORTABLE GENERATOR
Owner’s Manual
CUSTOMER SERVICE
SERVICE CLIENTELE
SERVICIO AL CLIENTE
888-980-4936
SAVE THIS MANUAL FOR FUTURE REFERENCE
IMPORTANT SAFETY INSTRUC
LIMITED WARRANTY
YEAR
TIONS ARE INCLUDED IN THIS MANUAL
A-iPOWER Corp.
1477 E. Cedar St. #B,
Ontario, CA 91761
U.S.A.
www.a-ipower.com

Introduction..........................................1
TABLE OF CONTENTS
Section 1 — Safety Rules.......................1
Standards Index...........................................1
Section 2 — General Information..........4
2.1 Unpacking...................................................4
2.2 Assembly.....................................................4
Section 5 — Operation..........................7
Section 6 — Maintenance....................10
Section 8 — Troubleshooting..............13
Section 9 — Parameter........................14
Section 10 — Diagram.........................15
Section 3 —Features and Controls........5
Section 4 — Preparation
Before Operation................6
4.1 Adding Engine Oil.........................................6
4.2 Adding Fuel.................................................6
4.3 Grounding the Generator.............................6
5.1 Starting the Engine......................................7
5.2 Connecting Electrical Loads...........................9
5.3 Stopping the Engine....................................9
5.4 Low Oil Level Shut down System..................9
5.5 High Altitude...............................................9
6.1 Maintenance Schedule................................10
6.2 General Recommendations..........................10
Section 7 — Storage...........................12
Section 11 — Warranties.....................16
6.2.1 Generator Maintenance...........................10
6.2.2 To Clean the Generator...........................10
6.2.3 Engine Maintenance................................10
6.2.4 Changing the Oil....................................11
6.2.5 Replacing the Spark Plug........................11
6.2.6 Spark Arrester.........................................11
6.3 Service Air Filter..............................................11
6.4 Valve Clearance..............................................12
6.5 General..........................................................12
6.6 Other Storage Tips..........................................12

• Operate this product ONLY outdoors.
• Install a battery operated carbon monoxide
alarm near the bedrooms.
• Keep exhaust gas away from entering a confined
area through windows, doors, ventilation intakes,
or other openings.
• NEVER operate this product inside any
building, carport, porch, mobile equipment,
marine applications, or enclosure, even if
windows and doors are open.
INTRODUCTION
SAFETY RULES
Safety Symbols and Meanings
Thank you for purchasing products from
Eenergy Cube.We appreciate your business. Our
generator is driven by a compact air-cooled
engine with high performance, which can supply
electrical power to operate power tools on job
sites, or to run home appliances during outage, or
provide power to remote locations where utility
power is unavailable.
Toxic Fumes KickbackElectrical Shock
Fire Explosion
Owner’s Manual
Moving PartsFlying Objects
Hot Surface
This manual contains safety information to make
you aware of hazards and risks associated with
generator products and how to avoid them. It is
important that you read and understand these
instructions thoroughly before attempting to start
or operate this equipment. Save this original
instruction for future reference.
Every effort has been made to ensure that
information in this manual is both accurate and
current. However Energy Cube. reserves all
rights to change, alter, or otherwise to improve
the generator and this documentation at any time
without prior notice.
If any portion of this manual is not understood,
please contact the nearest authorized dealer for
starting, operating and servicing procedures. We
also strongly recommend you to instruct any
other users who may operate the generator in an
emergency.
The Emission Control System within this
generator is warranted for standards set by the
Environmental Protection Agency (EPA).
1
This is the safety alert symbol. It is used to alert
you to potential personal injury hazards. Obey all
safety messages that follow this symbol to avoid
possible injury or death.
Read this manual carefully and become
familiar with your generator. Know its
applications, its limitations, and any
hazards involved. Failure to follow
instructions could result in serious injury or
death. Throughout this publication, and on tags
and decals affixed to the generator, DANGER,
WARNING, CAUTION and NOTE symbols are
used to alert personnel with special instructions
about a particular operation that may be
hazardous if performed incorrectly, or carelessly
Observe them carefully. Their definitions are as
follows:
Toxic Fumes Hazard. Running
engines give off carbon monoxide, an
odourless poisonous gas that can
cause nausea, fainting, or death. Do
not start or run engine indoors or in an enclosed
area, even if windows and doors are open.
The engine exhaust from this
product, certain components in this product and
related accessories contain chemicals known to
the State of California to cause cancer, birth
defects or other reproductive harm. Wash hands
after handing.
WHEN ADDING OR DRAINING FUEL
WHEN STARTING EQUIPMENT
• Ensuresparkplug, muffler, fuelcap, andaircleaner
are in place.
• DO NOT crank engine with spark plug removed.
WHEN OPERATING EQUIPMENT
• Transport/move/repair with fuel tank EMPTY or
with fuel valve OFF.
• DO NOT tip engine or equipment at angle which
cause fuel to spill.
• Disconnect spark plug wire.
WHEN TRANSPORTING, OR REPAIRING
EQUIPMENT
WHEN STORING FUEL OR EQUIPMENT WITH
FUEL IN TANK
Starter cord kickback (rapid
retraction) will pull hand and arm
toward engine faster than you can let
go which could cause broken bones,
fractures, bruises, or sprains resulting in serious
injury.
•When starting engine, pull cord slowly until
resistance is felt and then pull rapidly to avoid
kickback.
• NEVER start or stop engine with electrical
devices plugged in and turned on.
Fuel and its vapors are
extremely flammable and
explosive which could cause
burns, fire or explosion
resulting in death, serious injury and/or property
damage.
•Turn generator engine OFF and let it cool at
least 2 minutes before removing fuel cap. Loosen
cap slowly to relieve pressure in tank.
• Fill or drain fuel tank outdoors.
• DO NOT overfill tank,Allow space for fuel
expansion.
• If fuel spills, wait until it evaporates before
starting engine.
• Keep fuel away from sparks, open flames, pilot
light, heat, and other ignition sources.
• Check fuel lines, tank, cap and fittings
frequently for cracks or leaks. Replace if
necessary.
• DO NOT light a cigarette or smoke.
• DO NOT operate this product inside any
building, carport, porch, mobile equipment,
marine applications, or enclosure.
• DO NOT tip engine or equipment at angle
which cause fuel to spill.
• DO NOT stop engine by moving choke control
to “OFF” position.
•Store away from furnaces, stoves, water heaters,
clothes dryers, or other appliances that have light
or other ignition source because they could ignite
fuel vapors.
Generator voltage could cause
electrical shock or burn resulting in
death or serious injury.
• Use approved transfer equipment
to prevent back feed by isolating generator from
electric utility workers.
•When using generator for backup power, notify
utility company.
• Use a ground fault circuit interrupter in any
damp or highly conductive area, such as metal
decking or steel work.
• DO NOT touch bare wires or receptacles.
• DO NOT use generator with electrical cords
which are worn, frayed, bare or otherwise
damaged.
• DO NOT operate generator in the rain or wet
weather.
• DO NOT handle generator or electrical cords
while standing in water, while barefoot, or while
hands or feet are wet.
• DO NOT allow unqualified persons or children
to operate or service generator.
This generator does not meet U.S. Coast Guard
Regulation 33CFR-183 and can not be used
on marine applications. Incorrect use of the
appropriate U.S. Coast Guard approved generator
could result in death or serious injury and/or
property damage.
2

Exhaust heat/gases could ignite
combustibles, structures or
damage fuel tank causing a fire,
resulting in death, serious injury
and/or property damage. Contact with muffler
area could cause burns resulting in serious injury.
• DO NOT touch hot parts andAVOID hot
exhaust gases.
•Allow equipment to cool before touching.
• Keep at least 5 feet (1.5m) of clearance on all
sides of generator including overhead.
• It could be a violation of to use or operate the
engine on any forest - covered, brush - covered,
or grass - covered land unless the exhaust system
is equipped with a spark arrester.
Contact the original equipment manufacturer,
retailer, or dealer to obtain a spark arrester
designed for the exhaust system installed on this
engine.
• Replacement parts must be the same and
installed in the same position as the original parts.
WHEN ADJUSTING OR MAKING REPAIRS
TO YOUR GENERATOR
• Disconnect the spark plug wire from the spark
plug and place the wire where itcannotcontact spark
plug.
WHEN TESTING FOR ENGINE SPARK
• Use approved spark plug tester.
• DO NOT check for spark with spark plug
removed.
Exceeding generators wattage/
amperage capacity could damage generator
and/or electrical devices connected to it.
• DO NOT exceed the generator’s wattage/
amperage capacity. See Don’t Overload
Generator in the Operation section.
• Start generator and let engine stabilize before
connecting electrical loads.
•Turn electrical loads OFF and disconnect from
generator before stopping generator.
Unintentional sparking could
cause fire or electric shock
resulting in death or serious
injury.
Starter and other rotating parts
could entangle hands, hair, clothing, or
accessories resulting in serious injury.
• NEVER operate generator without protective
housing or covers.
• DO NOT wear loose clothing, jewelry or
anything that could be caught in the starter or
other rotating parts.
•Tie up long hair and remove jewelry.
Excessively high operating
speeds could result in minor injury and/or
generator damage.
Excessively low speeds impose a heavy load.
• DO NOT tamper with governor spring, links or
other parts to increase engine speeds. Generator
supplies correct rated frequency and voltage
when running at governed speed.
• DO NOT modify generator in any way.
Improper treatment of generator
could damage it and shorten its life.
• Use generator only for intended uses.
• If you have questions about intended use, ask
dealer or contact local service center.
• Operate generator only on level surfaces.
• DO NOT expose generator to excessive
moisture, dust, dirt, or corrosive vapor.
• DO NOT insert any object through cooling
slots.
• If connected devices overheat, to turn them off
and disconnect them from generator.
-or electrical output is lost.
-or equipment sparks, smokes, or emits flames.
-or unit vibrates excessively.
to turn them off and disconnect them from
generator.
3
There is a permanent conductor
between the generator (stator winding) and the
frame.
SECTION 2 —GENERAL INFORMATION
2.1 UNPACKING
• Set the carton on a rigid, flat surface.
• Remove everything from carton except
generator.
• Open carton completely by cutting each corner
from top to bottom.
• Leave generator on carton to install wheel kit.
2.1.1 PACKING CONTENTS
1-Owner’s Manual
2-Wheels
2-Wheel Axles
1-Hardware Bag
(Including 1-Spark Plug Socket; 1-Extension)
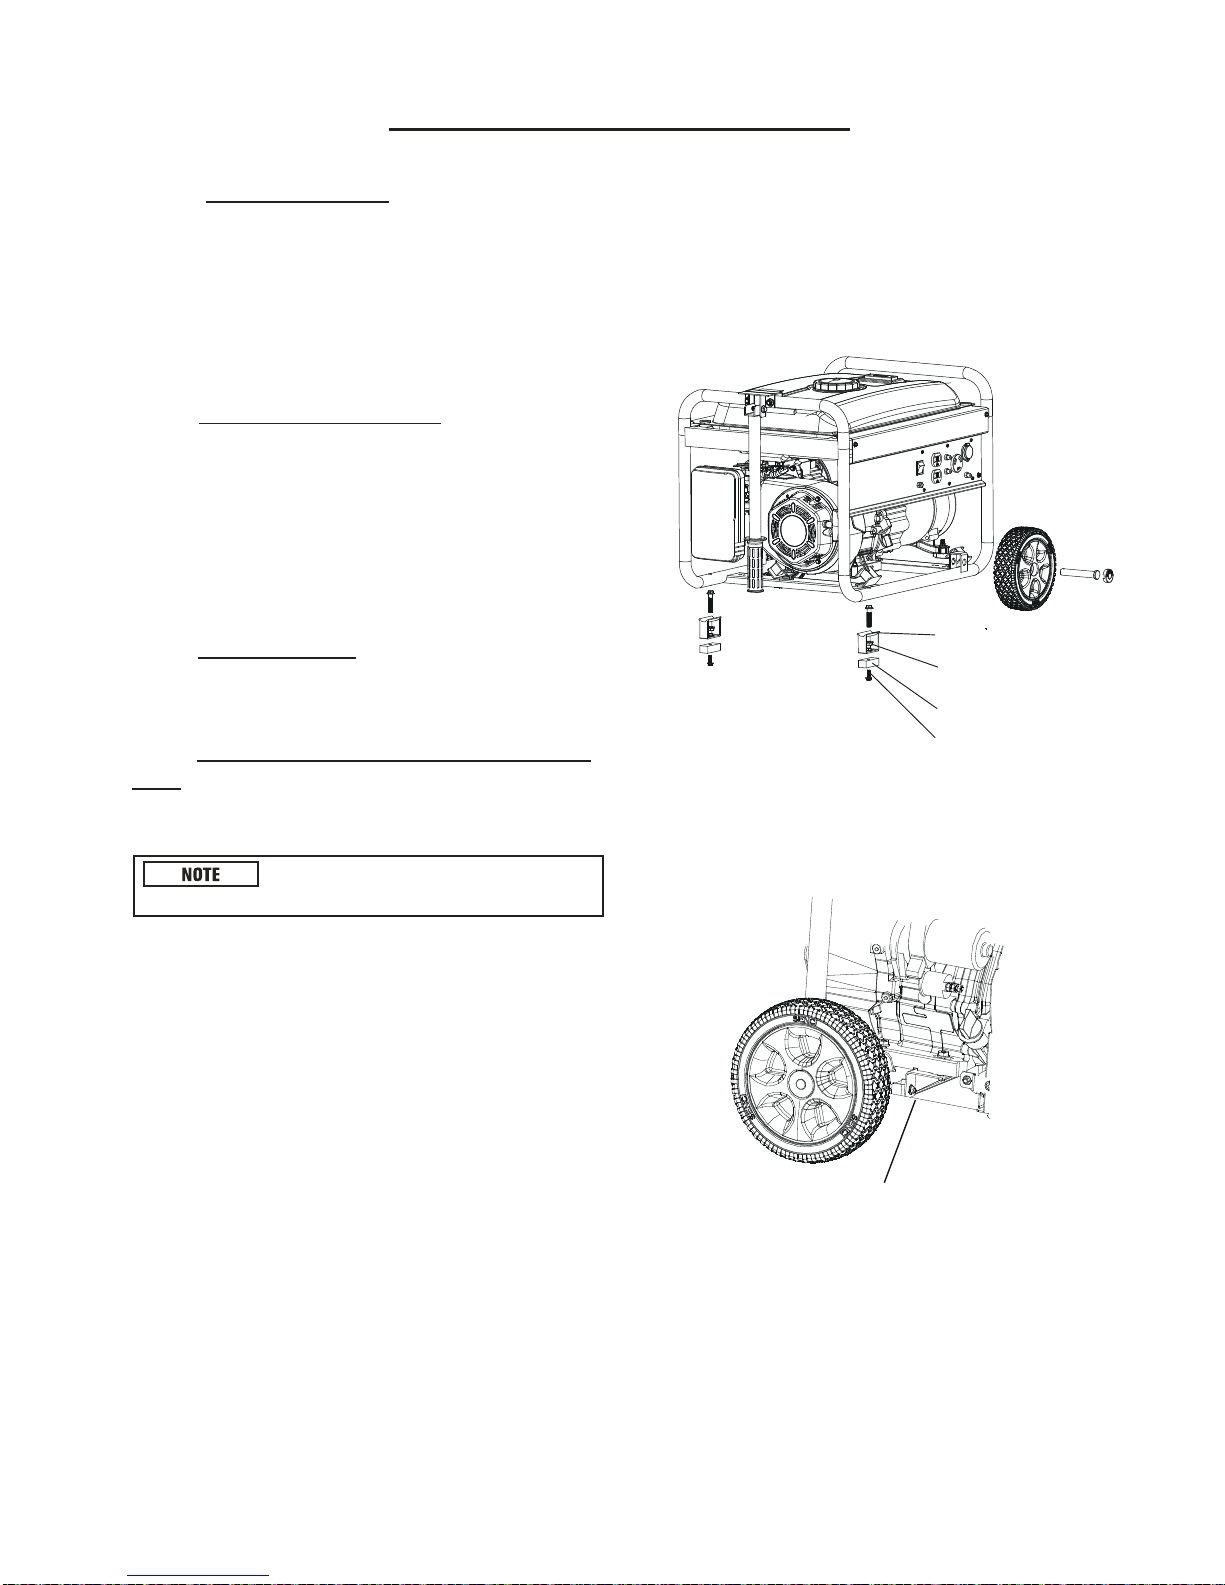
2.2 ASSEMBLY
The generator requires some assembly prior to locknut
support
rubber pad
flange bolt
using it.
2.2.1 ASSEMBLING THE ACCESSORY
KIT
The wheels are designed to greatly improve the
portability of the generator.
Refer to Figure to install wheels as shown.
Refer to Figure to install the leg supports as
shown.
The wheels are Not intended for
over-the-road use.
4
• Slide the axle through the wheel hub, then insert
the flat washer.
• Slide the axle through the frame brackets.
• Bend the cotter pin tabs outward to lock the pin
in place.
• Unscrew nut on leg support, install bolt through
the generator frame, secure the bolt tightly with
wrench(not included).
REMOVE Red Support Brackets (2 pieces total)
Before Use! (They are packing material, will
damage engine without removing them.)

SECTION 3 —FEATURES AND CONTROLS
Read this Owner’s Manual and safety rules before operating your generator.
Compare the illustrations with your generator, to familiarize yourself with the locations of
various controls and adjustments. Save this manual for future reference.
Pictures and drawings used in this manual are for reference only and do not represent any specific model.
5
12
2
3
1
5
4
6
8
711
13
910
1
10
2
ENGINE SWITCH
11
SPARK PLUG
3
12
MUFFLER
4
AC CIRCUIT BREAKER
13
CHOKE LEVER
5
OIL DRAIN PLUG
AIR FILTER
6
OIL FILL CAP/DIPSTICK
RECOIL STARTER
7
FUEL TANK
AC RECEPTACLE
8
FUEL GAUGE
9
FUEL TANK CAP

SECTION 4 — PREPARATION BEFORE OPERATION
All oil should meet minimum American
Petroleum Institute (API) Service Class SJ, SL or
better. Use no special additives. Select the oil’s
Viscosity grade according to the expected
operating temperature (also see chart).
Improper treatment of generator
could damage it and shorten its life. DO NOT
attempt to crank or start the engine before it has
been properly serviced with the recommended
oil. This could result in an engine failure.
4.2 ADDING FUEL
4.1 ADDING ENGINE OIL
Never fill tank indoors. Never fill
fuel tank when engine is running
or hot. Turn generator engine
OFF and allow engine to cool entirely before
filling fuel tank. Avoid spilling gasoline on HOT
engine. Keep fuel away from sparks, open
flames, pilot lights, heat, and other ignition
sources. DO NOT light a cigarette or smoke
when filling the fuel tank. Fuel is highly
FEAMMABLE and its vapors are EXPLOSIVE.
Do not overfill the fuel tank.
Allow space for fuel expansion.
IF the fuel tank is overfilled, fuel
can overflow onto a HOT engine and cause FIRE
or EXPLOSION. If fuel spills, wait until it
evaporates before starting engine. Check fuel
lines, tank, cap and fittings frequently for cracks
or leaks. Replace if necessary.
•
•
•
•
• Do not mix oil with gasoline.
• Install fuel cap and wipe up any spilled gasoline.
IMPORTANT: It is important to prevent gum
deposits from forming in fuel system parts such
as the carburetor, fuel hose or tank during
storage. Alcohol-blended fuels (called gasohol),
ethanol or methanol) can attract moisture, which
leads to separation and formation of acids during
storage. Acidic gas can damage the fuel system.
So the fuel should be emptied before storage of
30 days or longer. See the “Storage” section.
Never use engine or carburetor cleaner products
in the fuel tank as permanent damage may occur.
• Place generator on a flat, level surface.
•Clean area around oil fill and remove oil fill cap
and dipstick. Wipe dipstick clean.
•Slowly fill engine with oil through the oil filter
open until it reaches the full mark on the dipstick.
Stop filling occasionally to check oil level. Be
careful do not over fill.
•Install oil fill cap and finger tighten securely.
•Check engine oil level before starting each time
thereafter.
4.3 GROUNDING THE GENERATOR
The national Electrical Code requires that the
frame and external electrically conductive part of
this generator be properly connected to an
approved earth ground.
Local electrical codes may also require proper
grounding of the unit. For that purpose,
connecting a No. 10 AWG (American Wire
Gauge) stranded copper wire to the grounding lug
and to an earth-driven copper or brass grounding
rod (electrode) provides adequate protection
against electrical shock. However, local codes
may vary widely. Consult with a local electrician
for grounding requirement in the area.
Fuel gauge
EmptyFull
Fuel strainerFuel tankFuel gauge cap
Max oil level
10W-30
SAE 30
Synthetic 5W-30
Above 40︒F,use SAE 30
Between 40︒F to 10︒F,use 10W-30
Below 10︒F,use synthetic 5W-30
6
Fuel must meet these requirements:
Clean, fresh, unleaded gasoline.
A minimum of 87 octane/87AKI (91 RON).
Never use E85 fuel.
Gasoline with up to 10% ethanol (gasohol) or
up to 15% MTBE (methyl tertiary butyl ether)
is acceptable.
WATTAGE REFERENCE GUIDE
Proper grounding of the generator will help
prevent electrical shock in the event of ground
fault condition in the generator or in connected
electrical devices. Proper grounding also helps
dissipate static electricity, which often builds up
in ungrounded devices.
Wattage Reference Guide
Tool or Appliance
Running*
(Rated)
Watts
Additional
Starting
(Surging)
Watts
Essentials
Light Bulb - 75 watt 75 —
Furnace Fan Blower - 1/2 HP 800 2350
Sump Pump - 1/3 HP 800 1300
Refrigerator/Freezer 700 2200
Water Well Pump - 1/2 HP 1000 2100
Heating/Cooling
Window AC - 10,000 BTU 1200 3600
Humidifier - 13 Gal 175 —
Central AC - 24,000 BTU 3800 11400
Kitchen
Microwave Oven - 1000 Watt 1000 —
Coffee Maker 1000 —
Electric Stove - 8” Element 2100 —
Toaster 850 —
Family Room
DVD/CD Player 100 —
VCR 100 —
Stereo Receiver 450 —
Color Television - 27 in 500 —
Personal Computer w/17 in
monitor
800 —
Other
Security System 500 —
AM/FM Clock Radio 100 —
Garage Door Opener - 1/2 HP 875 2350
Electric Water Heater 4700 11700
DIY/Job Site
Quartz Halogen Work Light 1000 —
Airless Sprayer - 1/3 HP 600 1200
Reciprocating Saw 960 —
Electric Drill - 1/2 HP, 5.4 Amps 600 900
Circular Saw - 7-1/4 in 1400 2300
Miter Saw - 10 in 1800 1800
Table Planer - 6 in 1800 1800
Table Saw/Radial Arm Saw - 10 in 2000 2000
Air Compressor - 1 HP 1600 4500
SECTION 5 — OPERATION
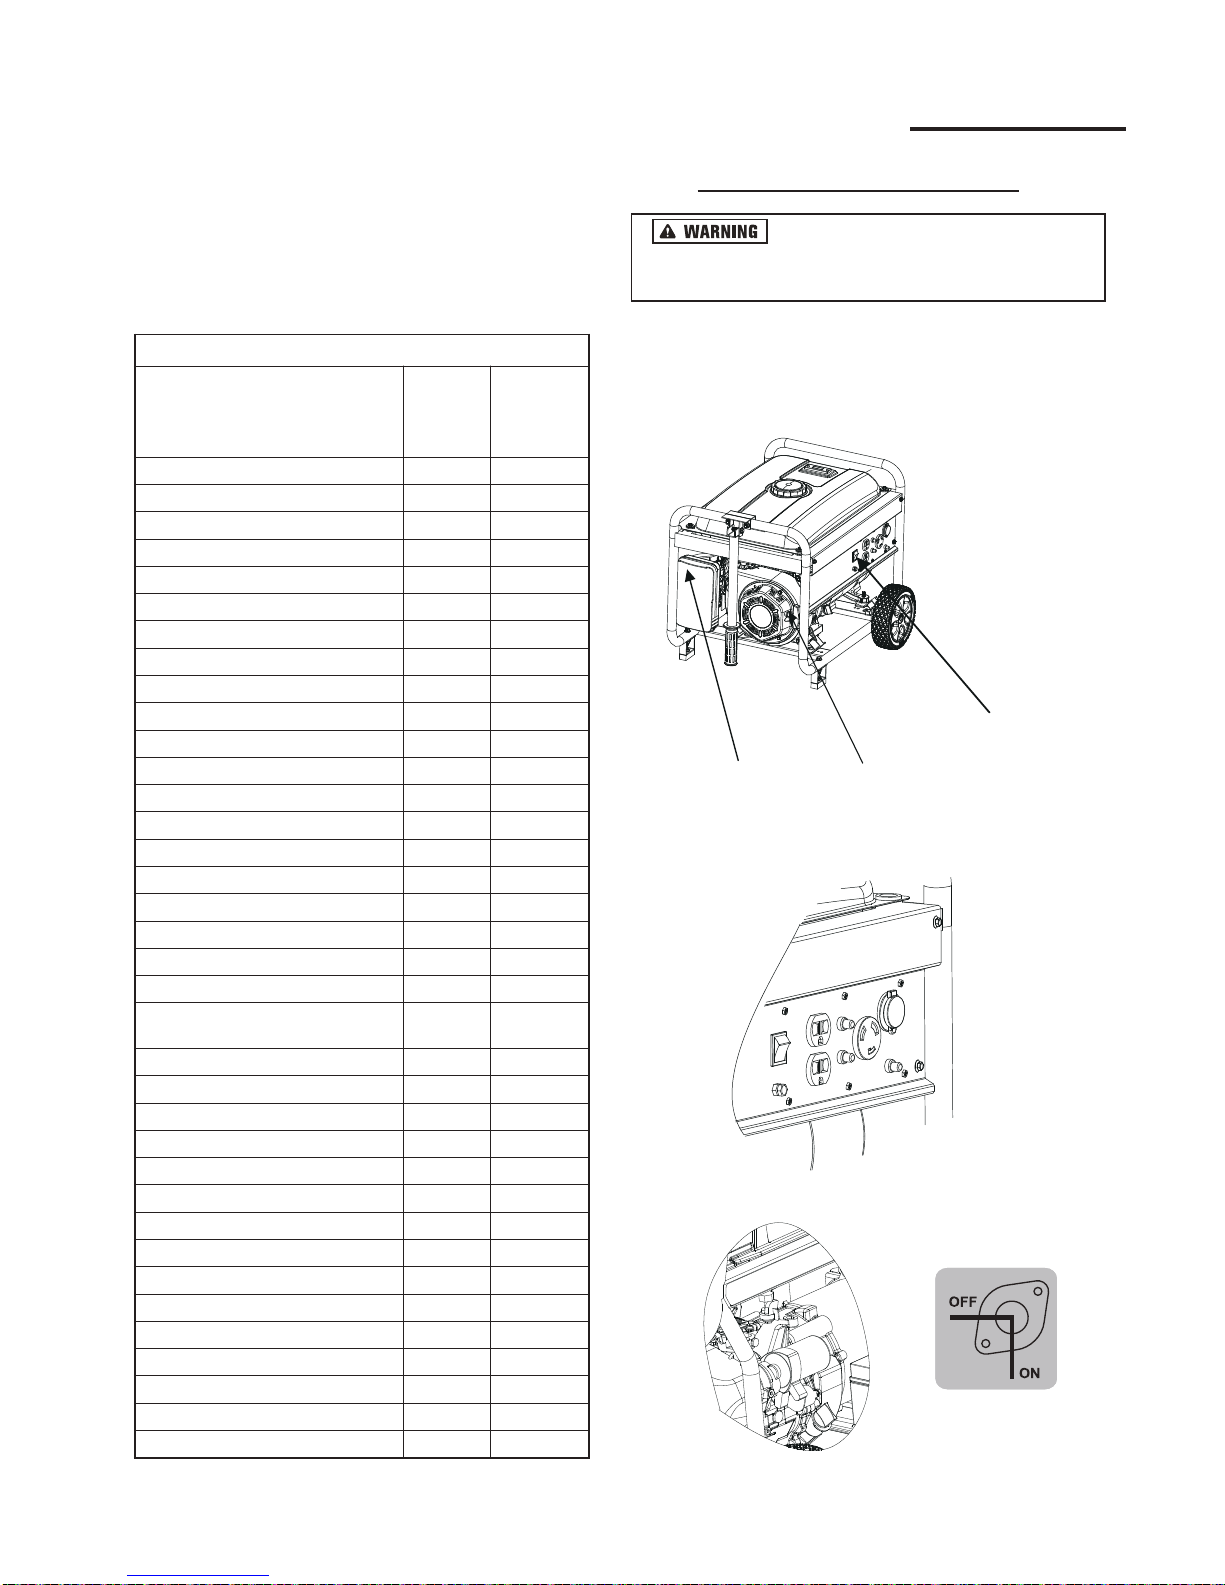
5.1 STARTING THE ENGINE
Never start or stop engine with
electrical devices plugged into the receptacles
AND devices turned on.
Unplug all electrical loads from the unit’s
receptacles before starting the engine.
Make sure the unit is in a level position.
Choker Lever Recoil Starter
Engine On/Off
Switch
Turn engine switch to ON position for Recoil start.
Turn Fuel switch to ON position.
7
Start/Démarrage
Off/Arrêt

If battery is discharged, use manual
starting instructions.
If engine fires, but does not continue
to run, move choke lever to the CHOKE position
and repeat starting instructions.
Starter cord kickback (rapid
retraction) will pull hand and arm toward engine
faster than you can let go which could cause
broken bones, fractures, bruises, or sprains
resulting in serious injury.
When starting engine, pull cord slowly until
resistance is felt and then pull rapidly to avoid
kickback.
Never start or stop engine with electrical devices
plugged in and turned on.
If engine fails to start after 3 pulls,
or if unit shut down during operation, make sure
unit is on a level surface and check for proper oil
level in crankcase. This unit may be equipped
with a low oil protection device. If so, oil must be
checked at proper level for engine to start and
run.
Exhaust heat/ gases could
ignite combustible, structures or damage
fuel tank causing a fire, resulting in death,
serious injury and/or property damage. Contact
with muffler area could cause burn resulting in
serious injury.
DO NOT touch hot part and AVOID hot exhaust
gases.
Allow equipment to cool before touching.
Keep at least 5 feet (152 cm) of clearance on all
sides of generator including overhead.
Contact the original equipment manufacturer,
retailer , or dealer to obtain a spark arrester
designed for the exhaust system installed on this
engine.
Replacement parts must be the same and installed
in the same position as the original parts.
When engine starts, move choke lever to 1/2-
CHOKE position until engine runs smoothly and
then fully into RUN position. If engine falters,
move choke back out to 1/2- CHOKE position
until engine runs smoothly and then fully into RUN
position.
Move engine choke lever to the CHOKE position.
For Recoil start, firmly grasp the recoil handle and
pull slowly until increased resistance is felt. Pull
rapidly up and away.
Recoil Starter
For electric start, set the switch to the "ON", turn
and hold key in start switch to “start” position
until generator starts. To prolong the life of
starter components, DO NOT hold key in “start”
position for more than 15 seconds, and pause for
at least 1 minute between starting attempts.
8
CHOKE
RUN
Start/Démarrage
Off/Arrêt
Do not overload the generator.
Also, do not overload individual panel
receptacles. These outlets are protected against
overload with push-to-reset-type circuit breakers.
If amperage rating of any circuit breaker is
exceeded, that breaker opens and electrical output
to that receptacle is lost.
5.2 CONNECTING ELECTRICAL
LOADS
• Let engine run stable and warm up for a few
minutes after starting.
• Plug in and turn on the desired 120 and/or 240
Volt AC, single phase, 60 Hz electrical loads.
• Add up the rated watts (or amps) of all loads to
be connected at one time. This total should not be
greater than (a) the rated wattage/amperage
capacity of the generator or (b) circuit breaker
rating of the receptacle supplying the power.
DO NOT connect 240 Volt loads to the 120 Volt
duplex receptacles, and do not do vice versa also.
DO NOT connect 3 phase loads to the generator.
DO NOT connect 50 Hz loads to the generator.
Start generator and let engine
stabilize before connecting electrical loads.
Connect electrical loads in OFF position then turn
ON for operation.
Turn electrical loads OFF and disconnect from
generator before stopping generator.
Exceeding generators wattage/
amperage capacity could damage generator
and/or electrical devices connected DO NOT
exceed the generator’s wattage/amperage
capacity.
• Overloading a generator in excess of its rated
wattage capacity can result in damage to the
generator and to connected electrical devices.
Observe the following to prevent overloading the
unit:
• Add up the total wattage of all electrical devices
to be connected at one time. This total should
NOT be greater than the generator’s wattage
capacity.
The rated wattage of lights can be taken from
light bulbs. The rated wattage of tools, appliances
and motors can usually be found on a data label
Some electric motors, such as induction types,
require about three times more watts of power for
starting than for running. This surge of power
lasts only a few seconds when starting such
motors. Make sure to allow for high starting
wattage when selecting electrical devices to
connect to the generator:
• Figure the watts needed to start the largest
motor.
• Add to that figure the running watts of all other
connected loads.
Shut off all loads then unplug the electrical cables
from generator panel receptacles. Never start or
stop the engine with electrical devices plugged in
and turned on.
Let engine run at no-load for several minutes to
stabilize the internal temperatures of engine and
generator.
Move ON/OFF switch to OFF position.
Close fuel valve.
5.3 STOPPING THE ENGINE
5.4 LOW OIL LEVEL SHUT DOWN
SYSTEM
or decal affixed to be the device.
If the appliance, tool or motor does not give
wattage, multiply volts times ampere rating to
determine watts (volts× amps = watts).
The engine is equipped with a low oil level
sensor that shuts down the engine automatically
when the oil level drops below a specified level.
If the engine shuts down by itself and the fuel
tank has enough gasoline, check engine oil level.
5.5 HIGH ALTITUDE
At altitudes over 3,000 feet (914.4 meters), a
minimum 87 octane / 87AKI (91 RON) gasoline is
acceptable. To remain emissions compliant, high
altitude adjustment is required. Operation without
this adjustment will cause decreased
performance, increased fuel consumption, and
increased emissions. See an authorized dealer for
high altitude adjustment information. Operation
of the engine at altitudes below 2,500 feet (762
meters) with the high altitude kit is not
recommended.
The wattage reference guide is provided to assist
in determining how many items the generator can
operate at one time.
9
IMPORTANT:
SECTION 6 — MAINTENANCE
6.1 MAINTENANCE SCHEDULE
The warranty of the generator does not cover
items that have been subjected to operator abuse
or negligence. The operator must maintain the
generator as instructed in this manual.
Once a year replace the spark plug
and replace the air filter. A new spark plug and
clean air filter assure proper fuel-air mixture and
help the engine run better and last longer.
6.2 GENERAL RECOMMENDATIONS
Generator maintenance consists of keeping the
unit clean and dry. Operate and store the unit in a
clean dry environment where it will not be
exposed to excessive dust, dirt, moisture or any
corrosive vapors. Cooling air slots in the
generator must not become clogged with snow,
leaves, or any other foreign material.
Check the cleanliness of the generator frequently
and clean when dust, dirt, oil, moisture or other
foreign substances are visible on its exterior
surface.
6.2.1 GENERATOR MAINTENANCE
Never insert any object or tool
though the air cooling slots, even if the engine is
not running.
6.2.2 TO CLEAN THE GENERATOR
• Use a damp cloth to wipe exterior surfaces
clean.
• A soft, bristle brush may be used to loosen
caked on dirt, oil etc.
• A vacuum cleaner may be used to pick up loose
dirt and debris.
• Low pressure air (not to exceed 25 psi) may be
used to blow away dirt. Inspect cooling air slots
and openings on the generator. These openings
must be kept clean and unobstructed.
First 5 Hours
•Change engine oil
Every 8 Hours or Daily
•Keep generator clean
•Check engine oil level
Every 25 Hours or Yearly
•Clean engine air filter
Every 50 Hours or Yearly
•Change engine oil
Yearly
•Replace engine air filter
•Service fuel valve
•Service spark plug
•Inspect muffler and spark arrester
•Clean cooling system
6.2.3 ENGINE MAINTENANCE
When working on the generator,
always disconnect spark plug wire from spark
plug and keep wire away from spark plug.
Some adjustments will need to be made
periodically to properly maintain the generator.
All adjustments in the maintenance section of
this manual should be made at least once each
season. Follow the requirements in the
“Maintenance Schedule”.
DO NOT use a garden hose to clean
generator. Water can enter the engine fuel system
and cause problem. In addition, if water enters
the generator though cooling air slots, some water
will be retained in voids and crevices of the rotor
and stator winding insulation. Water and dirt
buildup on the generator internal windings will
eventually decrease the insulation resistance of
these windings.
10
Follow the calendar intervals shown below.
More frequent service is required when
operating in adverse conditions.
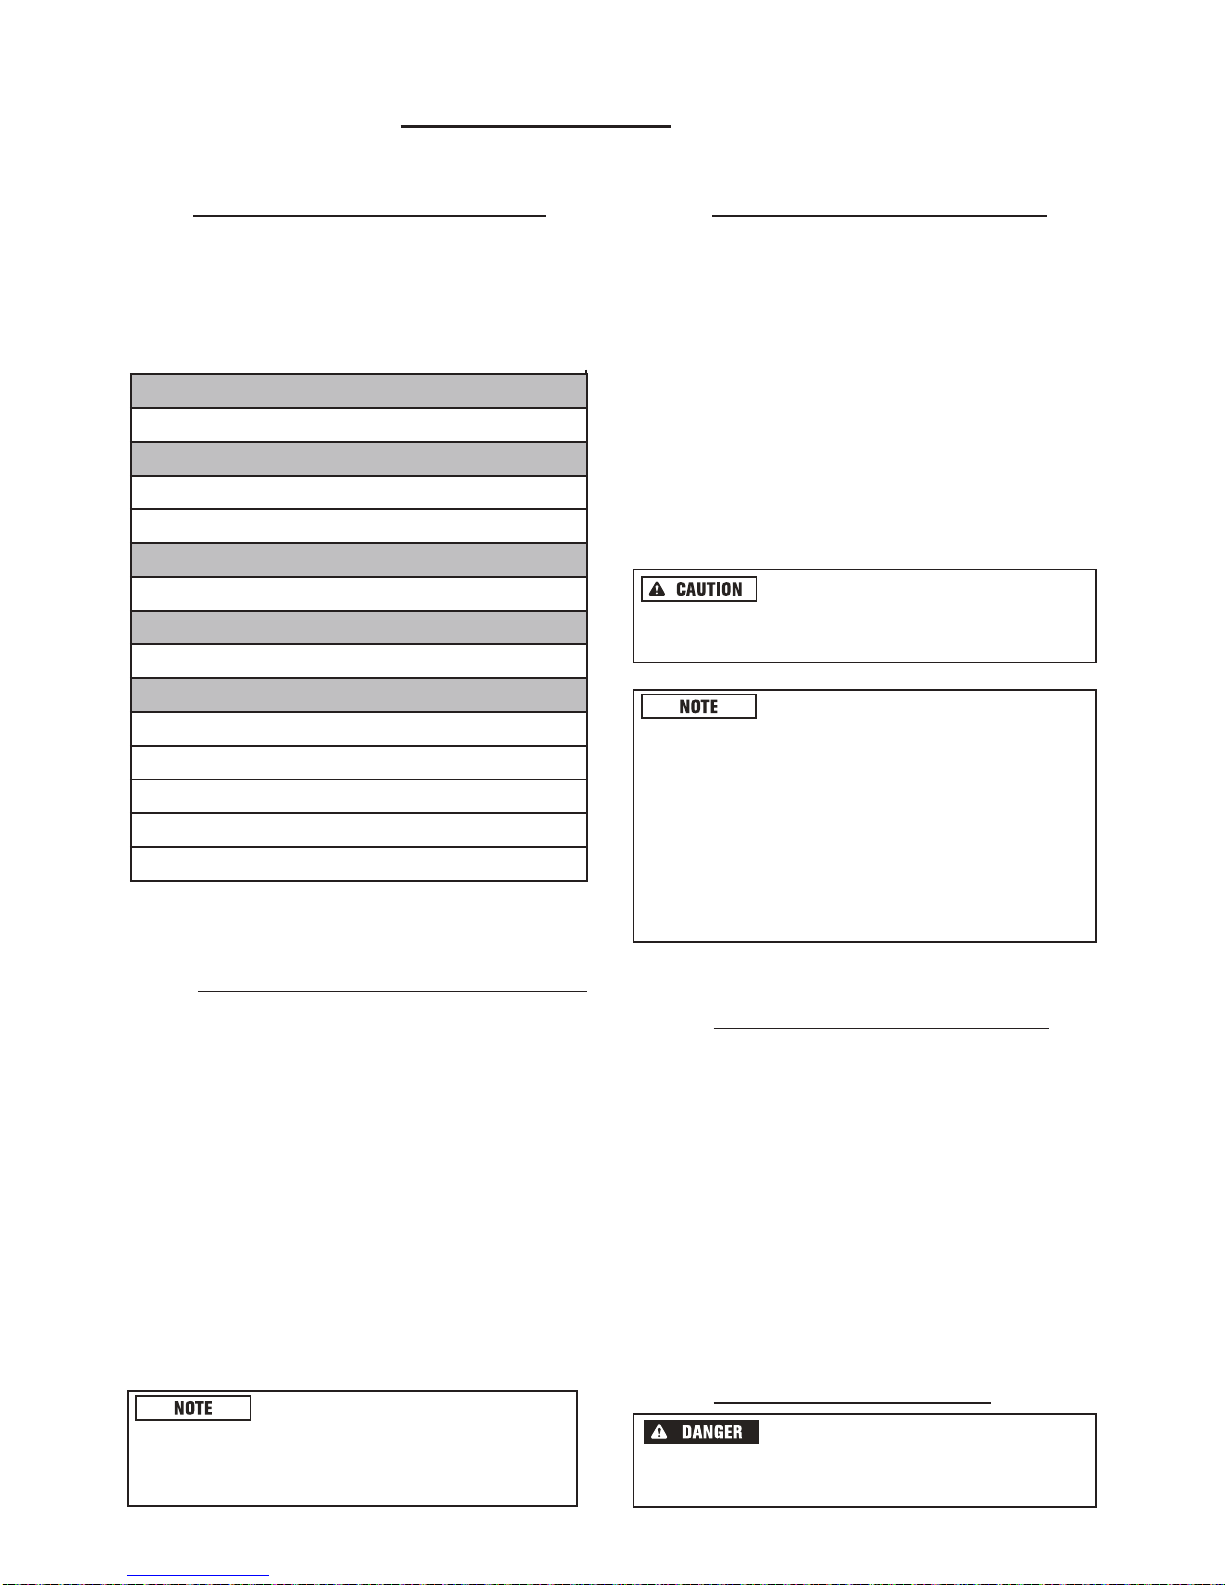
6.2.4 CHANGING THE OIL
Hot oil may cause burns. Allow
engine to cool before draining oil. Avoid
prolonged or repeated skin exposure with used
oil. Thoroughly wash exposed areas with soap.
Use the following instructions to change the oil
while the engine is still warm:
• Clean area around oil drain plug.
• Remove oil drain plug from engine and oil fill
plug to drain oil completely into a suitable
container.
• When oil has completely drained, install oil
drain plug and tighten securely.
• Fill engine with recommended oil. (See “Before
Starting the Generator” for oil recommendations).
• Wipe up any spilled oil.
• Dispose of used oil at a proper collection center.
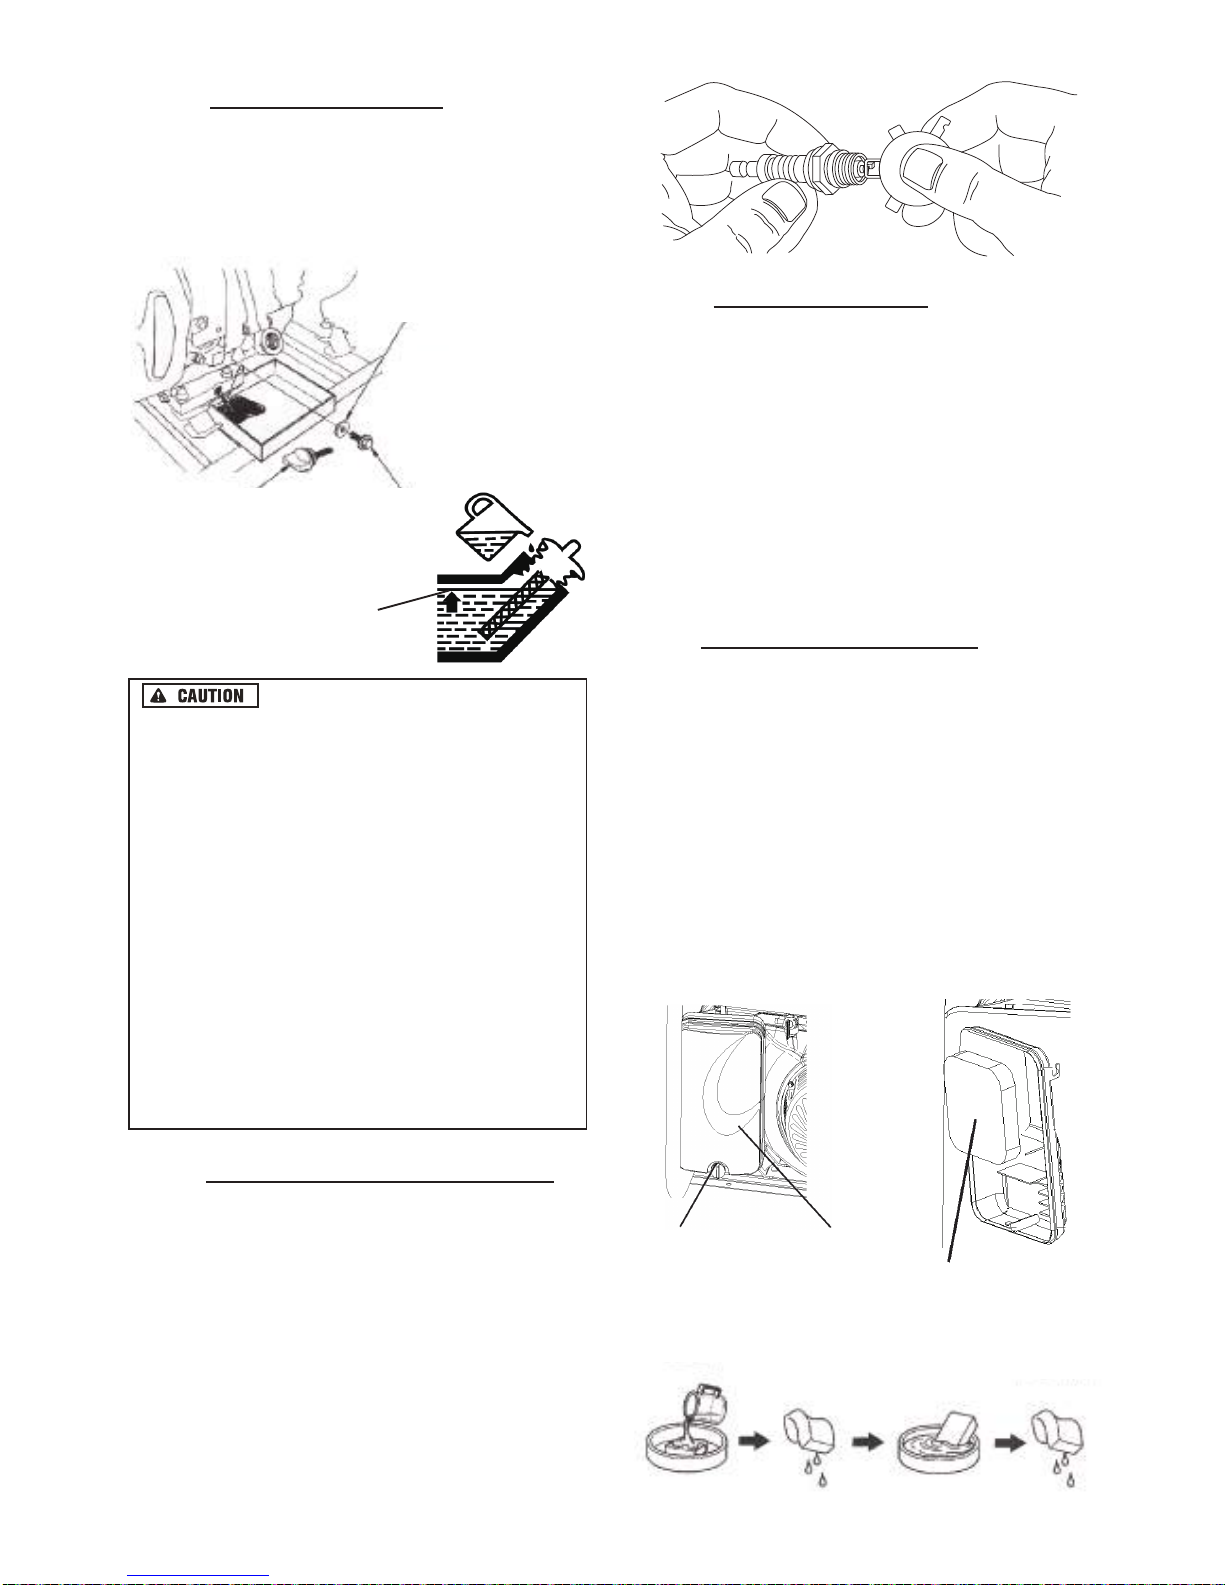
6.2.5 REPLACING THE SPARK PLUG
6.2.6 SPARK ARRESTER
• Shut off generator and allow the engine and
muffler to cool down completely before servicing
spark arrester (located on the back of the
muffler).
• Remove the clamp and spark arrestor screen.
• Clean the spark arrester screen with a small
wire brush.
• Replace the spark arrester if it is damaged.
• Installation of the spark arrester screen is the
reverse of the removal.
The engine will not run properly and may be
damaged if using a dirty air filter. Replace the air
filter once a year. Clean or replace more often if
operating under dusty conditions.
6.3 SERVICE AIR FILTER
Change the oil after the first five hours of
operation, then every 50 hours thereafter. If
running this unit under dirty or dusty conditions,
or in extremely hot weather, to change the oil
more often.
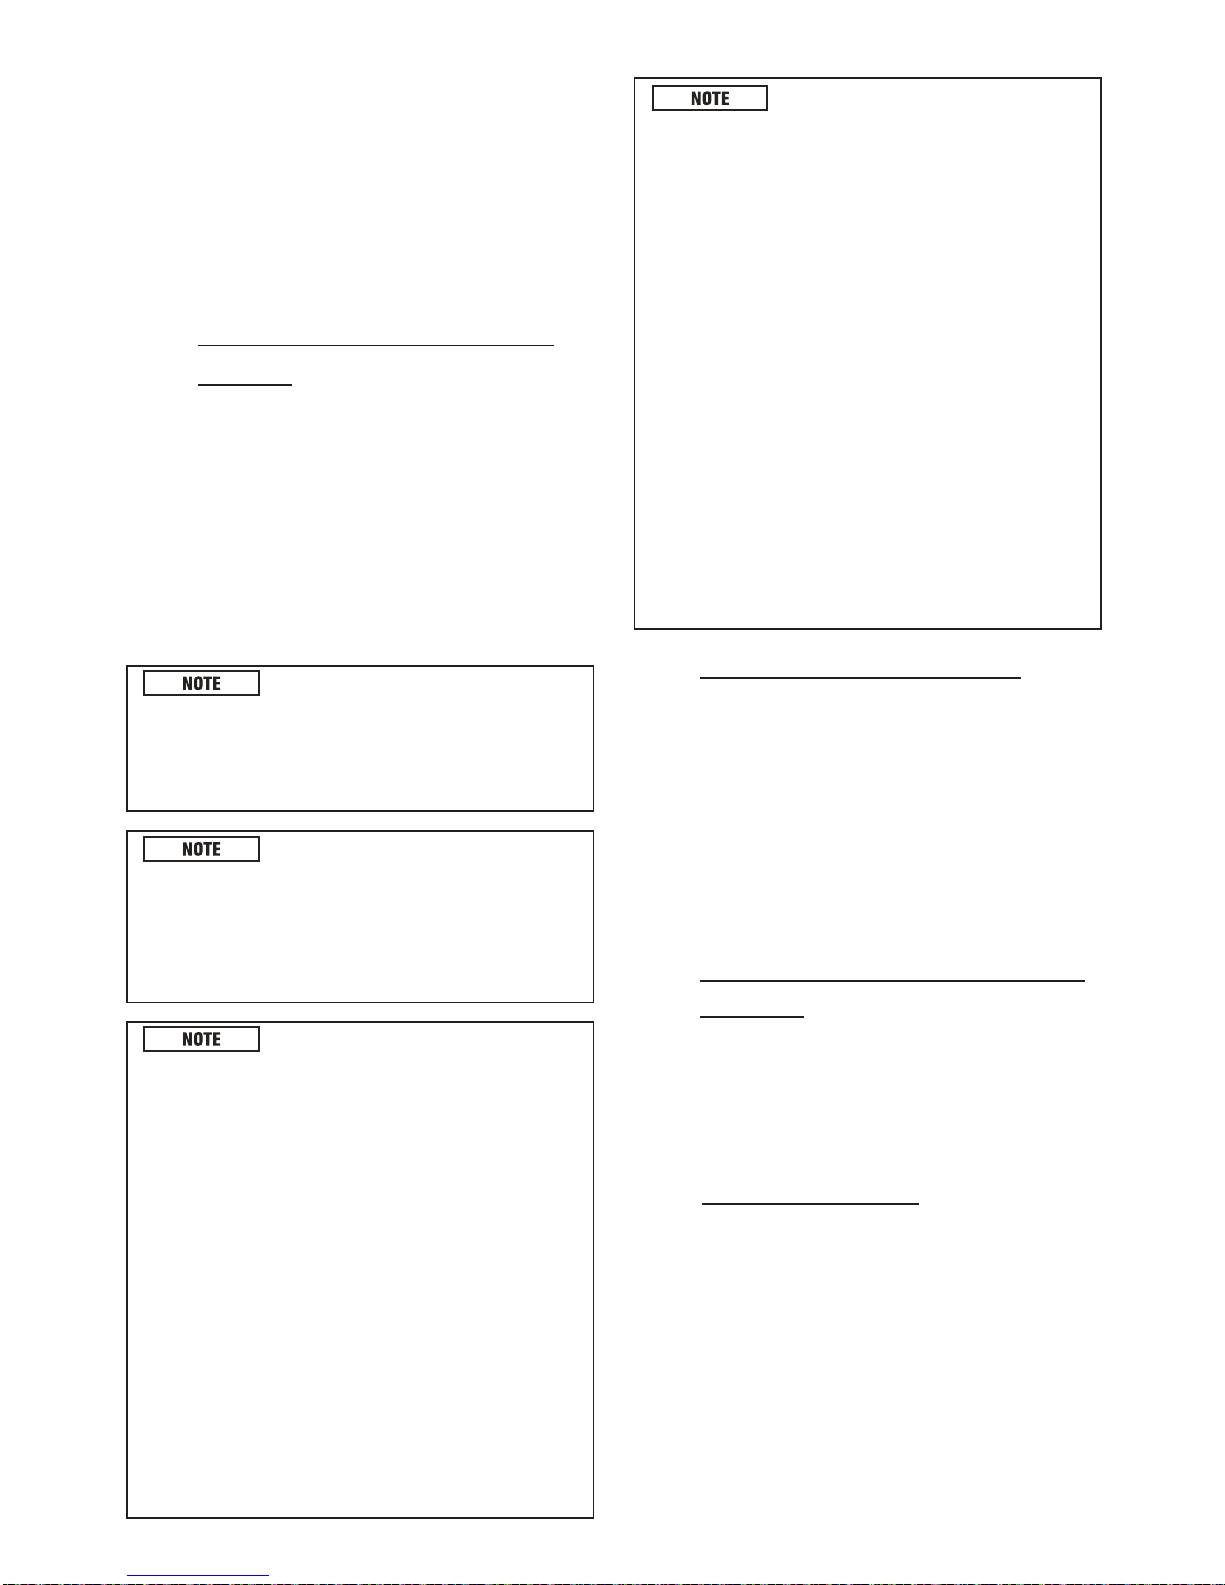
Soak Squeeze Engine oil Squeeze
Screw Cover of air filter
Cartridge of air cleaner
• Remove air filter cover.
• Wash in soapy water. Squeeze filter dry in clean
cloth (DO NOT TWIST).
• Clean air filter cover before re-installing it.
• Stop the engine and pull the spark plug wire off
of the spark plug.
• Clean the area around the spark plug and
remove it from the cylinder head.
• Set the spark plug’s gap to 0.70-0.80 mm
(0.028-0.031 in.). Install the correctly gapped
spark plug into the cylinder head and torque to 15
ft/lbs.
Drain plugDipstick
Max level
Sealing ring
11
Use spark plug F6TC, F7TC, BPR4ES or
Champion RN14YC.Replace the plug once each
year. This will help the engine start easier and run
better.
6.4 VALVE CLEARANCE
After the first 50 hours of operation, check
the valve clearance in the engine and adjust
if necessary. Inlet valve clearance:0.1-0.15mm;
exhaust valve clearance:0.15-0.2mm.
Important: If feeling uncomfortable about doing
this procedure or the proper tools are not
available, please take the generator to the nearest
service center to have the valve clearance
adjusted. This is a very important step to ensure
longest life for the engine.
7.1 GENERAL
The generator should be started at least once
every seven days and be allowed to run at least 30
minutes. If this cannot be done and the unit must
be stored for more than 30 days, use the following
information as a guide to prepare it for storage.
NEVER store engine with fuel in
tank indoors or in enclosed, poorly ventilated
areas where fumes may reach an open flame,
spark or pilot light as on a furnace, water heater,
clothes dryer or other gas appliance.
SECTION 7 — STORAGE
It is important to avoid gum deposits from
forming in essential fuel system parts such as the
carburetor, fuel hose or tank during storage. Also,
experience indicates that alcohol-blended fuels
(called gasohol, ethanol or methanol) can attract
moisture, which leads to separation and formation
of acids storage. Acidic gas can damage the fuel
system of an engine while in storage.
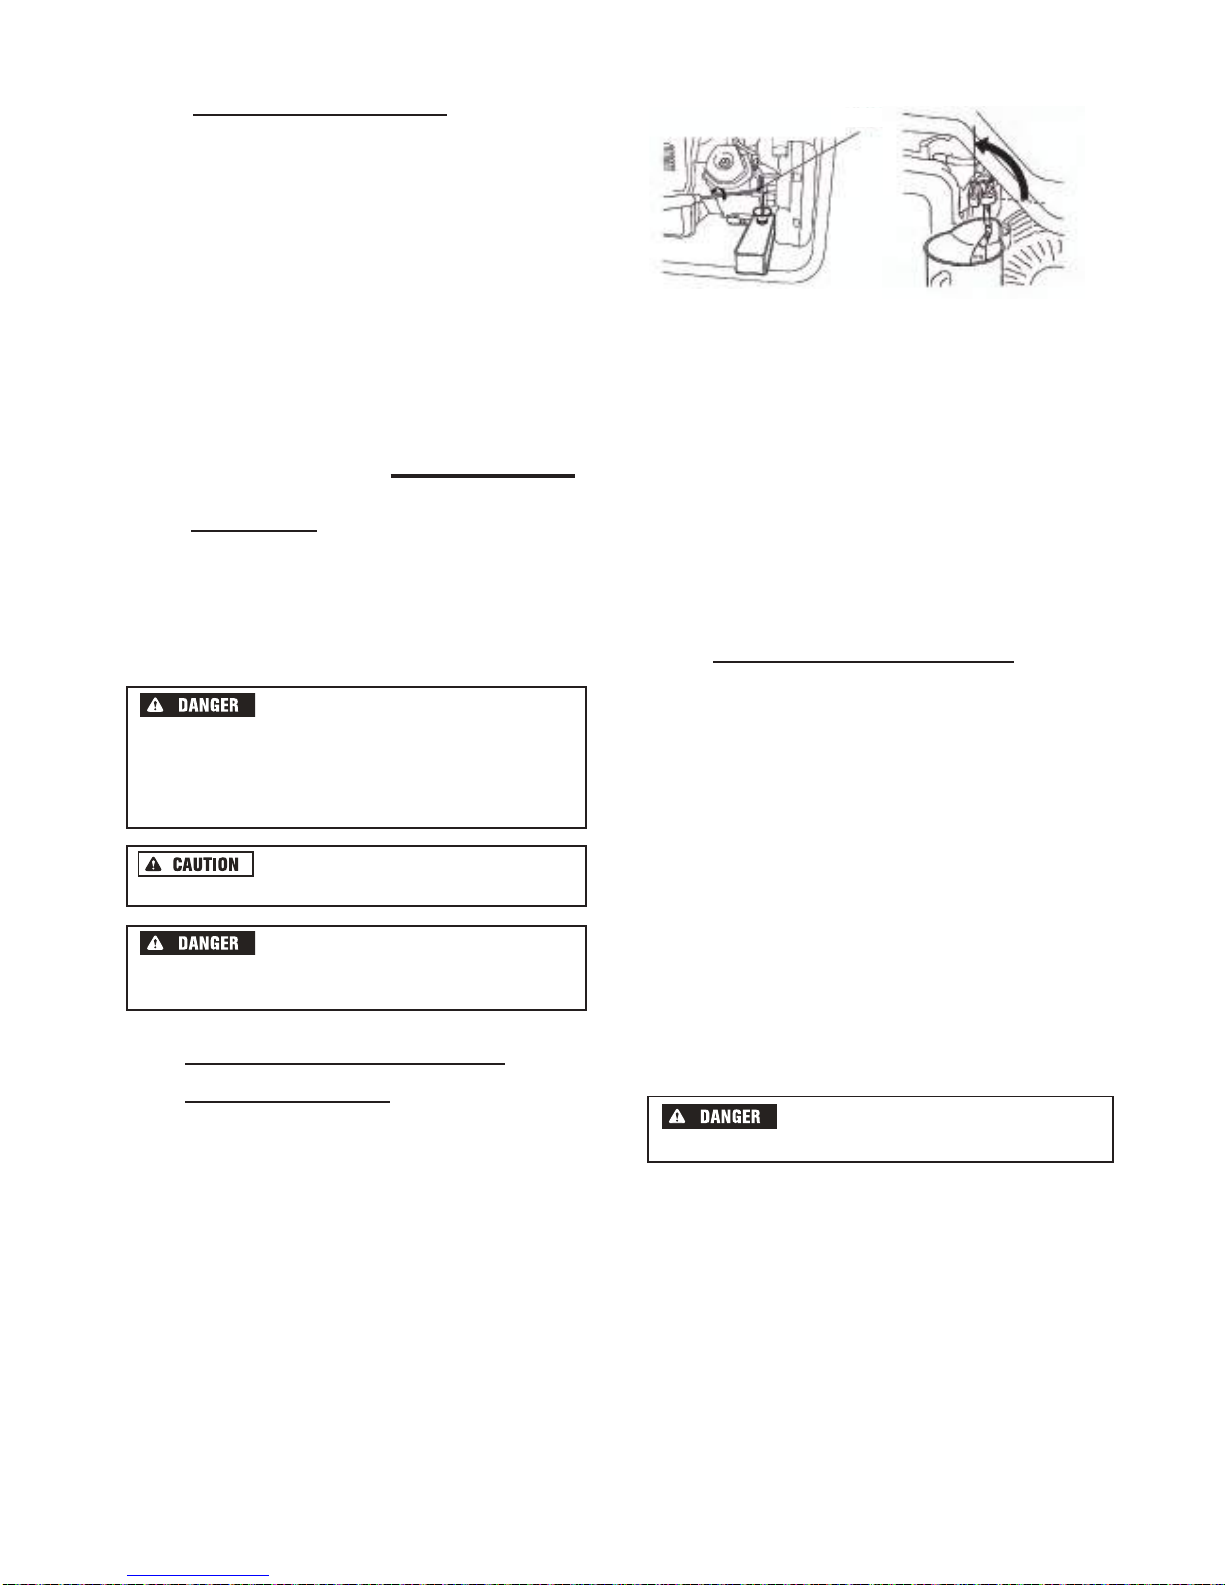
To avoid engine problems, the fuel system should
be emptied before storage of 30 days or longer, as
follows:
Drain fuel into approved container
outdoors, away from open flame. Be sure engine
is cool. Do not smoke.
• Remove all gasoline from the fuel tank.
• Start and run engine until engine stops from
lack of fuel.
• While engine is still warm, drain oil from
crankcase. Refill with recommended grade.
• Remove spark plugs and pour about 1/2 ounce
(15 ml) of engine oil into the cylinders. Cover
spark plug hole with rag. Pull the recoil starter a
couple times to lubricate the piston rings and
cylinder bore.
Avoid spray from spark plug
holes when cranking engine.
• Install and tighten spark plugs. Do not connect
spark plug wires.
• Clean the generator outer surfaces. Check that
cooling air slots and openings on generator are
open and unobstructed.
• Store the unit in clean, dry place.
NEVER cover the generator while
engine and exhaust area are warm.
Drain screw
• Do not store gasoline from one season to
another.
• Replace the gasoline can if it starts to rust. Rust
and/or dirt in the gasoline will cause problems
with the carburetor and fuel system.
• If possible, store the unit indoors and cover it to
give protection from dust and dirt. BE SURE TO
EMPTY THE FUEL TANK.
• If it is not practical to empty the fuel tank and
the unit is to be stored for some time, use a
commercially available fuel stabilizer added to
the gasoline to increase the life of the gasoline.
• Cover the unit with a suitable protective cover
that does not retain moisture.
7.3 OTHER STORAGE TIPS
12
7.2 LONG TERM SHORTAGE
INSTRUCTIONS

Problem Cause Correction
1.One of the circuit breakers is off. 1.Turn circuit breaker to ON.
2.Fault in generator. 2.contact authorized service facility.
3.Poor connection or defective cord set. 3.check and repair.
4.Connected device is bad. 4.Connect another device that is in good
condition.
1.Short circuit in a connected load. 1.Disconnect shorted electrical load.
2.Engine speed is too slow. 2.contact authorized service facility.
3.Generator is overloaded. 3.See Don't Overload Generator.
4.Shorted generator circuit. 4.Contact authorized service facility.
5.Clogged or dirty fuel filter. 5.Clean or replace fuel filter.
1.Start switch in off position. 1.Turn key in start switch to on .
2.Fuel valve is in "Off" position. 2.Turn fuel valve to "On" position.
3.Failed battery. 3.Replace battery.
4.Low oil level. 4.Fill crankcase to proper level or place
generator on level surface.
5.Dirty air cleaner. 5.Clean or replace air cleaner.
6.Clogged or dirty fuel filter. 6.Clean or replace fuel filter.
7.Out of fuel. 7.Fill fuel tank.
8.Stale fuel. 8.Drain fuel tank and carburetor;fill with
fresh fuel.
9.Spark plug wire not connected to
spark plug.
9.Connect wire to spark plug.
10.Bad spark plug. 10.Replace spark plug.
11.Water in fuel. 11.Drain fuel tank and carburetor;fill
with fresh fuel.
12.Flooded. 12.Wait 5 minutes and re-crank engine.
13.Excessively rich fuel mixture. 13.Contact authorized service facility.
14.Intake valve stuck open or closed. 14.Contact authorized service facility.
15.Engine has lost compression. 15.Contact authorized service facility.
1.Load is too high. 1.See Don't Overload Generator.
2.Dirty air filter. 2.Replace air filter.
3.Clogged or dirty fuel filter. 3.Clean or replace fuel filter.
1.Carburetor is running too rich or too
lean.
1.Contact authorized service facility.
2.Clogged or dirty fuel filter. 2.Clean or replace fuel filter.
Engine is
running,but no
AC output is
available.
Engine runs
good without
loading, but
"bogs down"
when loads
are connected.
Engine can’t
be started,
or runs
rough or
shuts down
while
running.
Engine"hunts"
or falters
Engine lacks
power.
SECTION 8 — TROUBLESHOOTING
13

SECTION 9 — PARAMETER
Specification
14
Model AP4050
Engine Kohler 7.0HP
Displacement 208cc
Rated frequency 60Hz
Rated voltage 120 V
Running watts 3050W
Starting watts 4050W
Fuel tank capacity 4Gallon
Full load continuum
running time
8.0H
12.0H
1/2 load continuum
running time

SECTION 10 — DIAGRAM
15
AP4050
protector26A
white
main winding
DC winding
black
black black
blue
brown
yellow
yellow
yellow
AVR
secondary winding
excitation winding
generator part
blue blue
blue
brown
control panel
engine switch
engine part
oil sensor oil alert spark plug ignition coil
RV TT-30R receptacle
30A/120V 20A/120V
protector 20A
DC12V
protector 9A CIG lighter
duplex

16
SECTION11 — WARRANTIES
Energy Cube EMISSION CONTROL
DEFECTS WARRANTY COVERAGE
Spark ignited small off-road engines are
warranted relative to emission control parts
defects for a period of three (3) years, subject to
the provisions stated below. If any emission
related part on your engine is defective, the part
will be repaired or replaced by Energy Cube.The
warranty period begins on the date the product is
delivered to the initial owner.
OWNER’S WARRANTY RESPONSIBILITY
As the owner of a spark ignited small off-road
engine, you should however be aware that
Energy Cube may deny you warranty coverage if
your spark ignited small off-road engine or part
has failed due to abuse, neglect, improper
maintenance or unapproved modifications.
EMISSION CONTROL SYSTEM
WARRANTED PARTS
Coverage under this warranty extends only to the
parts listed below (the emission control system
parts) to the extent that these parts were present
on the engine purchased.
As the spark ignited small off-road engine owner,
you are responsible for the maintenance required,
what are listed in the owner’s manual.
Energy Cube recommends that you retain all
receipts covering maintenance on your spark
ignited small off-road engine, butEnergy Cube
cannot deny warranty solely for the lack of
receipts or for your failure to ensure the
performance of all scheduled maintenance.
The emission warranty is a defects warranty and
defects are judged on normal engine
performance. The warranty is not related to an
in-use emission test.
You are responsible for presenting your spark
ignited small off-road engine to an authorized
service center as soon as a problem exists. The
undisputed warranty repairs should be completed
in a reasonable period of time, not to exceed 30
days. For the location of an authorized service
center and any questions you may have regarding
your warranty rights and responsibilities, you
should call our parts and technical support
group toll free at 888-980-4936, Mon-Fri,
8:00 AM to 5:00 PM Pacific Standard Time.
Fuel Metering System
Carburetor and/or internal parts
Intake manifold
Evaporative System
Fuel tank, Fuel cap, and tether.
Air Induction System
Air cleaner*
Intake manifold
Exhaust System
Exhaust manifold
Catalyst
Ignition System
Flywheel magneto
Ignition coil assembly
Spark plug*
Crankcase Emission Control System
Crankcase breather tube

Oil filler cap
Miscellaneous parts
Hoses, seals, gaskets, connectors and assemblies
associated with listed parts
COVERAGE TERM
Energy Cube warrants to the initial owner and each
subsequent purchaser that the spark ignited small
off-road engine is free from defects in materials
and workmanship which can cause the failure of
an emission warranted part for a period of three (3)
years after the engine is delivered to the original
retail purchaser. Warranty coverage shall extend
to the failure of any engine components caused by
the failure of any warranted part still under
warranty.
LIMITATIONS
(a) Repair or replacement required as the result of
misuse or neglect, improper maintenance or
unapproved modifications, repairs improperly
performed or replacement improperly installed,
use of unapproved replacement parts or
accessories and modifications not recommended
by Energy Cube.
(b) Replacement parts, other services and
adjustments necessary for normal maintenance.
(c) Transportation to and from the authorized
service center or retailer.
LIMITED LIABILITY
The liability of Energy Cube under this Emission
Control System Warranty is limited solely to the
remedy of defects in materials or workmanship.
This warranty does not cover inconvenience or
loss of the spark ignited small off-road engine
equipment or transportation of same to an
authorized service center. Energy Cube shall not
be liable for any other expenses, loss, or damage,
whether direct, incidental, consequential (except
as listed) or exemplary arising in connection with
the sale or use of or inability to use the spark
ignited small off-road engine equipment for any
other purpose.
The Emission Control System Warranty shall
NOT cover any of the following:
Note: * Covered up to the first required
replacement only. See the maintenance schedule
in the Owner’s Manual.
No express Emission Control System Warranty is
given by Aipower with respect to the engine
except as specifically set forth in this document.
Any Emission Control System Warranty implied
by law, including any warranty of merchantability
or fitness for a particular purpose, is expressly
limited to the Emission Control System Warranty
terms set forth in this document.
Do not return to store. Contact or call
1-888-980-4936 for help.
OUR WARRANTY
Energy Cube will, at its option, free of charge,
repair or replace any part(s) which, upon
examination, inspection and testing by
Energy Cube or an Energy Cube Authorized
Warranty Service Dealer, that is defective in
material or workmanship or both. Transportation
charges on product submitted for repair or
replacement under this warranty must be borne by
purchaser. Retain your proof-of-purchase receipt.
If you do not provide proof of the initial purchase
date, the manufacturer’s shipping date of the
product will be used to determine the warranty
period starting.
WARRANTY TERM
Any new Energy Cube generator purchased for
non-commercial use from an authorized
Energy Cube generator dealer in the continental
North America will be warranted against defects
in material or workmanship for a period of three
years , from date of purchase, subject to exclusions
noted herein. Commercial and rental applications
are warranted for one year . The warranty
period begins on the date of purchase by the first
retail end-user, and continues for the period of
warranty time. Energy Cube customer service will
keep on supplying spare parts per request after
warranty period with cost charge.
“Consumer Use" means residential household
using by a retail consumer. “Commercial Use"
means all other uses, including used for
commercial, industrial or business or rental
purposes. Once equipment has experienced
commercial use, it shall thereafter be considered
as commercial use for purposes of this warranty.
17
ENERGY CUBE GENERATOR
OWNER LIMITED
WARRANTY POLICY

18
HOW TO OBTIAN WARRANTY SERVICE
Please call our customer service number
888-980-4936, or email to:
team at first in case of a service needed. Please
prepare and provide the model number, serial
number and the proof of purchase while
contacting us. or mail a request to:
ABOUT YOUR WARRANTY
We welcome warranty repair and apologize to
you for being inconvenienced. Any Authorized
Service Dealer may perform warranty repairs.
Most warranty repairs are handled routinely, but
sometimes requests for warranty service may not
be appropriate. For example, warranty service
would not apply if equipment damage occurred
because of misuse, lack of routine maintenance,
shipping, handling, warehousing or improper
installation. Similarly, the warranty is void if the
manufacturing date or the serial number on the
portable generator has been removed or the
equipment has been altered or modified. During
the warranty period, the Authorized Service
Dealer, at its option, will repair or replace any
part that, upon examination, is found to be
defective under normal use and service. This
warranty will not cover the following repairs and
equipment:
• WEAR ITEMS: Outdoor Power Equipment,
as with all mechanical devices, need
periodic part(s) service and replacement to
perform as designed. This warranty will not cover
repair when normal use has exhausted the life-
time of a part(s) or engine.
• INSTALLATION AND MAINTENANCE: This
warranty does not cover the generators or its parts
what have been subjected to improper or
unauthorized assemblied, alterated, modified, or
damaged due to misusing, negligence, accident,
overloading, over-speeding, improper
maintenance, repair or storage so as, in our
judgment, to adversely affect its performance and
reliability. This warranty also does not cover
regular maintenance and parts such as air filters,
• OTHER EXCLUSIONS: This warranty excludes
wearing parts such as o-rings, filters, etc., or
malfunctions resulting from accidents, abuse,
modifications, alterations, or improper servicing
or freezing or chemical deterioration; Damaged
related to rodent and/or insect infestation.
Accessory parts such as starting batteries,
generator adapter cord sets and storage covers are
excluded from the product warranty. This
warranty excludes used, reconditioned, and
demonstration equipment, equipment used for
prime power in place of utility power, equipment
used in life support applications, and failures due
to acts of God and other force majeure events
beyond the manufacturers control, such as
collision, theft, vandalism, riot or wars, nuclear
holocaust, fire, freezing, lightning, earth-quake,
windstorm, hail, volcanic eruption, water or
flood, tornado or hurricane.
Energy Cube’s only liability shall be the repair or
replacement of part(s) as stated above in no event
shall Energy Cube be liable for any incidental or
consequential or consequential damages, even if
such damages are a direct result of Energy Cube’
negligence. Overnight freight or special shipping
costs for replacement part(s) or overtime, holiday
or emergency labor will be borne by purchaser.
THIS IS THE ONLY EXPRESS
WARRANTY ON OUR PRODUCTS
We neither assume nor authorize anyone to
assume for us any other express warranty. The
Energy Cube Distributor/ Dealer have no authority
to make any representation or promise on behalf
of Energy Cube or to modify the terms or
limitations of this warranty in any way.
THIS WARRANTY GIVES YOU
SPECIFIC LEGAL RIGHTS. AND YOU
MAY ALSO HAVE OTHER RIGHTS
WHICH VARY FROM COUNTRY TO
COUNTRY.
adjustments, fuel system cleaning and obstruction
(due to chemical, dirt, carbon, lime, and so forth).
A-iPOWER Corp.
1477 E. Cedar St. Unit B
Ontario, CA 91761
USA
Table of contents
Popular Inverter manuals by other brands

Mitsubishi Electric
Mitsubishi Electric FR-A500L Series instruction manual

Sharp
Sharp NU-JC415 installation manual

SUPREME
SUPREME Aqua-Gen 3D Instuctions for use

Viessmann
Viessmann VITOSOL-F installation instructions

Assurance Engineering
Assurance Engineering Assuramce Emergency Lighting Si-125 Installation & operation manual

EDECOA
EDECOA DPM10 user manual

Nature Power
Nature Power 40066 user manual

Voltronic Power
Voltronic Power 1KVA quick guide

ATESS
ATESS PV-CB8M Installation & operation manual

Shihlin electric
Shihlin electric SS2-021 Series manual

LOKERMANN
LOKERMANN Grand Tig 400 ACDC Pulse user manual

Mitsubishi
Mitsubishi FR-E520-0.1KN instruction manual


