EnerSys OutBack Power Mojave OGHESS8015A Technical manual
Planning Guide
Bellingham, WA 98226 USA
Web Site: www.outbackpower.com
Date and Revision
December 2021, Revision AA
*/ REV AA
©2021 OutBack Power. All Rights Reserved.
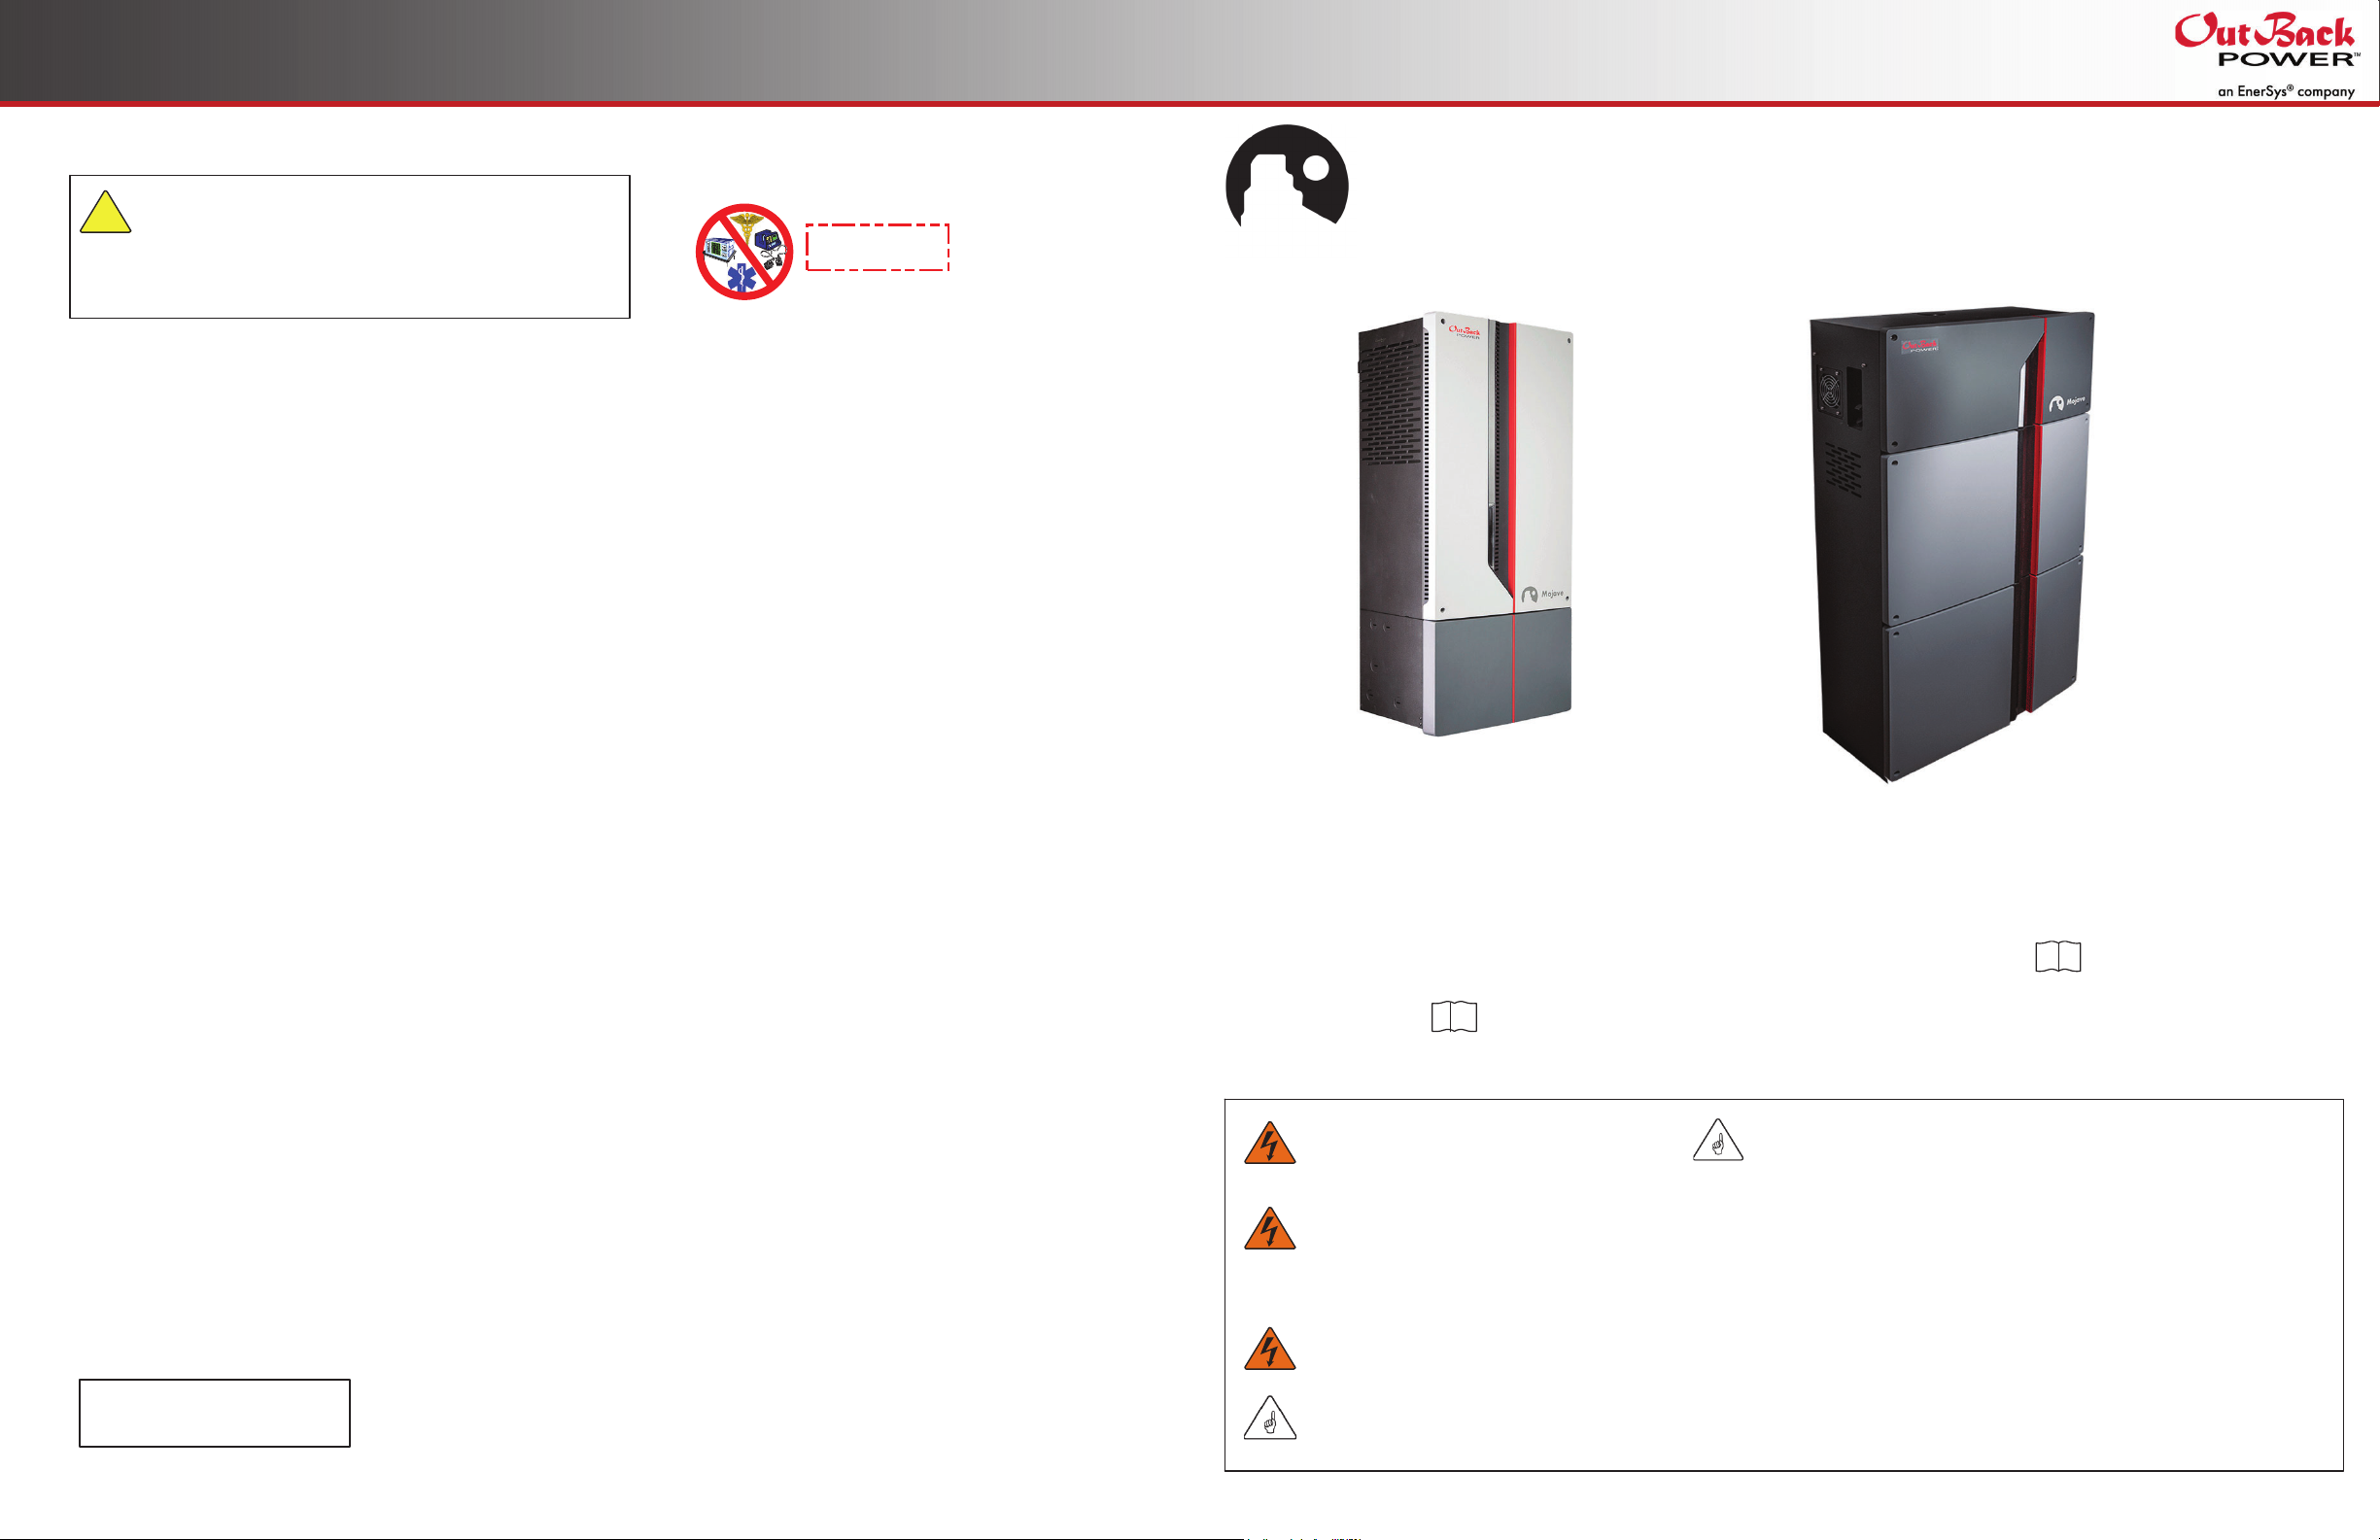
Mojave™ Energy Storage System
CAUTION: Battery Damage
OutBack Power does not approve custom applications, including
installation of lithium-ion batteries that have not been published as
installable with OutBack Power equipment. Damage resulting from
the use of these products is not covered by the limited warranty.
See the Mojave Operator’s Manual for more information.
!
WARNING: Burn Hazard
The vents (the sides of the product) may give off
heated air. Install this product so that casual
contact does not occur.
WARNING: Fire/Explosion Hazard
Do not place combustible or flammable materials
within 12 feet (3.7 m) of the equipment. This unit
employs mechanical relays and is not ignition-
protected. Fumes or spills from flammable materials
could be ignited by sparks.
WARNING: Personal Injury
Use safe lifting techniques and standard safety
equipment when working with this equipment.
IMPORTANT:
This document is for use by qualified personnel familiar with energy storage
systems (ESS) and basic inverter functionality. Users of this document should
meet all local and governmental code requirements for licensing and training
for the installation of electrical power systems with AC and DC voltage up to
600 volts. This product is only serviceable by qualified personnel.
Clearance and access requirements may vary by location.
9 Allow 8" (20.3 cm) on either side of the unit for ventilation.
9 A 36” (91.4 cm) clear space in front of the system for access is
recommended.
9 Consult local electric code to confirm clearance and access requirements
for the specific location. If this product is installed or used in a manner
other than specified, the protection it provides may be impaired.
This inverter is for use in backup power and AC-coupled applications. Use
with independent solar charge controllers is not supported at this time.
This product is designed and tested for stationary applications only. It is not
listed or warranted for mobile use.
IMPORTANT:
Read all safety instructions before proceeding.
IMPORTANT:
Not intended for use with
life support equipment.
oIt also supplements the Mojave ESS OSHUDWor’s Manual, which includes installation of the battery as well as
many other topics.
Please read both documents before beginning this Planning Guide.
About OutBack Power
OutBack Power™ is a leader in advanced energy storage and conversion technology. OutBack Power products
include true sine wave inverter/chargers, batteries, maximum power point tracking charge controllers, and
system communication components, as well as circuit breakers, accessories, and assembled systems.
Trademarks
Trademarks and logos are the property of Alpha Technologies Services, Inc., EnerSys, and its affiliates unless
otherwise noted. Subject to revisions without notice. 7KH,(((WUDGHPDUNLVQRWWKHSURSHUW\RI$OSKD
7HFKQRORJLHV6HUYLFHV,QFRU(QHU6\V
Warranty
The warranty for this product can be downloaded from
www.outbackpower.com/downloads/warranty_and_safety/warranty_mojave
A copy is available by sending a self-addressed envelope to this address:
Contact Information
Mailing Address: 3767 Alpha Way
The Mojave OGHESS8015A Energy Storage System (ESS) consists of the Mojave OGHI8048A inverter (shown to the left)
and the Mojave (66Oithium-Lon Eattery (shown to the right). These products are designed to work in conjunction to add
energy storage and backup capability to a PV system.
This Mojave ESS Planning Guide will describe how to physically integrate the two Mojave products.
o It supplements the Mojave Quick Start Guide, which describes installation of the inverter.
1
2
Installation
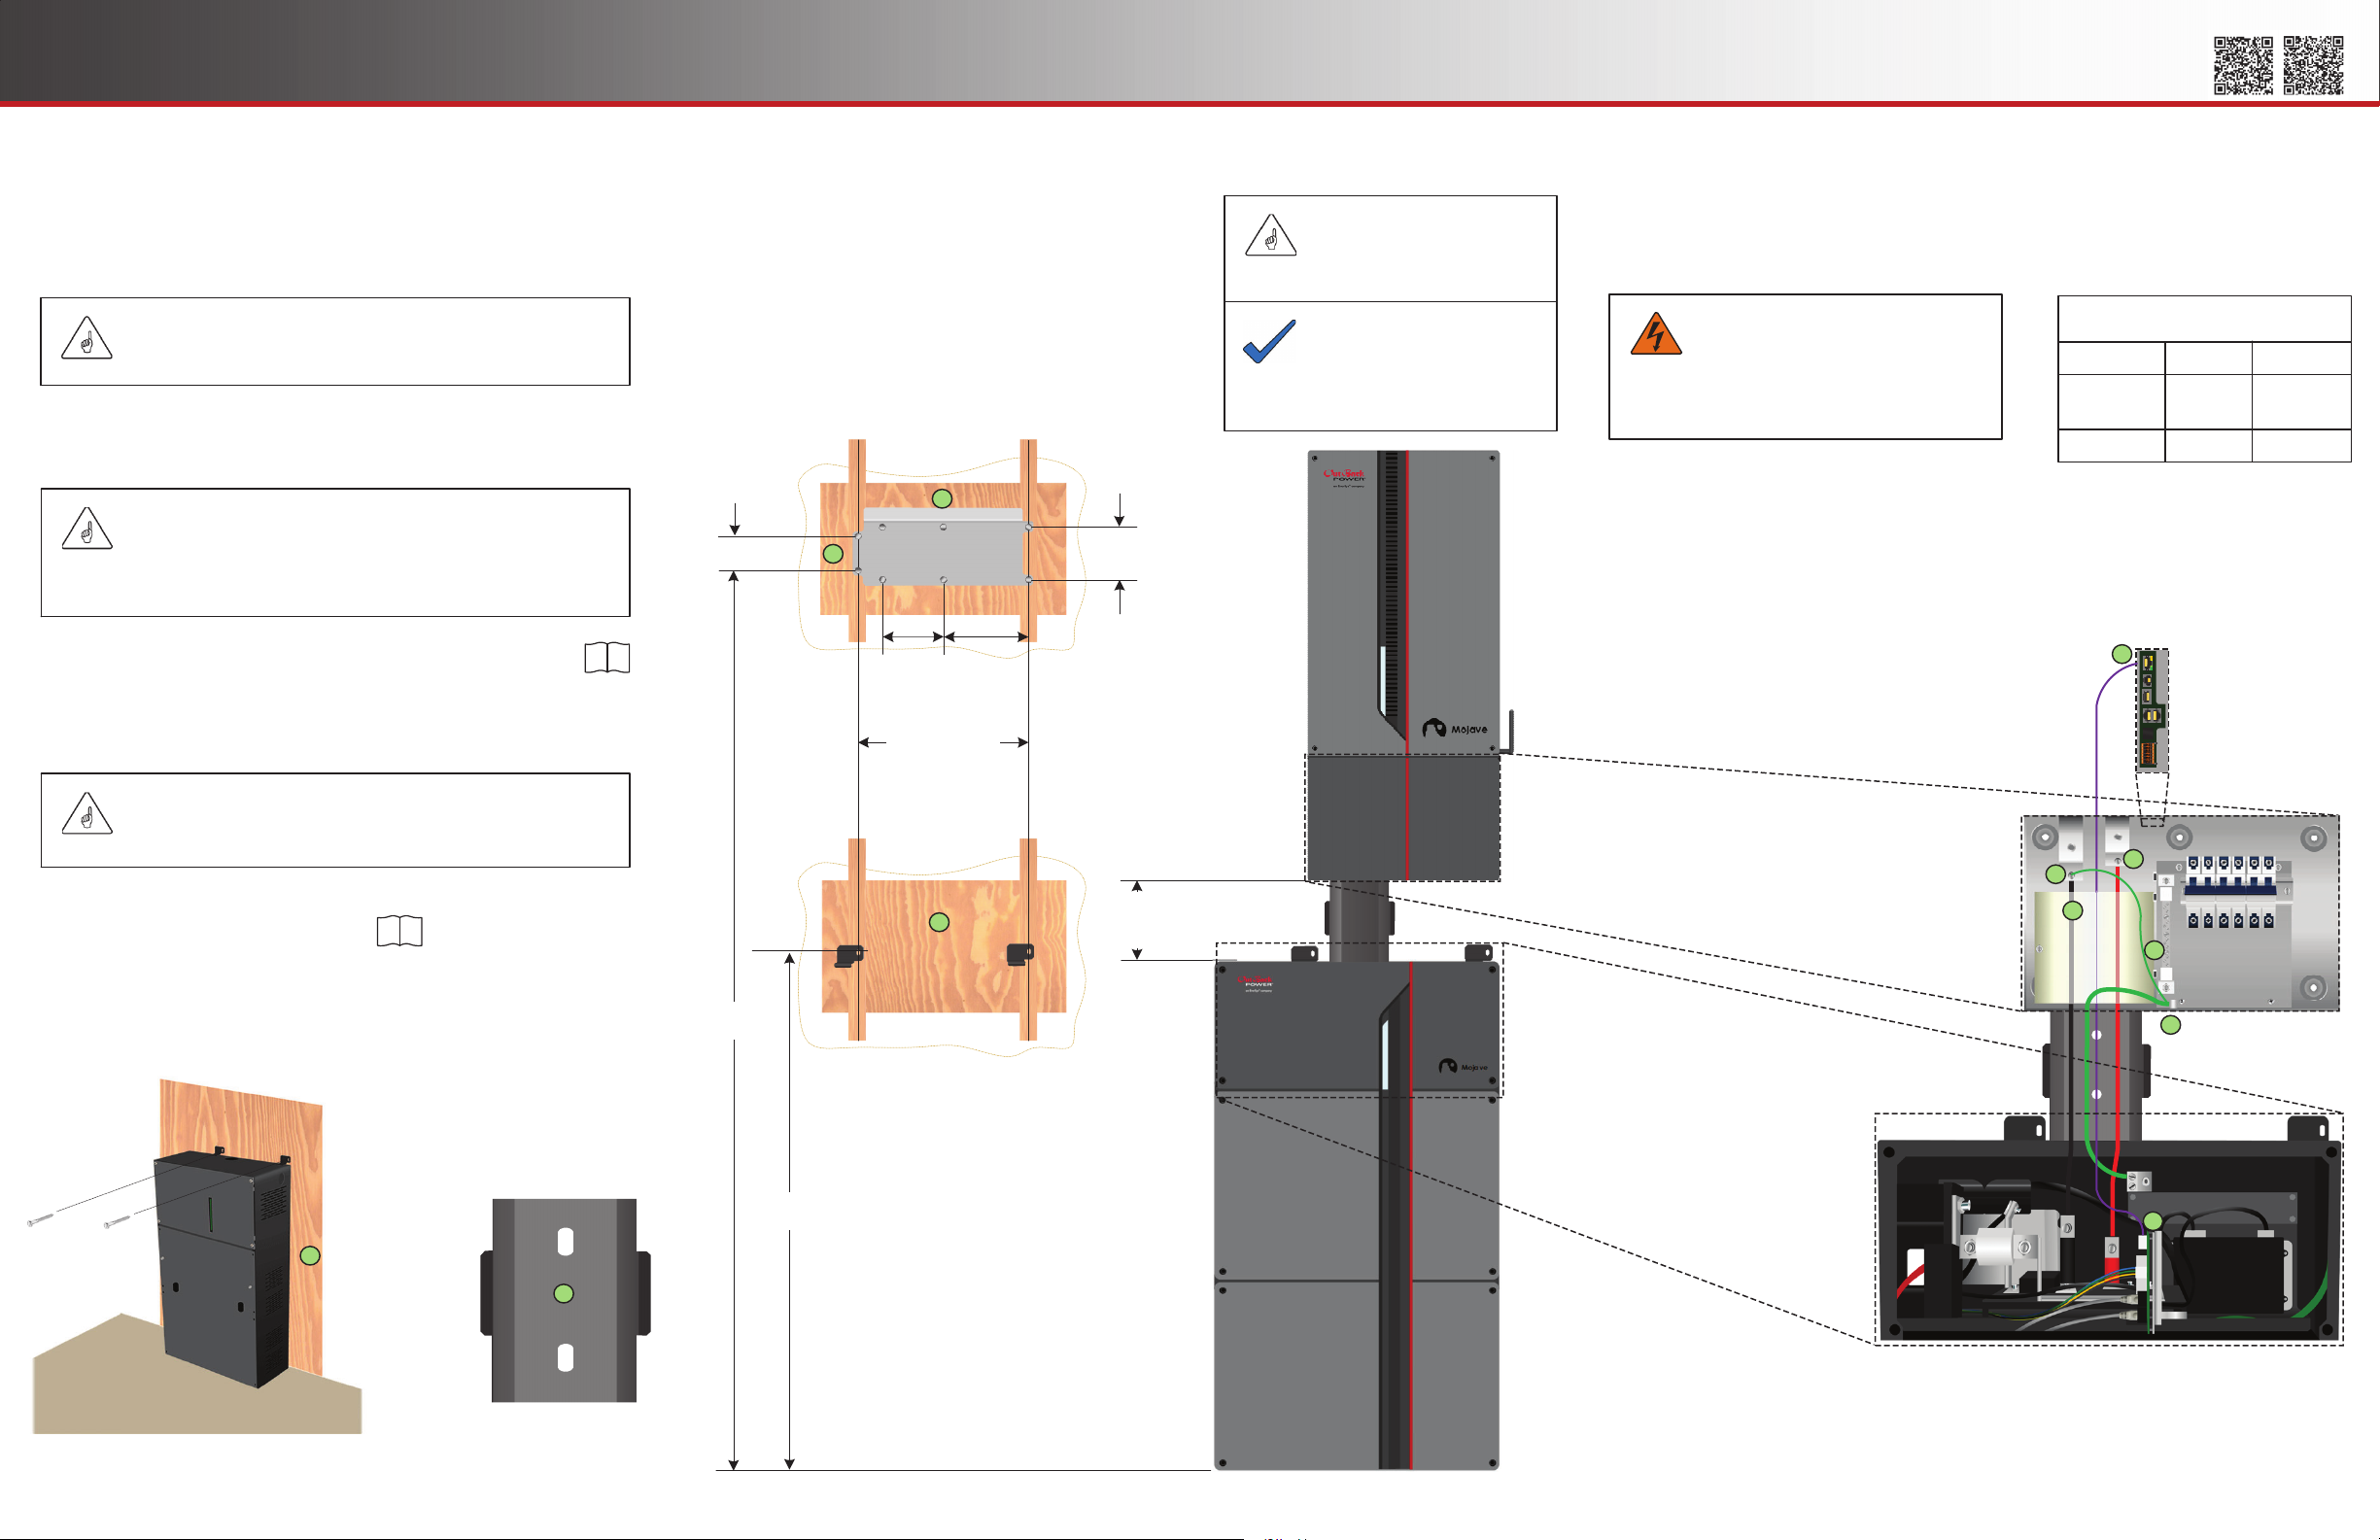
Mounting
1. Mark the locations of the battery mounting brackets. The brackets
must be placed on wall studs with 16" spacing, or on plywood or similar
mounting material to give appropriate support. The lag screws for the
brackets should be placed at 44.6" (113.3 cm) above the floor surface.
*/ REV AA
©2021 OutBack Power. All Rights Reserved.
Wiring
44.6"
(113.3 cm)
78.2"
(198.5 cm)
16" (40.6 cm)
Plywood
(Optional)
Wall Stud
Wall Bracket
Wall Stud
1
Plywood
(Optional)
Battery Bracket
Locations
4.1" (10.4 cm) 5.0" (12.7 cm)
6.0"
(15.2
cm)
8.0"
(20.3
cm)
Wall StudWall Stud
3. Install the bonding wire in battery and inverter. On the inverter’s negative bus
bar, the bonding wire ring terminal must go over the top of the negative conductor.
4. Install the nut on the negative bus bar. Tighten to the torque value shown.
5. Install battery positive (+) conductor in battery and inverter. Tighten to the
torque value shown.
6. Install BMS cable in battery and inverter. In the
inverter, the BMS port is located at the top of the
compartment (shown at 7).
NOTE: Do not install the cable in a different port.
6.0"
(15.2
cm)
CLOSE
CLOSED
RACEWAY
IMPORTANT
Do not install the battery brackets at this time. Mark the locations
of the lag screws and drill pilot holes if necessary.
IMPORTANT
When installed, the inverter is required to hang 6" (15.2 cm) above the
top of the battery in order to use the included raceway. The mounting
bracket is placed according to this spacing. If a different spacing or
configuration is used, new raceway will need to be provided.
IMPORTANT
If any AC conduit is to be located in the 6" space between the
inverter and the battery, install it at this time.
2. Mark the location of the inverter’s wall bracket. The left-hand holes
for the wall bracket should be located 78.2" (198.5 cm) above the floor
surface. Drill pilot holes if necessary.
3. Install the inverter’s wall bracket as described in the Mojave
Inverter/Charger Quick Start Guide.
4. Complete the mounting of the inverter (not depicted here)
according to the instructions in the Quick Start Guide. Install
securing screws in the wiring compartment.
5. Place the battery against the wall. Install the brackets as described
in the Mojave ESS Operator’s Manual and the image below.
6. Install the wiring raceway as shown below. Two screws are
provided to attach it to the surface. Install into plywood or a reinforced
mounting surface if available. If a reinforced surface is not available,
anchors are provided in the kit for mounting into wall board.
NOTE:
Install AC and other wiring in an
order appropriate to the
installation. See the Quick Start
Guide for more information.
1. Install ground conductor in battery and inverter. Tighten to the torque
value shown.
2. Install battery negative (–) conductor. Read the following before tightening.
WARNING: Shock Hazard
The negative conductor must be
mechanically bonded to the ground bar.
This is normally performed within the
Mojave inverter (between points 1and 4).
A bonding wire is supplied for this purpose.
IMPORTANT
Install all DC wiring within the
raceway. AC wires may not be
installed within the raceway.
2
3
5
6
Inverter
Battery
Torque Values
Conductor In-lb Nm
Battery 65 to 75 7.3 to 8.5
+and–
Ground 35 4.0
Installation is complete. Install all covers. Follow the
commissioning steps in each respective manual.
1
3
5
7
9
11
1
2
3
45
7
6
1
2
12
Other EnerSys Storage manuals

Popular Storage manuals by other brands

Actidata
Actidata Ti-NAS QT-6 quick start guide

Sony
Sony MicroVault USM1GH operating instructions

Hitachi
Hitachi CinemaStar 5K1000 Brochure & specs

SimpleTech
SimpleTech STI-105HD Quick installation guide

IBM
IBM SAN Volume Controller 2145-8F2 Hardware installation guide

Seagate
Seagate FreeAgent Go datasheet


