Enigma Motus Powered User manual


Thank you for choosing Enigma
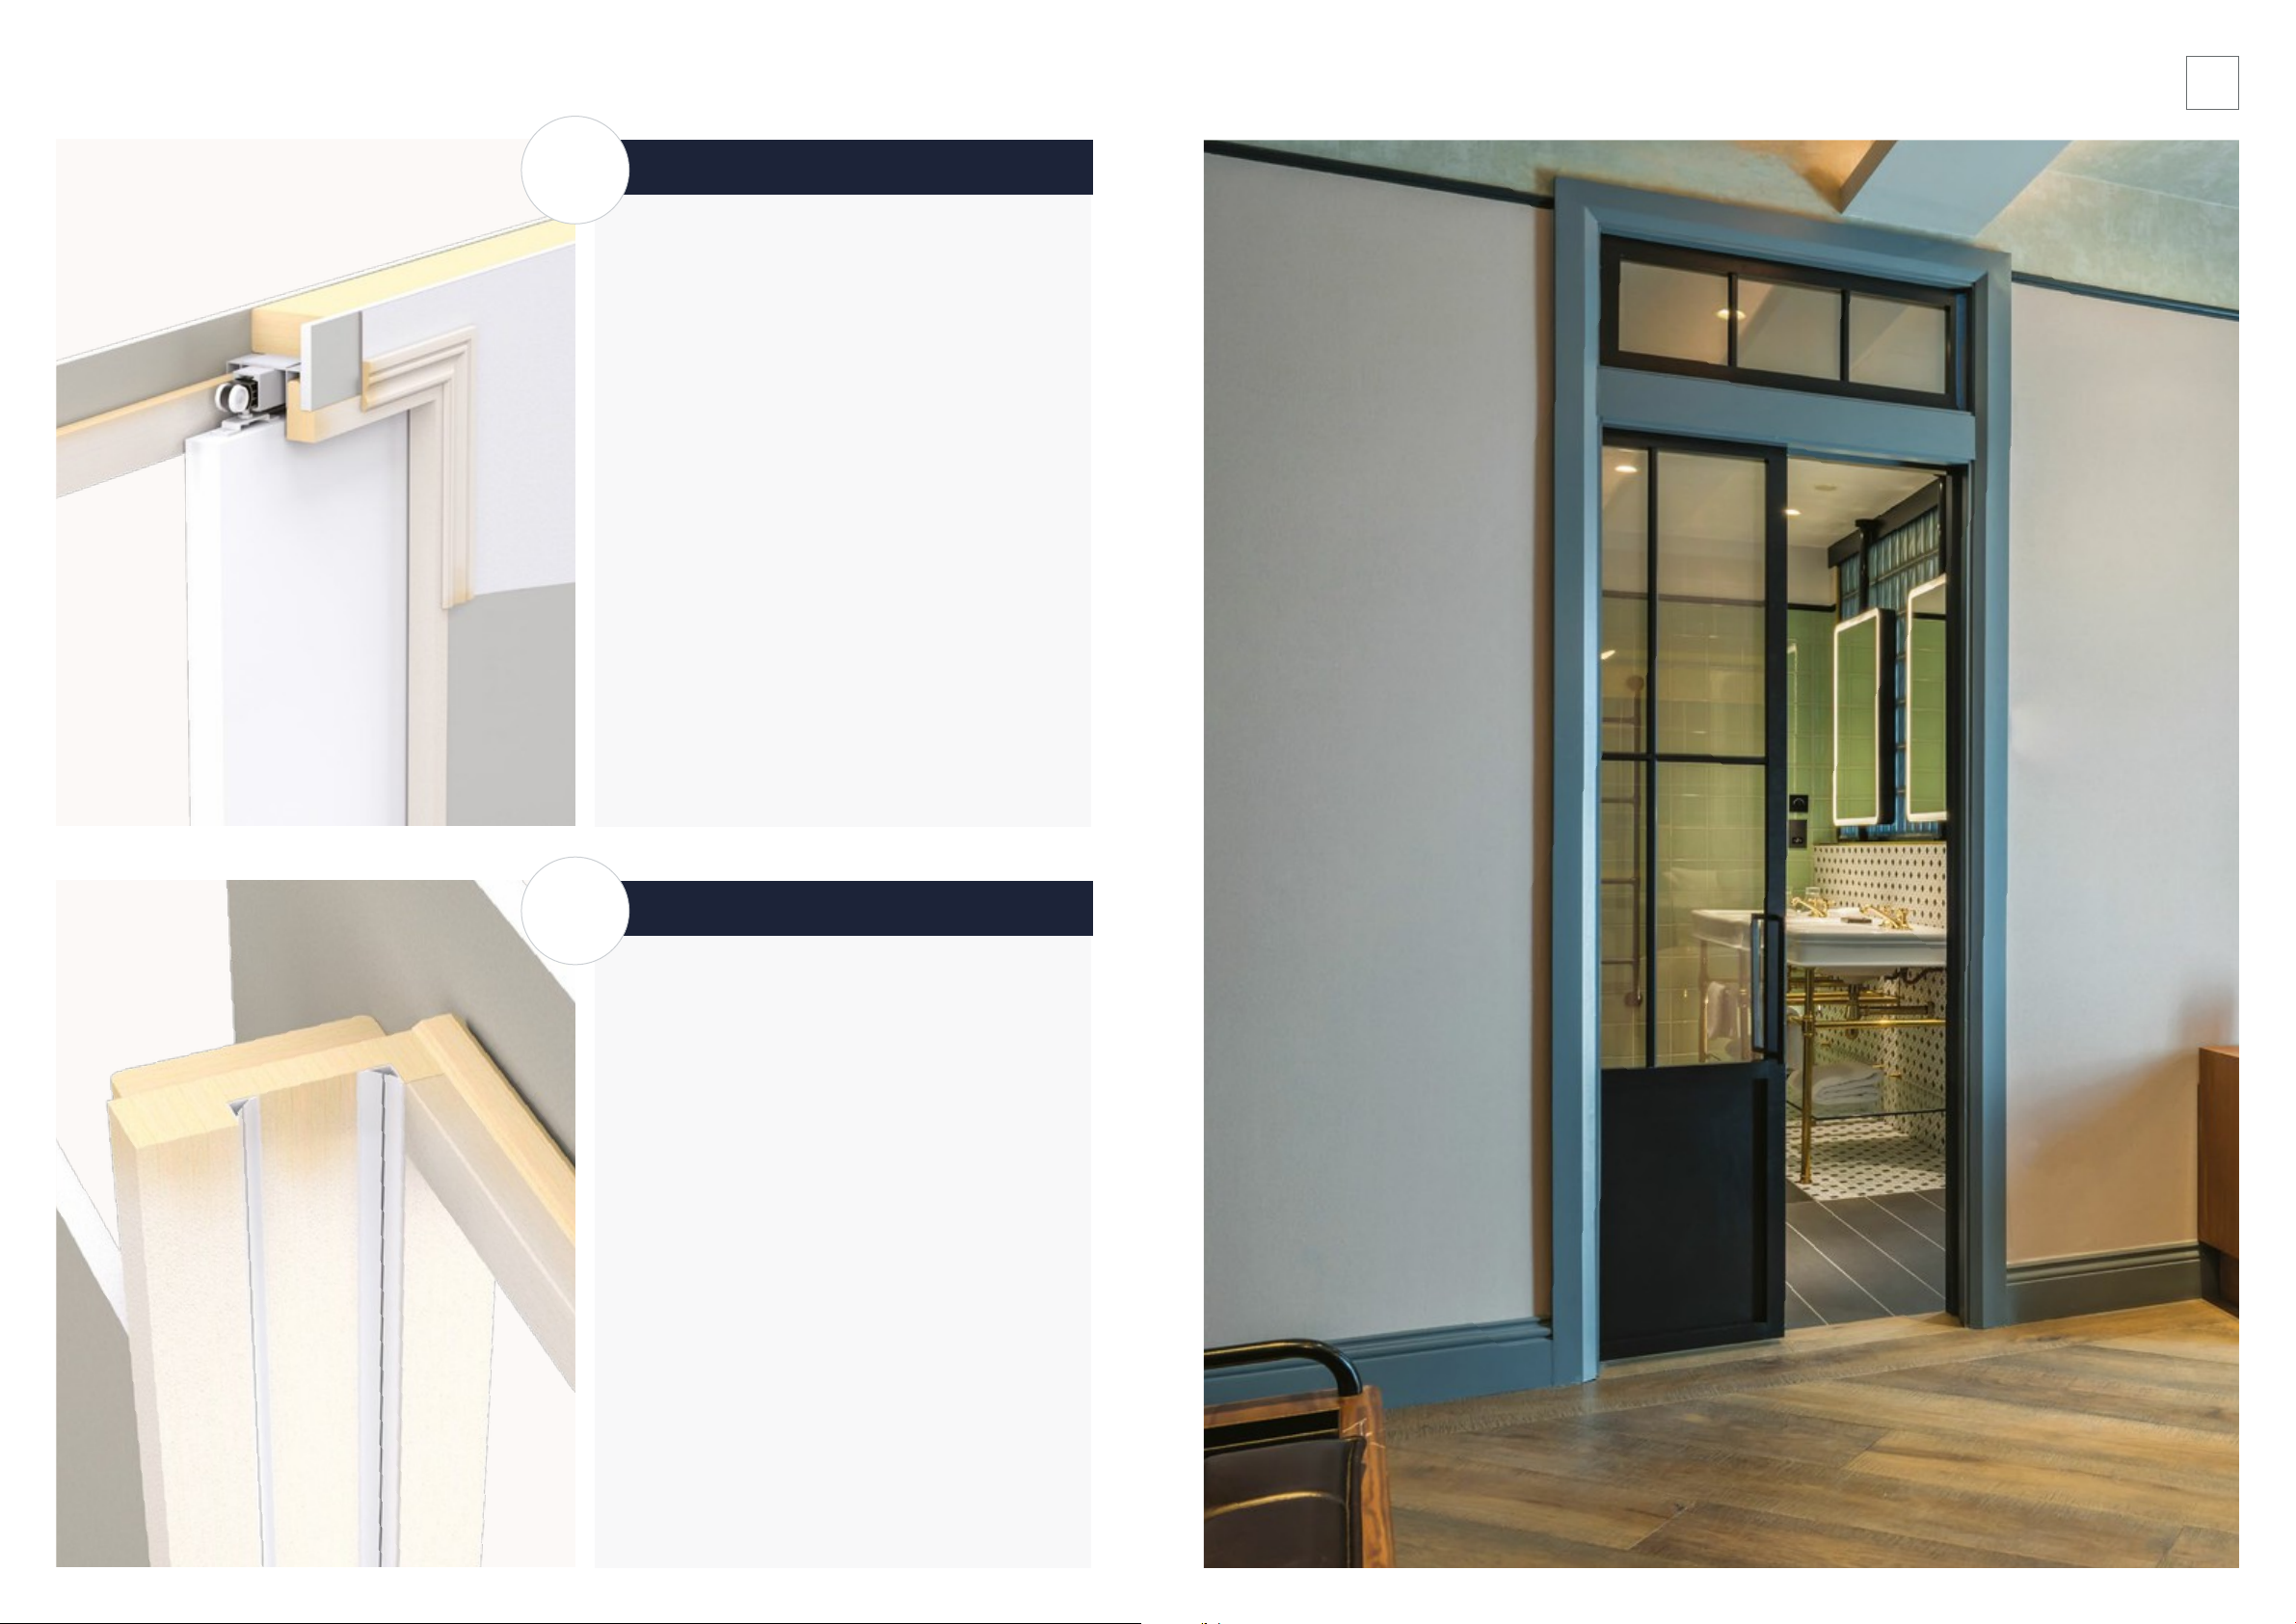
To ensure the installation process is simple and ecient,
we recommended you read this guide in full rst.
Specic tools are also required to complete the installation:
3
© 2019 by Selo. All rights reserved. Selo reserves the right to alter specication and designs without prior notice.
Laser Level
Pencil Tape Measure Knife Cordless Drill Driver
Powered
Chop Saw
Hex Keys
(Metric)
Cable Stripper
& Cutters
Flathead Screwdrivers
(Medium & Small)
Long-nose
Pliers
——————— Sync Unit Wiring Tools ———————
For Double Doors
Getting started
The Motus Enigma pocket door system will be delivered in three boxes:
1. Pocket Frame
2. Trim Surround
3. Track
If a door leaf has been ordered this will come separately.
Before you start installation ensure you
have read and understood the instructions.
POWER REQUIREMENTS
DELIVERY
The Motus Enigma pocket door system requires a low-voltage electrical
connection. Wiring for the system can vary based on the type of connection:
Hardwired (Optional)
1. 13 amp fused spur isolation switch
2. 1.5mm twin and earth cable feed to the
top of the pocket enclosure
‘Kettle-lead’ Wiring (Standard)
1. 13 amp single socket
IMPORTANT SAFETY INFORMATION
The unit should be installed and commissioned by a trained and qualied personnel.
The unit may only be opened and repaired by the manufacturer.
This unit may only be operated from a protective low-voltage with safe electrical isolation.
Always consider the safety functions of your application as a whole, never just in relation to one individual component of the system.
The installed is responsible for carrying out a risk assessment and installing correctly.
Avoid touching any electronic components.

Motus Frame kit NFR V
MOTUS FRAME FIXINGS
MOTUS FRAME COMPONENTS
5
MOTUS NFR V › INSTALLATION GUIDE |FRAME KIT CONTENTS
Familiarise yourself with components included. All xings will
come pre-packaged to suit your specic project requirements.
Type-4
30mm screw
Type-5
25mm self drilling screw
Concrete Screws
7.5mm x 60mm
M6 Screws
6mm x 100mm
Timber Insert
Motus Sliding Track
Head Channel
Intermediate Jamb
Base Channel Leading Edge Jamb
Door Guide Pin & Channel
Type-2
40mm screw
Type-1
19mm self drilling pan head screw
Type-13
60mm screw
Type-3
50mm screw
Brush Strip

Base Channel Calculations
Please refer to Step 4 of the Frame Installation instructions shown on page 12.
Door sizes (mm)
Height = S/O -95mm
Clear
openings (mm)
Structural
openings (mm)
Wall construction preparation
The Motus Enigma system can be tted to steel or
timber studwork partitions. If using steel you must ensure
the head stud is strong enough to take the door weight.
IMPORTANT INSTALLATION NOTES
MOTUS NFR V › INSTALLATION GUIDE |WALL CONSTRUCTION PREPARATION
1. Studwork size
The studwork size required is 94mm.
If using steel studs a 94mm head and base track and
92mm uprights should be used.
2. Steel studs
If using steel studs, timber inserts are required within
the studs to provide additional strength and purchase
for 60mm track screws.
3. Doors above 2300mm
If the door height you are installing is above 2300mm
then using 2 layers of plasterboard is recommended.
To order kits to suite two layers of plasterboard add
the sux (145) to the product code.
4. Self-supporting Head
For situations in high rise buildings where you cannot
x to the ceiling or sot then use the Enigma Self-
supporting Head installation detail.
Follow standard Enigma instructions to calculate your
studwork structural opening and add the following
dimensions: Width +92mm and Height +44mm.
Refer to the specic Self-supporting Head installation
instructions for further details.
Width Single
Width Double
Height
1870
3700
Door +95mm
2120
4200
Door +95mm
2370
4700
Door +95mm
Width
Min. Height
Max. Height
Min. Single
Max. Single
Min. Double
Max. Double
875
1500
2815
600
844
1000
1710
845
969
1711
1960
970
1094
1961
2210
1000
1500
2815
1125
1500
2815
MOTUS TRACK SIZE
ITEM 1750mm 2000mm 2250mm
Dimensions
Motus NFR V
7
Bespoke requirements?
Enigma can be customised to suit bespoke projects.
In principle, the installation process remains the same,
however certain installation dimensions may dier.
Please contact the Selo team to discuss your bespoke
requirements.
020 3880 0339
SELF-SUPPORTING HEAD
Follow the standard Enigma instructions to calculate your studwork structural
opening and add the following dimensions: Width +92mm and Height +44mm
IMPORTANT
If installing Self-supporting Head please refer to the specic installation instructions for further details
.

When constructing your stud partition, please
ensure the head is strong enough to take the
weight of the sliding door that will hang from it.
IMPORTANT
If using a Self-supporting Head please refer to those
specic installation instructions.
CHECK SIZE WITH SCHEDULE
STRENGTHEN HEAD
B
A
When forming the structural opening, please
ensure you are working to the correct opening
size provided on the door schedule.
MOTUS NFR V › INSTALLATION GUIDE |WALL CONSTRUCTION PREPARATION 9
LEVEL-UP
C
Ensure the opening is square and plumb.
IMPORTANT
We strongly recommend using a laser level for setting out.

PREPARE HEAD CHANNEL & SLIDING TRACK
Single doors
Cut the head channel to S/O width.
Double doors
Cut the Head channels equally to take up the
whole S/O. It is important to ensure that where the
two channels meet is in the centre of the opening.
1b
PREPARE THE STRIKE JAMB
1a
IMPORTANT
If installing double doors skip this step.
Cut some C16 timber stud (70mm x 45mm)
to the height of the structural opening.
Cut noggins at 26mm thick. Space at a
maximum of 500mm centres and x to the
strike as per the drawing.
Using a laser level, t the head channel to the top
stud with Head Channel screws.
IMPORTANT
It is important to ensure the Head channel is level with no
bends or bows. If the top stud is not straight then pack the
head channel out with packers to maintain level.
Single doors
The 70mm gap and the kettle lead port should be
at the strike end of the pocket.
Double doors
For double ensure the kettle lead ports are facing
each other in the centre of the opening and with
100mm gap between the tracks.
FIT THE HEAD CHANNEL
3
11
MOTUS NFR V › INSTALLATION GUIDE |FRAME INSTALLATION
Single doors
2a Mark 50mm from the rear end of the Head
channel and 70mm from the strike/front end.
2b The kettle lead port is at the front of the track
and will be installed at the strike end of the pocket.
Place the Track on the Head channel and line-up
the kettle lead entry point with the 70mm mark.
Align the centre lines of the Track and the Head
channel together, pilot drill the screw holes.
Double doors
Mark 50mm from each end. The Tracks will be
installed with the kettle lead ports in the middle to
aid wiring. Place the two Head channels together
with the tracks inside lining up the centre lines.
Ensure there is 100mm gap between the tracks for
the wire box and then pilot drill the screw holes.
HEAD CHANNEL PREPARATION
2
2b
2a
70mm
Frame installation
IMPORTANT
If installing Self-supporting Head please refer to the specic installation instructions for further details
.

13
Cut the Leading edge jamb and
Intermediate jamb 15mm less than
the structural opening height.
FIT TOP TRACK
5
CUT LEADING EDGE & INTERMEDIATE JAMB
6
Cut the intermediate Timber insert 100mm
shorter than the aluminium jamb and slide the
insert into the Intermediate jamb so it sits
50mm from each end.
IMPORTANT
When using door leafs wider than 926mm the kit will
be supplied with extra intermediate jambs to be tted
equally space within the pocket width.
CUT & FIT INTERMEDIATE TIMBER INSERT
7
MOTUS NFR V › INSTALLATION GUIDE |FRAME INSTALLATION
The front of the track must be lined-up with the
70mm mark for single door, or 50mm mark for
double doors. (Detailed in Step 2)
Once in place, secure the Motus track to the
Head Channel using Type-13 screws provided.
Single/Double doors
To accurately determine the length of the Base
channel, refer to the calculations on the left.
Cut the Base channel to this dimension.
Do NOT cut-o the end with the notch. Image 4a
Base channel tting
Place the Base channel on the oor against the
rear stud.
If provided with a ‘cut-to-size’ system position the
notched end tight against the rear stud.
At this stage it is vital that to ensure that the
centre line of the Base channel is secured directly
underneath the centre line of the track above.
Any deviation will result in misaligned doors and
trims. Secure to the ground with Type-2 xings.
Cover-plate (Non- Sync)
If the Sync unit is not used, screw the cover-plate
provided between the tracks to cover the cable.
CALCULATE BASE CHANNEL & FIX
4
Structural opening examples*
1750mm wide
Single S/O 1820mm (Track +70mm)
Double S/O 3600mm (Track x2 +100mm)
Max. movement range 875mm
2000mm wide
Single S/O 2070mm (Track +70mm)
Double S/O 4100mm (Track x2 +100mm)
Max. movement range 1000mm
2250mm wide
Single S/O 2070mm (Track +70mm)
Double S/O 4100mm (Track x2 +100mm)
Max. movement range 1125mm
*S/O height Door leaf +95mm
Permitted door leaf sizes
Min. height 1500mm
Max. height 2815mm
Min. width 875mm
Max. width 1125mm
Travel for unit = The amount which goes into the strike jamb.
System calculations
Base channel length
Single doors NFR V
Structural Opening (minus) -Clear Opening (minus) -130mm
Double doors NFR V
Structural Opening (minus) -Clear Opening (minus) -64mm ÷2
4a

9a Slide the Intermediate jamb into the
Head channel and Base channel with the
Timber inserts facing out so it sits centrally
in the pocket. Fix using Type-1 screws.
9b Slide the Leading edge jamb into Base
channel with notched end at the top, so the
ange sits hard against the end of the Base
channel. Plumb the jamb and x into place
using one Type-1 screw top and bottom as
shown in the image. Must be posited furthest
from the opening.
FIT POCKET SIDES & FIX THE JAMB
9
9a
9b
‘
8
MOTUS NFR V › INSTALLATION GUIDE |FRAME INSTALLATION 15
Single doors
Push the kettle lead in the strike end of the
track. Run the excess cable behind the strike
trim packer to the plug. DO NOT power on at
this point.
Double doors
Remove the kettle lead ports on both tracks.
As standard; Motus Double doors utilise a
Sync unit to open both doors at the same time,
additional wiring is required - See p18.
For Hardwired power supply please see p28.
CONNECTING THE TRACK
Cut the Brush Strip to length and t to the
leading edge aluminium prole.
IMPORTANT
If using simultaneous opening ensure that the door leafs
and head trims have been tted. Refer to the simultaneous
opening instructions for more.
FIT BRUSH STRIP
10

MOTUS NFR V › INSTALLATION GUIDE |DOOR LEAF INSTALLATION 17
4a The bracket ts onto the bolt as shown.
4b Feed the rest of the door at least halfway
into the pocket and hang the front bracket
onto the trolley bolt.
4c With spanners provided, wind the bolts up
or down to plumb the leading edge of the door
and to achieve the required gap under the
door (door undercut).
Tighten the locking nuts to secure the door to
the brackets. They may need to be slacked-o
later, to true the door to the trims once they
are tted.
HANG THE DOOR
4
4b 4c
Adjust the bolts to achieve a gap
approximately 15mm between the underside
of the track and the top of the bolt.
ASSEMBLE GEAR
4a
3
The door leaf needs to be hung before the trim is tted.
FIT THE GUIDE CHANNEL
200mm
150mm
100mm
Apply a thin bead of adhesive into the groove in
the bottom of the door and then tap the plastic
channel into position.
Double Doors Fit brackets 100mm from the back edge and 200mm from the front so the two
doors meet in the centre over the 100mm sync unit. (Instead of hanging equally as per the singles.)
Single Door Position the brackets equally to the edges of the door, spaced to 150mm centres.
SINGLE
DOUBLE
1
2
FIT HEAD BRACKETS
150mm
Door leaf installation

MOTUS NFR V › INSTALLATION GUIDE |DOOR LEAF INSTALLATION 19
SYNC FOR DOUBLE DOORS ONLY
Slide the Door stop into the track, x into place
by tightening the grub screws. This can be nally
adjusted once the trims are installed. To set the
rear stop, slide the door back into the pocket
until the door will be ush with the leading edge
trims, then tighten the stop up against the
carriages.
IMPORTANT
It is important to set the rear stop at this point as once
plasterboard is installed there is no access to rear stop.
FIT THE DOOR STOPS
5
SYNC FOR DOUBLE DOORS ONLY
SYNC FOR DOUBLE DOORS ONLY
DRILL HEAD CHANNEL
REMOVE KETTLE-LEAD PORTS
A
B
IMPORTANT
The next steps A-E refer to the installation of a Sync unit
and is used with Double doors ONLY. For Single door
installation please skip the following steps.
Work out in relation to your current internal
wall cabling as to the route to the centre of the
tracks, then drill a hole no smaller than 8mm in
the Head Channel as shown.
Remove the fascias on both tracks to expose
the kettle lead port and connection terminals.
Ports need to be removed from both tracks.
Cut the Kettle-lead plug o the power cable
supplied and thread through the Head Channel
hole drilled previously.
Strip the cable approximately 30mm from the ends.
CONNECT TRACKS
WIRE POWER CABLE
PREPARE CABLE
D
SYNC FOR DOUBLE DOORS ONLY
E
SYNC FOR DOUBLE DOORS ONLY
C
Wire the block to the Tracks as shown.
Connect the two Tracks together with the
Sync-cable provided in the plugs shown.
Wire the power cable to the connector block as
shown then ‘power-up’ the track.

Prior to conguration ensure doorstops are
correctly tted to avoid any potential damage.
Power-up the Motus. Press-and-hold the
‘reset’ button (both tracks if installing a
Double door)
for 3 seconds - The LED light
will ash, let go and
stand clear of the door(s)
while it self calibrates. Usually the door will
open/close 2-3 times during the process.
Adjust the door levels so it closes straight
against the strike jamb.
IMPORTANT
The tracks must have the same Speed/Delay times to
sync correctly. These can be adjusted with the plastic
screwdriver (enclosed).
Do not over turn the adjustment screws; only turn
between Min and Max indicators.
SYNC FOR DOUBLE DOORS ONLY
CALIBRATE TRACKS
Test the doors to ensure correct movement/
function. Attached the Cover Plate to cover
the gap and screw into place.
6
Fit the door guide pin at the nished oor level
with Type-2 xings. The pin needs to be facing
the strike stud and aligned centrally with the
centre line on the base channel.
If your installation requires the door guide pin to
be raised up - use the 1mm stackable packers
IMPORTANT
1. The pin needs to be tted at FFL (nished oor level). If the
nished oor is not yet installed, tment of the oor pin can
be delayed until the ooring is completed.
FIT DOOR GUIDE PIN
7
Plasterboard over one side of the pocket along
with the rest of the wall using the Type-5 self
drilling screws provided. It is vital to ensure the
leading-edge jambs remain completely vertical
and plumb once boarded. It is essential to clear
any swarf or debris that may be in the top track
and bottom channel at this stage.
PLASTERBOARD ONE SIDE
8
MOTUS NFR V › INSTALLATION GUIDE |DOOR LEAF INSTALLATION 21

23
MOTUS NFR V › INSTALLATION GUIDE |TRIM INSTALLATION
SUPPLIED TOOLS
TRIM FIXINGS (cont.)
TRIM FIXINGS
Type-7
35mm self drilling
drywall screws
Type-5
25mm self-drilling screws
Strike Trim
Single door x1 / Double door n/a
Head Trim
Single door x1 / Double door x2
Type-8
42mm self drilling
drywall screws
Type-9
50mm gold screws
Panel Pins
30mm
Strike Jamb Seals
Leading Edge Trim
Single door x2 / Double door x4
VISIBLE TRIM COMPONENTS
Spanner
Visible trim kit
All xings will come pre-packaged to suit
your specic project requirements.

Adjust the metal clip, so the door leaf closes
and is held in place, against the strike jamb.
Cut the Leading Edge Trims to the height of the
opening and slot them over the ange on the
leading-edge aluminium jamb, with the grooves for
the intumescent seal facing in towards the door.
They must be secured into position with the
Type-5 screws at 300mm intervals. Please note
that the timber will need to be pilot-holed rst.
INSTALL LEADING EDGE TRIM
1
Cut the Head trim the distance between the
two timber side jambs. Slot into place in the
head and x using Type-5 screws.
INSTALL THE HEAD TRIM
5
Cut the Strike trim as per the drawing measuring
from the notch to the end that is not notch. Cut
the end that is not notched.
Then t the notched end centrally in the Head
channel. Plumb the strike trim using a level so it
is aligned centrally with the Head channel and x
into place using the Type-9 screws.
IMPORTANT
When installing double doors the strike jamb is not used.
INSTALL STRIKE TRIM
3
Dimension =
Underside of head
prole
to oor
SET CLOSER STOP
4
Now the door leaf is hung you are ready to install the trim.
Visible trim installation
25
MOTUS NFR V › INSTALLATION GUIDE |TRIM INSTALLATION
LINE THE DOOR UP
2
If required, the door can now be trued into
alignment with the leading-edge trims by adjusting
the hanger bolts up or down as necessary.
When you’re happy that everything is aligned and
the gaps between the door and trims are equal,
lock the bolts rmly into position by winding
down the locknuts.
IMPORTANT
Maximum undercut must not exceed 8mm.
FIT STRIKE SEALS
7
Fit the rubber seals to the corners of the
strike trim as shown in the illustration.
You have now
completed the
installation of your
Enigma Motus sliding
pocket door with
visible trim.
27
MOTUS NFR V › INSTALLATION GUIDE |TRIM INSTALLATION
6
Now the wall can be tape and jointed and wall
and trims painted.
IMPORTANT
We recommend tape and jointing not plastering.
TAPE & JOINT / PAINT

Cut the leads to length, dismantle them and
connect L1 and N to the connection terminals
of the power supply as shown.
IMPORTANT
Before starting with the installation, make sure that the
power supply line is dead (de-energized).
L1
N
35 mm
6 mm
6 mm
150 mm
L1
N
Loosen the screw in the cover of the power
supply housing and remove the cover (on the
side where the connections are located).
IMPORTANT
Keep the cover and the screw in a safe place as you
will require it later.
REMOVE POWER SUPPLY COVER
1.
B
A
When the system is installed with permanent
power supply, the internal power supply socket
has to be removed.
Loosen the screws at the end stop and move
the end stop to the centre of the system.
IMPORTANT
Do not remove or screw down the end stop.
MOVE END STOP
B
A
1
2
Lay the grounding line through the housing
of the operator as shown in the picture and
connect it to the grounding terminal (PE).
EARTH CONNECTION
5
Carefully open the cover of the control unit
housing by levering it out with the tip of a at-
bladed screwdriver.
Relax the screws of the connection terminals
and remove the internal shockproof socket.
REMOVE INTERNAL SOCKET
B
A
3
LIVE & NEUTRAL CONNECTIONS
4
How to hard-wire a permanent power supply to your Motus powered
Enigma pocket door system.
Hardwired power supply
29
MOTUS NFR V › INSTALLATION GUIDE | HARDWIRED POWER SUPPLY

MOTUS NFR V › INSTALLATION GUIDE | HARDWIRED POWER SUPPLY
Close the cover of the control unit housing.
Fix and screw down the cover of the power
supply housing.
A
C
B
Move the end stop to the end of the channel
and screw it down thoroughly.
IMPORTANT
The end stop must not overlap.
RETURN END STOP
A
B
8
Connect all external accessories, except safety
sensors. The cables for Sensors, Push-buttons
etc have to be laid inside a cable channel as
indicated in the picture.
If additional Accessories are not required move
to next Step.
CONNECT EXTERNAL ACCESSORIES
6
CLOSE AND SCREW-DOWN COVERS
7
50mm
6mm
B
C
A
Commissioning
and inspection
These checks should be carried out on a routine
basis to be determined based on risk assessment.
Low energy movement of the doorset is generally not protected with
additional protective devices because the kinetic energy levels are
not considered to be hazardous. However, use of low energy doorset
movement should only be considered when the risk assessment has
taken account of elderly, frail and disabled users and indicates that the
risk to these users is low.
The result of the nal verication and operational tests should
be recorded in a log book. The log book shall refer to applicable
instruction for use and shall have space available to record:
1. All maintenance and repairs carried out, including
recommendations (Improvements, replacements etc)
2. All signicant changes or upgrading carried out
3. Any work undertaken to the doorset
4. Name, date, signature of designated responsible person
5. Include copies of the ‘Check Details’ table below,
lled out at periods dened in the risk assessment
Risk assessment carried out
within the last 12 months.
Check door and pocket condition ensuring
no sharp edges* or other hazards. Check
all essential components are tted and in
serviceable condition.
*If flush handles are fitted then the doors stop should be set so the
handle remains out of the pocket when open to mitigate risk of injury.
Isolate the power to the doorset and check to
ensure manual operation is achievable.
Restore power and check door cycles twice
whilst initiating, led lamp should remain green
when nished.
✓or ✗
RISK ASSESSMENT GUIDANCE
INSPECTION RECORD
Test door closing time (see Table F.2
Min Time for 90% Travel Distance).
Test auto reverse function works when
the door contacts an obstruction.
If auto close is enabled ensure
users are aware of this function.
If switches are present,
check condition and function.
If additional sensors have been tted
following risk assessment check
condition and function.
Initials
Signed Date / /
✓or ✗Initials
80kg 70kg 60kg 50kg 40kg 30kg 20kg 10kg
0.21mps 0.22mps 0.24mps 0.26mps 0.29mps 0.34mps 0.41mps 0.58mps
3.5s 3.2s 3.0s 2.7s 2.5s 2.1s 1.8s 1.3s
3.9s 3.7s 3.4s 3.1s 2.8s 2.4s 2.0s 1.4s
4.4s 4.1s 3.8s 3.5s 3.1s 2.7s 2.2s 1.6s
4.9s 4.6s 4.3s 3.9s 3.5s 3.0s 2.5s 1.8s
5.4s 5.1s 4.7s 4.3s 3.8s 3.3s 2.7s 1.9s
0.7m
0.8m
0.9m
1.0m
1.1m
Mass of Door Leaf (Kilogram)
Max. Travelling Speed (Meters/Sec)
Min. Travelling Time (Seconds)
90% Travel
Distance Per Leaf
(Meters)
Table F.2 - Minimum Travelling Time per Doorset vs. Mass of Door Leaf
31

Table of contents
Other Enigma Spotlight manuals


Popular Spotlight manuals by other brands


Larson Electronics
Larson Electronics HL-85-LED-CPR instruction manual

Home Zone Security
Home Zone Security ELI0857V installation instructions

Brother, Brother & Sons
Brother, Brother & Sons K7 Twist manual

Stairville
Stairville BEL1 Battery Event Light 15W user manual

Conrad
Conrad 432303 operating instructions

Phottix
Phottix Indra500 TTL instruction manual

Dorcy
Dorcy 41-1080 owner's manual

Lumascape
Lumascape Quadralux Q2 LS9140 installation instructions

Chauvet
Chauvet Intimidator Spot 375Z IRC Quick reference guide

Vision & Control
Vision & Control SLB-500-R625-P-SL Instructions for use

Sea-Dog
Sea-Dog 405626-3 Installation & operation instructions

HAMPTON BAY
HAMPTON BAY 91950 Use and care guide