EnjoyTone Robust S09 User manual
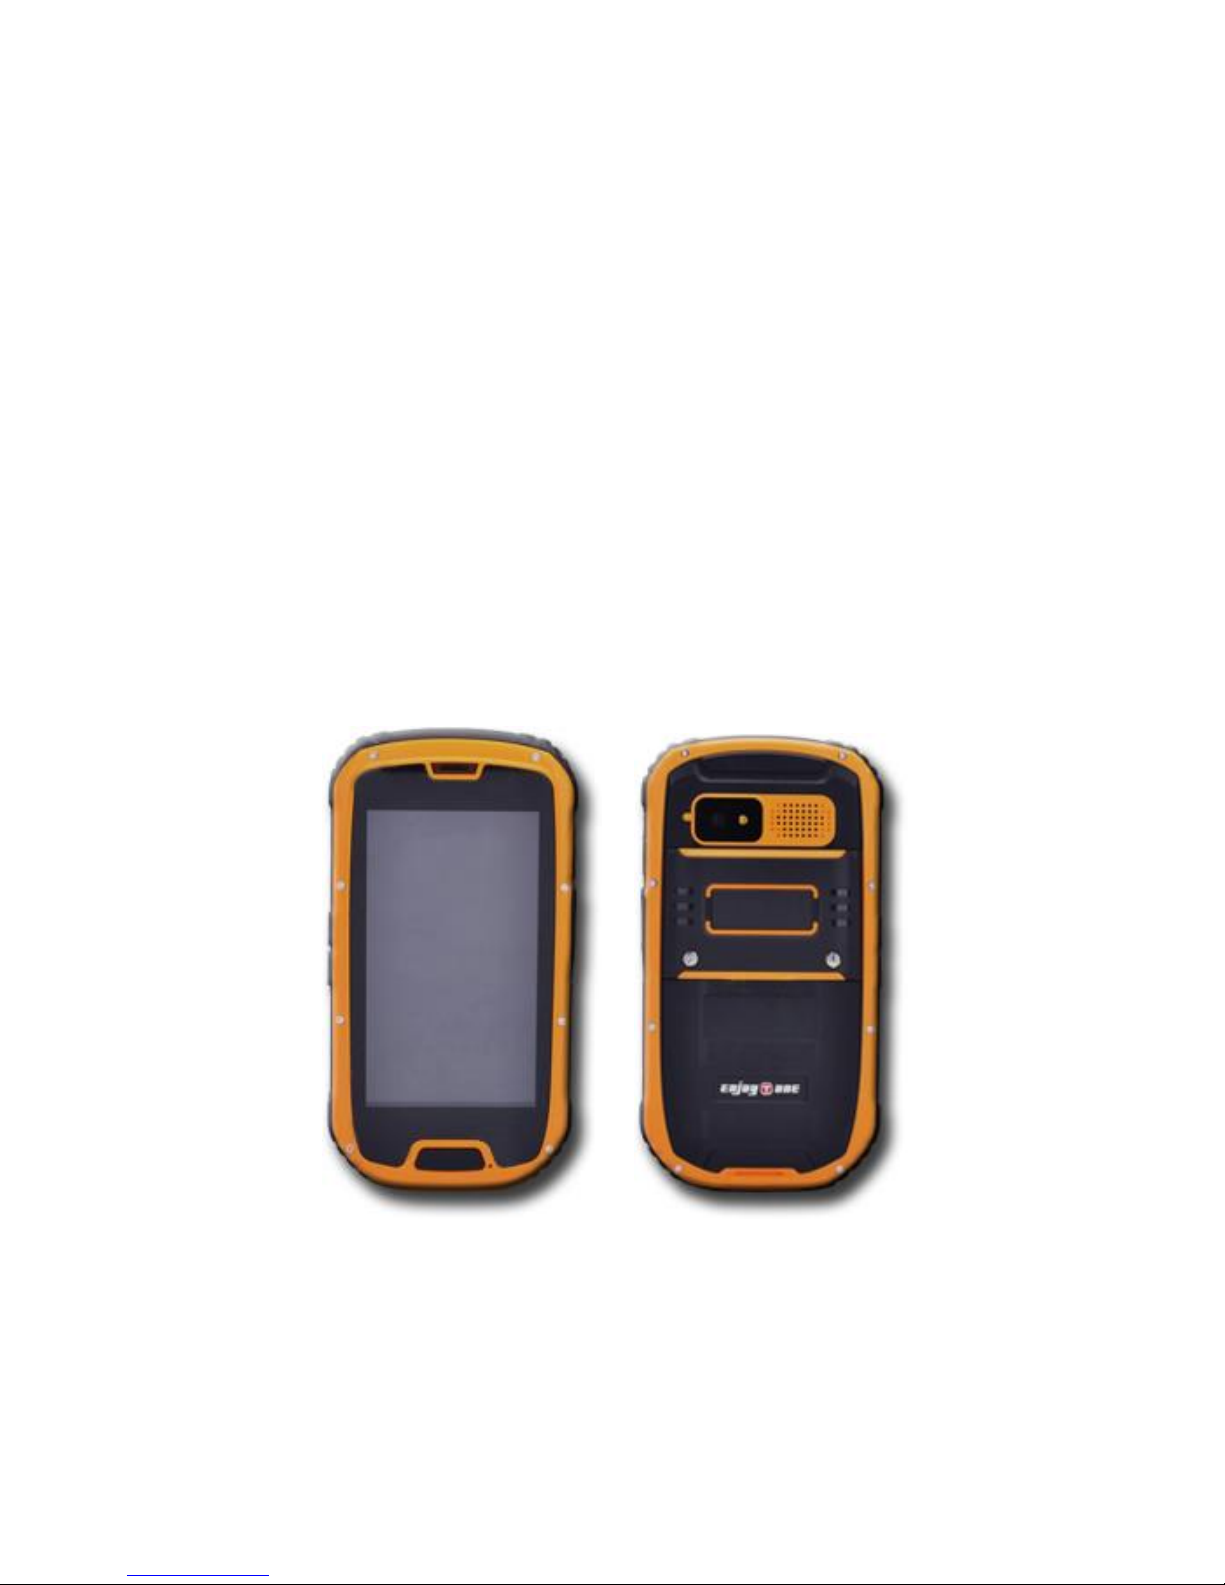
EnjoyToneTM Robust S09
User Manual

1
.............................................................................................................................4
................................................................................................5
.............................................................................................6
......................................................................................8
.................................................................................................9
.................................................................................................................9
.........................................................................................................................10
............................................................................................11
.......................................................................................12
..........................................................................................................13
..............................................................................................................................13
............................................................................................................13
........................................................................................................13
.............................................................................................................14
......................................................................................................14
.........................................................................................................................................15
........................................................................................................................................16
.................................................................................................................................17
..........................................................................................................................................17
...........................................................................................................................18
..................................................................................................................................18
...........................................................................................................................18
..........................................................................................................................18
........................................................................................................................19
..............................................................................................................................19
...............................................................................................................................19
.................................................................................................................................19
......................................................................................................................20
................................................................................................................20
..................................................................................................................................20
.........................................................................................................................20
............................................................................................................................21

2
...................................................................................................................................21
......................................................................................................................22
...................................................................................................23
3

4
Safety Precaution
This section includes some important notes for safety and effective
operation, Please read the safety precautions carefully to ensure the
correct use of your mobile phone.
1. If conditions permit, please stop the car to make/answer calls while
driving.
2. Although the phone is a rugged device, avoid dropping, crushing,
bending or hitting your mobile phone.
3. In some places with special requirements, such as hospitals or health
care places, please note restrictions on the use of mobile phone, and
turn off the mobile phone when required.
4. Do not switch on your mobile phone when it is prohibited to use
phones or when the phone may cause interference or danger.
5. Only qualified personnel are allowed to repair or disassemble the
mobile phone.
6. Do not carry your mobile phone in any area with risk of potential
explosion, such as gas, fuel stations or any places storing or
transferring chemicals.
7. Some electronic equipment may produce electromagnetic
interference or shield to the cell phone signal, such as electronic
vehicle system; if necessary, please consult the equipment's
manufacturer before using them.
8. Keep your mobile phone and its accessories away from young
children. Do not allow children to use your mobile phone without
guidance.
9. Avoid battery short-circuit, Do not dismantle or modify the battery, or
put the battery in any high-radiation or high temperature environment.
10. The operating temperature of this mobile phone is between -10℃
and 55℃.
5
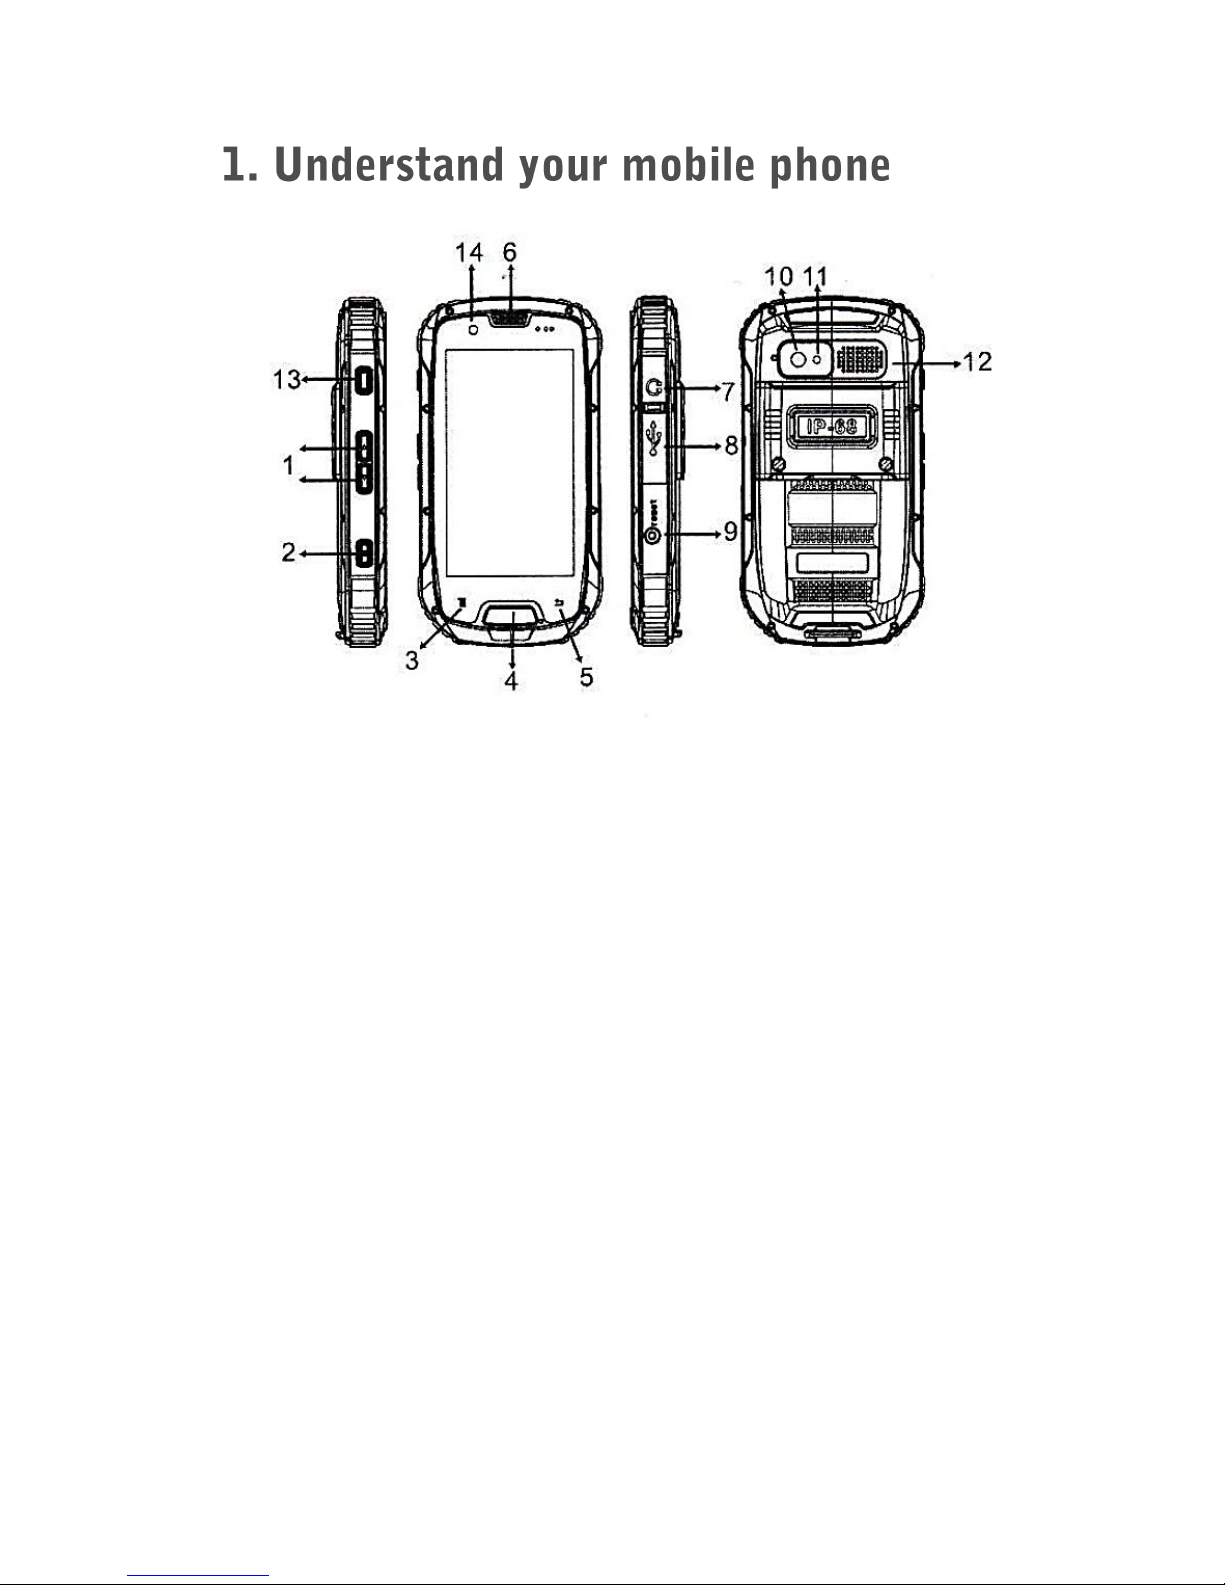
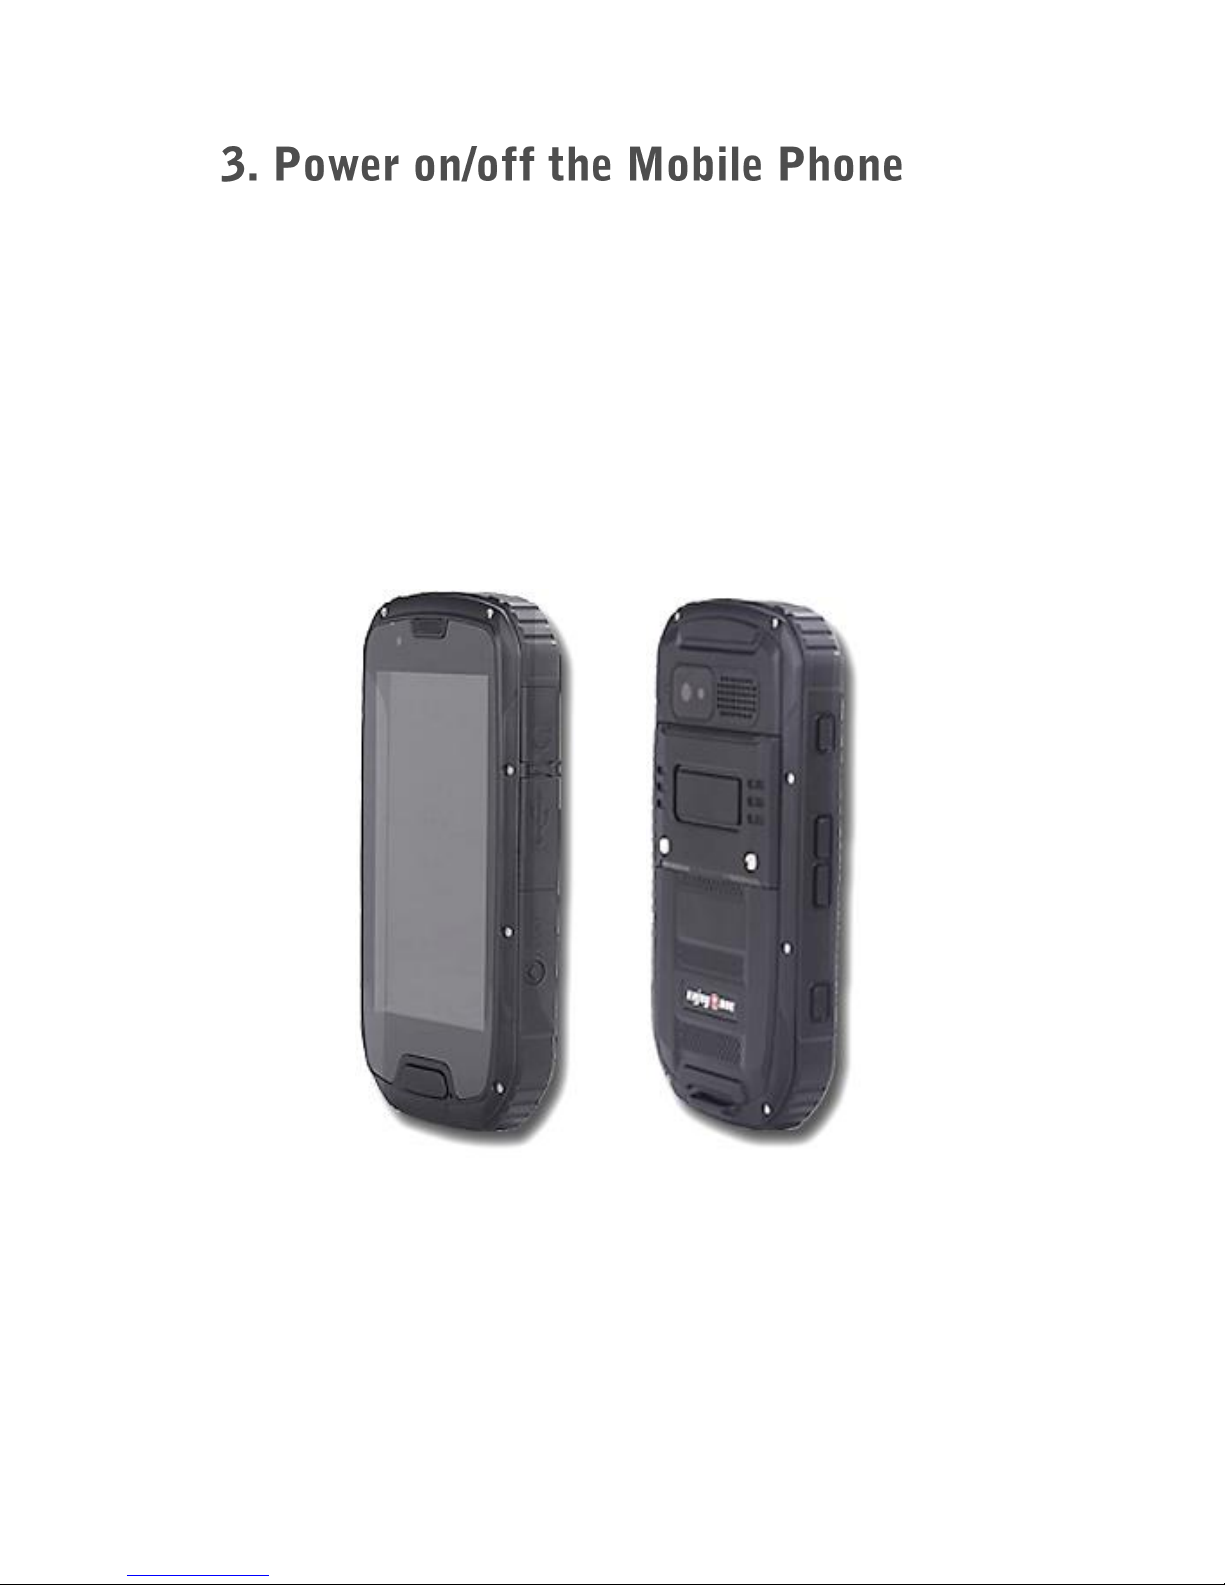
1. Volume Control Keys
2. Power Button
3. Menu Key
4. Home Key
5. Back Key
6. Earpiece
7. Earphone port
8. Micro USB port
9. Reset Key
10. Rear Camera
11. Flash
12. Speaker
13. PTT key or Shutter button (depends on version)
14. Front Camera
6
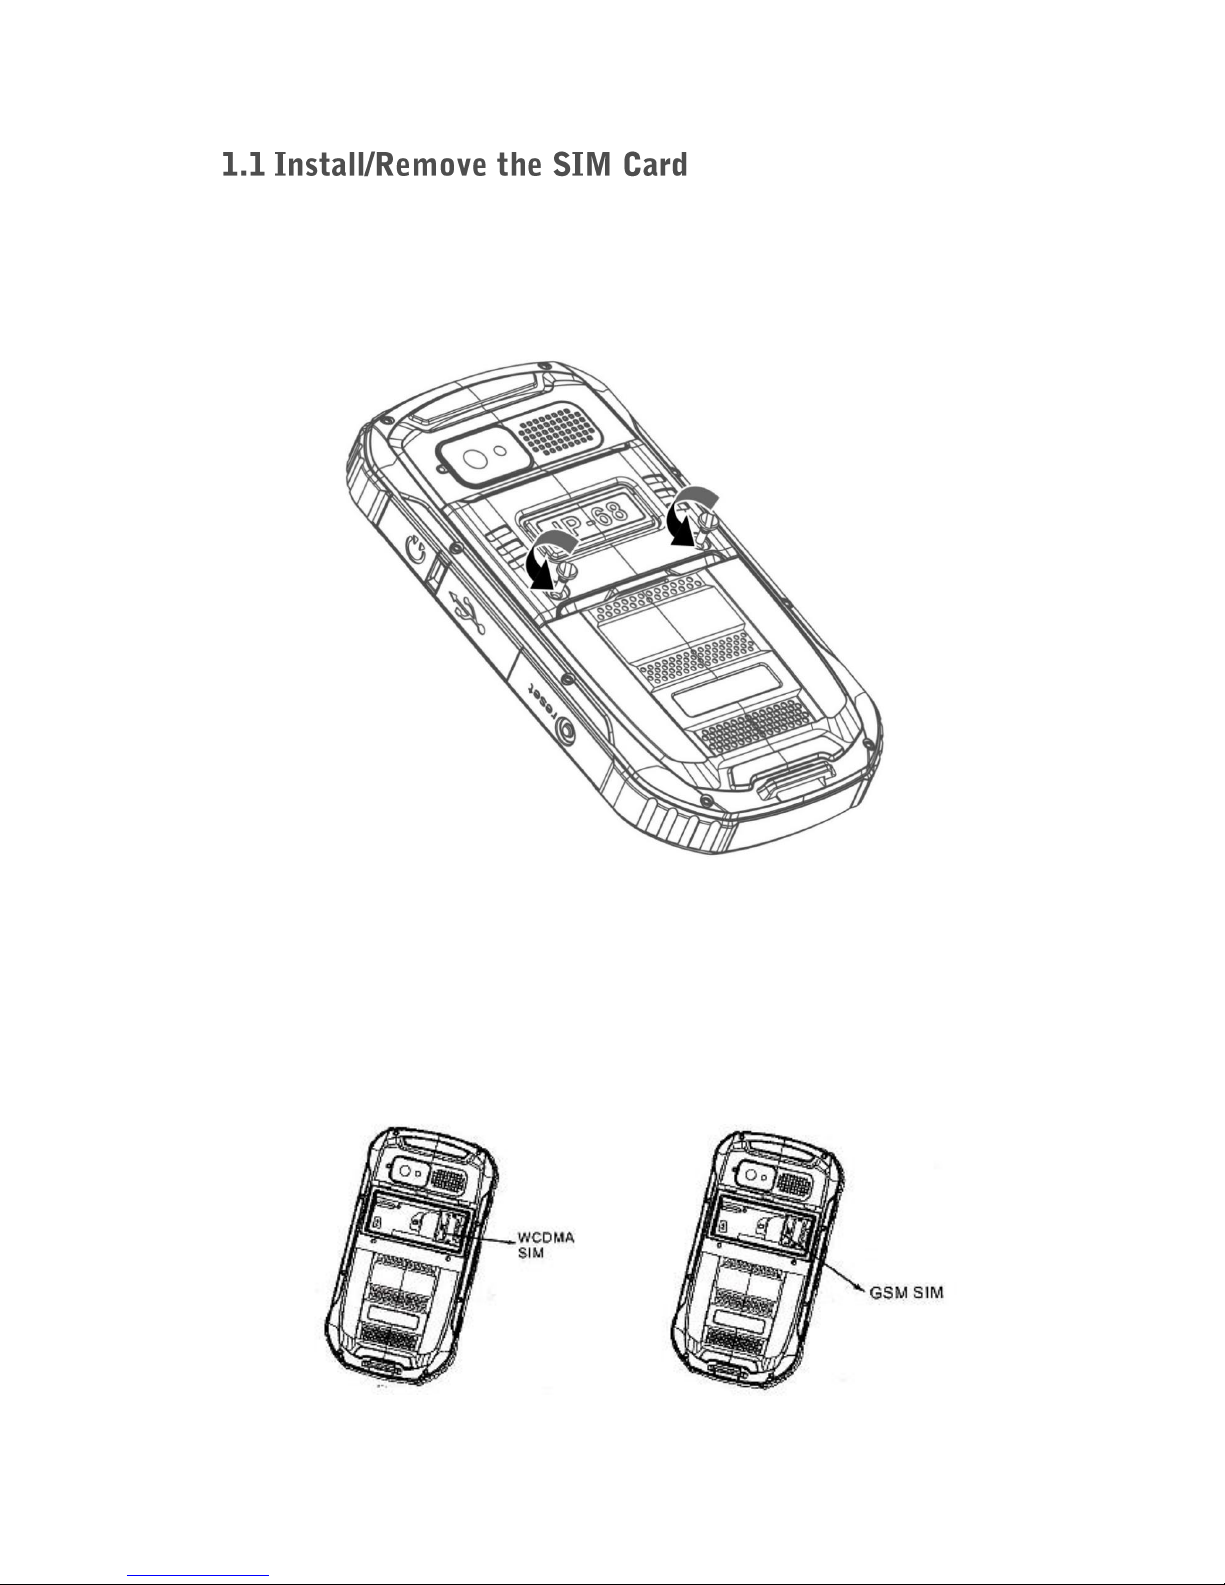
1. Remove the back cover: Loosen the screws on the back side –to
rotate both the screws anti-clockwise until open the back cover.
2. The phone supports Dual SIM cards. Put the SIM card into the slot
“circuit side” down and align the notch on the card with the notch on
the receptacle.
3. The UPPER SIM slot is for WCDMA 3G SIM card, and the NETHER
SIM slot is for GSM SIM card.

7
4. Replacing the back cover: Insert the back cover and rotate two screws
clockwise to lock the back cover.

8
1. If extra storage capacity is required, you can install a memory card.
This device uses micro SD or TF memory card.
2. Push the TF card into the card slot as shown.
Note: Please power off the phone before install or remove the SIM card
and memory card.
9
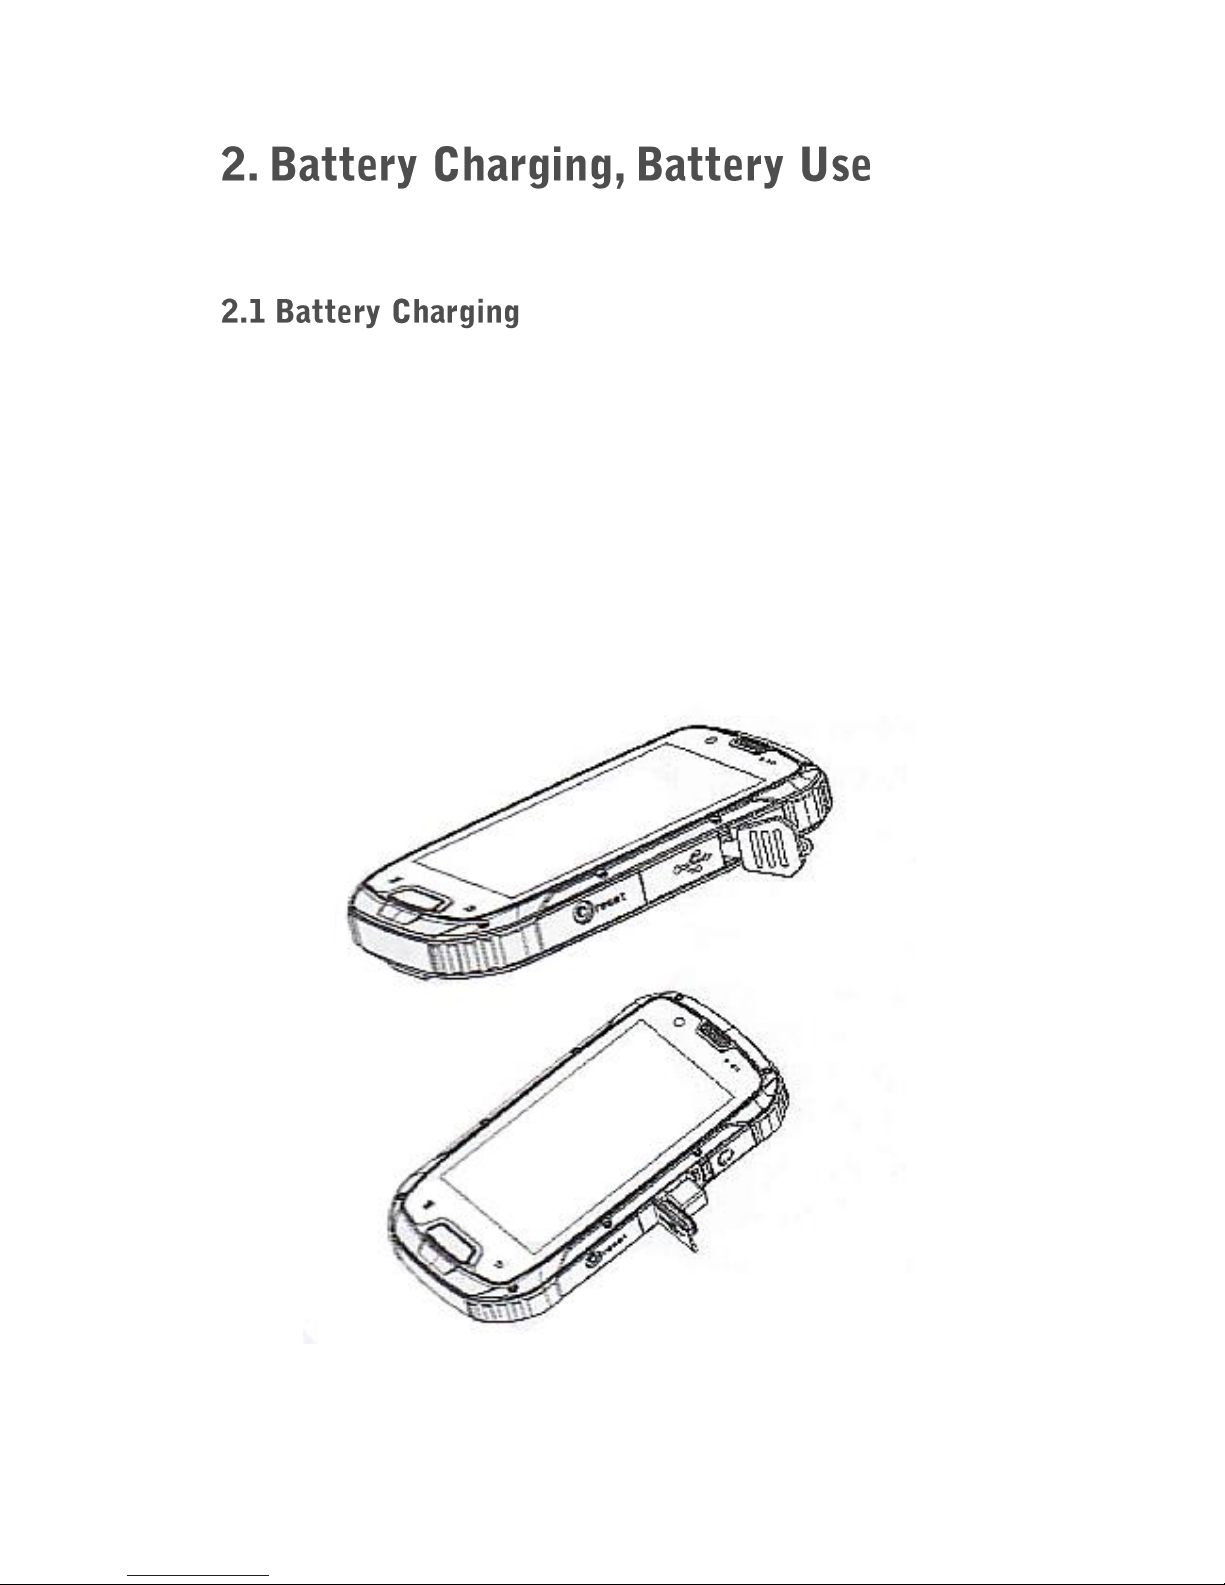
The battery is integrated in the body of the phone.
1. Connect the USB cable that came with your mobile phone to the
charger.
2. Open the USB port cover. Connect the USB cable to the USB port of
your phone.
3. Insert the other end of the cable into the wall charger and insert into
an electrical socket.
4. When charging is complete, remove the cable from the device and
then remove the wall charger.

10
Battery performance is influenced by many factors, including your carrier
network configuration, signal strength, the temperature while using the
device; the functions you choose and use, accessories and voice, data
or other application mode.
If the battery has not been used for a long period of time or the power
battery is very low, it may take some time to show it is charging.
Over time, the battery will not hold a charge for as long as it did when it
was new. When the battery life becomes noticeably shorter than usual
after being charged properly, replace the battery with a new one of the
same type.
Warning: Any kind of battery short circuit may cause explosion, fire or
personal injury and other serious consequence!
11
Long press the key for 2 - 3 seconds to switch on/off the phone.
If you have activated the PIN code, when switching on, the screen will
display “Enter PIN”.
You get the PIN code together with the SIM card from the network
operator. If you input the wrong PIN code three times, SIM card will be
blocked, please contact the network operator for help decoding.

12
When you power on the phone, the Home screen appears.
The Home screen is your starting point to access all the features on your
phone. It displays application icons, widgets, shortcuts, and other
functions. You can customize the Home screen with different wallpaper
and organize applications in a way you want.

13
Single Click: To select an icon. For example, click dial to open the
keypad which will be displayed on the screen.
Double Click: To zoom-in or zoom-out. For example, to zoom-in or out
of a photo, click twice when viewing a photo or browsing on the internet.
Hold: Click and hold the screen, Icon or input box to get more operation
options.
Swipe: Move your finger across the screen vertically or horizontally to
switch between pictures or pages.
Drag: Touch and hold the desired item with your finger. Drag the item to
any part of the screen. You may drag an icon to move or delete it.
Whenyour mobile phone is on, press the Power button to lock the screen.
When the screen is locked, you can still receive messages and calls.
If you leave your mobile phone undisturbed for a while, the screen will
lock automatically.
Press the Power button or Home button to wake up the screen. Then
follow the instruction on the screen and swipe to unlock the screen.

14
On the home screen, swipe down from top of the screen to show the
notification panel.
Your phone will notify you when there is a new event (call, message,
application update, application notification, etc.) Touch related bar of
notification will direct you to the related application.
Youcan also access Settings (including Airplane mode, Wi-Fi, Bluetooth,
GPS, Data Connection, Brightness, etc.) from notification panel.
1. Create shortcuts and widgets: Press and hold the APPS, and drag on
the desk. Select create shortcuts or widgets.
2. Delete the shortcuts and widgets. To delete an object, tap and hold
the object, then drag it towards the bottom of the screen “ ”. When
the object turns red let go of it and the selected object will be deleted.

15
1. Making a call: enter a number and dial “ ”, or select a number from
Call Log “” or Contacts “ ”.
2. Call log: it stores your call history. You can view calls by All,
Incoming, Outgoing and Unanswered.
3. Answering a call: When you receive a call, the incoming call screen
opens with the phone number and information about the caller that
you have entered in People. Touch and drag “ ” to the right to “”
answer.
4. Reject a call: Touch and drag “ ” to the left “ ” to reject a call.
5. End a call: During a call touch “ ” to end a call.
6. Conference call: When you are on a call, you can add multiple
person into the conversation by touching “ ”, adding contacts, and
then touching “ ”.
7. Switching between calls: While you are on two calls, you can switch
between them by touching “ ”.

16
1. Add a contact: touch “ ” to add a new contact. —Select the
location (SIM1, SIM2 or Phone) you want to save the contact to. —
Enter the contact’s name, phone number, email, address or other
information. —Touch ‘Done’to save.
2. Search a contact: Touch “ ” to search for a contact. –Enter the
name of the contact to perform the search.
3. Communicate with a contact: Touch the contact that you want to
communicate with. —Touch the phone number to make a call. —
Touch “” to send a message. —Touch “” to make a video call.
4. Copy a contact: Contacts can be copied to and from the SIM card,
the device, memory card or USB storage. In the contacts list, touch
the Menu key, and touch Import/export. —Select the source location
and destination location of the contact. —Then select the contacts
you want to copy and touch “ ”.
5. Delete a contact: In the contact list, touch the contact that you want
to delete. —Touch the Menu key and Delete.
17
1. SMS: Touch “ ” to create a new message. —Enter a phone number
or touch “ ” to select a contact from People. —Type your message
in the text box below. Touch “ ” to send.
2. MMS: Touch “ ” to create a new message. —Enter a phone
number or touch “ ” to select a contact from People. —Type your
message in the text boxbelow. Touch options to attach picture, video,
etc. to the message. Touch “ ” to send.
3. Reply a message: In the message list, touch the message thread to
open it. —Touch the text box to compose the reply and send.
1. Add an Email Account: When using the Email application for the first
time, you must configure your email account. Enter your Email
address and Password and follow the instructions to set up your email
account. Then you can manage your email on your phone.
2. Add another Email Account: After configuring your first email account,
touch the Menu key and then select Settings. —Select Add Account
to create another email account.
3. Send an Email: On the inbox screen touch “ ”. Enter the email
address of recipient in the ‘To’ field. — Enter subject. —Type your
email content. —Touch “” when you finish.
4. Reply an Email: Touch the email you want to view and reply. —Touch
“ ” or touch “ ” then Reply all.

18
1. Connect to Wi-Fi through Settings —Wi-Fi. Turn Wi-Fi on to see
available networks.
2. Touch a Wi-Fi network to connect. If the network is secured, enter the
password and then connect.
3. If you have connected to a network before, it will be automatically
connected when you enter the zone of that network again.
1. In Settings —WIRELESS & NETWORKS, touch ‘More’ —Mobile
networks and touch 3G service to check the network connection.
2. In Mobile networks —Data connection, touch the desired network
operator to enable data connection.
1. In Settings —WIRELESS & NETWORKS, touch Bluetooth. —Turn on
Bluetooth feature. When the Bluetooth is turned on, your phone
detects other Bluetooth devices. To make your phone visible to others,
touch your phone model name to make this device visible to other
Bluetooth devices.
2. Pair with another device: When you turn on Bluetooth, it will search for
nearby devices. Touch the device you want to pair with by entering
the password.

19
1. Access Camera from Apps screen.
2. Touch “ ” to take a photo, or “ ” to take a video. To switch between
front and rear cameras, touch “ ”.
3. Touch anywhere on the screen to set the focus.
1. View your picture and video in the Gallery.
2. In theview of a picture, you can editor share thepicture via Messaging,
Email, Bluetooth, etc.
1. Add music: Connect the phone to your computer with a USB cable
(with the memory card inserted). —Open the phone USB storage on
your computer. —Copy the music from your computer to a folder you
have created under the root directory of the memory card. —Safely
eject the mobile phone storage and remove the mobile phone from
computer.
2. Play music: Select a category on the music library. Then touch a song
you want to play.
This manual suits for next models
1
Table of contents
Other EnjoyTone Cell Phone manuals


