manuals.online logo
Brands
  1. Home
  2. •
  3. Brands
  4. •
  5. Sharp
  6. •
  7. Cell Phone
  8. •
  9. Sharp AQUOS SHL21 Service manual

Sharp AQUOS SHL21 Service manual

AS70e設定ガイド.fm
[1/2]
Thank you for buying the “AQUOS PHONE SERIE SHL21” (simply called the “product” from here on). This manual describes the settings
and precautions for using the product. For descriptions on various functions, refer to the “Instruction Manual application” (Japanese).
Basic Operations
Describes names of parts and basic
operations.
Initial Settings
■STEP1: Profile Settings
Set information such as your phone number
and mail address.
■STEP2: Google Account Settings
You will be able to download applications from
Google Play. You can also use services such
as Gmail, YouTube, Google Maps and Google
Calendar.
■STEP3: au ID Settings
Set an au ID to use various services provided
by au. You can also make initial settings for au
Wi-Fi SPOT.
■STEP4: Backup Settings
You will be able to back up address books or
photos to au Cloud.
■STEP5: au widget Settings
Set au widget.
E-mail Setting and Changing E-mail
Address
Set for using E-mail (@ezweb.ne.jp). An e-mail
address is set automatically in the initial
settings. You can change the e-mail address
set in the initial settings.
Making/Receiving Calls
You can make/receive a call.
Infrared Communication
You can send/receive data with devices which
support the infrared communication function.
Transferring Data
You can transfer your data from your old au
phone.
Viewing/Playing Data
You can view/play transferred data.
Data Backup
You can back up data to a microSD™ memory
card.
Reducing Battery Consumption
You can switch “function key” setting to reduce
the battery consumption.
Setting Guide
Please read this manual first
* All company names and product names in this manual are trademarks or registered trademarks of the respective companies.
Sold by: KDDI CORPORATION,
OKINAWA CELLULAR TELEPHONE COMPANY
Manufactured by: SHARP CORPORATION
September 2012, 1st Edition
You can switch the display language for function names and other items to English.
●On the home screen, tap [アプリ] (APPS) [[設定] (Settings) [[言語と文字入力] (Language & input) [[言語(Language)を選択]
(Select language) [[English].
For detailed operations, refer to the “Instruction Manual application” (Japanese).
●On the home screen, tap [APPS] [[Instruction Manual].
■Character Input Method
You can enter characters by flick input or tapping keys repeatedly. Tap “ ” to switch the input modes.
Flick input
By touching a key, the candidates that can be entered by flick input are displayed as shown on the right. By
flicking the key in the direction of a desired character being displayed, the character is entered in the
character entry area.
After you purchase the product, the initial settings screen is displayed automatically when you turn the power of the product on for the first
time. Follow the on-screen instructions to set each function.
●Alternatively, on the home screen, tap [APPS] [[Settings] [[Initial setting] to set up.
■STEP1: Profile Settings
■STEP2: Google Account Settings
You can use applications provided by Google Inc. such as “Gmail”, “Play Store” and “Talk” by setting up a Google account. You can use
the product without a Google account set, but in such case some applications are not available.
The main setting items are as follows (For “Recovery email address”, leave it blank when you do not have another mail address).
●The Google account setup screen is also displayed when you activate an application for which a Google account is required for the first
time.
*1 If you have already had a Google account, tap [Existing].
*2 Tap [Join Google+] to join Google+.
■STEP3: au ID Settings
You can use various services provided by au such as “au Simple Payment Service” in which you can purchase applications displayed on au
Market and Google Play by setting an au ID. Also, make initial settings for au Wi-Fi SPOT which is a public wireless LAN service that enables
you to use the comfortable high-speed Internet when you are out.
●Alternatively, on the home screen, tap [APPS] [[au Easy Setting] to set up.
Basic Operations
ADisplay
Touch it directly with your fingers to operate.
Tap
Gently touch the
screen and then
immediately release
your finger.
Flick
Touch the screen and
then quickly move
(flick) your finger up,
down, right or left.
B^Tap it to return to the previous screen.
C#Tap it to display the home screen.
D$Tap it to display the history of activated applications.
EeTap it to display available functions (menus).
FfPower key
Hold it down to turn the power on.
Unlock
Unlock by moving
down.
Initial Settings
1234
zzz
Tap [Next]. Tap [To profile settings]. Register each item, tap [Save]
and tap [Yes].
Tap [Next].
User name Register your Google account (user ID) and any characters which you want to use as a mail address. You can register any
user name but you cannot set the same user name as another user’s.
Password Register the password for using your Google account.
1234
zzzz
Tap [To Google account]. Tap [New].*1 Enter your first name and last
name in [First] and [Last]
respectively and tap [Next].
Enter any mail address and
tap [Next].
5678
zzzz
Enter the password and
tap [Next].
Enter the recovery email
address and the question and
answer for protecting security,
and tap [Next].
Tap [Not now].*2 Confirm the contents and
tap [I accept].
910 11 12
zzz
Enter the text displayed on the
screen and tap [Next].
Confirm the contents and
tap [Next].
Tap [Done]. Tap [Yes] or [No].
au ID Register your au phone number or any other characters as an au ID. The same “au ID” as another user’s cannot be
registered.
au ID password Register the password for using au ID.
1234
zzzz
Tap [Next]. Tap [Registration]. Confirm the contents and
tap [OK].
Tap [au IDの 設 定・保 存 ]
(Set/Save au ID).
《Character entry screen (12 Key)》
*1 The default value is the four-digit security code you wrote on the application form.
*2 Tap “お好きなau IDを新規登録したい方はこちら” (For registering any au ID) to register a new au ID with other than au phone numbers. Tap “au ID
をお持ちの方はこちら” (For using the au ID you already have) to set the au ID you have already owned.
*3 au ID registration is complete. Next, set the information for reissuing the password.
■STEP4: Backup Settings
You can back up address books or photos to au Cloud by performing Back up Settings.
■STEP5: au widget Settings
au widget is a widget that notifies you of latest information at the best time.
E-mail (@ezweb.ne.jp) is a service which enables you to exchange e-mails with other cell phones which support e-mail and with PCs. An
e-mail address is set automatically in the initial settings. You can change the e-mail address set in the initial settings.
■Initial Settings
■Changing E-mail Address
■Checking E-mail Address
5 6 7 8
z z z z
Enter the security code and
tap [OK].*1
Enter the password and tap
[利用規約に同意して新規登録]
(Agree with the terms of service
and register newly).*2
Tap [設定画面へ] (Go to the
setting screen).*3
Enter your date of birth, the
secret question and its answer,
tap [入力完了] (Finish entering)
and tap [設定] (Set).
910
z
Tap [終了] (End). Tap [Next].
1 2
z
Confirm the contents and
tap [Accept].
Tap [Next].
1 2 3
z z
Confirm the contents and
enable [Accept].
Tap [Next]. Tap [Finish].
E-mail Settingand ChangingE-mail Address
1 2 3 4
z z z z
On the home screen, tap [APPS]
and tap [Mail].
Tap [e] and tap [Settings]. Tap [E-mail settings] and
tap [Update Settings].
Confirm the contents and
tap [接続する] (Connect).
5
Confirm the contents and
tap [閉じる] (Close).
PC-mail settings
You can use a mail address other than one used for E-mail (@ezweb.ne.jp). For using PC-mail, PC-mail settings are required. When you
use this for the first time, set by the following operations.
On the home screen, tap [APPS] [[PC-mail] [Follow the on-screen instructions.
* For details, refer to the “Instruction Manual application” (Japanese).
1 2 3 4
z z z z
On the home screen, tap [APPS]
and tap [Mail].
Tap [e] and tap [Settings]. Tap [E-mail settings] and
tap [Other settings].
Confirm the contents and
tap [接続する] (Connect).
5 6 7 8
z z z z
Tap [Eメールアドレスの変更]
(Change e-mail address).
Enter the security code and
tap [送信] (Send).
Confirm the contents and
tap [承諾する] (Accept).
Enter an e-mail address and
tap [送信] (Send).
910
z
Tap [OK]. Tap [閉じる] (Close).
1 2 3
z z
On the home screen, tap [APPS]
and tap [Settings].
Tap [Profile]. Check your e-mail address on
the profile screen.
AS70_e_設定ガイド.fm 1 ページ 2012年11月8日 木曜日 午後12時59分
AS70e設定ガイド.fm
[2/2]
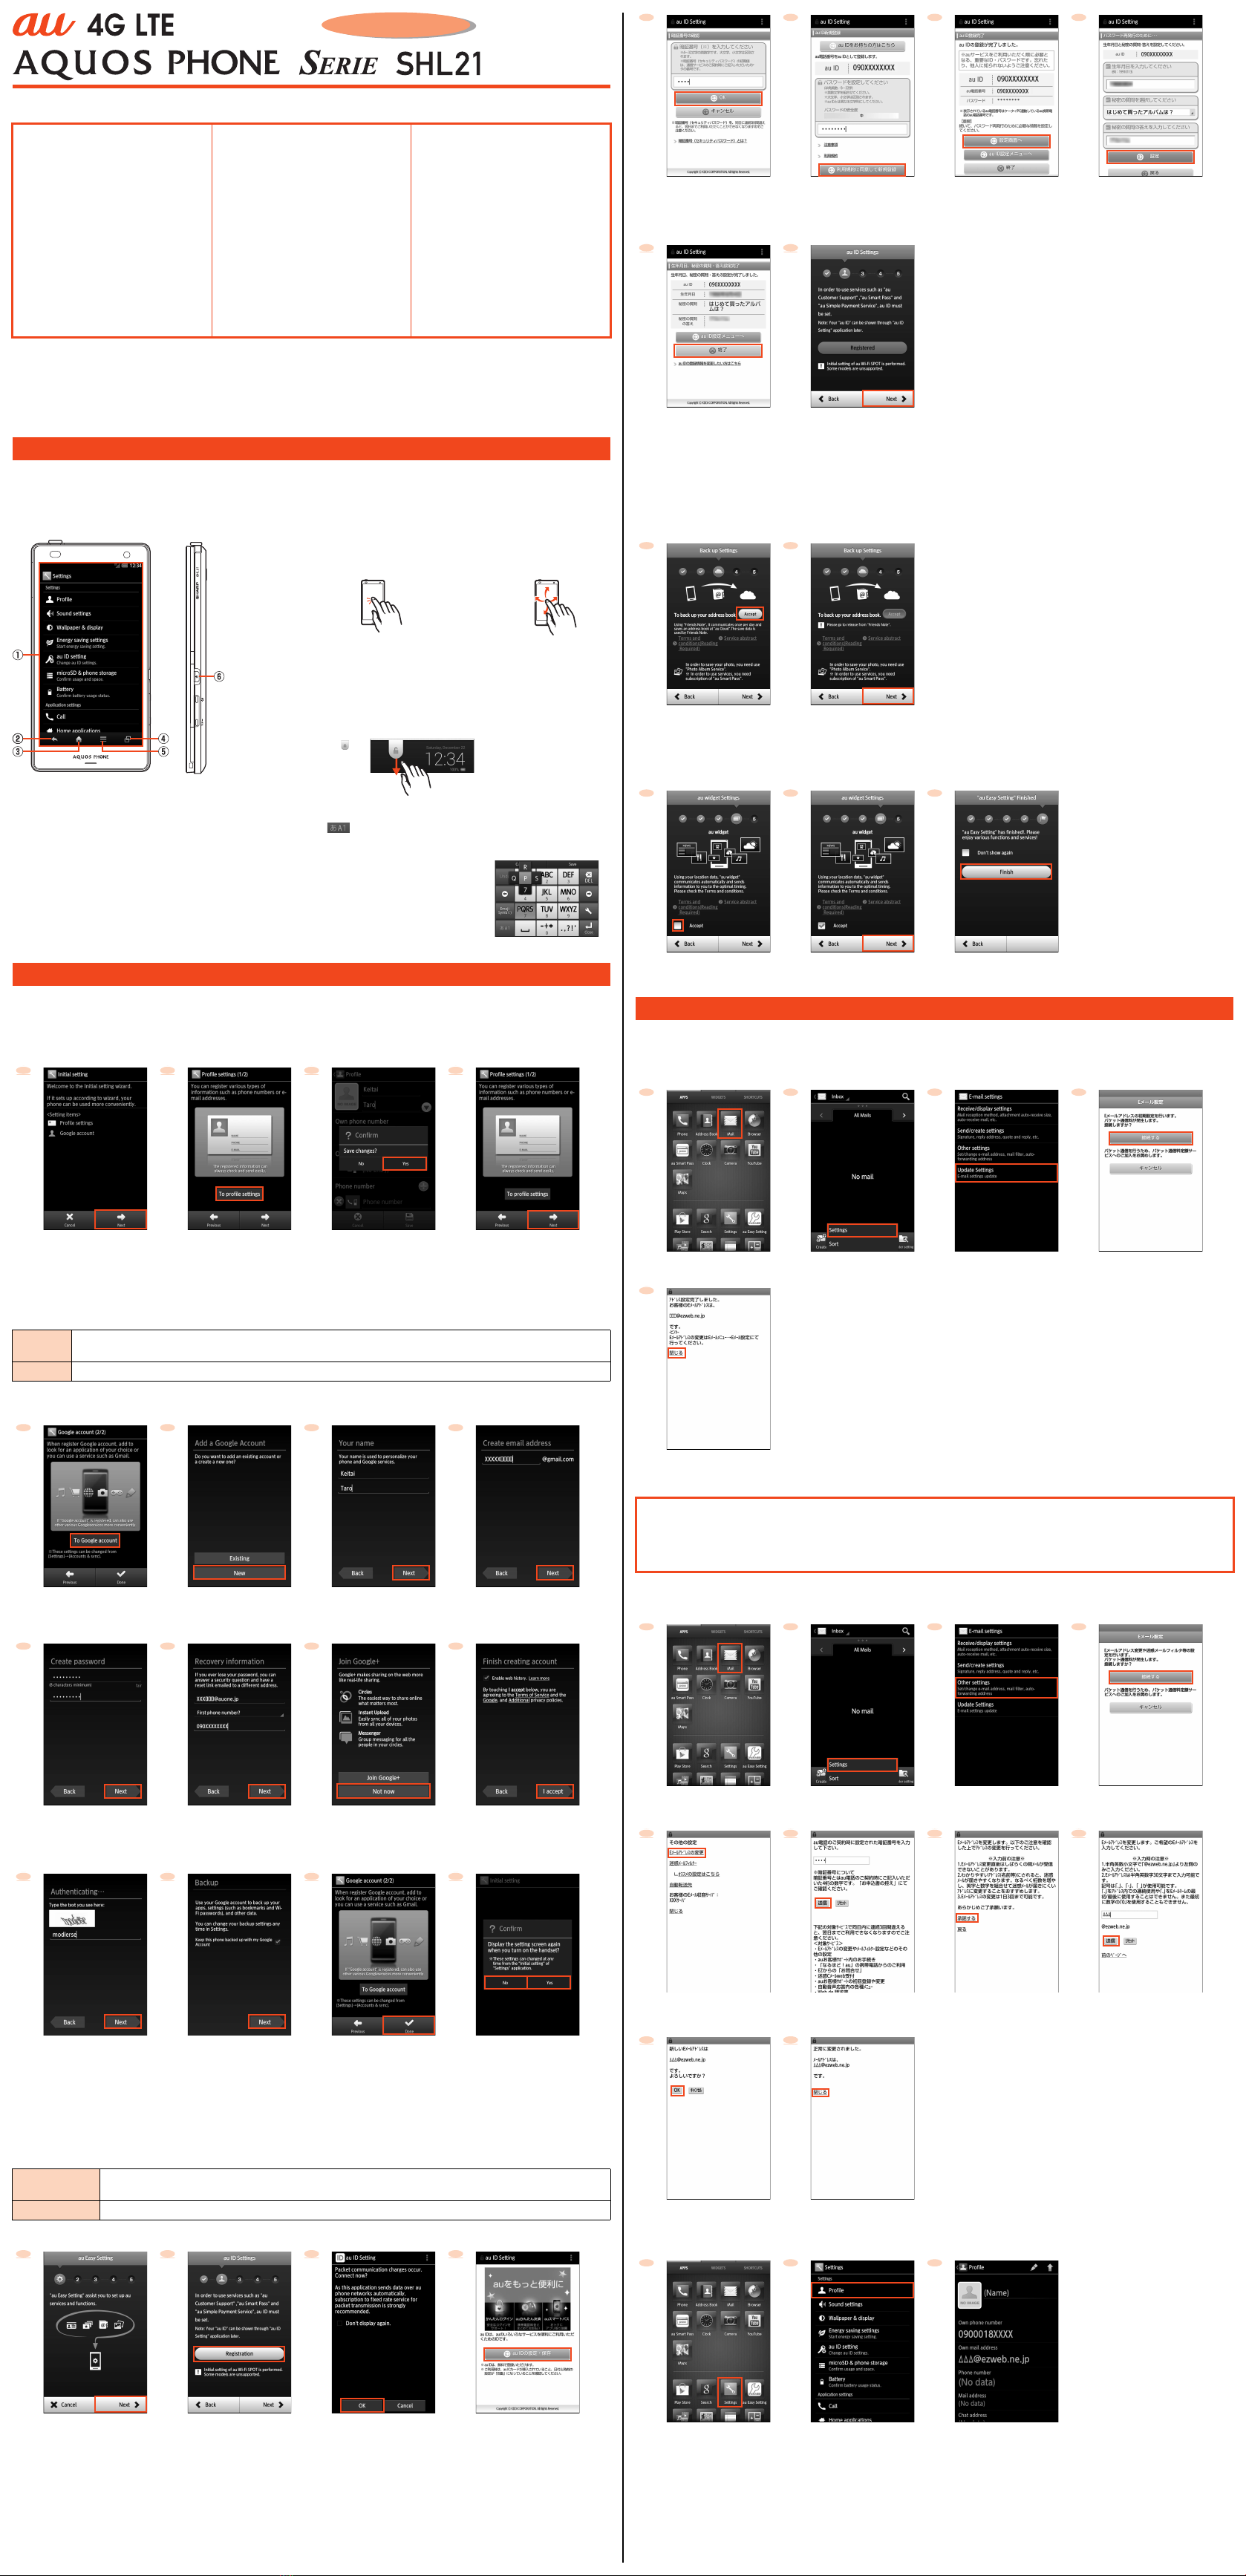
■Entering a Phone Number and Making a Call
■Making a Call Using Incoming History/Outgoing History
■Making a Call Using Address Book
■Answering a Call
■Putting a Call on Hold
While putting a call on hold, the following guidance is played for the caller.
“ただいま電話に出られません。申し訳ありませんが、まもなく出ますので、よろしければそのままお待ちください。” (I cannot take your call
right now. I will be available soon, so please hold just for a moment if it does not inconvenience you.)
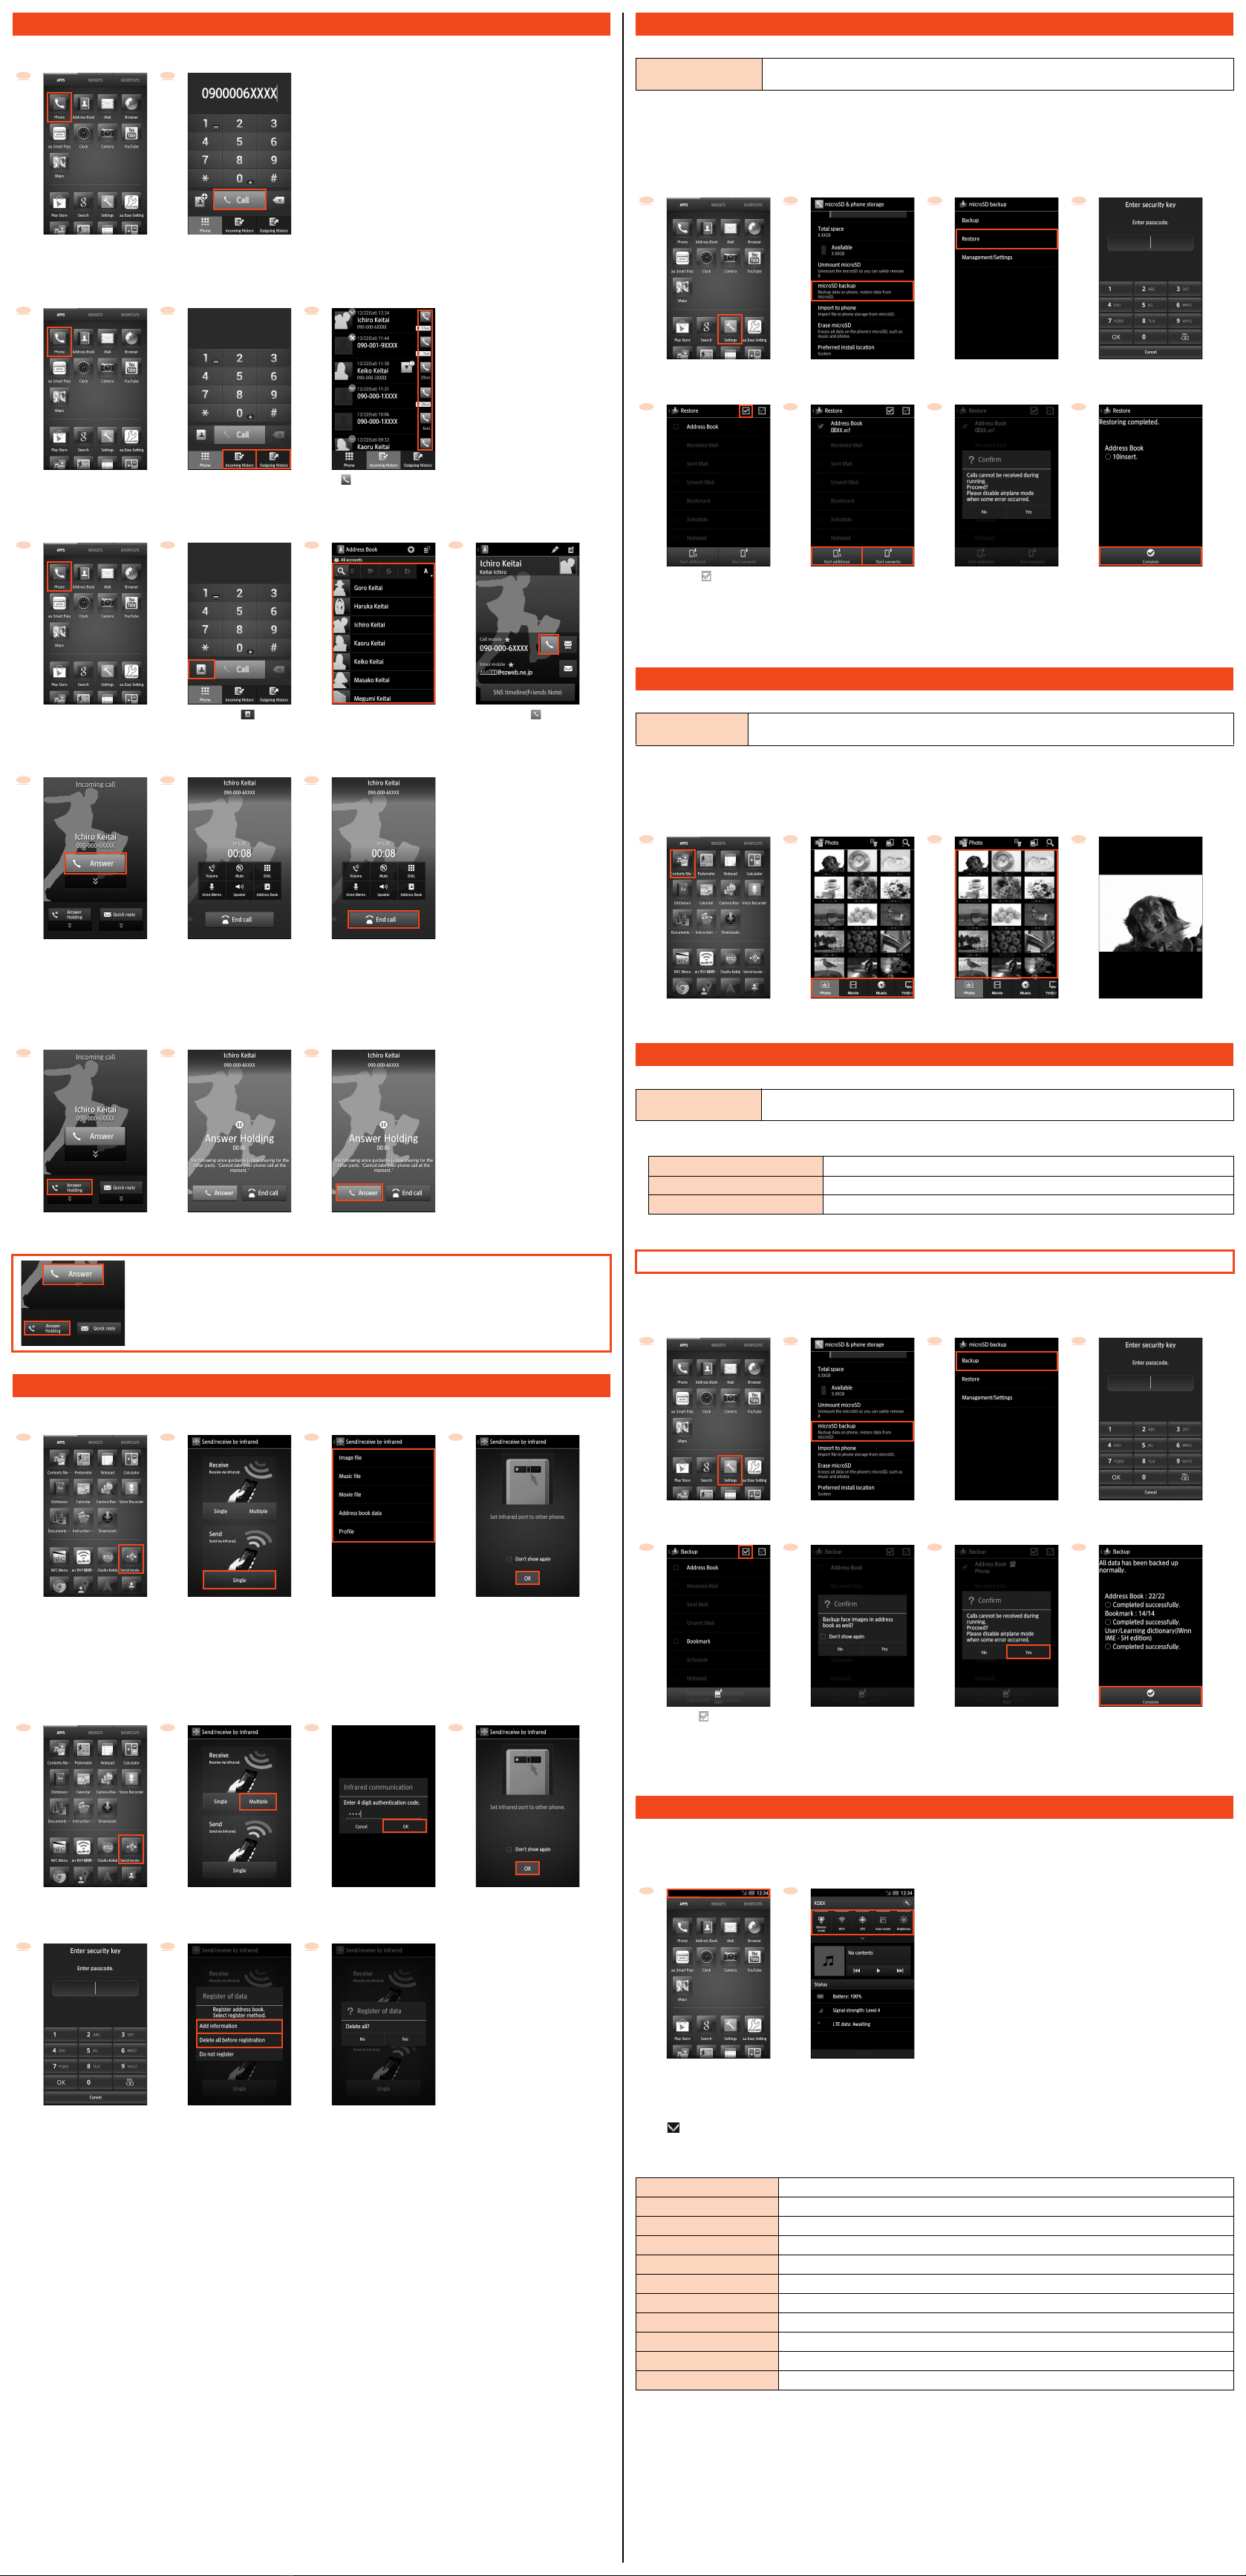
■Sending Data (Contents and the number of the screens to be displayed differ depending on the data to be sent.)
* When sending a profile, you can set items to send in “Send Setting”.
■Receiving Data (Contents and the number of the screens to be displayed differ depending on the data to be received.)
●Set the other party’s device ready for sending data via infrared communication in advance. For details, refer to the instruction manual of
the other party’s device which is to send data.
*1 When entering the authentication code is required, the sender and receiver enter the same four-digit number. Before sending/receiving data,
prepare the same authentication code as that of the other party in advance.
*2 The security key is set to “1234” by default.
*3 If you perform “Delete all before registration”, the original data will be deleted.
You can transfer data to the product from a previously used au phone using a microSD™ memory card.
●The data which can be transferred differ depending on the previously used au phone. For details on the data which can be transferred
and the method for transferring data to a microSD™ memory card, refer to the instruction manual of the previously used au phone.
●Mail data of up to 2,000 received mails and 1,000 sent mails (including unsent mails) can be transferred to the product (The number of
mails which can actually be saved may decrease depending on the free space on the main unit).
■Transferring Method (Contents and the number of the screens to be displayed differ depending on the data to be transferred.)
●Insert a microSD™ memory card with data to be transferred to the product in advance.
*1 The security key is set to “1234” by default.
*2 If you perform “Start overwrite”, the original data will be deleted.
If you transfer data to a microSD™ memory card from a previously used au phone, you can view/play the data with the product.
■Viewing/Playing Data on a microSD™ Memory Card
●You cannot transfer the copyrighted data saved on a previously used au phone to the product. However, if you change your phone
model from a LISMO compatible model, transferring Chaku-uta full®, Chaku-uta full plus®and video clips downloaded on the au phone
is available.
In addition, as for music transferred to the au phone from LISMO Port, you need to transfer the music from LISMO Port again.
To protect important data such as address book entries and mails, back up the data to a microSD™ memory card periodically.
●For data saved on the main unit, move/copy them to the microSD™memory card using Contents Manager etc. For details, refer to the
“Instruction Manual application” (Japanese). Furthermore, the locations of the main data saved on the main unit are as follows.
●You can download applications again only at the cost of communication charge using the same Google account/au ID as that used to
purchase the applications.
■Backup Method (Contents and the number of the screens to be displayed differ depending on the data to be transferred.)
●Insert a microSD™ memory card to the product in advance.
* The security key is set to “1234” by default.
You can enable/disable functions and perform other settings by using “function key” on the notification/status panel. You can reduce the
battery consumption by switching the settings frequently when not using the functions etc.
■Using “Function Key”
* Turns blue when you enable the function.
Tap “ ” to display/hide function keys on the second and subsequent row.
■“Function Key”
You can set the following functions.
Making/ReceivingCalls
1 2
z
On the home screen, tap [APPS]
and tap [Phone].
Enter a phone number and
tap [Call].
123
z z
On the home screen, tap [APPS]
and tap [Phone].
Tap [Incoming History] or
[Outgoing History].
Tap [ ] of the other party you
want to make a call to.
1234
zzz
On the home screen, tap [APPS]
and tap [Phone].
Tap [ ]. Tap the other party you want to
make a call to.
Tap [ ].
123
z z
Move [Answer] down
during an incoming call.
The call starts. Tap [End call] to
end the call.
123
z z
Move [Answer Holding] down
during an incoming call.
The call is put on hold and the
guidance is played for the caller.
Tap [Answer] to
answer the call.
When you receive an incoming call while the backlight illuminates (except when the Welcome Sheet(Lock
Screen) is displayed), the screen shown on the left is displayed.
Tap [Answer] or [Answer Holding].
Infrared Communication
1234
zzz
On the home screen,
tap [APPS] and
tap [Send/receive by infrared].
Tap [Single]. Select data to send.*Follow the on-screen instructions
and tap [OK].
1234
zzzz
On the home screen,
tap [APPS] and
tap [Send/receive by infrared].
Tap [Multiple]. Enter the authentication code
and tap [OK].*1
Follow the on-screen instructions
and tap [OK].
567
z z
Unlock.*2 Tap [Add information] or
[Delete all before registration].*3
When the confirmation screen,
the account selection screen,
etc. is displayed, follow the
on-screen instructions.
TransferringData
Data which can be
transferred to the product
Address book, mail (e-mail, SMS), bookmark (favorites in the browser), schedule, notepad and user/learning
dictionary (iWnn IME - SH edition)
1 2 3 4
z z z z
On the home screen, tap [APPS]
and tap [Settings].
Tap [microSD & phone storage]
and tap [microSD backup].
Tap [Restore]. Unlock.*1
5 6 7 8
z z z
Tap [ ] to restore
all contents.
Tap [Start additional] or
[Start overwrite].*2
When the confirmation screen,
the account selection screen,
etc. is displayed, follow the
on-screen instructions.
Tap [Complete]
after the restoration ends.
Viewing/PlayingData
Data which can be
viewed/played Photo (image), movie (video), music, TV (1Seg) and document
1 2 3 4
z z z
On the home screen, tap [APPS]
and tap [Contents Manager].
Tap a category to display. Tap data to display. Data is displayed.
Data Backup
Data which can be backed
up
Address book, mail (e-mail, SMS), bookmark (favorites in the browser), schedule, notepad and user/learning
dictionary (iWnn IME - SH edition)
Data shot by camera ¥mnt¥sdcard¥DCIM¥100SHARP
Data recorded by voice recorder ¥mnt¥sdcard¥PRIVATE¥SHARP¥CM¥MUSIC
Data saved by browser ¥mnt¥sdcard¥Download
When the product is kept at an au shop for repairing, the memories will be deleted. Back up data in advance.
1 2 3 4
z z z z
On the home screen, tap [APPS]
and tap [Settings].
Tap [microSD & phone storage]
and tap [microSD backup].
Tap [Backup]. Unlock.*
5 6 7 8
z z z
Tap [ ] to back up
all contents.
When the confirmation screen,
the account selection screen,
etc. is displayed, follow the
on-screen instructions.
Tap [Start] and tap [Yes]. Tap [Complete]
after the backup ends.
ReducingBattery Consumption
1 2
z
Move the status bar down. Tap the functions whose settings
you want to switch by using
“function key”.*
Manner mode Set the manner mode.
Wi-Fi Set the use of Wi-Fi®.
GPS Set the use of the GPS function.
Auto-rotate Set the automatic rotation of the screen.
Brightness Set the brightness of the screen.
VeilView Set VeilView.
Bluetooth Set the use of Bluetooth®.
Sync Set the synchronization of application.
Wi-Fi tethering Set the use of the Wi-Fi®tethering.
Wireless output Set the use of the wireless output.
NFC Set the use of NFC.
AS70_e_設定ガイド.fm 2 ページ 2012年11月8日 木曜日 午後12時59分

Other Sharp Cell Phone manuals

Sharp AQUOS sense3 User manual

Sharp

Sharp AQUOS sense3 User manual

Sharp AQUOS K SHF32 Service manual

Sharp

Sharp AQUOS K SHF32 Service manual

Sharp Aquos Sense3 SHV45 User manual

Sharp

Sharp Aquos Sense3 SHV45 User manual

Sharp WX-T923 User manual

Sharp

Sharp WX-T923 User manual

Sharp AQUOS sense3 Service manual

Sharp

Sharp AQUOS sense3 Service manual

Sharp ONE User manual

Sharp

Sharp ONE User manual

Sharp Docomo SH-05D User manual

Sharp

Sharp Docomo SH-05D User manual

Sharp SHV40 Installation guide

Sharp

Sharp SHV40 Installation guide

Sharp AQUOS PHONE SERIE ISW16SH Service manual

Sharp

Sharp AQUOS PHONE SERIE ISW16SH Service manual

Sharp GX20 User manual

Sharp

Sharp GX20 User manual

Sharp SH837W User manual

Sharp

Sharp SH837W User manual

Sharp Aquos R compact Installation guide

Sharp

Sharp Aquos R compact Installation guide

Sharp AQUOS sense5G User manual

Sharp

Sharp AQUOS sense5G User manual

Sharp TM150 User manual

Sharp

Sharp TM150 User manual

Sharp SHG01 Quick start guide

Sharp

Sharp SHG01 Quick start guide

Sharp Aquos Xx3 mini User manual

Sharp

Sharp Aquos Xx3 mini User manual

Sharp 770SH User manual

Sharp

Sharp 770SH User manual

Sharp AQUOS R User manual

Sharp

Sharp AQUOS R User manual

Sharp SHG02 Quick start guide

Sharp

Sharp SHG02 Quick start guide

Sharp SH9010C User manual

Sharp

Sharp SH9010C User manual

Sharp 902SH User manual

Sharp

Sharp 902SH User manual

Sharp 701SH User manual

Sharp

Sharp 701SH User manual

Sharp TM200 User manual

Sharp

Sharp TM200 User manual

Sharp SX813 User manual

Sharp

Sharp SX813 User manual

Popular Cell Phone manuals by other brands

Blackview BV9900E manual

Blackview

Blackview BV9900E manual

Samsung SGH-A107 user manual

Samsung

Samsung SGH-A107 user manual

Motorola V551 Service manual

Motorola

Motorola V551 Service manual

Huawei Y5 2017 user guide

Huawei

Huawei Y5 2017 user guide

Sagem MY401L user guide

Sagem

Sagem MY401L user guide

Zte Telstra T6 user manual

Zte

Zte Telstra T6 user manual

Huawei Ascend G510 Faqs

Huawei

Huawei Ascend G510 Faqs

BayMobile G3I user manual

BayMobile

BayMobile G3I user manual

Samsung SGH-R220E Service manual

Samsung

Samsung SGH-R220E Service manual

Samsung Delve SCH-R800 Series user manual

Samsung

Samsung Delve SCH-R800 Series user manual

Gionee V6L user guide

Gionee

Gionee V6L user guide

LG 236C user guide

LG

LG 236C user guide

Nokia 7200 user guide

Nokia

Nokia 7200 user guide

Trevi FORTE 80 user manual

Trevi

Trevi FORTE 80 user manual

Samsung SM-A6060 user manual

Samsung

Samsung SM-A6060 user manual

LG D100j user guide

LG

LG D100j user guide

LG F9200 -  Cell Phone 24 MB Specification sheet

LG

LG F9200 - Cell Phone 24 MB Specification sheet

Webberfly Four user manual

Webberfly

Webberfly Four user manual

manuals.online logo
manuals.online logoBrands
  • About & Mission
  • Contact us
  • Privacy Policy
  • Terms and Conditions

Copyright 2025 Manuals.Online. All Rights Reserved.