ENMALAC ST9704V User manual

ENMALAC™ST9704V 4-CHANNELH.264DVRMANUAL
Page ReservedbyReginexSendirianBerhad
1
User Manual
4-CHANNEL H.264 DVR

ENMALAC™ST9704V 4-CHANNELH.264DVRMANUAL
Page ReservedbyReginexSendirianBerhad
2
Warning
•To reduce the risk of fire or electric shock, do not expose this appliance to rain or moisture.
•All the safety and operating instructions must be read before the unit is operated.
Precaution
•Make sure to switch the power off before you install the DVR.
•Avoid using the DVR outside of the reference temperature and humidity indicated in the specification.
•Avoid exposing the DVR to violent movement or vibration.
•Do not use or store the DVR in direct sunlight or near to any source of heat.
•Do not place any object into the holes used for air circulation.
•Always use the DVR in the well ventilated location to prevent overheating.
•Do not disassemble or reassemble the product. It may cause malfunction or fire.
•There is the danger of an electric shock if DVR is repaired by an unqualified service engineer or installer.
Power Supply
•Please use the provided adaptor. The DVR provide DC12V,3A power adaptor. Please select the correct
voltage and power if using other adaptor.
•Keep the adaptor and power cord dry and protect from humidity.
•When this machine is not using for a long time, please remove the connection of power adaptor.
Features
•Non-pc stand-alone security digital video recorder with embedded operation system
•H.264 compression format
•Mobile monitoring
•Email for alarm
•Chinese/English languages supported
•Audio and video real time recording and playback
•Support NTSC/PAL video system
•4CH video inputs, 1CH BNC monitor output, VGA output
•4CH audio inputs, 1CH audio output
•High quality image, brightness, contrast and color adjustable for each channel
•Recording modes: manual recoding, always recording and scheduled recording include sensor alarm
recording and motion detection recording
•Multi Recording image quality
•CIF Audio/Video real-time playback, support D1, 1/2D1 resolution
•Searching modes: time & data searching, folder list searching, log list searching
•Support fast forward and fast rewind: ×2, ×4, ×8
•Backup modes: network backup, USB 2.0 backup, moveable USB HDD and USB DVRROM backup
•Support RS-485 PTZ control
•Support USB mouse operation
•Support 1 SATA port HDD.
•4 CH alarm input, 1 CH alarm output
•Multiplex operation: live & record & playback & network can be operated at the same time
•Support IE browser, email for alarm, DDNS function
•Network function: IE browser monitor/playback/record/backup/setup

ENMALAC™ST9704V 4-CHANNELH.264DVRMANUAL
Page ReservedbyReginexSendirianBerhad
3
Content
I INSTALLATION
1.1 Packing Detail
1.2 Front Panel Controls
1.3 Rear Panel Connectors
1.4 Rear Panel Connection
1.5 Remote Controller
1.6 Installation Process
II OPERATION
2.1 Power On
2.2 Power Off
2.3 Display Mode
2.4 Manual Recording
2.5 Alarm Recording
2.6 Schedule Recording
2.7 Playback
2.8 Time Searching Playback
2.9 Folder List Playback
2.10 Log List Playback
2.11 USB Backup
2.12 System Information
2.13 PTZ Control
2.14 Password
III SYSTEM MENU SETUP
3.1 Main menu
3.2 RECORD SEARCH
1. NORMAL SEARCHING
2. TIME SEARCHING
3. FOLDER LIST SEARCHING
4. LOG LIST SEARCHING
3.3 RECORD MODE
1. CHANNEL
2. RESOLUTION
3. QUALITY
4. AUDIO
5. RECORD MODE
6. FOLDER SIZE
7. DEFAULT
3.4 HDD MANAGEMENT
1. HDD LIST
2. OVERWRITE
3. FORMAT HDD
4. FORMAT USB

ENMALAC™ST9704V 4-CHANNELH.264DVRMANUAL
Page ReservedbyReginexSendirianBerhad
4
3.5 BASIC
1. LANGUAGE
2. TIME SETUP
3. PASSWORD
4. DISPLAY SETUP
5. VIDEO/AUDIO SETUP
6. EXIT
3.6 ADVANCE
1. ALARM
2. INFORMATION
3. MOTION DETECTION
4. MOBILE
5. MAINTENANCE
6. PTZ
7. NETWORK
IV IE BROWSER
4.1 USER LOGIN
4.2 RECORD SEARCH
4.3 LIVE
4.4 REPLAY
4.5 SETUP
V SPECIFICATION

ENMALAC™ST9704V 4-CHANNELH.264DVRMANUAL
I INSTALLATION
1.1 Packing Detail
1. DVR console x 1 unit
2. User’s manual x 1 unit
3. DC12V/3A power adaptor x 1 unit
4. Screws x 1 set
5. Infrared remote controller x 1 unit
6. USB mouse x 1unit
1.2 Front Panel Controls
1. ”UP” button
In the live display mode, press this button to display CH1. In the setup menu, press this button to move the
cursor up to the next line.
2. ”RIGHT” button
In the live display mode, press this button to display CH2. In the setup menu, press this button to move the
cursor in right direction.
3. ”DOWN” button
In the live display mode, press this button to display CH3. In the setup menu, press this button to move the
cursor down to the next line.
4. ”LEFT” button
In the live display mode, press this button to display CH4. In the setup menu, press this button to move the
cursor in left direction.
5. “ENTER” button
In the setup menu press this button to enter sub-menu or confirm setting.
6. “MODE” button
In the single channel display mode, press this button to change to QUAD display mode.
7. “MENU” button
In the live or record mode, press this button to enter main setup menu, press “ESC” button to quit menu.
8. “ESC” button
In the setup menu or PTZ operation mode, press this button to quit setup menu or PTZ operation mode.
9. “PTZ” control button
In the live or record mode, press this button to enter PTZ operation of single channel, press “ESC” button to
quit PTZ operation.
Page ReservedbyReginexSendirianBerhad
5

ENMALAC™ST9704V 4-CHANNELH.264DVRMANUAL
Page ReservedbyReginexSendirianBerhad
6
10. “REC” button
When set recoding mode to TIMER RECORD and set schedule recording mode to “OFF” or “ALARM” Mode,
press this button to start manual record, Press “STOP” button to stop manual record.
Note: When set recoding mode to POWER UP or ALWAYS, this button can not be used.
11. “PLAY” button
In the live or record mode, press this button to enter “RECORD SEARCH” menu. Press “UP”, “DOWN”, “LEFT”
or “RIGHT” button to select the playback setting and press “ENTER” button to play back. In the playback
mode, if it’s not in the playback, press this button to start playback.
12. “PAUSE” button
In the playback mode, press this button to pause the image, press it again for step forward the image.
13. “REWARD” button
In the display mode, repeat pressing this button to speed-up playback backward at the speed of 2x, 4x or 8x.
14. “FORWARD” button
In the display mode, repeat pressing this button to speed-up playback forward at the speed of 2x, 4x or 8x.
15. “STOP” button
In the manual record mode, press this button to stop the manual record.
16、USB 2.0 port
Connect with USB disk for updating firmware and backup files.
17、Mouse port
Connect with USB mouse. Not used for USB disk.
18. Receiver port of remote controller.
19. DVR indicator
POWER: ON when DVR power on.
HDD: Blink when backup from hard disk.
REC: ON during the DVR recording.
NET: Blink when network connected.
ALARM: ON when alarm signal detected (video loss, HDD loss, sensor alarm or motion alarm).

ENMALAC™ST9704V 4-CHANNELH.264DVRMANUAL
1.3 Rear Panel Connectors
1. CAMERA IN(CH1~CH4) 2. MONITOR OUT
3. AUDIO IN(CH1~CH4) 4. AUDIO OUT
5. RJ-45NET 6. VGA OUT
7. RS-485 PTZ 8. ALARM IN
9. DC: 12V/3A POWER IN 10. GROUND
11. DVR FAN
1.4 Rear Panel Connection
ALARM IN:
No. 1 ~ No. 4: Alarm signal input
No. 5: Alarm output: GND (Ground)
No. 6: Alarm output: N.C. (Normally Close)
No. 7: Alarm output: N.O. (Normally Open)
No. 8: Alarm output: COM (Common)
No. 9: RS-485 + (A)
No.10: RS-485 - (B)
Page ReservedbyReginexSendirianBerhad
7

ENMALAC™ST9704V 4-CHANNELH.264DVRMANUAL
1.5 Remote Controller
Remote Controller Introduction:
1. REC: Begin and stop manual recording.
2. PLAY: Enter the playback mode and display the RECORD SEARCH menu.
3. MENU: Display the MAIN setup menu in the live display mode.
4. UP: Press this button to move the cursor up to the next line in the setup menu.
5. ESC: Return to the previous mode in the setup menu.
6. RIGHT: Press this button to move the cursor in left direction in the setup menu.
7. ENTER: Enter in the setup menu.
8. RIGHT: Press this button to move the cursor in right direction in the setup menu.
9. STOP: In the manual record mode, press this button to stop the manual record.
10. DOWN: Press this button to move the cursor down to the next line in the setup menu.
11. PTZ: Enter PTZ operation mode.
12. PAUSE: Press this button to display a still picture during the playback, press this button again to step
forward the image.
13. REWARD: Repeat pressing this button to speed-up playback backward at the speed of X2, X4 or X8
during the playback.
14. FORWARD: Repeat pressing this button to speed-up playback forward at the speed of X2, X4 or X8
during the playback.
15. MUTE: Turn audio on/off during the live display mode or playback mode.
16. No.1: Display channel 1 picture on the monitor.
17. No.2: Display channel 2 picture on the monitor.
18. QUAD: Display quad picture on the monitor.
19. No.3: Display channel 3 picture on the monitor.
20. No.4: Display channel 4 picture on the monitor.
1.6 Installation Process
1. Turn off the power of DVR.
2. Open the top cover of the DVR and mount HDD with the screws. Connect power cord and SATA
cable between HDD and DVR main board. Then install the top cover.
3. Connect BNC for CAMERA IN port, MONITOR OUT port and JACK for AUDIO IN, AUDIO OUT port
from the relevant equipments.
4. Connect the power cord of adaptor.
Page ReservedbyReginexSendirianBerhad
8

ENMALAC™ST9704V 4-CHANNELH.264DVRMANUAL
Page ReservedbyReginexSendirianBerhad
9
II OPERATION
2.1 Power On
1. After installation correctly, connect power adaptor to switch the power of DVR on.
2. The HDD must be formatted by DVR when using the HDD first time.
2.2 Power Off
1. Remove the power adaptor cord. It’s better not to remove the power of DVR during recording,
playback or system setup.
2. If the DVR is not in use for a long time, please remove the connection of the power cord of adaptor.
2.3 Display Mode
1. Press the “MODE” button to display quad picture in the live display mode. Press “UP”, “DOWN”,
“LEFT” and “RIGHT” button to select single camera and the single live view is displaying on the
screen.
2. Use mouse double click the mouse to select single camera and the single live view is displaying on the
screen in the live display mode. Double click again to return back to display quad picture.
2.4 Manual Recording
1. Set recording mode to TIMER RECORD in the RECORD MODE menu. Set all channel and all date/time
to MANUAL REC mode in the SCHEDULE menu.
2. In the live mode, press the “REC” button on the front panel or remoter controller to start manual
recording. Or right click mouse and select MANUAL REC to start manual recording. A red symbol R will
be displayed on the picture of the channel. Press STOP button on the front panel or remoter
controller to stop manual recording. Or right click mouse and select STOP REC to stop manual
recording.
3. If the hard disk is full during recording, the system may stop recording when selecting OVERWRITE
to CLOSE in the HDD MANAGEMENT setup menu. The system may not stop recording and
automatically overwrite the oldest recorded file when selecting OVERWRITE to OPEN in the HDD
MANAGEMENT setup menu.
2.5 Alarm Recording
1. Stop manual recording.
2. Connect ALARM IN port of DVR with outside sensor alarm equipments.
3. Set recording mode to TIMER RECORD in the RECORD MODE menu. Set relevant channel and
date/time for ALARM REC mode in the SCHEDULE menu.
4. When a sensor alarm input signal or motion alarm is detected, the relevant single screen will begin
ALARM recording. The red symbol R and I will be displayed on the image of the channel for sensor
alarm recording. The red symbol R and M will be displayed on the image of the channel for motion
alarm recording. For this recording mode, the alarm setting and motion setting in the ALARM SETUP
and MOTION DETECT menu must be set up correctly.
ENMALAC™ST9704V 4-CHANNELH.264DVRMANUAL
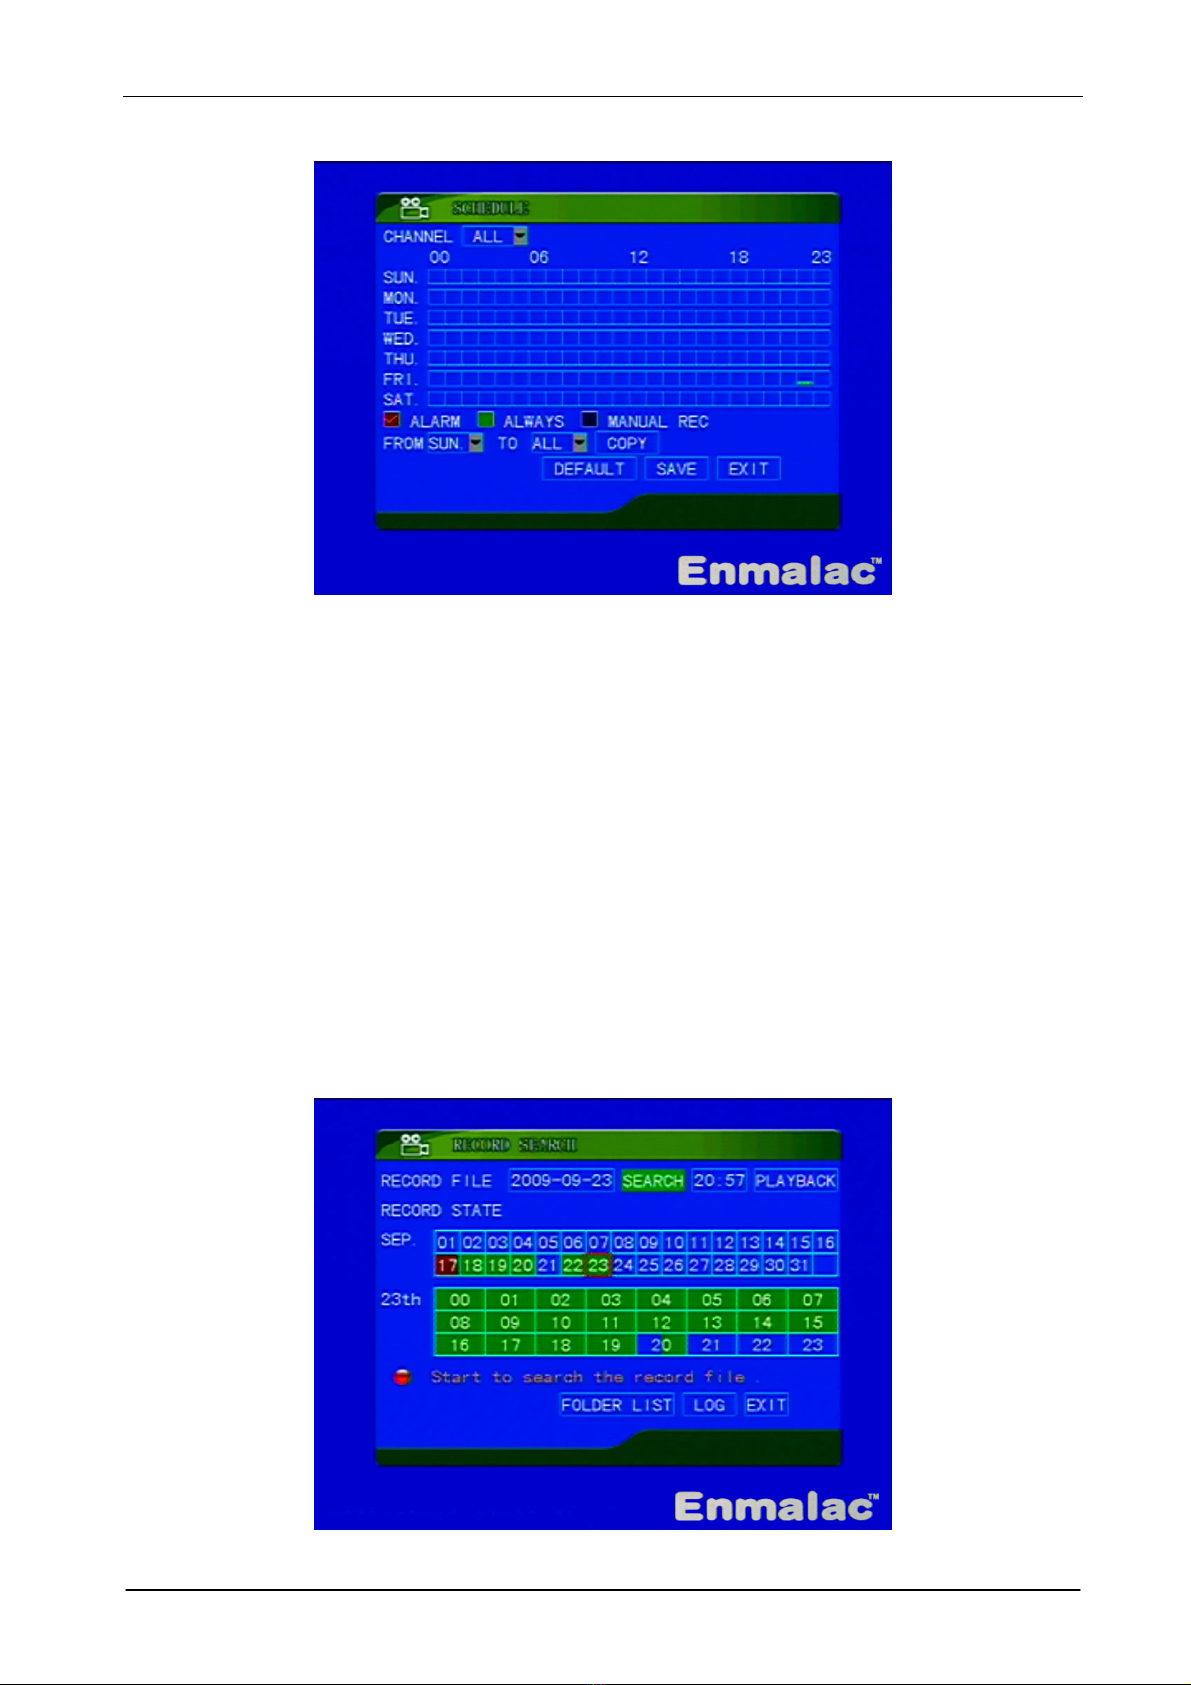
2.6 Schedule Recording
1. Stop manual recording.
2. Make sure the current date and time are correct.
3. Set recording mode to TIMER RECORD in the RECORD MODE menu. Set relevant channel and
date/time for this mode in the SCHEDULE menu.
4. The system begins or stops schedule recording automatically according to the SCHEDULE setup.
2.7 Playback
1. Press “PLAY” button on the front panel or remote controller to display RECORD SEARCH menu in the
live display mode.
2. Press “UP”, “DOWN”, “LEFT” or “RIGHT” button on the front panel or remote controller to move the
cursor to RECORD FILE. Press “ENTER” button to select date. Press “ENTER” and “ESC” button to
change date and finish date setting.
3. Move the cursor to SEARCH button in the RECORD SEARCH menu and press “ENTER” button on the
front panel or remote controller to get detailed recording date and time.
4. Press “UP”, “DOWN”, “LEFT” or “RIGHT” button to select recording date and time, press “ENTER” to
play back.
Page ReservedbyReginexSendirianBerhad
10

ENMALAC™ST9704V 4-CHANNELH.264DVRMANUAL
5. In the playback mode, press “PAUSE” button to pause the image. Repeat pressing “PAUSE” button to
step forward the image. Press “PLAY” button to restart playback.
6. In the playback mode, press “FORWARD” button or “BACKWARD” button to speed-up playback
backward or forward at the speed of 2x, 4x or 8x.
7. In the playback mode, press “ESC” button on the front panel or remote controller to stop playback
and return to previous mode.
●Mouse
1. Right click mouse to display QUICK MENU in the live display mode. Click on the VIDEO SEARCH
button to display RECORD SEARCH menu.
2. Click on the RECORD FILE box to set date and click on SEARCH button to get detailed recording date
and time. Click on a button of recording date and time to play back.
3. In the playback mode, click on the relevant button of the status bar on the bottom screen to select
the playback mode: fast forward, rewind, pause, step forward and normal playback. Click on the
mute button to turn off the audio of playback.
4. Click “ESC” button to stop playback and return to previous mode.
2.8 Time Searching Playback
1. Press “PLAY” button on the front panel or remoter controller to display RECORD SEARCH menu in the
live display mode.
2. Press “UP”, “DOWN”, “LEFT” or “RIGHT” button on the front panel or remote controller to select
RECORD FILE. Press “ENTER” button to set date. Press “ENTER” and “ESC” button to change date
and finish date setting.
3. Select the searching time beside the PLAYBACK button in the RECORD SEARCH menu. Select
PLAYBACK button in the RECORD SEARCH menu and press “ENTER” button on the front panel or
remote controller to play back.
4. In the playback mode, press “ESC” button on the front panel or remote controller to stop playback
and return to previous mode.
Page ReservedbyReginexSendirianBerhad
11

ENMALAC™ST9704V 4-CHANNELH.264DVRMANUAL
Page ReservedbyReginexSendirianBerhad
12
●Mouse
1. Right click mouse to display QUICK MENU during the live display mode. Click on the VIDEO SEARCH
button to display RECORD SEARCH menu.
2. Click on the RECORD FILE to set date and click on the searching time beside the PLAYBACK button in
the RECORD SEARCH menu to select recording time. Click on the PLAYBACK button in the RECORD
SEARCH menu to play back.
3. Click on the relevant button of the status bar on the bottom screen to select the playback mode: fast
forward, rewind, pause, step forward and normal playback. Click on the mute button to turn off the
audio of playback.
4. Click “ESC” button to stop playback and return to previous mode.
2.9 Folder List Playback
1. Press “PLAY” button on the front panel or remoter controller to display RECORD SEARCH menu in the
live display mode.
2. Select SEARCH button in the RECORD SEARCH menu and press “ENTER” button on the front panel or
remote controller to get detailed recording date and time.
3. Select FOLDER LIST button in the RECORD SEARCH menu and press “ENTER” button on the front
panel or remote controller to enter FILE LIST menu.
4. Select channel and type in the FILE LIST menu to get the detailed recording folder list.
5. Select the FIRST, PRE, NEXT, LAST, ALL and OTHER button in the FILE LIST menu and press
“ENTER” button on the front panel or remote controller to select the page. Select a folder in the FILE
LIST menu and press “ENTER” button on the front panel or remote controller to play back.
●Mouse
1. Right click mouse to display QUICK MENU in the live display mode. Click on the VIDEO SEARCH
button to display RECORD SEARCH menu.
2. Click on the SEARCH button in the RECORD SEARCH menu to get detailed recording date and time.
Click on the FOLDER LIST button in the RECORD SEARCH menu to enter FILE LIST menu.
3. Click to select channel and type in the FILE LIST to get the detailed recording folder list.
4. Click to select the FIRST, PRE, NEXT, LAST, ALL and OTHER button in the FILE LIST menu to select
the page. Click on a folder in the FILE LIST menu to play back.

ENMALAC™ST9704V 4-CHANNELH.264DVRMANUAL
2.10 Log List Playback
1. Press “PLAY” button on the front panel or remoter controller to display RECORD SEARCH menu in the
live display mode.
2. Select LOG button in the RECORD SEARCH menu and press “ENTER” button on the front panel or
remote controller to enter LOG SEARCH menu.
3. Select LOG TYPE, START date and END date in the LOG SEARCH menu and select SEARCH button in
the LOG SEARCH menu, press “ENTER” button on the front panel or remote controller to enter LOG
LIST menu.
4. Select the FIRST, PRE, NEXT and LAST button in the LOG LIST menu and press “ENTER” button on
the front panel or remote controller to select the page. Select a log in the LOG LIST menu and press
“ENTER” button on the front panel or remote controller to play back.
●Mouse
1. Right click mouse to display QUICK MENU in the live display mode. Click on the VIDEO SEARCH
button to display RECORD SEARCH menu.
2. Click on the LOG button to enter LOG SEARCH menu.
3. Click to select LOG TYPE , START date and END date in the LOG SEARCH menu and click on the
SEARCH button in the LOG SEARCH menu to enter LOG LIST menu.
4. Click to select the FIRST, PRE, NEXT and LAST button in the LOG LIST menu to select the page. Click
on a log in the LOG LIST menu to play back.
Page ReservedbyReginexSendirianBerhad
13

ENMALAC™ST9704V 4-CHANNELH.264DVRMANUAL
2.11 USB Backup
1. Connect the USB backup device to DVR USB port.
2. Press “PLAY” button on the front panel or remoter controller to display RECORD SEARCH menu in the
live display mode.
3. Select SEARCH button in the RECORD SEARCH menu and press “ENTER” button on the front panel or
remote controller to get detailed recording date and time.
4. Select FOLDER LIST button in the RECORD SEARCH menu and press “ENTER” button on the front
panel or remote controller to enter FILE LIST menu.
5. Select channel and type in the FILE LIST to get the detailed recording folder list.
6. Select the FIRST, PRE, NEXT, LAST, ALL and OTHER button in the FILE LIST menu and press
“ENTER” button on the front panel or remote controller to select the page. Select a BAK box beside
the folder list in the FILE LIST menu and press “ENTER” button on the front panel or remote
controller to select backup files.
7. Select the BACKUP button in the FILE LIST menu and press “ENTER” button on the front panel or
remote controller to start backup recording files.
●Mouse
1. Right click mouse to display QUICK MENU in the live display mode. Click on the VIDEO SEARCH
button to display RECORD SEARCH menu.
2. Click on the SEARCH button in the RECORD SEARCH menu to get detailed recording date and time.
Click on the FOLDER LIST button in the RECORD SEARCH menu to enter FILE LIST menu.
3. Click to select channel and type in the FILE LIST to get the detailed recording folder list.
4. Click to select the FIRST, PRE, NEXT, LAST, ALL and OTHER button in the FILE LIST menu to select
the page. Click on a BAK frame beside the folder list in the FILE LIST menu to select backup files.
5. Click on the BACKUP button in the FILE LIST menu to start backup recording files.
Note: The backup recording file is .264 format, it can be played by Windows Media Player or the
player on the CD in the packing. Using removable USB HDD to backup, it needed to format the
HDD system into “FAT32”.
2.12 System Information
1. Press “MENU” button on the front panel to display MAIN menu in the live display mode.
2. In the MAIN menu, Press “UP”, ”DOWN”, “LEFT” and “RIGHT” buttons to select ADVANCE button on
the MAIN menu and press “ENTER” button to enter ADVANCE setup menu.
3. Press “UP” or “DOWN” button on the front panel to move the cursor to the INFO icon. Press “ENTER”
button on the front panel to enter SYSTEM INFO menu.
4. Press “ESC” button on the front panel or remote controller to return to previous mode.
Page ReservedbyReginexSendirianBerhad
14

ENMALAC™ST9704V 4-CHANNELH.264DVRMANUAL
2.13 PTZ Control
1. Press the “UP”, “DOWN”, “LEFT” or “RIGHT” button to select desired camera you wish to display on
the monitor in the live display mode. Then press “PTZ” button on the front panel or remoter controller
to display PTZ control menu and enter the PTZ operation mode.
2. Press “UP”, “DOWN”, “LEFT” or “RIGHT” button to control pan, tilt, zoom plus, zoom minus, focus
plus, focus minus, iris plus, iris minus and speed of pan & tilt.
Note: Only keep pressing “UP”, “DOWN”, “LEFT” or “RIGHT” button to control pan and
tilt function. When these buttons released, the system may stop pan and tilt control
function.
Press “ESC” button on the front panel or remote controller to quit PTZ operation.
●Mouse
1. Right click mouse to display QUICK MENU in the live display mode. Click on the PTZ button to display
PTZ control menu and enter the PTZ operation mode.
2. Click on the relevant buttons in the PTZ control menu to control pan, tilt, zoom plus, zoom minus,
focus plus, focus minus, iris plus, iris minus and speed of pan & tilt.
3. Click on the EXIT button in the PTZ control menu to quit PTZ operation.
2.14 Password
If the password protection is enabled, the password will be required when the system enter MAIN MENU.
To set or change password, please refer to SYSTEM PASSWORD setup.
1. Press “MENU” button on the front panel or remote controller, it will display USER LOGIN dialog box to
ask you to input correct password if password is required.
2. Press “UP”, “DOWN”, “LEFT” or “RIGHT” button on the front panel or remote controller to move
cursor to DEVICE ID and PASSWORD. Press “ENTER” button and press “ENTER” button again to input
correct ID number and password. After input the correct password, press “ESC” button to close input
and press “ESC” button again, move the cursor to APPLY on the USER LOGIN box, press “ENTER”
button on the front panel or remote controller to enter the MAIN menu.
3. Setting password: Enter the MAIN menu, select BASIC button on the main menu and press “ENTER”
button to enter BASIC setup menu. Press “UP” or “DOWN” button on the front panel to move the
cursor to the PASSWORD icon. Press “ENTER” button on the front panel to enter the SECURITY menu.
Set DEVICE ID and set PASSWORD to ENABLE. Input 6 digits user password and administrator
password.
Page ReservedbyReginexSendirianBerhad
15

ENMALAC™ST9704V 4-CHANNELH.264DVRMANUAL
III SYSTEM MENU SETUP
3.1 Main Menu Setup
1. Press “MENU” button on the front panel to display MAIN menu in the live display mode.
2. In the MAIN menu, Press “UP”, ”DOWN”, “LEFT” and “RIGHT” buttons to select submenu icon and
press “ENTER” button to enter relevant submenu.
3. In the MAIN menu, Press “ESC” button to quit the MAIN menu.
●Mouse
1. Right click mouse to display QUICK MENU in the live display mode.
2. At the QUICK MENU, Click on the MAIN MENU button to enter MAIN menu.
3. In the MAIN menu, click on the “EXIT” icon to quit the MAIN menu.
MAIN MENU: Enter MAIN menu.
LOCK:Password needed
CH SWITCH: Select the live display mode.
VIDEO SEARCH:Search recording files for playback
PTZ:Enter PTZ operation mode
MUTE:Turn off the live audio
MANUAL REC:Start manual recording
STOP REC: Stop manual recording
Page ReservedbyReginexSendirianBerhad
16

ENMALAC™ST9704V 4-CHANNELH.264DVRMANUAL
3.2 RECORD SEARCH
Press “MENU” button on the front panel or remote controller to display MAIN menu in the live display mode.
Press “UP”, ”DOWN”, “LEFT” and “RIGHT” buttons to select SEARCH icon in the MAIN menu and press
“ENTER” button to enter RECORD SEARCH menu.
1. NORMAL SEARCHING
In the RECORD SEARCH menu, press “UP”, “DOWN”, “LEFT” or “RIGHT” button on the front panel or remote
controller to select RECORD FILE and press “ENTER” button to select date. Press “ENTER” and “ESC” button
to change date and finish date setting. Select SEARCH button in the RECORD SEARCH menu and press
“ENTER” button on the front panel or remote controller to get detailed recording date and time.
Press “UP”, “DOWN”, “LEFT” or “RIGHT” button to select recording date and time, press “ENTER” to playback.
Page ReservedbyReginexSendirianBerhad
17

ENMALAC™ST9704V 4-CHANNELH.264DVRMANUAL
In the playback mode, press “PAUSE” button to pause the images. Repeat pressing “PAUSE” button to step
forward the images. Press “PLAY” button to restart playback. Press “FORWARD” button or “REWARD” button
to speed-up playback backward or forward at the speed of 2x, 4x or 8x.
2. TIME SEARCHING
•In the RECORD SEARCH menu, press “UP”, “DOWN”, “LEFT” or “RIGHT” button on the front panel or
remote controller to select RECORD FILE and press “ENTER” button to select date. Press “ENTER”
and “ESC” button to change date and finish date setting.
•Select the searching time beside the PLAYBACK button in the RECORD SEARCH menu. Select
PLAYBACK button in the RECORD SEARCH menu and press “ENTER” button on the front panel or
remote controller to play back.
3. FOLDER LIST SEARCHING
•In the RECORD SEARCH menu, select SEARCH button and press “ENTER” button on the front panel
or remote controller to get detailed recording date and time.
•Select FOLDER LIST button in the RECORD SEARCH menu and press “ENTER” button on the front
panel or remote controller to enter FILE LIST menu.
Page ReservedbyReginexSendirianBerhad
18

ENMALAC™ST9704V 4-CHANNELH.264DVRMANUAL
Select channel and type in the FILE LIST menu to get the detailed recording folder list . Select the FIRST, PRE,
NEXT, LAST, ALL and OTHER button in the FILE LIST menu and press “ENTER” button on the front panel or
remote controller to select the page. Select a folder in the FILE LIST menu and press “ENTER” button on the
front panel or remote controller to play back.
4. LOG LIST SEARCHING
•In the RECORD SEARCH menu, select LOG button in the RECORD SEARCH menu and press “ENTER”
button on the front panel or remote controller to enter LOG SEARCH menu.
•Select LOG TYPE, START date and END date in the LOG SEARCH menu and select SEARCH button in
the LOG SEARCH menu, press “ENTER” button on the front panel or remote controller to enter LOG
LIST menu.
•Select the FIRST, PRE, NEXT and LAST button in the LOG LIST menu and press “ENTER” button on
the front panel or remote controller to select the page. Select a log in the LOG LIST menu and press
“ENTER” button on the front panel or remote controller to playback.
Page ReservedbyReginexSendirianBerhad
19

ENMALAC™ST9704V 4-CHANNELH.264DVRMANUAL
3.3 RECORD MODE
Press “MENU” button on the front panel or remote controller to display MAIN menu in the live display mode.
Press “UP”, ”DOWN”, “LEFT” and “RIGHT” buttons to select RECORD icon in the MAIN menu and press
“ENTER” button to enter RECORD MODE menu.
1. CHANNEL
Turn on or off the channel recording.
2. RESOLUTION
HIGHEST: D1, 6.25fps for each channel (not real time).
HIGH: 1/2D1, 12.5fps for each channel (not real time).
NORMAL: CIF, 25fps for each channel (real time).
3. QAULITY
The quality of recording image can be set to BEST, FINE and NORMAL.
4. AUDIO
ON: Enable audio record of all channels.
OFF: Disable audio record of all channels.
5. RECORDING MODE
POWER UP: Record all the time.
TIME RECORD: Record mode can be set to ALARM record, ALWAYS record and MANUAL record
according to date and time setting. In the RECORD MODE menu, select RECORDING MODE to
TIMER RECORD, select SCHEDULE button in the RECORD MODE menu and press “ENTER” button
on the front panel or remote controller to enter SHEDULE menu.
Page ReservedbyReginexSendirianBerhad
20
Table of contents


