Enpaix EPX300 User manual
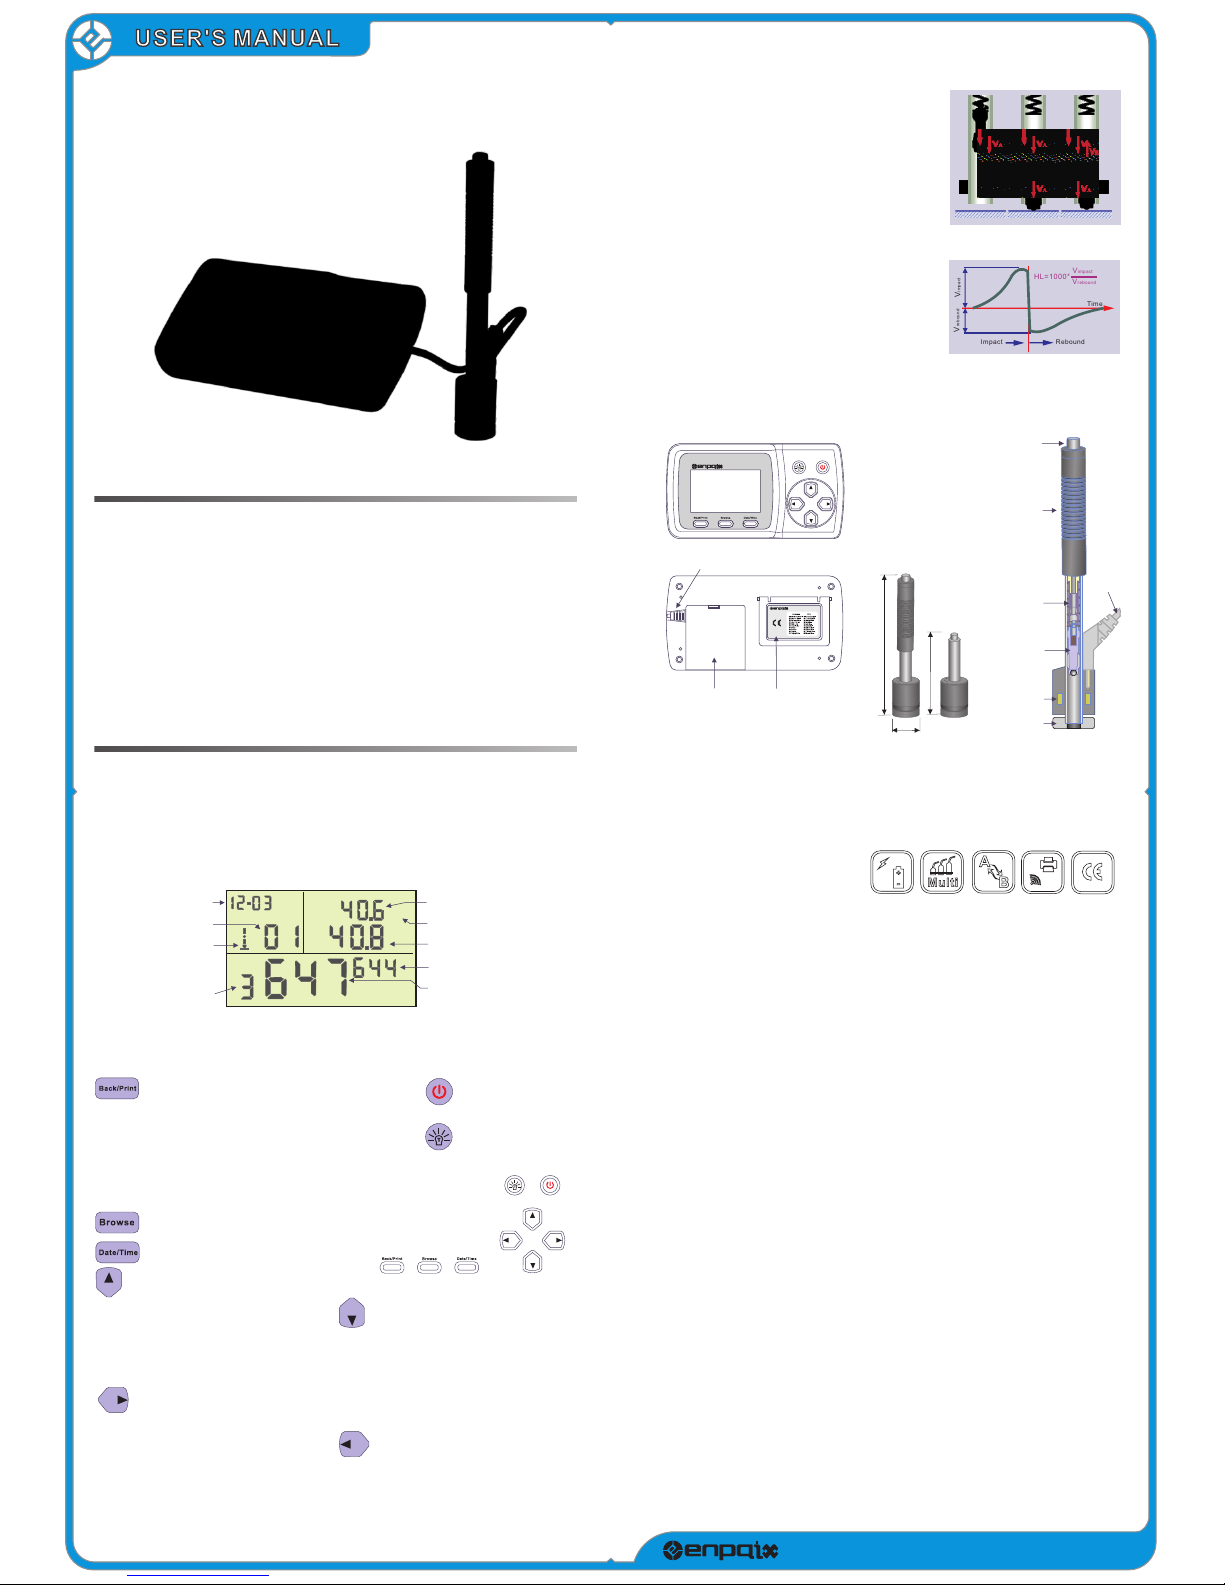
Tim e
Impact Re bound
Vimpact
Vrebound
HL=1000*
Vimpact
Vrebound
POLYGON Instrument Ltd.
1 Introduction
1.1 Principle
1.2 Structure
1.3 Specifications
2 Test
2.1 Instrument Preparation
2.2 Specimen
2.3 Test Procedure
2.4 Browse
2.5 Printing
3 Setup
3.1 Material
3.2 Direction
3.3 Scale
3.4 Clock
Preparation
EPX300
Portable Hardness Tester
CONTENTS
4 Maintenance
4.1 Routine Maintenance
4.2 Calibration
4.3 System Reset
Appendix
A-1 Hardness Conversion
A-2 Tensile StrenghConversion
1 Introduction
1.1 Principle
The tester measuring principle is physically a
rather simple, dynamic hardness tester.
An impact body with a hard metal test tip is
propelled by spring force against the surface of
the test piece. Surface deformation takes place
when the impact body hits the test surface,
which will result in loss of kinetic energy.
The energy loss is calculated by velocity
measurements when the impact body is at a
precise distance from the surface for both the
impact and rebound phase of the test. The permanent magnet in the
impact body generates an induction voltage in
the single coil of the impact device. The
voltage of the signal is proportional to the
velocity of the impact body, and signal
processing by the electronics provides the
hardness reading for display and storage.
1.2 Structure
1) Display Unit 2) Impact Device
. 1 .
Portable Hardness Tester
Standardized
according to
ASTM A956
SCALE
MAT
DEL
DIR
EPX300
D
147
86
Φ20
DC
Release Button
Loading Tube
Coil
Catch Chuck
Cable
Impact Body
Support Ring
LCD
Signal Cable
Cell Cover Material Code
SCALE
MAT
DEL
DIR
Mat'L
Avg.
HRC
Avg.
HL
Clock
Material Code
Impact Direction
Impact Times
Conversion Average
Conversion Scale
Conversion
HL Average
HL Value
SCALE
DIR
DEL
MAT
❶In measurement mode, press and hold it to erase
the measured data. Or if the mini-printer is linked
with the display unit, it will print out those data.
❷In other mode, press it to complete setup and
save the parameters and return to the
measurement mode.
Browse data in memory
Adjust date and time.
Pressing and holding to
turn on/off power.
Turn on/off the LCD
backlight
❶ In measurement mode, press it to
setup the impact direction.
❷In Date/Time setup mode and
calibration mode, press it to increase
the flickering bit.
❸In browse mode, press it to display
the previous data.
❶In measurement mode, press it to
setup the conversion scale.
❷In Date/Time setup mode and
calibration mode, press it to decrease
the flickering bit.
❸In browse mode, press it to display
the next data. measurement mode or
browse mode.
Press and hold it to delete current data
in measurement mode or browse mode.
❶In measurement mode, press it to
select the material.
❷In Date/Time setup mode and
calibration mode, press it to select
the next bit.
3) Display
4) Keypad
1.3 Specifications
● Display Range 0~999HLD
● Accuracy: ±6 HL(at 800HLD)
● Resolution: 1 (HL,HV,HB, HSD , MPa ); 0.1(HRC,HRB)
● Impact Energy: 11 Nmm
● Mass of Impact Body: 5.5g
● Test Tip: Φ3mm tungsten carbide ball
● Power: 3 *1.5V AAA Batteries
●Operating Temperature:0°C~+50°C (32°F~122°F)
●Storage Temperature: -10°C~+60°C (14°F~140°F)
●Dimensions: 150*80*24mm(Display unit), Impact length
●Weight: Approx.200g(display unit)
Impact device 75g(Type D), 50g (Type DC)
●Conforms to Standard: ASTM A956 & DIN50156
:
. 2 .

3.3 Scale
In measurement mode, press to convert to the
other hardness scales or tensile strength (MPa).
Notes:
A) The conversion value is “---” indicated the conversion is out of range.
B) When you set the conversion from hardness scale to tensile strength or from
tensile strength to hardness scale, you must be reset the material group.
C) Conversion value only supplies the general reference, which may result in
some offset. Precisely conversion generally needs related comparative tests.
3.2 Impact Direction
In measurement mode, press button to select the
impact direction.
The tester can do some correction for test directions
automatically.
2.4 Browse
The tester can save 9 hardness values, you can browse them after testing.
Press button to browse stored data and display the first data in last
nine test data, including hardness value HLD, material code, conversion,
impact direction, date and time etc.
Press or button to browse the next or previous data group.
Press button back to the measurement mode.
3.4 Clock
The Hardness Tester has built-in real-time
clock system.
It must be adjusted when you reinstall the
batteries or other necessary case.
Press to enter the clock adjustment
mode.
Press or to change the value and press
or to move item.
Press to confirm the set and back to measurement mode.
Mat'L
Avg.
HRC
Avg.
HL
Month
Day
Year Hour Minute
Ra 1.6
2 Test
2.1 Instrument preparation
Install the battery
Connect impact device
Turn on the power
To confirm the accuracy: Use the standard test block to check the tester
and make sure it work well.
2.2 Specimen preparation
Inappropriate specimen will bring the error measured results. It should be
the necessary processing and preparation according to the original
conditions of specimen. The preparation of specimen shall be annexed the
basic requirements for the following:
In the test surface preparation, should be avoided
cold, heat processing on the specimen surface.
Test surface should be flat with metallic luster, and
no oxide skin and other dirt.
The roughness of test surface should be Ra ≤ 1.6.
The specimen must be of
sufficient mass and rigidity to
avoid the displacement or move in
test.
Generally, the mass of the
specimen is greater than or equal
to 5kg can be carried out the test
directly.
The specimen of 2 ~ 5kg need to
be clamped to fix, the specimen of
0.05 ~ 2kg should be coupled . If the mass is lighter than 0.05kg, it is
unfavorable to Leeb test type D.
The thickness of specimen shall be not less than 5mm, and thickness
of homogeneous layer (or surface hardening layer) is not less than
0.8mm.
If the test surface is not flat, the radius of test area should be larger
than 30mm. And should mount a appropriate support ring.
The specimen should not be with magnetic.
❶
❷
❸
❹
❶
❷
❸
❹
❺
❻
❼
2.3 Test Procedure
1) Loading
Simply load the impact device by sliding the loading
tube forward.
2) Locating
Then place and hold the impact device on the surface
of the test piece at the desired test point. Impact
indirection should be vertical with the test of surface.
3) Impacting (Measuring)
Trigger the impact by pressing the release button. The
hardness value will be instantaneously displayed.
4) Read test result
Read out the test result from LCD.
Note:
Generally, each measurement location of sample is conducted for the five tests.
The distance between any two impact point should be ≥3 mm ; the distance
between impact position and the edge of the sample should be≥3 mm.
Direct Clamping Coupling
>5kg 2~5kg 0.05~2kg
Mat'L
Avg.
HRC
Avg.
HL
Hardness value: 786HLD;
The 3rd measurement point;
Mean value: 785HLD
Material Code:"01"(Steel & Casting Steel)
Conversions to HRC: 58.6HRC
Mean value of HRC: 58.5HRC
SCALE
2.5 Print Test Report
The tester can be linked to a wireless printer to print a
report.
Place the printer near the tester(within 2 m), and turn it
power on.
Press for about 2 seconds, a report will be printed.
NOTE:
The original data in memory will be erased automatically when
the print completed.
Te s t R e po r t
Impact Unit Type: D
Material: Steel & Cast steel
1 7 8 2 H L D 5 8 .3 H R C
2 0 15 - 1 2 - 0 3 1 5 : 2 1
2 7 8 7 H L D 5 8 .7 H R C
2 0 15 - 1 2 - 0 3 1 5 : 2 1
3 7 8 6 H L D 5 8 .6 H R C
2 0 15 - 1 2 - 0 3 1 5 : 2 2
4 7 8 5 H L D 5 8 .5 H R C
2 0 15 - 1 2 - 0 3 1 5 : 2 2
5 7 8 4 H L D 5 8 .4 H R C
2 0 15 - 1 2 - 0 3 1 5 : 2 3
S = 5 H L D 0 . 4 H R C
X = 78 5 H L D 5 8 . 5 H R C
2 0 15 - 1 2 - 3 1 5: 2 5
3 Setup
3.1 Material Code
In measurement mode, press button
to select the material code you will test.
The material code is listed on the back
label
Note:
It is necessary to select the material
classification. When you did not know the
material type, you should reference the
related material handbook.
MAT
DIR
DIR
HRC HRB HB
HV
HSD
MPa
SCALE
SCALE
DIR
MAT
DEL
. 4 . . 5 .
. 6 . . 7 .
4 Maintenance
4.1 Routine maintenance
1) General considerations
Impact device should avoid collision, the weight stack in the use and
storage. Put into the case after use. The impact body should is in release
state when storage.
Should avoid close to the strong magnetic. Any of the components can't
stick any kinds of oil or lubricant.
2) Clean the impact body
General every 1~2 thousands of times after test, the impact device tube and
impact should be cleaned up.
Method: Rotate off the support ring, release and remove the impact body.
use the nylon brush to clean up the tube and impact body.
3) Replacement impact ball
For long-term use, the impact ball may be worn, it should be replaced when
affect the test precision.

4.3 System Reset
If the display unit isn't working properly or halt, you should reset system.
Replace the batteries and remount them , then turn on the power.
4.2 Calibration
The calibration can be done in any scale (HLD, HRC,
HRB, HB, HV, HSD), so as to farthest decrease the
measuring error.
Before calibration, the scale should be converted into
the scale needed. Such as to calibrate in HB, "HB"
should be selected by press button.
Press button for about 2 seconds until the
number of impact times flicker that the impact time
become to “0”.
Test 5 times on test block to obtain the average
value (can delete some error data in operation).
Press and hold button about 2 seconds to
display the calibration mode.
Enter the standard value of test block.
Press or to change the value and press
or to move digit.
❶
❷
❸
❹
Mat'L
Avg .
HRC
Avg .
HL
Mat'L
Avg .
Avg .
HL
Mat'L
Avg .
HRC
Avg .
HL
SCALE
DIR SCALE DEL
MAT
Note:
A) If calibration in the other scale(HRC, HRB, HB, HV or HSD), the scale must be
adjusted in measurement mode first.
B) In the other scale (HRC, HRB, HB, HV, HSD) calibration mode, the standard
values input is different from calibration in Leeb hardness(HL).
25.0HRC, should be entered into "250" (HRB is the same).
85HB, should be entered into "085"(HV, HSD are the same).
If the input data exceeds the range, the calibration will not be performed.
Steel & Cast Steel
Alloy Tool Steel
Stainless Steel
Grey Cast Iron
Ductile Iron
Cast Aluminum Alloy
Brass
Bronze
Copper
Forging Steel
Materials HV HB HRC HRB HSD
81-955
80-898
85-802
83-976
20.0-68.4
20.4-67.1
19.6-62.4
19.8-68.5
81-654
85-655
63-336
140-387
19-164
40-173
60-290
45-315
142-651
38.4-99.5
46.5-101.7
23.8-84.6
13.5-95.3
59.6-99.6
32.5-99.5
26.4-99.5
Low Carbon Steel
Hi-Carbon Steel
Chrome Steel
Cr-V Steel
Cr-Ni Steel
Cr-Mo Steel
Cr-Ni-Mo Steel
Cr-Mn-Si Steel
Hi-Strength Steel
Stainless Steel
Materials Tensile Strengh
(MPa)
375-788
774-1710
742-1845
736-2026
782-2058
747-1888
850-1947
781-2045
1170-2693
740-1725
Appendix
A-1 Hardness Scale Conversion Range
A-2 Tensile Strengh Conversion Range
. 8 . . 9 .
DUM111-00-0000EN1511
Popular Test Equipment manuals by other brands

Agilent Technologies
Agilent Technologies BERT N4901A Getting started

Endress+Hauser
Endress+Hauser Memocheck Sim CYP03D operating instructions

Tektronix
Tektronix Keithley 2302 Quick results guide

Tektronix
Tektronix 5110 instruction manual

Rigol
Rigol DS1000B Series quick guide

Bartec
Bartec Tech500 user guide


