Entes DTR-10 User manual

A5299 / Rev.3
DTR-10 User Manual and
Menu Map
Dudullu OSB; 1. Cadde; No: 23 34776 Umraniye - ISTANBUL / TURKIYE
Tel : 0 216 313 01 10 Fax : 0 216 314 16 15
www.entes.com.tr
12
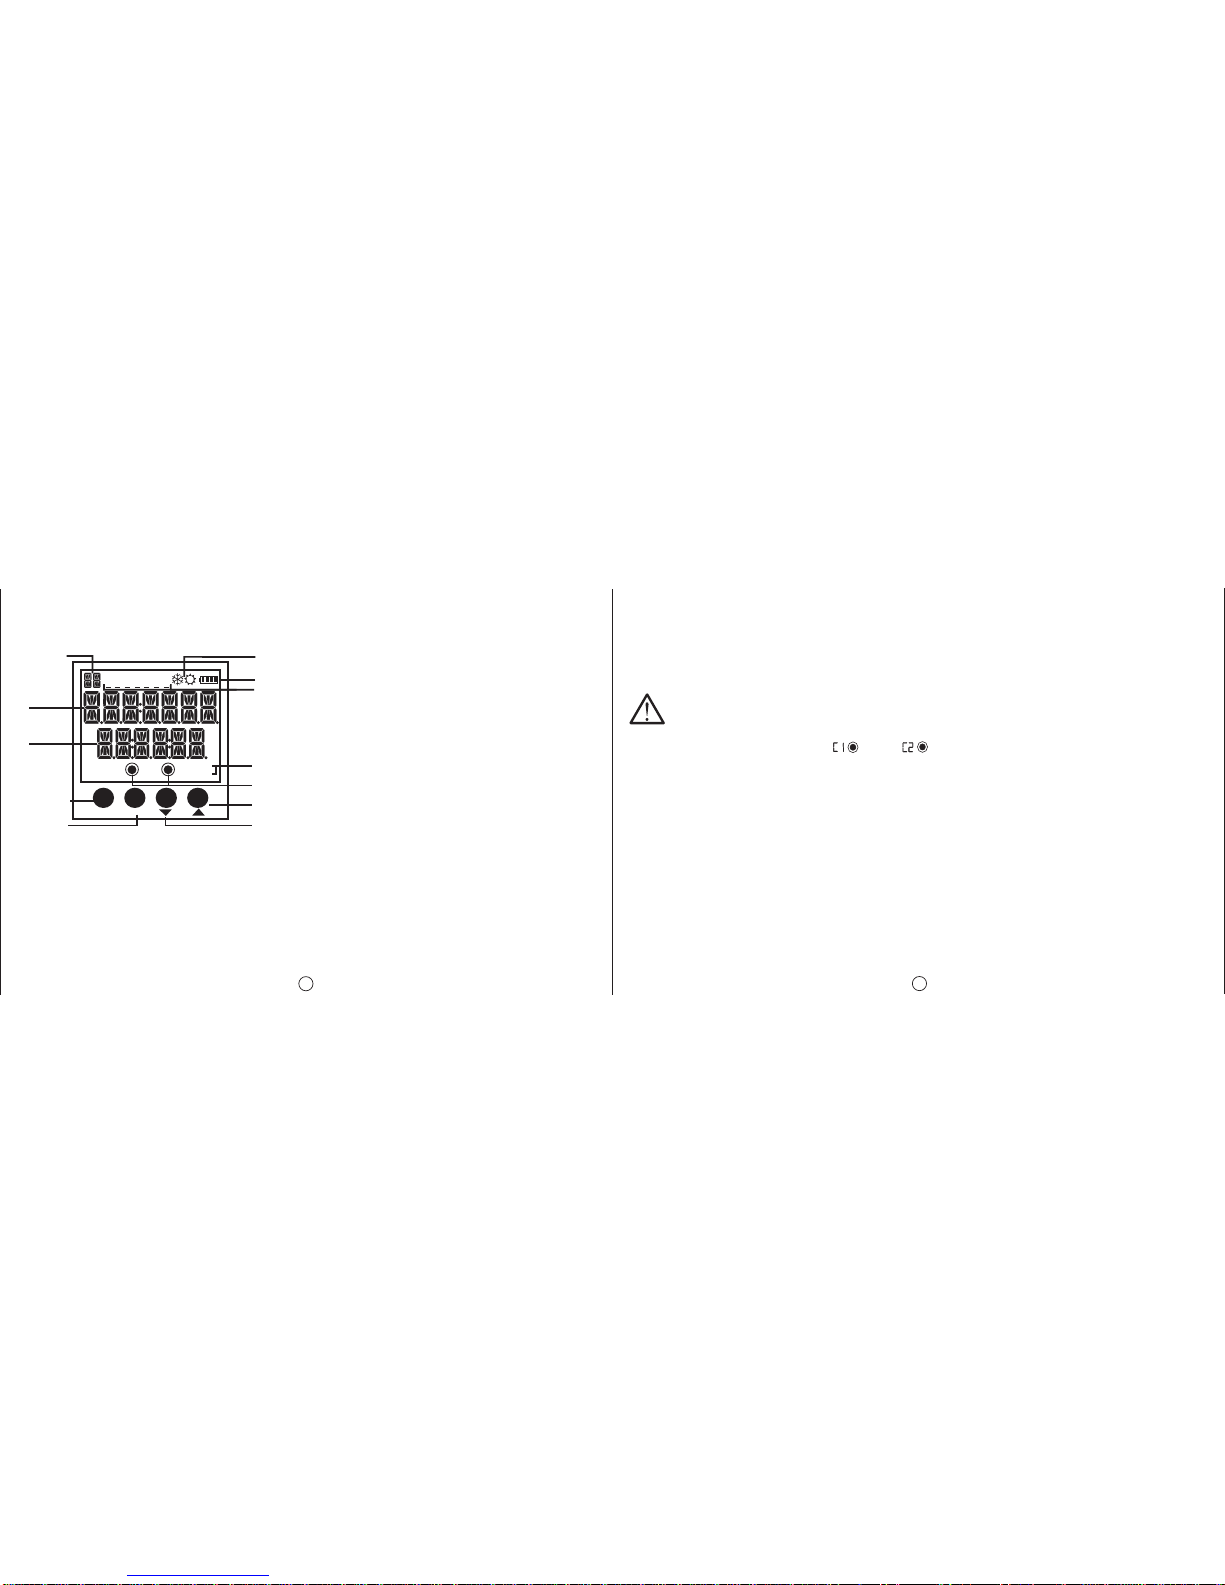
ESC SET
Day
gg.aa.yy
Hour
Relay on/off status
ESC Button
SET Button
UP Button
DOWN
Date
HH:mm:ss
Relay AUTO/MANUAL
status
Battery Status
Used Summer/Winter
Time status
Selected days for the
shown program while in
Program Menu
1 2 3 4 5 6 7
C1: C2:
AUTO
MANUAL
DTR-10, which has a real time clock, is an electronic timer that calculates the sunset and sunrise periods
automatically. It is designed for controlling the devices which are connected to its contacts according to
sunset, sunrise and the time periods which are programmed by the user.
Precautions for Installation and Safe Use
If below precautions are not properly observed and carried out, it may result in cases with injury or death.
- Disconnect power before working on the device.
-When device is connected to the network, do not remove the front panel.
-Do not clean the device with solvent or similar items. Only clean with dry cloth.
-Verify correct terminal connections before energizing the device.
-Install the device on the electrical panel.
-Contact your authorized reseller in case problems occur with your device.
No responsibility is assured by the manufacturer or any of its subsidiaries for any consequences
rising out of the use of this material.
- There are two reserves in the device. Programmed data is protected by these reserves against power
outages.
-
Battery shelf life is
5 years.
- Reserve battery should only be changed by the authorized service.
MANUAL MODE :
In order to use the relay outputs manually, DTR-10 has to be in the monitoring mode. The DOWN button
is used to switch the C1 relay to manual mode and the UP button is used to switch the C2 relay to manual
mode. When the UP or DOWN button is pressed for 3 seconds, “MANUAL” indication appears on the
screen. If this is done while the relay C1 or C2 is activated, that relay will be deactivated. If it is done while
the relay C1 or C2 is deactivated, no switching will occur. After the relay C1 or C2 is in the manual mode;
when the DOWN button is pressed again for 3 seconds, C1 relay will exit the manual mode and when the
UP button is pressed again for 3 seconds, C2 relay will exit the manual mode. The relay will stay activated
or deactivated according to the program flow. When both of the the relays are in manual mode, “AUTO”
indication will dissappear from the screen.
- The output loads connected to the relays do not function if auxiliary supply is absent. Even if the
relay status is monitored as “on”( and/or ), auxiliary supply is a must for the operation.
ESC Button :
SET Button :
UP
DOWN Buttons:
It is used to switch between monitoring menus. In the programming mode, it is used to
cancel a parameter change or to return to the previous menu.
It is used to switch between monitoring menus. When it is pressed for 3 seconds,
programming mode is entered. In the programming mode, it is used to apply a parameter
change or to enter to a menu.
In the monitoring menu, it is used to switch between programs to show their activity in a
day. When the DOWN button is pressed for 3 seconds, C1 relay goes into manual mode
and when the UP button is pressed for 3 seconds, C2 relay goes into manual mode. In
the programming menu; it is used to browse between menus, to select parameters and
to adjust values with digits.

34
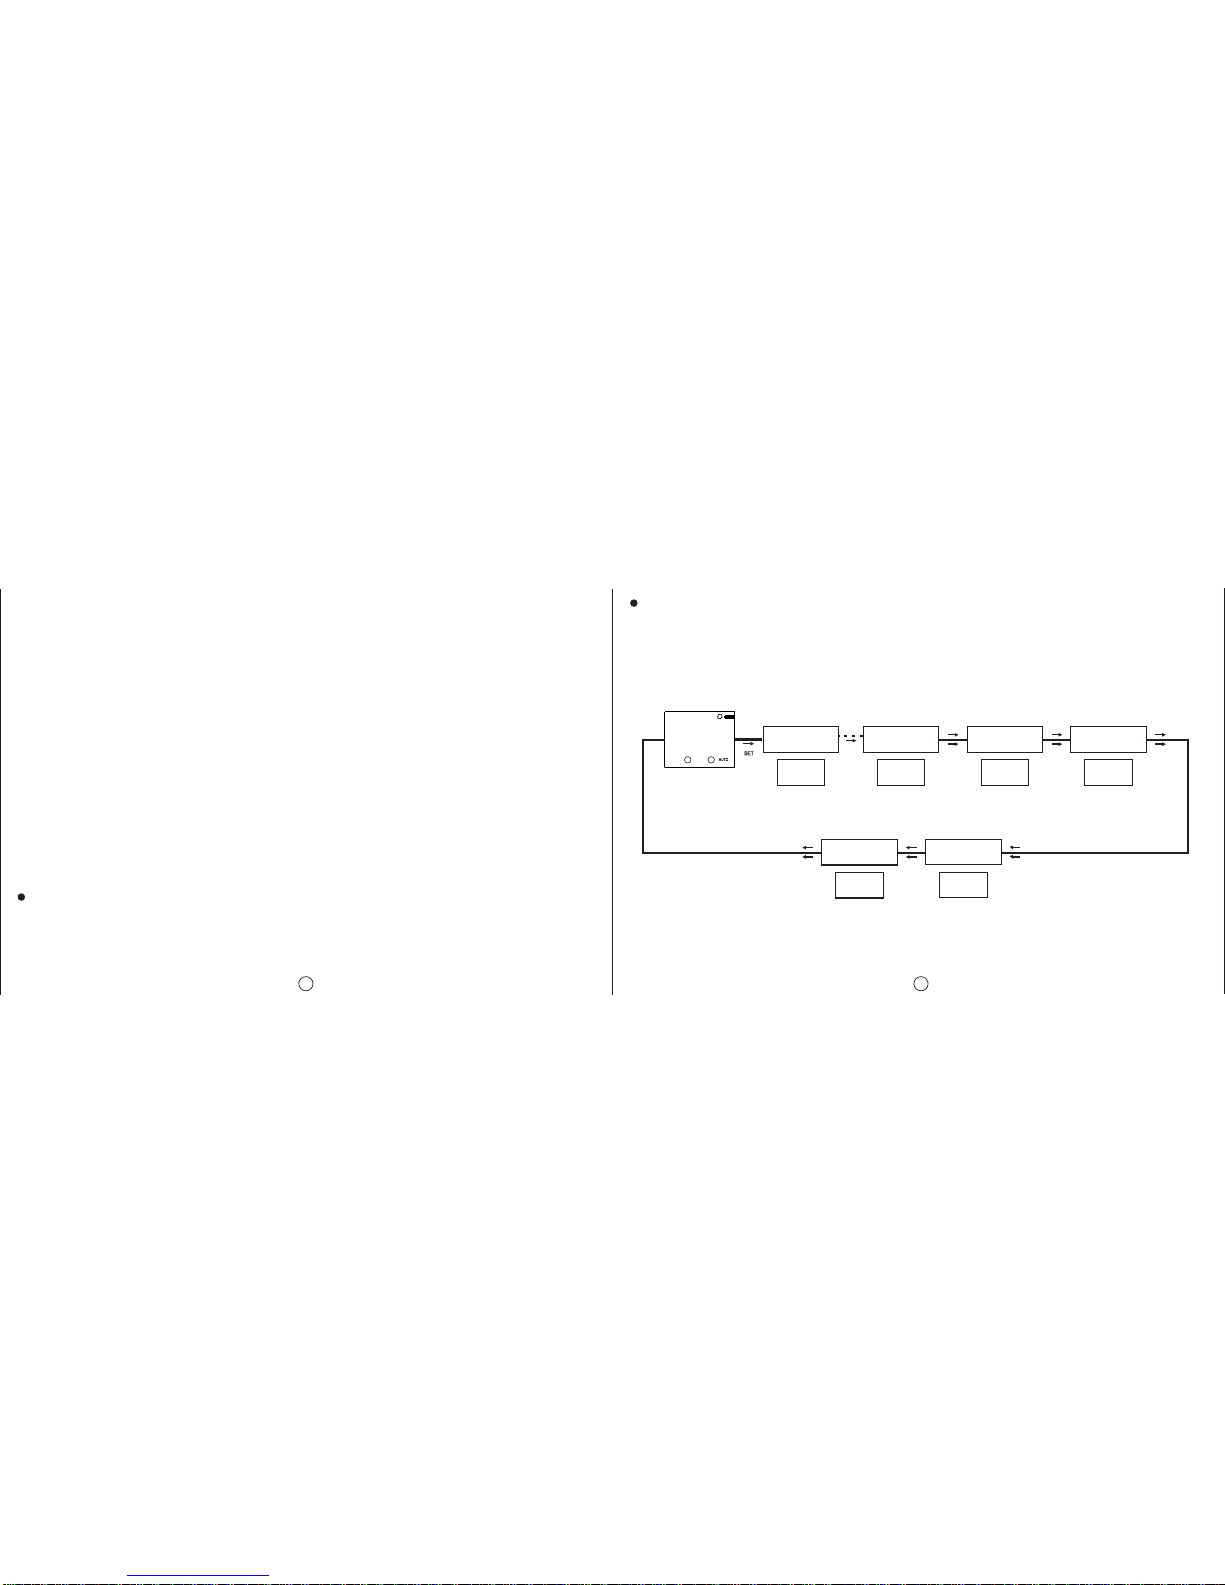
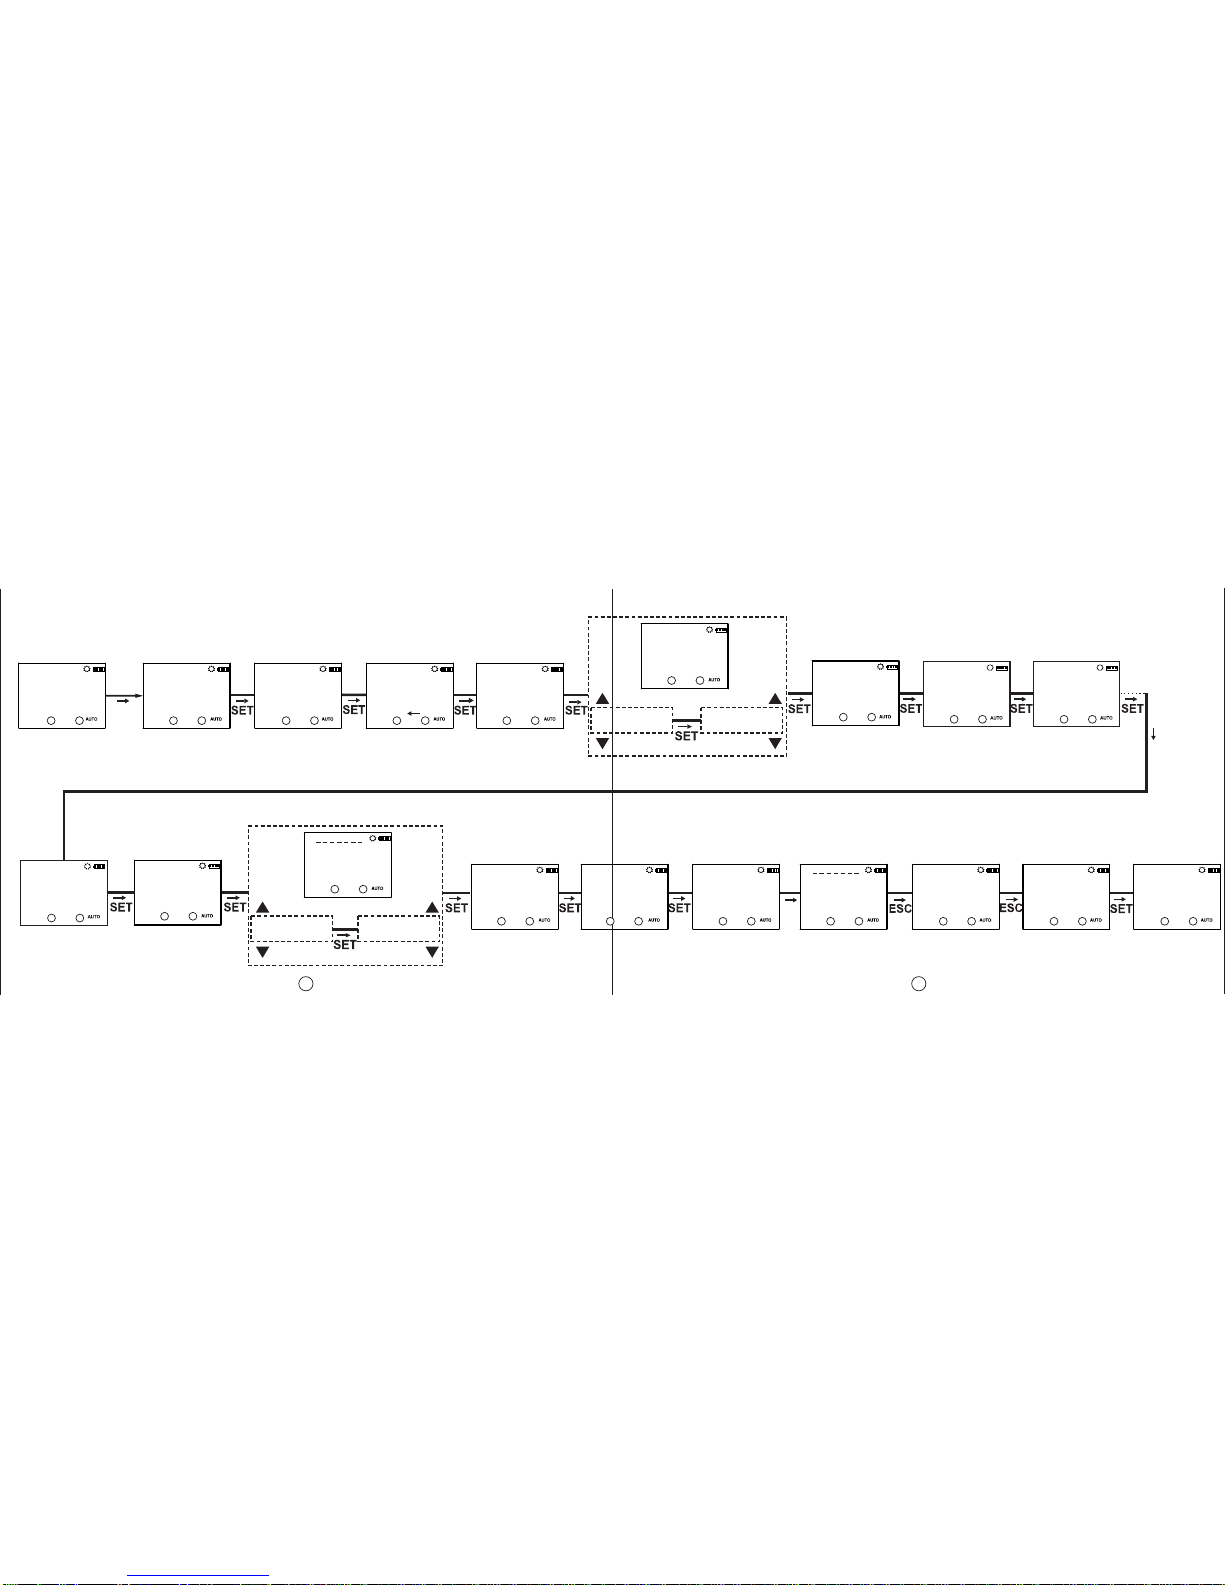
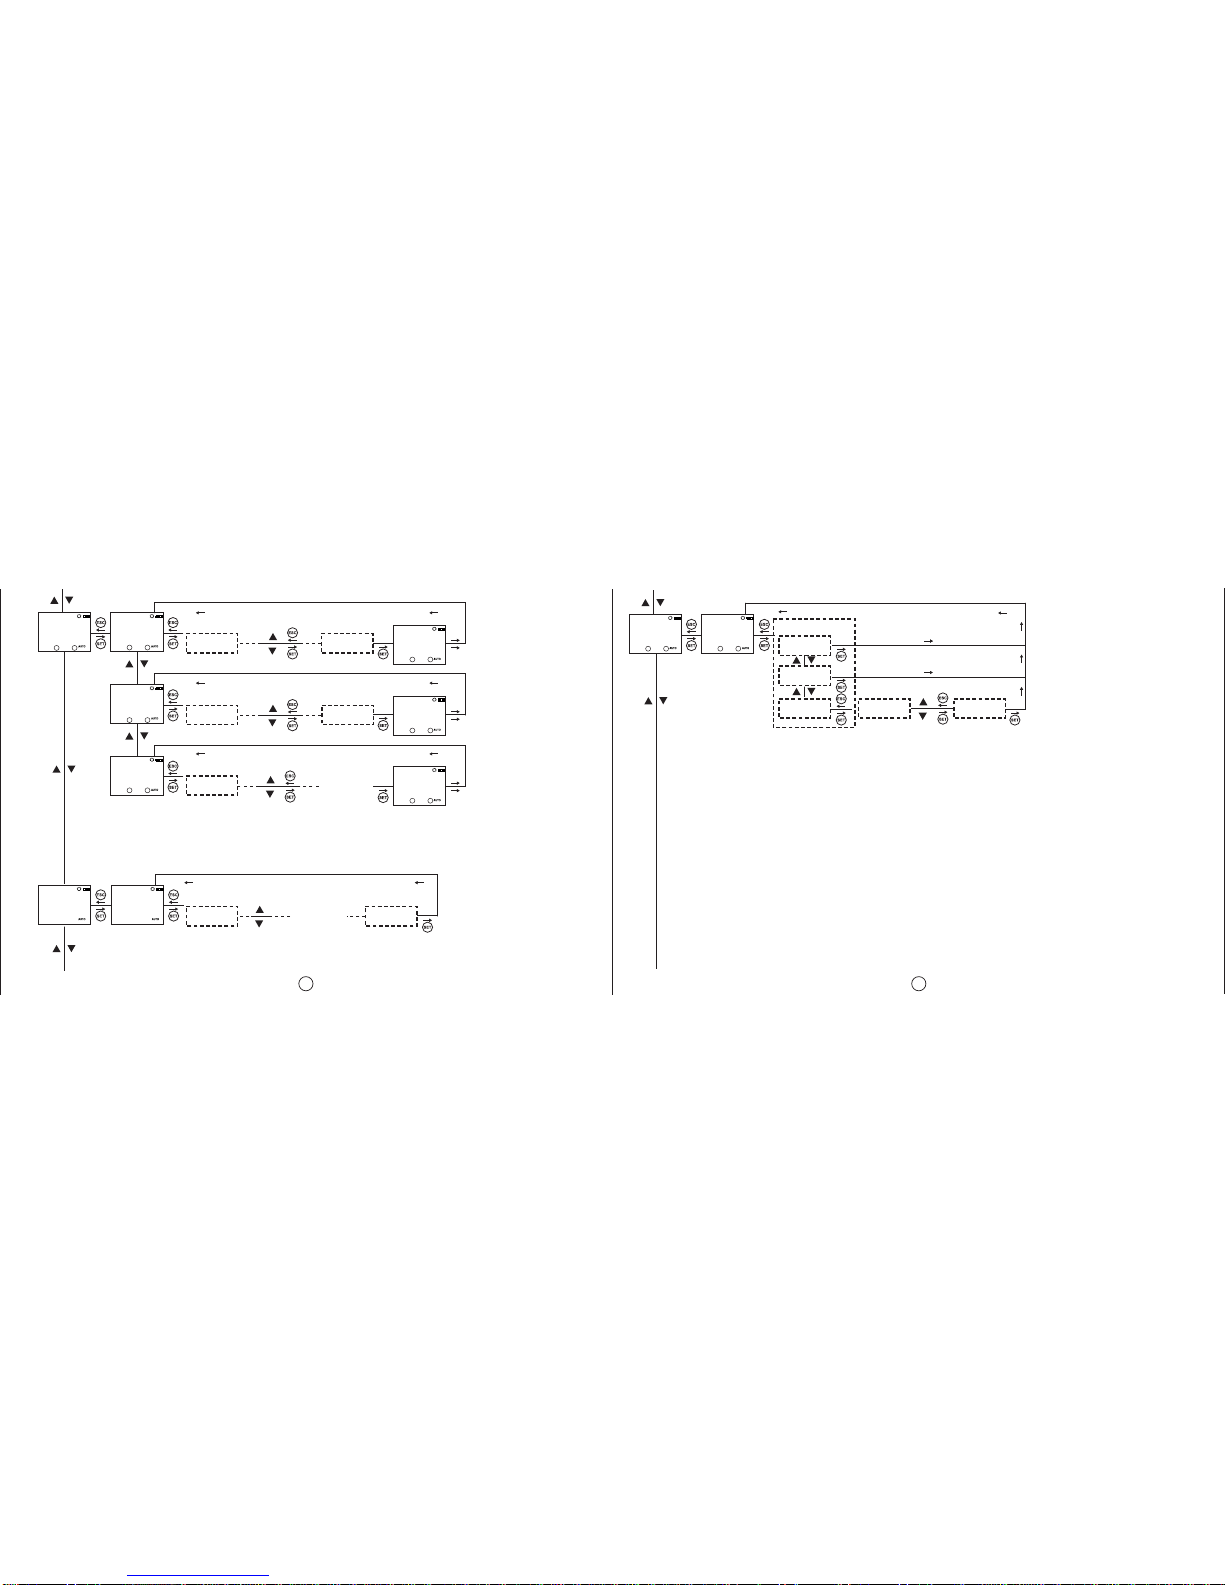
MONITORING MENU :
SET and ESC buttons are used to switch between menus in the monitoring mode. If the device is left
unattended for 60 seconds in any menu other than the real time and date, it returns to the real time and
date screen.
Real Time
and Date
Menu
Sunrise Time
Menu Sunset Time
Menu Program
Activity Time
Menu
Activation
Time for C1
Relay(Hours)
Operation
Count for C1
Relay
Activation
Time for C2
Relay(Hours)
Operation
Count for C2
Relay
Program activity time menu shows the programs, which are stored on the device, in order according to
program activity time. The active or finished programs can be shown with UP or DOWN buttons. The
programs with a sign next to them are the programs which are still active.
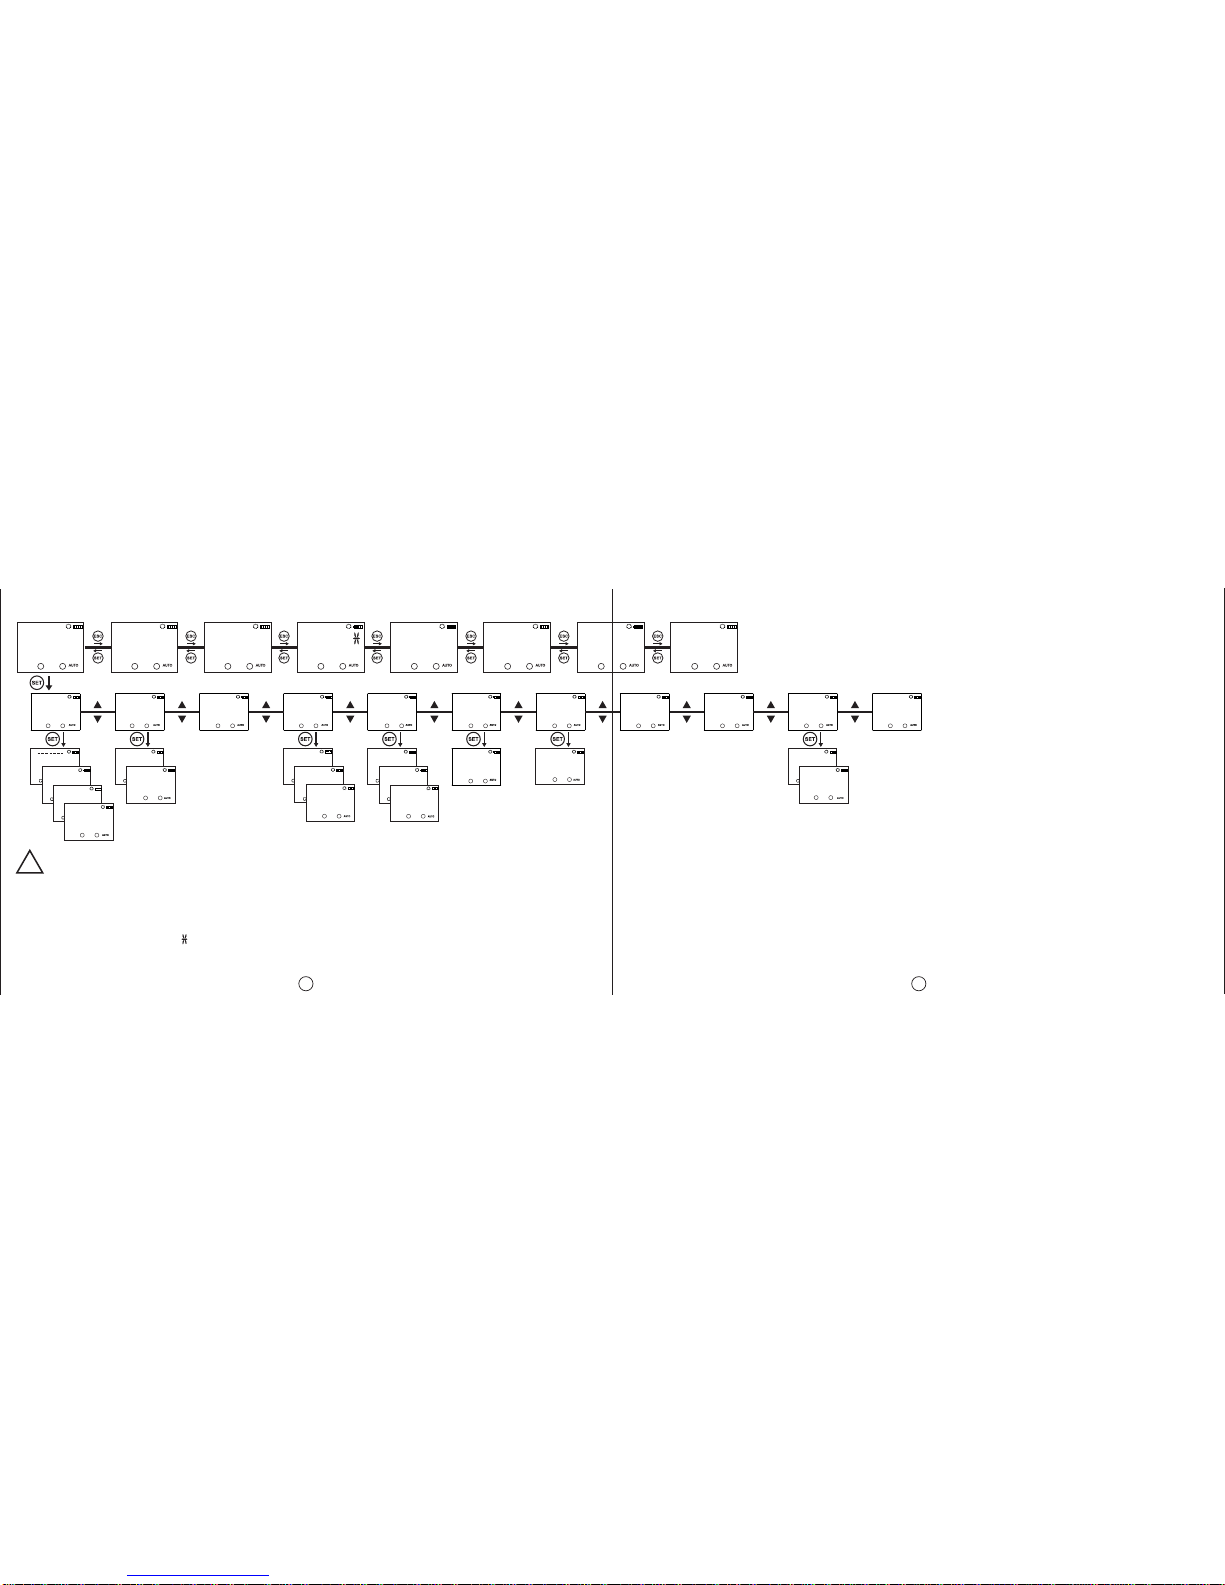
DTR-10 Menu Settings
If the “SAVE” option doesn’t get accepted when returning to the monitoring menu, the changes
which are made in the DTR-10 menus will be discarded. This isn’t the case for “TIME SETING”
menu. The changes which are done in “TIME SETING” menu are applied immediately.
When none of the keys are pressed in the programming menu, the device returns to monitoring menu and
any changes which were made will be discarded. Refer to the menu map when configuring the DTR-10
menus.
Program Menu:
There are 15 programs available to program between P01 and P15. The available settings for programs
are relay selection, activation time, activation day, deactivation time, time conflict query and save. In
addition to these, an appointed program has two additional settings as “EDIT” and “DELETE”. If “EDIT” is
selected for an appointed program, the existing settings of that program is shown and can be reconfigured.
If “DELETE” is selected for an appointed program, that program will be deleted permanently.
Output Selection ( PXX-OUT ):
DTR-10 has 2 relay outputs as C1 and C2. The user must choose between C1 and C2 as the relay output
which he want to control.
Activation Time Setting ( PXX-ON ):
There are 3 parameters: Time, sunrise and sunset. The user can select and set any of the 3 parameters
which suits the application best.
Time Parameter ( TIME ):
This parameter is the adjustment of the relay according to the real time clock. If this parameter is selected,
the user can enter an activation time between 00:00:00 (HH:mm:ss) and 23:59:59.
Sunrise Parameter ( SUNRISE ):
This parameter is the adjustment of the relay according to sunrise time which is calculated in reference
to the local coordinates and date. If this parameter is selected, the user can enter an activation time
adding or substracting 9:59:59(HH:mm:ss) to the local sunrise time. If the time after the substraction
corresponds to the day before, this parameter is adjusted as 00:00:00 for the current day.
Sunset Parameter ( SUNSET ):
This parameter is the adjustment of the relay according to sunset time which is calculated in reference
to the local coordinates and date. If this parameter is selected, the user can enter an activation time adding
or substracting 9:59:59(HH:mm:ss) to the local sunset time. If the time after the addition corresponds to
the day after, this parameter is adjusted as 23:59:59 for the current day.
16:12:10
MO
18:45:52
C1: C2:
SUNRISE
MO
07:22:00
C1: C2:
SUNSET
MO
16:36:00
C1: C2:
PO1-C1
MO
05:44:00
C1: C2:
C2-SHOT
MO
000000
C1: C2:
C2-TIME
MO
000000
C1: C2:
C1-SHOT
MO
000000
C1: C2:
C1-TIME
MO
000000
C1: C2:
5
Selection of Activation Days: The day/days in which the program will be activated is adjusted in this
menu. If “ALL DAYS” “YES” is selected, the program will be activated for all days of the week. If “NO” is
selected, the user will be asked to select “YES” or “NO” for the all of the days starting from Monday in which
the program will be active. There are numbers 1 to 7 on the top section of the screen.These numbers stand
for the days of the week. “1” indicates Monday. These numbers also help to indicate the days in which a
program will be active without entering that appointed programs menu.
Deactivation Time Setting ( PXX-OFF ): There are 3 parameters: Time, sunrise and sunset. The user can
select and set any of the 3 parameters in the best way. These parameters are the same as in the relay
activation setting. In this menu, the user can select a different option than in the relay activation setting
but the activation and deactivation times must be set differently. If the activation setting is selected as
sunrise/sunset and the deactivation setting is selected as time, the deactivation time shouldn’t be earlier
than the activation setting. For the cases other than this one in which the deactivation time is set earlier
than the activation time, the deactivation time is set for the next day.
Time Conflict Query: The device checks for any time conflicts between the existing programs and the
newly entered program. If there is a time conflict, it warns the user with the “CROSS PXX” warning. If there
isn’t a time conflict, “PROGRAM VALID” is shown on the screen. These warnings will be shown for 3 seconds.
If a button is pressed before 3 seconds run out while a warning is displayed, the save menu is entered.
Save: In this menu, the user is asked to approve the changed program or not. If the program is not
confirmed by the user, it stays unchanged. If the program is confirmed by the user, the changes are kept
on the memory but are not in effect. When the “SAVE” query is confirmed by the user while returning to
the monitoring menu, the changes are saved to the memory. See application example 1 and 2
Relay Time Menu:
The operation counts and activation times of the C1 and C2 relays are reset in this menu. The user can
reset any of the parameter/parameters of the C1 relay. There are 4 sub-menus as “C1-TIME”, “C1- SHOT”,
“C2-TIME” and “C2-TIME”. When the “SAVE” query is confirmed by the user while returning to the monitoring
menu, the changes are saved to the memory.
Settings Observation Menu:
The user can observe the sub-menu settings with 3 second intervals in this menu. The activation/deactivation
time settings, time zone, summer/winter time setting, geographical coordinates and the parameter to which
the exit from the manual mode is set can be displayed. UP, DOWN and ESC buttons enables the interval
between screens to extend. The SET button provides a faster browsing between the sub-menus.
xxxx is a symbolic representation. The set parameters are shown here.
DEMO
MODE
RECOVRY
PO1-C1 P31-C1 TIMEZON DAYLIGH
XXXXXXXXXXXXXXXX
XXXX
MO
POSITIO
XXXX
C1: C2:
6

78
Regional Settings Menu:
Geographical settings are done in this menu. The changes which are made in this menu are saved to the
memory when the “SAVE” query is confirmed by the user while returning to the monitoring menu.
Location Menu: The sunrise and sunset times are automatically calculated according to the set coordinates.
The user can choose to select the MANUAL parameter and enter latitude and longitude of the coordinate
which he is in manually or to use the coordinates which are already saved on the devices memory. The
selectable options are 68 world clocks. When any parameter other than MANUAL is selected, the time zone
is adjusted automatically.
Time Zone Menu: The time zone for the geographical location in which the user resides is set in this menu.
This parameter affects only the sunrise and sunset times according to the set location.
Daylight Savings Time (DST) Menu: DST usage is set in this menu. There are 4 parameters.
Europe Parameter: According to the European DST settings; the DST starts when the local time is about
to reach 03:00:00 and the clocks are turned 1 hour forward to 04:00:00 on the last Sunday of March. The
DST ends when the local time is about to reach 02:00:00 and the clocks are turned 1 hour backward to
01:00:00 on the last Sunday of October.
USA Parameter: According to the USA DST settings; the DST starts when the local time is about to reach
02:00:00 and the clocks are turned 1 hour forward to 03:00:00 on the second Sunday of March. The DST
ends when the local time is about to reach 02:00:00 and the clocks are turned 1 hour backward to 01:00:00
on the first Sunday of October.
Custom Parameter(CUSTOM): By choosing this parameter, the user first selects the month, the place of the
day in that selected month(Ex.: The selection of the “second” parameter in the “second Saturday of March”.
It is selected as the week of the month.), the day, the time on which it will be turned forward for DST start.
The user then selects the month, the place of the day in that selected month(Ex.: The selection of the
“second” parameter in the “second Saturday of September”. It is selected as the week of the month.), the
day, the time on which it will be turned backward for DST finish.
Time Settings Menu:
The time settings are done in this menu. There are 3 sub-menus. The changes which are meade in this
menu are immediately applied.
Date Menu (DATE): It is displayed as dd.mm.yy.
Clock Menu (CLOCK): It is displayed as HH.mm.ss.
Century Menu (CENTURY): The first two digits of the year which you’re in is set in this menu. It is displayed
as yyyy. The last two digits come from the date setting. When the user wishes to set this value it
changes to yy--. It can be set between 19 and 25.
DATE
16.08.10
MO DATE
16.08.10
dd.mm.yy dd.mm.yy
HH.mm.ss HH.mm.ss
DATE
23.08.10CHANGED
DATE DATE
23.08.10
MO
CLOCK
20:43:50CHANGED
CLOCK CLOCK
20:43:50
MO
CLOCK
20:53:40
CLOCK
20:53:40
MO
CENTURY
1910
MO 19Can be set
between
19~25 CHANGED
CENTRY CENTRY
2010
MO
CENTURY
C1: C2:
C1: C2:
C1: C2:
C1: C2:
C1: C2:
C1: C2:

9 10
Display Settings Menu:
The contrast is adjusted between 00 an 15 in this menu.
Manual Mode Menu: The setting for leaving the manual mode after the device is set in manual mode
is done in this menu. There are 3 parameters. The user can leave the manual mode with the DOWN button
regardless of what parameter he chooses in this menu.
Disabled Parameter (DISABL): When this parameter is selected; after the manual mode is enabled with
the UP/DOWN buttons for any of the outputs, it must be disabled again with the UP/DOWN buttons.
Program Parameter (NEXT-P): When this parameter is selected; after the relay/relays is/are activated or
deactivated by a program in the program flow, the manual mode for the relay/relays will be disabled.
Timer Parameter (TIMER): When this parameter is selected; the user will be prompted to enter the time
as HH:mm. The device will start to count back from the entered time when the manual mode is enabled
for the relay/relays. If the time is entered as 23:59, the manual mode will be disabled after 23 hours and
59 minutes.If the time is entered as 00:01, the manual mode will be disabled after 1 minute. There is a
special case if the time is entered as 00:00. With this entered time, the manual mode will be disabled after
1 minute too.
Password Settings Menu:
The activation and changing of a password is done in this menu. The factory default value for the password
is “0000”. The 4 digit password is prompted before entering this menu. If the password is activated, it isn’t
prompted again before entering this menu since the password was entered before entering the main
programming menu.
Password Activation Menu: The password is activated or deactivated in this menu. It is activated as
following:
CONTRAS
08
MO CONTRAS
08 CONTRAS
05 CONTRAS
05
MO
Can be set
between
00~15
C1: C2:
PASWORD
SETING
MO PASWORD
0000 PASWORD
0000PASWORD
DISABL
PASWORD
DISABL
ACTIVE
PASWORD
ACTIVE
PASWORD
SETING
MO
SAVE
yes
no
16.08.10
16:40:51
MO
Selected
parameter is
shown
Selected
parameter is
shown
Changes are saved
Changes are
discarded
C1: C2:
C1: C2: C1: C2:

11 12
Password Change Menu: The password is changed in this menu. It is done as following: Factory Setting Menu:
The device is returned to its factory settings in this menu. The 4 digit password is prompted before entering
this menu. If the password is activated, it isn’t prompted again before entering this menu since the password
was entered before entering the main programming menu. The device returns to its factory settings when
the “SAVE” query is confirmed by the user while returning to the monitoring menu. Time settings, relay
operation count and relay operation time doesn’t change.
Version Information Menu:
The software and hardware versions of the device is shown in this menu.
Exit from Main Programming Menu:
This menu is used to exit from the main programming menu. The ESC button can be used for this, too. If
any changes are committed in the menus while in the main programming menu, an approval promt is
shown. If there aren’t any changes, the monitoring menu is shown directly.
Factory Settings:
Program
P01: C1 relay will be activated everyday at sunset and will be deactivated everyday at sunrise.
P02: C2 relay will be activated everyday at sunset and will be deactivated everyday at sunrise.
P03....P15: FREE
PASWORD
SETING
MO PASWORD
ACTIVE PASWORD
CHANGE 0000 0001
NEWPASS NEWPASS
PASWORD
CHANGD
PASWORD
CHANGE
PASWORD
SETING
MO
SAVE
yes
no
16.08.10
16:40:51
MO
0000
0001
REENTER REENTER
Selected
parameter is
shown
Changes are saved
Changes are
discarded
C1: C2:
C1: C2:
C1: C2:
Merge Function
AND-1: FREE
AND-2: FREE
Regional Settings
POSITION: ISTANBUL
TIME ZONE: 2:00
DAYLIGHT SAVING: EUROPEAN
Display Settings
CONTRAST:08
Manual Mode
RECOVRY : DISABLE
Activation Time
C1 TIME : 0
C1 SHOT : 0
C2 TIME : 0
C2 SHOT : 0
Password
PASSWORD:0000
PASSWORD STATUS:INACTIVE
13 14
TECHNICAL FEATURES
Program Number 5 Years
Battery Shelf Life 15
Screen Size
Accuracy
Power Consumption
Mechanical Features
Equipment Protection Class
Ambient Temperature
Protection Class
Installation
Dimensions
Weight
Quantity in 1 Package
Refresh Time
Output Contact
Operating Voltage (Un)
Electrical Features
1,3” LCD
1 sec./Day
< 5 VA
1 sec.
2 C/O , 16 A / 4000 VA
Class II ( )
-10°C ... +55°C
IP20
Rail Mount
PK25
0,2 kg
5 pcs
Please look at the side label
Due to the structure of LCD screens, the liquid inside them starts to freeze below its operating temperature.
This causes the screen to respond slower or not respond at all. Device's other functions are not affected from this
and it opens/closes its relays as programmed. After the device temperature rises back to the operating range,
LCD screen starts to work normally.
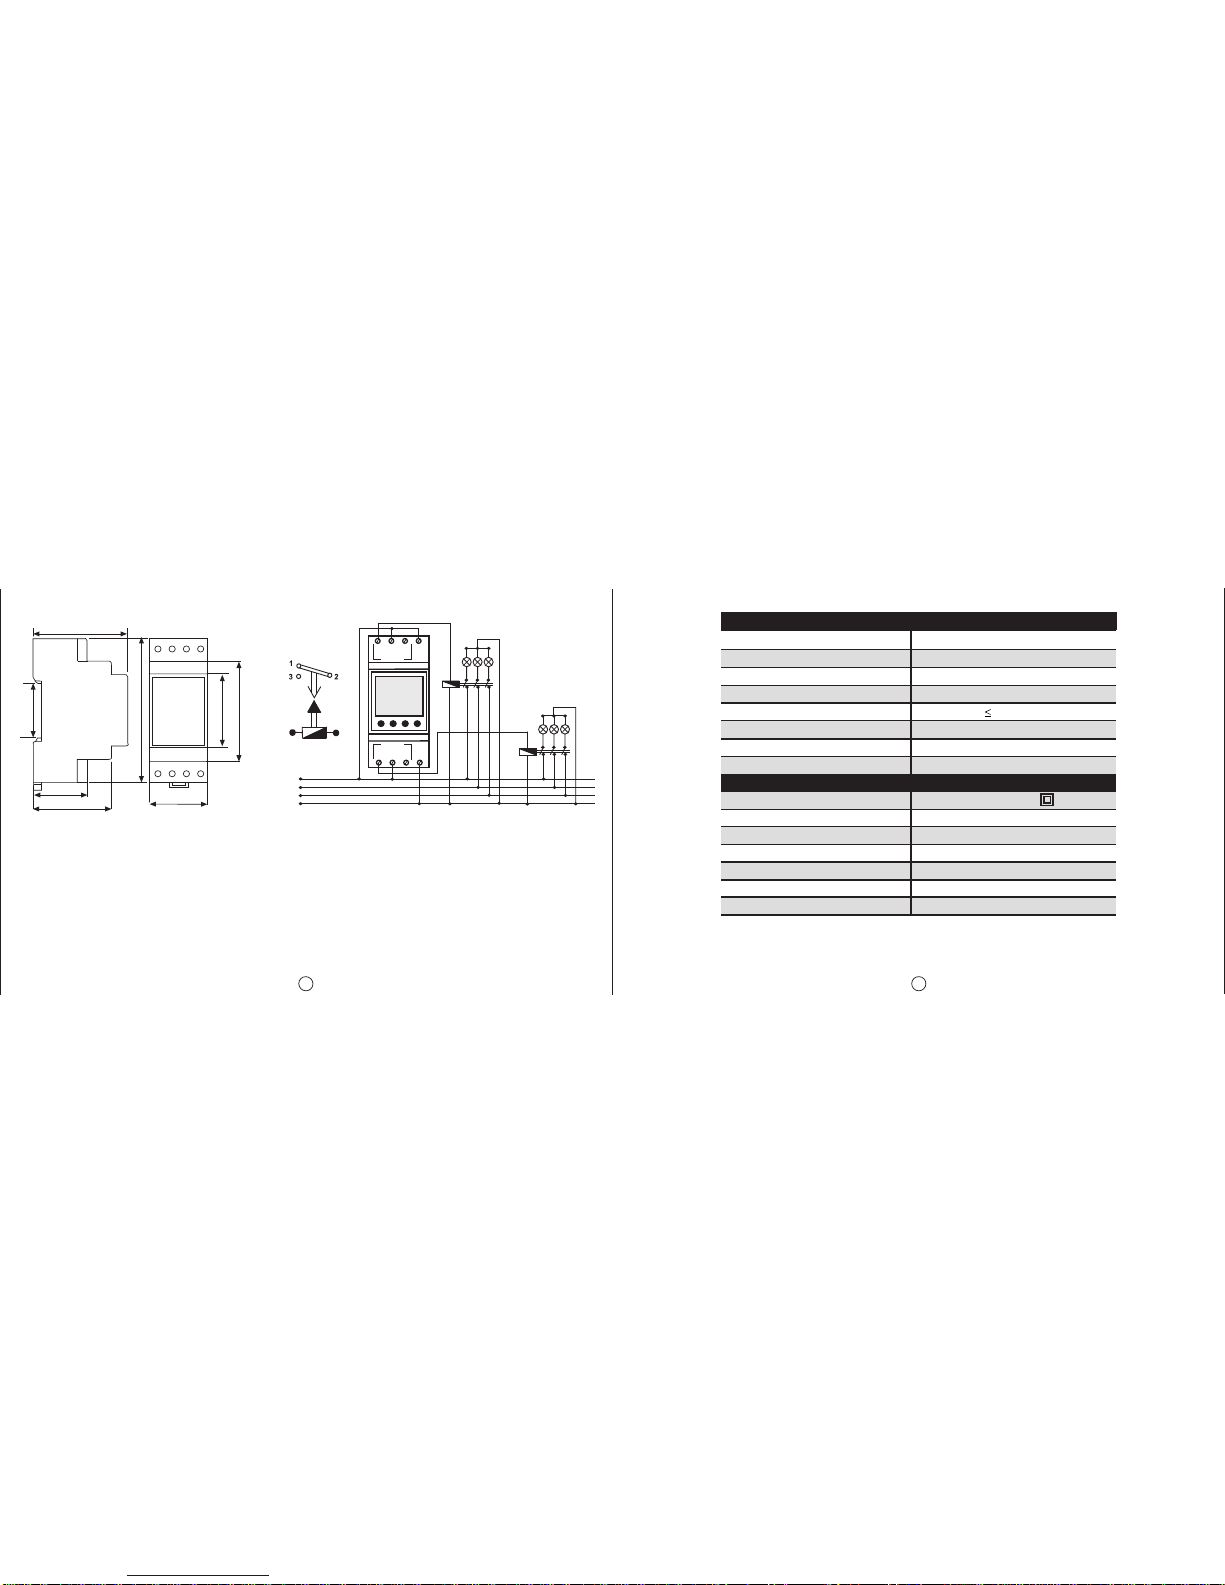
DIMENSIONS
CONNECTION DIAGRAM
L1
N
L2
L3
Un
C1
C2
1A1
32
1A2
32
TYPE PK25
35 mm
90 mm
45 mm
62 mm
58 mm
32 mm
48 mm
35 mm
Note: The contact resistance at ohmic load ( eg: Incandescent bulb, Resistance devices ) is 16A.
It is recommended to use a contactor if the inductive load (eg: AC motor, fluorescent,etc.) or
capacitive load (eg: Led Drivers, UPS, Fluorescent ( Electronic Ballast), etc.) switch. Otherwise
adhesion may occur in relay contacts.
13
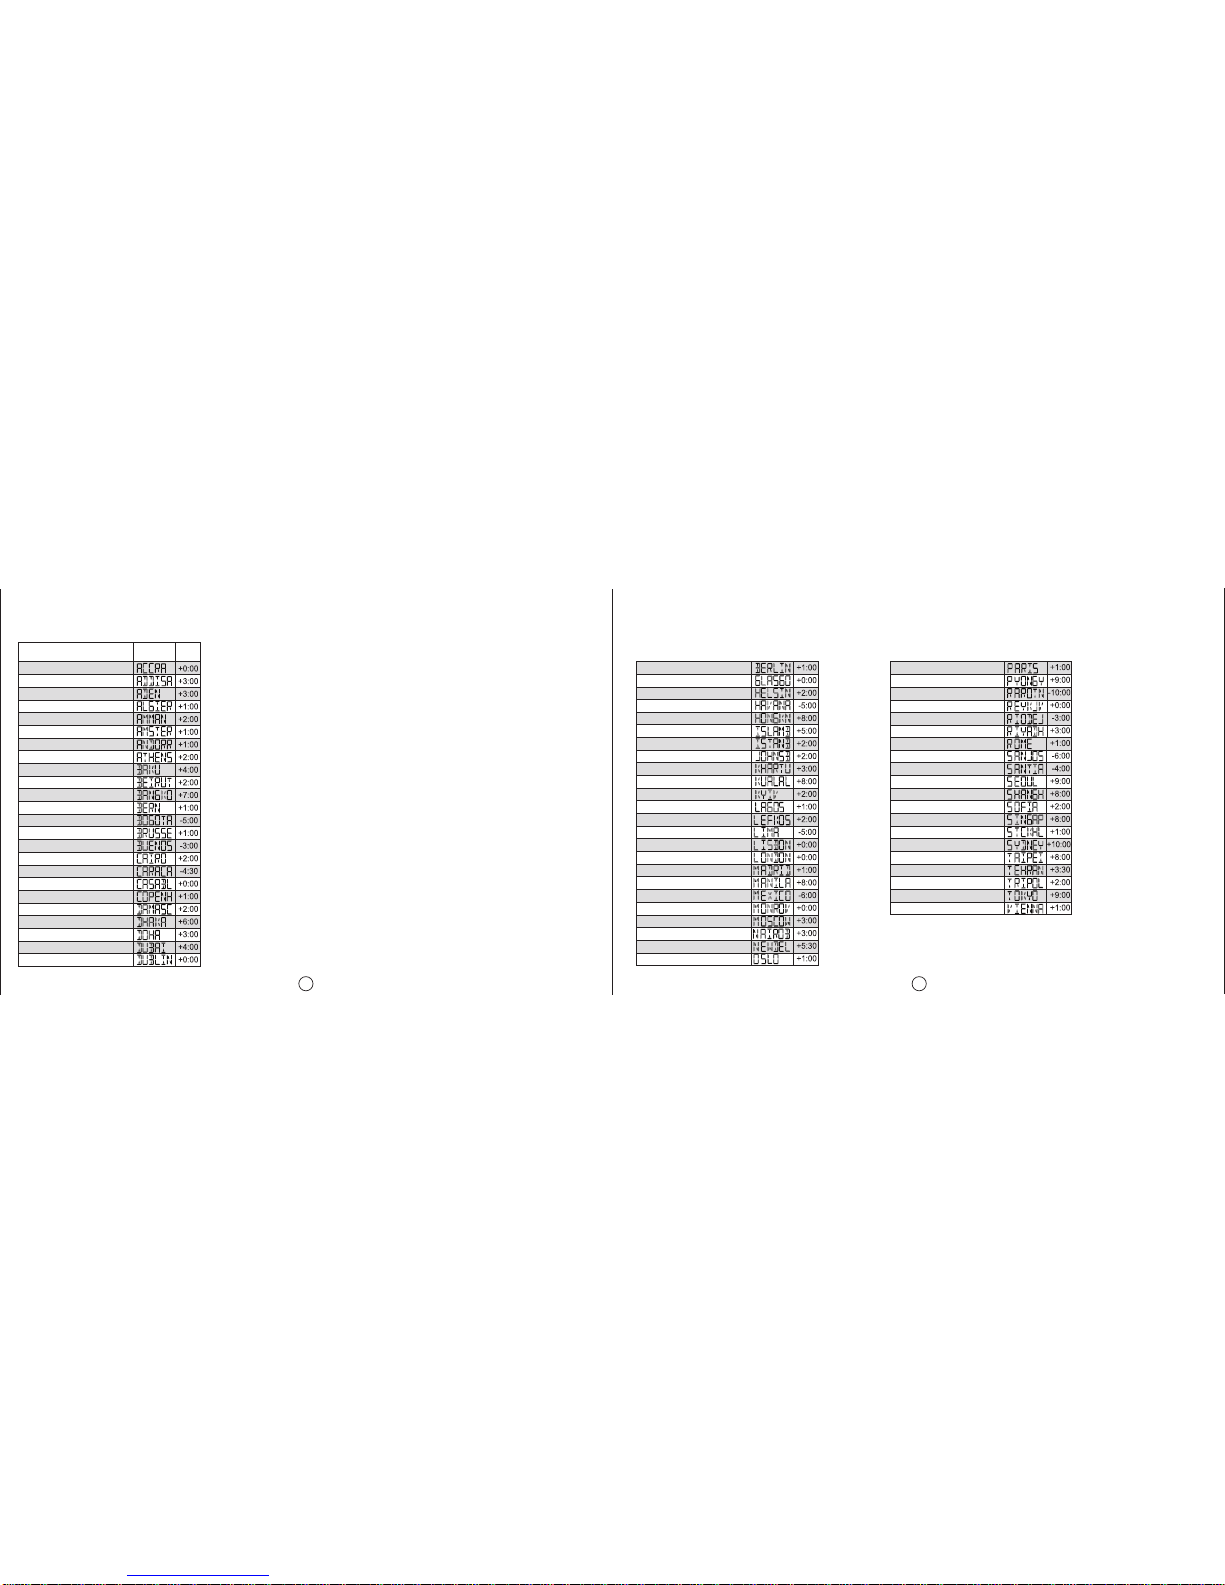
City Names and Their Screen Displays for the Language set in the Regional Settings
15 16
16
Paris, France
Pyongyang, North Korea
Rarotonga, Cook Islands
Rejkjavik, Iceland
Rio de Janeiro, Brazil
Riyad, Saudi Arabia
Rome, Italy
San José, Costa Rica
Santiago, Chile
Seoul, South Korea
Shanghai, PRC
Sofia, Bulgaria
Singapore, Singapore
Stockholm, Sweden
Sydney, Australia
Taipei, Taiwan
Tehran, Iran
Tripoli, Lebanon
Tokyo, Japan
Vienna, Austria
Berlin, Germany
Glasgow, Scotland
Helsinki, Finland
Havana, Cuba
Hong Kong, Hong Kong
Islamabad, Pakistan
Istanbul, Turkey
Johannesburg, South Africa
Khartoum, Sudan
Kuala Lumpur, Malaysia
Kiev, Ukraine
Lagos, Nigeria
Lefkosa, TRNC
Lima, Peru
Lisbon, Portugal
London, England
Madrid, Spain
Manila, Philippines
Mexico City, Mexico
Monrovia, Liberia
Moscow, Russia
Nairobi, Kenya
New Delhi, India
Oslo, Norway
Displayed
Name
Cities Time
Zone
Accra, Ghana
Addis Ababa, Ethiopia
Aden, Yemen
Algiers, Algeria
Amman, Jordan
Amsterdam, Netherlands
Andorra la Vella, Andorra
Athens, Greece
Baku, Azerbaijan
Beirut, Lebanon
Bangkok, Thailand
Bern, Switzerland
Bogotá, Colombia
Brussels, Belgium
Buenos Aires, Argentina
Cairo, Egypt
Caracas, Venezuela
Casablanca, Morocco
Copenhagen, Denmark
Damascus, Syria
Dhaka, Bangladesh
Doha, Quatar
Dubai, United Arab Emirates
Dublin, Ireland

17 18
APPLICATION EXAMPLE 1: On every weekday, the C1 relay will be activated 1 hour 35 minutes 51
seconds before the sunrise and be deactivated at 9 o’clock.
Note: The parameter selection in the example program diagrams must be done with the UP or DOWN
buttons. This isn’t described in the diagrams. The SET button is used for approval and the ESC button is
used for returning to the previous selection. The diagrams are for P01 and the programming is done the
same way for the other programs.
PROGRAM
MO P01
MO
FREE ALLDAYS
MO
YES P01-OFF
MO
TIME
TIME
MO
00:00:00
00:00:00 09:00:00
PR0GRAM
MO
VALID CONFIRM
MO
YES ADJSTED
MO
PO1 PO1
MO
FULL
1234567
1234567
PROGRAM
MO SAVE
MO
YES 16.08.10
MO
16:41:21
P01-ON
MO
SUNRSE
3 sec.
SET
P01-OUT
MO
C1
C1: C2:C1: C2:C1: C2: C1: C2:
C1: C2: C1: C2:
C1: C2:C1: C2:C1: C2:C1: C2:C1: C2:C1: C2:C1: C2:
C1: C2:
16.08.10
MO
16:40:51
C1: C2:
SUNRISE
MO
+0:00:00
+0:00:00 -1:35:51
C1: C2:
APPLICATION EXAMPLE 2: C2 relay will be activated every monday at 18:30 and will be deactivated at
sunrise time.
19 20
PROGRAM
MO TIME
MO
+0:00:00
+0:00:00 18:30:00ALLDAYS
MO
NO
PR0GRAM
MO
VALID CONFIRM
MO
YES ADJSTED
MO
PO1 PO1
MO
FULL
1234567
1234567
PROGRAM
MO SAVE
MO
YES
P01-ON
MO
TIME
3 sec.
SET
C1: C2: C1: C2:
C1: C2:
C1: C2:
C1: C2:C1: C2:C1: C2:C1: C2:C1: C2:C1: C2:
16.08.10
MO
16:40:51
C1: C2:
MONDAY
MO
YES
C1: C2:
SUNDAY
MO
NO
C1: C2:
TUESDAY
MO
NO
C1: C2:
P01
MO
FREE
C1: C2:
P01-OUT
MO
C2
C1: C2:
P01-OFF
MO
SUNSET
C1: C2:
SUNSET
MO
+0:00:00
+0:00:00 +0:00:00
C1: C2:
16.08.10
MO
16:41:21
C1: C2:
21 22
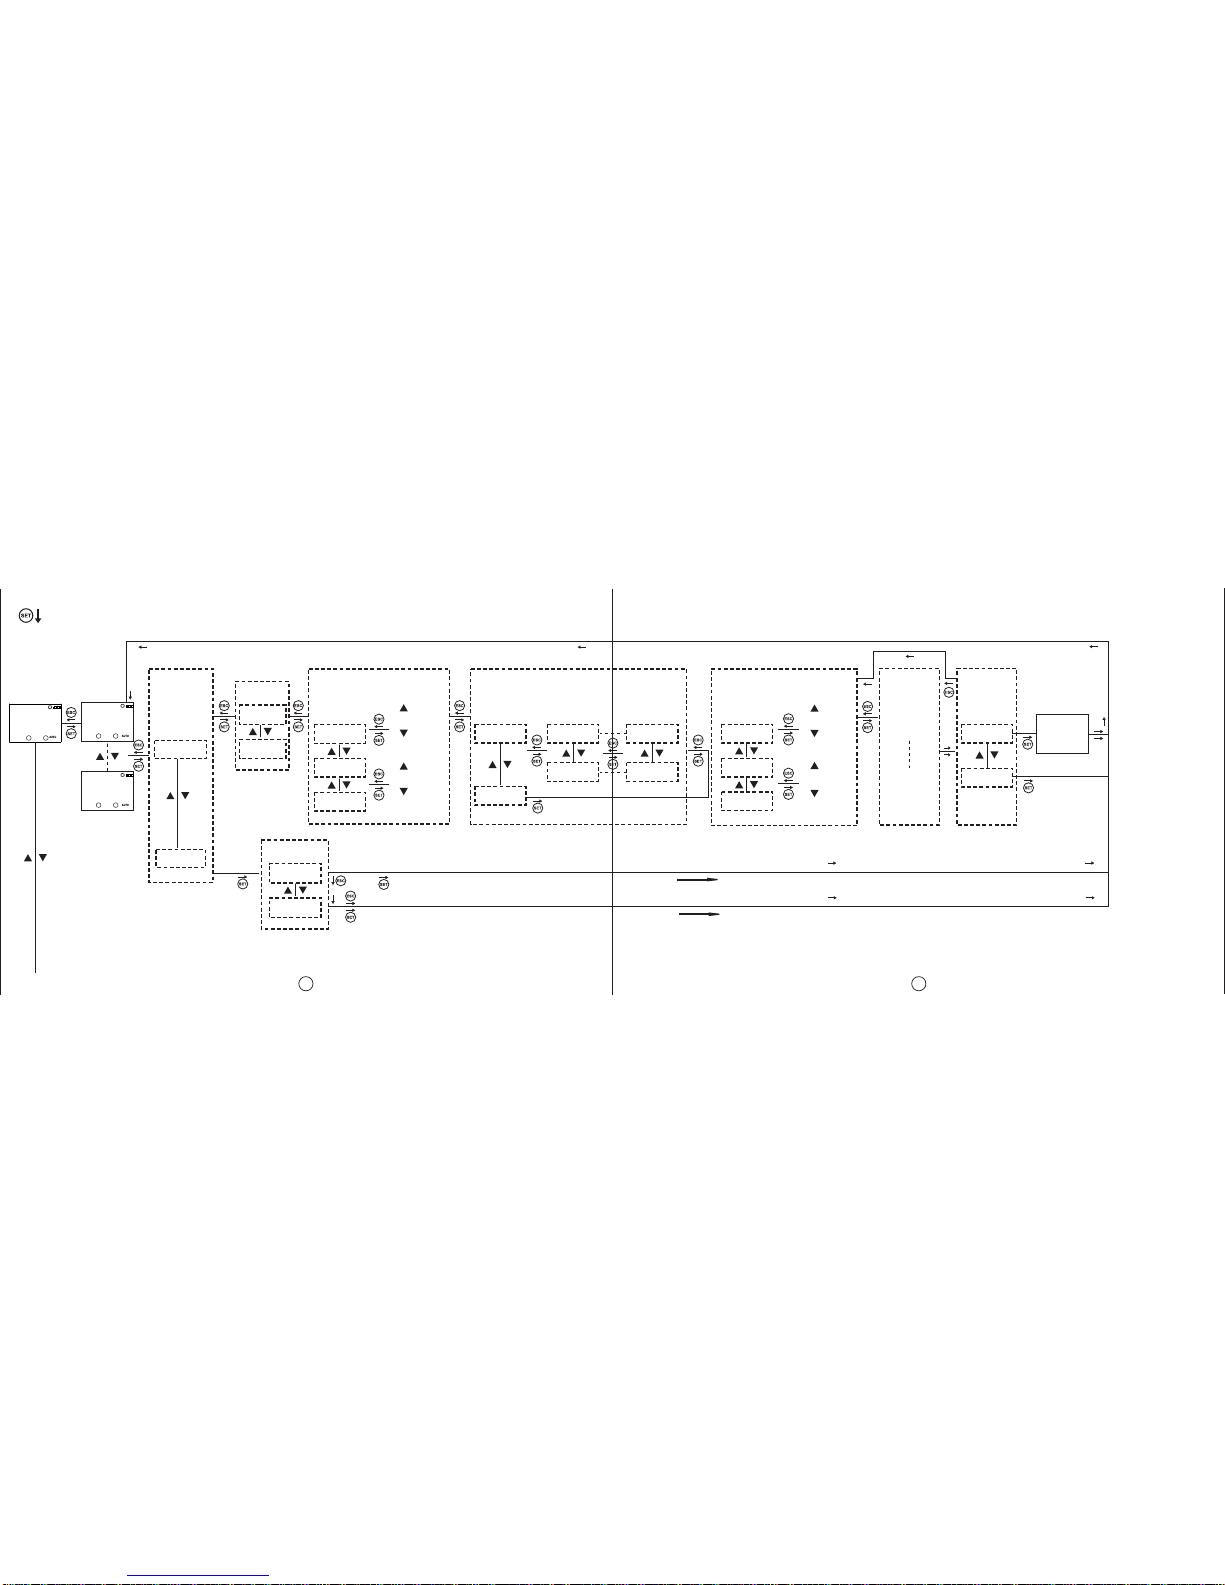
MENU MAP
!
PROGRAM
MO HOUR
MO
COUNTR REGIONL
MO
SETING TIME
MO
SETING MANUAL
MO
MODE FACTORY
MO
SETING EXIT
MO
MENU
DEMO
MO
MODE
CONTRAS
MO
08
P01
MO 1234567
P
MO
P
MO
P15
MO
FREE
C1-TIME
MO
C1-TIME
MO
DELETE
POSITIO
MO
TIMEZON
MO
DAYLIGH
MO
DATE
MO
CLOCK
MO
CENTURY
MO
2010
RECOVRY
MO
DISABL FIRMWRE
MO
HARDWRE
MO
V000
(Monitoring Menu and Main Programming Menu screens are shown).
C2-SHOT
MO
000000
C1: C2:
C2-TIME
MO
000000
C1: C2:
C1-SHOT
MO
000000
C1: C2:
C1-TIME
MO
000000
C1: C2:
16:12:10
MO
18:45:52
C1: C2:
SUNRISE
MO
07:22:00
C1: C2:
SUNSET
MO
16:36:00
C1: C2:
PO1-C1
MO
05:44:00
C1: C2:
Press for 3 seconds
C1: C2:C1: C2:C1: C2:C1: C2:C1: C2:C1: C2:C1: C2:C1: C2:
C1: C2:
C1: C2:
C1: C2: C1: C2:
C1: C2: C1: C2:
C1: C2:
If the “SAVE” query is not confirmed by the user while returning to the monitoring menu, the changes which are committed in the menus will be discarded(This
doesn’t apply to the Time Settings Menu).
* The device shows the entered programs in the order of their program flow in the menu display. The programs can be browsed with the UP or DOWN
buttons. The programs with a symbol next to them are the programs which didn’t run yet.
DISPLAY
MO
SETING
C1: C2:
PASWORD
MO
SETING
C1: C2:
VERSION
MO
INFOS
C1: C2:
23 24
EDIT / DELETE
won’t be shown
for empty
programs.
Activation time setting Activation day selection Deactivation time setting Time
conflict
query
The settings stay
unchanged.
Program is deleted completely. FULL changes to FREE.
Program stays unchanged.
PROGRAM
MO
PO1
MO
FULL
P15
MO
FREE
CONFIRM
PO1
EDIT
DELETE yes
no
PO1-ON
TIME
sunrse
sunset
00:00:00
+0:00:00
HH:mm:ss
±HH:mm:ss
ALLDAYS MONDAY FRIDAY PO1-OFF
TIME
sunrse
sunset
00:00:00
+0:00:00
HH:mm:ss
±HH:mm:ss
yes
no no no
yes yes
yes
no
CONFIRMPROGRAM
VALID
CROSS
PXX
ADJSTED
PO1
Press for 3
seconds.
C1: C2: C1: C2:
C1: C2:
P01-OUT
C1
C2
In the settings observation menu, the set
parameters of the sub-menus are shown. The
sub-menu titles are shown on the menu flow
diagram. These parameters are shown for 3
seconds. To prolong this time; ESC, UP or DOWN
buttons should be pressed. If the SET button is
pressed the shown parameter changes
immediately.
C1-SHOT
MO
DELETE
C1-TIME
MO
DELETE
HOUR
MO
COUNTR
NO
YES
CONFIRM
DEMO
MO
MODE PO1-C1 P15-C1 TIMEZON DAYLIGH POSITIO RECOVRY
REGIONL
MO
SETING POSITIO
MO
MANUAL
POSITIO
MO
ACCAA
POSITIO
MO
VIENNA
POSITIO
MO
MANUAL
MANUaL
POSITIO
accaa
vienna
N 0000 E000.00
LATITUDE LONGITUDE
C1: C2:
C1: C2:
C1: C2: C1: C2:
C1: C2: C1: C2:
C1: C2:
C1: C2:
C1: C2:
25 26

27 28
Buttons increase or decrease the
value by "0:30".
DST Start Time Setting DST Finish Time Setting
january
decembe
SMONTH FIRST
LAST
SWEEK monday
sunday
SDAY 01
23
SHOUR WMONTH WWEEK WDAY WHOUR
CUSTOM
DAYLIGH
DISABL
3:30 12:00 -12:00 3:00
REGIONL
MO
SETING POSITIO
MO
MANUAL
TIMEZON
MO
3:30
DAYLIGH
MO
SAVING
TIMEZON TIMEZON TIMEZON TIMEZON
SUMMER
MO
TIME WINTER
MO
TIME
01
23
january
decembe
FIRST
LAST
monday
sunday
DAYLIGH
MO
ADJSTD
C1: C2: C1: C2:
C1: C2:
C1: C2: C1: C2: C1: C2: C1: C2:
europe
usa
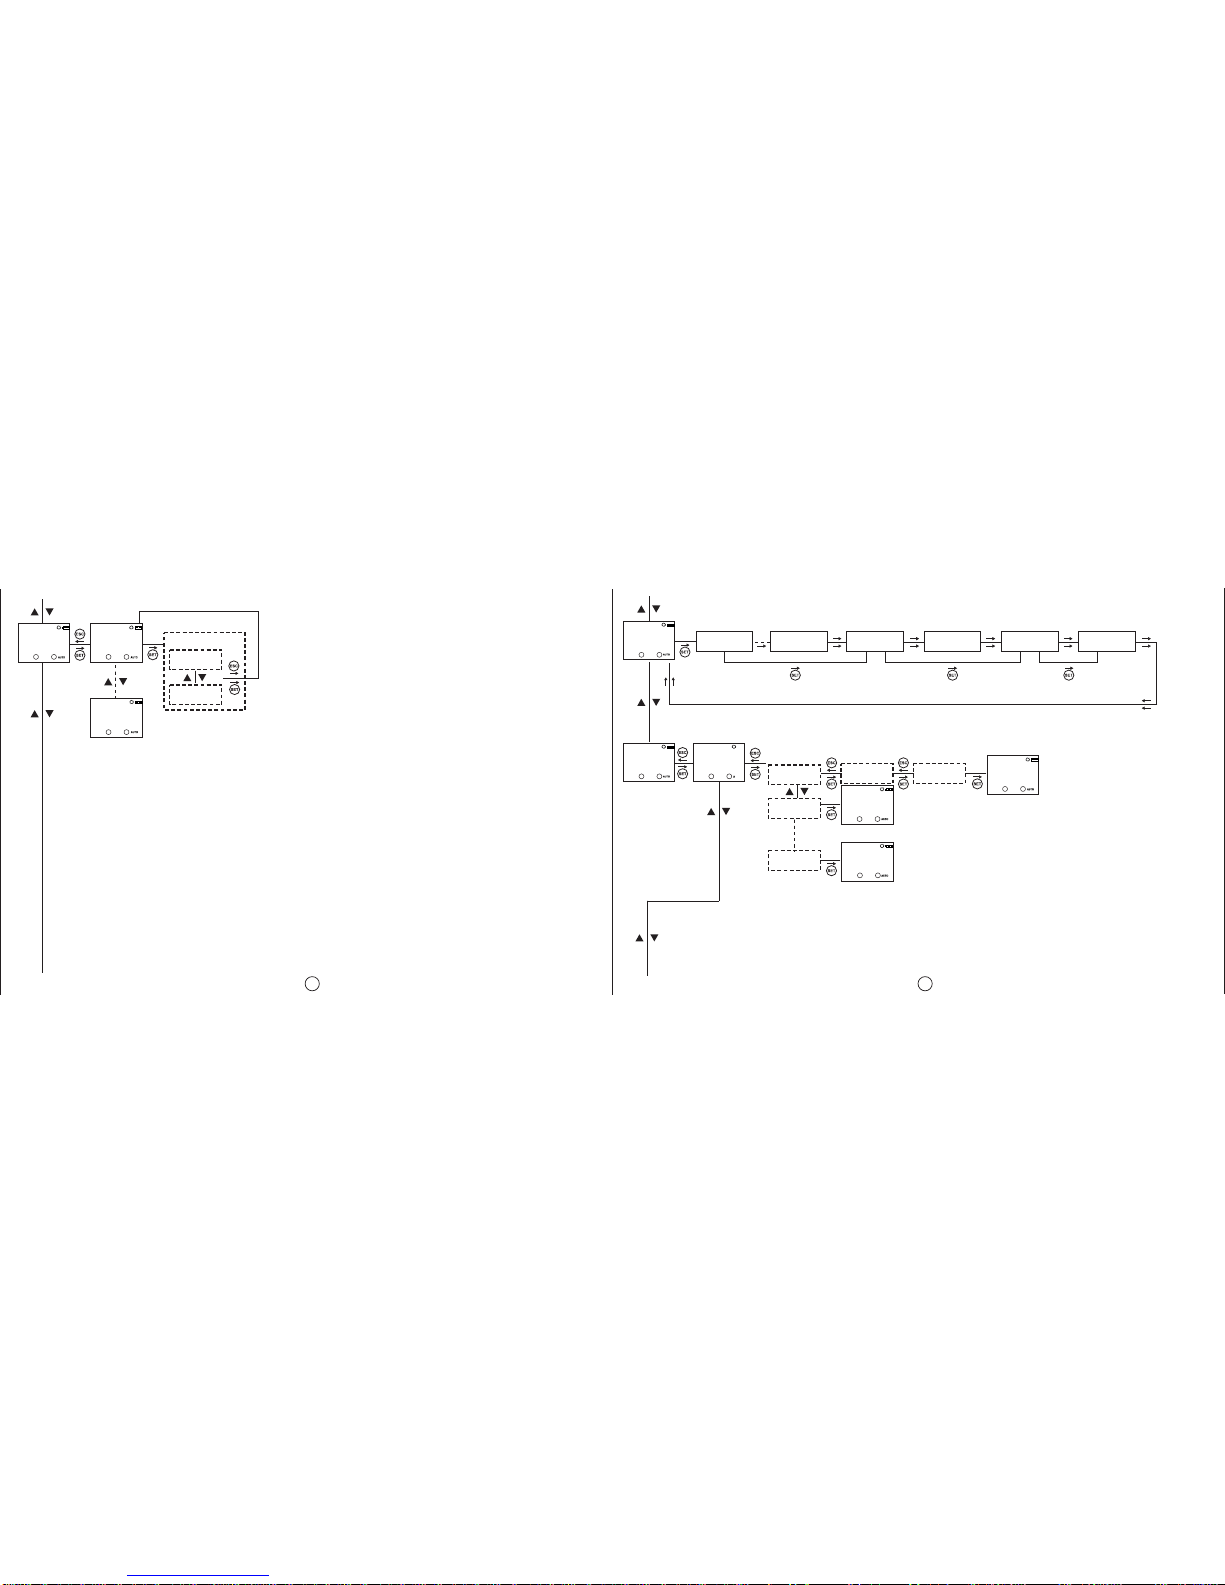
29 30
The last entered DATE is shown.
The last entered CLOCK is shown.
The last entered CENTURY is shown.
The last entered value is shown.
Can be set
between
00~15
Selected parameter is shown.
TIME
MO
SETING DATE
MO
13.09.10
CLOCK
MO
20:53:40
CENTURY
MO
2011
DISPLAY
MO
SETING CONTRAS
MO
08 CONTRAS
08
CONTRAS
05
CENTURY
13
CHANGED
MO
CENTURY
CLOCK
20:53:40
DATE
13.09.11
DATE
20.09.89
CLOCK
20:43:50
CHANGED
MO
CLOCK
CHANGED
MO
DATE MANUAL
MO
MODE RECOVRY
MO
DISABL RECOVRY
DISABL
00:00
R-TIMER
00:00
R-TIMER
NEXT-P
TIMER
Can be set
between
19~25
C1: C2: C1: C2:
C1: C2:
C1: C2:
C1: C2:
C1: C2:
C1: C2:
C1: C2:C1: C2:

31 32
If the password is active, it isn’t prompted. If the password is active, it isn’t prompted.
Selected parameter
is shown.
When this menu is selecetd without making any changes
in the device menu, monitoring menu is shown without
the SAVE prompt.
PASWORD
MO
SETING PASWORD
0000
PASWORD
0000
0001
PASWORD
MO
DISABL PASWORD
DISABL
PASWORD
MO
WRONG
ACTIVE
PASWORD
MO
CHANGE NEWPASS
0000
NEWPASS
0000
REENTER
0000
PASWORD
0000
PASWORD
0000
CONFIRM
N0
REENTER
0000
0001
PASWORD
MO
CHANGD
ENTRY
MO
WRONG
FACTORY
MO
SETING
VERSION
MO
INFOS
EXIT
MO
MENU
0001
FIRMWRE
MO
V0.00
HARDWRE
MO
V0.00
SAVE
YES
N0
16.12.10
MO
18:45:52
YES
SETTING
MO
LOADED
PASWORD
MO
WRONG
C1: C2:
C1: C2:
C1: C2:
C1: C2: C1: C2:
C1: C2:
C1: C2:
C1: C2:
C1: C2:
C1: C2: C1: C2:
C1: C2:
C1: C2:
C1: C2:
Other manuals for DTR-10
1
Table of contents
Other Entes Timer manuals


