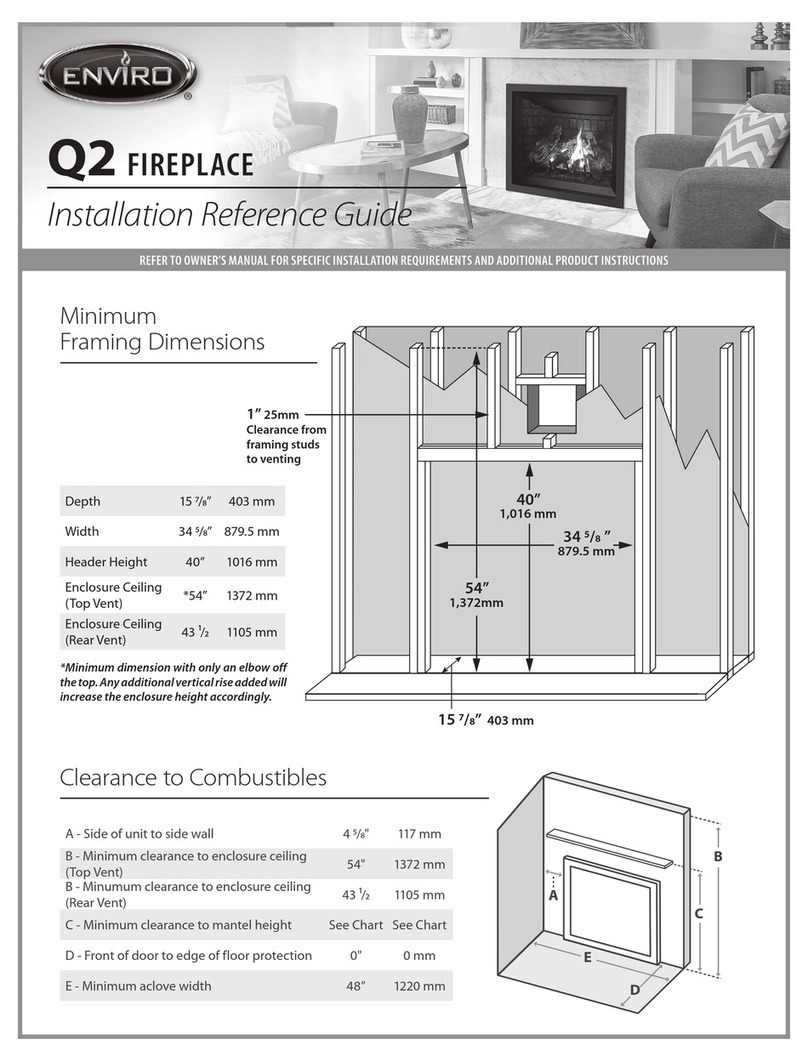
Non-Combustible Board
Placement
Mantel Projections
Mantel graph dimensions are measured from the bottom of the
replace, if you wish to reference the mantel height from the
tiling edge subtract 15 inches (381mm) from the mantel height
depicted on the graph. If you plan to install a TV above your
replace refer to the appropriate section of the owner’s manual
for available options. It is acceptable to install a combustible
mantel over top of the non-combustible board. If you are
activating the Cool Surface System you are eligible to subtract
12” (305mm) from the mantel height shown in this diagram.
Minimum Venting Requirements
Minimum venting is shown in figure 20. the framing height to the
center of the thimble is 62”. Minimum venting must include a 24”
vertical section and a 90 degree elbow which is then terminated
horizontally. For a vertical termination please follow the vent
pipe manufacturer’s installation instructions for vertical vent
termination framing. A minimum of 1 in. (25 mm) clearance on
all sides of the vertical vent pipe must be maintained. For every
12” of horizontal run there must be a 1/4” of rise. 1” of clearance
between framing and venting must be maintained at all times. 2”
above the venting and 3” above an elbow.
Fireplace Dimensions
1 2 3 4 5 6 7 8 9 10 11 12 13 14
MANTLE HEIGHT
MANTLE DEPTH
Minimum Mantle Clearances
8” MANTLE
4”MANTLE
47”
46”
45”
44”
43”
42”
41”
39”
40”
12” MANTLE
56 1/2”
13 3/4”
10”
COMBUSTIBLE
NON COMBUSTIBLE
Framing
MetalStud
Drywall
Concrete
Board
Sidewall
7”
5 3/16
72
6
Specications
Dimensions:
Rating LabeL & Lighting instRuctions Location:
Rotate the safety screen upward or remove the screen completely to access the rating label and lighting
instructions. The plates are attached to a length of chain and are never to be tampered with or removed.
All important information for your replace is on this label as well of the model specic serial number
which you will need for warranty information. The plates are located inside the cabinet on the left side
near the front.
71
4
"
186mm
30
3
4
"
779mm
62"
1575mm
65"
1651mm
91
4
"
235mm
16
1
2
"
422mm
12
1
4
"
308mm
4"
103mm
91
4
"
232mm
38"
965mm
3"
73mm
91
4
"
232mm
7"
176mm
31
4
"
81mm
Gas Inlet
Bottom
(Optional)
20"
507mm
1
2
"
13mm
70
3
4
"
1797mm
17
3
4
"
453mm
15"
378mm
Electrical
Inlet Left
Side
Gas Inlet
Right Side
Figure 1. Unit Dimensions
6
Specications
Dimensions:
Rating LabeL & Lighting instRuctions Location:
Rotate the safety screen upward or remove the screen completely to access the rating label and lighting
instructions. The plates are attached to a length of chain and are never to be tampered with or removed.
All important information for your replace is on this label as well of the model specic serial number
which you will need for warranty information. The plates are located inside the cabinet on the left side
near the front.
71
4
"
186mm
30
3
4
"
779mm
62"
1575mm
65"
1651mm
91
4
"
235mm
16
1
2
"
422mm
12
1
4
"
308mm
4"
103mm
91
4
"
232mm
38"
965mm
3"
73mm
91
4
"
232mm
7"
176mm
31
4
"
81mm
Gas Inlet
Bottom
(Optional)
20"
507mm
1
2
"
13mm
70
3
4
"
1797mm
17
3
4
"
453mm
9"
231mm
15"
378mm
Electrical
Inlet Left
Side
Gas Inlet
Right Side
Figure 1. Unit Dimensions
6
Specications
Dimensions:
Rating LabeL & Lighting instRuctions Location:
Rotate the safety screen upward or remove the screen completely to access the rating label and lighting
instructions. The plates are attached to a length of chain and are never to be tampered with or removed.
All important information for your replace is on this label as well of the model specic serial number
which you will need for warranty information. The plates are located inside the cabinet on the left side
near the front.
71
4
"
186mm
30
3
4
"
779mm
62"
1575mm
65"
1651mm
91
4
"
235mm
16
1
2
"
422mm
12
1
4
"
308mm
4"
103mm
91
4
"
232mm
38"
965mm
3"
73mm
91
4
"
232mm
7"
176mm
31
4
"
81mm
Gas Inlet
Bottom
(Optional)
20"
507mm
1
2
"
13mm
70
3
4
"
17
3
4
"
453mm
231mm
15"
378mm
Electrical
Inlet Left
Side
Gas Inlet
Right Side
Figure 1. Unit Dimensions
6
Specications
Dimensions:
Rating LabeL & Lighting instRuctions Location:
Rotate the safety screen upward or remove the screen completely to access the rating label and lighting
instructions. The plates are attached to a length of chain and are never to be tampered with or removed.
All important information for your replace is on this label as well of the model specic serial number
which you will need for warranty information. The plates are located inside the cabinet on the left side
near the front.
71
4
"
186mm
30
3
4
"
779mm
62"
1575mm
65"
1651mm
91
4
"
235mm
16
1
2
"
422mm
12
1
4
"
308mm
4"
103mm
91
4
"
232mm
38"
965mm
3"
73mm
91
4
"
232mm
7"
176mm
31
4
"
81mm
Gas Inlet
Bottom
(Optional)
20"
507mm
1
2
"
13mm
70
3
4
"
1797mm
17
3
4
"
453mm
15"
378mm
Electrical
Inlet Left
Side
Gas Inlet
Right Side
Figure 1. Unit Dimensions
509mm
62"
[1575mm]
*Do not use two
12” vent sections
or this dimension
will not work.
Use one 24”
section.

