Enzo EMPC6019Q User manual
6.3 Quart Digital Pressure Cooker
USER MANUAL
For technical assistance or troubleshooting
please call 1-888-770-3696 or visit www.sibrandssupport.com
MODEL: EMPC6019Q

Please read this entire manual before using this device, paying extra attention to these safety
warnings and guidelines. Please keep this manual in a safe place for future reference.
WARNINGS:
•THE METAL PARTS ON THE TOP OF THE PRESSURE COOKER GET VERY HOT
DURING THE COOKING PROCESS AND CAN CAUSE BURNS. DO NOT TOUCH THE
METAL PARTS ON THE TOP OF THE PRESSURE COOKER DURING THE COOKING
PROCESS, OR FOR AT LEAST 30 MINUTES AFTER COOKING THE PRESSURE
COOKER HAS BEEN TURNED OFF.
•Intended for countertop use only.
•Spilled food can cause serious burns. Keep appliance and cord away from children. Never
drape cord over edge of counter, never use outlet below counter, and never use with an
extension cord.
•Do not immerse the cooker in water for cleaning. If the cooker falls into water during use,
do not reach in the water to retrieve it. Immediately unplug it from its power source.
•Do not touch the cooker or power cord with wet hands.
•Prior to operation, check the cooker and power cord for physical damage. Do not use if
physical damage has occurred.
•Do not expose this cooker to excessively high temperatures. Do not place it in, on, or near
heat sources, such as a fireplace, stove, radiator, etc. Do not leave it in direct sunlight.
•Use only in a well-ventilated area where steam and heat can escape and dissipate.
•Do not expose your skin to the steam that escapes during cooking. The steam is very hot
and can cause burns.
•Before plugging the cooker into a power outlet, ensure that the outlet provides the same
type and level of power required by the device.
•Unplug this cooker from the power source when not in use and prior to cleaning.
•Take care to prevent damage to the power cord. Do not allow it to become crimped,
pinched, walked on, or become tangled with other cords. Ensure that the power cord does
not present a tripping hazard.
•Never unplug the cooker by pulling on the power cord. Always grasp the connector head.
•Inspect and clean the pressure limit valve and release valve needle before use.
•Do not open the lid while the float valve is up. This indicates that pressure still exists inside
the cooker.
•Do not touch the lid, pressure limit valve, or float valve during use. Wait until the cooker
fully cools before touching these parts.
•Do not move the cooker by holding the lid handle. Use the handles on the body side
instead.
•Take extreme care when moving the cooker while it contains hot liquids.
•Ensure that there is a minimum of 2 cups of liquid in the cooker to maintain pressure.
•Ensure that the lid is fully installed and properly sealed prior to use.
•Do not use the cooker without the lid securely installed, except when using the Sauté
function.
•Do not open the pressure cooker until it has cooled and all internal pressure has been
released.

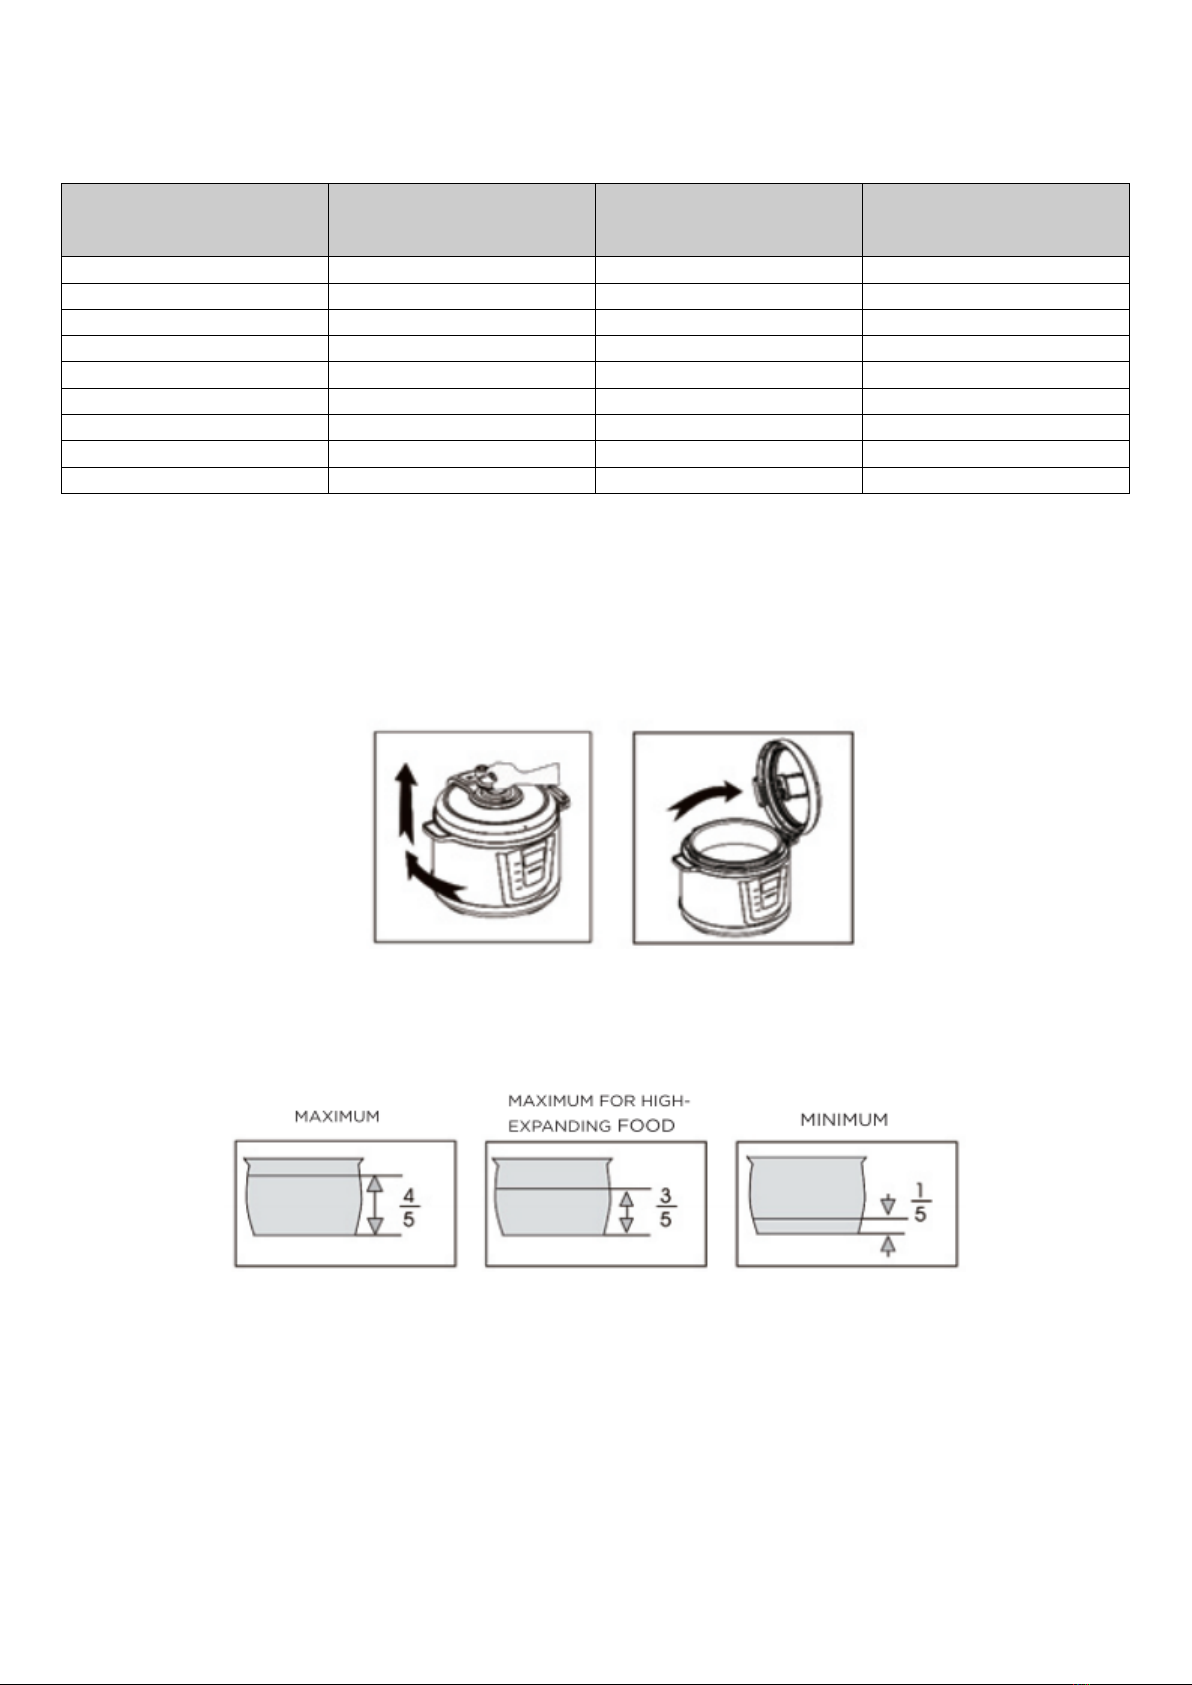
•Never fill the cooking pot with food and/or liquid above the 4/5 mark. For foods that expand
during cooking, such as beans or rice, do not fill beyond the 3/5 mark. Never attempt to
cook with food and/or water below the 1/5 mark.
•Do not use the cooking pot anyplace except inside the cooker. Do not place it on a stove or
in an oven. Do not store in the refrigerator.
•The maximum of the Keep-warm time is 24 hours, however it is recommended to not
exceed 6 hours to ensure the best taste for your food.
•The maximum time of the preset timer is 24 hours.
•This cooker has no user serviceable parts. Do not attempt to open, service, or modify the
cooker.
•This cooker should only be operated by qualified adults. Children should be supervised to
ensure they do not play with this appliance.
PRESSURE COOKING TIPS
•Always use at least 2 cups of water or other liquid in your recipes. This will make
sure there is enough steam to be created to produce the pressure required for
cooking.
•You should use sufficient food to fill the Inner Pot to at least the 1/5 mark inside the pot. If
using food that expands when cooked, such as beans or rice, do not fill the pot past the 3/5
mark. If using food that does not expand, do not fill the pot past the 4/5 mark.
•If you are unsure of the cooking time for your dish it is always better to begin with a shorter
cooking time, or use the default cooking time. Cook for the set time and use the quick
release method to release the pressure when the timer completes. If the food is not done,
simply begin another cooking program until the food is fully cooked.
•When cooking rice always rinse before cooking. Cook rice in water or broth. Different types
of rice require different cooking times and rice-to-water ratios. Below is a table that
provides recommendations based on cooking 1 cup of uncooked rice.
Type of Rice
Cooking Time (minutes)
Liquid (cups)
White (long-grain)
4-5
1 ½
White (short-grain)
6-8
1 ½
Brown (long-grain)
10-18
1 ½to 2
Brown (short-grain)
12-20
1 ½
Wild Rice
20-25
3-4
Jasmine
4-7
1 ½
Basmati
4-6
1 ½
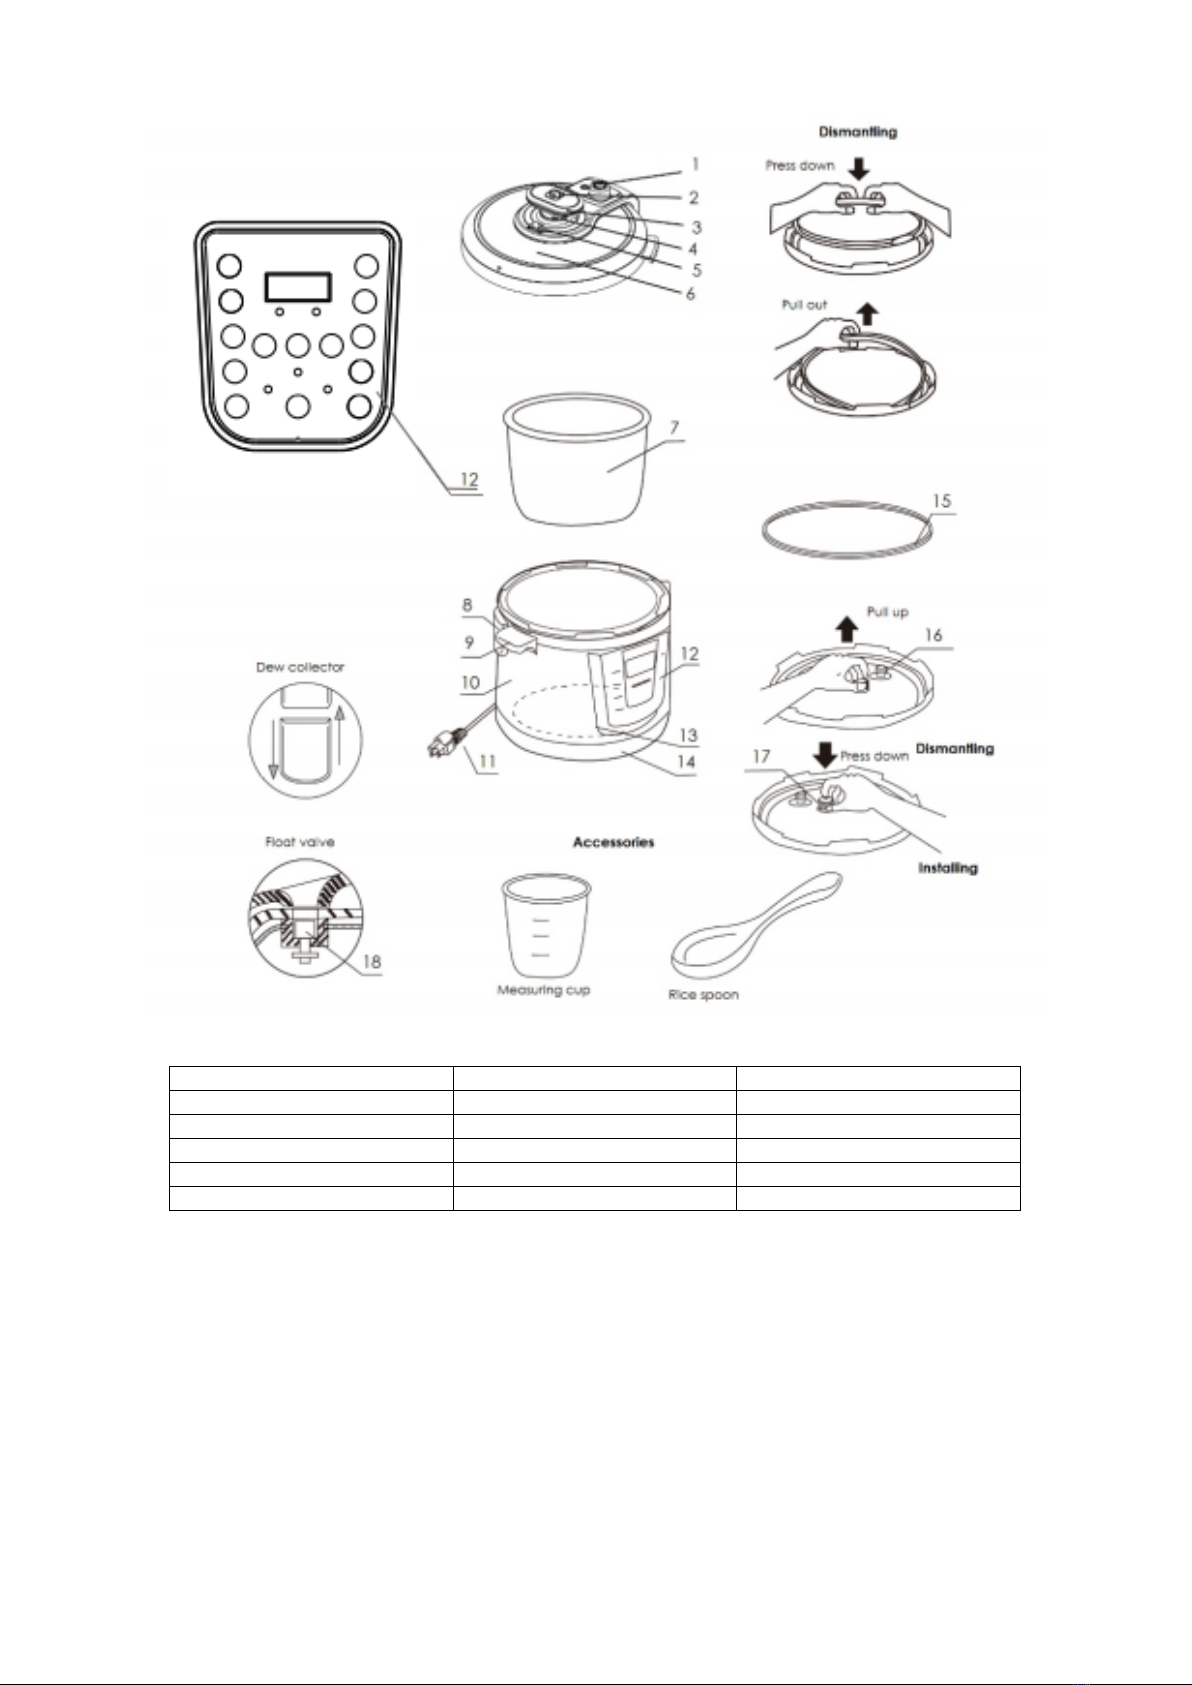
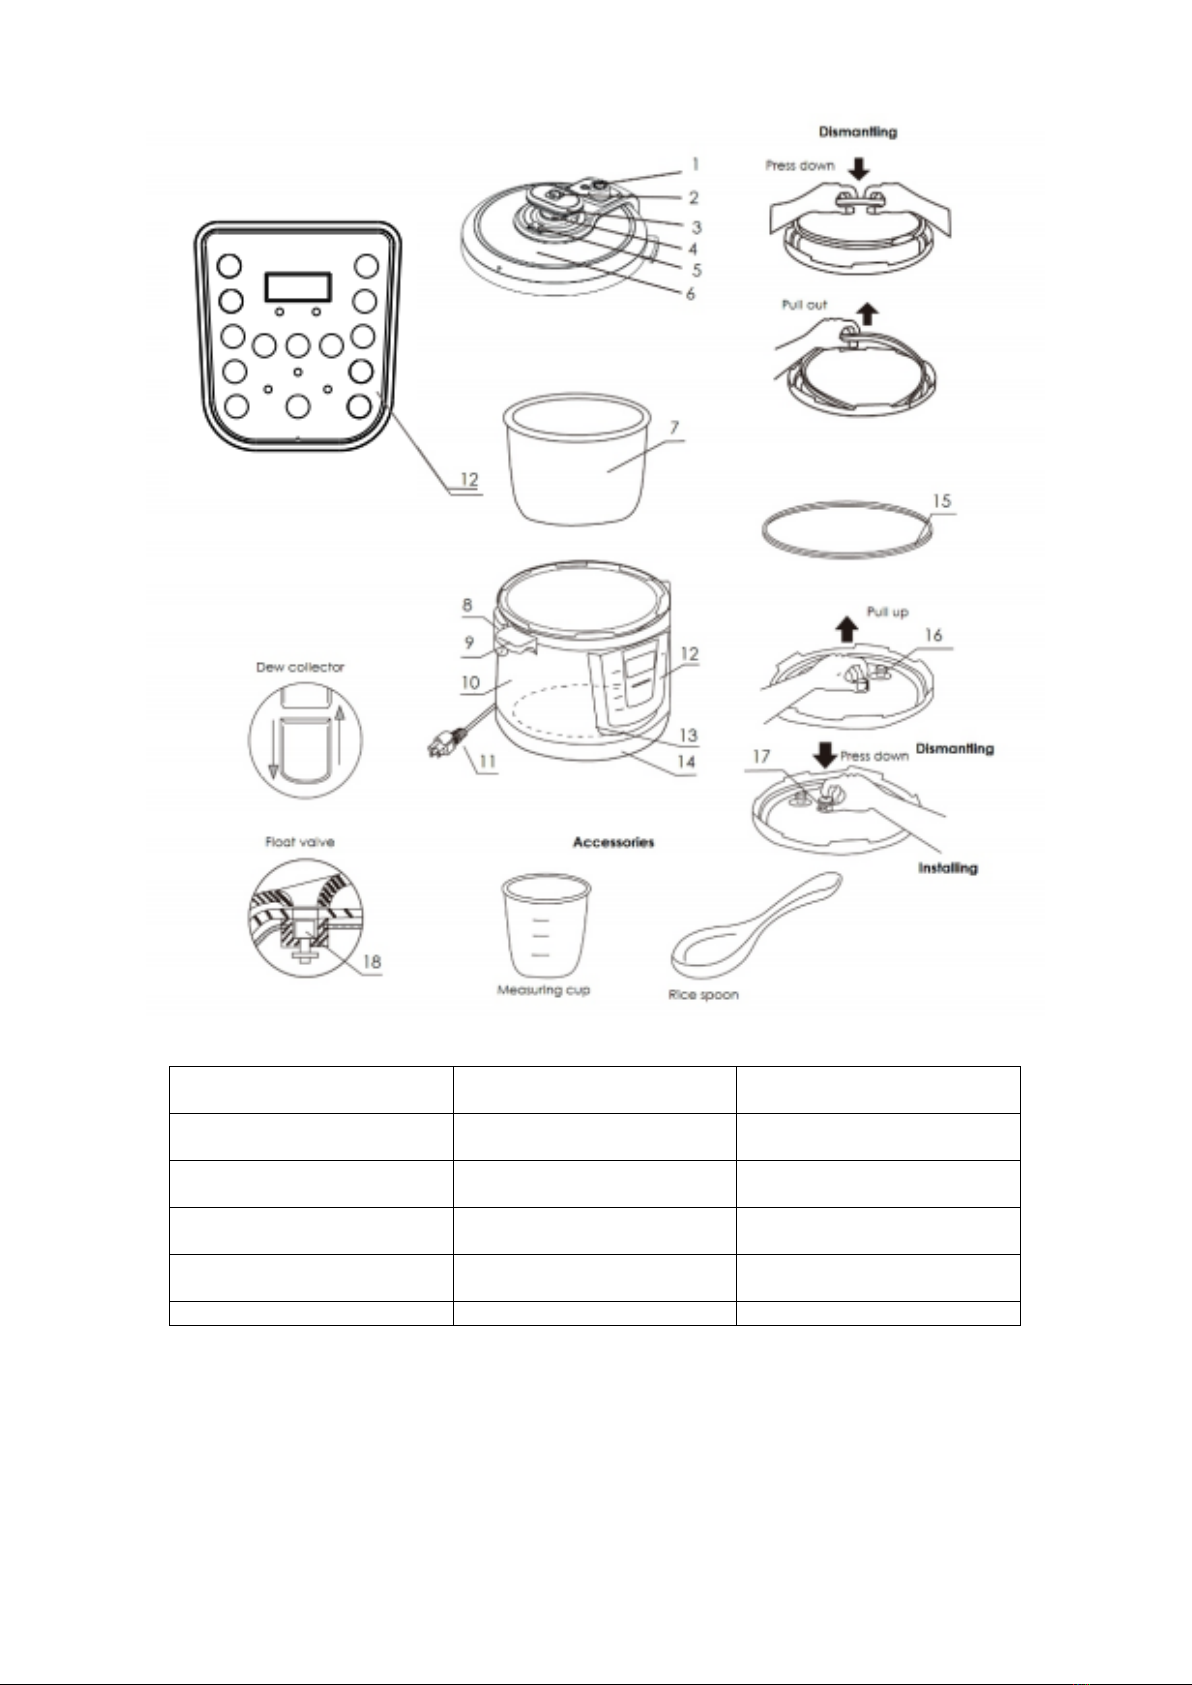
PRODUCT OVERVIEW
1. Pressure Limit Valve
7. Inner Pot
13. Heater
2. Steam Release Button
8. Moisture/Dew Collector
14. Base
3.Lid Handle
9. Cooker Base Handle
15. Rubber Seal Ring
4. Tab
10. Cooker Body
16. Seal Ring of Float Valve
5. Steam Release Ring
11. Power Cord
17. Anti-block Shield
6. Lid
12. Control Panel
18. Float Valve

B
C
D
F
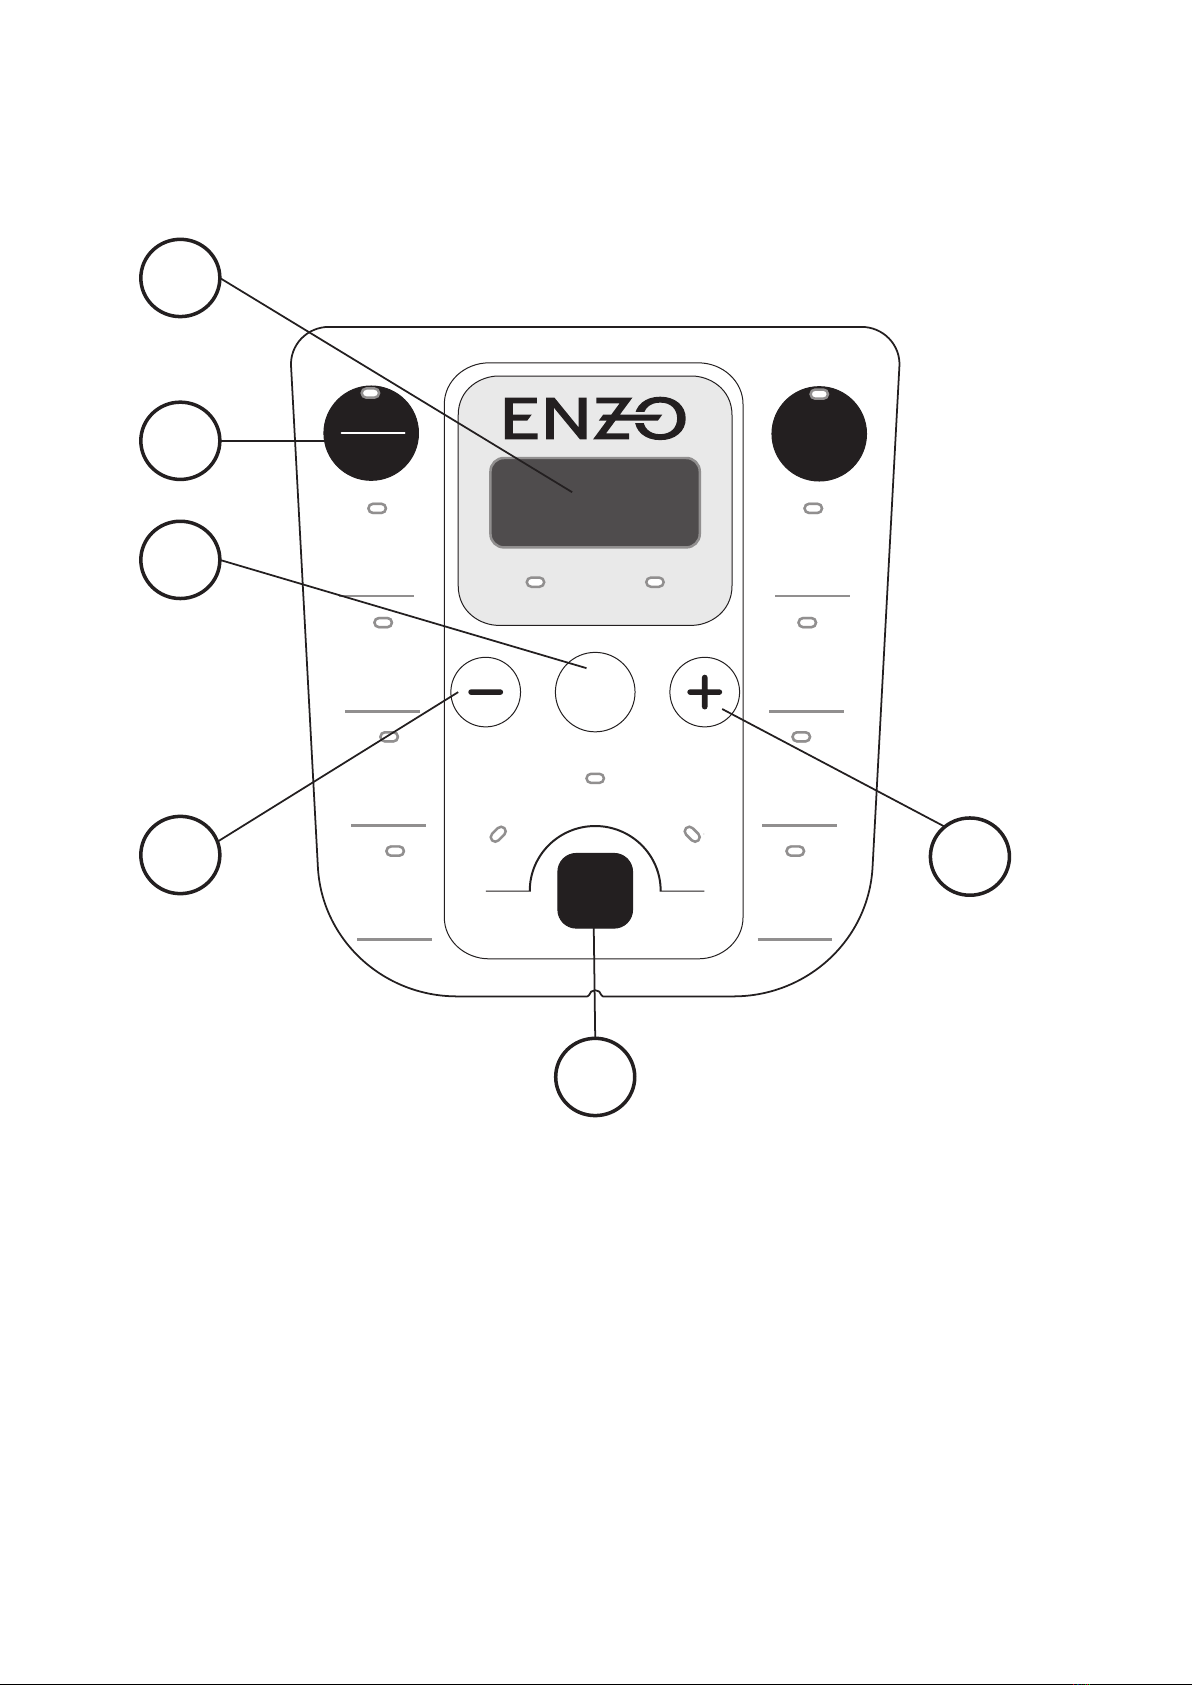
CONTROL PANEL OVERVIEW
A. Time Display - displays the remaining cooking time or remaining delayed start time
B. Warm / Cancel Button - used to enter Warm mode or to Cancel a cooking program
C. Delay Start Button - used for setting a delayed starting time
D. Decrease Time Button- press the button to Decrease Cooking Time or Delay Start Time
E. Increase Time Button- press the button to Increase Cooking Time or Delay Start Time
F. Pressure Adjust Button - adjusts cooking pressure between Low/Medium/High settings
Manual
Warm
Cancel
Rice
Cake
Soup/
Broth
Heating
Pressure keeping
Delay
Start
Low
Medium
High
Porridge
Eggs
Meat/
Stew
Sauté
Slow
Cook
Pressure
Adjust
A
E

COOKING MODES PROGRAM GUIDE
PROGRAMS
PRESSURE
SETTING
SUGGESTED
USES
NOTES
Rice
Low
1-5 cups of rice
Modes based on
amount of rice being
cooked.
Medium
6-10 cups of rice
High
11-16 cups of rice
Cake
N/A
Cakes, muffins,
cupcakes, etc.
Adjust cooking time
based on
recipe/type of cake.
Non-pressure
cooking mode.
Soup/Broth
Low
Soup with no meat
Broth remains clear
due to lack of
boiling.
Medium
Soup with meat
High
Rich soups/broths
Slow Cook
N/A
Use this mode
exactly as you
would a normal
Slow Cooker
Non-pressure
cooking mode.
Porridge
Low
Oatmeal
DO NOT use Quick
Release to avoid
splatter.
Medium
Porridge/Congee
High
Porridge/Congee
with beans
Eggs
Low
Soft boiled eggs
Settings are based
on Extra Large
eggs. Use shorter
times for smaller
eggs.
Medium
Medium boiled eggs
High
Hard boiled eggs
Meat/Stew
Low
Soft texture
Choose mode
based on desired
texture of meat.
Medium
Very soft texture
High
Fall-off-the-bone
Sauté
N/A
Simmering,
Browning, Stir-fry,
Sautéing
DO NOT cook with
Lid attached. Non-
pressure cooking
mode.
Manual
Low
Manual
programming
according to your
recipes
Time is adjustable
between 1-99
minutes.
Medium
High
Warm
N/A
Re-heating food or
keeping cooked
food warm
Time is not
adjustable. Will
operate up to 24
hours.
COOKING MODES TIME GUIDE
The information below shows the default, minimum, and maximum cooking times for each cooking
mode.
COOKING MODE
PRESET DEFAULT
(minutes unless noted
otherwise)
MINIMUM
(minutes unless noted
otherwise)
MAXIMUM
(minutes unless noted
otherwise)
Rice
12
4
16
Cake
30
30
40
Soup/Broth
20
15
40
Slow Cook
4 Hours
2 Hours
8 Hours
Porridge
18
12
40
Eggs
3
1
8
Meat/Stew
25
10
30
Sauté
20
10
30
Manual
1
1
99
•NOTE: the “Warm” cooking mode does not have an adjustable time.
USING THE PRESSURE COOKER
1. To remove the Lid (6), turn the Lid Handle (3) clockwise and lift the Lid (6) upward. The lid
can rest in a vertical position. (The tab on the lid hooks into the notch above the Right Base
Handle (9).
2. Per your recipe, add food and liquids to the Inner Pot (7). Do not fill more that 4/5 capacity.
The interior of the pot is marked for your convenience. High-expanding food (such as dry
beans, rice, etc.) should not fill more than 3/5 of the pots capacity. At a minimum, fill the
inner pot to 1/5 of its capacity.
3. To close the Lid (6), align the “Unlock” arrow on the lid to the arrow on the front rim of the
base. Hold the Lid Handle (3) and turn the lid counter-clockwise to lock it in place. The
“Lock” arrow on the lid will align with the arrow on the front rim of the base.

4. Turn the Steam Release Ring (5) to “SEAL” and check that the Float Valve is in the down
position.
5. Plug the power cord into an outlet. The control panel display will show “--:--“.
6. Press the Cooking Mode Button (ex: Soup, Cake, Meat, etc.) of your choice, or press
“Manual”.
7. Press the “-” or “+“ buttons (D & E) to adjust the Cooking Time up or down.
8. Press the Pressure Adjust button (F) to adjust the Cooking Pressure between
Low/Medium/High.
9. The cooking mode light on the control panel will blink several times and then begin the
cooking process.
•NOTE: for modes that cook under pressure, the cooker will begin pressurizing as the
first step of the cooking process. This process may take several minutes to complete
depending on the fullness of the pot. The timer will not start counting down until after
the cooker is fully pressurized.
10.When the set cooking time has finished, the cooker will beep 5 times and automatically
switch to “Warm” mode. (The Keep Warm light will turn ON).
11.To exit “Warm” mode simply press the Warm/Cancel button (B).
12.Follow the instructions below for Releasing the Pressure to remove your cooked food.
Canceling or Stopping a Cooking Program
oDuring the programming steps you may wish to cancel a selection and start over. To do this
simply press the Warm/Cancel button (B).
oDuring cooking process you may wish to stop cooking. To do this simply press
Warm/Cancel button (B).
RELEASING THE PRESSURE
WARNING: never attempt to force the lid open. If the lid will not open easily it means there
is still pressure inside the cooker that must be released before the lid can be opened.
Always make sure the Float Valve (18) has returned to the lowered position before
attempting to open the lid.
WARNING: Hot steam will be ejected from the pressure cooker during pressure release.
Before proceeding with either of the pressure release methods described below, make sure
to wear oven mitts or some other sort of protection for your hands to ensure you do not get
burned by the escaping steam.
There are two methods of pressure release:
•Natural Release – this method allows the cooker to naturally release the built-up
pressure inside the cooker automatically. The pressure will slowly release out of the
cooker over several minutes (normally between 10-45 minutes) depending on the

amount of food in the cooker. During Natural Release hot steam will slowly eject
from the pressure cooker through the vents in the Pressure Limit Valve (1).
•Quick Release – this method allows the user to manually release the built-up
pressure inside the cooker in one of two ways:
oPressing the Steam Release Button (2) in short bursts
oSliding the Steam Release Ring (5) to the “RELEASE” setting.
oNOTE: steam will escape with more strength when using the Steam Release
Button (2), so always press the button in short bursts when using this method
until the steam has fully released. Steam will be released completely and with
less power when sliding the Steam Release Ring (5) to RELEASE, so you will
not need to make any further adjustments after sliding to RELEASE.
WARNING: Hot steam will be ejected from the pressure cooker with both types of
release methods. Always keep your hands and face away from the steam vents on
the top of the unit.
oTIP: for foods with large liquid volume or starch content, use the Natural
Release method. If Quick Release is used with these types of food thick
liquid can be ejected from the Pressure Limit Valve (1) and cause
splattering during pressure release.
As the cooker releases pressure the Float Valve (18) will begin to lower. When the cooker
has released all of the pressure the Float Valve (18) will be at the low point setting as it was
before the cooking process started.
Once the Float Valve (18) has fully lowered it is safe to open the lid and transfer your food
to a serving plate.
WARM MODE
•The “Warm” mode is used to keep cooked food warm for extended periods of time.
•The Pressure Cooker will automatically enter the “Warm” mode after the set cooking
time has completed.
•You can also manually enter “Warm” mode at any time during cooking by pressing the
Warm / Cancel button (B) twice.
•The pressure cooker will stay in “Warm” mode for up to 24 hours before automatically
shutting down.
•To cancel “Warm” mode simply press the Warm / Cancel button (B).
SAUTÉ Mode
Do not attach the lid during “SAUTÉ” mode. This mode is used to sauté or brown foods such as
ground beef, ground turkey, etc. Use this mode much like you would using a frying pan on the
stove or hot plate.
To use “SAUTÉ” mode simply place your food in the pot, choose “SAUTÉ” mode from the control
panel, set your desired cooking time, and begin cooking.
This mode does not cook using pressure, so you do not need to follow the steps for Pressure
Release. When your food has finished cooking simply press the Warm / Cancel button (B) to end
the cooking process.
SLOW COOK Mode
The “SLOW COOK” mode is designed to cook food in the same way as a traditional slow cooker.
This mode does not cook using pressure.

To cook using the “SLOW COOK” mode simply follow the same steps described previously,
however when the food has finished cooking you can simply press the Warm / Cancel button (B)
to end the cooking process and then remove the lid. You do not need to follow the steps for
Pressure Release
CAKE Mode
The “CAKE” mode is designed to cook food in the same way as a traditional oven. This mode
does not cook using pressure.
To cook using the “CAKE” mode simply follow the same steps described previously, however
when the food has finished cooking you can simply press the Warm / Cancel button (B) to end the
cooking process and then remove the lid. You do not need to follow the steps for Pressure
Release
USING THE DELAYED TIMER
The delayed timer function allow you to set the Pressure Cooker to turn on and being cooking up
to 24 hours in the future.
NOTE: Perishable foods such as meat, poultry, fish, cheese, dairy products, etc. cannot be left at
room temperature for more than 2 hours (no longer than 1 hour when room temperature is above
80°F). When cooking these foods do not set the delay time function for more than 1-2 hours.
NOTE: the “Cake” & “Sauté” modes cannot use the Delayed Timer function.
1. Add food to the Inner Pot (7) and close the Lid (6) according to the instructions outlined
previously in this manual.
2. Turn the Steam Release Ring (5) to “SEAL”
3. Plug the power cord into an outlet. The control panel display will show “--:--“.
4. Press the Delay Start button (C).
5. Press the “-” or “+“ buttons (D & E) to set the desired time of delay (up to 24 hours in the
future). Time can be delayed in 30-minute increments up to 10 hours, and then in 1-hour
increments from 10 hours to 24 hours. The “Delay” light will flash.
6. Select the Cooking Mode Button (ex: Rice, Cake, Eggs, Manual, etc.) of your choice.
7. Use the “-” or “+“ buttons (D & E) to set your Cooking Time.
8. Use the Pressure Adjust button (F) to set your Cooking Pressure.
9. The screen on the control panel will blink several times and then begin the Delay Timer
countdown.
10.The Delay Time you have set will show on the control panel.
•NOTE: the Pressure Cooker will begin the pressurizing process after the set Delay Time
has elapsed. The countdown for the cooking time will begin after the cooker is
pressurized.
11.When the set cooking time has finished, the cooker will beep 5 times and automatically
switch to “Warm” mode. (The Keep Warm light will turn ON).
12.To exit “Warm” mode simply press the Warm/Cancel button (B).
13.Follow the previous instructions for “Releasing the Pressure” and removing your food.
CARE AND MAINTENANCE
Regular care and maintenance is essential in ensuring that this product is safe and effective for
use. Below are some steps to take to ensure best performance.
oDuring the cooking process some excess moisture is collected in a small plastic Moisture
Collector (8) attached on the rear of the cooker. Empty the reservoir after each use. To
remove the reservoir gently pull it downward.
oSmall parts of food can sometimes enter the Anti-block Shield (17). The Anti-block Shield
(17) is located on the underside of the lid directly below the Pressure Limit Valve (1).

Clean the Anti-block shield (17) with water and a dry, soft cloth after each use.
oVisually inspect and clean the Rubber Seal Ring (15) regularly. The Rubber Seal Ring (15)
is located on the underside of the lid. It is attached around a metal ring that is designed to
hold the seal ring in place. You can remove the Rubber Seal Ring (15) for cleaning by
gently pulling it away from the metal ring. Clean the Rubber Seal Ring (15) with water and
a dry, soft cloth and then place it back into place by gently pressing it over the metal ring.
Make sure the seal ring is completely seated over the metal ring, otherwise the cooker will
not be able to pressurize properly.
CLEANING
oCAUTION: do not attempt cleaning until the cooker has completely cooled down. Allow a
minimum of 30 minutes for the cooker to cool.
1. Turn off and unplug the appliance after each use.
2. Always allow the appliance to cool completely before cleaning.
3. Do not use abrasive brushes or pads, or harsh cleaning solutions.
4. Wash the inside of the Pot (7) with hot water, mild dish soap, and a clean dishcloth. Use a
sponge or rubber spatula to remove any stuck-on food or residue. Rinse and wipe dry with
a soft cloth. Note: the Pot (7) is also dishwasher safe.
5. Wash the inner surface of the lid thoroughly, including the Rubber Seal Ring (15), Float
Valve (18), and Anti-block Shield (17).
•NOTE: if the Rubber Seal Ring (15) is damaged, do not use the Pressure Cooker. If the
seal ring is not positioned properly, the unit will not be able to build pressure. Check
periodically to make sure the seal ring is clean, flexible, and not cracked or torn.
6. Wipe the Base of the Pressure Cooker clean using a damp cloth.
7. Do not immerse the power cord into water.
8. Ensure all parts are dried thoroughly before reassembling and using the appliance again.
9. Store the Pressure Cooker with the Lid (6) upside down on top of the pot. This will protect
the valves, knobs and pressure regulator on top of the lid. If the Pressure Cooker is stored
with the lid sealed, persistent odors may form inside and the seal ring may become
damaged.
TROUBLESHOOTING
Problem
Likely Cause
Solution
Difficult to close the lid.
The Rubber Seal Ring
(15) on the lid is not
lined up properly.
Re-align and try again.
Difficult to open the lid.
The Float Valve (18)
remains up after
releasing the steam.
Press down on the Float Valve (18)
gently with a kitchen utensil.
Steam leaking from the
lid.
The Rubber Seal Ring
(15) is uninstalled.
Install the Rubber Seal Ring (15).
The Rubber Seal Ring
(15) has food crumbs on
it.
Clean the Rubber Seal Ring (15).
The Rubber Seal Ring
(15) is damaged.
Replace the Rubber Seal Ring
(15).
The lid is unlocked.
Lock the lid.
Steam leaking from the
float valve.
The Seal Ring of the
Float Valve (16) has
food crumbs on/in it.
Clean the Seal Ring of the Float
Valve (16)

LIMITED ONE-YEAR WARRANTY
We warrant this product to be free from defects in material and workmanship under normal use for
a one-year period from the original date of purchase from an authorized ENZO dealer. We will
repair or replace the unit free of charge should it become defective under this warranty, providing
you, the original purchaser, submit proof of purchase (sales slip) along with the product and all
accessories.
Should you be missing any of the included accessories or other components (screws, pieces,
etc.), please contact the Customer Support Center to secure a replacement. It is not necessary to
bring the unit back to the store. When calling, please reference the parts list found in the
Instruction Manual to help us accurately identify the missing parts and promptly provide
replacements.
During the one-year period from the original purchase date, we will service or exchange the
product, at no charge. To obtain warranty service or replacement within the duration of the one-
year warranty, please return the product and all accessories to the original place of purchase.
For technical support, visit our website www.sibrandssupport.com or call the ENZO Technical
Support Center for technical assistance or troubleshooting at 1-888-770-3696, Monday to
Saturday, 10:00AM to 7:00PM EST.
There are no consumer serviceable parts contained in this product and any attempt by the owner
to service or repair the unit will immediately void all warranty coverage.
This warranty does not cover any product which has been subject to damage due to an act of
nature, misuse, neglect, accident, abuse, outdoor use, commercial use, or modification of, or to,
any part of the product. Damage to any external devices such as countertops, cabinets, and/or
tables or other platforms are not covered nor is the cost incurred in shipping the unit for warranty
repair. Under no circumstances shall ENZO be liable for any loss (direct, indirect, incidental,
foreseen, unforeseen, special or consequential) or for any damage arising out of, or in connection
with, the use of this product.
UNDER NO CIRCUMSTANCES WILL ENZO BE LIABLE FOR ANY INCIDENTAL OR
CONSEQUENTIAL DAMAGES.
This warranty does not cover re-manufactured units, or product sold 'As Is'.
This warranty is valid only to the original purchaser of the Product in the United States and
Canada and grants specific legal rights.

SAMPLE RECIPES
Hard-Boiled Eggs
-2 cups water
- 8 large fresh eggs
- 4 cups cold water
- 4 cups ice cubes
1. Place the eggs and 2 cups of water in the pot.
2. Cook using the “Eggs” cooking mode for 3-5 minutes. Longer times will yield harder-
boiled eggs.
3. Combine cold water and ice in a bowl.
4. When the timer has completed exit “Warm” mode and allow the pressure to drop
naturally (Natural Release) for about 5 minutes. Then use the Quick Release method to
release the remaining pressure.
5. Transfer the hot eggs to the ice water and let cool for about 30 minutes.
6. Peel and serve.
Shredded Chicken
- 2 cups water
- 2 chicken breasts
- Salt & pepper or other seasoning to taste
1. Season the chicken breasts to your desired taste
2. Add the chicken breasts and water to the pot
- Optional: you can insert a oven-safe trivet or cooking rack (not included) and place
the chicken on the trivet/rack for cooking.
3. Cook the Chicken using either the “Meat/Stew” or “Manual” mode for 8-10 minutes.
4. When timer has completed exit “Warm” mode and use the Quick Release method to
release the pressure.
5. Transfer the chicken to a cutting board and shred using two forks.
Creamy Chicken & Mushroom Pasta
- 1 tablespoon olive oil
- 1 tablespoon butter
- 2 cloves garlic (chopped)
- 8 oz. crimini mushrooms (halved)
- 2 chicken breasts cut into ½inch pieces
- 1 can chicken stock
- 1 cup milk (or heavy whipping cream for thicker sauce)
- 1 pound dry pasta
- 8 ounces cream cheese
1. Turn the pressure cooker to “Sauté” and add the olive oil, butter, and garlic to the pot.
Sauté the garlic for a few minutes until it is caramelized. (Do not use the lid during
“Sauté mode)
2. Add the mushrooms and sauté 3-5 minutes until softened
3. Press and Hold the Start/Cancel button (D) to cancel the “Sauté” mode.
4. Add the chicken, chicken stock, and milk/cream to the pot.
5. Close the lid and set the pressure cooker to “Manual” mode for 5 minutes.
6. When the timer has completed exit “Warm” mode and use the Quick Release method to

release the pressure.
7. Stir in the cream cheese using a spatula or wooden spoon.
8. Add seasoning, grated cheese, and any desired garnishes and serve.
No-soak Black Beans
- 2 cups dry black beans (rinse but do not soak)
- 8 cups water
- 1 white onion (chopped)
- 1 teaspoon garlic powder
- 1 teaspoon ground cumin
- 1 teaspoon dried oregano
-1 bay leaf
- 2-3 tablespoons cilantro
- 1 lime (for juice)
1. Add the beans, water, onion, garlic powder, cumin, oregano, and bay leaf to the pot.
2. Close the lid and set pressure cooker to the “Manual” mode. Adjust cooking time to 20
minutes.
3. When the timer has completed exit “Warm” mode and use the Natural Release method
to release the pressure.
4. Drain the beans using a colander.
5. Stir in cilantro.
6. Squeeze the juice of half a lime (or both halves if preferred). Stir and serve.
Texas Style Chili
- 1 ½pounds beef stew meat cut into 1 inch pieces
-2 tablespoons olive oil
- 1 medium onion (chopped)
- 1 medium jalapeño pepper (minced)
- 2 cans (14 ½ounces, each) chili-seasoned diced tomatoes
- Optional: shredded cheddar cheese & sour cream
1. Turn the pressure cooker to “Sauté” and add oil. After the oil has warmed, add the beef
and cook until brown.
2. When beef has browned press and Hold the Start/Cancel button (D) to cancel the
“Sauté” mode.
3. Add all of the remaining ingredients to the pot. Except for the cheese and sour cream.
4. Close the lid and set pressure cooker to the “Meat/Stew” setting. Adjust cooking time to
20-25 minutes.
5. When the timer has completed exit “Warm” mode and use the Quick Release method to
release the pressure.
Garnish with sour cream & cheddar cheese if desired.

Olla de presión digital de 6.3 cuartos de gallon
MANUAL DE USUARIO
Para asistencia técnica o solución de problemas
llame al 1-888-770-3696 o visite www.sibrandssupport.com
MODEL: EMPC6019Q

Lea todo el manual antes de usar este dispositivo, prestando especial atención a estas
advertencias y pautas de seguridad. Guarde este manual en un lugar seguro para futuras
consultas.
ADVERTENCIAS:
•LAS PARTES METÁLICAS EN LA PARTE SUPERIOR DE LA COCINA A PRESIÓN SE
ENCUENTRAN MUY CALIENTES DURANTE EL PROCESO DE COCCIÓN Y PUEDEN
CAUSAR QUEMADURAS. NO TOQUE LAS PARTES METÁLICAS EN LA PARTE
SUPERIOR DE LA COCINA A PRESIÓN DURANTE EL PROCESO DE COCCIÓN, O
POR LO MENOS 30 MINUTOS DESPUÉS DE COCINAR, LA COCINA A PRESIÓN HA
SIDO APAGADA.
•Para uso exclusivo de mostrador.
•Los alimentos derramados pueden causar quemaduras graves. Mantenga el aparato y el
cable fuera del alcance de los niños. Nunca coloque el cable sobre el borde del mostrador,
nunca use la salida debajo del mostrador y nunca lo use con un cable de extensión.
•No sumerja la olla en agua para limpiarla. Si la olla cae al agua durante el uso, no toque el
agua para recuperarla. Inmediatamente desenchúfelo de su fuente de poder.
•No toque la cocina o el cable de alimentación con las manos mojadas.
•Antes de la operación, verifique que la cocina y el cable de alimentación no tengan daños
físicos. No usar si ha ocurrido daño físico.
•No exponga esta cocina a temperaturas excesivamente altas. No lo coloque en, cerca o
cerca de fuentes de calor, como una chimenea, estufa, radiador, etc. No lo deje a la luz
directa del sol.
•Use solo en un área bien ventilada donde el vapor y el calor puedan escapar y disiparse.
•No exponga su piel al vapor que se escapa durante la cocción. El vapor está muy caliente
y puede causar quemaduras.
•Antes de enchufar la cocina en una toma de corriente, asegúrese de que la misma tenga el
mismo tipo y nivel de energía que el dispositivo.
•Desenchufe esta cocina de la fuente de energía cuando no esté en uso y antes de
limpiarla.
•Tenga cuidado para evitar daños en el cable de alimentación. No permita que se enrosque,
pellizque, camine o se enrede con otros cables. Asegúrese de que el cable de alimentación
no presente un peligro de tropiezo.
•Nunca desenchufe la cocina tirando del cable de alimentación. Siempre agarre la cabeza
del conector.
•Inspeccione y limpie la válvula de límite de presión y suelte la aguja de la válvula antes de
usar.
•No abra la tapa mientras la válvula de flotador está arriba. Esto indica que todavía existe
presión dentro de la cocina.
•No toque la tapa, la válvula de límite de presión o la válvula de flotador durante el uso.
Espere hasta que la olla se enfríe completamente antes de tocar estas partes.
•No mueva la cocina sosteniendo la manija de la tapa. Utilice las asas en el lado del cuerpo
en su lugar.
•Tenga mucho cuidado cuando mueva la cocina mientras contenga líquidos calientes.
•Asegúrese de que haya un mínimo de 2 tazas de líquido en la cocina para mantener la

presión.
•Asegúrese de que la tapa esté completamente instalada y debidamente sellada antes de
usarla.
•No use la cocina sin la tapa firmemente instalada, excepto cuando use la función Sauté.
•No abra la olla a presión hasta que se haya enfriado y se haya liberado toda la presión
interna.
•Nunca llene la olla con alimentos y / o líquidos por encima de la marca 4/5. Para alimentos
que se expanden durante la cocción, como frijoles o arroz, no llene más allá de la marca
3/5. Nunca intente cocinar con alimentos y / o agua por debajo de la marca 1/5.
•No use la olla de cocción en ningún lugar, excepto dentro de la olla. No lo coloque en una
estufa o en un horno. No almacenar en el refrigerador.
•El tiempo máximo de calentamiento es de 24 horas, sin embargo, se recomienda no
exceder las 6 horas para garantizar el mejor sabor para su comida.
•El tiempo máximo del temporizador preestablecido es de 24 horas.
•Esta cocina no tiene partes reparables por el usuario. No intente abrir, reparar o modificar
la cocina.
•Esta cocina solo debe ser operada por adultos calificados. Los niños deben ser
supervisados para asegurarse de que no jueguen con este aparato.
CONSEJOS DE COCCIÓN A PRESIÓN
•Siempre use al menos 2 tazas de agua u otro líquido en sus recetas. Esto asegurará
que haya suficiente vapor para crear la presión requerida para cocinar.
•Debe usar suficiente comida para llenar la olla interior hasta al menos la marca de 1/5
dentro de la olla. Si usa alimentos que se expanden cuando se cocinan, como frijoles o
arroz, no llene la olla más allá de la marca 3/5. Si usa alimentos que no se expanden, no
llene la olla más allá de la marca 4/5.
•Si no está seguro del tiempo de cocción de su plato, siempre es mejor comenzar con un
tiempo de cocción más corto o utilizar el tiempo de cocción predeterminado. Cocine
durante el tiempo establecido y utilice el método de liberación rápida para liberar la presión
cuando se complete el temporizador. Si la comida no está lista, simplemente comience
otro programa de cocción hasta que esté completamente cocida.
•Cuando cocine arroz siempre enjuague antes de cocinar. Cocer el arroz en agua o caldo.
Diferentes tipos de arroz requieren diferentes tiempos de cocción y proporciones de arroz
a agua. A continuación se muestra una tabla que proporciona recomendaciones basadas
en la cocción de 1 taza de arroz crudo.
Tipo de arroz
Tiempo de cocción (minutos)
Líquido (tazas)
Blanco (grano largo)
4-5
1 ½
Blanco (grano corto)
6-8
1 ½
Marrón (grano largo)
10-18
1 ½to 2
Marrón (grano corto)
12-20
1 ½
Arroz Salvaje
20-25
3-4
Jazmín
4-7
1 ½
Basmati
4-6
1 ½
DESCRIPCIÓN DEL PRODUCTO
1. Válvula de límite de
presión
7. Olla interna
13. Calentador
2. Botón de liberación de
vapor
8. Colector de humedad /
rocío
14. Base
3. Manija de la tapa
9. Manija de la base de
cocina
15. Anillo de sello de goma
4. Lengüeta
10. Cuerpo de cocina
16. Sello de la válvula de
flotador
5. Anillo de liberación de
vapor
11. Cable de alimentación
17. Escudo antibloqueo
6. Tapa
12. Panel de control
18. Válvula de flotación
B
C
D
F
DESCRIPCIÓN GENERAL DEL PANEL DE CONTROL
A. Pantalla de tiempo: muestra el tiempo de cocción restante o el tiempo de inicio
retrasado restante
B. Botón de calentamiento / cancelación: se usa para entrar en el modo de
calentamiento o para cancelar un programa de cocción
C. Botón de inicio demorado: se utiliza para establecer un tiempo de inicio retrasado
D. Botón para disminuir el tiempo: presione el botón para disminuir el tiempo de
cocción o el tiempo de inicio demorado
E. Botón de aumento de tiempo: presione el botón para aumentar el tiempo de cocción
o retrasar el tiempo de inicio
F. Botón de ajuste de presión: ajusta la presión de cocción entre los ajustes
Bajo / Medio / Alto
Manual
Warm
Cancel
Rice
Cake
Soup/
Broth
Heating
Pressure keeping
Delay
Start
Low
Medium
High
Porridge
Eggs
Meat/
Stew
Sauté
Slow
Cook
Pressure
Adjust
A
E

GUÍA DEL PROGRAMA DE MODOS DE COCCIÓN
PROGRAMAS
AJUSTE DE
PRESION
USOS
SUGERIDOS
NOTAS
Rice
Low
1-5 tazas de arroz
Modos basados en
la cantidad de arroz
que se cocina.
Medium
6-10 tazas de arroz
High
11-16 tazas de
arroz
Cake
N/A
Pasteles, muffins,
cupcakes, etc.
Ajustar el tiempo de
cocción en función
de la receta / tipo de
pastel. Modo de
cocción sin presión.
Soup/Broth
Low
Sopa sin carne
El caldo permanece
claro debido a la
falta de ebullición.
Medium
Sopa con carne
High
Sopas/caldos ricos
Slow Cook
N/A
Utilice este modo
exactamente como
lo haría con una olla
de cocción lenta
normal
Modo de cocción
sin presión.
Porridge
Low
Harina de avena
NO use la liberación
rápida para evitar
salpicaduras.
Medium
Gachas/Congee
High
Gachas/Congee
Con Frijoles
Eggs
Low
Huevos pasados
por agua
Los ajustes se
basan en huevos
extra grandes. Use
tiempos más cortos
para huevos más
pequeños.
Medium
Huevos medianos
High
Huevos duros
Meat/Stew
Low
Textura suave
Elija el modo
basado en la textura
deseada de la
carne.
Medium
Textura muy suave
High
Textura mas suave
Sauté
N/A
Cocer a fuego lento,
dorar, saltear
NO cocine con la
tapa adjunta. Modo
de cocción sin
presión.
Manual
Low
Programación
manual según sus
recetas
El tiempo es
ajustable entre 1-99
minutos.
Medium
High
Warm
N/A
Recalentar
alimentos o
mantener calientes
los alimentos
cocidos
El tiempo no es
ajustable.
Funcionará hasta
24 horas.
Table of contents
Languages:


