eoGEAR HIGHBOY BRACKET 2316 User manual

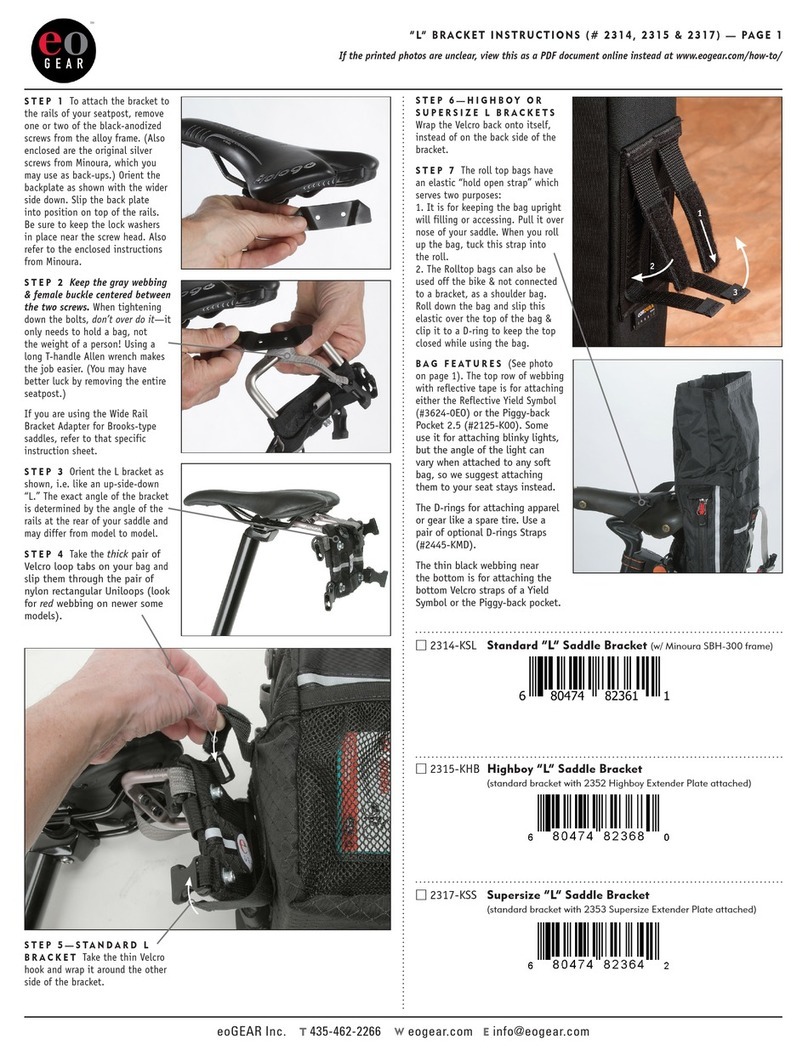
STEP 1
Using the orange
push-button, tilt the backboard
so it angles away from your
saddle. Attach the SKS adapter
to your seatpost as high as
possible. Adjust the webbing on
the adapter so you achieve a
snug fit. Slide the rubber O-ring
so it sits over the loose end of
webbing.
STEP 2 Slip the pair of Velcro
straps up and through the rails of
your saddle and back to the front
of the opposing Velcro on the
backboard.
STEP 3 With the bag upside-
down, s
lip the thick pair of Velcro
loop tabs (soft fuzzy, #1 on DTS
Overview photo), which are sewn
to each bag, through the loops
of the figure 8. Stick it back
to itself (#2 in DTS Overview
photo).
STEP 4
Slip the thin Velcro
hook (the Velcro half with
the tiny sharp fingers) straps
through the row of skinny 10mm
webbing on the backboard.
Then stick both halves of the
Velcro back onto itself (see next
photo for clarity on that).
#2316 HIGHBOY BRACKET INSTRUCTIONS — PAGE 1
PMS 187 red, PMS 424 Gray “o”, Black other text.
oe
GEAR
™
STEP 5 — DTS OVERVIEW
eoGEAR Dual Tab System — Shown
to the right are the steps for
attaching a bag to a bracket (or
piggy-backing a smaller pouch onto
a larger bag).
1. Insert the heavy Velcro loop male
tab through the female webbing
loops or slots found on the bracket
or host bag.
2. Adhere the tab to the back side
of the bag.
3. After slipping it under the skinny
webbing, adhere the thin Velcro
hook to the heavy male tab Velcro
loop tab as shown.
STEP 6 Take the male buckles,
which are part of the “Upside-down
Y Strap” and insert them into the
bottom female buckles on the
backboard (see page 2 to see what
this strap is).
Be sure the male buckle is pushed
all the way through and clear of the
bag, so it is free to slides freely.
STEP 7 Insert the male buckles
from the “Horizontal Compresskion
Strap” to the upper female buckles
on the backboard.
STEP 8 The roll-top bags have
an elastic “hold open strap” for
keeping the bag upright will filling
or accessing.* Stretch over the
nose of your saddle. When you roll
up the bag, stuff this strap into
your roll. After filling the bag, roll
the top opening of the bag towards
the saddle a couple of times. Roll
it more times if you have less gear.
That is beauty of this design—the
bag reduces in size as you add or
remove the contents.
*Some of the 9.3 bags have
a male buckle inside the bag
instead, which is designed to clip
to the bracket achieving the same
purpose.
Attached to this elastic “hold open
strap” is a snaphook buckle. It’s
purpose is when the bag is used off
the bike, i.e. carrying as a shoulder
bag. Roll down the bag and slip
this elastic over the end of the bag
& snap it to a D-ring or webbing
piece to keep the top closed.
eoGEAR Inc. T435-462-2266 Weogear.com Einfo@eogear.com

#2316 HIGHBOY BRACKET — PAGE 2
eoGEAR Inc. T435-462-2266 Weogear.com Einfo@eogear.com
PMS 187 red, PMS 424 Gray “o”, Black other text.
oe
GEAR
™
OTHER ROLL-TOP BAG FEATURES
Hidden inside the zippered pocket is a lanyard with a snaphook, for attaching your keys or other valuable item.
An elastic loop, sewn near the zippered pocket is for stowing a pen or pencil.
CAUTION
RandoBags utilize very tough nylon fabrics, but over time, with the constantly jostling on long rides, sharp objects, like a bicycle multi-tool or an uncapped Presta stem, may
puncture the fabric. We recommend stowing such items in a fabric pouch, like the Do Wrap WrapPack Max (our # 4912-K00).
BIKE FRAME SIZE
If you are using a smaller frame (48–54cm), then we recommend the Angled Saddle Bracket (2321-KAF), the Highboy Saddle Bracket (# 2316-KAF) or as a last resort, the Supersize
Saddle Bracket (# 2317-KAF). See http://www.eogear.com/fit for details.
ROLL-TOP RANDOBAG FEATURES
(the Zippered RandoBag 6.8 has similar features)
The top row of webbing is for attaching the Reflective Yield
Symbol (
3624-0EO). Some use it for attaching blinky
lights, but the angle of the light can vary when attached
to any soft bag, so we suggest attaching them to your
seat your seat stays. You can piggy-back pouches here,
but they will sitting rather high, possibly interfering with
the functionalaity of the roll-top opening.
This row of webbing is the DTS attachment point for
piggy-backing extra pouches onto the outside of the bag.
D-rings for attaching apparel or (with the 6.6) a water
bottle (see website for photos of this). The D-rings Straps
(2445-KMD) are used here.
This narrow piece of webbing is to hook the bottom piece
of Velcro loop (similar to step 4) when piggy-backing
other pouches.
Horizontal Compression strap. You may find it is overkill
and it can be removed.
This row of webbing has open slots for securing the
bottom of the Yield Symbol. These slots are not for the
“upside down Y-strap.”
This pair of webbing loops, which are sewn to the
underneath side of the bag, are for securing the bottom
portion of the “upside down Y-strap.”
These straps (the “upside down Y-strap“) attach to the
the bracket. Tighten down securing before riding so the
bag doesn’t drag on the rear wheel.
6.6 9.3
STEP 10 Clip the top part of the
silver “upside-down Y strap” into
the it’s respective female half found
on the figure 8 (not to the female
buckle as found on some 9.3 bags).
Cinch down very snug with a lot of
pressure, so your bag doesn’t sway.
Be sure to slip any loose ends of
webbing into this “strap keeper” or
“slotted uniloop,” otherwise the
strap might end up in the spokes
of your wheel!
Many of the bags have webbing
loops for attaching a shoulder strap,
for off bike use.
Other eoGEAR Bicycle Accessories manuals
