EPG ER-PACE S User manual
1
Remote Electric Golf Trolley, ER-PACE S
User Manual
EPG Golf
www.epggolf.com
Tel: +1 416-666-9509

2
CONTENTS
Page
1.
Packing List and Parts Glossary
3
2.
Assembly Instructions
5
3.
Operating Instructions
9
4.
Important Safety Instructions
16
5.
Electronic System
17
6.
General Maintenance
18
7.
Technical Specifications
19
8.
Trouble Shooting
20
9.
Frequently Asked Questions
20
10.
One-Year Limited Warranty
22

3
Congratulations on your purchase of the EPG Golf ER-PACE S Remote Electric Golf Trolley. eR-PACE S trolley is
constructed from high-quality, lightweight aluminum alloy and durable polymer components, providing superior
durability. The one-click quick setting design makes it easy to fold and unfold, while the lightweight and sturdy
aerospace-grade aluminum frame ensures that it’s easy to maneuver. The triangle back support design provides
excellent stability, making it a reliable choice for transporting your golf equipment. The remote control allows the
user to have complete control of the trolley. Alternatively, the trolley can also be operated manually with the
speed control knob and on-board control button. The pre-programmed 10/20/30 yards distance control can be
operated at both the remote and handle control panel for added flexibility. To ensure operate the golf trolley
properly, please read these instructions before using your ER-PACE S.
1.Packing List and Parts Glossary
Standard Parts
•1 x Caddy
•2 x Rear Wheels
•1 x Anti-flip Wheel
•1 x Battery Pack (Battery, Bag, Leads)
•1 x Battery Charger
•1 x Tool kit
•Remote handset
•User Guide
•Extras may be included as per the advert statement.
Optional Accessories
•Cup Holder
•Umbrella Holder
•Scorecard holder
•Seat Assembly

4
1.
T-Handle with LED
7.
Bag Support Strap
2.
Manual Rheostat Speed Ctrl.
8.
Frame Lock
3.
Dual Motors/Gearbox Ass.
9.
Lower Bag Support
4.
Anti-flip Wheel
10.
Tracking Adjustment Ass.
5.
Rear Wheels
11.
Battery
6.
Upper Bag Support
12.
Front Wheel
5
2. Assembly Instructions
1.Unpack all items carefully and check everything that has been included. Some extras may be in small
packages so do not throw anything away until all has been checked.
2. Place the frame structure (one piece) on soft and clean floor and ensure that you do not scratch the
frame on a hard surface.
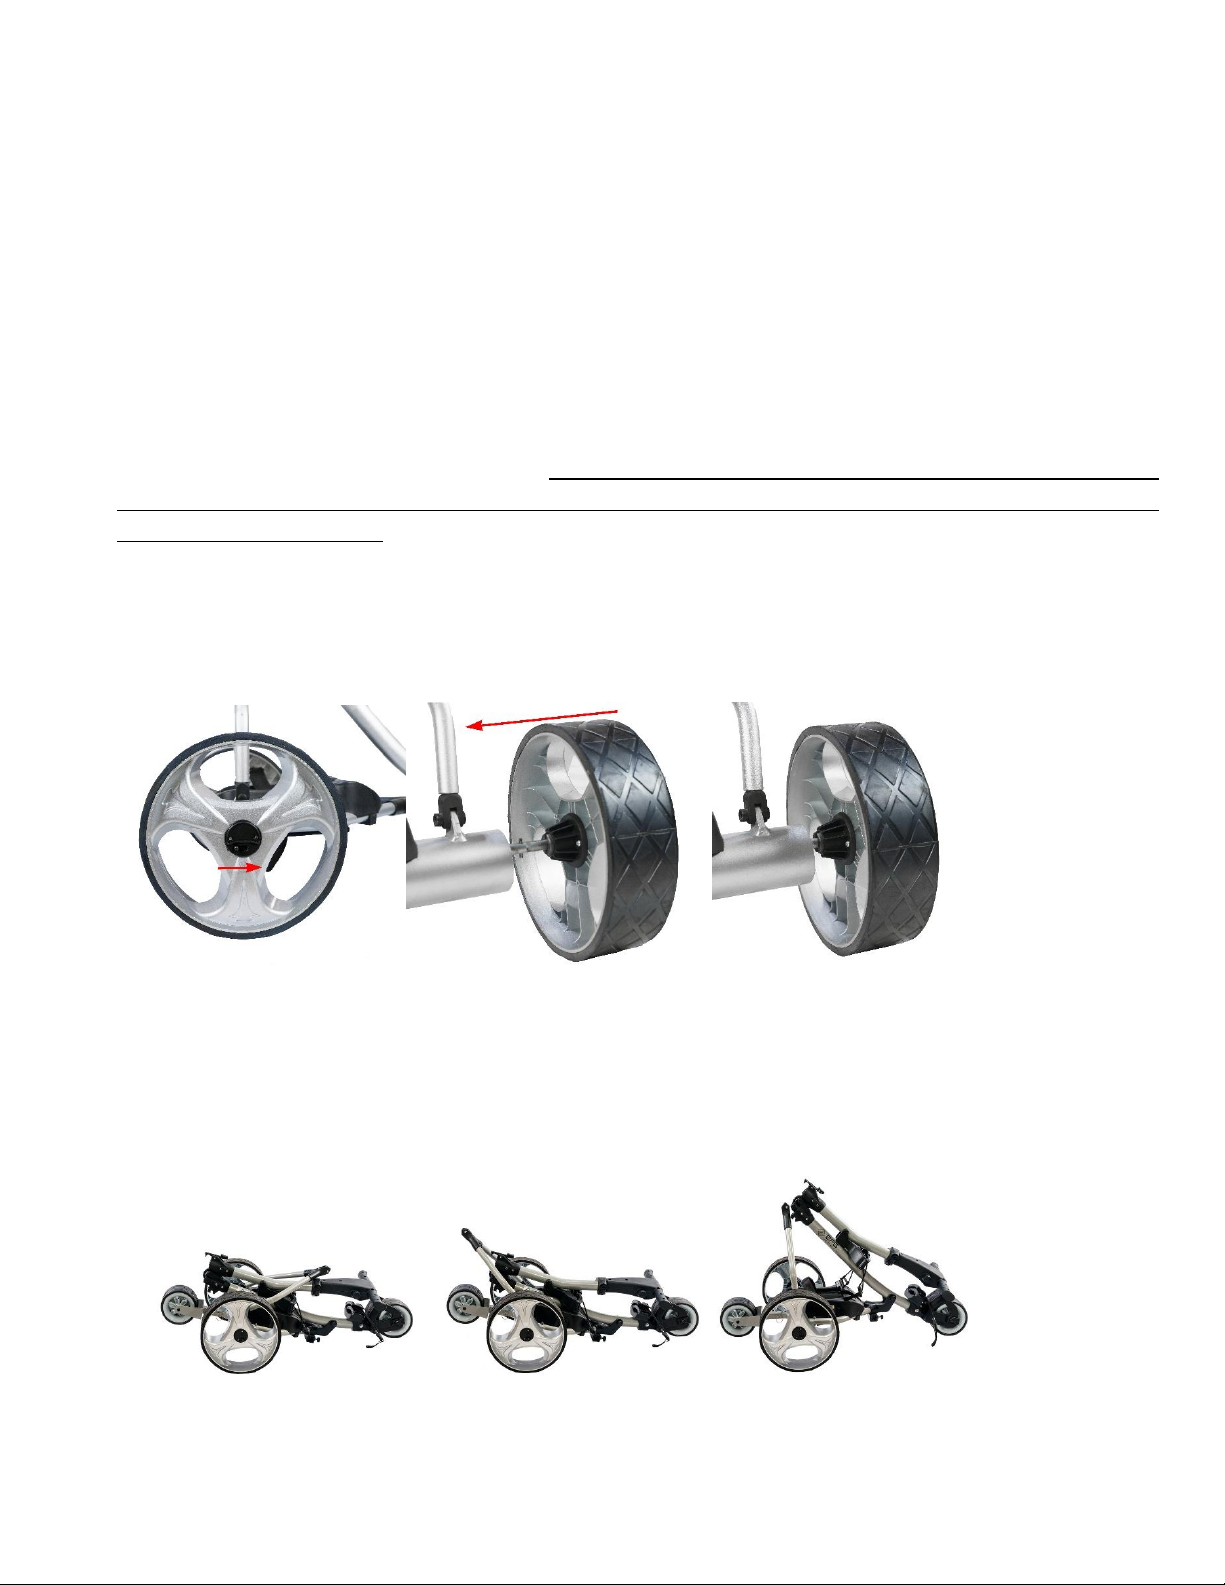
3. Attach the wheels to the axles by pushing the wheel locking button on the outside of the wheel and
inserting the axle extension into the wheel. Make sure to keep the locking button on the outside of the
wheel pushed in during this process, to enable the axle extensions, including the two pins, to be inserted
all the way into the wheel. If not locked in, the wheel will not be connected to the clutch and will not be
propelled!!! Test the lock by trying to pull the wheel out. To disassemble the wheels, proceed in reverse
order. If you feel the wheels are not working, then take them off –switch the power on and if the axle
rotates you will know you have not pushed the wheels all the way in.
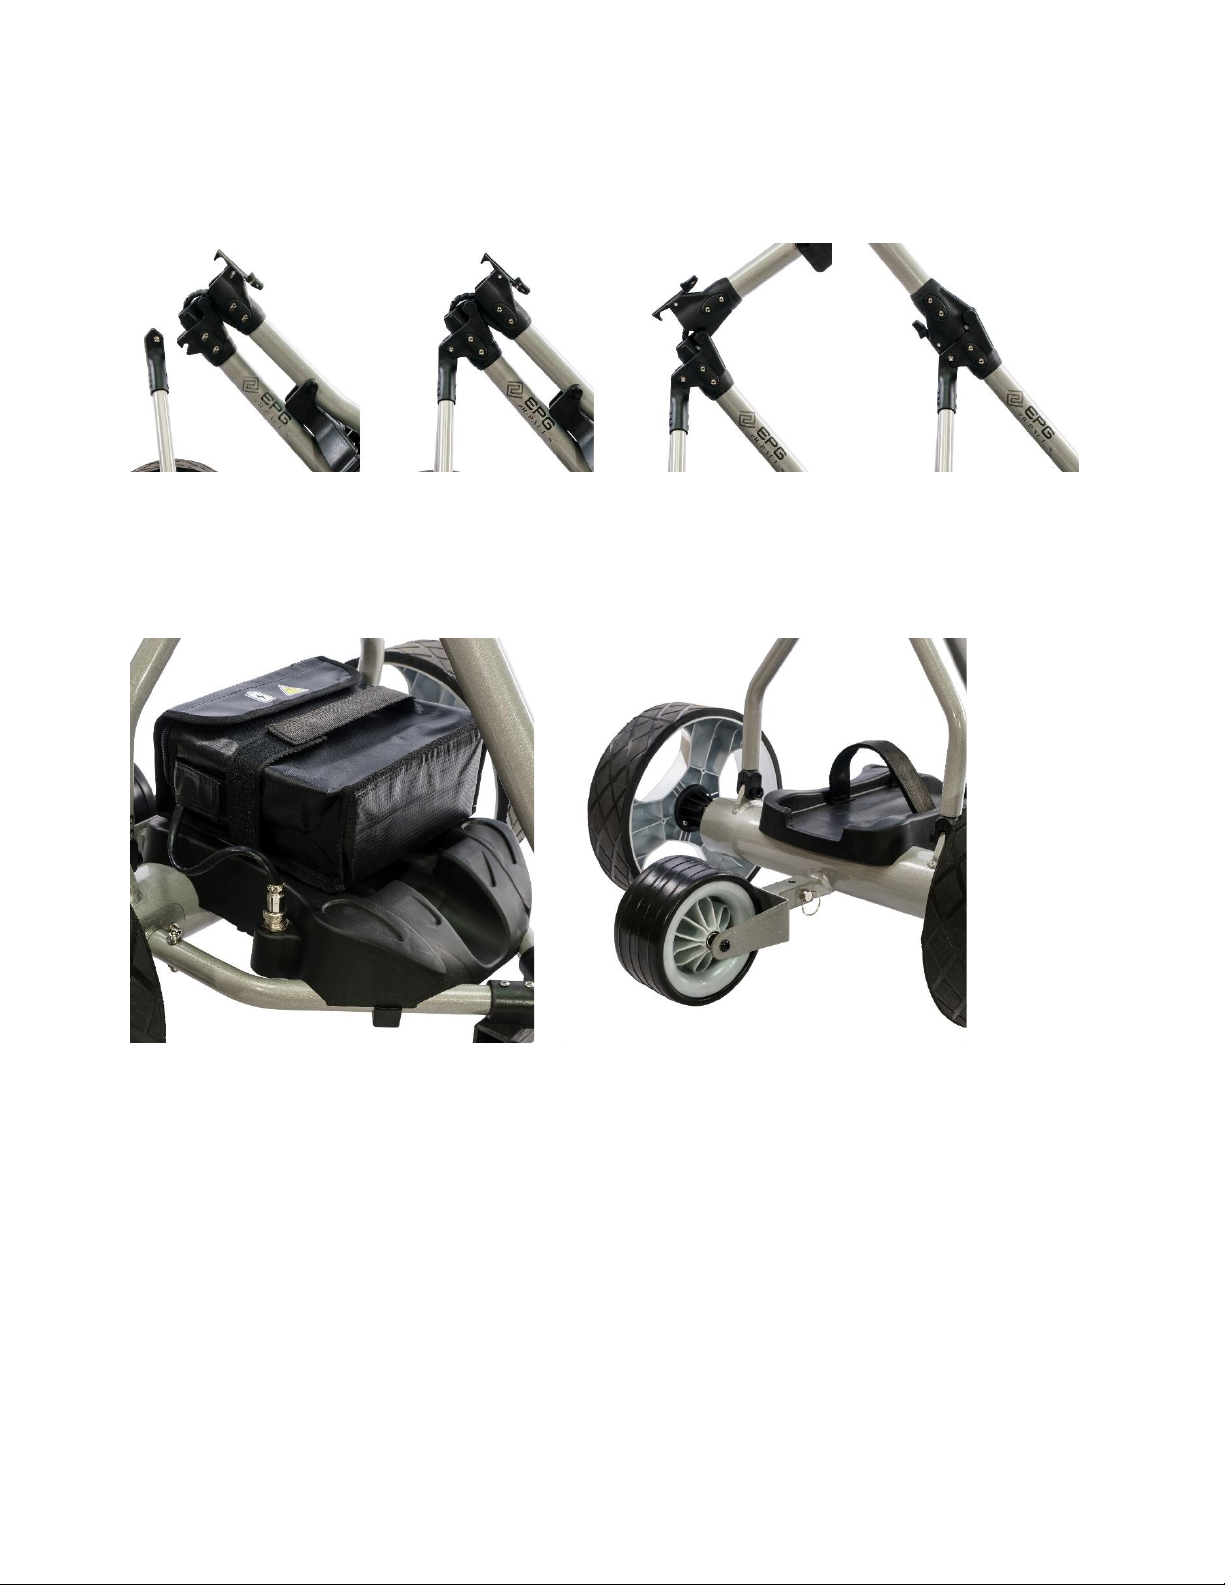
4. Erect the frame by unfolding and connecting the main frame tube together at the joint and locking the Y-
shape lower support structure to the main frame with the frame lock mechanism. Proceed in reverse for
folding the caddy.
6
5. Place battery pack on battery tray and fasten Velcro strap around battery tightly. Insert battery plug into
caddy outlet.
6. Insert anti-flip wheel into frame and secure with pin (or built-in ball pin).
7. Install clamp style Accessories Station on frame and attach Scorecard Holder, Umbrella Holder to
Accessories Station. Attach Beverage Holder to frame.

7
8. Unpack remote control and install batteries as indicated in the diagram in the receiver compartment of the
unit. Now you are ready to learn and understand the function of the manual and remote controls.
8
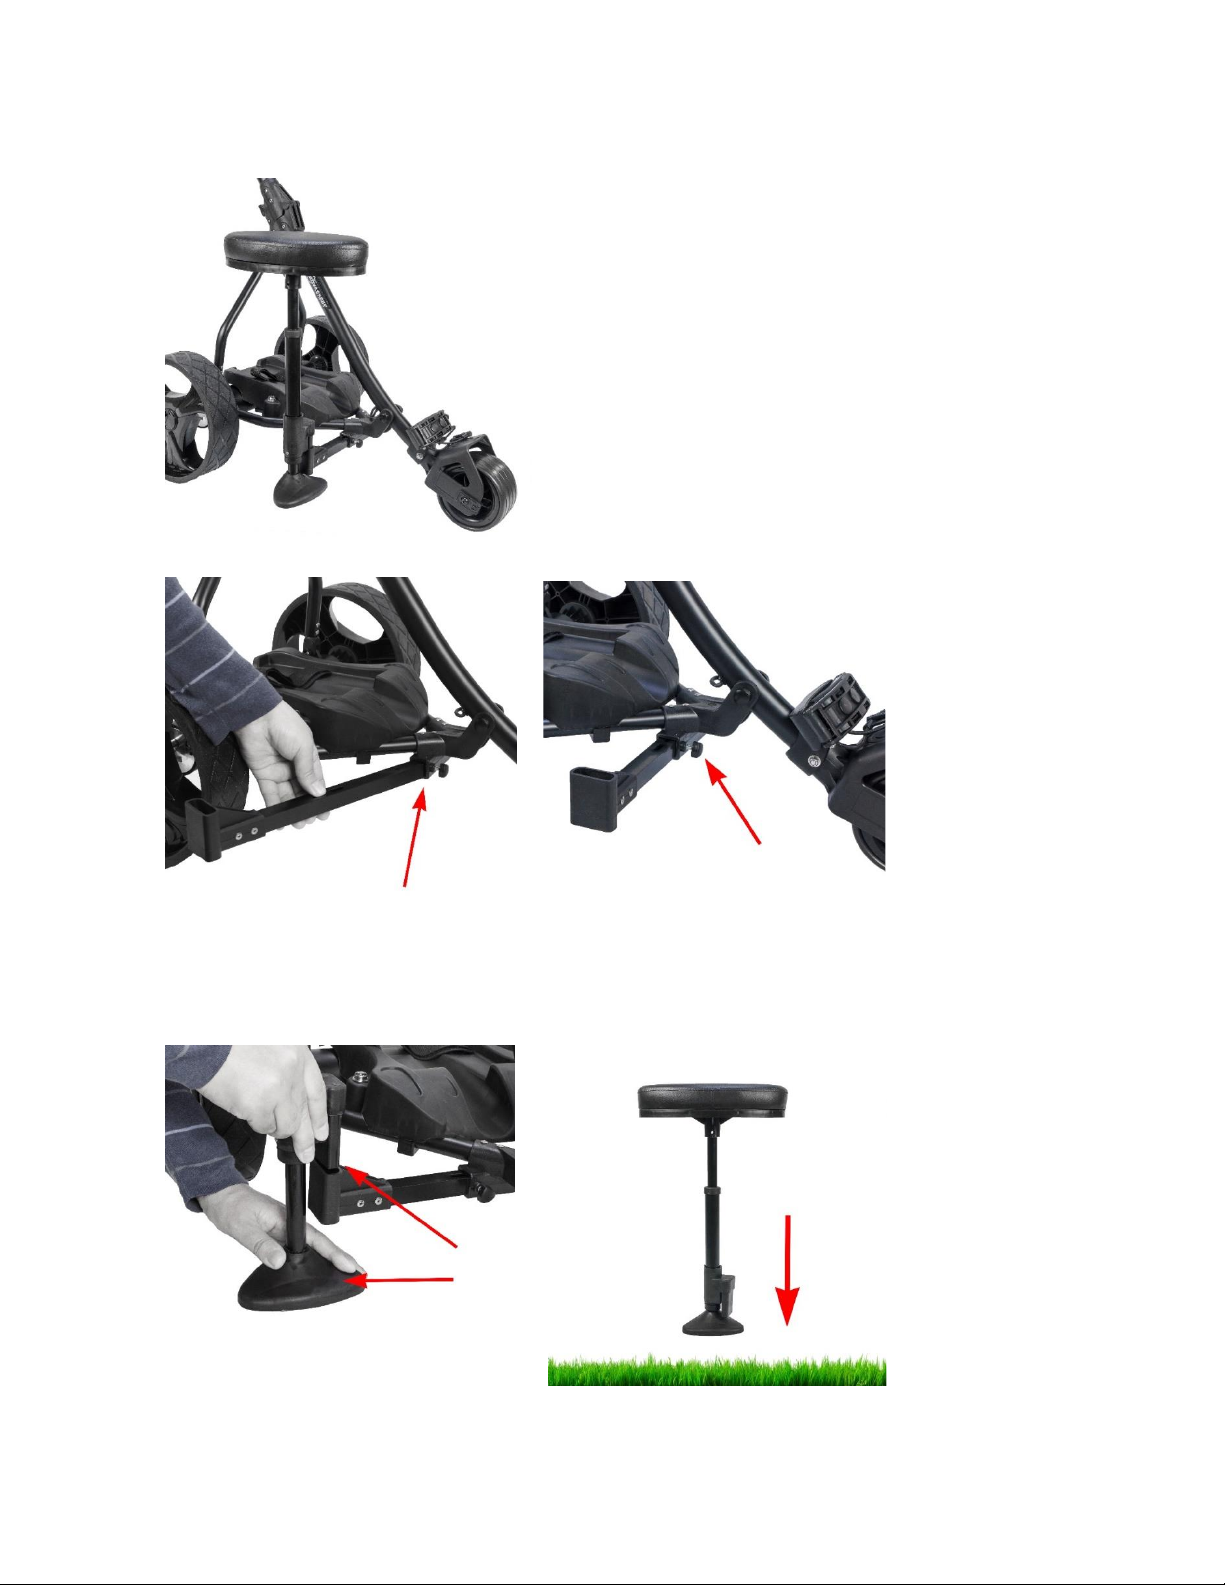
9. Installation of seat (Optional)
9.1 Slide seat bracket bar into seat tube connector at lower frame
9.2. Tight both thumb screws to secure the bracket bar
9.3. Fit seat post into slot on the bracket bar. Hold base of post on the ground and lift the post
connector to slide on to slot.
9.4. Attach seat to top of post. The seat is spring loaded and base is kept off the ground until weight is
applied. When sit on the seat, the base will touch the ground for support.

9
3. Operating Instructions
3.1. T-Handle Function
3.1.1. Power Level.
H (High power): Green Color
MID (Mid power): Yellow Color
LOW (Low power): Red Color
3.1.2. Timer Function (Distance function)
When pressed, the trolley runs 10 sec (roughly about 10 meter/yard) and stops by itself.
When pressed, the trolley runs 20 sec and stops by itself.
When pressed, the trolley runs 30 sec and stop by itself.
10
3.1.3. Cruise and Pause Function:
: One press in order to Pause or Run the trolley. Select the speed to match your pace.
The cart will remember its last setting when you stop, and travel at that speed automatically
when you start again, except when you change the speed knob position.
Power ON/OFF button controls the caddy’s power supply. Press and hold for 2-5
seconds in order to switch the caddy ON or OFF. After you have connected your battery, you
need to press ON, and the battery LED will illuminate. Now your caddy is ready for operation.
3.1.4. Digital Display
Digital display shows the speed level and Timer Function. The speed level is from 1 to 9. Timer
10M/20M/30M function shows as Program a/b/c.
3.1.5. Manual Speed controller
Scrolling of the Manual Rheostat Speed Control knob lets you choose your preferred speed to
suit your space perfectly, and the digital display will show the preferred speed. The speed level
is from 1 to 9.
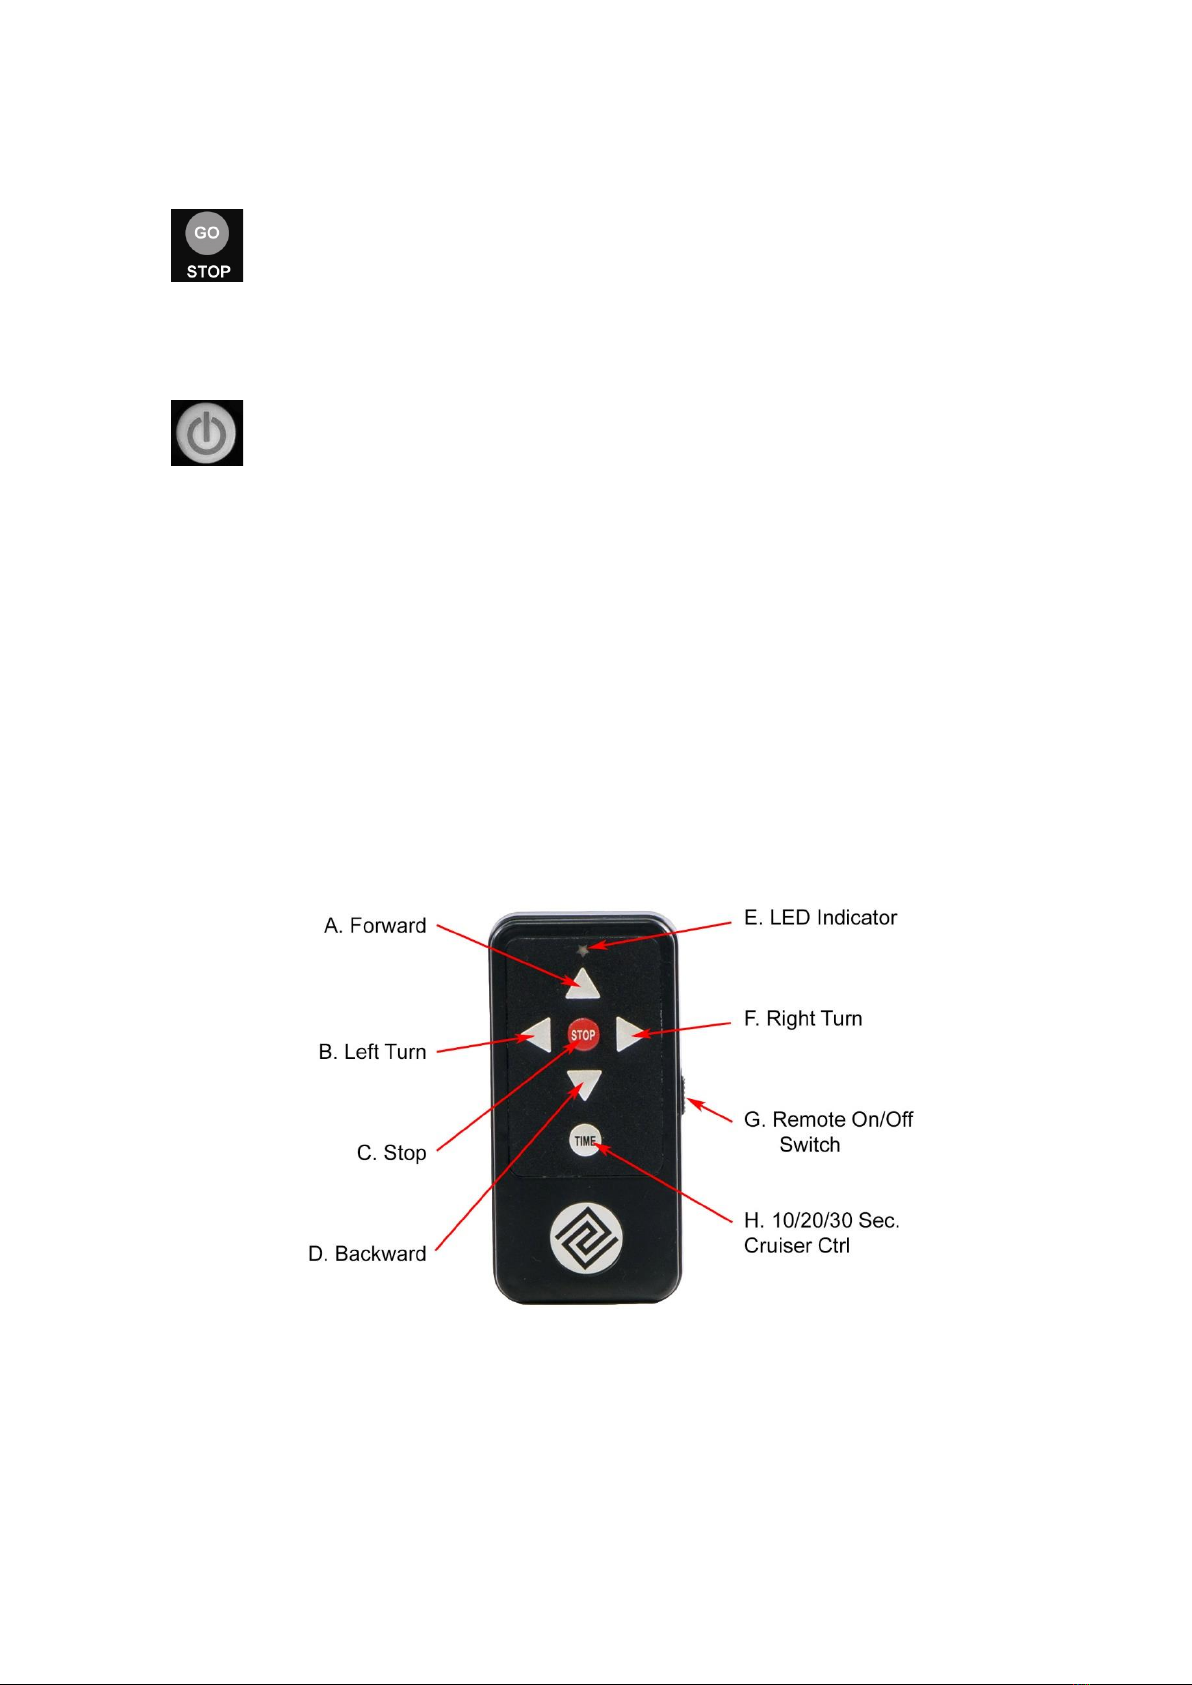
3.2. Remote Control
A. Forward: Press the FWD button will set the caddy in forward motion. Briefly press the FWD
button will increase the speed (press FWD button to decrease speed at backward motion).
B. Left Turn: Initiates left turn. When the button is released, the caddy stops turning and
continues straight with original speed prior to turning.
C. Stop: Stop the caddy from any movement.
D. Backward: Press the BWD button will set the caddy in backward motion. Briefly pressing the

11
BWD button will increase the speed (press BWD button to decrease speed at forward motion).
E. LED Indicator: Remote Control signal indicator.
F. Right Turn: Same as left arrow function
G. Remote ON/OFF Switch: Turn the Remote-Control power ON/OFF.
H. Cruise Ctrl (Timer Function): 10, 20, 30 Seconds moving control (roughly 10, 20, 30
yard/meter) Increase 10 seconds (10 yards) each press. 30 seconds (30 yards) max.
Important Notes:
•Change remote control batteries once the indicator LED gets weak or dim. The remote
control uses 2 x 1.5V AAA batteries.
•The maximum range of the remote control varies between 80-100 yards, depending on the
battery level, obstacles, atmospheric conditions, power lines and topography of the course.
It is strongly recommended to operate the caddy at a maximum range within 50 yards in
order to prevent the loss of control of the caddy!
•Remote Control Connection: This is used to align the caddy frequency with an out-of-tune
or replacement remote control or new control box.
Step 1 - Make sure the power is totally off for at least five (5) seconds.
Step 2 - Hold down the STOP button on the remote.
Step 3 - Power up cart. Continue to hold down the stop button.
Step 4 - Continue to hold down the stop button until the lights on the LED screen blink.
Step 5 - Cart is now in “sync” test each function to assure all are functioning.
3.3. Additional Function
3.3.1. Tracking Adjustment:
The tracking can be adjusted via the adjustment mechanism mounted to the front wheel.
Turning the adjustment thumb wheel DOWN (left and/or right side of the front wheel) to adjust
the alignment to RIGHT direction, tuning the thumb wheel UP to adjust the alignment to LEFT
direction.

12
3.4. Test Caddy
Test caddy power supply by pressing POWER button on T-handle. All power volume lights (Red,
Yellow, Green) should come on and caddy should be operable by both the manual control on
the T-handle and remote control.
Note: Familiarize yourself with the T-handle control and remote-control functions.
Before you start operating the caddy. NOW: Please read and follow the operating instructions
BEFORE you operate the caddy.
3.4.1. Test Environment
First, make sure that you perform your first test of the caddy in a wide and safe area, free of
obstructions or valuables, such as people, parked automobiles, flowing traffic, water body (river,
swimming pool, pond, etc.), steep hills, cliffs or similar hazards.
3.4.2. Manual Control Operation
Turn the main power on by pressing POWER button on T-handle. The manual functions of the
caddy are controlled through the rheostat control knob on the right side of the T-handle. Turn
the knob forward (clockwise) will control the forward movement of the caddy. In order to slow
down the caddy, turn the knob backward (counterclockwise). Push the GO/STOP button any
time to pause or replay the caddy. Turn the knob dead end of backward to stop the caddy
completely. Test “10M”, “20M” and “30M” timer function.
3.4.3. Remote Control Operation
Make sure you are close to the caddy all the time while testing it and familiarizing yourself
with the remote control!
Now turn on the main power of caddy, and make sure the manual speed control knob is in “0”
position (turn it to dead end of backward).
ONE touch of the Forward or Backward Arrow button on remote starts the caddy in either
direction. Further presses increase speed. In order to STOP the caddy, press the round red
STOP button in the middle of the remote. To turn the caddy in either direction, push the Left or
Right Arrow button. Once you release the button, the caddy will continue in the current
direction at the same speed prior to the turning command. You will notice that the caddy reacts
promptly to any turning command, so it will take you some practice to get just the right touch
for turning maneuvers. Please be aware that the turning characteristics will change depending
on the surface (grass or asphalt), the slope or the weight (loaded, unloaded) of your caddy.
The remote is designed to have a reach of approximately 80-100 yards, but we strongly
recommend operating the caddy in closer range of 10-30 yards (do not exceed 50 yards) to be
able to react to any unforeseen events, such as other golfers crossing your path or to avoid
hidden obstructions (creeks, bunkers, GUR, etc.) or a unexpected disconnection in remote
operation.
Automatic stop feature. An additional safety feature of this caddy is that it will stop moving at
remote control mode, if it does not receive a signal from the remote control at least every 25-
30 seconds. This way, should you ever be distracted, your caddy does not get away.
Timer Function. By pressing the lower middle TIMER button on the remote to active Cruise
Control (timer function).

13
3.5. Battery Charging and Maintenance
Please download Battery manual and Charging Instruction from our website at
https://www.epggolf.com/pages/battery-manuals-and-care
3.5.1. Safety Instructions for Battery Use, Store and Charging
Please OBEY These Precautions for Battery use and Charging
oAlways wear protective gear when handling batteries
oUse a wrench with a rubber coated handle.
oDo not place any objects on top of batteries.
oDo not place batteries on a metallic surface.
oCheck the cable is in good condition.
oMake sure all cable connections are properly tightened.
oKeep sparks, flames, and metal objects away from the battery.
oHave a fire extinguisher of the following type: a foam extinguisher, CO2, ABC dry
chemical, powdered graphite, copper powder or soda. (sodium carbonate) on the
premises
oThe battery should be stay inside the fireproof and explosion-proof lithium battery
bag when using, charging, and storing.
oThe battery MUST be securely fastened to the trolley’s battery seat with battery
straps.
oDon’t impact or drop the battery. No longer use the battery, if it has been punctured,
crashed or water damaged.
oPlease do not disassemble the battery or throw it into a fire. EXPLOSION!!!
oNever touch the electric poles of the battery!! Safety hazard!!
3.5.2. Battery Charging Instructions for LFP Lithium Batteries
3.5.2.1. When to Charge your LiFePO4 Battery
If LiFePO4 batteries are not fully discharged, they do not need to be charged after each
use. LiFePO4 batteries do not get damaged when left in a partial state of charge (PSOC).
You can charge your LiFePO4 batteries after each use or when they have been discharged
up to 80% (20% SOC). If the BMS disconnects the Battery due to low voltage, at 100%
depth of discharge, remove the load to reconnect the Battery circuit and charge
immediately. You must use a LiFePO4 Battery charger in order for the BMS to reconnect.
3.5.2.2. Charging Temperature
Lithium Iron Phosphate batteries generate a fraction of the heat of other lithium
chemistries when charging, making them very safe. LiFePO4 batteries can safely charge
between 0°C to 45°C (32°F to 113°F).
LiFePO4 batteries do not require temperature compensation for voltage when charging at
hot or cold temperatures. The LiFePO4 comes with a BMS that protects the battery from
under-temperature and over-temperature. If the BMS disconnects due to low temperature
while charging, the Battery must warm up for the BMS to reconnect and continue charging.
If the Battery disconnects due to high temperature, the BMS will not allow the Battery to

14
recharge until the Battery’s temperature is reduced.
3.5.2.3. Battery Charging Instructions for LiFePO4 Lithium Batteries
•Do not expose the battery to excessive heat or direct sun for long periods of
time.
•Do not leave the battery on the charger for extended periods of time. Do not
overcharge the battery.
•To start charging Lithium battery, connect the battery cable plug to the charger
and then plug the charger into an electrical outlet. It regularly takes about 2-3
hours to fully charge the lithium battery after one 18 holes game.
•During the charging cycle the LED on the charger will show a red steady light
(or blink red/green light). Once the battery is fully charged, the charger’s
indicator will turn into a steady green light.
•Do never drain it. Give it half charging after your last game of season. Store it in
door, dry and cold nonfrozen area. Don’t put it on concrete or metal surface.
Disconnect from equipment and charger. It will be good for long term till next
golf season.
•Never expose or throw the Lithium battery into open fire. EXTREME FIRE
HAZARD
Recommendations:
Similar to a mechanical device that wears out faster with heavy use, so also does the
depth of discharge (DoD) determine the cycle count to Lithium battery. The shorter the
discharge (low DoD), the longer the Lithium battery will last. AVOID full discharges and
charge the battery more often between uses. Please always charge the battery after you
play each game.
Recommendations, Maintenance and Storage LiFePO4 Battery
•Fully charge the battery before the first use.
•Do not leave the battery on the charger. Remove it from the charger after charge is
Completed.
•Never keep your battery connected to the grid during prolonged power outages. It
might be irreversibly damaged.
•DO NOT fully discharge the battery by “overplaying” it. It is recommended to
recharge the battery after every 18 holes.
•Do not strike battery terminals with metallic tools since this can contribute to sparks
and cause subsequent explosions.
•Keep the tops of your batteries clean and check that cables are tight. Do not tighten
or remove cables while charging or discharging. Any spark around batteries can
cause a hydrogen explosion inside, and ruin one of the cells, and you.
•How to Store LiFePO4 Battery: It is common for people to store lithium batteries
during the off-season. When storing LiFePO4 batteries, it is important to store them
properly to ensure they do not get damaged and to keep them at peak performance
for many years ahead. Based on the temperature and length of time, here’s a

15
summary of how to store your LiFePO4 Battery:
· Recommended storage temperature: -5 to +35°C (23 to 95 °F)
· Storage up to 1 month: -20 to +60°C (4 to 140 °F)
· Storage up to 3 months: -10 to +35°C (14 to 95 °F)
· Extended storage time: +15 to +35°C (59 to 95 °F)
It is highly recommended to store lithium batteries indoor during the off season.
Don’t put it on concrete or metal surface. Disconnect from equipment and charger.
It will be good for long term till next golf season.
LiFePO4 batteries have a low self-discharge rate of 2% a month. This means that
when a lithium Battery is stored, it’ll lose 2% of its charge capacity every month. In
order to prevent a higher rate of discharge, we recommend disconnecting all power
draw from your batteries. When you store LiFePO4 batteries, it is important that you
store them with a state of charge (SOC) of 50% or higher. A higher state of charge is
recommended when storing for an extended period of me. If you want the Battery to
retain a good level of charge after the storage period is over, you should charge
them to 100% and store them in that fully charged state.
•Replacement batteries are available from your authorized EPG Golf dealer, or from
EPG Golf directly. You can also order online at:
http://www.EPGGolf.com
3.5.3. Battery Charging Instructions for SLA (Sealed Lead-Acid) Batteries
3.5.3.1. Please do not charge the battery in a sealed container or in upside down position.
It is recommended to charge the battery at a well-ventilated area.
3.5.3.2. Connect the battery cable plug to the charger and then plug the charger into an
electrical outlet.
3.5.3.3. During the charging cycle the LED on the charger will show a red steady light (or
blink red/green light). Once the charging cycle is complete, the red light will turn into a
steady green light.
3.5.3.4. The charging cycle can last up to 12 hours depending on the level of discharge.
3.5.3.5. Normally the battery will hold its charge for several months, and it does not have a
“memory effect”, and therefore can be recharged at any discharge level. It is
recommended to not fully discharge the battery, as this will shorten battery life drastically.
The battery has a normal lifespan of approximately 100-150 charges, depending on
charging frequency, storage conditions, and time and discharge history, which could
reduce this lifetime.
3.5.3.5. In order to prolong the service life of the battery, please AVOID full discharge,
charge the battery after every use and KEEP THE BATTERY FULLY CHARGED. When the
battery is not in use for an extended period of time, it is recommended to charge the
battery once a month.

16
3.5.3.6. Before storing a battery for extended periods of time you must fully charge it.
3.5.3.7. Do not leave the battery on the charger for extended periods of time. Do not
overcharge the battery.
DO NOT store a discharged battery or as it may become unusable. Replacement batteries
are available from EPG Golf or your authorized dealer.
Recommendations and Maintenance
•Fully charge the battery for approximately 5-9 hours before the first use.
•Do not leave the battery on the charger. Remove it from the charger after charge is
Completed.
•The battery will take approximately 2-3 rounds and charging cycles before it reaches
its full operating potential. During the first couple of rounds it might still be below its
optimal power.
•Always keep your battery fully charged before another game.
•Never keep your battery connected to the grid during prolonged power outages. It
might be irreversibly damaged.
•DO NOT fully discharge the battery by “overplaying” it. It is recommended to
recharge the battery after every 18 holes.
•Do not strike lead acid battery terminals with metallic tools since this can contribute
to sparks and cause subsequent explosions.
•Keep the tops of your batteries clean and check that cables are tight. Do not tighten
or remove cables while charging or discharging. Any spark around batteries can
cause a hydrogen explosion inside, and ruin one of the cells, and you.
•Normally the battery will hold its charge for several months, and it does not have a
“memory effect” and therefore can be recharged at any discharge level. It is not
recommended to fully discharge the battery, as this will shorten battery life. The
battery lifespan is depending on charging frequency, storage conditions and
discharge history. Before storing a battery for extended periods of time you must
fully charge it. DO NOT store an empty battery or else it might become unusable.
*Life of sealed lead acid and any other batteries is dependent on a variety of factors,
other than purely the number of charges, including but not limited to, frequency
between charges, duration of charge, level of drainage, idle time, operating
temperature, storage conditions and duration and overall shelf time.
4. Important Safety Instructions
•Be alert and act responsibly at all time while operating your caddy, just as you would when
operating a riding cart, or motor vehicle. We absolutely do not recommend the
consumption of alcohol or any other impairing substances while operating our caddies.
•Do not operate the caddy with the remote control in narrow or dangerous spaces, places
with valuables or any people gathering areas, such as parking lots, close to flowing traffic,

17
bag drop-off areas, stores, driving ranges, putting greens and practice areas, pro shops,
restaurants, and other areas where people or items could be harmed through an error or
lack of skill in operation. In such situations the caddy should be best operated with its
manual controls or free-wheeling model (power off). Also, please make sure to always
turn the power off and secure the caddy when you park and leave the unit for any reason,
either on or off course.
•With its optimized balance and straight front wheel the caddy has extraordinarily narrow
and responsive turning and maneuvering abilities. However, it sometimes tends to react to
severe uneven weight distribution of its load or steep slope variations and follows the slope
of the golf course. Therefore, please make sure the weight in your bag is distributed evenly
(move heavy balls and items to both sides, or shift the bag on the caddy). Also, when
operating your caddy by remote control anticipate the slope of the course in order to avoid
frequent corrections in directions. In some extreme environments, such as very uneven
terrain, steep hills, narrow and/or sloped cart paths, muddy areas, gravel paths, close to
bunkers and hazard, around bushes and trees, it is recommended to operate the caddy via
manual control in order to prevent any collisions, damage or the need for complicated
correction adjustment maneuvers.
5. Electronic Systems
•Remote control Range: We recommend not to exceed 50 yards distance. The greater the
distance between you and your caddy, the greater the chance of losing contact with it.
•Microcomputer: The remote caddy has 3 microcomputer controls. The 1st one is in the
main controller box. The 2nd one is in the remote-control transmitter handset, and the 3rd is
in the receiver in the handle.
•Safety Protection: When the temperature of the controller box reaches its upper limit in
case of an overload, it will automatically shut down to cool off. Give the caddy a short time
to cool down, then you can run it again. You can still use free-wheeling model (power off)
to push the cart and keep your game run.
•Microprocessor Controlled Electronics System: When you connect the battery, the
electronics system will automatically run through a start-up routine. Then you can press
the main power on the T-handle turn the power ON. The battery level indicator lights will
show you the battery level. All lights ON (Green + Yellow + Red) means highest battery
level. Both Yellow and Red on means middle battery level. Only Red on means low battery
level.
•Important: The electronics controller box contains no user serviceable parts. Therefore, it
is sealed to reduce the risk of moisture entering and impacting the electronic system.
Breaking this seal increased the risk of damaging the electronics and decreasing the
reliability of your caddy. DO NOT attempt to open the controller case.
•Battery Operation and Care: Follow battery charge and maintenance instructions at section
3.5.
Note: EPG Golf reserves the right to modify/upgrade any components during a model year, so
Illustrations on our website, brochures and manuals may slightly vary from the actual product

18
shipped. However, EPG Golf guarantees that specifications and functionality will be always equal
to or better from the advertised product. Promotional accessories may also vary from
illustrations shown on our website and other publications.
6. General Maintenance
The steps below will ensure that you get a prolonged and reliable life out of your golf trolley.
•The Caddy has been designed so that the user can concentrate on playing golf, whilst the
caddy does the work of carrying your bag. In order to keep your golf trolley looking at its
best, we advise that you wipe any mud or grass from the frame, wheels and chassis after
every round with a damp cloth or paper towel.
•Do NOT use any high-pressure jet washers to prevent moisture entering the electronic
systems, motors or gearboxes of the caddy.
•Remove the rear wheels every few weeks and remove any debris that might cause the
wheels to drag. You might also apply some lubricant, such WD-40 to keep moving parts
smooth.
•Inspect your cart at least once a year thoroughly, please contact our customer service if
there are any problems.
•Always disconnect the battery when you store the caddy, and always reassemble your
caddy before reconnecting the battery. If you are not planning to play for at least a month,
store the battery in a cool and dry place (not on concrete floor or metal surface) DO
NEVER leave battery on charger.
All of these recommendations will help keep your trolley in top condition and ensure that it
remains your reliable partner, both on and off the course.

19
7. Technical Specification
Control
Remote control up to 120 yards
Forward, Backward, Left Turn, Right Turn, Stop in 9 speeds.
Timed advance function: 10, 20 and 30 meter/yard Automatic
forward cruise.
Manual control
Motor
2 x 200W (400W) 12V DC motor
Drive Train
Rear Wheel Drive, Dual Stainless-Steel Gears & Gear boxes (17:1
ratio)
Dual independent transmission
Speed
Max. 8km/hr (5 MPH), 9 speed adjustable
Distance/Range per battery
charge
20km (12.5 miles)
Climbing Capability
30º
Max. Load
40kg (88lb)
Battery and Charger
Power: 14V20Ah LFP Lithium or 12V35Ah SLA battery
Charge AC adapter: 110~240V, 50/60Hz
Weight
9.2 kg (20lbs) without battery
12.4 kg (27lb) with LFP Lithium Battery
20.4 kg (25lb) with SLA battery
Dimensions
42 x 24 x 39 in. (105 x 60 x 98 cm) Full Size
31.5 x 24 x 14 in. (80 x 60 x 35 cm) Folded Size
Materials
High quality aluminum alloy frame, dual stainless steel gear box,
durable polymer component
Wheels
Airless, rubberized thread
Color
Silver, White and Black

20
8. Trouble Shooting
SYMPTOM
ACTION
Caddy does not have
power
•Make Sure battery is plugged correctly onto cart plug
•Check battery charge level
•Check all wiring connections and plugs
•Depress and hold down power button for at least 5 seconds
•Check main control cable at frame hinge
Motor is running, but
wheels don’t turn
•Check if wheels are secured to axle by split pin
•Check the split pin on axle
•Check wheel clutches
Trolley pulls to left or
right
•Check and make sure the weight in your golf bag is
distributed evenly
•Check if wheels is fitted over the clutch and latched to axle
•Check if clutch pin is visible at both sides of the axle
•Check if the clutch turns freely in one direction only
•Do Tracking Adjustment if need ref. To 3.3.1.
Battery lacks power
•Check cable connections
•Check charger function
•Give a new full charge
•Ensure you have not completely discharged the battery
Problems attaching
wheels
•Make sure you are holding the spring clip down
•Sand and smooth axle with Emery cloth to remove excess
paint or burrs
•Remove outer cap and adjust quick release catch
9. Frequently Asked Questions
Question 1: I lost my remote control handset. What shall I do?
Reply: You can purchase a new remote handset from your dealer or from
http://www.EPGGolf.com directly. After you receive your new remote control, ref to 3.2 to
connect the new remote to your trolley.
Question 2: When I connect the battery plug to caddy and turn the main switch on, the
battery indicator lights do not come on.
Replay:
a) Make sure the battery is recharged.
b) Check the battery lead cable.
c) Open the back of the T-handle with a screwdriver. Make sure the T-handle line plug is
in the right position on the handle electronic board. It will happen when the line of the
caddy is not connected at correct position in security.
Question 3: The caddy’s main power is on, and all battery indicator lights are on, but the
Table of contents


