Epifani UL 901 User manual

UL 901
Bass Amp

Thank you for purchasing a UL 901 Bass Amp, and welcome to the Epifani family! You are about to experience
Legendary Sound. We hope you love it.
Being an Epifani player puts you in the company of some of history’s most inuenal bassists. Aer all, it
was their invaluable feedback that helped Nick Epifani design every amp, combo, and cabinet down to the
smallest detail. Over the past 23 years, we’ve been making bass gear in cooperaon with legends like Anthony
Jackson, Oteil Burbridge, and Ron Carter, just to name a few. Our relaonship with them has shaped the Epifani
experience you’ll have today and in the future.
Your UL 901 is as much a piece of hand-craed, Hi-Fi studio gear as it is a rugged, road-ready bass amp.
Every detail has been meculously engineered to ensure you’re able to dial in exactly the sound you want in any
playing situaon.
Less is more
When dialing in your perfect tone, keep in mind just how powerful the UL 901’s controls are. Nick recommends
making small EQ shis at rst. When it’s set at, the amp will produce a precise aural picture of your bass,
strings, and hands. You might nd that just a small adjustment brings your perfect tone into focus in most
playing situaons.
We also recommend that you experiment with cung the bass, mid, and treble just as much boosng them.
Somemes the shortest distance between you and your perfect tone is taking out a lile of the boom caused by
a hollow stage, or the bark of a bass with too much gain from the bridge pickup.
We want you to have an incredible Epifani experience. So, if there is anything at all we can do to help,
please feel free to get in touch any me. You can reach us online at www.Epifani.com/support or over the phone
at (888) 925-3781.
Thank you. And, have fun!
- The Epifani Team
Safety Information
Welcome and Thank You
/Epifaniamps
@Epifaniamps
@Epifaniamps

Safety Information
1. Read these instrucons.
2. Keep these instrucons.
3. Heed all warnings.
4. Follow all instrucons.
5. Do not use this apparatus near water.
6. Clean only with a dry cloth.
7. Do not block any venlaon openings. Install in
accordance with all applicable manufacturer’s instrucons.
8. Do not install near any heat sources such as radiators,
heat registers, stoves, or other apparatus (including
ampliers) that produce heat.
9. Do not defeat the safety purpose of the polarized or
grounding-type plug. A polarized plug has two blades
with one wider than the other. A grounding-type plug has
two blades and a third grounding prong. The wide blade
or third prong is provided for your safety. If the provided
plug does not t into your outlet, consult an electrician for
replacement of the obsolete outlet.
10. Protect the power cable from being walked on or
pinched parcularly at the plugs, convenience receptacles,
and the point where they exit from the apparatus.
11. Only use aachments/accessories specied by the
manufacturer.
12. Use only with the cart, stand, tripod, bracket, or table
specied by the manufacturer, or sold with the apparatus.
When a cart is used, use cauon when moving the cart/
apparatus combinaon to avoid injury from p-over.
13. Unplug this apparatus during lightning storms or when
unused
for long periods of me.
14. Refer all servicing to a qualied service personnel.
Servicing is required when the apparatus has been damaged
in any way, such as the power-supply cord or plug is
damaged, liquid has been spilled or objects have fallen into
the apparatus, the apparatus has been exposed to rain or
moisture, does not operate normally, or has been dropped.
15. Do not overload wall outlets and extension cords as this
can result in a risk of re or electric shock.
16. Never push any foreign objects of any kind into the
openings as they may touch dangerous voltage pointsthat
could result in re or electric shock. The apparatus shall not
be exposed to dripping or splashing and no objects lled
with liquids such as a beverage container should come in
contact with the unit.
17. This apparatus has been designed with Class-I
construcon and must be connected to mains socket outlet
with a protecve earthing connecon (the third grounding
prong).
18. The MAINS plug or an appliance couple is used as the
disconnect device, so the disconnect device shall remain
readily operable.
19. Exposure to extremely high noise levels may cause
permanent hearing loss. Individuals vary considerably in
suscepbility to noise-induced hearing loss, but nearly
everyone will lose some hearing if exposed to suciently
intense noise for a period of me.
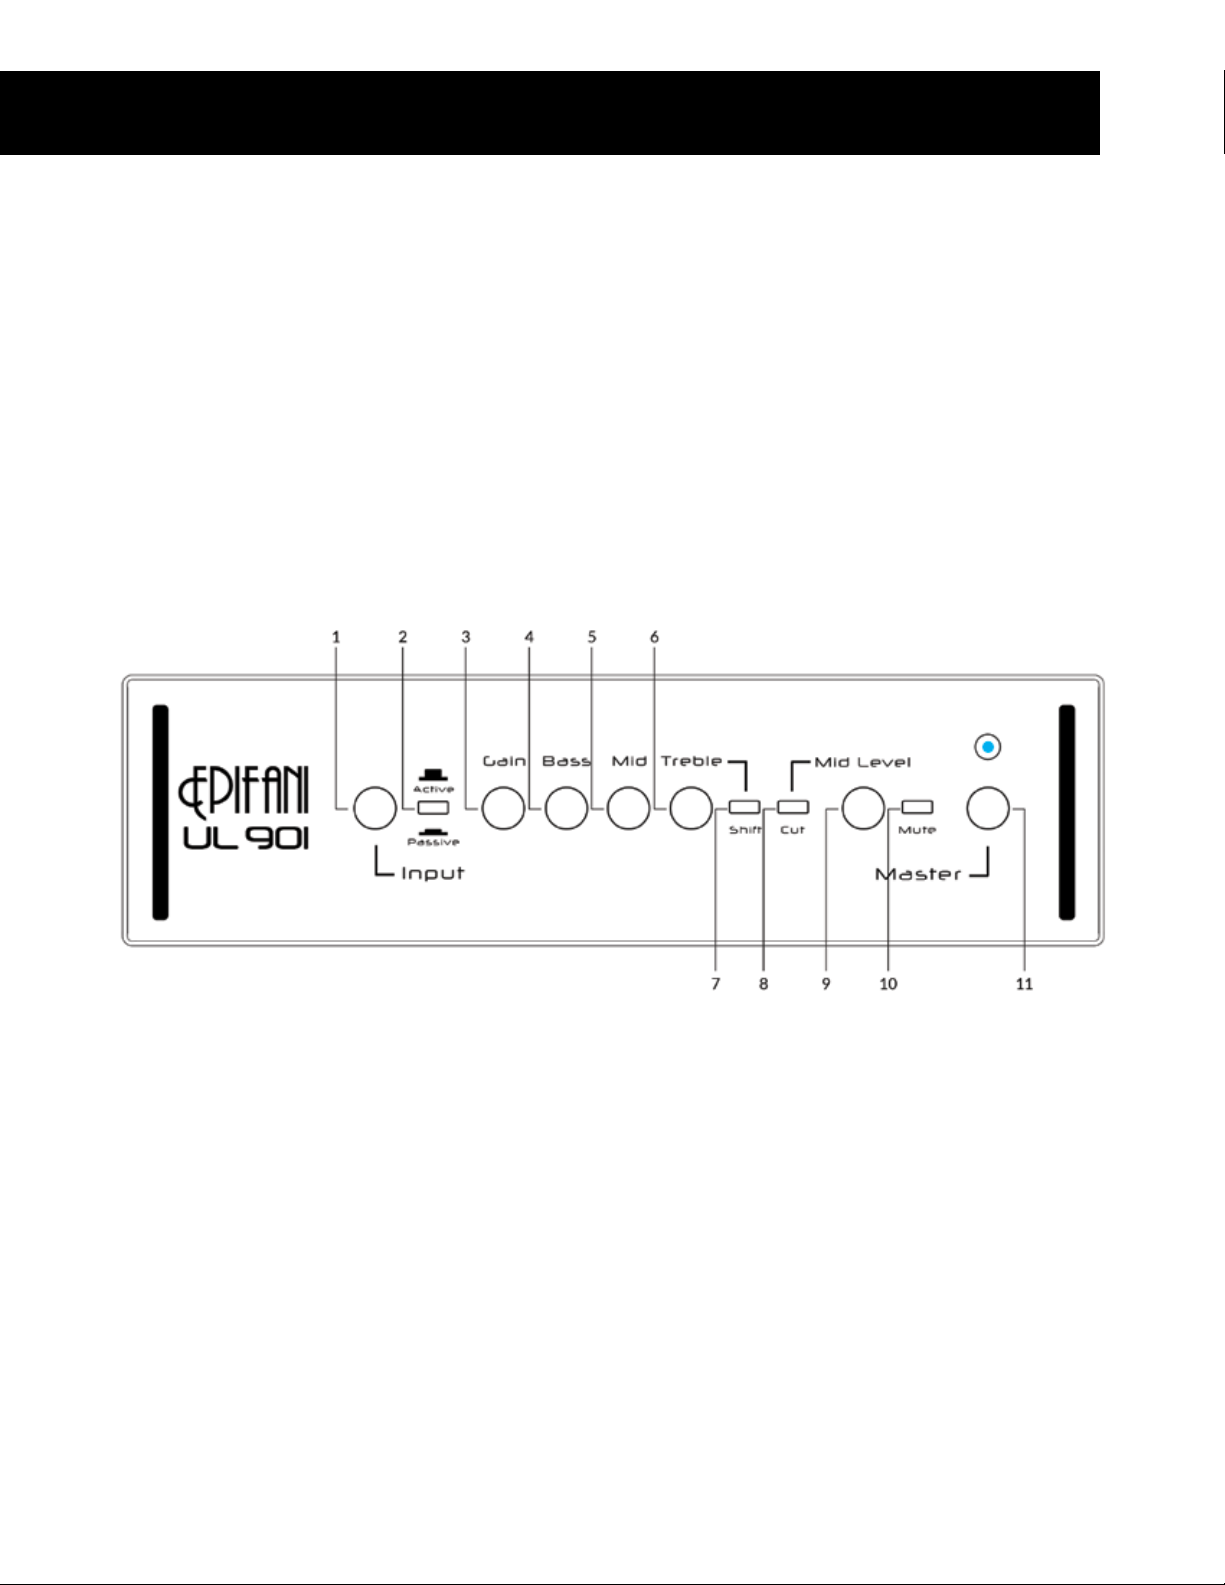
1. Input Jack
Connect your instrument using a standard 1/4 inch
instrument cable.
2. Acve/Passive Switch
Provides a 10 dB cut for acve basses to avoid
unwanted distoron.
3. Gain
Controls the volume of the signal passing through the
EQ stage.
4.Bass
Acve shelving EQ with 22 dB boost @ 40 Hz
5. Mid
Acve bandpass EQ with 17 dB boost @ 450 Hz
6. Treble
Acve shelving EQ with 22 dB boost @ 3 kHz or 6 kHz
7. Treble Shi
Sets the apex for the Treble control to 3 kHz if pushed
in, or 6 kHz if out.
8. Mid Cut Switch
Acvates Mid Cut EQ. Green light is on when acve.
9. Mid Cut Level
Provides up to 8 dB of cut @ 800 Hz. When engaged,
turning the knob all the way to the right (clockwise)
produces no cut. Turning the knob to the le
(counterclockwise) cuts high-mid frequencies.
10. Mute
Mutes the amplier. Red light is on when engaged.
11. Master Volume
Controls the overall volume of the amplier. Other
outputs including the DI, Tuner Out, and
Eects Send are not aected by the Master Volume
control.
Note: The Mute is automacally engaged when you
turn on the amplier so you can set your Gain level
before sending sound through to the speakers.
Front Panel Rear Panel

1, 2. Eects Loop Send and Return
Use a 1/4-inch cable to connect the input of your
eects to the Send jack, and the output of your
eects to the Return jack.
3. Eects Mix
Mix between a dry (unaected) signal and a wet
(eected) signal when using the Eects Loop.
4. Pre/Post EQ Switch
When the switch is engaged (post EQ) DI signal will be
shaped by the acve EQ. When the switch is
disengaged (pre EQ), EQ will not aect DI.
5. DI Level
Adjusts the output level of the DI.
6. Power On/O
Turns your amplier on and o. There is a 2-second
delay as the amplier performs a self-diagnosc.
7. Neutrik Speakon™ / 1/4” Combo Speaker Output
Connect either a Speakon twist-lock speaker cable or
1/4-inch speaker cable.
8. Tuner Out
Connect your electronic tuner via a standard 1/4-inch
instrument cable.
9. Pedal
Use a TRS 1/4-inch cable to connect the oponal foot
pedal. Use the foot pedal to engage/disengage the
Mid-Cut feature and Mute.
10. Ground Li
Disconnects the chassis ground from the DI Output to
reduce 60-cycle hum.
11. DI Output
A balanced, low impedance output. Connect a
standard XLR microphone cable to send a signal to a
mixing console or recording device.
12. Universal AC Power Port
Use the included cable to connect your UL 901 to a
standard power source.
13. T10 AL 250 Volt Fuse
Protects UL 901 from power surges that can damage
the amplier.
Front Panel Rear Panel

Get Ready
1. Before turning your amplier on, always set the
MASTER VOLUME control to the zero posion.
2. Turn your UL 901 on using the power switch located
on the back of the amplier. The POWER indicator
light on the front panel will illuminate.
Note: Upon power-up, the amplier will go through
a self-diagnosc test for about 2 seconds before it is
fully funconal.
Then, the MUTE feature will engage and its light will
be illuminated red. You will also see the PEAK light
illuminate green.
4. Turn the volume controls on your instrument to their
full, or loudest posions.
5. Set the EQ controls (BASS, MID, and TREBLE) to
zero (twelve oʼclock posion).
Set The Gain
6. With the MASTER VOLUME sll set at zero, begin
playing aggressively while turning up the GAIN control.
When the LED light is green there is sll potenal to
increase the gain. When the light starts ashing red,
your input is too hot and your signal will distort.
For the cleanest sound, allow the LED indicator to
ash red intermiently while playing aggressively.
Make Some Noise
7. Disengage the MUTE buon. Itʼs light will turn o.
8. Turn the MASTER VOLUME control clockwise to
the desired listening volume. At this point you should
hear your instrument through the speakers.
Sculpt Your Sound
9. By adjusng the EQ controls, the sound of your
instrument can be shaped in very subtle or very
dynamic ways.
The UL 901 pre-amp is designed to work like the
channel strip of a professional mixing console—a lile
EQ goes a long way.
In fact, many sound engineers start with the EQ in the
at posion and cut rather than boost frequencies to
achieve the desired sound.
They then add gain to make up the loss of volume due
to the reducon in EQ. Cung back is oen preferred
to boosng.
10. The MID CUT level adjusts the amount of mid-
range frequencies that will be reduced when you
engage the MID CUT switch.
This feature actually gives you an addional level of
control as you change playing styles or when changing
your instrument. Itʼs almost like having a second
channel.
Quesons? Visit www.Epifani.com/support and tell us how we can help.
Dialing In Your Sound Warranty Information

SpecificationS
Conguraon
Single Channel Preamp
Class-D Power Amp
Switch-Mode Power Supply
Power Output
UL 901 [750W]
750 Was RMS @ 4 Ohms
UL 901 [1000W]
1000 Was RMS @ 2 Ohms
Voltage
Auto Adjusng Voltage
115 Volts or 240 Volts, 50 or 60 Hz
750 or 1000 Was
Weight
6 pounds (2.7 Kg)
Dimensions
11.25 inches (W) x 10 inches (D) x 3 inches (H)
285 mm (W) x 254 mm (D) x 76 mm (H)
Amplier Response
20Hz - 25kHz
Sensivity
98 dB (1W @ 1m)
Connectors
Input: 1/4-inch TS Phone Jack
Passive: 470KΩ
Acve: 200KΩ
Output: Combinaon Speakon™ and 1/4-inch
Send: 1/4-inch TS Phone Jack 200KΩ
Return: 1/4-inch TS Phone Jack 50KΩ
Tuner Out: 1/4-inch TS Phone Jack
Foot Switch: 1/4-inch TRS Phone Jack
Direct Out: Low Impedance XLR w/ Level Control
Pre/Post EQ: Selectable Switch sets DI Output to
Pre or Post EQ
Tone Controls
Bass: Shelving, +22 dB @ 40 Hz
Mid: +17 dB @ 450 Hz
Treble: Shelving, +22 dB @ 3 kHz or 6 kHz
Mid Cut: -8dB @ 800Hz
Your UL 901 amp is covered under a limited warranty against defects in materials and workmanship for a period
of 2 years. This warranty is non-transferable.
The warranty period starts from the date of purchase from an Authorized Epifani Dealer. Proof of purchase
from an Authorized Epifani Dealer is required for warranty service.
You must obtain a return authorizaon number from an Epifani team member before sending your amp to
Epifani for repair. Please contact us at www.Epifani.com/support. Any product shipped to Epifani without a
return authorizaon number will be refused.
You may be responsible for shipping charges. Epifani is not responsible for shipping damage, either to or from
our service center. Claims must be led with the carrier.
The only company in the US authorized to perform work under this warranty is Epifani located in New York, NY.
Warranty Service may be dierent in your country. Please contact the Epifani distributor in your country for
terms and procedures.
Dialing In Your Sound Warranty Information

www.epifani.com
Table of contents
Other Epifani Amplifier manuals


