Epipole EpiCam V User manual

Digital Retinal Camera
EpiCam V
Please ensure you keep this manual in a safe place.
Read before operating the device.
epiCam V Manual H14 Version 8
24th April 2019

EpiCam V Manual H14 v8 Page 2 of 40
Contents
1Overview ...............................................................................................................5
2Components..........................................................................................................6
2.1 Contents in the box.......................................................................................6
2.2 Overview of epiCam V ..................................................................................7
3Instructions for use ...............................................................................................9
3.1 Setup.............................................................................................................9
3.1.1 Software setup ..........................................................................................9
3.1.2 Connecting epiCam V ............................................................................. 13
3.1.3 Imaging set up........................................................................................ 14
3.2 Imaging ...................................................................................................... 15
3.2.1 Imaging steps ......................................................................................... 15
3.2.2 The capture window .............................................................................. 16
3.2.3 Camera settings...................................................................................... 17
3.2.4 Image capture ........................................................................................ 18
3.2.5 Video recording...................................................................................... 19
3.2.6 Telemetry sensors .................................................................................. 21
3.2.7 Anterior segment imaging...................................................................... 21
3.2.8 Patient comfort ...................................................................................... 21
3.3 Reviewing images and videos .................................................................... 23
3.3.1 Overview of the review window ............................................................ 23
3.3.2 Previewing images and videos ............................................................... 24
3.3.3 Video playback ....................................................................................... 24
3.3.4 Adjusting image settings ........................................................................ 25
3.3.5 Extracting video frames.......................................................................... 27
3.3.6 Exporting adjusted images..................................................................... 28
3.4 Monitor setup............................................................................................ 30
3.5 After use .................................................................................................... 30
3.6 Cleaning ..................................................................................................... 31
4Technical specifications and performance ......................................................... 32
4.1 Intended use .............................................................................................. 32
4.2 Main specifications .................................................................................... 32
4.3 Environment of use.................................................................................... 33
4.4 Software licenses ....................................................................................... 33
5Safety information.............................................................................................. 34
6Product failure, repair and return information .................................................. 38
7Software and manual updates ........................................................................... 38


EpiCam V Manual H14 v8 Page 4 of 40
Notes
1. Please contact your sales representative or local epiCam dealer if you require installation for your instrument.
2. The user is responsible for the use and maintenance of the product. We suggest that a dedicated individual
is assigned responsibility for maintenance to ensure that the product is kept in good condition and can be
used safely.
3. It is unlikely but possible that this product may malfunction due to electromagnetic waves caused by mobile
phones or other radio wave generating devices. Be sure to avoid having objects such as these brought near
to the product.
4. Disposal of this product in an unlawful manner may have a negative impact on human health or on the
environment. When disposing of this product, therefore, be absolutely sure to follow the procedures which
conform with the laws and regulations applicable in your area.
5. Reading of images and storage of data must be performed in accordance with the law of the country where
the product is being used. Also, the user is responsible for maintaining the privacy of image data.
6. The cable supplied is designed to be used solely with this camera. Do not use it for any other product.
7. epipole Ltd reserves the right to change the specifications, configuration and appearance of the product
without prior notice. Updates may be found on the epipole website at http://www.epipole.com
Warnings and cautions
The manual contains warnings and cautions for the safe usage of epiCam V. Please read
these to ensure the safety of both users and patients.
European Union (and EEA*) only
This symbol indicates that this product is not to be disposed of with your household waste,
according to the WEEE Directive (2002/96/EC) and your national law. This product should
be handed over to a designated collection point, e.g., on an authorized one-for-one basis
when you buy a new similar product or to an authorized collection site for recycling waste
electrical and electronic equipment (EEE). Improper handling of this type of waste could
have a possible negative impact on the environment and human health due to potentially
hazardous substances that are generally associated with EEE. At the same time, your
cooperation in the correct disposal of this product will contribute to the effective usage of
natural resources. For more information about where you can drop off your waste
equipment for recycling, please contact your local city office, waste authority, approved
WEEE scheme or your household waste disposal service.
*EEA: Norway, Iceland and Liechtenstein
Trademarks
epiCam® and the e logo are trademarked.

EpiCam V Manual H14 v8 Page 5 of 40
1 Overview
The epiCam V is a hand-held retinal fundus camera for veterinary use. It can be used
to take colour digital images of the retina by imaging through the pupil.
The epiCam V has the following features:
•Captures real-time video with the option to freeze and store images on demand.
•Hand-held design which connects to a laptop, tablet or PC and has no internal
battery to charge.
•Can resolve details down to 10μm, supporting early detection of very small
features such as microaneurysms.
•Can correct focus in excess of ± 15 dioptres for pupil sizes above 4 mm.
•May be used for anterior segment imaging without significant adjustment.
•Generates video streams at 14 frames per second
•Images at a wide field angle – the hand-held design allows straightforward
panning and tilting to locate areas of interest.
•Safe, low-power illumination which needs no flash.
epiCam V Software
The epiCam V includes simple software to organise patient records, capture and
review digital images and videos.
Limitations of use
epiCam V should not be used on human patients.
EpiCam V Manual H14 v8 Page 6 of 40
2 Components
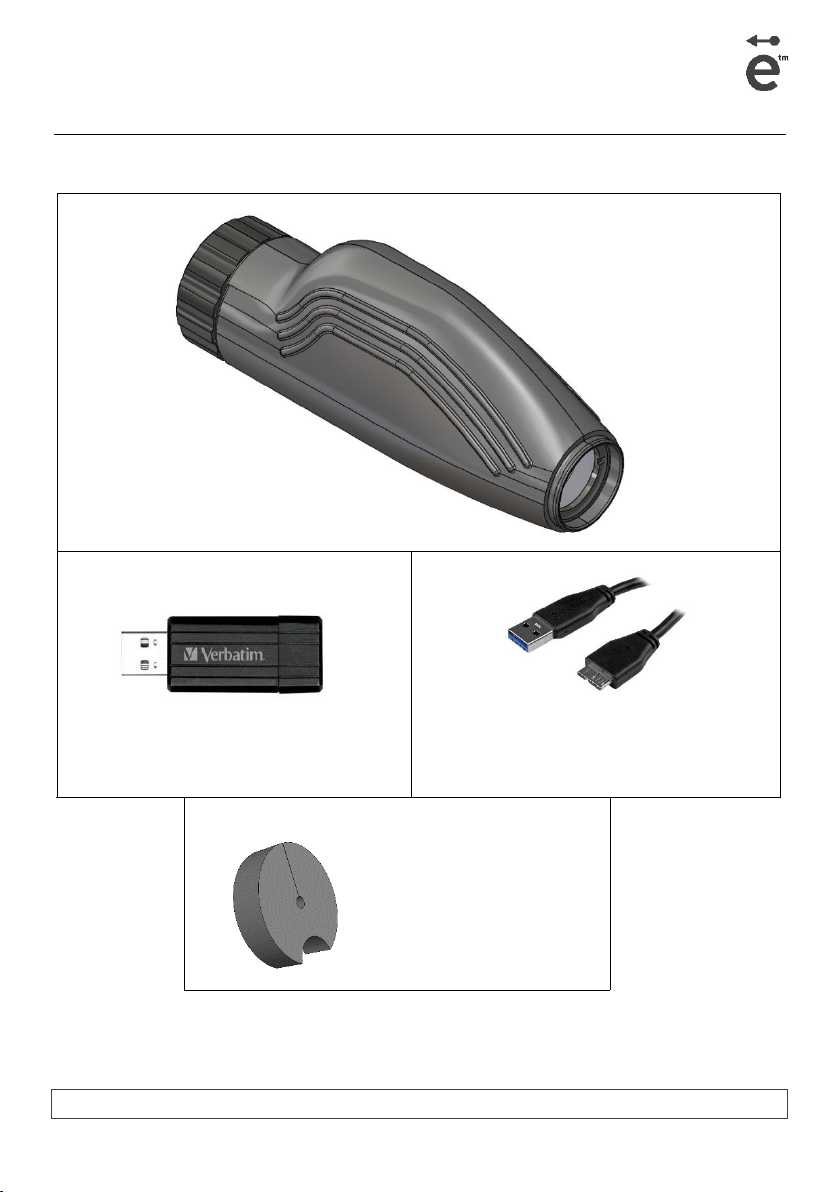
2.1 Contents in the box
EpiCam V
USB drive
Contains the epiCam V software and
user manual.
USB cable
USB 3.0 A to micro-B cable for data and
power.
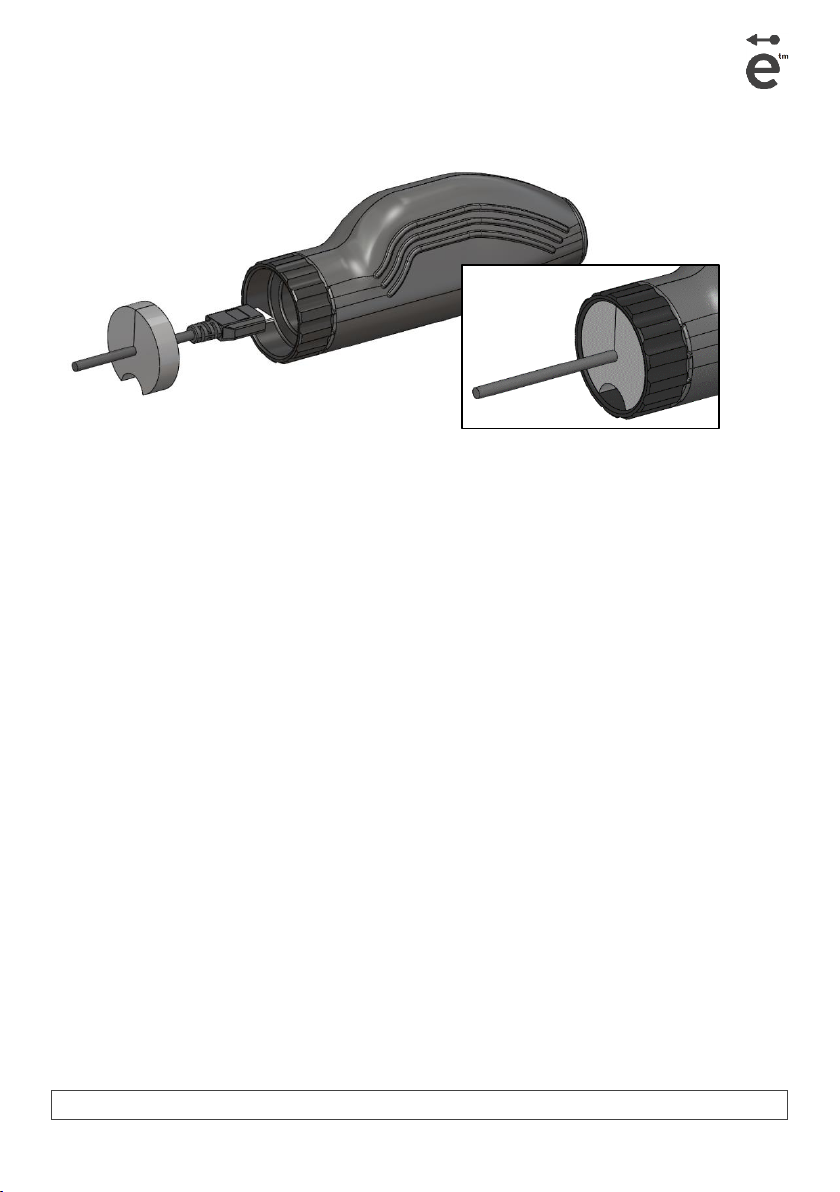
Cable guide
Helps maintain connection if
the cable is pulled. Slide it
onto the cable and into the
Focus Wheel.

EpiCam V Manual H14 v8 Page 7 of 40
2.2 Overview of epiCam V
To focus epiCam V, rotate the black focus ring anti-clockwise for myopic and clockwise
for presbyopic patient prescriptions. One quarter turn is around 3 Dioptres.
The epiCam V emmetropic setting is found by focussing it on an object 3 metres or
more from the camera objective lens.
Objective lens
Focus wheel
USB port
Status light
EpiCam V Manual H14 v8 Page 8 of 40
A cable guide is included, which helps maintain connection if the cable is pulled. Slide
it onto the cable and into the Focus Wheel.

EpiCam V Manual H14 v8 Page 9 of 40
3 Instructions for use
3.1 Setup
3.1.1 Software setup
System requirements
•A desktop, laptop or tablet PC with a quad core CPU (6th generation Intel Core i5
or higher)
•GPU memory of at least 512 MB
•Graphics hardware that supports a hardware-accelerated implementation of
OpenGL 2.1 or later.
•Microsoft Windows (7, 8/8.1 or 10) or macOS (High Sierra or Mojave)
•At least 4 GB of RAM
•A USB 3.0 port is required for full resolution (2592 × 1944) image capture. If
connected to USB 2.0 the epiCam V will function at a resolution of 1296 × 972.
•At least 70 MB of free disk space for installation, and as much disk space as
necessary for image and video storage. Typical image size is between 4.5 and 6MB
and the typical size of a 30 second lossless video is approximately 700 MB.
•A monitor/screen with at least 1920 × 1080 pixel resolution at 24-bit (or greater)
colour depth
•An Internet connection to visit the epipole website for future software
downloads and support.
Installing the software
•Make sure that you have the necessary permissions to install software,
permission to access a USB drive and a working Internet connection. Contact
your IT support if you require help.
•If you are installing from a non-admin user account then you should start the
install from your own account and then seek administrator support to complete
the install. A password, usually the administrator's, may be required.
•Anti-virus warnings: If you encounter warnings from anti-virus software during
installation, then please temporarily disable your anti-virus software until the
install has been completed. Refer to the instructions for your anti-virus software
on how to do this.
EpiCam V Manual H14 v8 Page 10 of 40
•Insert the USB drive supplied with the epiCam V (or download the latest version
of the software from http://www.epipole.com).
•Locate the required installer (the .exe file for Windows or the .dmg file for
macOS). Run the installer by double-clicking on it and follow the on-screen
instructions.
•For Windows users, the epiCamV Viewer software will be added to your
Windows Start Menu and an icon will be added to your Desktop. For macOS
users the application will be added to your applications folder.
Launching the software
Windows:
macOS:
•Launch the epiCam V Viewer
software.
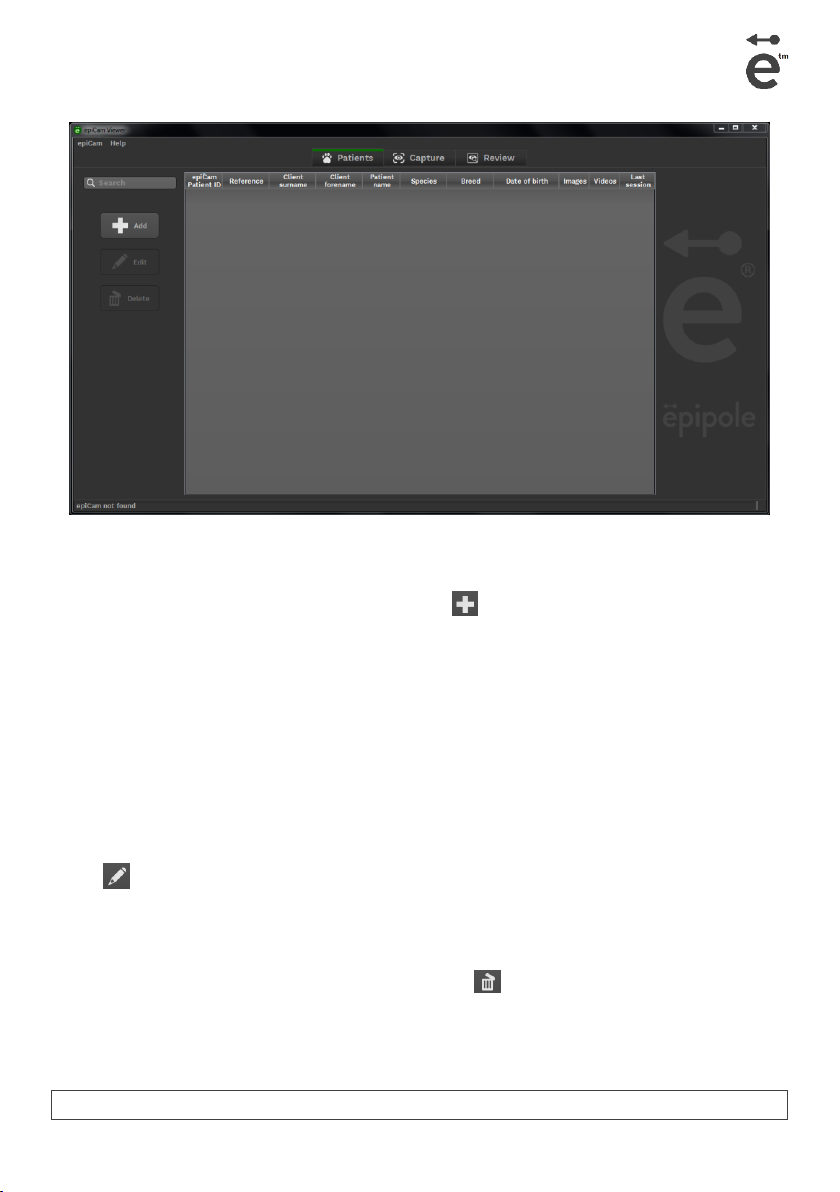
•The Patient Management
window will then open with
an empty patient record list
(see below). This window
allows you to add, edit and
delete patient records.
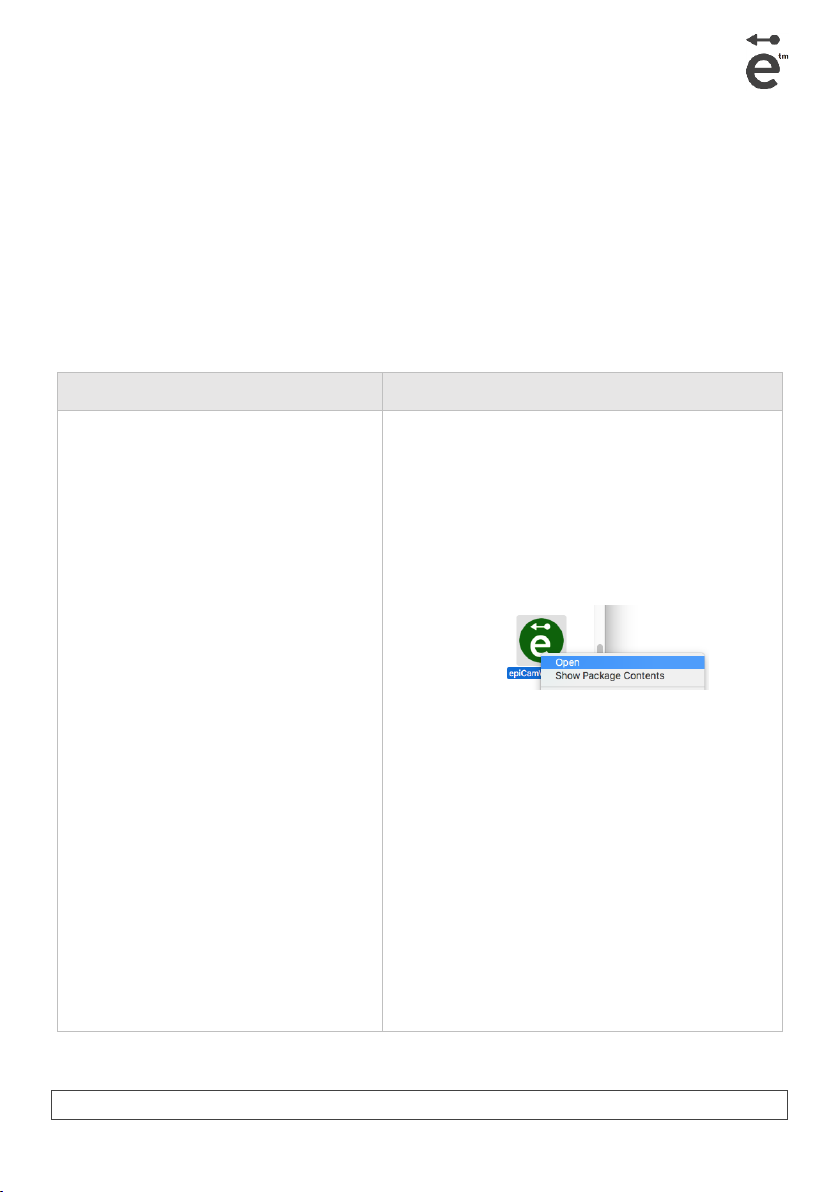
•Launch the epiCam V Viewer
software.
•If you receive a message stating that
the application “can’t be opened
because it is from an unidentified
developer” then right click the
application and select “Open”:
Then click “Open” on the message
asking if you are sure. You will only
need to do this the first time you run
the newly installed software.
•You will be asked to agree to the
License Agreement and to enter your
epiCam V serial code the first time the
software is run.
•The Patient Management window will
then open with an empty patient
record list (see below). This window
allows you to add, edit and delete
patient records.
EpiCam V Manual H14 v8 Page 11 of 40
Adding patient records
Click on the button with the ‘add record’ icon ( ) to add a new patient record. This
allows you to fill out patient details as required. Each patient record is given a unique
epiCam Patient ID by the software which cannot be changed and is also used to label
the folder where that patient's images and videos are stored on your computer.
The Species and Breed fields will provide suggestions as you enter text based on any
previous entries in the patient database. The Reference field is optional for your own
use, e.g. a reference number.
Editing patient records
Select the record you wish to change and click on the button with the ‘edit record’
icon ( ) to change the patient details. This does not make any changes to the
folders where the images are stored on your computer.
Deleting a patient record
Click on the button with the ‘delete record’ icon () to remove a patient record. It is
not possible to undo this action or to restore the patient record. Upon deleting a
record you will be asked to confirm if you wish to remove the associated images and
videos from your computer or not.

EpiCam V Manual H14 v8 Page 12 of 40
Searching patient records
To search for patients enter an appropriate search term in the search box. Use the
clear ( ) button to clear the search results and return to the full listing. You can also
click on the column headers of the listing if you wish to sort the records into
alphabetical or numerical order.
Uninstalling the software
Windows:
macOS:
•Launch the Uninstall epiCamV
Viewer file from the Start Menu
and follow the on-screen
instructions. This will remove the
epiCam V software from your
system.
•Drag the application from the
Applications folder to the Trash
(located at the end of the dock).
NOTE
Uninstalling the software will not remove any of the patient
images and videos which have been stored in your
Documents/epiCamV folder.
Limitations and restrictions
•The software will only operate a single epiCam V device.
•The software product does not encrypt images or patient data stored on your
PC system.
•You, the user, are responsible for safe and secure storage of all data.
•For best viewing it is recommended that the computer screen resolution is at
least 1920 × 1080.
•Make sure your system meets the minimum system requirements. Be aware that
the software may not display the feed from the camera at full frame-rate, or
correctly perform video recording on overloaded or improperly configured PC
systems.
EpiCam V Manual H14 v8 Page 13 of 40
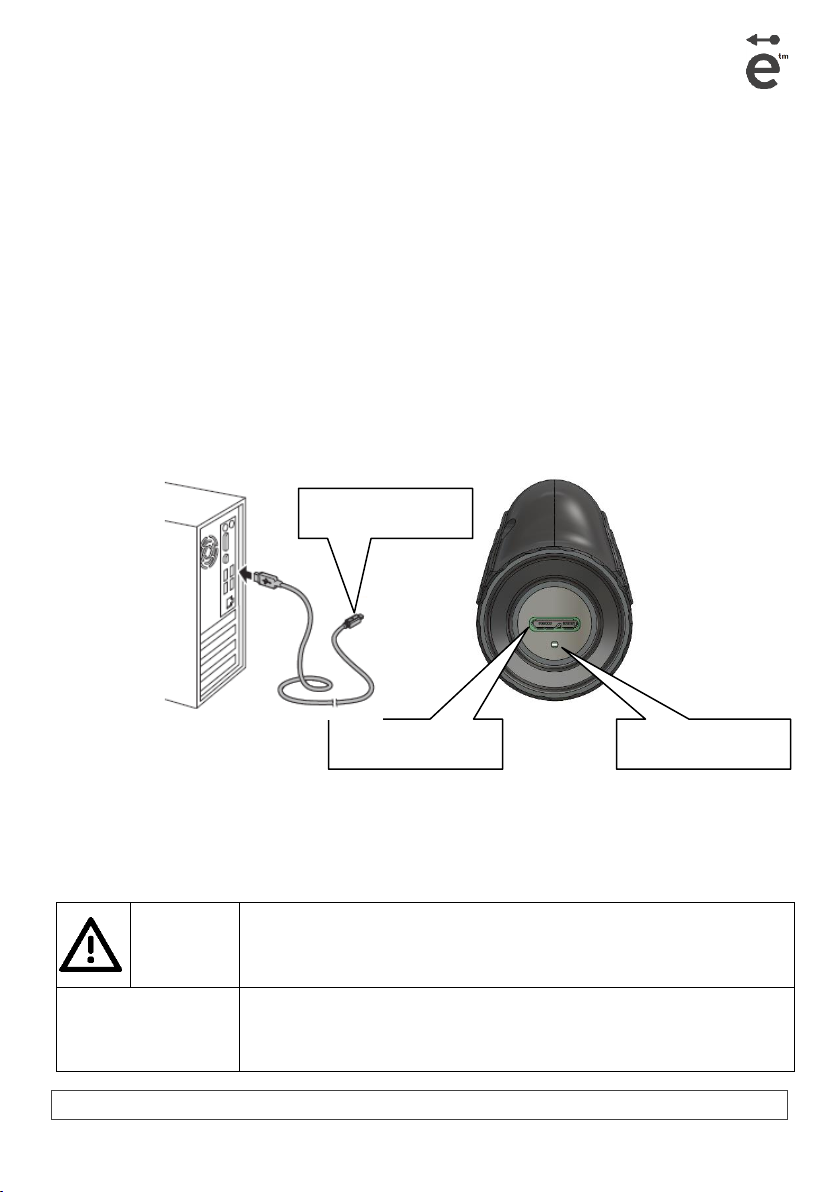
3.1.2 Connecting epiCam V
You must connect the epiCam V to your computer using the USB cable supplied.
Do not touch the objective lens (see Section 2.2 ) whilst connecting or disconnecting
the epiCam V as any dirt, fingerprints, dust, or other foreign objects on the objective
lens could appear as artefacts in captured images.
•Insert the USB cable into the USB port on the epiCam V.
•Insert the USB cable connector into a USB 2.0 or USB 3.0 port on your PC.
Note: epiCam V will operate in full resolution only when connected via USB 3.0
•Windows may automatically install a driver at this point, which may take a few
minutes.
•The Status light will blink when the epiCam V is connected.
Sudden changes in temperature may cause condensation to form on the objective lens
or on optical parts inside the instrument. In this case, wait until condensation
disappears before using the device.
CAUTION
Before connecting or disconnecting the cables, be sure to hold the
epiCam V firmly to ensure safety. Otherwise the main unit may fall
over, causing possible injury.
NOTE
To ensure epiCam V can be detected by your PC, you must only use
cables with a type A to micro-B connector plug supporting USB 3.0,
maximum length of 3 meters.
USB port
Status light
USB cable

EpiCam V Manual H14 v8 Page 14 of 40
3.1.3 Imaging set up
To capture images and videos you must first add a patient record.
To start an imaging session for a patient:
•Open the epiCamV Viewer software.
•Select an existing patient record in the list or add a new record.
•Click on the Capture ( ) tab to go to the capture window. The camera live
view will be shown.
NOTE
Before you begin image capture, please ensure that you have
selected the correct patient record and the correct eye.
Otherwise a retinal image may become associated with the
wrong record or wrong eye.

EpiCam V Manual H14 v8 Page 15 of 40
3.2 Imaging
3.2.1 Imaging steps
Imaging can be performed alone or with support from an assistant.
1. Choose a dimly lit environment
Taking images in a darkened room enlarges the patient’s pupils and reduces
extraneous light, making imaging easier.
2. Reset Focus
At the start of an imaging session you should reset the epiCam V’s focus by pointing
the device at a distant object then bring it into focus by turning the focus wheel
clockwise or anticlockwise.
3. Reset image settings
Set the illumination to a mid-range level and leave the other controls at their
default values (Once you are imaging, further adjustments can be made to the
Illumination, Exposure, Gain and Gamma if required.)
4. Centre the epiCam on the eye
Point the epiCam V at the patient's eye from a distance of approximately 15 cm
and centre it on the pupil. You should be able to see some retina or the optic disc
through the pupil.
5. Move the epiCam in towards the eye.
Slowly move the epiCam V towards the patient while keeping it centred on the
pupil until retinal tissue fills the screen. The correct working distance between the
objective lens and the corneal surface is 13 mm.
6. Fine-tune the focus
Correct focus by turning the black focus wheel until the fine vessels on the retina
you see look sharp. You shouldn’t need to adjust focus for that eye again. One
quarter turn is approximately 3 dioptres. For myopic patients rotate the focus
ring clockwise. For presbyopic patients rotate it anticlockwise.

EpiCam V Manual H14 v8 Page 16 of 40
7. Fine tune the image brightness
First adjust the illumination setting. The camera gain will be adjusted automatically
if auto gain is ON. If necessary, you can turn auto gain OFF and manually adjust the
gain to set the overall image brightness to suit the RPE reflectance (when moving
from imaging the low reflectance macula to the higher reflectance optic disc, the
gain may need to be reduced.)
3.2.2 The capture window
The capture window can be accessed from the Patient Management window by
selecting a patient record and clicking on the Capture tab ( )
An overview of the Capture window is shown below. It consists of three panels:
1. A patient details panel containing the patient information
2. A preview window which shows the camera live view
3. An imaging control panel which is used to control camera settings, capture
images and record video.

EpiCam V Manual H14 v8 Page 17 of 40
The software provides the option to scale the camera live view to fit the preview
window or zoom in and out. Zoom can be performed by rotating the mouse wheel
(many mouse tracker pads are also configured to imitate mouse wheel rotations by
performing a two-finger pinch or spread gesture). Alternatively, the zoom level can be
set at 100%, 150% or 200% using the options in the View menu.
The live view can also be viewed in full screen mode. To access full screen mode, select
“full screen” from the View menu or press the ‘f’ key. To exit full screen mode, press
the ‘Esc’ or ‘f’ key, or click the button with the ‘exit full screen’ icon ( ).
A reticule can be displayed over the camera live view to aid with centralising the image.
The reticule can be shown or hidden using the option in the View menu or pressing
the ‘r’ key.
A full list of keyboard shortcuts for the software can be found in Section 8
3.2.3 Camera settings
The epiCam V has a colour digital image sensor which is sensitive to light and
transforms this information into an image. The capture software provides three
controls which affect the appearance of the image.
Illumination is the brightness of the epiCam V light source. This setting can be used
to adjust the brightness to suit RPE reflectance. If your images appear overly bright,
reducing the illumination will help to reduce image saturation. Once a suitable
illumination level is found you can then fine tune the image brightness using the Gain
control.
Gain is a control to amplify the image information (signal) from the sensor. If your
images are very dark, then by increasing gain, you can amplify the signal from the
sensor and increase the contrast across the image. However, gain settings which are
too high will cause saturation, meaning that the image becomes overly bright. Using
Gain and Illumination in combination provides a wide range of image brightness levels.
Gain can be set to adjust automatically (the default setting) or manually adjusted.
Exposure is the amount of time (in milliseconds) used to capture a single frame. This
is the equivalent of shutter speed on traditional cameras. As you increase exposure,
the sensor is allowed more time to gather light and form the image. However, longer

EpiCam V Manual H14 v8 Page 18 of 40
exposure times are more susceptible to motion artefacts from patient and/or operator
movement.
Gamma allows adjustment of the image intensities such that dark parts of the image
can be made lighter. A value of 1.0 does not apply any gamma adjustment and a higher
gamma value will lighten the darker areas of the image more.
The colour mode of the live imaging can be changed between:
•Full colour
•Green only
•Red only
The green and red colour modes are displayed as monochrome in the live feed. Any
images or videos captured in these colour modes will always be stored in 'full colour'.
3.2.4 Image capture
To capture an image:
•First select left eye or right eye
•Click the button with the camera icon to save the image currently displayed on
screen.
•You may also press the space-bar or the letter 'c' on your keyboard. A foot pedal
configured to simulate the space-bar can also be used to capture an image by
performing a quick press and release on the pedal.
•The image counter will update to reflect the number of saved images for the
session.

EpiCam V Manual H14 v8 Page 19 of 40
You may switch between Left eye and Right eye by clicking on the buttons at the top
of the imaging control panel or by pressing the letter ‘e’ on your keyboard. Note that
you may have to repeat the focusing procedure for each eye by following the steps in
section 3.2.1 .
Images are saved in Portable Network Graphics (PNG) format – a standard image
format using lossless compression (ISO/IEC 15948:2004). PNG images are completely
free from compression artefacts. The image size depends on the image content and is
typically between 4.5 and 6 MB when using epiCam V in full resolution USB 3.0 mode.
Images can be exported to alternative file formats in Review (see section 3.3.6
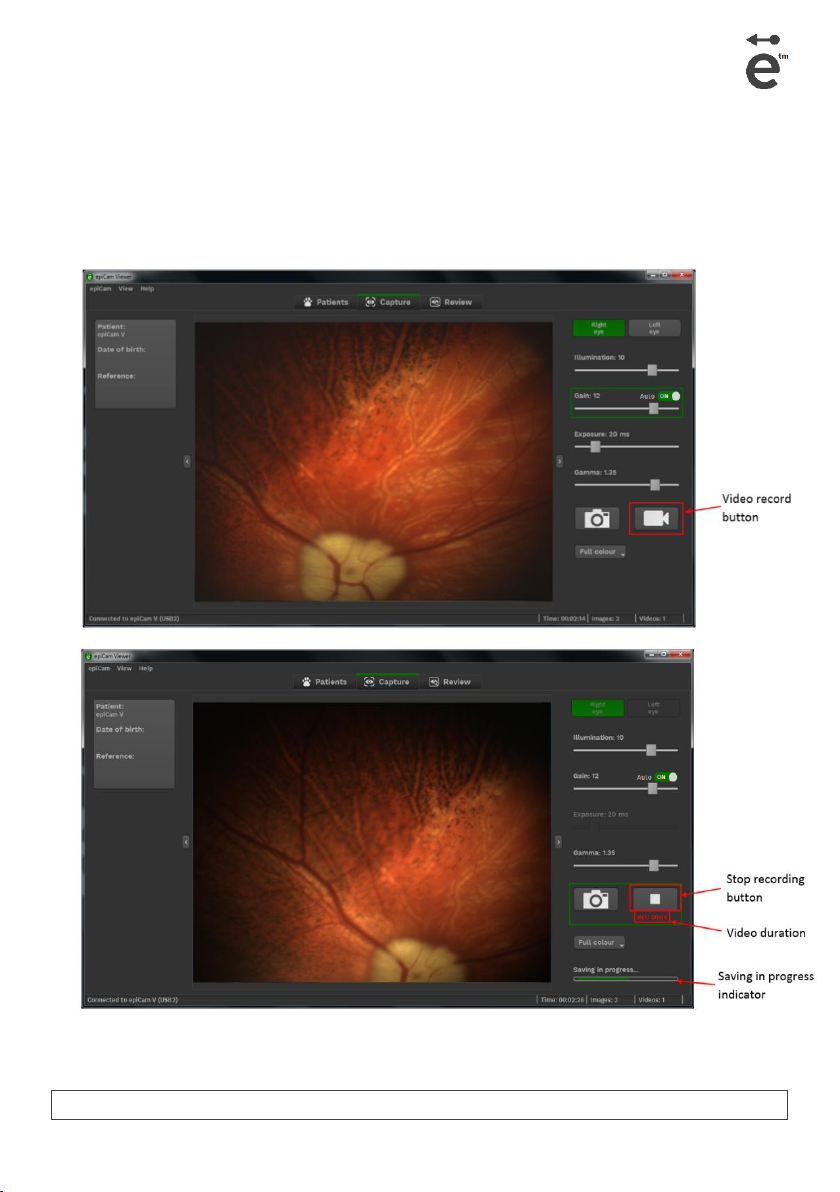
3.2.5 Video recording
To record a video:
•Click the button with the video icon to start recording. The button icon will
change and a timer indicating the length of the recording will be displayed.
•To stop the recording press the same button again.
•You may also press the letter 'v' on your keyboard to start, and again to stop,
video recording.
•A foot pedal configured to simulate the space-bar can also be used to start and
stop video capture. To do this, press and hold down the foot pedal to start
recording, and release the foot pedal to stop recording.
EpiCam V Manual H14 v8 Page 20 of 40
•When the video recording is stopped there may be a short period while the file
is being saved during which a new video cannot be recorded. Whenever file
saving is in progress a message is displayed at the bottom of the imaging control
panel.
•The video counter will update to reflect the number of saved videos for the
session.
Table of contents
Other Epipole Digital Camera manuals


