Epoch epoSmiley User manual

http://lighting.epoch-optic.com
LED一體式吸頂燈安裝說明書(吸頂式
http://www.lighting-epoch.co.en 02-1005171.T1 http://www.lighting-epoch.co.en
Ceiling lock hole
Preliminary hole A
Outlet hole
Preliminary hole B
Outlet hole
23
1
Anchor x 4
12Washer x 4
4Close end connector x 3
Anchor allocation distance 910mm
Accessories for Surface-Mounted type
35Wing nut x 1
4T-accessory x 1 6Carriage bolt x 1 7Machine Screw x 1
Accessories for Corner Installation (Only for U-type, additional purchase)
1
3
2
Swing pipe lock hole (690mm)
Anchor x 2 Self-tapping screw x 2Washer x 2
(Applicable for solid wooden
panelsor woodenangle bars
that are above 20mm thick, or
solid cement walls an d brick
walls)
Self-tapping screw x 2
(Applicable for solid wooden
panelsor woodenangle bars
that are above 20mm thick, or
solid cement walls an d brick
walls)
holder
light source
1234mm x 85mm x 48mm
1230mm x 100mm x 41.2mm
Type dimension
It is recommended that installation should be performed by professionals or certified electricians; and ensure that the power
is turned off during installation, maintenance, and cleaning.
Do not remove the warranty and manufacture labels, nor disassemble, repair, or modify the luminaire.
Please ensure that the luminaire is complete and intact, and wires are not damaged nor broken before installation. In
addition, please do not connect the luminaire with other electrical equipments in series.
Please mind the sharp angles around the luminaire, and ensure that the luminaire is installed firmly to prevent it from falling
and causing injuries.
Wipe the luminaire gently by soft cloth without any solvent when performing cleaning tasks to prevent the luminaire's surface
from scratching or damaging.
Please use the original carton provided when performing storing and delivery tasks; don’t drop or place heavy objects on it.
Simple troubleshooting
Please contact the distributor for customer
service.
Please contact the distributor for customer
service.
Problem
Luminaire fails to
light up.
Luminaire lights
does not light up at all.
Troubleshooting
Switch on the power.
Ensure all wires are properly connected.
Possible causes
Power is not on.
Power cord is not
properly connected.
Luminaire or LED driver
malfunction.
LED light source malfunction.
Simple troubleshooting
This luminaire is for
indoor use only.
Input voltage must comply
with the range as specified
on the LED driver.
Operating temperature
range : -20 ℃~+40 ℃
Storage temperature
range : -20 ℃~ +50 ℃
Precautions
Precautions
WarrantyWarranty
1、Service: Under normal usage, if the product is found to be defective within its warranty period, please send the
product and the receipt back for repair.
2、The warranty is void if :
Incorrect voltage was applied to the product, or the product was installed improperly, or used in abnormal environment
/ under abnormal usage, or its precautions were not followed.
The product did not use the dedicated LED driver provided by us.
The product is repaired, modified, or altered in any way; or, the warranty and the manufacture labels were removed,
damaged, or unrecognizable.
The failure was caused by the buyer's misbehavior or carelessness during transportation, delivery, or storage process
after purchasing.
The failure was caused by natural disasters such as earthquake, or nibbles by mice or bugs etc.
The product was used or operated under special and harsh environments; for example, damp or sulphuric area,
seashore area, or on the ship, or other corrosive and erosive environments.
3、For further information regarding the product, please refer to our website or contact customer service.
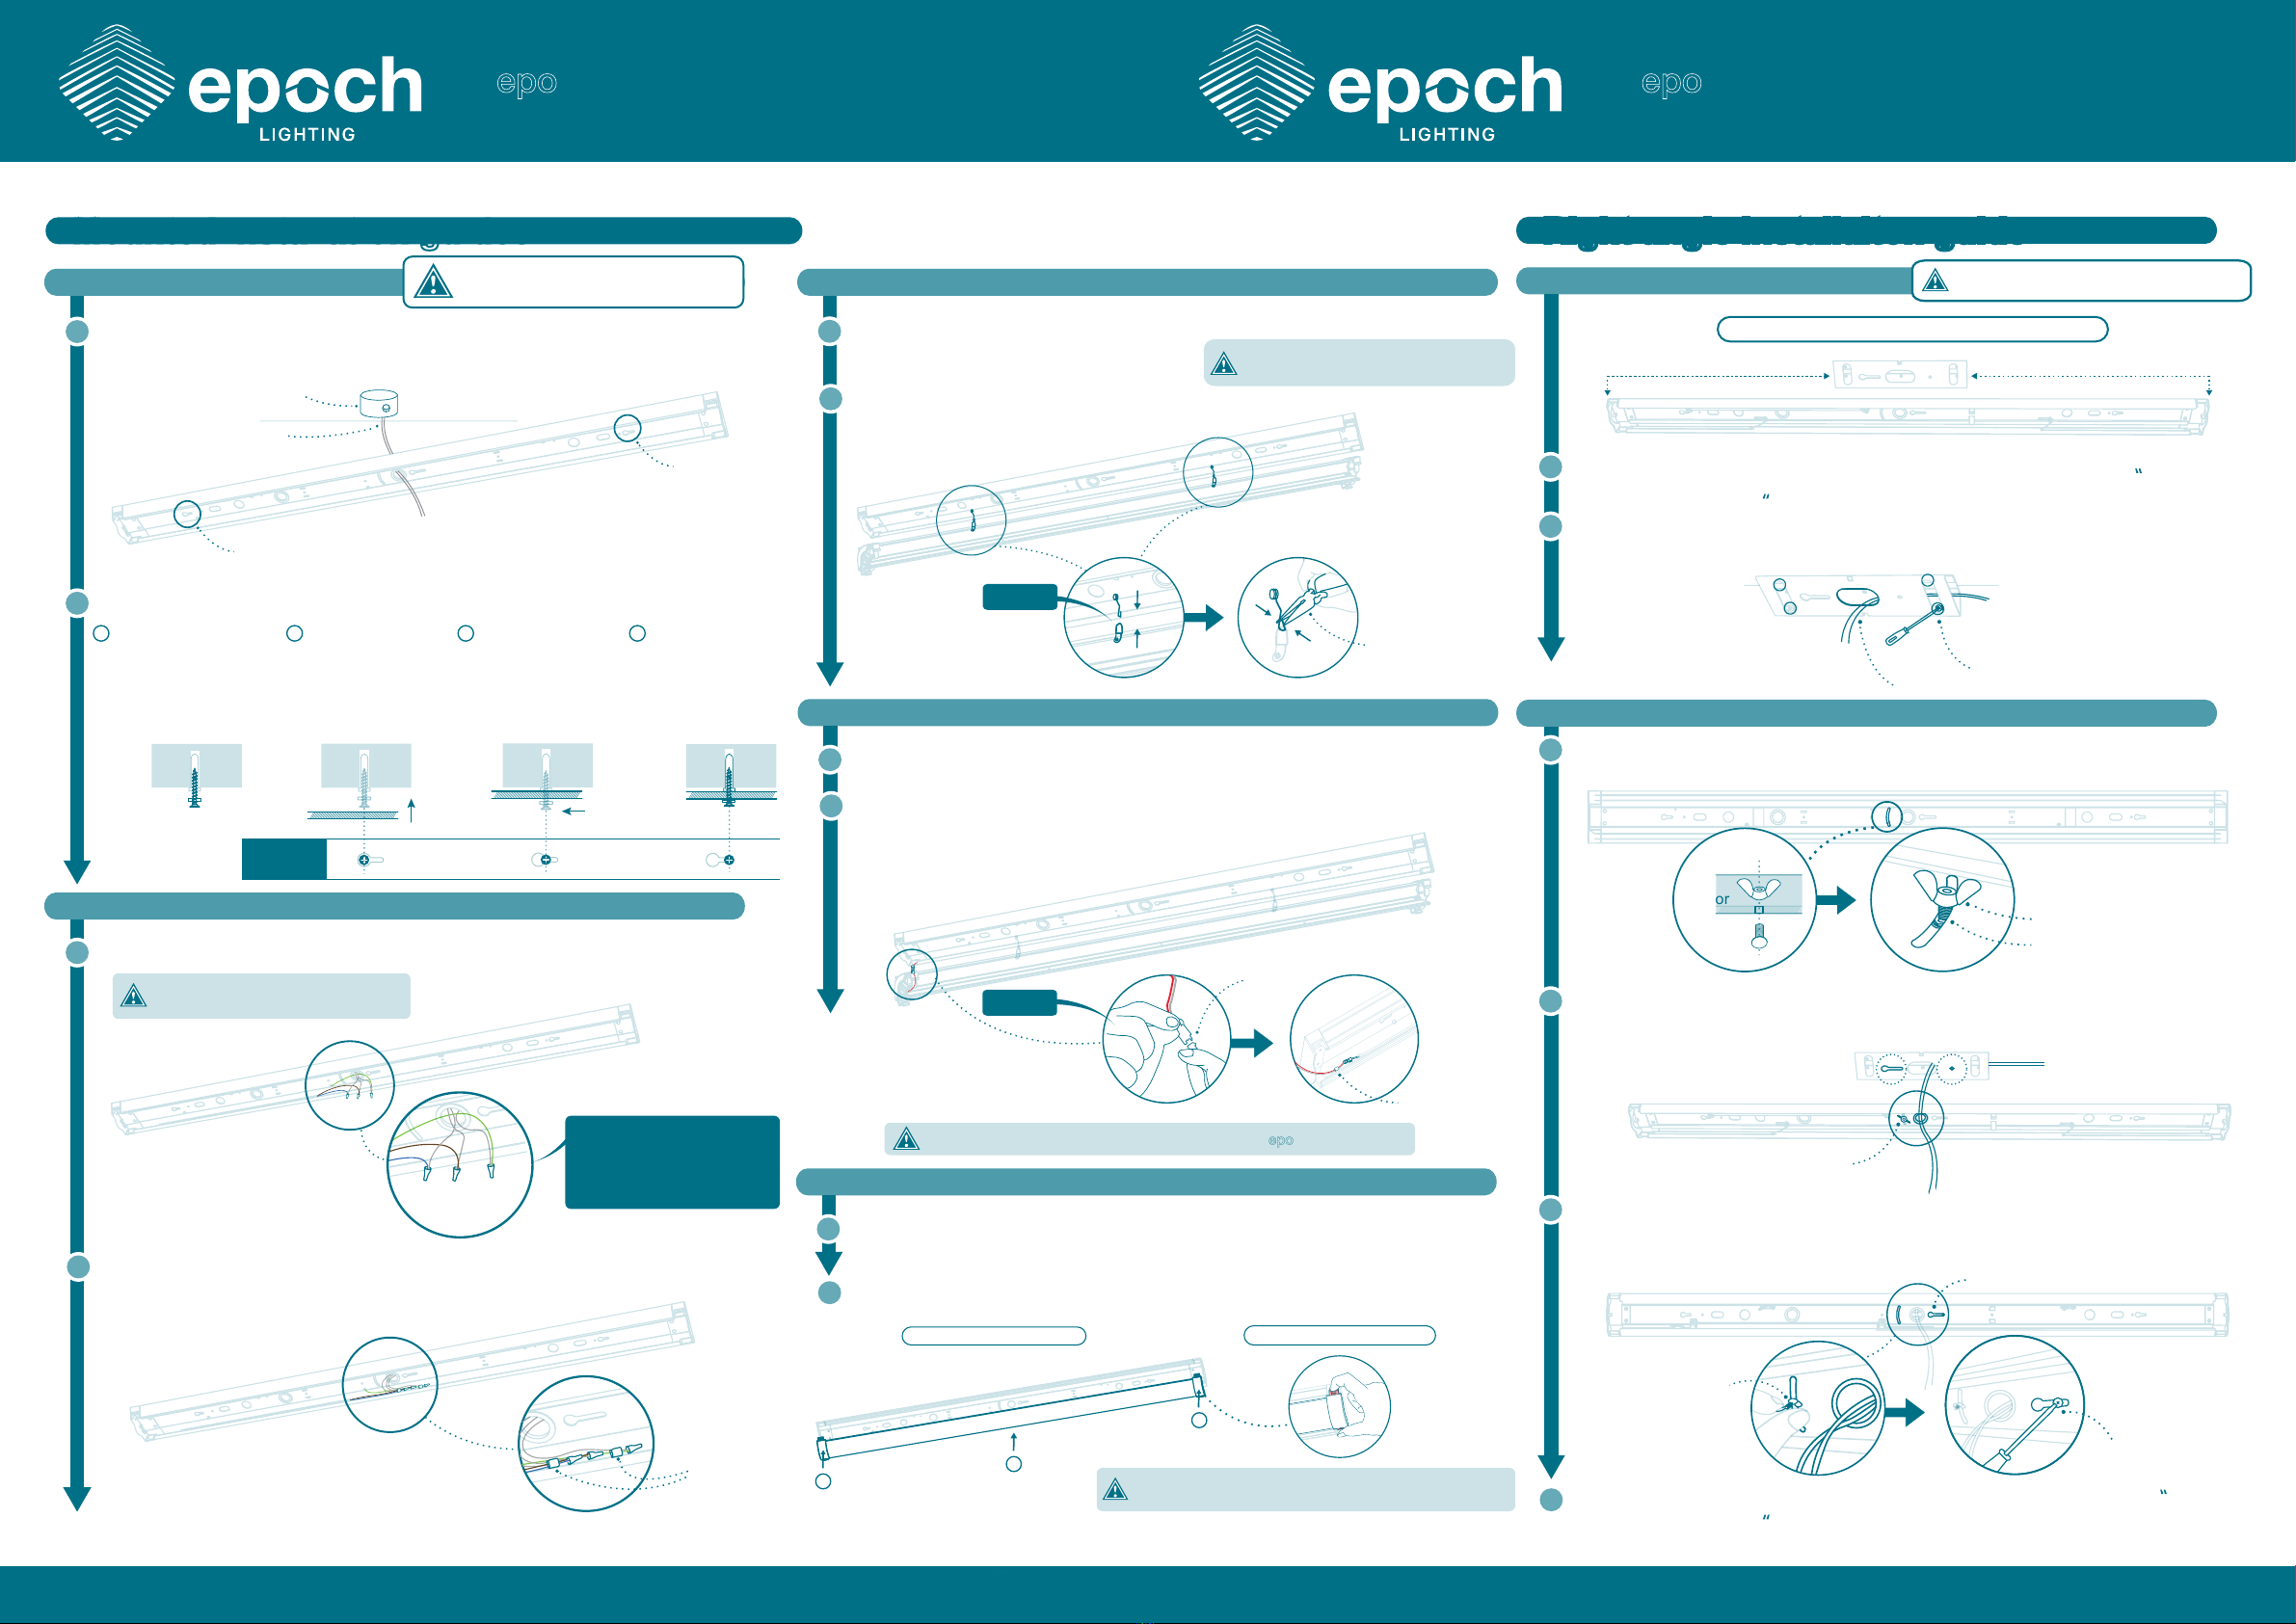
Hole on luminaire diagram
Hole on luminaire diagram
Luminaire accessories and Anchor allocation positionLuminaire accessories and Anchor allocation position
Smiley™ Installation guide
(Mounted and corner installation)
epo Smiley™ Installation guide
(Mounted and corner installation)
epo
Smiley™C type
Smiley™U type
holder
holder holder
junction box
in-house power cord
ceiling lock hole
ceiling lock hole
Right angle installaiton guide
http://www.lighting-epoch.co.en http://www.lighting-epoch.co.en
Right angle installaiton guide
Before allocating luminaire, pass the in-house
power cord through the outlet hole of the
luminaire for preparing wiring.
Mounted installation guidee
Mounted installation guide
Pull the in-house power cord and pass it through
the outlet hole of the holder.
Luminaire position
Wiring luminaire with AC power cord
1
Connect the in-house AC power cord with driver's AC side.
Insert the 18 AWG AC power
cord into the close end connector
and press the end of the connector
by tools such as crimping pinchers
to insure the wires are not falling.
3
Hang up the rings of the light source onto the holder's
accessory hook.
Fasten the T-accessory with self-tapping screws.
(Use anchors and washers on concrete ceiling, take Mounted
installation guide step 2 for reference.)
Pass the in-house power cord through the T-accessory and pull
it from the outlet hole.
Allocation distance of T-accessory
Fasten the wing nut and carriage bolt on the holder's
Preliminary hole A.
Pass the in-house power cord through the outlet hole of the holder.
Put the carriage bolt set to T-accessory's ceiling lock hole a.
Adjust the holder and T-accessory location by carriage bolt set and
ceiling lock hole a, then, fasten the holder and T-accessoty with
machine screw on holder's ceiling lock hole B and T-accessory 's
ceiling lock hole b.
For the wiring installation and light source installation, take Mounted
installation guide step 3 to step 10 for reference.
Hang up the light source temporarily
Insert the wires into the wire clip in holder's side.
4
Fix the holder onto the ceiling.
2
b
acd
Ceiling lock
hole diagram
5
Use tools to press the accessory hook.
6
1
2
3
4
5
6
Connect light source with driver's DC side connector.
Connect light source with driver's DC side
7
Arrange the wires and insert to the wire clip in holder.
8
Buckle up the light source's two end caps with holder.
Buckle the light source with holder
9
1
2
Push the middle of the light source until hearing a click
sound, then finishing the installation.
10
N wire
(Blue)
(Brown)
(Green)
L wire
Earthing wire
wire clip
connector
wire clip
Tool
ex: Needle-nose pliers Self-tapping screw
In-house power sord
T-accessory
holder
Preliminary hole A
Wing nut carriage bolt set
Carriage bolt
Mounted T-accessory installation
Mounted holder installation
Preliminary hole B
carriage bolt set
ceiling lock hole a ceiling lock hole b
Machine Screw
If you need to detach the light source, please press
light source's two end caps where marks the “press”.
This step is aim to wiring preparation,
not for suspended function.
Only connect with the dedicated light source as Smiley™ series.
The close end connector applies to
18AWG AC power cord.
1
Connect
Connect
Only for U type. Right angle accessory need
to be bought in additional.
Holder
Interior
Light source installation Light source detachment
carriage bolt set
+=
517mm 517mm
Referring to the diagram
of “Hole on luminaire”, drill
the hole to fix the two anchors,
and screw the self-tapping
screws and washers half
into the two anchors.
Align “the two ceiling
lock hole”of the luminaire
and “two half-screwed
self-tapping screws”, and
push the luminaire up.
Move the luminaire to
be latched by the ceiling
lock hole of the luminaire.
After latching with the
ceiling lock hole, screw
the other half of self
-tapping screws, and
finish the luminaire
allocation.
Smiley™ Installation guide
(Mounted and corner installation)
epo
epo
Smiley™ Installation guide
(Mounted and corner installation)
epo
Other Epoch Lighting Equipment manuals

Popular Lighting Equipment manuals by other brands


MPK
MPK VisionStar L pro LED Installation and operating instructions

Whelen Engineering Company
Whelen Engineering Company M Series installation guide

Lightolier
Lightolier Lytecaster 2000LVE specification

Sunjoy
Sunjoy S-CH792PST Assembly instruction

Ikan
Ikan CB6-2PT-KIT quick start guide

GAME OF BRICKS
GAME OF BRICKS Poe Dameron's X-wing Fighter 75273 instruction manual