ePropulsion E Series User manual
E-Series Battery User Manual
April, 2020 Version 1.0
Copyright © 2020 ePropulsion. All Rights Reserved


1
Acknowledgement
Thanks for choosing ePropulsion products, your trust and support in our company
are sincerely appreciated. We are dedicated to providing high-performance, reliable
lithium batteries and accessories.
Welcome to visit www.epropulsion.com and contact us if you have any concerns.
Using this manual
Before the use of this product, please read this reference manual thoroughly to
understand the correct and safe operations. By using this product, you hereby agree
that you have fully read and understood all the contents of this manual. ePropulsion
accepts no liability for any damage or injury caused by operations that contradict this
manual.
Due to the ongoing optimization of our products, ePropulsion reserves the rights of
constantly adjusting the contents described in the manual. ePropulsion also reserves
the intellectual property rights and industrial property rights including copyrights,
patents, logos and designs, etc.
This manual is subject to update without prior notice. Please visit our website www.
epropulsion.com for the latest version. If you find any discrepancy between your
products and this manual, or should you have any doubts concerning the product or
the manual, please visit www.epropulsion.com.
ePropulsion reserves the right of final interpretation of this manual.
This manual is multilingual, in case of any discrepancy in the interpretation of
different language versions, the English version shall prevail.
Symbols
The following symbols will help to acquire some key information.
Useful information or tips
Important instructions or warnings
2
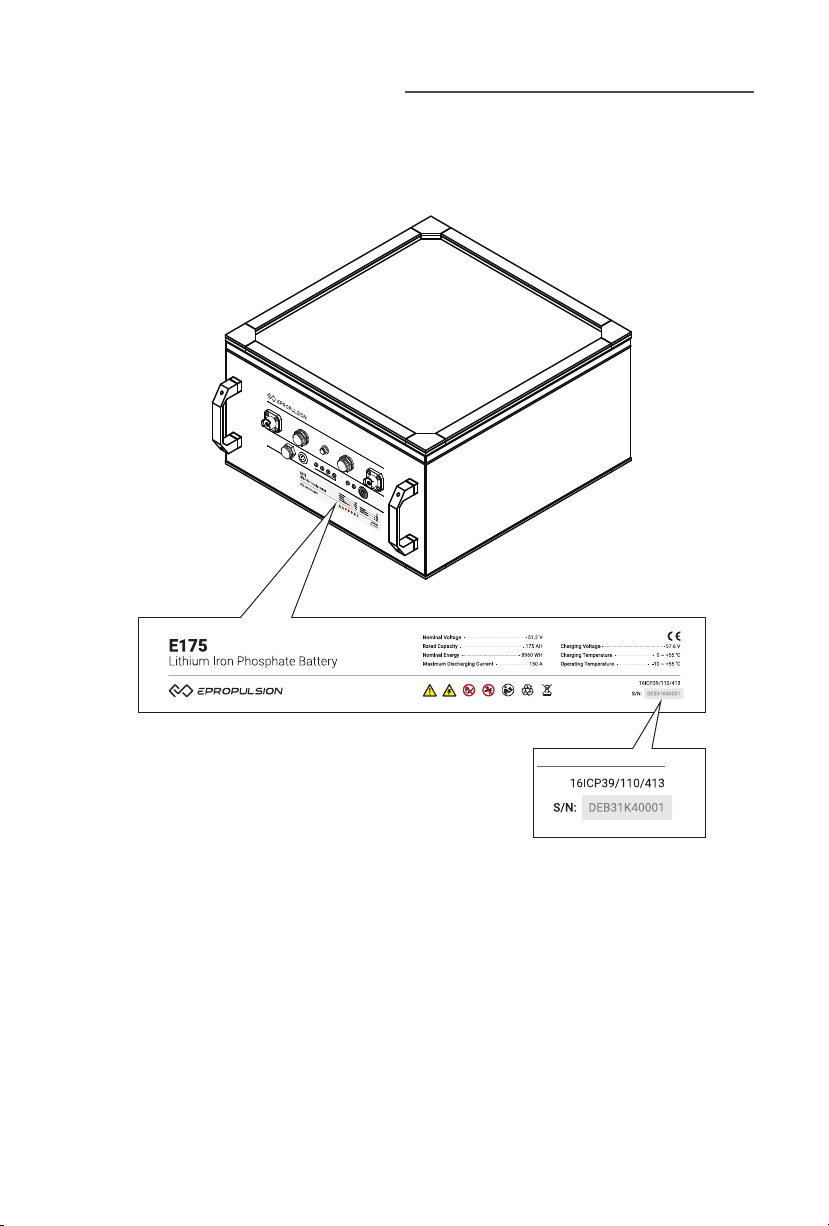
Product Identification
Below figure indicates the position of the product label on which the serial number
is located. Please record the serial number for access to maintenance or other after-
sale services.
Figure 0-1

3
Table of content
Acknowledgement..................................................................................... 1
Using this manual...................................................................................... 1
Symbols .................................................................................................... 1
Product Identification................................................................................ 2
1 Product Overview ................................................................................... 5
1.1 In the Package......................................................................................... 5
1.2 Parts and Diagram................................................................................... 6
1.3 Specifications.......................................................................................... 7
1.4 Instructions before Use........................................................................... 8
1.5 Important Instructions ............................................................................ 8
1.6 Declaration of Conformity....................................................................... 9
2 Operation.............................................................................................. 10
2.1 Check the Battery Status ...................................................................... 10
2.2 Using the Battery ................................................................................... 10
2.2.1 Connecting the Battery to the Machine...................................... 10
2.2.2 Turning on/off the Battery........................................................... 12
2.2.3 Charging the Battery.................................................................... 13
2.3 Using Multiple Batteries........................................................................ 15
2.3.1 Connecting Batteries in Parallel.................................................. 15
2.3.2 Connecting Parallel Batteries to the Machine............................ 17
2.3.3 Turning on/off the Batteries in Parallel ...................................... 18
2.3.4 Charging the Batteries in Parallel ............................................... 19
2.4 LED Indicator ......................................................................................... 20
2.5 Buzzer .................................................................................................... 21
3 Troubleshooting ................................................................................... 22
4 Transportation and Storage .................................................................. 23
4.1 Transportation ....................................................................................... 23
4.2 Storage................................................................................................... 24
5 Routine Maintenance............................................................................ 25
6 Warranty .............................................................................................. 26

4
6.1 Warranty Policies................................................................................... 26
6.2 Out of Warranty...................................................................................... 27
6.3 Warranty Claim Procedures.................................................................. 27
5
1 Product Overview
ePropulsion E-Series Battery is a lithium iron phosphate battery with good safety
performance, high energy density, long cycle life and high reliability.
E-Series Battery includes three models, E40, E80 and E175, with a nominal voltage of
51.2V and a capacity of 40Ah, 80Ah and 175Ah.
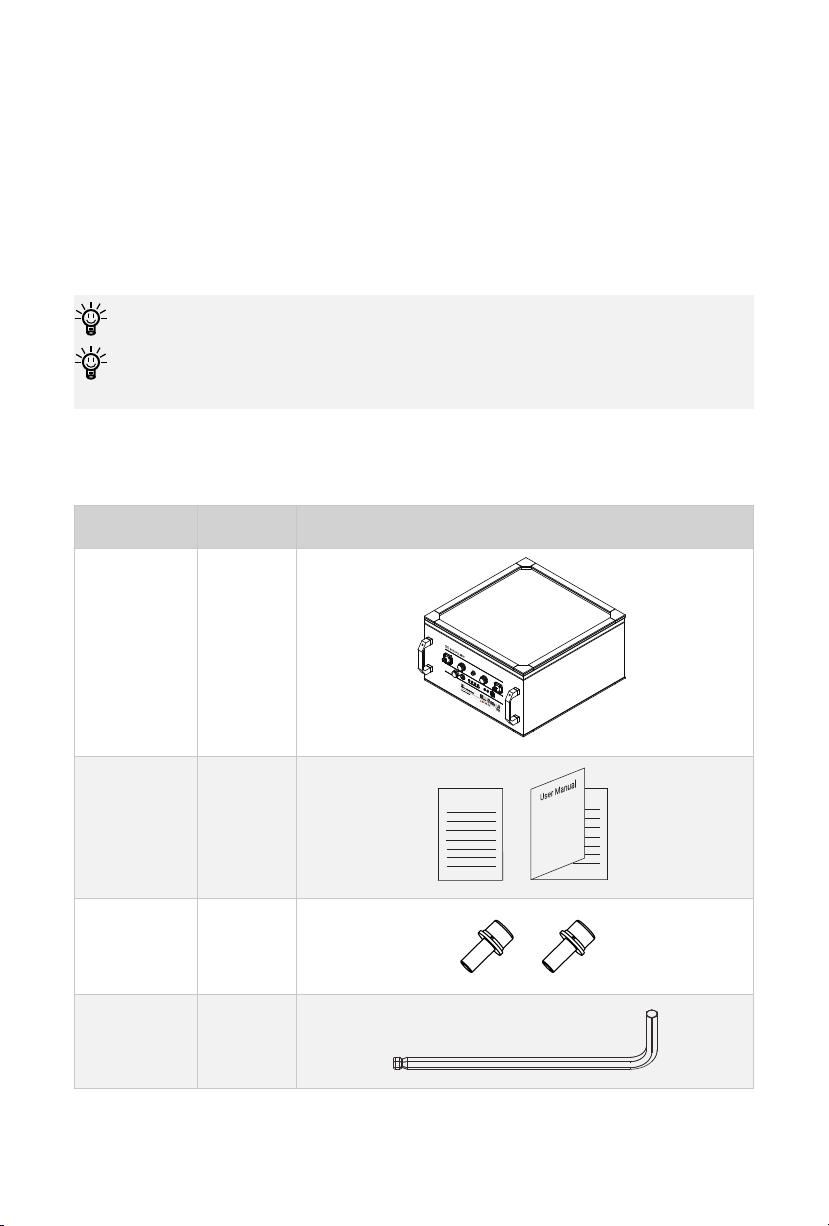
1.1 In the Package
Save the ePropulsion original package for the battery storage.
Other accessories mentioned in this user manual need to be purchased by users
from ePropulsion authorized dealers.
Unpack the package and check if there is any damage caused during transport.
Check all the items inside the package against the below list. If there is any transport
damage or lack of any listed item, please contact your dealer immediately.
Items Qty./Unit Figure
E-Series
Battery 1 set
Warranty
Card & User
Manual
1 set
Warranty
M8x16 Hex
Screw 2 pieces
6mm Hex
Wrench 1 piece
6
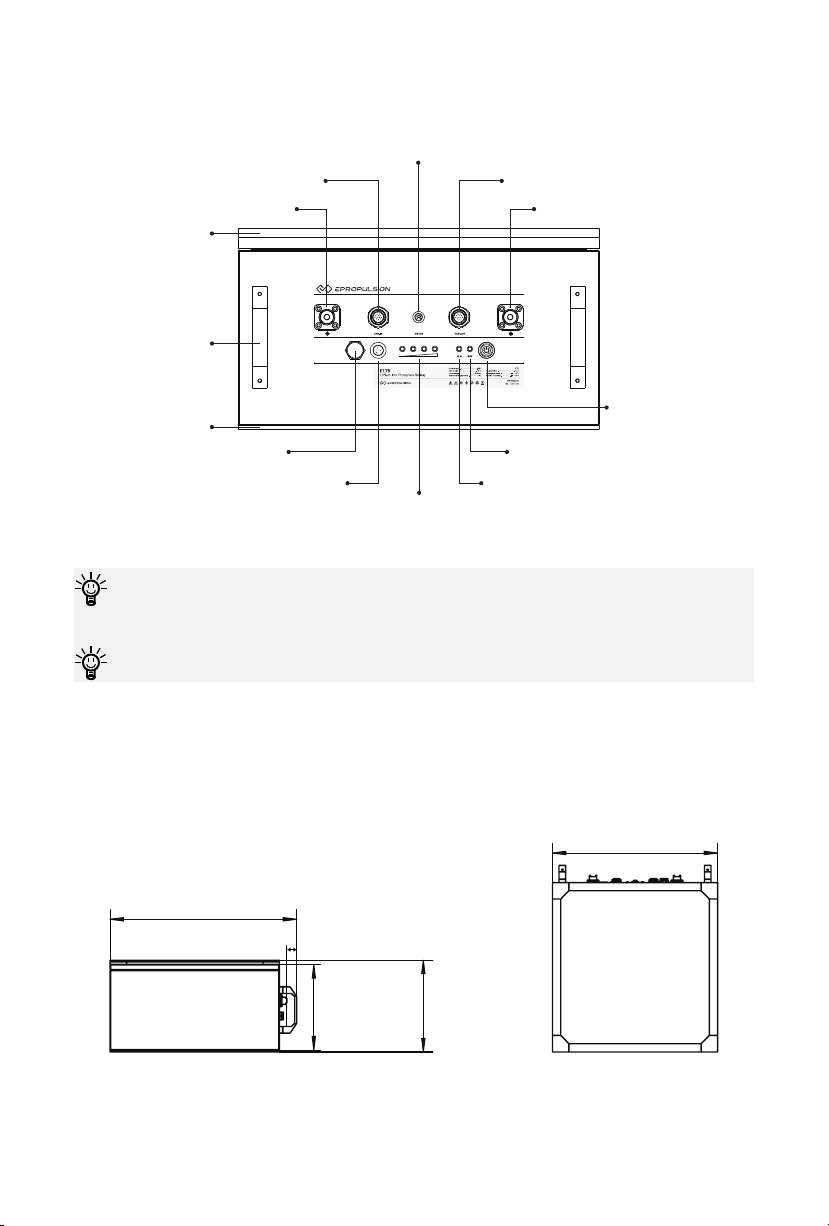
1.2 Parts and Diagram
Figure 1-1
CAN-IN port can be connected with E battery remote switch, E battery
communication terminator or CAN-OUT port.
CAN-OUT port can be connected with the charger or CAN-IN port.
Figure 1-2
Battery positive terminal
Battery level indicator
Valve
Buzzer Alarm indicator
Running indicator
Power Button
CAN-IN port CAN-OUT port
Motor communication port
Battery negative terminal
Handle
(Detachable)
Protective foam
Protective foam
E40: 390
E80: 440
E175: 565
Unit: mm
25
E40: 207
E80: 212
E175: 277
E40: 190
E80: 195
E175: 260
E40: 420
E80: 555
E175: 500

7
1.3 Specifications
E40/E80/E175 Battery
Type of battery Lithium iron phosphate battery
Nominal capacity 40Ah(E40) / 80Ah(E80) / 175Ah(E175)
Rated voltage 51.2V
Rated power 2048Wh(E40) / 4096Wh(E80) / 8960Wh(E175)
Charging voltage 57.6V
Discharging cut-off voltage 41.6V
Maximum charging current 20A(E40) / 40A(E80) / 80A(E175)
Maximum continuous
discharging current 40A(E40) / 80A(E80) / 150A(E175)
Parallel connection Max 16 E-Series Batteries
Series connection Not support
Storage temperature -20~60°C
Charging temperature 0~55°C
Discharging temperature -10~55°C
Dimensions (w handle)
420*390*207mm(E40)
555*440*212mm(E80)
500*565*277mm(E175)
Weight
29kg(E40)
49kg(E80)
87kg(E175)
Ingress protection rating IP67
Recommended battery level
during storage 45%~50%

8
1.4 Instructions before Use
• Before using the battery, please read the user manual carefully. Only adults who
have fully read and understood this manual are allowed to operate this product.
• Before each use, check if the battery is firmly fixed, and check the condition,
functionality and connection of the battery.
• Do not remove the protective foam on the battery base. The foam protects the
battery from corrosion and covers fixings.
• Avoid battery short-circuit during connection, do not disassemble the battery.
• Do not store the battery in a damp environment.
• During use, keep away from an external heat source and high voltage equipment.
• Do not exposure to shock or excessive vibrations.
• During use, when a fault occurs, please refer to Section 2.4 LED Indicators,
Section 2.5 Buzzer, and Section 3 Troubleshooting.
• It is not recommended to stack batteries.
• Used batteries should be disposed of according to local laws and regulations.
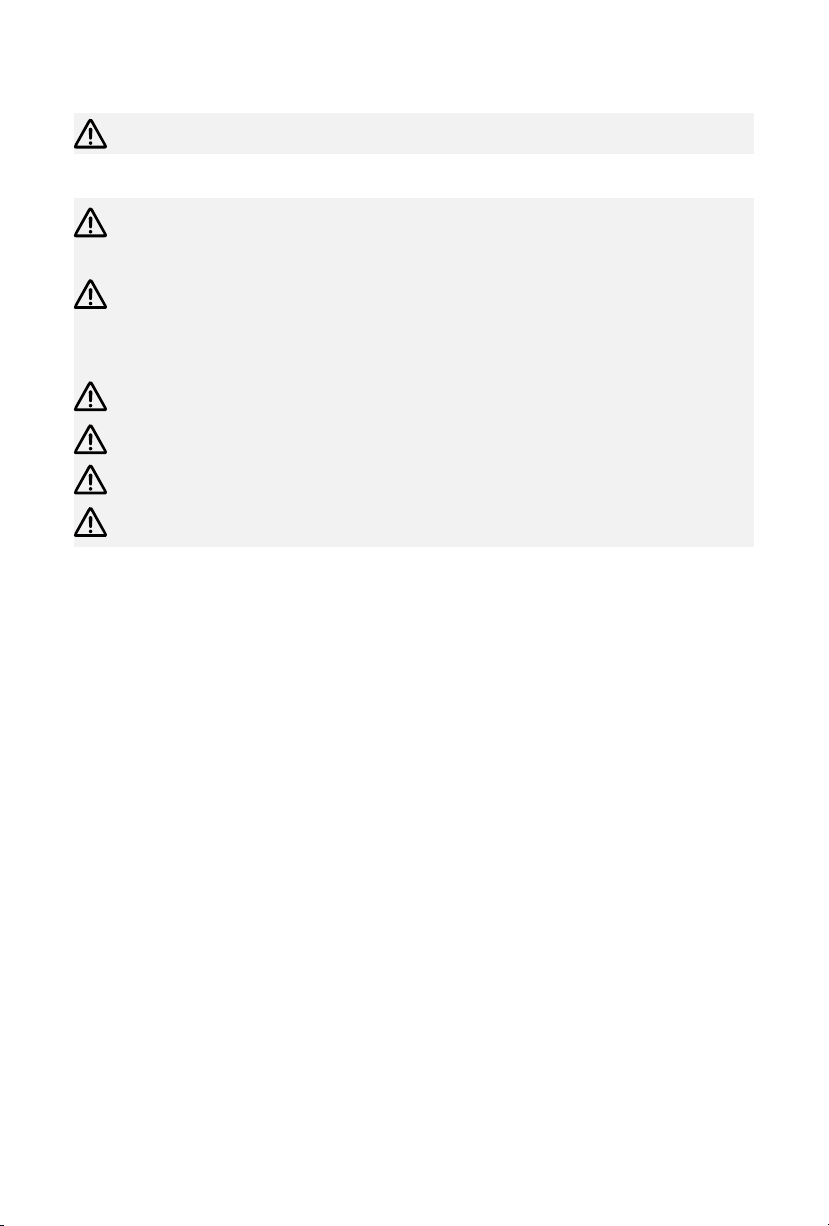
1.5 Important Instructions
• When the battery is not in use, make sure that the battery's connectors are
covered well with the waterproof caps.
• Do not expose the battery to high temperatures or sparks.
• Do not immerse or splash the battery in water.
• Ensure the battery can never cause a short via jewellery or tools.
• Do not exposure to shock or excessive vibrations.
• Never puncture the battery.
• Do not subject the battery to significant damage.
• Never touch a leaking battery or cell.
• Never mix up the positive terminals with negative terminals.
• Do not short circuit, overcharge or over discharge the battery.
• Never connect batteries in series.
• It is strictly prohibited to mix this battery with different types or specifications of
batteries in parallel.
• If the battery is used in extreme environments (below 0°C or above 50°C), the
battery life will be shortened.

9
• Charge the battery in the place that is safe, dry and free of flammable materials.
• When the battery is not used for an extended period of time, make sure the battery
level is around 45%~50% before storing.
• Do not use conductive materials like metal that could cause a short circuit.
• Please keep the battery in a cool and dry place.
• Keep the battery away from children.
• Do not place the battery in direct sunlight.
• Never disassemble or modify the battery.
• Never open the battery case. If the case is damaged, do not use, charge or
discharge the battery. Please contact ePropulsion authorized distributor.
1.6 Declaration of Conformity
Object of the Declaration:
Product: Lithium-ion Battery Pack
Model: E40, E80, E175
Company Name: Guangdong ePropulsion Technology Limited
Address: Room 201, Bldg.17A, 4th XinZhu Road, SongShan Lake District, Dongguan
City, Guangdong Province, China
The object of the declaration is in conformity with the following directives:
EMC-directive 2014/30/EU
Applied Standards:
EN 61000-6-3:2007+A1:2011
EN IEC61000-6-1:2019
Signature:
Shizheng Tao, Chief Executive Officer & Co-founder of
Guangdong ePropulsion Technology Limited

10
2 Operation
2.1 Check the Battery Status
Do not remove the protective foam on the battery base. The foam protects the
battery from corrosion and covers fixings.
If the alarm indicator is on, refer to Section 2.4 LED Indicators, Section 2.5
Buzzer, and Section 3 Troubleshooting to deal with the problems.
During this operation, the battery has no output.
Before each use of the battery, please check the battery status by following steps:
Short press (not turn on) the power button on the battery or the remote switch. The
battery indicator will light for 5 seconds to show the battery status (battery level or
warnings).
2.2 Using the Battery
2.2.1 Connecting the Battery to the Machine
When connecting the power cables, please pay attention to the positive and
negative terminals. Never mix up the positive terminals with negative terminals.
Avoid battery short-circuit during connection.
If it is connected to ePropulsion outboard motor, and the power cable or
communication cable is abnormally connected, the outboard motor will stop.
Before connecting the battery to the machine (outboard, etc.), make sure that the
battery power button is turned off and follow these steps:
1. Connect the power cable of the machine to the battery.
2. When connecting with ePropulsion outboard motor, in order to better obtain the
battery information please use the communication cable (purchased separately)
to connect the machine with the battery (refer to figure 2-1).
3. If you need to use the ePropulsion outboard with a wired remote control, tiller,
side mount control or other control systems, it recommends you use a Y-type
communication cable (purchased separately) to connect your equipment (refer to
figure 2-2).

11
Y-type communication cable can be connected with the motor communication
port on the battery or the communication port of the outboard motor.
Figure 2-1
Figure 2-2
CAN-IN CAN-OUTMOTOR
Y type communication cable
Remote
Control
Tiller
Handle
Side
Mount
Control
CAN-IN CAN-OUTMOTOR

12
2.2.2 Turning on/off the Battery
The battery has an auto sleep function. After the battery is turned on, if no
operation or use is carried out within 8 hours, the battery will automatically turn
off.
Before turning on the battery, please make sure that the power cable of the
machine is securely connected to the battery, the connection is locked and there
is no risk of slipping, and there is no short circuit.
a. Using the power button on the battery
1. For turning on the battery, please press and hold the power button on the battery
for 1second (no more than 3 seconds). The battery will start and self-check. If no
warning, it means the battery turned on successfully.
2. For turning off the battery, please press and hold the power button on the battery
for 3 seconds, then the battery will turn off automatically.
b. Using E battery remote switch
The remote switch can only be connected to the CAN-IN port. Do not connect to
the CAN-OUT port.
When using the remote switch, there is no need to operate the power button on
the battery. Using either switch can control the switching on or off of the battery.
Remote switches need to be purchased separately.
When using an ePropulsion E battery remote switch, please connect the remote
switch with the CAN-IN port according to the following figure, then operate the
remote switch.
1. Fix the remote switch.
2. Connect the remote switch to the battery CAN-IN port.

13
Figure 2-3
1. To turn on the battery, please press and hold the power button on the remote
switch for 1second (no more than 3 seconds). The running indicator and the
indicator on the remote switch are both on. The battery will start and self-check. If
there are no warnings, it means the battery is really for use.
2. To turn off the battery, please press and hold the power button on the remote
switch for 3 seconds, you can see the indicators on the remote and battery are off.
2.2.3 Charging the Battery
Please read the following notices before charging:
Only use the ePropulsion charger specially designed for E-Series Batteries to
charge the battery. Do not use a third-party charger to charge the battery.
The charger's communication cable needs to be connected to the battery's
CAN-OUT port.
Please make sure that the AC power is turned off before charging.
Never mix up the positive terminals with negative terminals.
Only charge the battery at 0 ~ 55°C.
When charging, keep the battery away from water and avoid direct sunlight or
rain. Charge the battery in the dry, ventilated place.
Avoid direct contact with the charger when in use, the charger can get to a high
temperature.
Please do not overcharge the battery.
Keep battery away from fire.
14
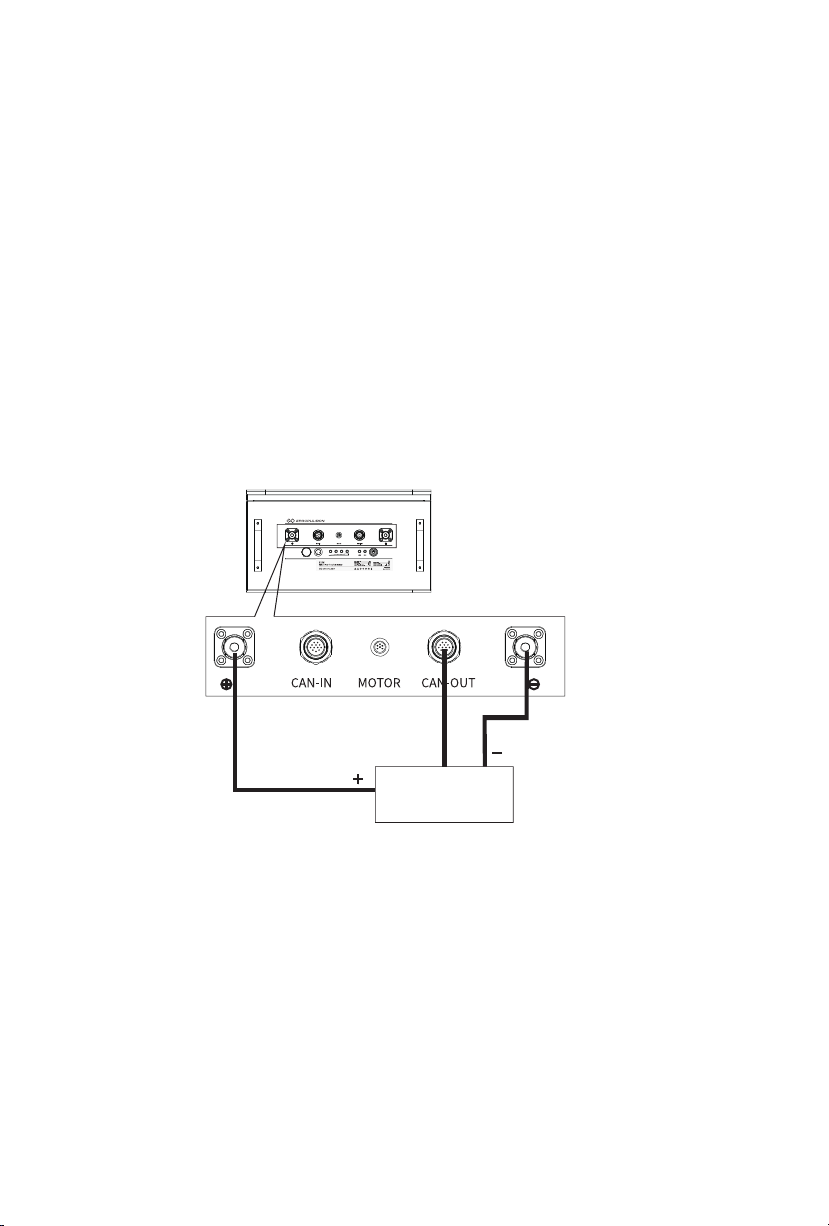
1. When charging the battery, connect the charger's power cable to the positive and
negative terminals of the battery. The positive terminal of the charger's power
cable is connected with the positive terminal of the battery, and the negative
terminal of the charger's power cable is connected with the negative terminal of
the battery. Then connect the communication cable from the charger to the battery
CAN-OUT port. Make sure that the connection is correct.
2. After confirming that the battery is turned off, connect the charger to AC power,
and then press the power button on the battery/remote switch to turn on the
battery. If the system has no alarms, indicating that the battery is successfully
charging.
3. After the charging is completed, long press the power button on the battery/
remote switch, then unplug the power plug of the charger, and then release the
connection with the battery charger.
Figure 2-4
Charger
Communication
cable
15
2.3 Using Multiple Batteries
Do not connect batteries in series.
2.3.1 Connecting Batteries in Parallel
Connect the batteries in parallel when the batteries are fully charged, and the
voltage difference must not exceed 2V.
When batteries are connected in parallel, the battery's CAN-IN port must be
connected to a remote switch or a communication terminator (purchased
separately).
It is forbidden to use different types or specifications of batteries in parallel.
Do not connect new and old batteries in parallel.
Before connecting, make sure the power button is off.
Never mix up the positive terminals with negative terminals.
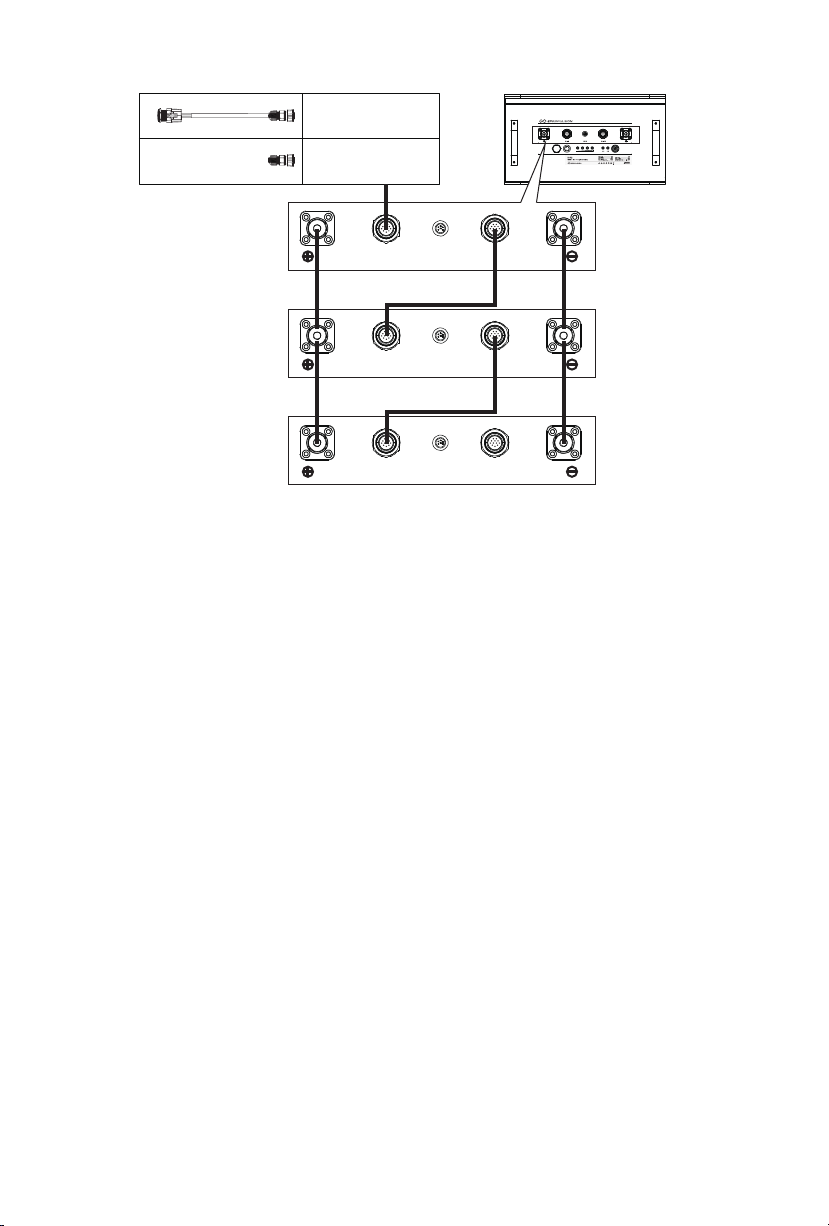
Connecting two or more batteries in parallel can will expand their capacity. E-Series
Batteries support up to 16 batteries of the same type in parallel. Use battery bridging
cables and E battery communication cables (purchased separately) to connect the
batteries.
Use the E battery communication cable to connect the CAN-OUT port of the 1#
battery (refer to figure 2-5) and the CAN-IN port of the 2# battery and so on. Please
refer to the figure below.
16
Figure 2-5
CAN-IN CAN-OUTMOTOR
CAN-IN CAN-OUTMOTOR
CAN-IN CAN-OUTMOTOR
Remote
Switch
1#Battery
2#Battery
3#Battery
Communication
Terminator
Battery Bridging
Cable
Battery Bridging
Cable
Battery Bridging
Cable
Battery Bridging
Cable
E battery
communication cable
E Battery
Communication Cable
17
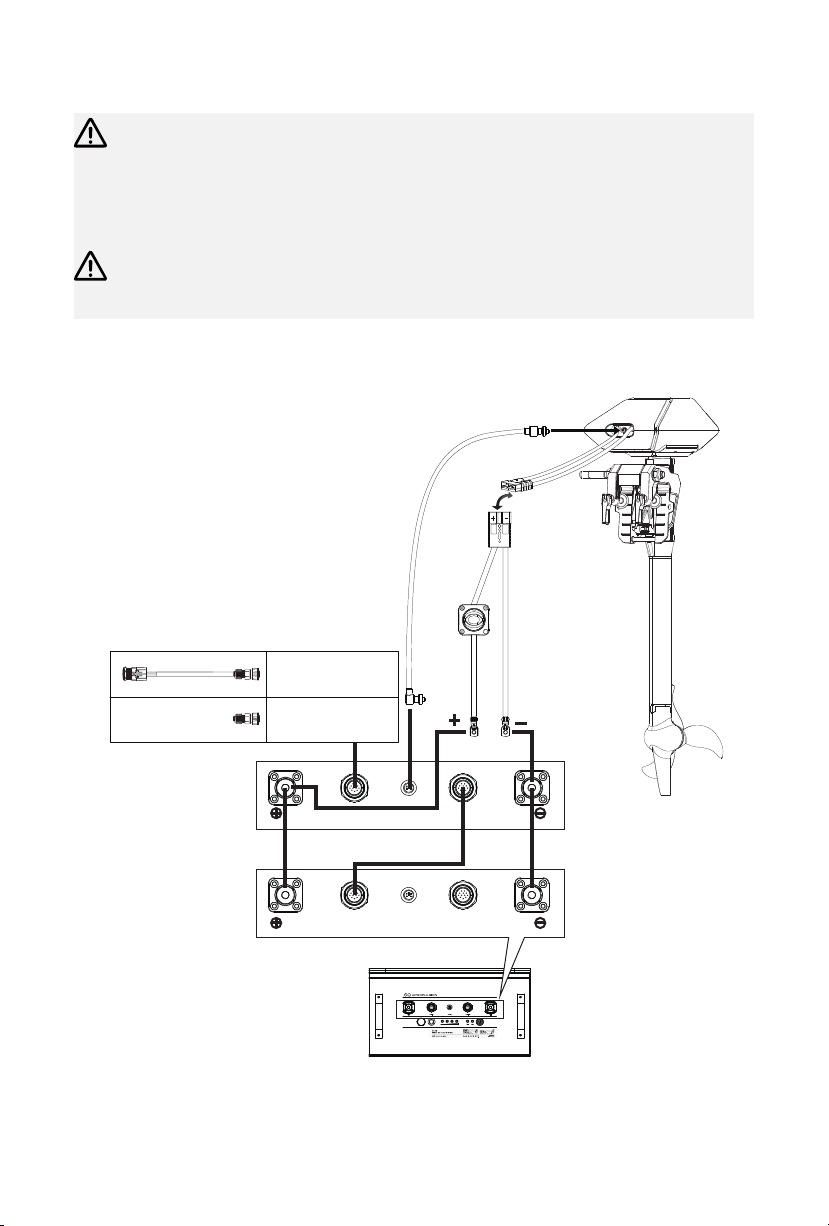
2.3.2 Connecting Parallel Batteries to the Machine
When the parallel batteries are connected to the ePropulsion outboard motor,
it needs to connect the outboard motor to 1# battery with the communication
cable (refer to figure 2-6). And the outboard motor can only be connected with
1# battery.
When connected in parallel, the CAN-IN port must be connected to a remote
switch or a communication terminator.
Refer to Section 2.2.1 to connect the 1# battery to the machine. The figure below is
the connection between the parallel batteries and ePropulsion outboard motor.
Figure 2-6
CAN-IN CAN-OUTMOTOR
CAN-IN CAN-OUTMOTOR
Remote
Switch
1#Battery
2#Battery
Communication
Terminator
Battery Bridging
Cable
Battery Bridging
Cable
E Battery
Communication Cable

18
2.3.3 Turning on/off the Batteries in Parallel
When multiple batteries of the same model are connected in parallel, you
can only press the power button on the 1# battery (the battery connect to the
machine, refer to figure 2-6) or the remote switch to turn on/off the batteries.
1. To turn on the batteries, please press and hold the power button on the 1# battery
or the remote switch for 1 second (no more than 3 seconds). The batteries will
start and self-check. If there are no warnings, it means the batteries are really for
use.
2. To turn off the batteries, please press and hold the power button on the 1# battery
or the remote switch for 3 seconds, you can see the indicators on the remote and
batteries are off.
The maximum continuous discharging current of the battery is 40A (E40)/80A
(E80)/150A(E175). Only the machine with load current less than this value can
be connected.
If the batteries are connected in parallel, the discharging current range will
increase.
If the discharging current is exceeded, the fuse of the battery may be blown.
Other manuals for E Series
2
This manual suits for next models
3
Table of contents
Other ePropulsion Camera Accessories manuals


Popular Camera Accessories manuals by other brands


Vello
Vello FreeWave Viewer VL user manual

Sealife
Sealife SL962 instruction manual

Blue Raven
Blue Raven 64648 Replacement instructions

Scheppach
Scheppach BPS4.0-40Li Original operating instructions

VERSATIVTECH
VERSATIVTECH Circuit Breaker Finder instruction manual

walimex
walimex 16 angle instruction manual


