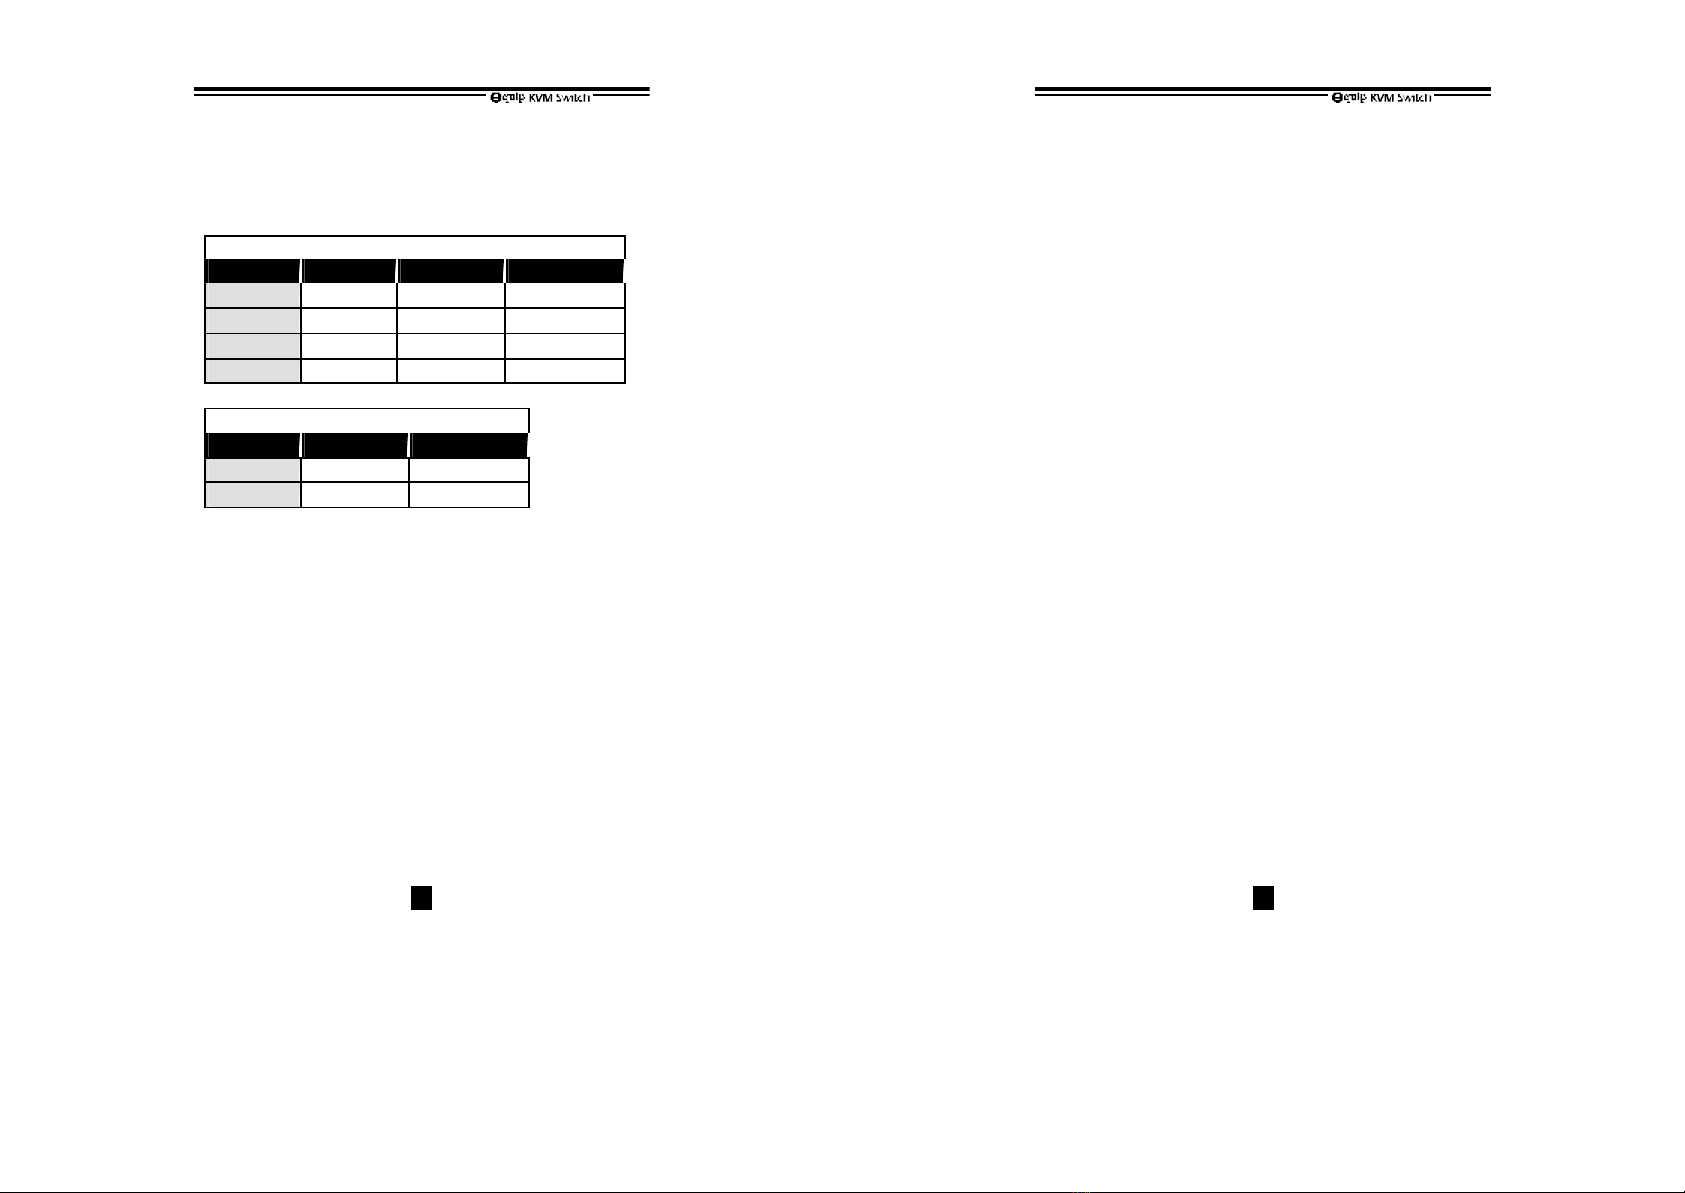
Equip SW0202C User manual

Table of Content
■Introduction
Overview……………...……………………………....1
Features………………….………………………..….2
■Installations
Console Connection……………….………………...3
Computers Connection……………….……….….…4
Initial Power-up……………….………………..…….6
■Operations
Front Panel operation…………...…………...…..….7
Hot-key commands…...…………...……………..….7
■Appendices
Specifications………………..……………………….9
Please read this manual thoroughly
and follow the Installation procedures to
prevent any damage to the KVM Switch or any
connecting device.
This device is tested and complies with Part 15 of
FCC/class B, CE and VCCI rules.
-1-
----------------- Introduction
Overview
The KVM Switch SW0202C is a computer switch that
allows access to two IBM compatible computers from
one keyboard, mouse and monitor. Switching between
computers is as easy as pressing the push button or
entering hot-key commands from your keyboard. There
is no interface card and software to install. The
powerful KVM Switch is independent of the computer
operatingsystem,allowing the attached computers to run
different applications. The space-saving design enables
you to connect all the cables to the back of the
SW0202C taking the least amount of space on your desk.
It is a valuable tool for your computer management.
Automatic Mouse Conversion
This technology enables you to connect computers with
either PS/2 or serial mouse ports to the KVM Switch, and
control both computers from one PS/2 mouse. The
KVM Switch automatically identifies the mouse and
switches to proper mouse protocol.

-2-
Features
nSupports both PS/2 and serial mouse
nCascade configuration expands system capability
nAuto scanautomatically selects computers
sequentially
nSupports Microsoft IntelliMouse (Pro), IntelliTrackball
nHot-key functionsallow easycomputer access
nBuilt-in buzzer for hot-key command confirmation
nKeyboard states automatically saved and restored
whenswitchingcomputers
nOperating system independent, transparent to all
applications
nTrue plug and play system configuration
nKeyboard and mouse can be hot plugged at any time
nHigh VGA resolution 1920x1440
nDDC2B compatible
nPower-free operation
-3-
-----------------Installation
Console Connection
Turn your computers off. Connect a PS/2 keyboard and
a PS/2 mouse to the mini-DIN-6 ports of the C
(CONSOLE) marked with Kand Mrespectively. Then
connect your VGA monitor cable directly to the
HD-DB-15 port ofCas shown in figure 1.
Figure 1:CONSOLE Connection
The monitor connected to theHD-DB-15 VGA port of the
Cmust be capable of synchronizing with the computer's
video signal. If you are uncertain about the monitor type,
please consult the monitor user's manual.
The KVM Switch consumes negligible power and is
designed to run reliably without external power adapter.

-4-
Computers Connection
Now you want to connect two computers to the KVM
Switch. Use a male-to-male Mini-DIN-6 cable to
connect from the first PC’s keyboard port to the
corresponding K1 port; and, use another male-to-male
Mini-DIN-6 cable from the PC’s mouse port to the M1
port. Then, connect your computer’s VGA port to the
HD-DB-15 port of the KVM Switch as shown in figure 2.
Follow the same procedures for the second computer
using K2 and M2 port.
Figure 2:COMPUTER Connection
If your computer uses serial mouse, a mouse adapter
should be connected to the computer’s mouse port as
shown in figure 3. (Note: use only the mouse adapter
comes with the kit)
-5-
Figure 3: Adapter and serial mouse connection
NOTE: 1. There is no serial mouse for theC(CONSOLE),
just a PS/2 mouse. The KVM Switch's
automatic mouse conversion system allows you
to connect computers using serial mouse and
control the computers fromone PS/2 mouse.
2. Be ware that the mouse adapter can only be
used on the PC side. Attempting to use it at the
C(CONSOLE) side will not work.
3. If your PC uses an AT style keyboard, you will
need an AT-to-PS/2 keyboard adapter, DIN-5
male to mini-DIN-6 female, at PC side in order to
plug the cable to the SW0202C.

-6-
Initial Power-up
Make sure all computers and KVM Switch are
powered down during installation. After connection,
you just power up the computers; the KVM Switch
will get enough power to operate from the computers.
This procedure ensures the KVM Switch receive
computer settings correctly when computer boots.
Therefore, the KVM Switch generates correct responses
and allows both computers to boot successfully without
user intervention. Should you decide to expand the
system in the future or to replace failed devices, you may
hot plug any additional power-downed computer and
KVM Switch to the system.
-7-
----------------- Operations
Front Panel operation
You may switch to a different computer by pressing the
front panel push-button directly or by issuing hot-key
commands. The front-panel red indicator changes to
reflect the computer port selected.The indicator flashes
while in either Auto Scan or Manual Scan mode.
Hot-key commands
Hot-key command is a short keyboard sequence to
select a computer, to activate computer scan, etc. The
KVM Switch interprets keystrokes for hot-keys all the
time. A hot-key sequence starts with two left Ctrl
keystrokes followed by one or two more keystrokes. A
built-in buzzer generates ahigh-pitch beep for correct
hot-key command; otherwise, one low-pitch beep for
error and the bad key sequence will not be forwarded to
the selected computer.
=To select a computer:
left Ctrl+ left Ctrl+ 1
Selects the computer at port 1.
left Ctrl+ left Ctrl+ 2
Selects the computer at port 2
Do not use the keypad at the right of the
keyboard.
=To start Auto Scan, automatically scan power-

-8-
on computers one by one at a fixed interval:
left Ctrl+ left Ctrl+ F 1
To abort the Auto Scan mode, press the left Ctrl
key twice. When Auto Scan detects any keyboard
or mouse activity, it suspends the scanning till
activity stops; it then resumes with the next
computer in sequence. The length of the Auto
Scan interval (Scan Rate) is adjustable, see
below.
=Manual Scan enables you to manually switch
back and forth betweenpower-on computers.
left Ctrl+ left Ctrl+ F2
Press ↑or ↓to select the previous or the next
computer in sequence. And, press any other
key to abort the Manual Scan.
=To adjust Scan Rate which sets the duration
before switching to the next computer in Auto
Scan:left Ctrl+ left Ctrl+ F3
The KVM Switch generates 1 to 4 beeps
indicating scan interval of 3, 8, 15 and 30
seconds respectively.
=To adjust keyboard typematic rate
(characters/sec), this setting over-rides that of
BIOS and any operating system:
left Ctrl+ left Ctrl+ F4
The KVM Switch generates 1 to 4 beeps
corresponding to 10, 15, 20 and 30
characters/sec respectively.
-9-
----------------- Appendices
Specifications SW0202C
Computer port number 2
Cascade control PCnumber Up to 4*
Front panel button control 1
Hot plug-and-play Yes
Hot-key control Yes
Automatic scan interval 3, 8, 15, 30 seconds
Year 2000 Compliant Yes
Cable Length (Max)
30M(100ft) at CONSOLE
30M(100ft) at PC
VGA 1920 x 1440, DDC2B
Computer keyboard connector
mouse
monitor
PS/2
PS/2, serial (with adapter)
HD-DB-15 male
Console keyboard connector
mouse
monitor
PS/2
PS/2
HD-DB-15 female
Weight 420g
H x W x D (mm)
(in.)
size
40x124x70
1.6x4.9x2.7
Micro
Power supply Optional (DC 9V,500mA)
* Use three SW0202Cs. If other models (SW0403C, SW0404C,
SW0802C, SW0803C, SW0804C, SW1602C, SW1603C) are
cascaded, you can control up to 122 computers.

-10
-
Troubleshooting
Ensure that all cables are well seated. Check
that keyboard/mouse cables are not swapped.
Label and bundle the cables for each computer
to avoid confusion when connected to the KVM
Switch.
Symptom Causes Solutions
Keyboard or
mouse does not
work
Improper power-up
sequence.
Keyboard or
mouse not properly
initialized.
Press and hold down the
push button for 3
seconds, the KVM Switch
will re-initialize the
keyboard and mouse.
If problem persists,
unplug the keyboard or
mouse, wait for few
seconds then plug it back.
Keyboard error
on boot Loose keyboard
connection. Make sure keyboard
cables are well seated.
Keyboard
strokes shifted
The computer was
in shifted state
when last switched
Press both SHIFT keys.
Auto Scan does
not switch PC
automatically
and KVM
Switch beeps
All PCs are off or
only one PC is
turned on. Scan
mode works for
power-on
computers only.
Turn computers on.
Press left Ctrl key twice
to abort Auto Scan mode.
-11
-
The↑and ↓
keys do not
work in Manual
Scan
All PCs are off or
only one PC is
turned on. Scan
mode works for
power-on
computers only.
Turn computers on.
Press any other key to
abort Manual Scan mode.
The KVM
Switch fails to
function
occasionally.
Computers do not
supply enough
power.
Add a power adapter with
minimum of DC 9V
500mA output rating to
the SPARE power jack.
Computer can
not useserial
mouse
Loose mouse
adapter
Incorrect mouse
adapter.
Secure the mouse
adapter to computer’s
COM port.
Use only the mouse
adapter comes with the
SW0202C.
Not functional
in cascade
configuration.
In master/slave
configuration, the
master unit must
have equal or more
PC ports than that
of slaves. If
SW0202C is a
slave, its master
can be SW0202C,
SW0403C, SW0404C,
SW0802C, SW0803C,
SW0804C, SW1602C,
SW1603C
SW0202C can be a slave
of SW0202C, SW0403C,
SW0404C, SW0802C,
SW0803C, SW0804C,
SW1602C an
d SW1603C.
If SW0202C is a master,
only SW0202C can be its
slave.

-12
-
Other KVM Switches
Other high-performance KVM switches
One-Console KVM Switch
NoOSD OSDmodel Rack-mountkit
2-port SW0202C
4-port SW0403C
SW0404C
RMK04
8-port SW0802C
SW0803C
RMK08
16-port SW1602C
RMK16
Two-Console KVM Switch
OSDmodel Rack-mountkit
8-port SW0804C
RMK08
16-port SW1603C
RMK16
-OSD: Advanced On-Screen Display interface
enables you to assign PC names, access PCs by
the names. Other features include
programmable scan pattern, password security,
etc.
-Rack-mount Kit: for industry-standard 19-inch
rack cabinet with cable support.
-Two-Console KVM switch: provides two access
points (local & remote up to 100ft/30M) to
manage 8 or 16 computers.
-13
-
FCC Statement
This equipment has been tested and found to comply with the limits for a
Class B digital device, pursuant to part 15 of the FCC Rules. These limits
are designed to provide reasonable protection against harmful interference in
a residential installation. This equipment generates, uses and can radiate
radio frequency energy and, if not installed and used in accordance with the
instruction, may cause harmful interference to radio communications.
However, there is no guarantee that interference will not occur in a particular
installation. If this equipment does cause harmful interference to radio or
television reception, which can be determined by turning the equipment off
and on, the user is encouraged to try to correct the interference by one or
more of the following measures:
-Reorient or relocate the receiving antenna.
-Increase separation between the equipment and receiver.
-Connect the equipment into an outlet on a circuit different from that to
which the receiver is connected.
-Consult the dealer or an experienced radio technician for help.
Limited Warranty
IN NO EVENT SHALL THE DIRECT VENDOR'S LIABILITY FOR DIRECT
OR INDIRECT, SPECIAL, INCIDENTIAL OR CONSEQUENTIAL
DAMAGES, LOSS OF PROFIT, LOSS OF BUSINESS, OR FINANCIAL
LOSS WHICH MAY BE CAUSED BY THE USE OF THE PRODUCT
EXCEEDS THE PRICE PAID FOR THE PDOCUDT.,
The direct vendor makes no warranty or representation, expressed or implied
with respect to the contents or use of this documentation, and especially
disclaims its quality, performance, merchantability, or fitness for any
particular purpose.
The direct vendor also reserves the right to revise or update the product or
documentation without obligation to notify any user of such revisions or
updates. For further information, please contact your direct vendor.
All the brand names and registered trademarks are the property of their
respective owners.

-14
-
PP5-N1200-007
Printed in Taiwan
Table of contents
Other Equip Switch manuals

Equip
Equip 332725 User manual

Equip
Equip 332721 User manual

Equip
Equip Desktop KVM Switch User manual

Equip
Equip 128927 User manual

Equip
Equip 332722 User manual

Equip
Equip 128542 User manual

Equip
Equip USB Cable KVM Switch 2 Port + Audio User manual

Equip
Equip 128544 User manual

Equip
Equip Vision 332702 User manual

Equip
Equip HUBBIES08B User manual
Popular Switch manuals by other brands

Ametek
Ametek Magnetrol B74 Installation and operating manual

Edimax
Edimax ES-5224RM manual

EMP-Centauri
EMP-Centauri S?16/1?PCP-W3 Operation manual

Digitus professional
Digitus professional DN-80111 manual

Radial Engineering
Radial Engineering SW8-USB owner's manual

Advantech
Advantech EKI-3725 Startup manual