Equipter RB4000 User manual
RB4000 SERVICE MANUAL


i
All rights reserved. No part of this publication may be reproduced, stored in a retrieval system, or
transmitted in any form or by any means, electronic, mechanical, photocopying, recording, or otherwise,
without prior written permission of New Heights, LLC.
The information in this manual is provided to promote the safe use of, and assist the operator in achieving
the best performance from Equipter products described herein, for their intended applications.
DISCLAIMER
Copyright 2019 by New Heights, LLC
Covered by Patent Number 6817677

ii
(1) Air Filter
(1) Spark Plug
(1) Engine Oil
(1) Long Neck Funnel for Engine Oil
(1) Hydraulic Oil Filter
(1) Grease Tube
(1) 12mm Wrench
(1) Pair of Gloves
EQUIPTER SERVICE KIT PART LIST
Recommended Service Schedule .................................................................................................................................... 1
Replacement Parts................................................................................................................................................................. 1
Maintenance Precautions.................................................................................................................................................... 1
Replace Air Filter.................................................................................................................................................................... 2
Replace Spark Plug............................................................................................................................................................... 2
Replace Engine Oil. ............................................................................................................................................................... 3
Replace Hydraulic Oil Filter................................................................................................................................................ 3
Inspect Trailer Brakes........................................................................................................................................................... 3
Inspect Parking Brake. ......................................................................................................................................................... 4
Inspect Breakaway System................................................................................................................................................. 4
Inspect Hydraulic Hoses...................................................................................................................................................... 4
Tires. ............................................................................................................................................................................................ 4
Lubricate Fittings............................................................................................................................................................... 5-6
Slide Rails............................................................................................................................................................................ 5
Wheel Lock Pin.................................................................................................................................................................. 5
Wheel Lock Handle.......................................................................................................................................................... 6
Front Axle Hub................................................................................................................................................................... 6
Axle Engagement System.............................................................................................................................................. 6
Index A: Service Providers...................................................................................................................................................7
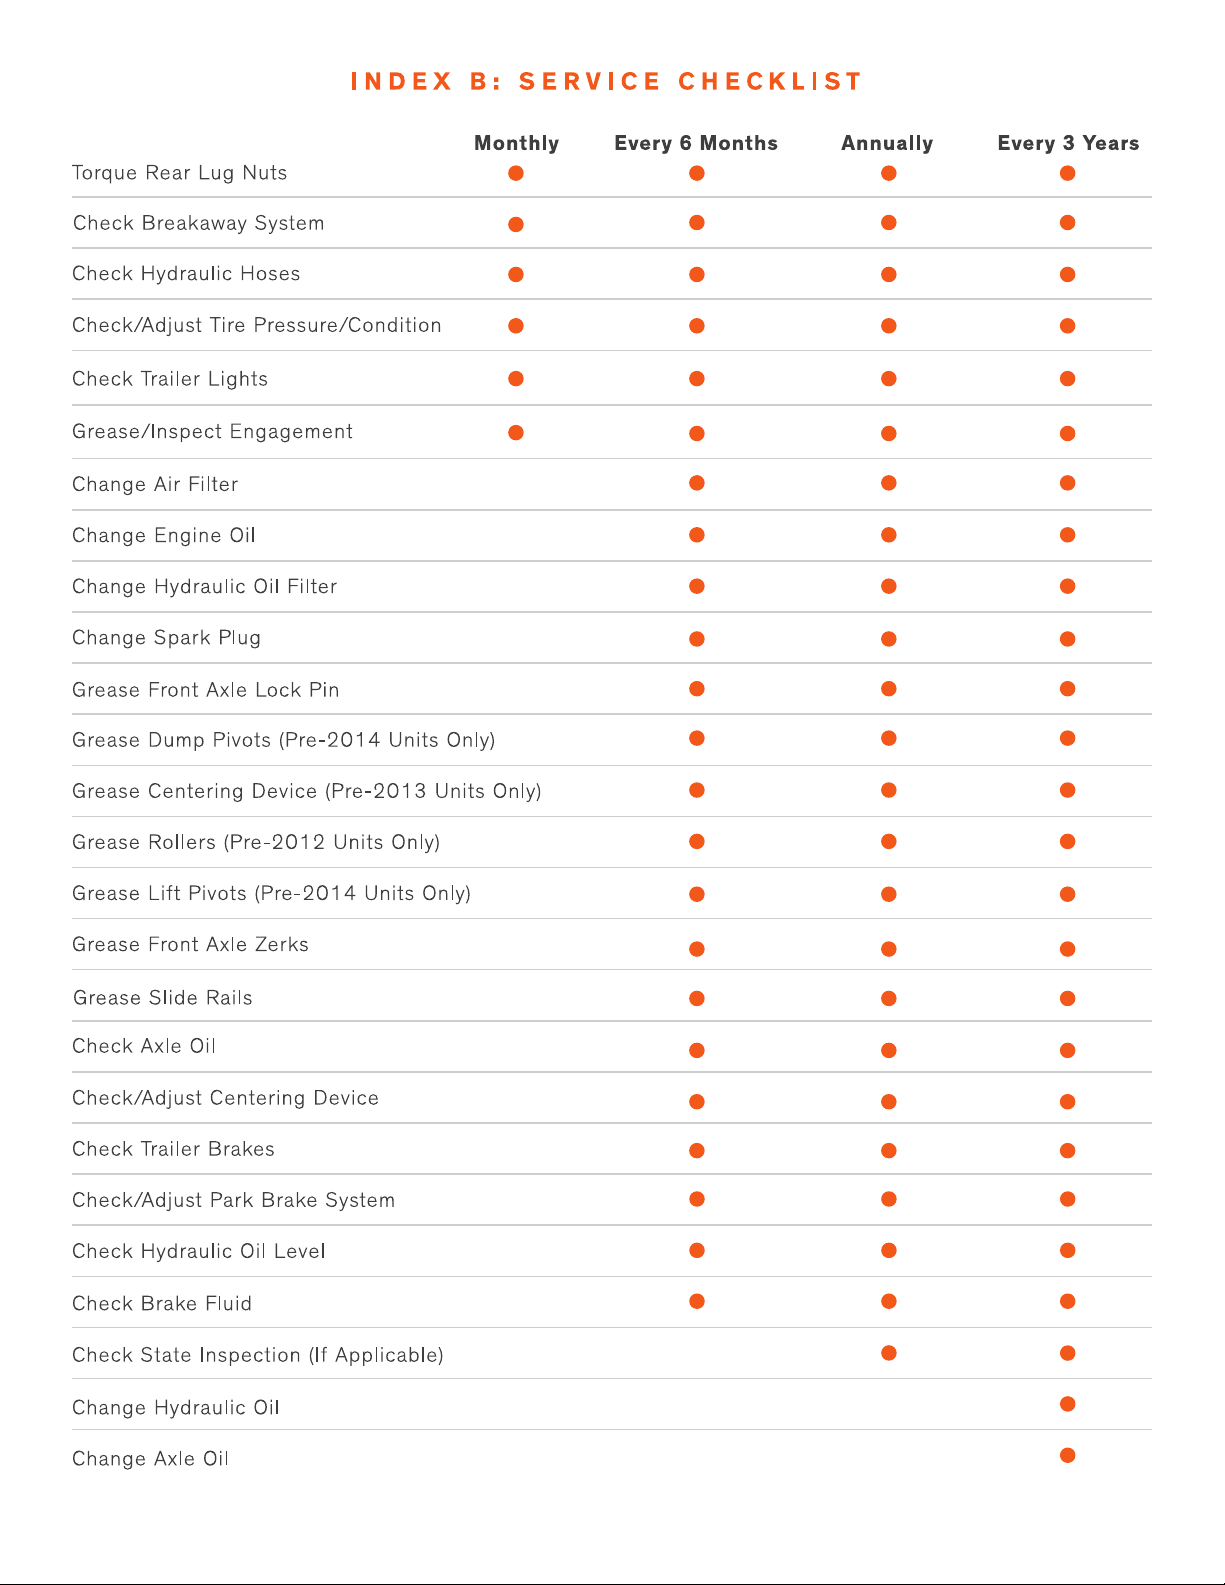
Index B: Service Checklist.................................................................................................................................................. 8
Index C: Service Schedule...........................................................................................................................................9-10
TABLE OF CONTENTS
For more than 15 years, our team has manufactured Equipter products using top-quality processes
and components. To protect your investment and ensure a long service life, it’s essential to perform
regular maintenance.
If you encounter wear beyond what’s outlined in this manual, see Index A to have your RB4000
serviced at a qualified shop.
See Index A of this booklet or contact your local service provider to purchase a service kit for your
RB4000.

1
Recommended Service Schedule
We recommend doing the first preventative maintenance at about 30 service hours. Following this service,
select maintenance tasks should be performed monthly, every six months, and so forth. Please refer
to Index B: Service Checklist for a comprehensive list of preventative maintenance tasks and when to
complete them.
Replacement Parts
Use only manufacturer-recommended replacement parts. Other parts may be substandard in fit and
quality.
For additional replacement parts, contact the service provider (Index A).
Maintenance Precautions
Always take proper safety precautions while servicing this equipment. For complete RB4000 safety
and operation guidelines, refer to the Operator’s Manual. If you do not have a manual, contact the
manufacturer’s recommended service provider.
Always perform maintenance when the vehicle is level.
Never do any maintenance or adjustments while the equipment is operating. Turn off the engine when
performing maintenance to prevent accidental movement.
Never perform maintenance on this machine unless the dump box is completely in the transport position
(fully retracted and lowered). To perform maintenance under the dump box, the box can be tilted in the
dump position. It must be secured with the support arm in place. Never perform maintenance with the
dump box in the lifted position.
Make sure all operating and residual pressures are relieved before working on a hydraulic system.
Shut engine off and operate all the controls to relieve any pressure.
Replace all safety shields and guards when finished performing maintenance. Do not operate the
equipment with protective equipment removed.
2
1. Unscrew the wing knob.
2. Remove the air filter cover.
3. Remove the wing nut.
4. Lift the old air filter away and replace
with the new filter.
5. Replace the wing nut.
6. Replace the air filter cover.
7. Replace the wing knob.
REPLACE AIR FILTER
NOTE: The spark plug is easier to
change with the air filter cover and base
removed. The wrench can be found in
the canister or holder that contains the
RB4000 Operator’s Manual.
1. Pull off the spark plug cap.
2. Use the wrench to unscrew the spark
plug.
3. Install the spark plug carefully, by hand,
to avoid cross-threading.
4. Tighten with the spark plug wrench to
compress the sealing washer until it sets.
5. Tighten the new spark plug ½ turn after
the spark plug seats.
6. Push the cap back on.
7. Replace the air filter cover and base.
REPLACE SPARK PLUG
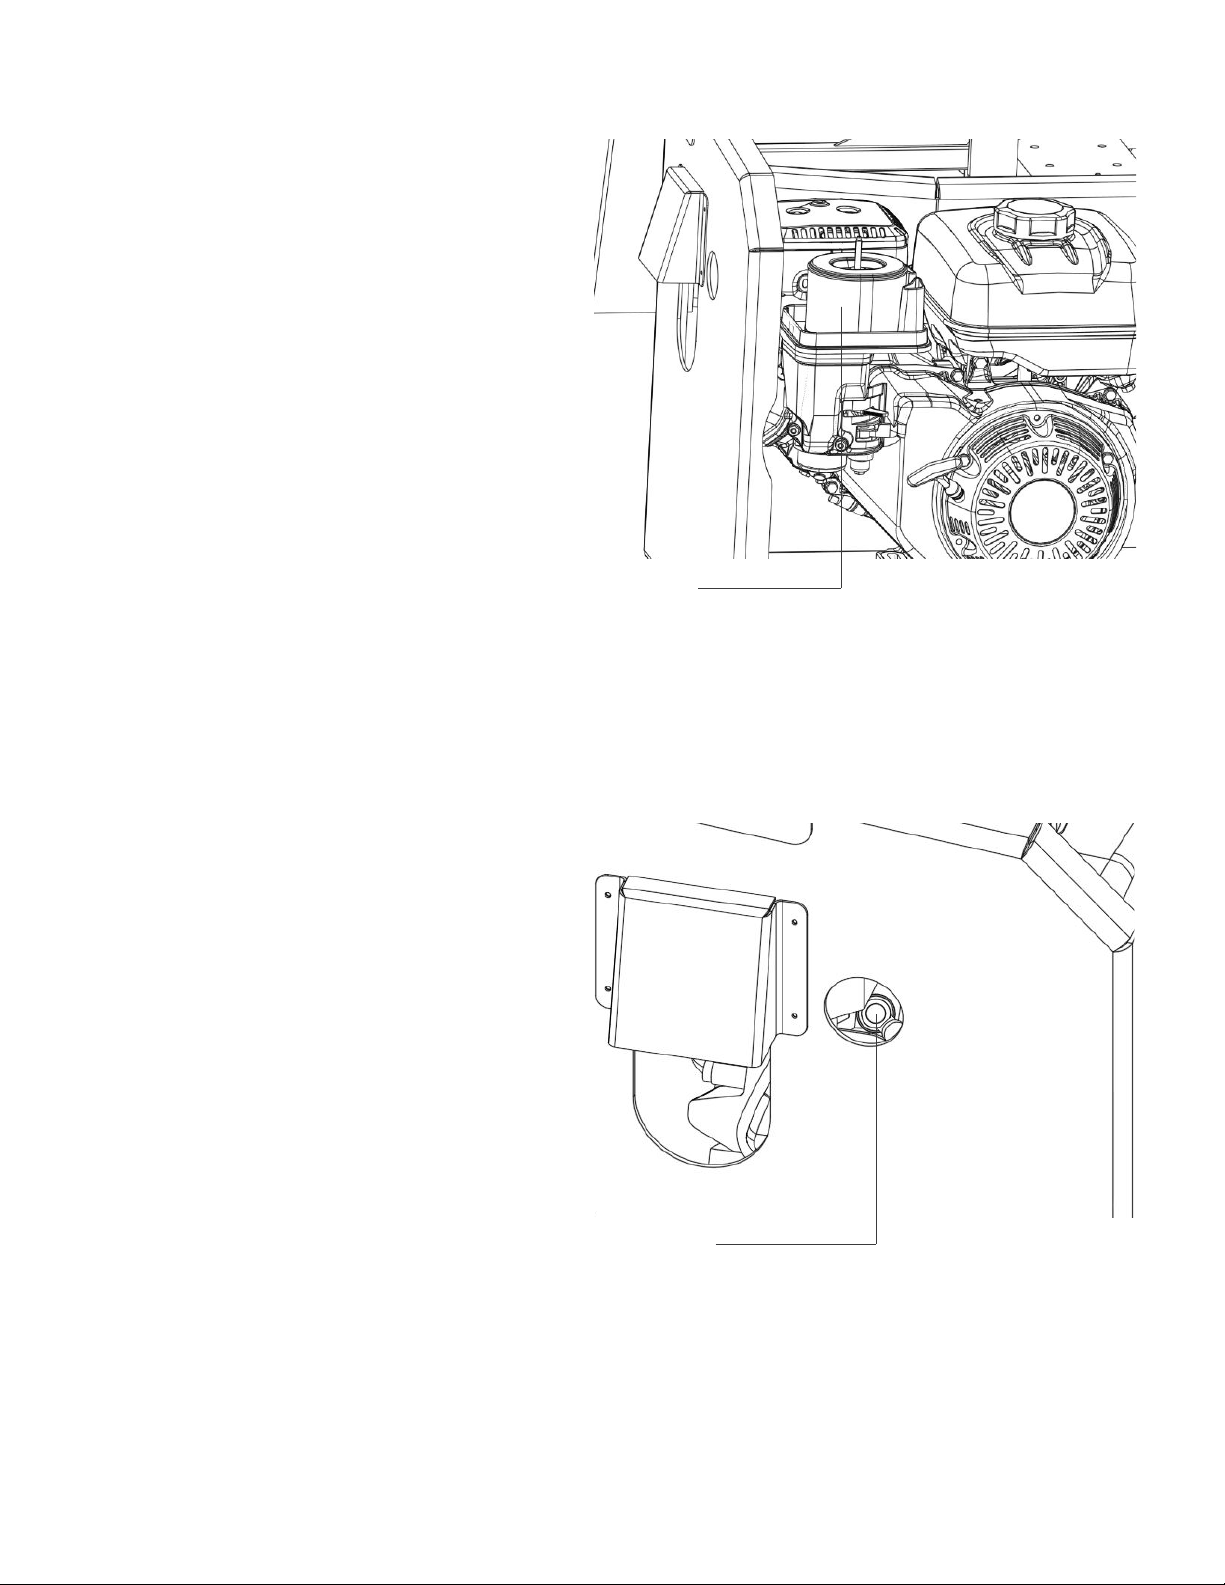
Spark Plug
Air Filter

NOTE: Drain oil while the engine is
still warm to ensure rapid, complete
draining.
1. Undo the drain bolt using the 12mm
wrench provided in this service kit.
2. Drain oil through the hole into an
appropriate container.
3. Replace the bolt.
4. Remove the fill cap.
5. Insert the provided funnel through the
fill hole.
6. Add new oil using 1 US quart of low-30
synthertic oil.
7. Replace the fill cap.
REPLACE ENGINE OIL
1. Unscrew the used hydraulic filter.
2. Twist on the new filter.
3. As you twist, you will feel the seal hit the filter mount housing. When this happens, turn it another
¾ turn.
Always dispose of used oil filters in compliance with your local regulations.
REPLACE HYDRAULIC OIL FILTER
• Visually inspect all brake pads for wear.
• If brakes aren’t working properly, confirm the fuse is working and check the brake fluid level.
INSPECT TRAILER BRAKES
3
Always dispose of used oil in compliance with your local regulations.
Check / Replace Oil
Drain Oil Check / Replace Oil
4
• Visually inspect the parking brake
handle for wear.
• If it’s loose, turn the handle clockwise
until it’s tight.
INSPECT PARKING BRAKE
• Pull out the breakaway pin and listen for the actuator to make a humming noise from behind the
engine area.
• If you don’t hear the humming noise, check the inline fuse in the battery box. If needed, replace with
a 30-amp fuse (not included in this 6-month service kit).
INSPECT BREAKAWAY SYSTEM
• Visually inspect to ensure there’s no dry rot, wear, or damage that exposes the wires beneath.
• Damaged hoses should be replaced immediately by a qualified service shop.
CHECK HYDRAULIC HOSES
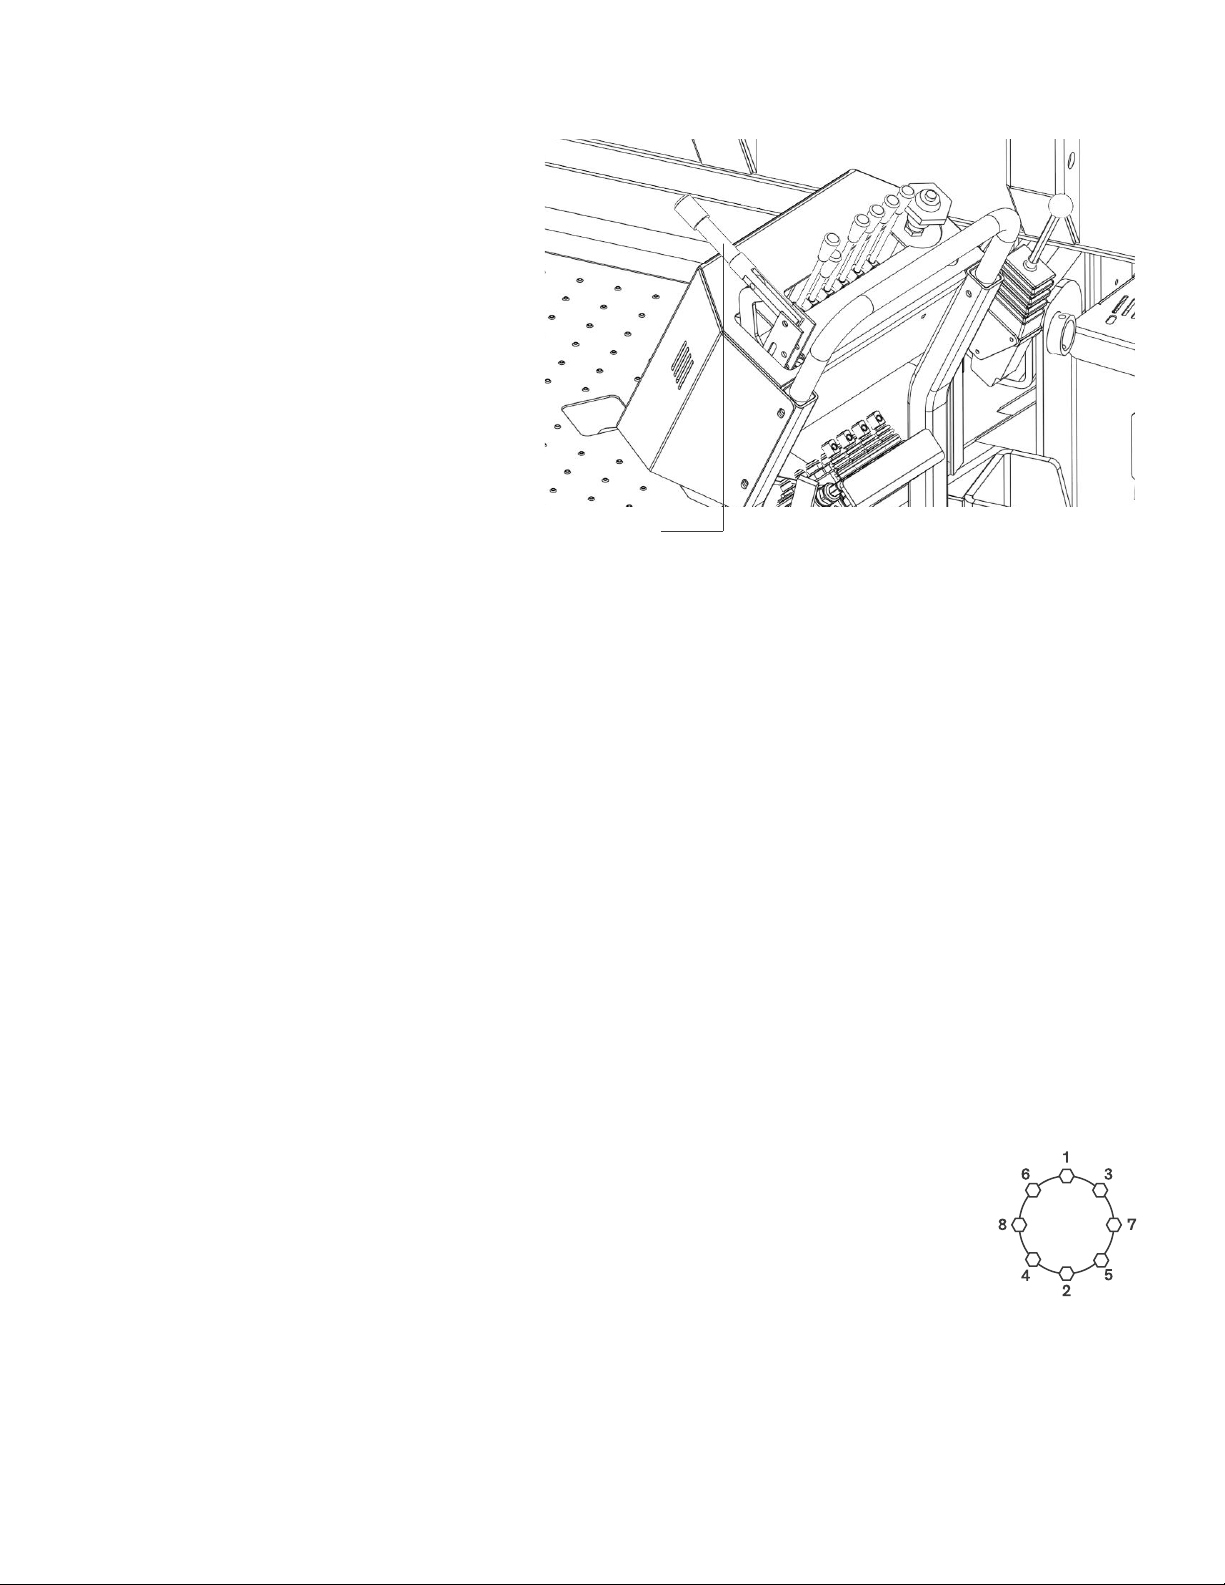
TIRES
• Front tires: visually inspect, check
pressure, and, if needed, tighten lug nuts.
• Rear tires: visually inspect and check
pressure. You must also make sure rear
tire lug nuts are tightened to 140 ft-lbs,
in the order outlined in the illustration.
Wheel bolt tightening sequence
Brake Handle

5
NOTE: Never work under the raised dump
box without using the safety arm to prevent
the box from falling down.
All four stabilizers and rollback must be
fully extended when greasing fittings on the
RB4000.
Greasing guidelines vary slightly on pre-
2014 RB4000 units. For older units, contact
the manufacturer’s recommended service
provider (Index A) for guidance on grease
locations.
Use provided grease tube to apply lubricant
to the following areas on all units:
LUBRICATE FITTINGS
Slide Rails
NOTE: Use provided gloves to apply the
grease to slide rails directly.
1. With the rollback fully extended, grease
the 3” x 5” tubes.
2. Grease the inside of the 4” x 6” tubes.
Wheel Lock Pin
NOTE: This step is applicable
for units manufactured on or
before October 2019. Units after
October 2019 are equipped with a
greaseless bushing.
1. Reach under the wheel lock
guard.
2. Insert grease into the zerk.
3. Pull the wheel lock handle and
grease the pin.
Step 1
Step 2
Safety Arm

Axle Engagement System
NOTE: The fitting in the drive system should
be lubricated every 40 hours to ensure
proper operation. To access the grease
fitting:
1. Engage the parking brake.
2. Lower the stabilizers.
3. Release the safety latch and raise the front
steering wheels completely.
4. Tilt the dump box to gain access to the top
of the drive axle. Place prop under the dump
box for additional safety while lubricating the
axle engagement system.
5. Insert grease into the zerk.
NOTE: If the grease fitting is rotated away and cannot be accessed, the drive system can be
operated to spin the drive shaft. Use the drive control lever to “bump” the system until the grease
fitting is accessible.
For additional replacement parts or service assistance, contact the maufacturer’s recommended service
provider.
Front Axle Hub
1. Use a flat screwdriver to remove the
rubber grease cap.
2. Insert grease into the zerk until the zerk
is full.
3. Spin the tire to ensure the wheel turns
freely.
4. Replace the rubber grease cap.
5. Repeat on the opposite front wheel.
6
Grease Zerk
Wheel Lock Handle
1. Disengage the wheel lock pin.
2. Grease the wheel lock pin.
3. Replace the wheel lock pin.
Wheel Lock Pin
7
INDEX A: SERVICE PROVIDERS
Manufacturer’s Recommended Service Provider
Equipter, LLC
49 Eagle Drive
Suite 102
Leola, PA 17540
(717) 661-3591
support@equipter.com
Your Local Service Providers
8

INDEX C: RB4000 SERVICE SCHEDULE
Date:
Date:
Date:
Date:
Date:
Date:
Notes:
Notes:
Notes:
Notes:
Notes:
Notes:
Service Type:
Service Type:
Service Type:
Service Type:
Service Type:
Service Type:
Engine Hours:
Engine Hours:
Engine Hours:
Engine Hours:
Engine Hours:
Engine Hours:
9

INDEX C: RB4000 SERVICE SCHEDULE
Date:
Date:
Date:
Date:
Date:
Date:
Notes:
Notes:
Notes:
Notes:
Notes:
Notes:
Service Type:
Service Type:
Service Type:
Service Type:
Service Type:
Service Type:
Engine Hours:
Engine Hours:
Engine Hours:
Engine Hours:
Engine Hours:
Engine Hours:
10


©2019 New Heights, LLC. All rights reserved. No part of this manual may be reproduced, in any form, without prior, express, written
authorization of New Heights, LLC.
Other manuals for RB4000
2
Table of contents


