ER KEYFREE Technical specifications
KEYFREE TRANSMITTER
Carrier frequency 433,92 MHz
Modulation AM/ASK
N° channels 1
E.r.p. 1 mW
Battery type CR123A
Operating voltage 3 Vdc
Current consumption 12-15 µA : stand-by
20 mA : transmission
Battery life 2 years
Security protocol
Code combinations 2exp64
Range in open space 200/400 m
Operating temperature -20°/+80°C
Enclosure IP grade IP55
Dimensions (mm) 60 x 90 x 25
Weight ( gr. ) 93
KeeLoq® Hopping code
2 - TECHNICAL SPECIFICATIONS
1 - INTRODUCTION
The Erone Keyfree transmitter is a special radio transmitter
operating at 433,92 MHz in AM/ASK modulation. It’s mainly
composed by a capacitive touch sensitive circuit and by a radio
transmitter. It can be used to operate gates or garage doors or any
device with the corresponding compatible 433 MHz receiver.The
security protocol is a rolling code type.
Each product is already factory programmed with a different
security code. The button is battery supplied with a CR123A lithium
battery for 2 year life. The enclosure protection grade IP55 allows
outdoor installations.The product fully complies to the
requirements of the European Directives 73/23/CEE,
89/336/CEE, 99/05/CE.
Use and installation manual
Thank you for choosing this product .
You are recommended to read this manual carefully before
installing this product.
WARRANTY
The guarantee period of all Erone products is 24 months, beginning from the
manufacturer date. During this period, if the product does not work correctly,
due to a defective component, the product will be repaired or substituted at
the discretion of the producer. The guarantee does not cover the plastic
container integrity. After-sale service is supplied at the producer's factory.
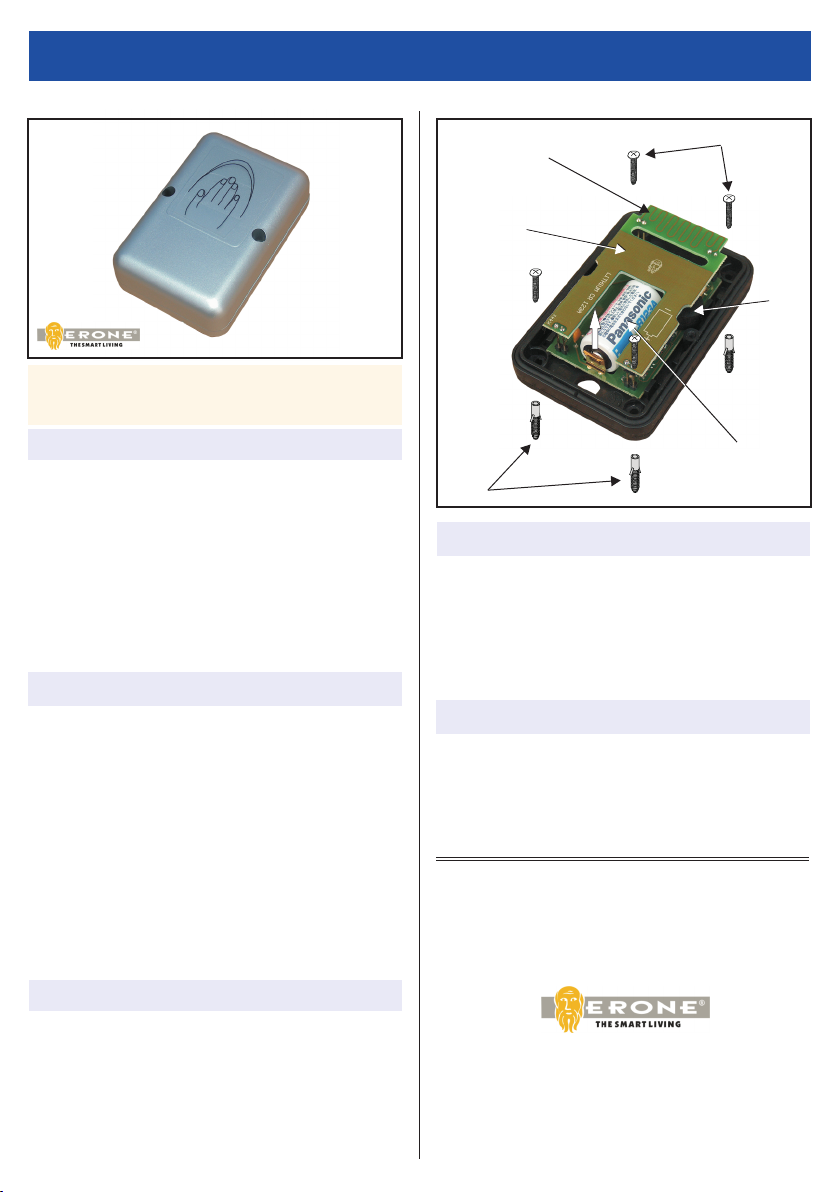
Mounting screws
Plugs
CR123A
Lithium Battery
Lift to remove
battery
3 - INSTALLATION PHASES
4 - OPERATE
The Button operates when you skim over the external surface with
the hand. The sensitivity of the detector can change according to
the fixing surface type: metallic surfaces increase the sensitivity but
can reduce the range of the radio transmission. Approach the
cover or touch it until the buzzer sounds.The RF transmissions lasts
all time the buzzer sounds. Normally it’s necessary to skim over the
cover with the hand and not only with a single finger.
Touch sensitive
area
RF Antenna
Buzzer
The appliance uses a lithium battery type CR123A. Insert the
new battery on the battery location, respecting the right
polarity. The removal and the disposal of the battery must
have effected before the elimination of the appliance and
according to the current Regulations.
5 - BATTERY REPLACEMENT
1. Locate the best position for the installation, avoiding metallic
surfaces that could decrease the RF transmission.
2. Using the box bottom as a template mark the position of the
4 mounting holes.
3. Drill the mounting holes and insert the plugs.
4. Assemble base and seal together, install to mounting surface
using 4 screws.
5. Install the module to base and secure with the screws.
FKT2641E1
Manufactured by CDVI Wireless Spa
Via Piave, 23 - 31020 S.Pietro di Feletto (TV) - ITALY
Tel.: +39/0438/450860 - Fax.:+39/0438/455628
E-Mail: [email protected]
Web: www.erone.com

NADAJNIK DOTYKOWY
Częstotliwość: 433,92 MHz
Modulacja: AM / ASK
Liczba kanałów: 1
Szacowane E.r.p. : 1 mW
Typ baterii: CR123A
Napięcie: 3 VDC
Pobór prądu: 12-15 µA : w czuwaniu
20 mA: transmisja
Czas pracy baterii: 2 lata
Liczba kombinacji kodu
bezpieczeństwa: 2exp64
Zasięg na otwartej przestrzeni: 200/400 m
Temperatura pracy: -20 ° C / + 80 ° C
Klasa szczelności IP: IP55
Wymiary: 60 x 90 x 25 mm
Waga: 93 g
2 – SPECYFIKACJA TECHNICZNA
1 - WPROWADZENIE
Nadajnik Bezdotykowy, jest specjalnym nadajnikiem
radiowym działającym na częstotliwości 433,92 MHz i
modulacji AM/ASK. Składa się głównie z obwodu
pojemnościowego oraz nadajnika radiowego. Może być
używany do obsługi bram garażowych i drzwi lub innego
urządzenia kompatybilnego z odpowiednim odbiornikiem 433
MHz. Zastosowany protokół bezpieczeństwa to rolling code.
Każdy produkt jest fabrycznie zaprogramowany innym kodem
bezpieczeństwa. Ten dotykowy przycisk, zasilany jest baterią
litową CR123A z czasem działania 2 lata. Stopień ochrony
obudowy IP55, pozwala na instalację na zewnątrz. Produkt w
pełni spełnia wymagania europejskich dyrektyw 73/23/CEE,
89/336/CEE, 99/05/CE.
Instrukcja instalacji oraz użytkowania
Dziękujemy za wybór tego produktu.
Zalecamy się uważnie zapoznać się z niniejsza instrukcją przed
rozpoczęciem instalacji.
IS-FKTERML-PL Rev. 0 del 21/3/2016
Manufactured by CDVI Wireless Spa
Via Piave, 23 - 31020 S.Pietro di Feletto (TV) - ITALY
Tel.: +39/0438/450860 - Fax.:+39/0438/455628
E-Mail: [email protected]
Web: www.erone.com
Gwarancja
Okres gwarancji: 24 miesiące od daty produkcji. W tym okresie, jeżeli
urządzenie ma awarię z powodu wadliwego elementu, zostanie
naprawione lub wymienione przez producenta. Gwarancja nie
obejmuje plastikowej obudowy. Wsparcie techniczne, zostanie
przeprowadzone na miejscu u producenta.
Wkręty montażowe
Kołki
Bateria litowa
CR123A
Podnieś aby
Usunąć
baterię
3 – FAZY INSTALACJI
4 – PRACA Z URZĄDZENIEM
Przycisk działa, gdy muśniesz palcami dłoni zewnętrzną
powierzchnię obudowy. Czułość czujnika może zmieniać się
w zależności od rodzaju powierzchni montażu. Powierzchnia
metalowa zwiększa czułość, ale może ograniczyć zasięg
transmisji radiowej. Transmisja radiowa trwa cały czas
sygnału brzęczyka. Zwykle konieczne jest muśnięcie pokrywy
dłonią, a nie tylko za pomocą jednego palca.
Czuła strefa
dotyku
Antena RF
Brzęczek
Urządzenie korzysta z baterii litowej typu CR123A. Włóż nową
baterię zachowując właściwą polaryzację. Unieszkodliwienie
usuniętej baterii z urządzenia, musi być przeprowadzone
według obowiązujących przepisów.
UWAGA:Niebezpieczeństwo wybuchu, jeśli bateria nie
zostanie wymieniona we właściwy sposób! Wymienić tylko na
taką samą lub równoważnego typu.
5 – WYMIANA BATERII
1. Znajdź najlepsze miejsce na instalację, unikając
powierzchni metalowych, które mogłyby zmniejszyć
transmisję RF.
2. Wykorzystać obudowę, jako szablon do zaznaczenia
pozycji 4 otworów montażowych.
3. Wywiercić otwory montażowe i włożyć kołki.
4. Zamontować podstawę i uszczelnić całość, przymocować
do powierzchni montażowej przy użyciu 4 śrub.
5. Zamontować moduł do podstawy i przymocować za
pomocą wkrętów.
FKT2641E1
Table of contents
Languages:


