Erbauer ERN646ATL-I User manual
AIR GREASE GUN
ERN646ATL-I
BX220IM

AIR GREASE GUN
GUARANTEE
This product carries a 2 year guarantee. If your product develops a fault within this
period, you should in the first instance contact the retailer where the itemwas purchased.
This guarantee specifically excludes losses caused dueto:
- Fairwear and tear
- Misuse or abuse
- Lack of routine maintenance
- Failure of consumable items (such as batteries)
- Accidental damage
- Cosmetic damage
- Failure to followmanufacturer’s guidelines
- Loss of use of the goods
Consumables supplied with this product are excluded from any guarantee offered.
This guarantee does not affect your statutory rights. This guarantee is only valid in UK,
France, Poland, Germany, Romania, Spain, Portugal, and Ireland.
Congratulations on your purchase of a quality powertool fromKingfisher
International Products B.V..This product should give you reliable service but for
your peace of mind this power tool does carry a 2 year guarantee, the
terms of which are detailed below.
If this product develops a fault within the guarantee period contact your retailer.
Please retain this handbook in case you need to refer to safety, care or
guarantee information in the future.

AIR GREASE GUN
GENERAL SAFETY RULES
WARNING!
Improper operation or maintenance of this tool could result in
personal injury and/or property damage. Read and understand all
warnings and operation instructions before using this tool.
When using this tool, these basic safety precautions should
always be followed to reduce the risk of personal injury and/or
property damage.
Workplace conditions
1. Always work in a clean, dry, well-ventilated area free of combustible materials.
Never operate the tool near flammable substances such as gasoline, naphtha,
cleaning solvent, etc.
2. Dress properly. Do not wear loose clothing. Tie up or cover long hair, remove any
jewelry, necklaces, etc., which might become caught by the tool.
3. Keep the work area well lit and free of clutter. Slips, trips and falls are major
causes of workplace injury. Be aware of excess air hose left on your walking way
or on the working surface.
4. Ensure that there are no electrical cables, gas pipes, etc., which can cause a
hazard if damaged by use of the tool.
5. Keep visitors a safe distance from the work area. Keep children away.
Use of air tools
1. Stay alert and use common sense. Watch what you are doing. Do not operate the
tool when you are tired or under the influence of alcohol, drugs or medication.
2. Do not overreach. Keep proper footing and balance at all times.
3. Always wear eye protectors which provides protection from flying particles from
the front and side when using the tool. Ear protectors should also be worn.
4. Never use oxygen, carbon dioxide, combustible gases or any other type of
bottled gases as a power source for this tool.
5. Always verify prior to using this tool that the air source has been adjusted to the
rated air pressure range. Never connect to an air source that is capable of
exceeding 200psi.
6. Do not connect the air supply hose to the tool with your finger on the trigger.
7. Do not exceed the maximum working pressure 90psi/6.3bar for the tool.
Excessive pressure will reduce the tool life and/or might cause a hazardous
situation.
8. Never leave the operating tool unattended. Disconnect the air hose when the tool
is not in use.
9. Keep the air supply hose away from heat, oil and sharp edges.

AIR GREASE GUN
10. Check the air supply hose for wear and/or leaks before each use. Make sure that
all connections are tight and secure.
11. Do not use the tool for any other than its intended use.
12. Do not carry out any alternations and/or modifications to the tool.
13. Always disconnect the tool from air supply before replacing any accessories,
performing any repair and maintenance, moving to another work area, or passing
the tool to another person.
14. Never use the tool if it is defective, damaged, or operating abnormally.
15. Check for misalignment or binding of moving parts, breakage of parts and any
other condition that affects the tool operation. If damaged, have the tool serviced
before using.
16. Keep working parts of the tool away from hands and body.
17. Do not carry the tool by the air hose.
18. Do not apply excessive force of any kind to the tool. Let the tool perform the work
at the rate as it was designed.
19. Do not remove any labels on the tool. Replace if they become obscured or
damaged.
20. Always maintain the tool with care. Keep it clean for the best and safest
performance.
21. It is not recommended that quick change couplings should be located directly at
the air inlet, as they add weight and could fail due to vibration.
Air grease gun safety instructions
1. Always use the grease gun in the manner and for the functions described in this
manual.
2. Always ensure the gun is disconnected from the air supply when loading grease.
3. Always ensure that the cartridge grease is loaded into the tool correctly and
securely before starting the tool.
4. Never point the grease gun at anybody or pets when the gun is loaded and
connected with air supply.
5. Never carry the gun by the air supply hose.
6. Always disconnect the grease gun from the air supply when the gun is not required
for immediate use in order to avoid accidental start.
7. Do not discard the safety instructions, give them to the operator.
8. Always store this product in a dry and safe place out of reach of children or
untrained operators.

AIR GREASE GUN
AIR SUPPLY
Please refer to the typical air system layout recommended below.
WARNING! Compressed air can be dangerous. Ensure that you
are familiar with all precautions relating to the use of compressors
and compressed air supply.
1. Use only clean, dry, regulated compressed air as the power source.
2. Air compressors used with the tool must comply with the appropriate European
Community Safety Directives.
3. Make sure that the air compressor being used for the tool operation supplies the
correct output (CFM).
4. Have the tool in "off" position when connecting the tool to the air supply.
5. Use normal 90psi working pressure for the tool. High pressure and unclean air will
shorten the tool life due to the faster wear and also maycreate a safety hazard.
6. Drain water from the air compressor tank daily, as well as any condensation in
the air lines. Water in the air line may enter the tool and cause damage to the tool
mechanisms at operation.
7. Clean the tool air inlet screen filter for blockage weekly. Clean if necessary.
8. Usually a 3/8" (inner diameter) air hose is recommended for air supply and
airflow to get the optimum performance of tool.
9. A long air hose (usually over 8 meters) may cause up to 15psi drop in pressure,
so you need to set the output pressure of the air compressor higher to maintain
the required working pressure at the tool.
10. Use proper hoses and fittings. We do not suggest connecting quick change couplings
directly to the tool since they may cause failure due to tool vibration at operation.
Instead, add a lead hose and connect coupling between air supplyand hose whip.
11. Check hoses for wear before each use. Make certain that all connections are in
security.
AIR SYSTEM LAYOUT:
1. Air Tool
2. Air Hose 3/8" (I.D.)
3. Oiler
4. Pressure Regulator
5. Filter
6. Shut Off Valve 11. Air Dryer
7. Whip Hose 12. 1" Or Larger Pipe And Fitting
8. Coupler Body And Connector 13. Air Compressor
9. Drain Daily 14. Auto Drain
10. 1/2" Or Larger Pipe And Fitting 15. Drain Daily

AIR GREASE GUN
SYMBOLS
On the product, the rating label and within these instructions you will find among
others the following symbols and abbreviations. Familiarise yourself with them to
reduce hazards like personal injuries and damage to property.
CFM
Cubic feet per minute
PSI
Pound per square inch
xxWxx
Manufacturing date code; year of manufacturing (20xx) and week of
manufacturing (Wxx)
SN
Serial number
Caution / Warning.
Read the instruction manual.
Wear hearing protection.
Wear eye protection.
Wear protective gloves.
The product complies with the
applicable European
directives and an evaluation
method of conformity for
these directives was done.

AIR GREASE GUN
PRODUCT DESCRIPTION
PART
DESCRIPTION
QUANTITY
A
Tip
1
B
Rigid Coupler Assembly
1
C
Connector
1
D
Front Housing
1
E
Main Housing
1
F
Air Inlet
1
G
Container Tube
1
H
Follower Rod
1
I
Handle
1
J
Locking Plate
1
K
Trigger
1
L
Air Vent Valve
1
M
Fill Nozzle
1

AIR GREASE GUN
TECHNICAL SPECIFICATIONS
COMPONENT
SPECIFICATIONS
Capacity
Working pressure
Average air consumption
Air hose (inner diameter)
Air inlet
500cc
90psi (6.3bar)
6cfm
3/8"
1/4" BSP
INTENDED USE
This air grease gun ERN646ATL is durable in construction and ergonomic with
rubber protective grip. It features standard 500 cc. grease canister, which can be
loaded either with cartridge grease, or by suction filling, or by filler pump filling. The
intended use includes the delivery of grease in machinery and automotive industry.
For safety reasons it is essential to read the entire instruction manual before first
operation and to observe all the instructions therein.
This product is intended for private domestic use only, not for any commercial trade
use. It must not be used for any purposes other than described.
UNPACK
1. Unpack all parts and lay them on a flat, stable surface.
2. Remove all packing materials and shipping devices if applicable.
3. Make sure the delivery contents are complete and free of any damage. If you find
that parts are missing or show damage do not use the product but contact your
dealer.
4. Using an incomplete or damaged product represents a hazard to people and
property.
5. Ensure that you have all the accessories and tools needed for assembly and
operation. This also includes suitable personal protective equipment.
AIR GREASE GUN
GREASE LOADING
WARNING! Always disconnect air supply from the tool before you are
loading grease.
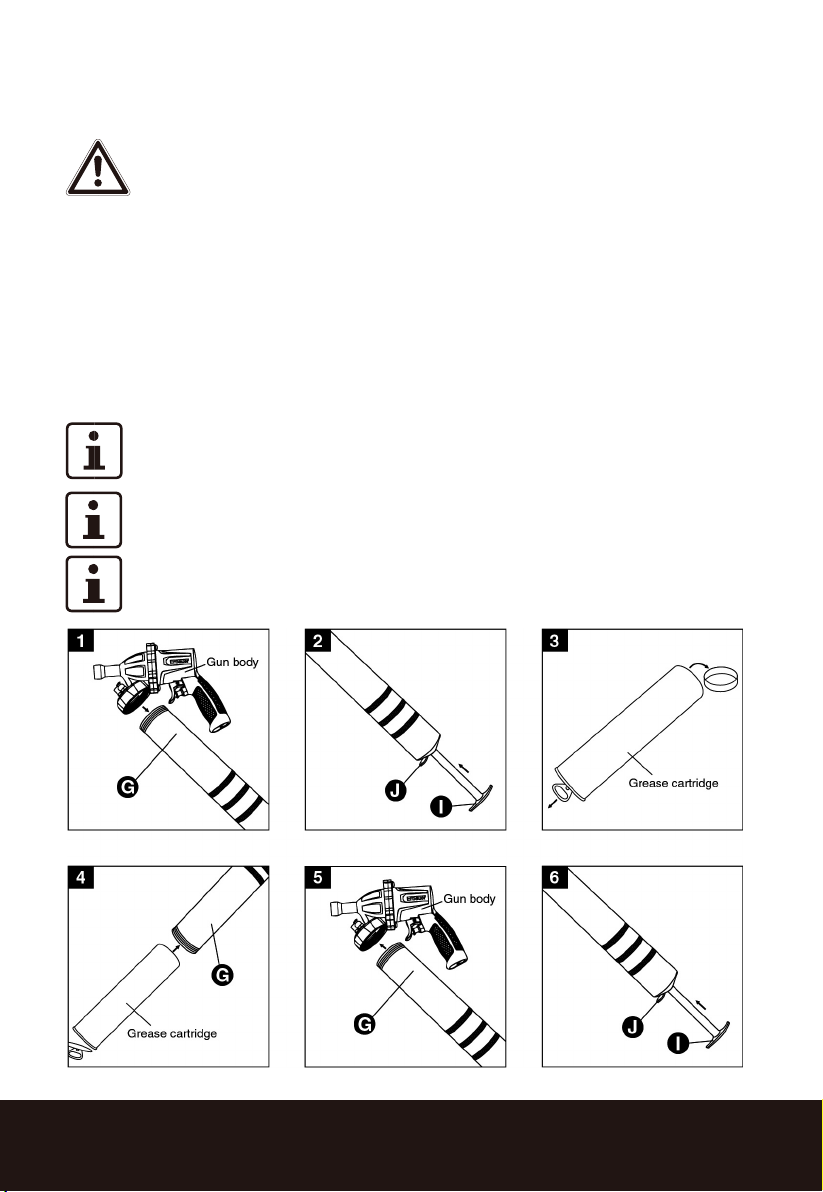
A. Cartridge Grease Loading
1. Remove the container tube (G) from the gun body. (See Figure 1)
2. Pull back on the handle (I) until it is fully extended. Lock it into place with the locking
plate (J). (See Figure 2)
3. Remove the cap and/or lid from both ends of the cartridge (not included). Insert the
cartridge into the container tube in the orientation indicated on the cartridge, and
make sure that the cartridge is as far as possible. (See Figure 3 & 4)
4. Reassemble the container tube to the gun body. Press the locking plate to release
the handle. Press the handle in as far as it will go. (See Figure 5 & 6)
NOTE: Make sure that the end of the grease cartridge inserted into the
container tube should not be damaged or squeezed and should remain in the
grease cartridge resulting in grease not being forced out.
The grease cartridge should be an exactly round shape. Otherwise, the
plunger will be prevented from entering.
NOTE: Do not re-use the empty grease cartridge for refilling after one time
of usage.

AIR GREASE GUN
B. Suction Filling (See Figure 7)
1. Remove the container tube (G) from the gun body.
2. Submerge the open end of the container tube 2 inches
approximately into the grease container (not included).
3. Pull back slowly and extend the handle (I) fully to draw
grease upward into the container tube. Lock the handle into
place with the locking plate (J) when it is fully extended.
4. Reassemble the container tube to the gun body. Press the
locking plate to release the handle. Press the handle in as far
as it will go.
C. Filler Pump Filling (See Figure 8)
1. Pull back on the handle (I) until it is fully extended. Lock it
into place with the locking plate (J).
2. Insert the filler plug on the end of the hose of a filler pump
(not included) into the filler nozzle (M) of the grease gun.
3. Follow the operating instructions provided in the filler pump
manual (not included) to work the filler pump until the
container tube (G) of the grease gun is full.
4. Disconnect the grease gun from the filler pump.
5. Press the locking plate to release the handle.
Press the handle in as far as it will go.
ASSEMBLY
1. Attach the rigid coupler assembly (B) to the connector (C)
of the grease gun. (See Figure 9)
2. Remove the air inlet protective cap from the air inlet (F).
(See Figure 10)

AIR GREASE GUN
3. Mount a male plug by hand into the air inlet (F).
(See Figure 11)
NOTE: Use thread sealant tape on the male plug
and tighten it with a wrench for airtight connection.
Do not overtighten.
4.Connect air supply hose to the male plug. (See Figure 12)
5. Set the working pressure at 90psi/6.3bar for best tool
performance.
NOTE: Working pressure refers to the air line
pressure set to tool when tool is under working
conditions.
OPERATION
1. Press the trigger (K) to inject a small amount of grease.
Release and press the trigger repeatedly to inject more
grease. (See Figure 10)
2. Disconnect air supply from the grease gun before refilling it.
NOTE: Air pockets will sometimes form in the
grease gun, resulting in operation failure. To
remove air pockets, disconnect air supply from the
grease gun. Pull back and fully extend the handle (I). Then
push the handle forward into the container tube (G) while
depressing the air vent valve (L). Reconnect air supply to the
grease gun. Press and release the trigger (K) several times
until the trapped air is expelled. Repeat as needed.
NOTE: Air will vent out of the trigger during use.
NOTE: Before each use, prime the grease gun by following the above operation
instructions until grease flows from the tip (A). If the grease gun does not prime
properly, follow the directions above for venting trapped air.
WARNING! The grease gun may still have air pressure after disconnected
from air supply. Point the grease gun into a suitable receptacle and fire it
until all the air in the grease gun has been expended.

AIR GREASE GUN
TROUBLESHOOTING
PROBLEM
POSSIBLE CAUSE
CORRECTIVE ACTION
The grease
gun does not
work.
1. Lowair pressure.
2. Air hose leaks.
3. Springs (Part
#7) and/or piston
assembly (Part #6) are
damaged.
1. Set the air pressure to 30 - 100 PSI.
Working pressure of 90 PSI is recommended
for the best operation of tool.
2. Check and see if the air hose is in good
condition. Tighten and seal hose fittings,
using thread sealant tape if leaks are found.
3. Replaces springs and/or piston assembly
if they are damaged.
The grease
gun cycles and
does not pump
grease.
The grease gun is out
of grease.
1. Refill the grease gun if it is out of grease.
2. Repeat priming operation.
3. Disconnect any extensions and prime until
grease flows.
The grease
gun continues
to lose prime.
1. There is trapped air
in the grease gun.
2. The grease gun is
out of grease.
1. Release trapped air in the grease gun.
2. Refill the grease gun and repeat priming.
NOTE: For any special troubles which cannot be resolved by the operator, contact a
qualified service technician or the distributor from whom you purchase the tool.
NOTE: Air will vent out of the trigger during use.
CARE AND MAINTENANCE
1. Clean leftover grease from the container tube (G) after each use.
2. Clean the fill nozzle (M) and the air vent valve (L) free of dirt, grease or any debris.3.
Clean the grease gun all over with a cotton rag. Keep the grease gun in a dry and
safe place out of reach of children.
AIR GREASE GUN
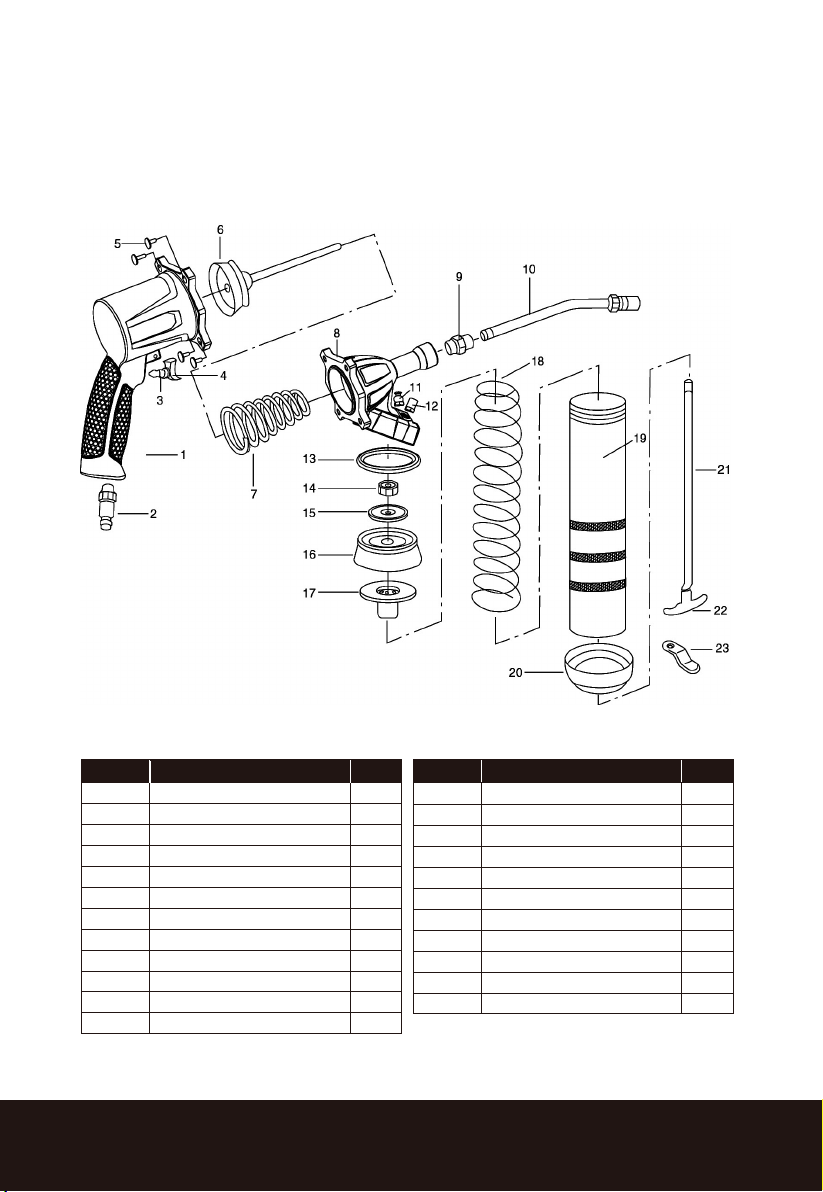
EXPLODED DIAGRAM AND PARTS LIST
Part No.
Description
Qty.
1
Main housing
1
2
Air inlet
1
3
Trigger assembly
1
4
Trigger
1
5
Set screw
1
6
Piston assembly
1
7
Spring
1
8
Front housing
1
9
Connecter
1
10
Rigid coupler assembly
1
11
Air vent valve
1
12
Fill nozzle
1
Part No.
Description
Qty.
13
Gasket
1
14
Lock nut
1
15
Washer
1
16
Plunger
1
17
Backlash gasket
1
18
Spring
1
19
Container tube
1
20
Container cap
1
21
Follower rod
1
22
Handle
1
23
Locking plate
1

AIR GREASE GUN
DECLARATION OF CONFORMITY
Standard and technical specications referred to:
Directive 2006/42/EC-Annex I
Complies with the following Directive(s),
EC Machinery Directive 2006/42/EC
Declare that the product
Description: Air Grease Gun
Model: ERN646ATL-I
Name / title: Eric Capotummino / Group Quality Director
Kingfisher International Products B.V.
Rapenburgerstraat 175E 1011 VM Amsterdam The Netherlands
Authorised Signatory and technical file holder
Date: 09/10/2019
Signature:
We, Importer
Kingfisher International Products B.V.
Rapenburgerstraat 175E 1011 VM Amsterdam
The Netherlands
Customer Helpline (Freephone)
UK 0800 324 7818 [email protected]
Eire 1800 932 230 [email protected]

Manufacturer,Fabricant,Producent,
Producător,Fabricante:
UK Manufacturer:
Kingfisher International Products Limited
3 Sheldon Square
London
W2 6PX
United Kingdom
EU Manufacturer:
Kingfisher International Products B.V.
Rapenburgerstraat 175E
1011 VM Amsterdam
The Netherlands
www.diy.com
www.screwfix.com
To view instruction manuals online,
visit www.kingfisher.com/products
EN
AIR GREASE GUN
POMPE ÀGRAISSE PNEUMATIQUE
ERN646ATL-I
de garantie
2
ans

POMPE À GRAISSE PNEUMATIQUE
Nous vous remercions d'avoir choisi un outil électrique de qualité Kingfisher
International Products B.V.. Ce produit offrira à l'utilisateur un service fiable, mais
pour sa tranquillité d'esprit, cet outil électrique est couvert par une garantie
de 2 ans, dont les modalités sont détaillées ci-dessous.
Si ce produit présente un défaut durant la période de garantie, contactez votre
revendeur.
Veuillez conserver ce manuel pour le cas où vous devriez à l'avenir vous reporter aux
informations de sécurité, d'entretien ou de garantie.
Ce produit est couvert par une garantie de 2 ans. Si votre produit présente un défaut
pendant cette période, vous devez dans un premier temps contacter le détaillant chez qui
l'article a été acheté. Cette garantie exclut expressément les dommages causés par :
- L'usure normale
- Une utilisation inappropriée ou une négligence
- Un manque d'entretien
- La défaillance d'articles consommables (tels que les batteries)
- Les dommages accidentels
- Les dommages esthétiques
- Le non-respect des directives du fabricant
- La perte de l'usage des biens
Les consommables fournis avec ce produit sont exclus de toute garantie offerte.
Cette garantie n'affecte pas vos droits statutaires. Cette garantie est valable uniquement au
Royaume-Uni, en France, en Pologne, en Allemagne, en Roumanie, en Espagne, au Portugal et
en Irlande.
GARANTIE

POMPE ÀGRAISSE PNEUMATIQUE
RÈGLES GÉNÉRALES DE SÉCURITÉ
AVERTISSEMENT !
Une mauvaise utilisation ou un entretien incorrect de cet outil
pourrait causer des blessures et/ou des dommages matériels.
Lire et assimiler tous les avertissements et toutes les instructions
d'utilisation avant d'utiliser cet outil.
L'utilisation de cet outil implique de toujours respecter ces
précautions de sécuritéde base pour réduire le risque de
blessures et/ou de dommages matériels.
Exigences relatives àl'espace de travail
1. Toujours travailler dans un endroit propre, sec et bien ventilé, exempt de
matériaux combustibles. Ne jamais faire fonctionner l'outil àproximitéde
substances inflammables comme de l'essence, du naphta, du solvant de
nettoyage, etc.
2. S'habiller de manière appropriée. Ne pas porter de vêtements amples. Attacher
ou couvrir les cheveux longs, retirer les bijoux, colliers, etc., qui pourraient se
prendre dans l'outil.
3. Maintenir la zone de travail bien éclairée et exempte de tout encombrement.
Les glissades, les trébuchements et les chutes sont les principales causes de
blessures sur le lieu de travail. Noter la présence d'un flexible d'air laissésur le
passage ou sur la surface de travail.
4. S'assurer qu'il n'y a pas de câbles électriques, de tuyaux de gaz, etc., susceptibles
de représenter un risque s'ils étaient endommagés suite àl'utilisation de l'outil.
5. Maintenir les visiteurs àune distance de sécuritépar rapport àla zone de travail.
Tenir les enfants àl'écart.
Utilisation d'outils pneumatiques
1. Rester vigilant et faire preuve de bon sens. Rester attentif àla tâche en cours.
Ne pas utiliser l'outil dans un état de fatigue ou sous l'influence de drogues,
d'alcool ou de médicaments.
2. Ne pas se pencher. Garder des appuis et l'équilibre àtout moment.
3. Toujours porter des lunettes de protection contre les particules volantes
projetées devant et sur le côtépendant l'utilisation de l'outil. Il est également
conseilléde porter des protections auditives.
4. Ne jamais utiliser d'oxygène, de dioxyde de carbone, de gaz combustibles ou
tout autre type de gaz en bouteille comme source d'alimentation pour cet outil.
5. Toujours vérifier avant d'utiliser cet outil que la source d'air a étéajustée àla
plage nominale de pression d'air. Ne jamais brancher l'outil àune source d'air
susceptible de dépasser 200 psi.
6. Ne pas brancher le flexible d'alimentation en air de l'outil avec le doigt sur la gâchette.
7. Ne pas dépasser la pression de fonctionnement maximale de 90 psi/6,3 bar de
l'outil. Une pression excessive réduirait la durée de vie de l'outil et/ou risquerait
d'entraîner une situation dangereuse.

POMPE ÀGRAISSE PNEUMATIQUE
8. Ne jamais laisser l'outil en fonctionnement sans surveillance. Débrancher le
flexible d'air lorsque l'outil n'est pas utilisé.
9. Tenir le flexible d'alimentation en air àl'écart des sources de chaleur, des huiles
et des bords tranchants.
10. Vérifier que le flexible d'alimentation en air ne présente aucun signe d'usure et/ou
de fuites avant chaque utilisation. S'assurer que toutes les connexions sont bien
serrées et sécurisées.
11. Ne pas utiliser d'outil pour tout autre usage que celui pour lequel il a étéconçu.
12. Ne pas apporter de modifications àl'outil.
13. Toujours débrancher l'outil de l'alimentation en air avant de remplacer un
accessoire, d'effectuer une opération de réparation et d'entretien, de passer
àun autre espace de travail, ou de transmettre l'outil àune autre personne.
14. Ne jamais utiliser l'outil s'il est défectueux, endommagéou s'il ne fonctionne pas
correctement.
15. Rechercher tout défaut d'alignement ou blocage des pièces mobiles, toute
rupture des pièces ou tout autre état susceptible d'affecter le fonctionnement
de l'outil électrique. S'il est endommagé, faire réparer l'outil avant utilisation.
16. Tenir les pièces de fonctionnement de l'outil loin des mains et du corps.
17. Ne pas transporter l'outil en le tenant par le flexible d'air.
18. Ne pas exercer une pression excessive sur l'outil. Laisser l'outil exécuter
le travail àla vitesse pour laquelle il a étéconçu.
19. Ne retirer aucune étiquette de l'outil. Les remplacer si elles sont illisibles ou
endommagées.
20. Toujours entretenir l'outil avec soin. Le garder propre pour garantir les meilleures
performances, en toute sécurité.
21. Il est déconseilléde placer les accouplements àchangement rapide directement
au niveau de l'admission d'air, car ils ajoutent du poids et peuvent casser sous
l'effet des vibrations.
Consignes de sécuritépour le pistolet àgraisse pneumatique
1. Toujours utiliser le pistolet àgraisse de la manière et pour les fonctions décrites
dans ce manuel.
2. Toujours s'assurer que le pistolet est débranchéde l'alimentation d'air avant de le
recharger en graisse.
3. Toujours s'assurer que la cartouche de graisse est correctement chargée dans
l'outil avant de le démarrer.
4. Ne jamais pointer le pistolet àgraisse vers une personne ou des animaux lorsqu'il
est chargéet connectéàl'alimentation en air.
5. Ne jamais transporter le pistolet en le tenant par le flexible d'alimentation en air.
6. Toujours débrancher le pistolet àgraisse de l'alimentation en air lorsqu'il ne doit
pas être utiliséimmédiatement afin d'éviter un démarrage accidentel.
7. Ne pas jeter les consignes de sécurité, les remettre àl'opérateur.
8. Toujours conserver ce produit dans un endroit sec et sûr, hors de la portée des
enfants ou des opérateurs non formés.

POMPE ÀGRAISSE PNEUMATIQUE
ALIMENTATION EN AIR
Se reporter àla disposition du circuit pneumatique standard recommandée
ci-dessous.
AVERTISSEMENT ! L'air comprimépeut être dangereux. Veiller àse
familiariser avec toutes les précautions relatives àl'utilisation de
compresseurs et des alimentations en air comprimé.
1. Utiliser uniquement une source d'alimentation en air comprimépropre,
sec et régulé.
2. Les compresseurs d'air utilisés avec l'outil doivent se conformer aux directives
de sécuritéappropriées de la CommunautéEuropéenne.
3. Vérifier que le compresseur d'air utilisépour faire fonctionner l'outil fournit la
puissance d'alimentation correcte (CFM).
4. Mettre l'outil en position d'arrêt avant de le raccorder àl'alimentation d'air.
5. Utiliser une pression de fonctionnement normale de 90 psi pour faire fonctionner
l'outil. L'utilisation d'air impur sous haute pression raccourcit la durée de vie de
l'outil en raison d'une usure plus rapide et peut également nuire àla sécurité.
6. Vidanger l'eau du réservoir du compresseur d'air tous les jours, ainsi que toute
condensation dans les conduites d'air. L'eau présente dans la conduite d'air peut
pénétrer dans l'outil et endommager ses mécanismes pendant le fonctionnement.
7. Vérifier chaque semaine que le filtre àtamis d'admission d'air de l'outil n'est pas
obstrué. Le nettoyer si nécessaire.
8. Il est habituellement recommandéd'utiliser un flexible d'alimentation en air
de 3/8" (diamètre intérieur) pour garantir des performances optimales de l'outil.
9. Un flexible d'air long (généralement plus de 8 mètres) peut provoquer une chute
de pression pouvant atteindre 15 psi ; il faut donc régler la pression de sortie du
compresseur d'air àun niveau plus élevépour maintenir la pression de
fonctionnement requise au niveau de l'outil.
10. Utiliser les flexibles et raccords appropriés. Nous recommandons de ne pas
raccorder les accouplements àchangement rapide directement àl'outil, car ils
risquent de provoquer des pannes dues aux vibrations de l'outil en cours de
fonctionnement. Au lieu de cela, ajouter un flexible et raccorder l'accouplement
entre l'alimentation en air et le flexible.
11. Vérifier avant chaque utilisation que les flexibles ne sont pas usés. S'assurer que
toutes les connexions sont sécurisées.
This manual suits for next models
1
Table of contents
Languages:
Other Erbauer Tools manuals


