Ergo Systems 20008D User manual

Model and serial number may be found
at the rear of the 8 Day Feeder base.
Please record both model and serial
number in a safe place for future use.
Where Purchased : ______________________
Date Purchased : Month ________________
: Day __________________
: Year __________________
Model No. : ______________________
Serial # : ______________________
The Owner’s Manual contains
information for all models.
Read and keep this manual for
future reference.
This manual contains important
information on Safety, Assembly,
Operation and Maintenance.
Ergo Systems Inc. Rev# 1.2
MODEL NO.
20008D
8 Day Autopetfeeder
Owner’s Manual
ergo systems inc.
LIMITED WARRANTY
Please read this warranty carefully. Ergo Systems Inc. will warranty this product to be free from manufacturing
defects, including workmanship, when assembled and operated according to operating instructions enclosed with
this product, for a period of ninety (90) days from the date of original purchase. This warranty is non-transferable and
applies solely to the original purchaser and does not extend to subsequent owners of this product. Please register
your product at http://www.autopetfeeder.com.
1. Repair service for a period of ninety (90) days from the date of original purchase at no charge for parts
and labor with proof of purchase.
2. Replacement of defective parts for a period of 12 months from the date of original purchase with proof of
purchase. (Labor not included after Initial ninety (90) days).
3. This warranty does not cover cost incurred in the shipping of the product to and from Ergo Systems
Inc. for service. Shipping to Ergo Systems Inc. must be prepaid and insured by UPS or other parcel
delivery services.
THIS WARRANTY IS VOID IF THE PRODUCT IS:
1. Damaged due to negligence, abuse, misuse, accident, modication, tampering, alteration, faulty installation
and/or acts of God.
2. Used for commercial applications or rentals.
3. Modied or repaired by anyone other than Ergo Systems Inc.
The extent of Ergo Systems Inc. under this limited warranty is the repair or replacement of the product at the sole
discretion of Ergo Systems Inc, In no event shall Ergo Systems Inc.’s. liability exceed the purchase price paid by the
purchaser. Under no circumstances shall Ergo Systems Inc. be liable for any loss, direct, indirect, incidental, foreseen,
unforeseen, special or consequential damage arising out of or in connection with the use of this product. This
warranty is valid only in the United States of America and Canada.
2
Important : This is an Owner’s Manual for 8 Day Autopetfeeder.
Please do not discard this.
Congratulations on purchasing the “8 DAY
AUTOPETFEEDER”. You will now have more time on
your hands and your pet can be fed on time. Before
you can use this appliance you need to follow same
simple steps to assemble the 8 Day Autopetfeeder.
DO NOT RETURN THE PRODUCT TO
THE STORE
Call 1-888 ERGOSYS (1-888-374-6797)
If there are missing parts. Check all packing for missing
parts prior to discarding the package.
Before you call us, please have the following
Information ready.
1. Details of purchase like Invoice number (found
on the bill or invoice)
2. Name and model number of the product (found
on the manual and on the carton.)
3. Actual problem after following the instructions.
4. List of missing parts.
Reviewing these important safety alert symbols
When you see this Safety Symbol on the following pages, It will alert you to the
possibility of damage to your 8 Day Pet Feeder. If you do not comply with the
corresponding instructions. The hazard may come from something mechanical or
electrical. Read the instructions carefully.

3
Components
1. Base
2. Bowl Cover
3. Bowl
4. Ice Pack
5. Digital Timer
6. Bowl Cover Handle
7. Cover Lock Screw
List of parts in the 8 day Autopetfeeder Box
Cover Lock Screw
7
Bowl Cover Handle
6
Ice Packs (Quantity 4)
4
Bowl Cover
2
8 Day Feeder Base
1
Bowl
3
Digital Timer
5
RECORD
PROG HOUR MIN ON/AUTO/OFF
RESET
4
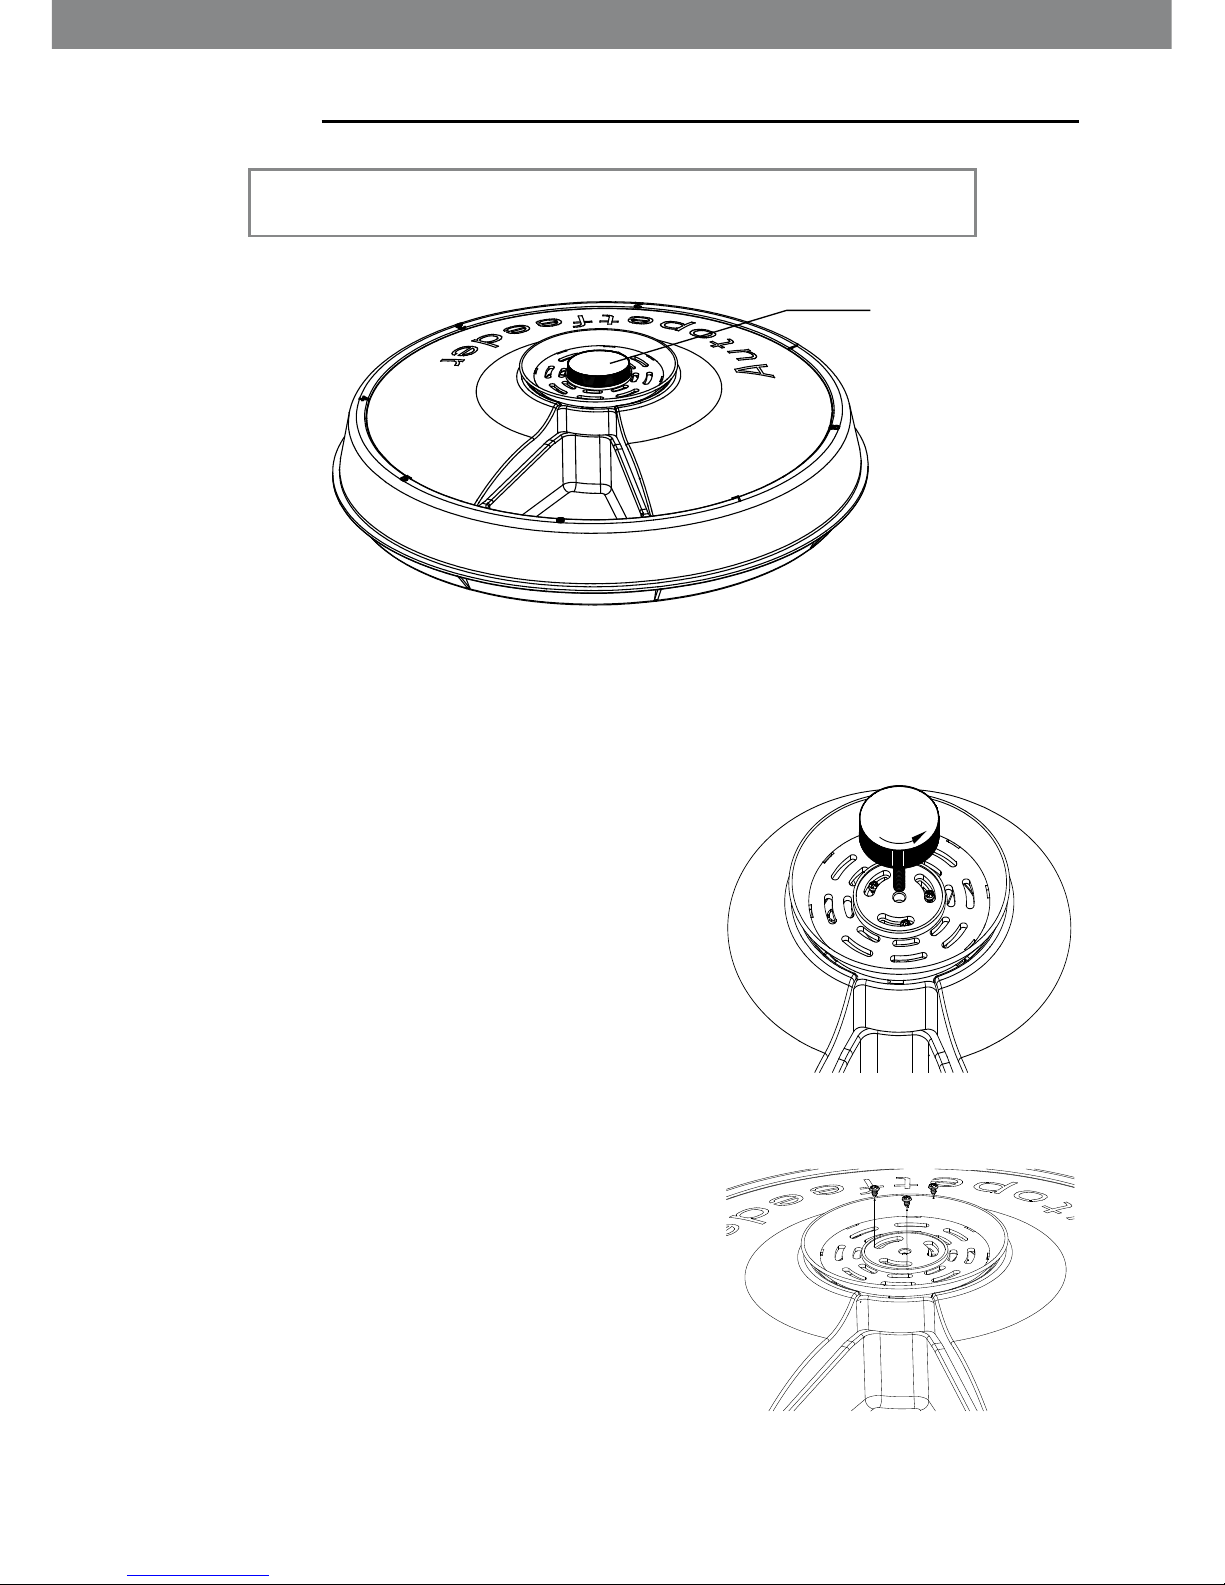
Step 2
pRemove the three screws to remove the Bowl
Cover Handle. Align the bowl to the cover and
tighten the screws.
Assembly
Cover Lock Screw
Fig-1
The 8-Day Autopetfeeder comes as a pre-assembled unit.
Bowl Cover Alignement
Step 1
pRemove the cover lock screw from the Bowl
cover handle.
Fig-2
Fig-3
5
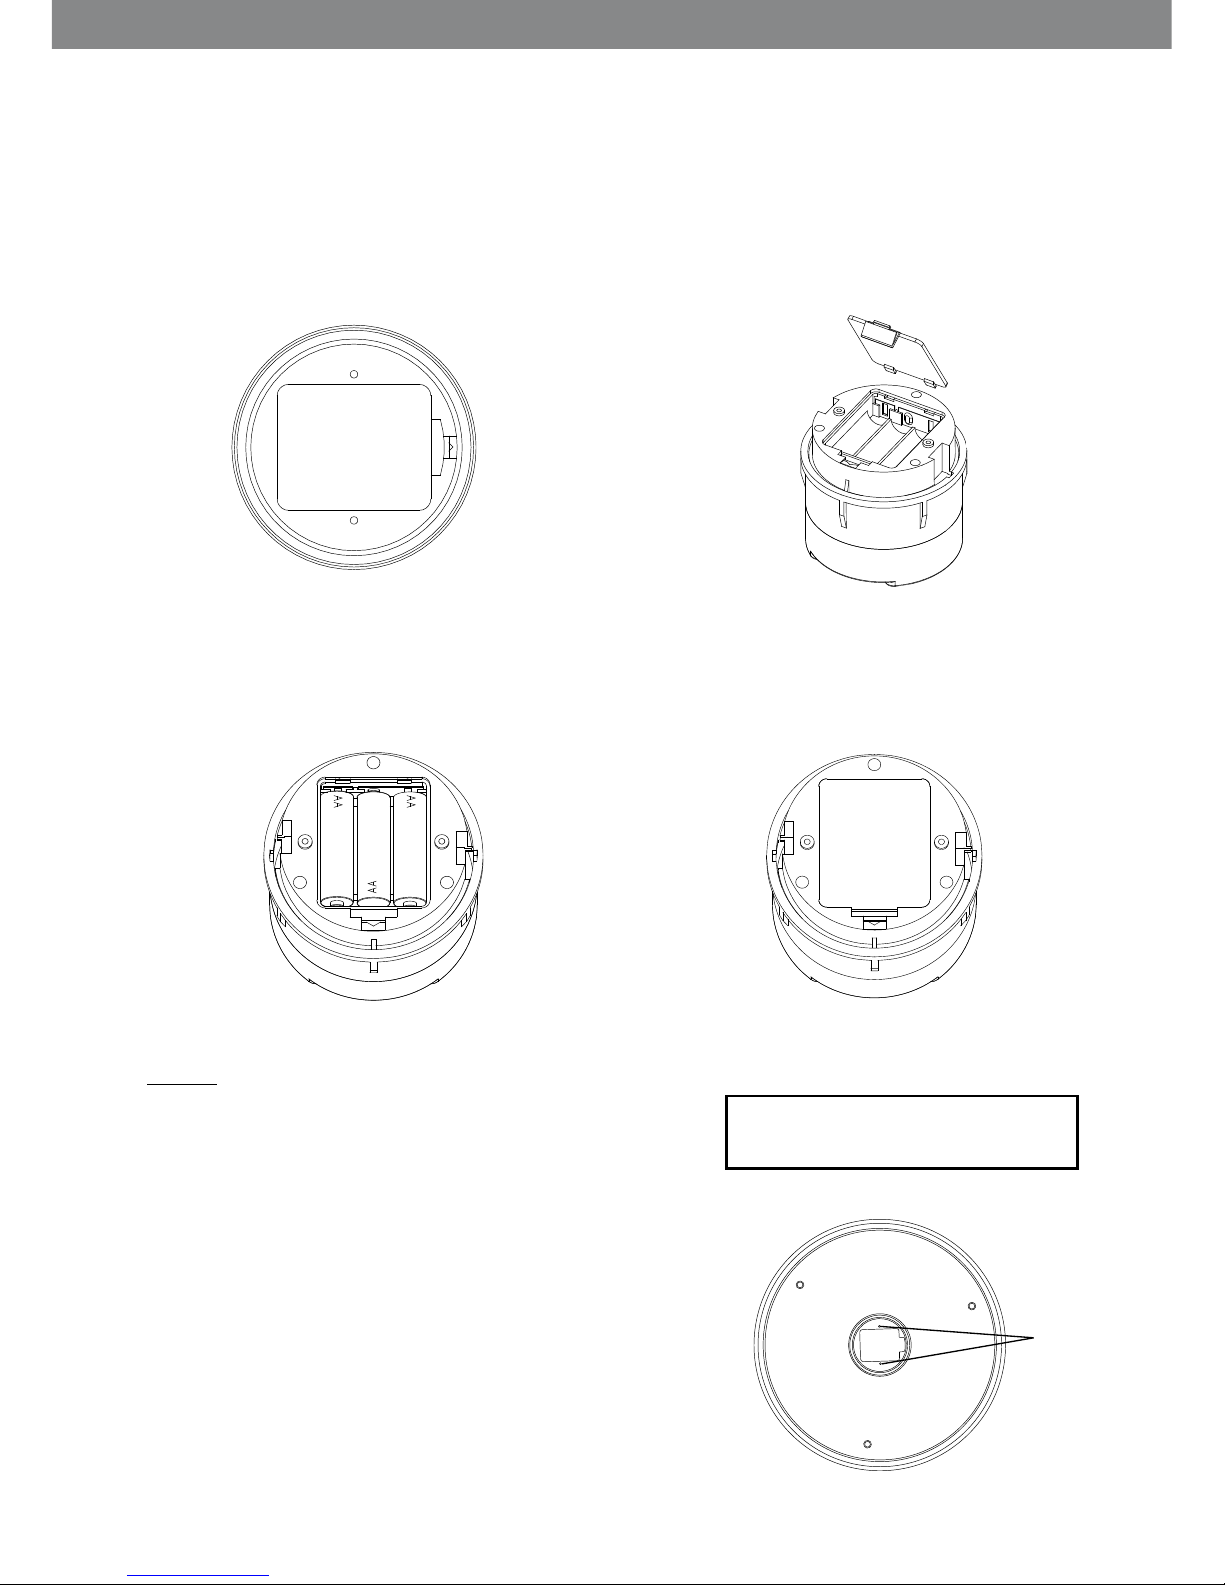
Installing batteries in the Timer Module.
Step 1
p Place the feeder bottom side up. You will
nd the battery compartment at the back of
the Timer Module.
Step 2
p Open the battery compartment by pushing
the plastic tab to the left and lift up.
Step 3
p Install 3 new AA batteries in the battery
compartment.
Step 4
p Close and latch the cover.
NOTE:
Always install new batteries. When you replace the
old battery you must do it within 1 minute or you will
loose the programs.
Replacing Timer Module
pIn the event that the timer module has to be
replaced, place the feeder bottom side up. Then
remove the two screws that attach the timer to
the feeder base.
pThen turn the feeder rightside up and lift the
timer out of the base.
pTo install timer follow the above steps in reverse.
Fig-7
Fig-5
Fig-6
THE TIMER WILL MAKE A BEEPING
SOUND WHEN THE BATTERY IS LOW
Fig-4
Screw
The bottom view of the 8 day feeder
6
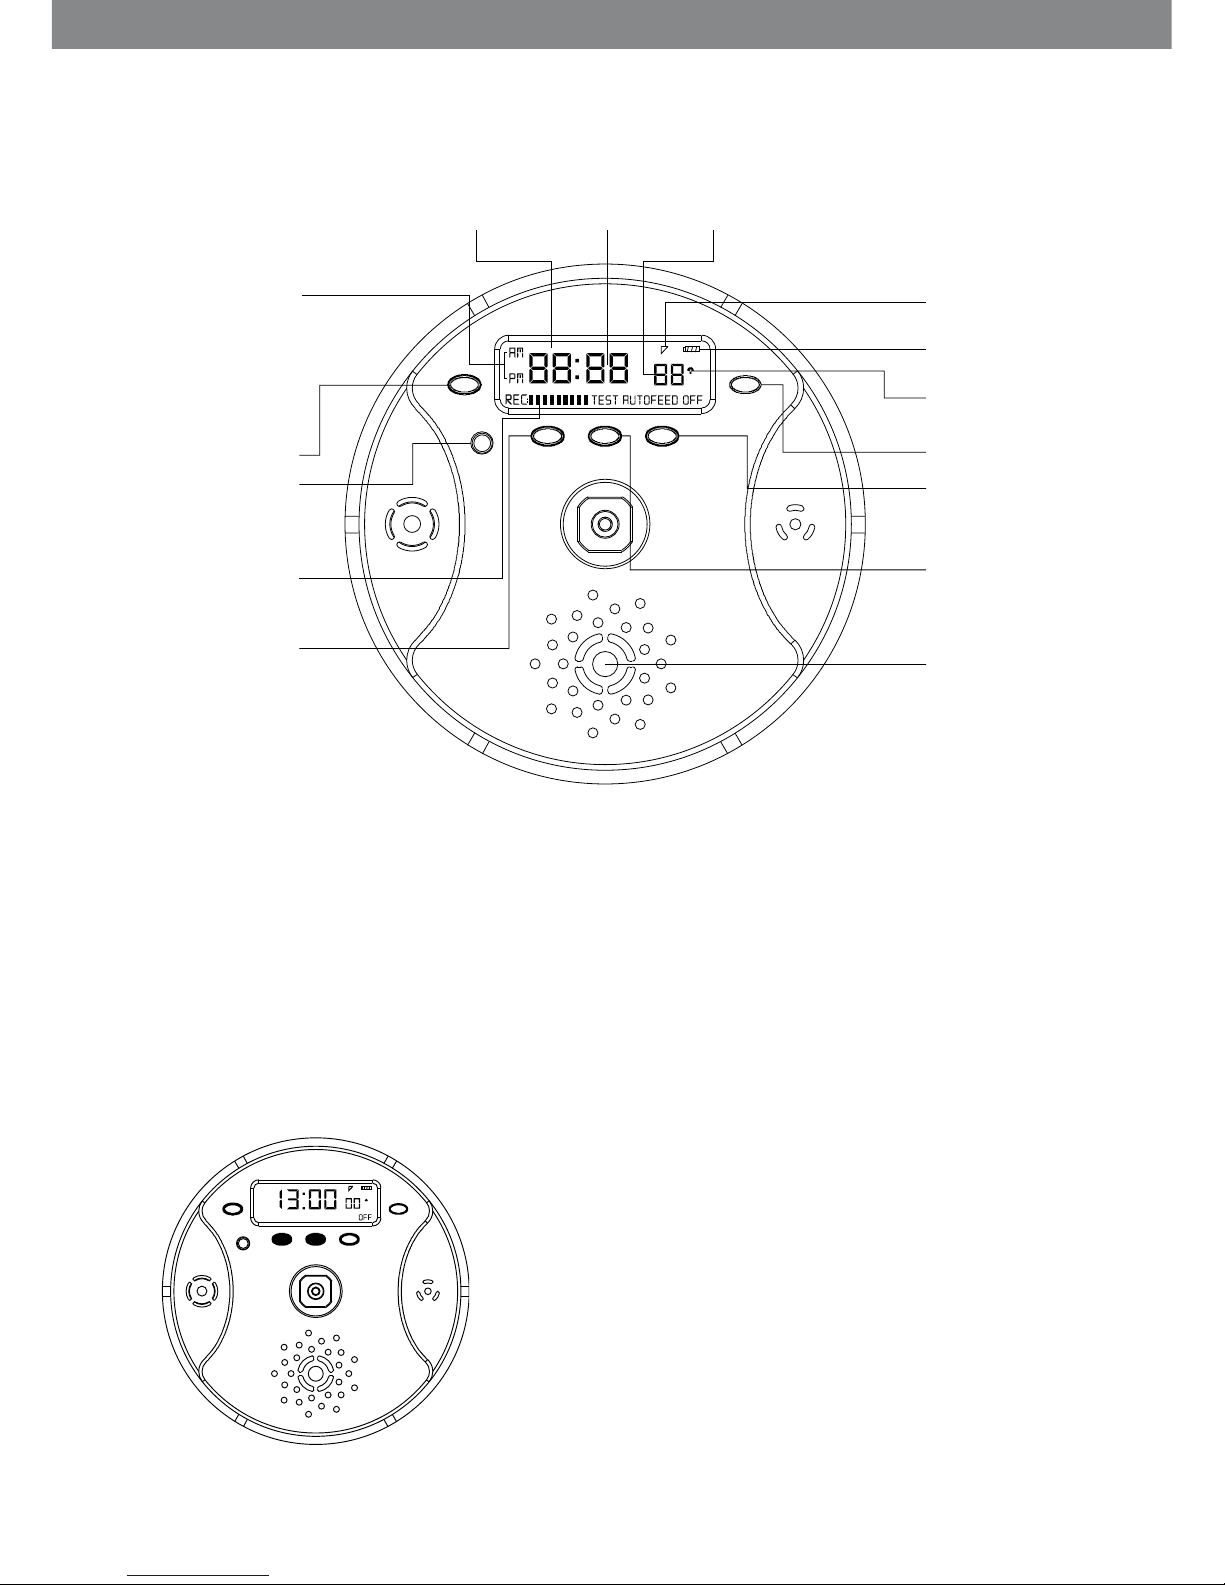
This is the Digital Timer unit for 8 Day Autopet Feeder. The timer works on 3 AA batteries. With this
Digital Controller Module you can record your voice which will be played back every meal time.
Records your voice up to 7 seconds.
NOTE:
p Remove bowl cover to program the timer.
p Press RESET button prior to programming the timer. Use 3 AA Batteries. Do not mix old and
new batteries.
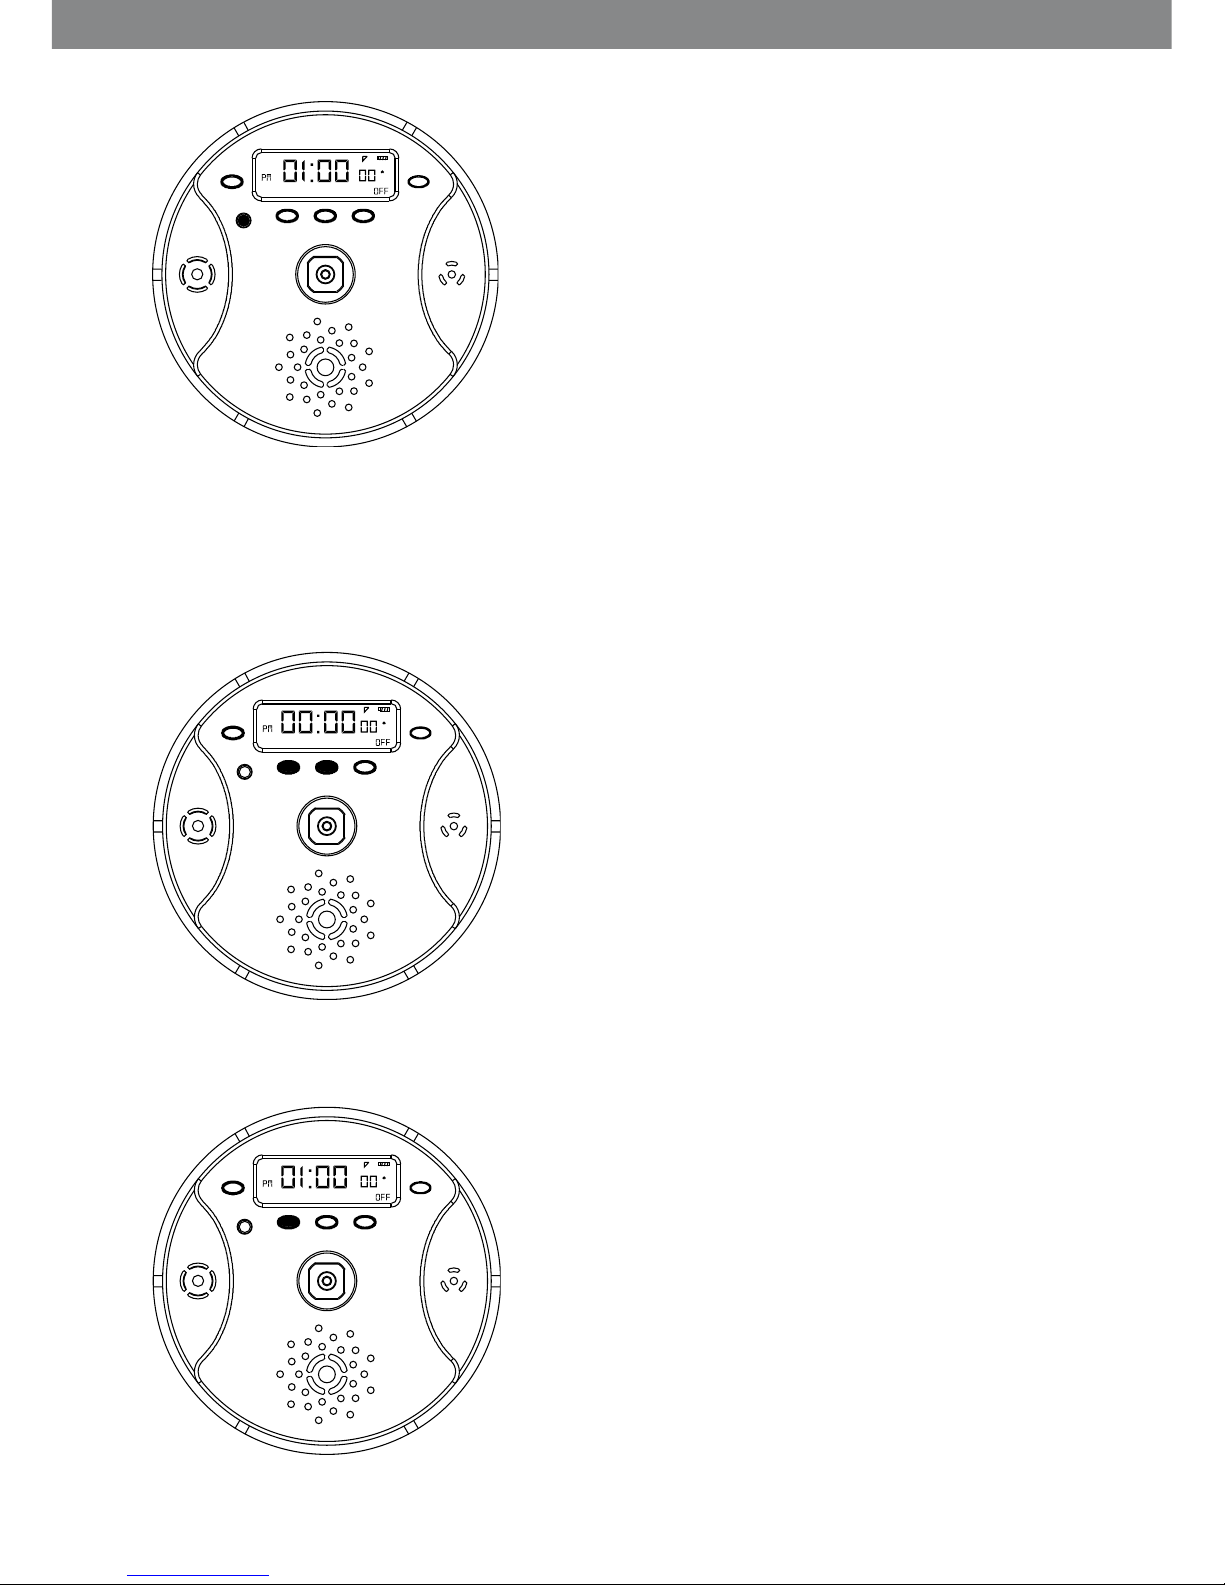
1.0 Setting the time mode: 24 hour (military time) or 12 hour AM/PM MODE
TIMER PROGRAMMING
pPress the HOUR and MINUTE button simultaneously
to activate 12 hour or 24 hour program mode. The
display will begin to ash.
INDICATES
HOUR
INDICATES AM/PM
OR
24 HOUR MODE
INDICATES
MINUTES
INDICATES
SECONDS
SPEAKER INDICATOR
BATTERY LEVEL
INDICATOR
FEED ON/OFF
INDICATOR
RESET BUTTON
ON/AUTO/OFF
BUTTON
MINUTE BUTTON
SPEAKER
HOUR BUTTON
INDICATES
RECORD MEMORY
PROGRAM BUTTON
VOICE RECORDING
BUTTON
RECORD
PROG HOUR MIN ON/AUTO/OFF
RESET
RECORD
PROG HOUR MIN ON/AUTO/OFF
RESET
Fig-1
7
1.1 Setting the Current Time
p Press the HOUR and MINUTE button
simultaneously to activate the setting
mode.
pPress the HOUR button to set the HOUR.
p Press the PROGRAM button to switch from the
present mode to the next mode i.e. from 24
hour to AM/PM or AM/PM to 24 hour mode.
RECORD
PROG HOUR MIN ON/AUTO/OFF
RESET
Fig-2
RECORD
PROG HOUR MIN ON/AUTO/OFF
RESET
Fig-3
RECORD
PROG HOUR MIN ON/AUTO/OFF
RESET
Fig-4

8
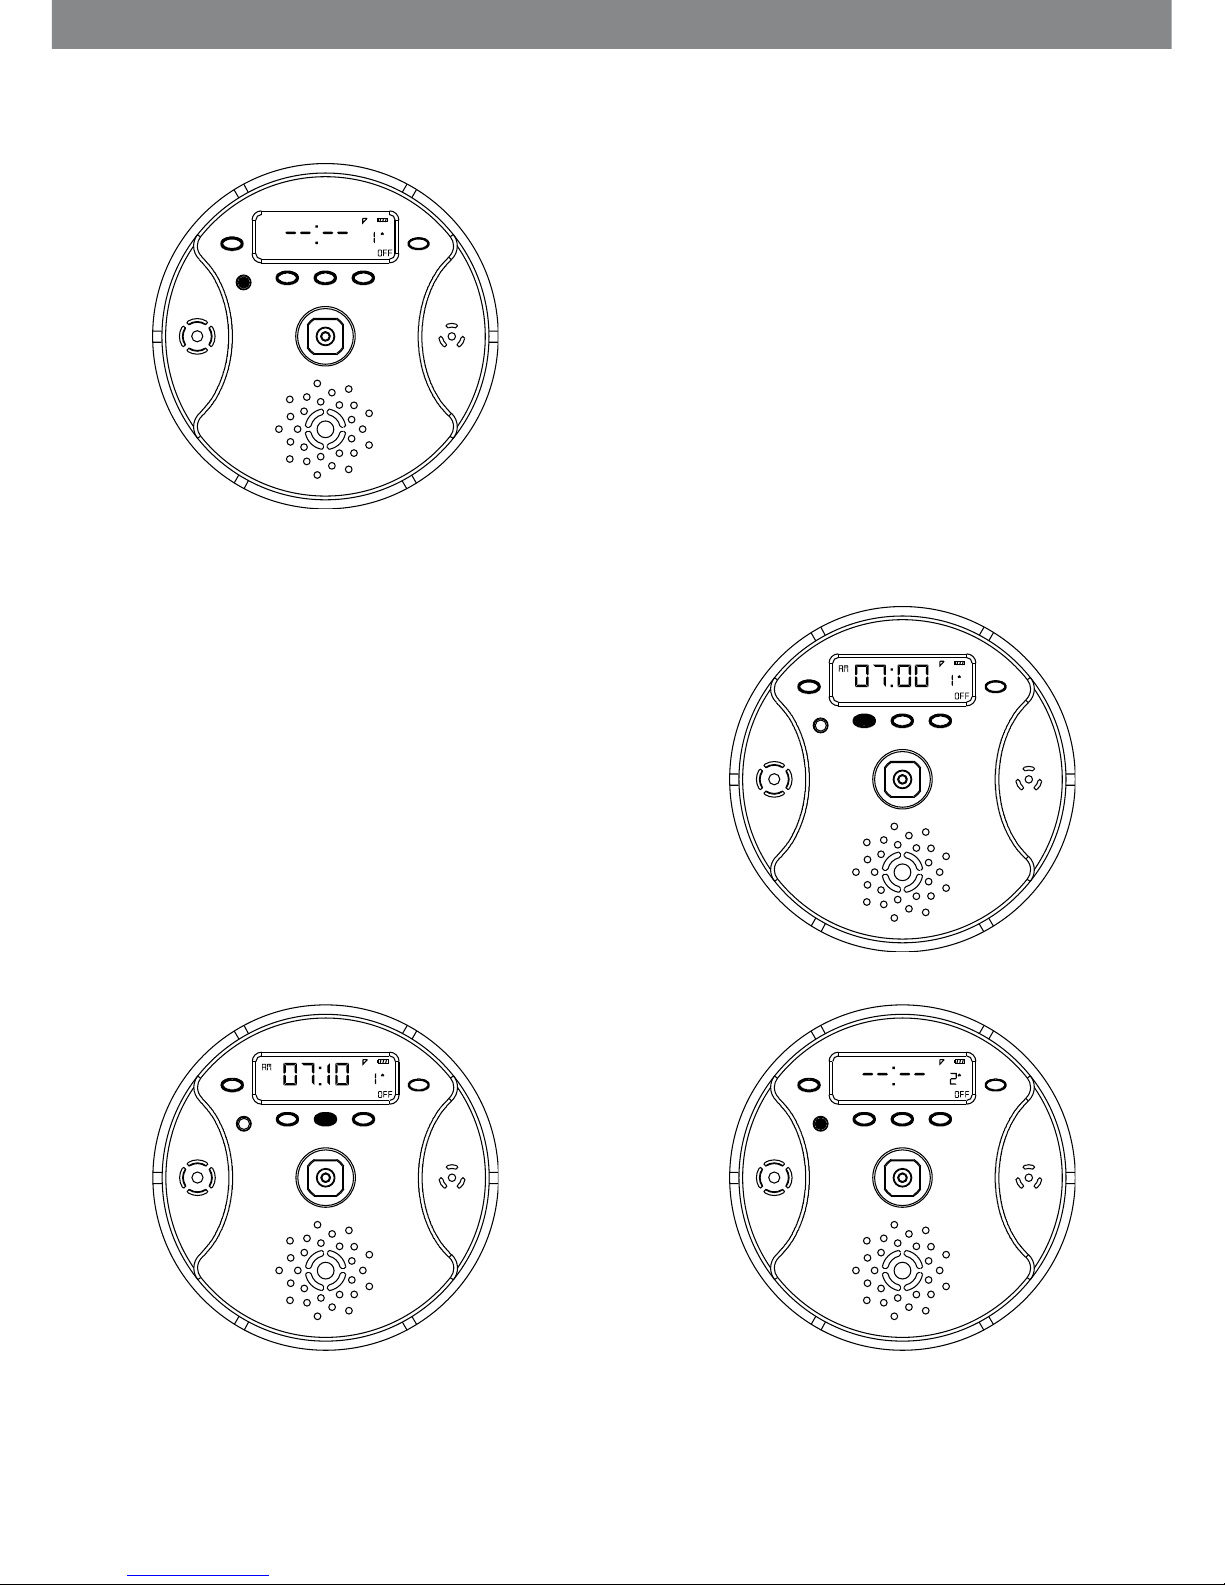
1.2 Understanding the Timer
pThe autopetfeeder is capable of feeding your pet up to 8 times per day. You can set the time for the
feeder up to 8 times per day. This will give you control over the amount of food you feed your pet and
also the time your pet is fed. By pressing the PROGRAM button you will enter the programming mode.
The display will now show 1, At this time the feeder will turn ON and after the cover rotates 45 degrees,
the feeder will turn OFF.
pThe pet feeder is capable of feeding both dry and canned food and pet meds.
pPress ON/AUTO/OFF button to go back to clock
mode.
RECORD
PROG HOUR MIN ON/AUTO/OFF
RESET
Fig-6
pPress the MINUTE button to set the MINUTE.
Fig-5
RECORD
PROG HOUR MIN ON/AUTO/OFF
RESET
NOTE: The seconds setting cannot be altered.

9
1.3 ON/AUTO/OFF
pPress ON/AUTO/OFF button to toggle
between TEST, AUTO and OFF mode. The
display will show the mode in which the
timer is set.
pIn TEST mode the bowl cover rotates
45 degree and enters the next feed
compartment.
pIn AUTO mode the feeder works as per the
programmed schedule.
Now let us understand the dierent modes of operation in the timer.
RECORD
PROG HOUR MIN ON/AUTO/OFF
RESET
Fig-8
RECORD
PROG HOUR MIN ON/AUTO/OFF
RESET
Fig-7
RECORD
PROG HOUR MIN ON/AUTO/OFF
RESET
Fig-9
RECORD
PROG HOUR MIN ON/AUTO/OFF
RESET
Fig-10
pIn OFF mode the feeder does not work.
10
1.4 Setting the Program Mode
pPress the PROGRAM button to
enter into program mode. The
display will show 1 whch means
that we are setting the 1st schedule.
pPress the HOUR button till the display shows 7 AM.
1.5 Timer Programming Examples :
RECORD
PROG HOUR MIN ON/AUTO/OFF
RESET
Fig-11
RECORD
PROG HOUR MIN ON/AUTO/OFF
RESET
Fig-12
pLet us set a schedule for 7.10 am.
pPress the MINUTE button till the
display shows 10.
RECORD
PROG HOUR MIN ON/AUTO/OFF
RESET
Fig-13
pPress the PROGRAM button again
and the display will show 2 which
means that we are setting the
second feed time.
RECORD
PROG HOUR MIN ON/AUTO/OFF
RESET
Fig-14

11
PROGRAM TO FEED CHART
No. of
Programs
No. of Feeds / Day
Day 1 Day 2 Day 3 Day 4 Day 5 Day 6 Day 7 Day 8
1 1 1 1 1 1 1 1 1
2 2 2 2 2
3 3 3 2
4 4 4
5 5 3
6 6 2
7 7 1
8 8 0
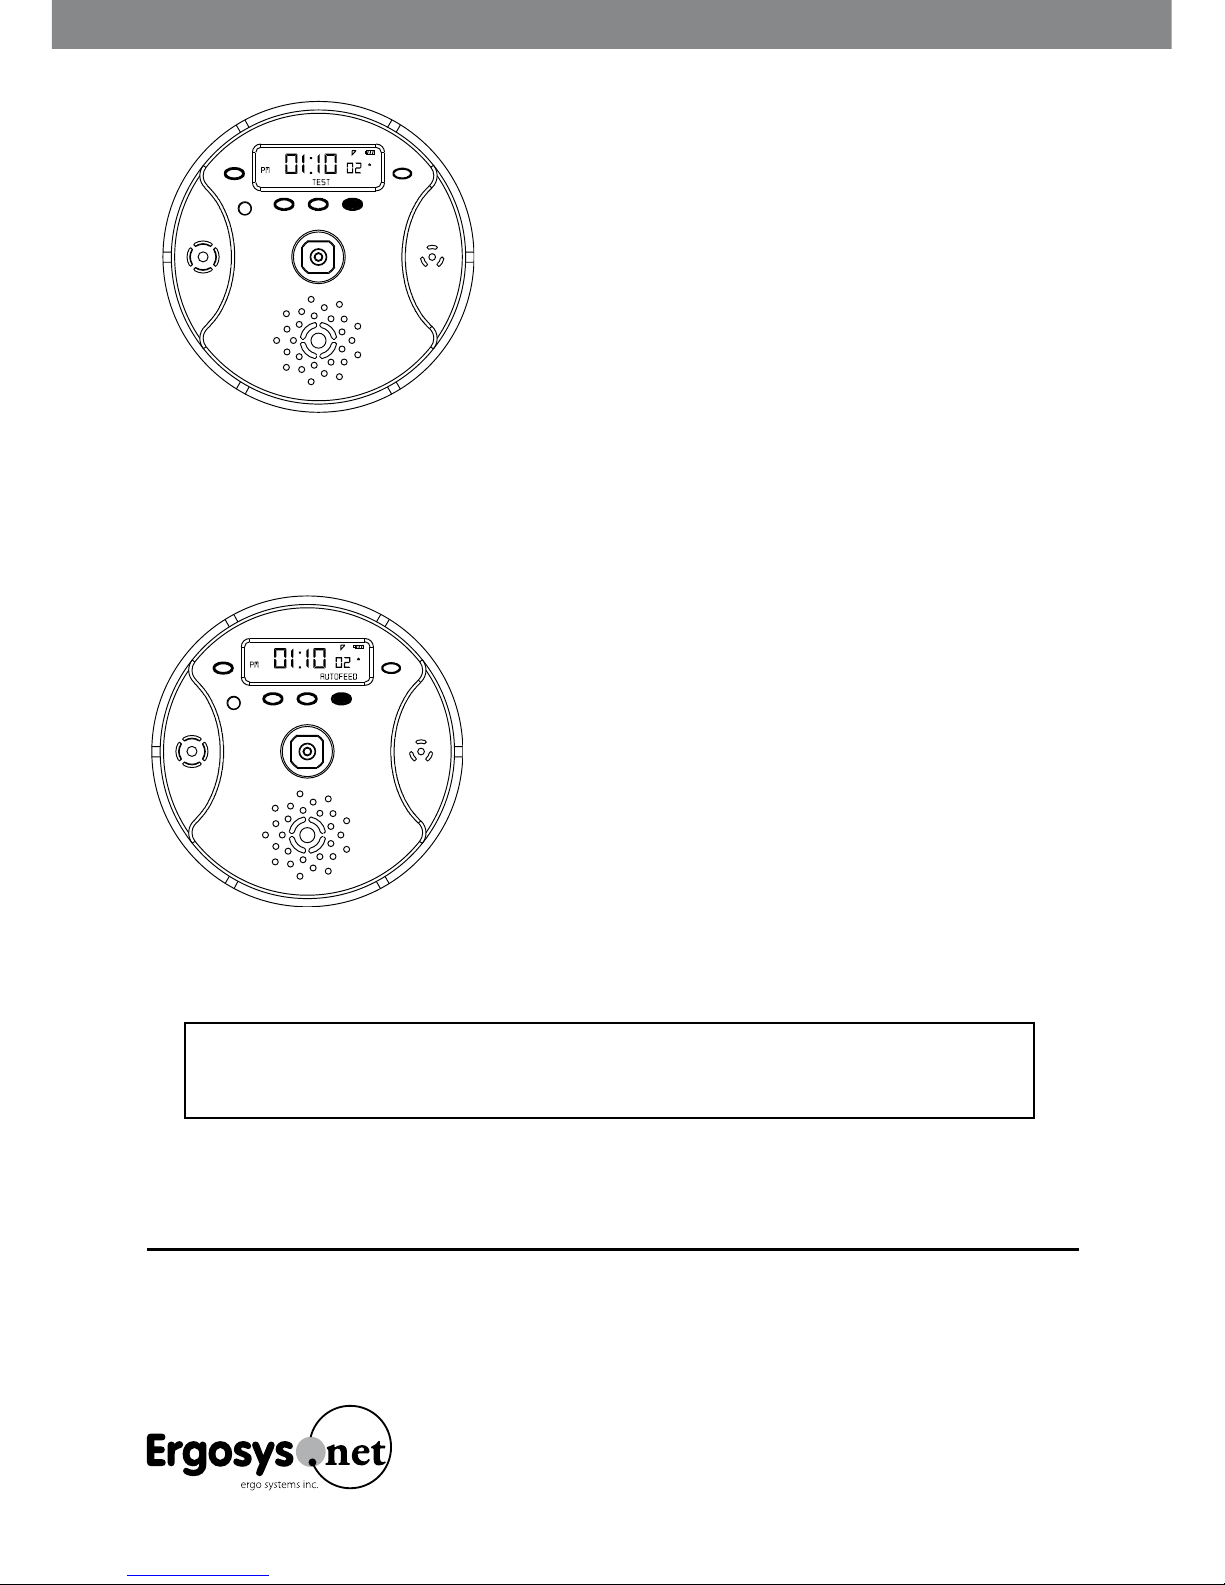
pPress the PROGRAM button again to exit from the
program mode to CLOCK mode.
RECORD
PROG HOUR MIN ON/AUTO/OFF
RESET
Fig-15
NOTE :
To exit out of program mode press PROGRAM button until you see the CLOCK mode Appear.
pPress the RECORD button to record your voice,
a record time bar will appear on the display which
indicates the memory level. You can record upto 7
seconds.
1.6 Recording Voice
RECORD
PROG HOUR MIN ON/AUTO/OFF
RESET
Fig-16
E-mail
contact@autopetfeeder.com
Website
http://www.autopetfeeder.com
Warranty Registration
http://www.autopetfeeder.com/warranty.asp
Toll-Free Phone.US only
1-888-ERGOSYS
(1-888-374-6797)
International Phone
1-630-543-7686
Fax 1-630-839-3321
Corporate oce
Ergo Systems Inc.,
1103 S.Westwood Ave.
Addison IL 60101
Now your 8 Day Autopetfeeder is ready to feed your Pet 8 Times a Day
or as per the program/feed Chart.
1.7 Setting Feeder in Auto Mode
RECORD
PROG HOUR MIN ON/AUTO/OFF
RESET
Fig-18
pPress the ON/AUTO/OFF button until the
display shows AUTO, to set the feeder in AUTO
mode.
RECORD
PROG HOUR MIN ON/AUTO/OFF
RESET
Fig-17
pPress the ON/AUTO/OFF button until the timer
display shows TEST, to play back the recorded
voice in the TEST mode. This is used to test the
voice recording and demonstrates the function
of the timer.
Other manuals for 20008D
1
Table of contents
Other Ergo Systems Pet Care Product manuals


