AutoPets Feeder-Robot User manual

feeder-robot.com
INSTRUCTION MANUAL
877. 250.7729 | feeder-robot.com877. 250.7729 | feeder-robot.com
2 3
Thank you for purchasing an AutoPets product!
This manual will help you get the most out of your
Feeder-Robot. We will guide you through the setup
process, as well as provide you with useful tips and advice
for acclimating your pet to their new automatic feeder.
AutoPets is dedicated to the design and manufacture of
highly functional, easy-to-use products that keep your pets
happy and safe, while making pet care more enjoyable
for you. We pride ourselves on our customer service and
18-month full warranty. If you should be dissatisfied for
any reason, we will make it right, and if needed, promise
to make your return experience an easy one. Enjoy your
Feeder-Robot, and enjoy your freedom!
Brad Baxter
President | AutoPets

877. 250.7729 | feeder-robot.com877. 250.7729 | feeder-robot.com
4 5
Table of Contents
Important Safety Instructions.......................................................6
Specifications....................................................................................7
Dimensions........................................................................................7
Components......................................................................................8
ControlPanel...................................................................................10
ButtonFunctions......................................................................10
Indicator Lights.........................................................................12
Status Indicator Lights...................................................................13
Setting Up Your Feeder-Robot....................................................13
Feeding Modes.........................................................................16
Setting Feeding Schedule via Control Panel......................17
AutoPets Connect App...............................................................20
Introducing Your Pet to the Feeder-Robot...............................21
Care and Cleaning.........................................................................22
Battery Backup..............................................................................25
Frequently Asked Questions......................................................26
Troubleshooting.............................................................................28
Key Definitions..............................................................................30
Money-Back Guarantee and Warranty.....................................32
Contacting Customer Service.....................................................33

877. 250.7729 | feeder-robot.com877. 250.7729 | feeder-robot.com
6 7
Important Safety Instructions
●Always place the Feeder-Robot on a level surface. Avoid uneven
or unstable flooring, which may affect the reliability in automatic
feeding.
●Always unplug the unit before cleaning or servicing.
●Never put anything in the unit other than dry or semi-moist kibble.
●Never sit on or place anything on top of the Feeder-Robot.
●Never wet or submerge the Feeder-Robot except for those items
outlined in this manual as hand-washable.
●Never allow children and persons with reduced physical, sensory,
or mental capabilities or lack of experience and knowledge use,
clean, or maintain the Feeder-Robot without supervision, instruction
concerning its use in a safe way, and understanding of the hazards
involved. Children below 8 years of age should not be allowed con-
tact with the Feeder-Robot.
●Never allow children or others to play with the Feeder-Robot.
●Never use an external power supply other than the one
provided with the unit.
●Never turn the unit upside down when there is food present in the
Hopper, even if the Hopper Lid is fastened securely.
●If the external power supply is damaged, please contact us for a
replacement.
Specifications
Food Types
The Feeder-Robot can accept any dry or semi-moist cat or dog food that
is 5/8" or less in kibble size. Do not use canned, wet, or moist pet food.
Capacity
The Hopper has a capacity of 25 cups. The capacity may be increased to
30-32 cups with the clear Hopper Insert removed (only for small kibble
sizes - see page 15).
Serving Size
The Feeder-Robot is capable of dispensing food in 1/4-cup increments.
You can set the quantity of Portions served through the Control Panel or
the AutoPets Connect App.
Power
●AC/DC power supply
●Nylon-braided, chew-resistant power cord
●Backup battery
(24 hours in power-saving mode)
Height Width xDepth Weight
Fully Assembled 15 x13 x12.5 9 lbs.
Foot Print 9 x11.25
Floor to Top of Bowl 2.75
Food Bowl 7.25 x7.25
Dimensions (inches)

877. 250.7729 | feeder-robot.com877. 250.7729 | feeder-robot.com
8 9
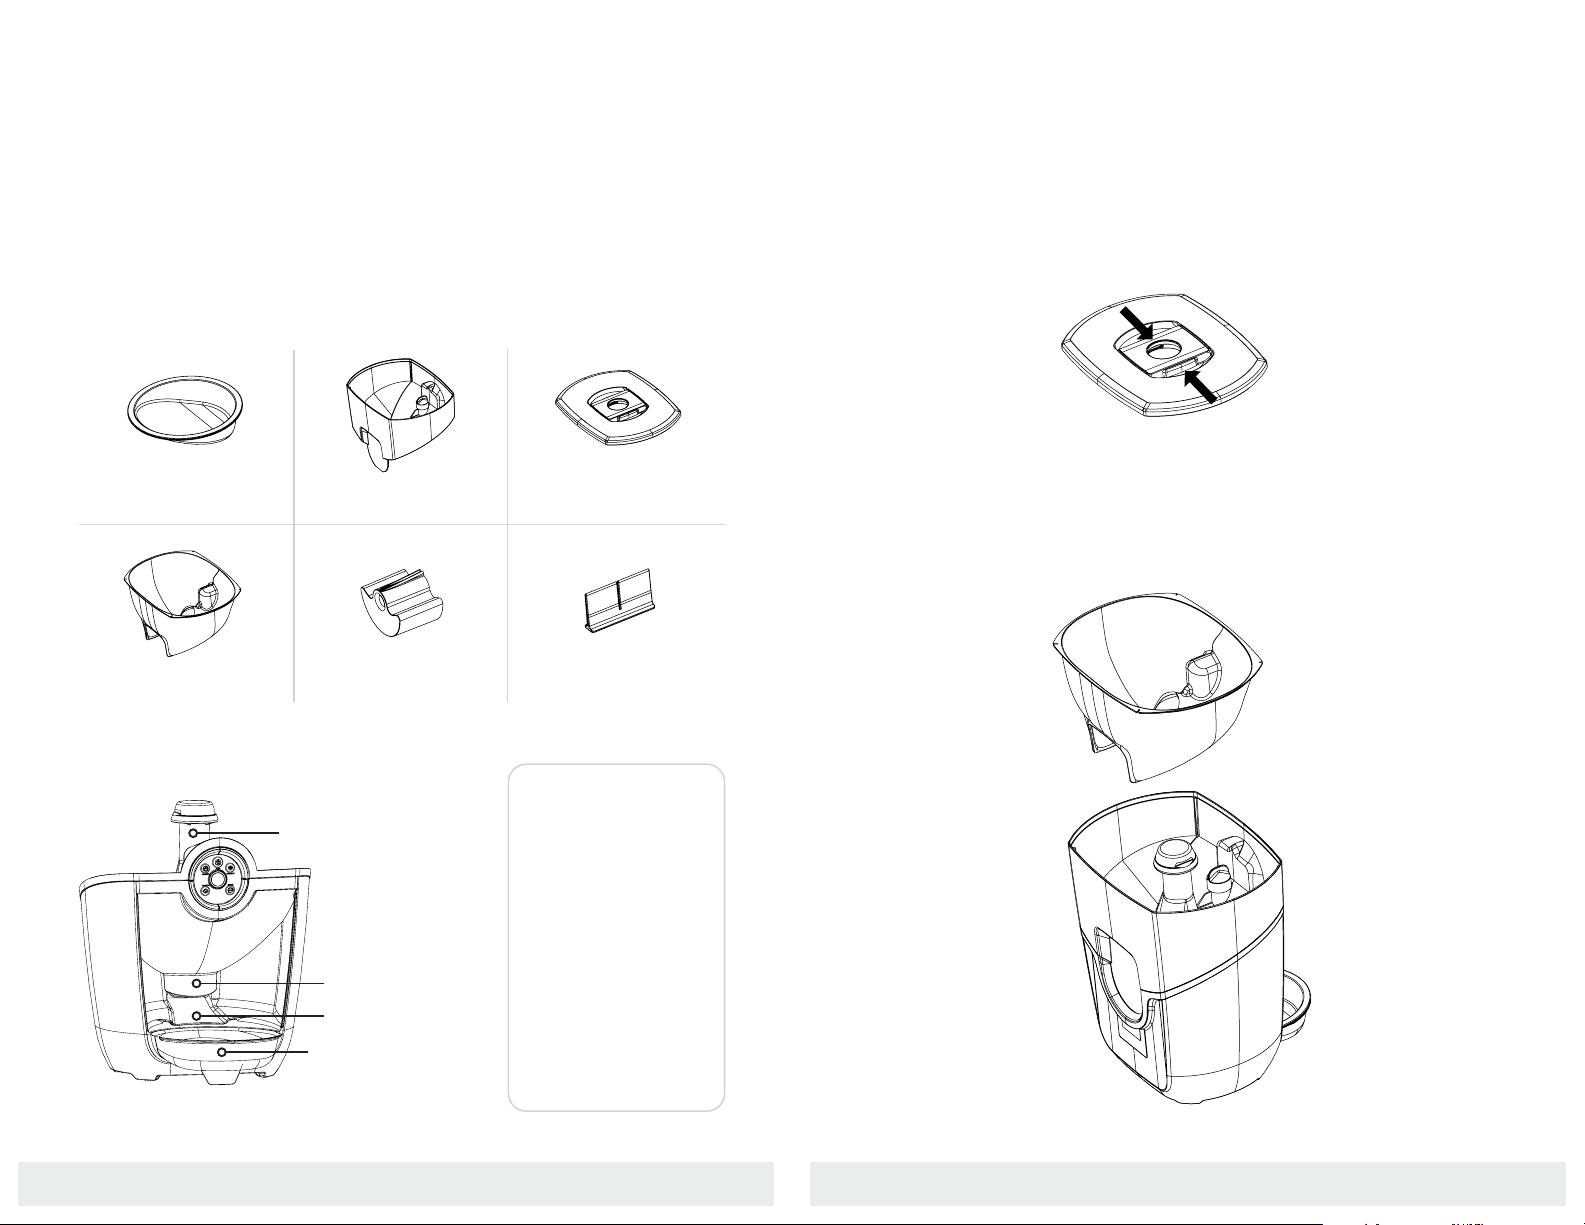
Components
Food Bowl
Food Chute
Control Panel
Status
Indicator Light
Hopper
Food Bowl
Food Ramp Food Ramp Lip
Food Bowl Holder
Front View
Rear View
Base
Hopper Lid
Release
Hopper
Dispenser
Dispenser Flap
Hopper Insert
Base
Serial Number Label
Dispenser Pocket
Hopper Lid
Hopper
Dispenser
Flap
Dispenser
Status Indicator
Tower
Exploded View

877. 250.7729 | feeder-robot.com877. 250.7729 | feeder-robot.com
10 11
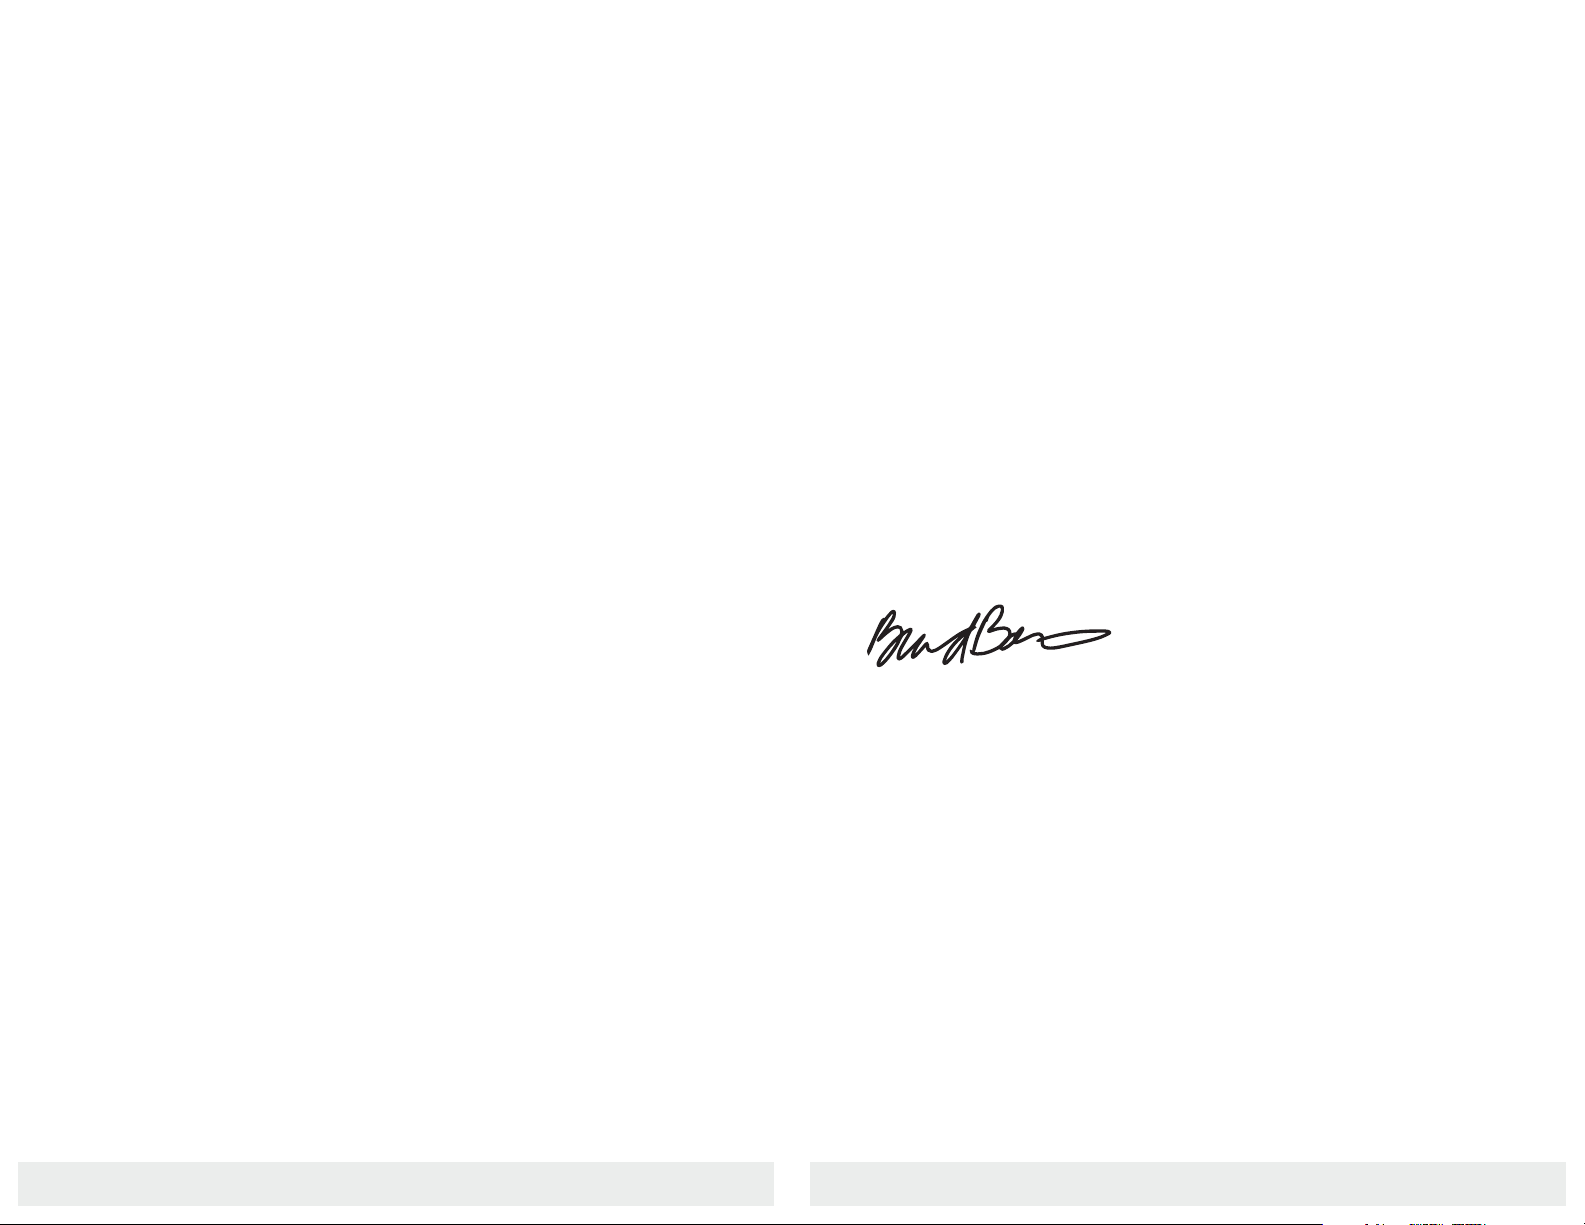
Power: Press the Power button to turn the unit power ON or OFF.
All lights on the Control Panel will flash white and the Power button
light will remain solid blue indicating power is ON.
Gravity Mode: Press the Gravity Mode button to enable or disable
Gravity Mode. The unit will keep the Food Bowl full by checking the
food level every 6 hours, adding up to 1 cup at a time as needed to
keep the Food Bowl full. A 3-second long press of the Gravity Mode
button will enable or disable Night Mode (dimming lights).
Feed: Press the Feed button to feed a single serving of food. A
3-second long press will enable or disable Control Panel Lockout.
The Status Indicator Light (top of the unit) will flash white once
indicating Control Panel Lockout Mode has been set, and all
subsequent button presses will coincide with a red flash of the
Power button light. Locking the Control Panel with this feature will
ensure settings are not changed by accidental button presses.
Connect: Press the Connect button to turn WiFi ON or OFF. WiFi
connecting is indicated by a blinking blue light, and WiFi connected
is indicated by a solid blue light. A 3-second long press will initiate
the Onboarding process indicated by a blinking yellow light. Press
and release to exit Onboarding.
Control Panel
Gravity Mode
Button
Gravity Mode
Button
Power Button Power Button
Portion Button Portion Button
Button Functions
Connect Button Connect Button
Meals Button Meals Button
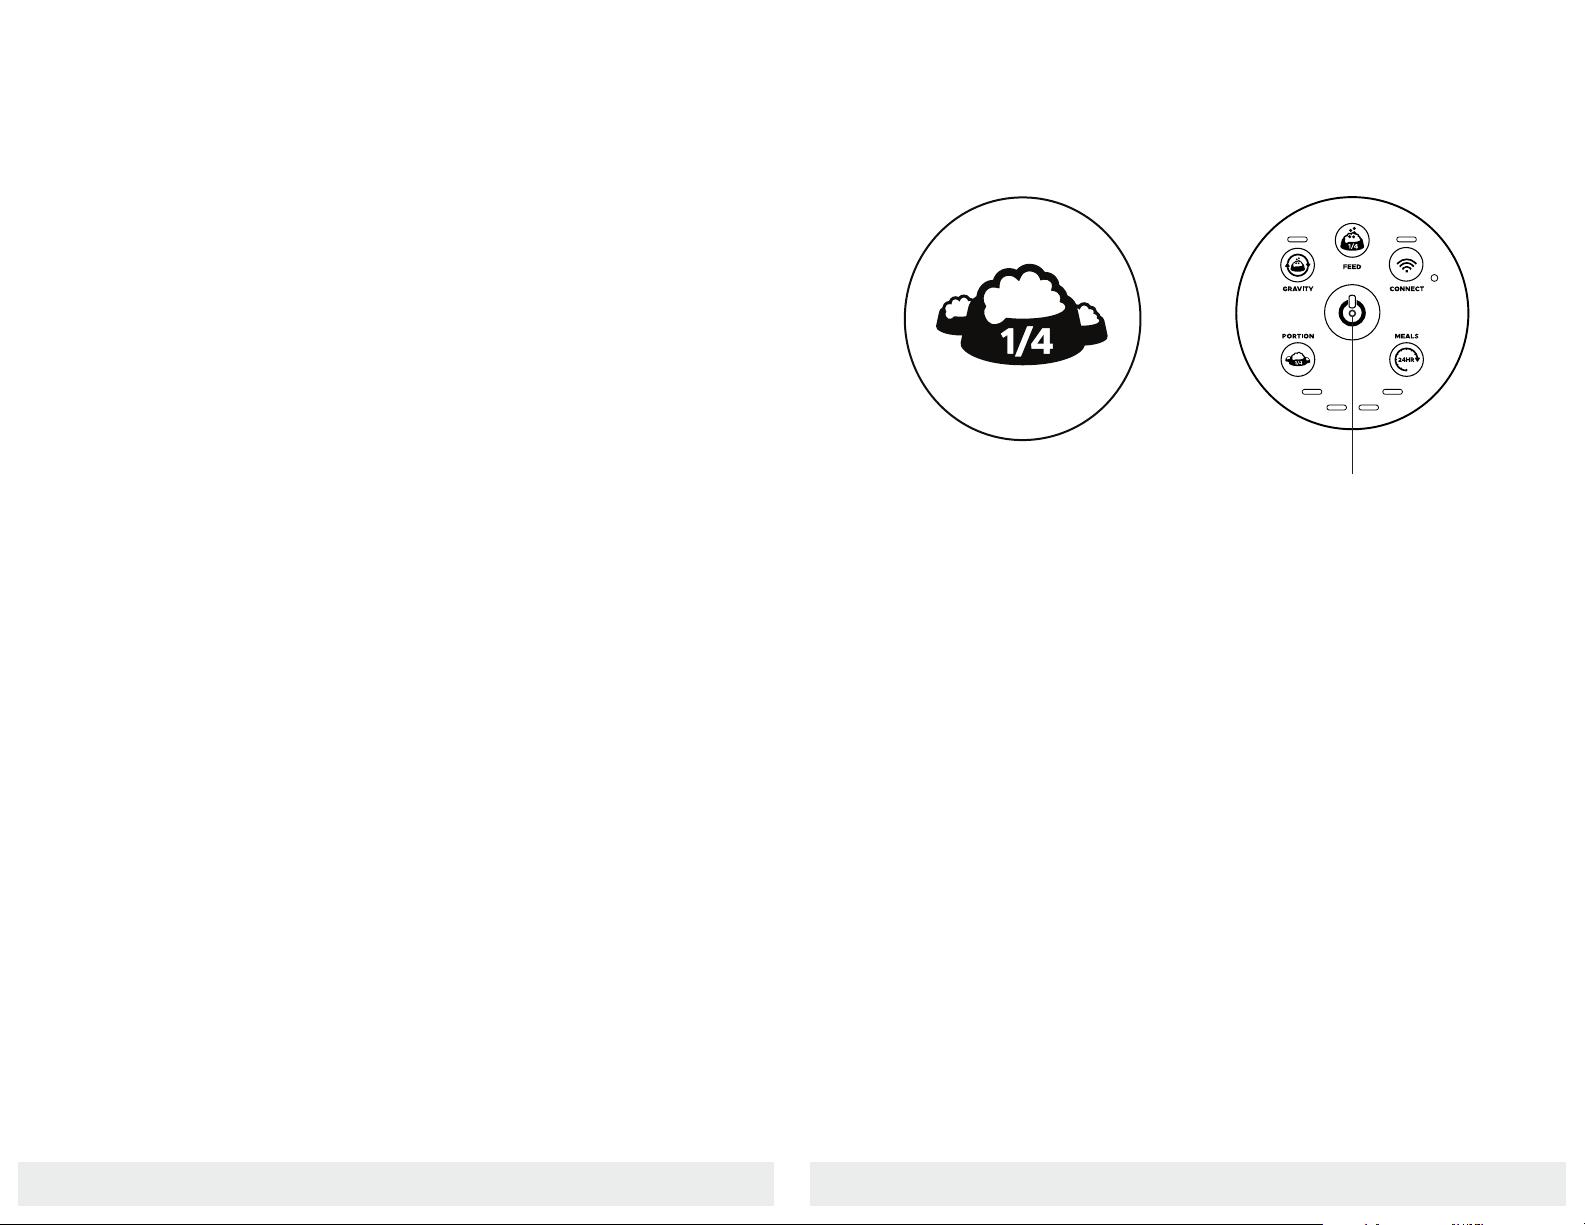
Portion: Sets the number of 1/4 cups dispensed in a meal. Press the
Portion button once to show the current quantity set (all 4 lights
blinking white indicates zero 1/4 cups set). Press the Portion button
again within 2 seconds of the first press to increment (from left to
right) the number of 1/4 cups per meal. Settings will be saved upon
the last button release.
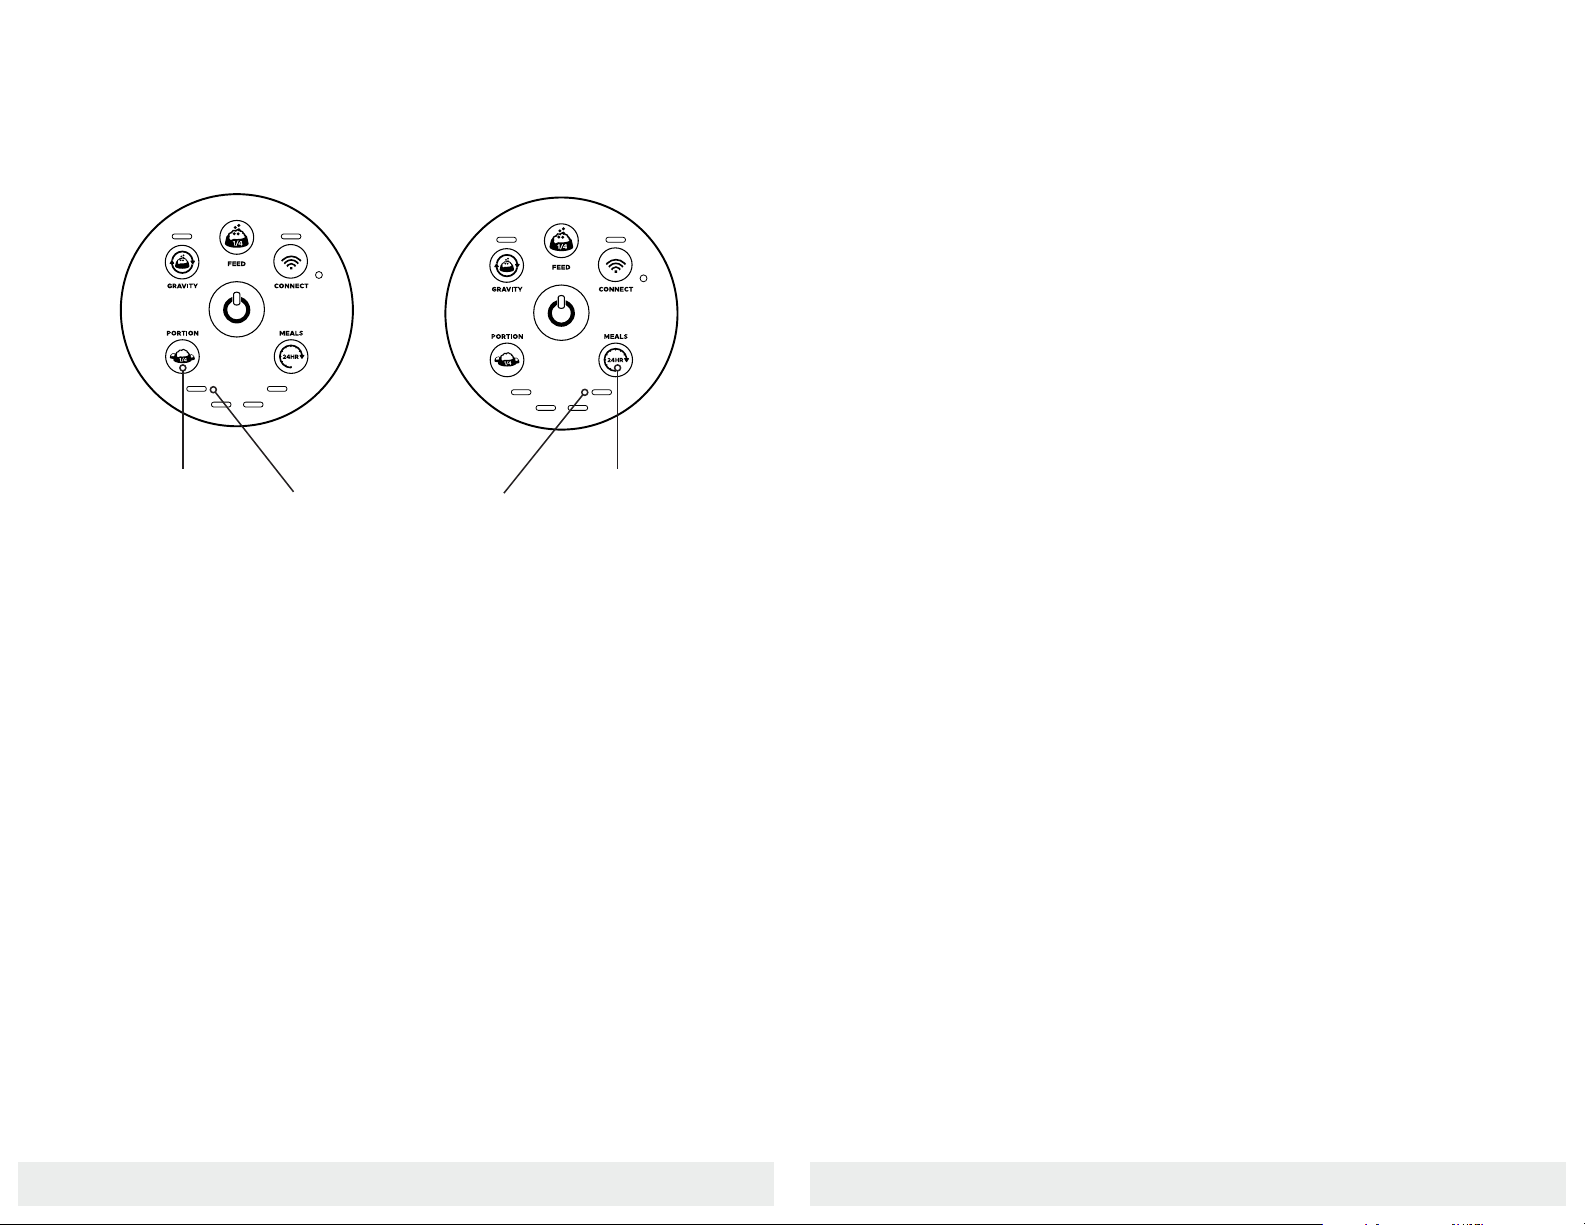
Meals: Sets the number of meals served in a 24 hour period -
starting from the time of the setting. Press the Meals button once
to show the current quantity of meals set (all 4 lights blinking white
indicates zero meals set). Press the Meals button again within
2 seconds of the first press to increment (from right to left) the
number of meals served in a 24-hour period. Settings will be saved
upon the last button release. Note: Program will not initiate unless
both Portion and Meals have non-zero settings.
Feed Button Feed Button
877. 250.7729 | feeder-robot.com877. 250.7729 | feeder-robot.com
12 13
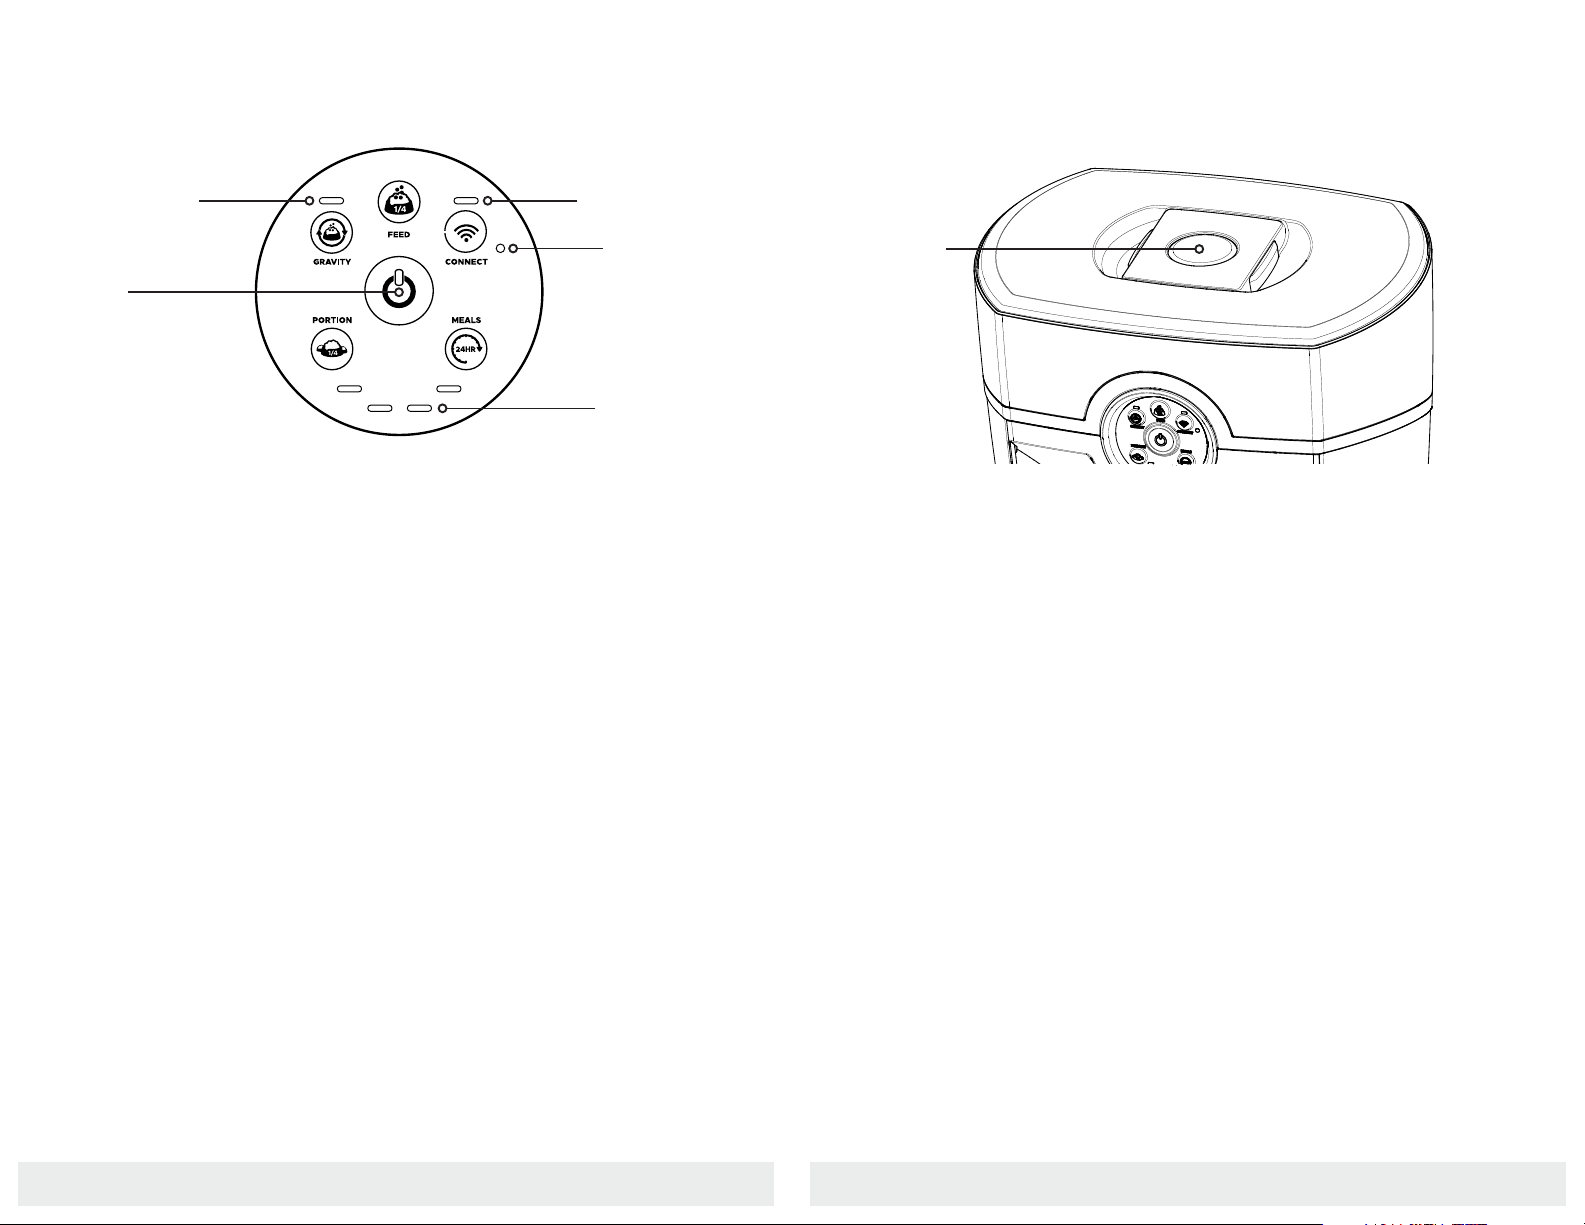
Quantity
Indicator Lights
Power Button Lights
●Solid Blue: Unit is ON and connected to power
●Single Red Flash (with any button push): Control Panel Lockout
is activated
●Blinking Yellow (every 4 seconds): Unit is in Battery Backup Mode
Gravity Mode Light
●Solid White: The Feeder is in Gravity Mode
WiFi Status and Onboarding Light
●Blinking Blue: Connecting to the internet
●Blinking Yellow: Onboarding Mode
●Solid Blue: Onboarding complete. Unit is online and
connected to the internet
●Blinking Red: Disconnected from WiFi
Quantity Lights
●Solid White: Number of lights illuminated indicates number of
1/4 cups dispensed or number of Meals depending on the button
pressed (Portion or Meals). The Portion setting increments left to
right, and the Meals setting increments right to left.
Control Panel
Gravity Mode
Light
Power Button
Light
Indicator Lights
WiFi Status and
Onboarding Light
Ambient
Light Sensor
Note: The maximum daily feeding amount you can set up via the Control Panel is 4 cups per day.
Status Indicator Lights
●Solid Blue: Feeder is in Automatic Feeding Mode
●Solid Yellow: Hopper is low indicating less than 20%
food remaining
●Solid Red: Hopper is critically low indicating less than 5%
food remaining
●Flashing Red: Dispenser is jammed (see page 29)
●Solid Purple: Food Bowl and Food Chute are full for 12+ hours
(food has not been consumed)
Status Indicator Lights
Status
Indicator
Light
Setting Up Your Feeder-Robot
Your Feeder-Robot ships fully assembled and ready to use. Get started by
following the steps below. See page 22 for instructions on how to remove
parts for care and cleaning.
Pre-Check
1. Remove the Feeder-Robot from its package.
2. Optional: Clean removable components that contact food. All parts
which contact pet food are made of BPA-free plastics. Wipe or
Ambient Light Sensor
Detects ambient light level for automatic dimming of indicator lights.

877. 250.7729 | feeder-robot.com877. 250.7729 | feeder-robot.com
14 15
hand-wash with mild soap the following removable parts:
the Hopper, Hopper Insert, the Hopper Lid (underside only),
the Dispenser, the Dispenser Flap, and the Food Bowl(s).
3. Optional: Hand-wipe non-removable parts that touch pet food: The
Food Chute, the Food Bowl Holder, and the Status Indicator Tower.
Do NOT submerge the Feeder-Robot Base or Control Panel in water.
4. Let all parts air dry completely before reassembling the
Feeder-Robot.
Placement
Place the Feeder-Robot in the same location as the previous
feeding device (at least during transition).
Make sure the unit is on a level surface. It can be placed on hard
flooring or carpet, as long as it is level.
Locate the unit near a power outlet (cord is 6 feet long).
Do not place or store the Feeder-Robot where it can fall or be
pulled into a tub or sink.
To avoid tripping, always position power cord out of the way of
foot traffic.
Do NOT use outdoors. FOR INDOOR HOUSEHOLD USE ONLY.
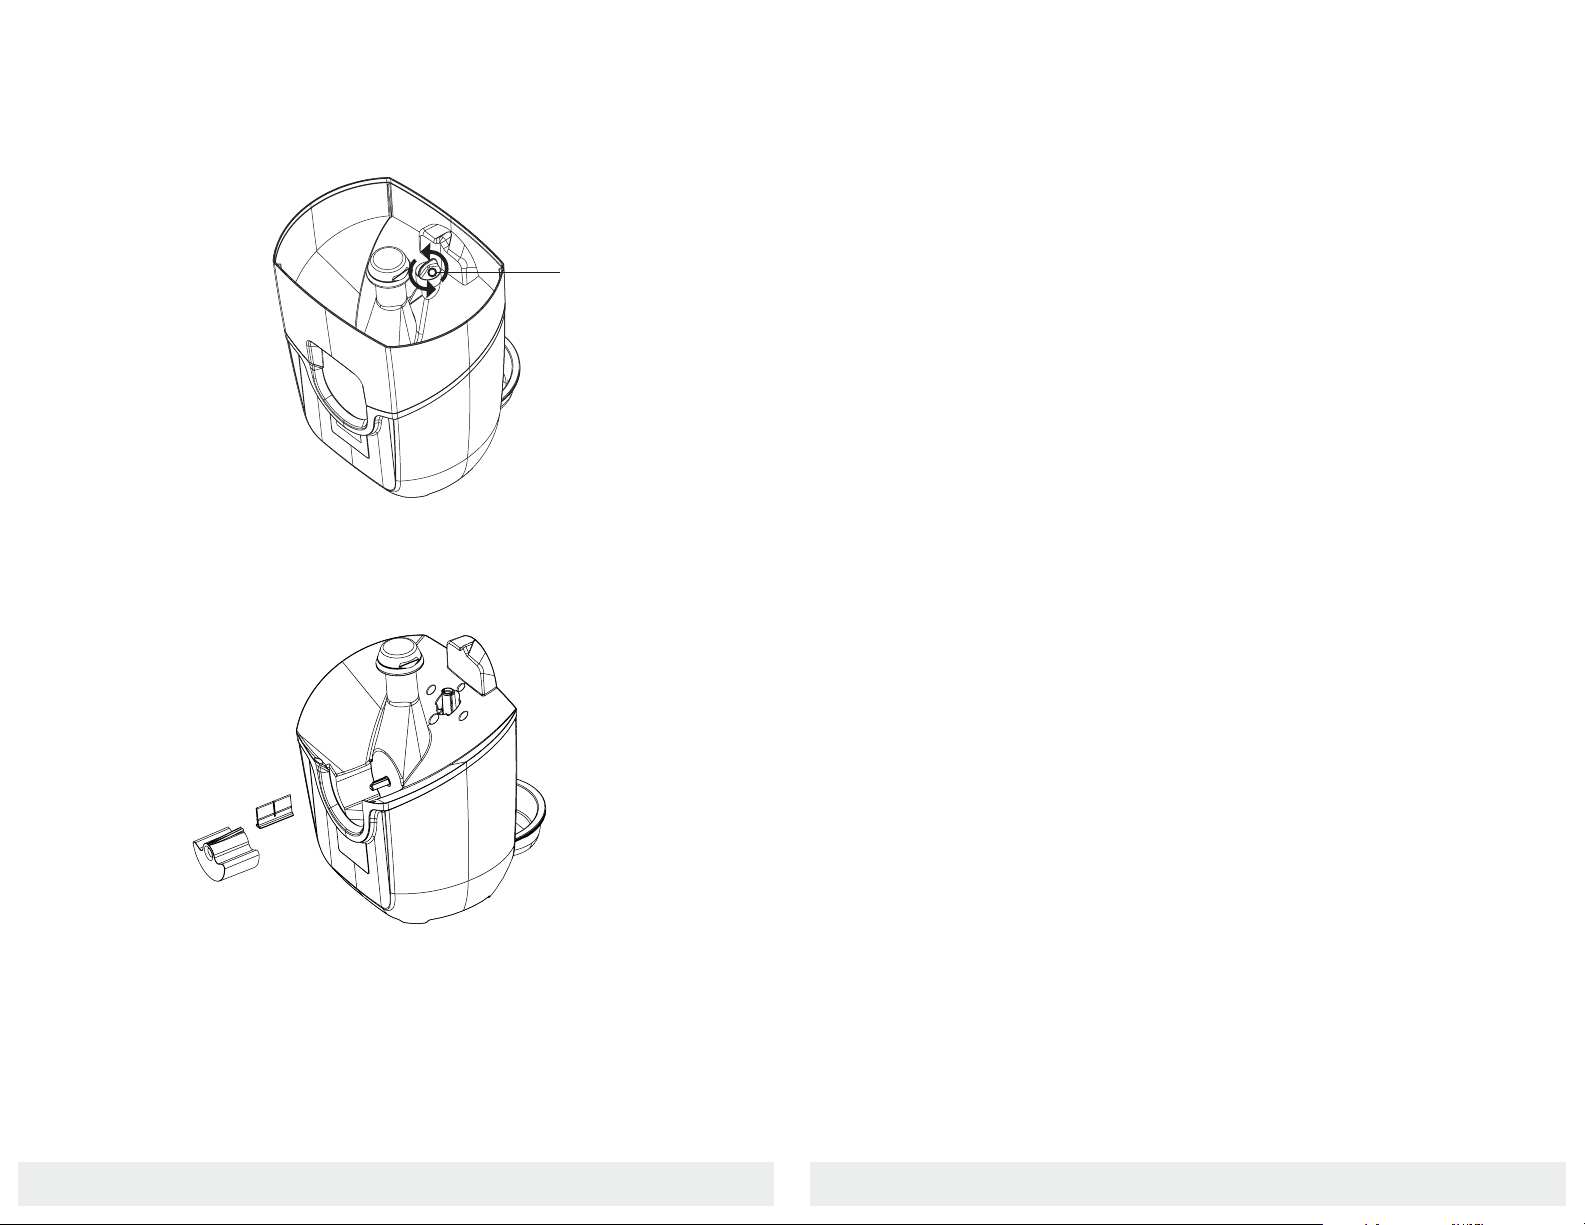
Plug It In
Note: Plug in the Feeder-Robot BEFORE adding
food to the Hopper.
1. Install the small plug end of the
power supply cord into the socket
underneath the unit (see image to
the right for location)
2. Then plug the power supply into a
wall outlet.
Power Input
Add Food
1. Remove the Hopper Lid by squeezing the Hopper Lid Release in the
center of the Hopper Lid (see page 8 for location). Use the built-in hook
on the underside of the Hopper Lid to hang it on the rear of the unit.
2. Add food: With the Hopper Insert, you can add up to 25 cups of
kibble. Without the Hopper Insert, you can add 30-32 cups of kibble.
Make sure food is level. If you have small, round-shaped kibble, the
Hopper Insert may not be required.
Situate The Food Bowl
Important: The Food Bowl design is shaped like a wedge. Make sure
the narrow end of the Food Bowl is placed under the Food Ramp Lip
(see illustration below). If the Food Bowl is not aligned in this way, the
dispensed food may catch along the edge of the Food Bowl, preventing
it from filling properly.
Place Food Bowl
Under Food Ramp Lip
Fill LineHopper
Lid Hook
877. 250.7729 | feeder-robot.com877. 250.7729 | feeder-robot.com
16 17
Determine Feeding Schedule
Before you start, make note of how
many cups of food per day you want to
feed your pet. For reference, standard
veterinary guidelines suggest:
Cats
●Two 1/4-cup meals per day per cat.
Dogs
●Two 1/2-cup meals per day per
15-pound dog.
●Dogs that weigh 30 pounds or
more may require 2-4 cups of
food per day.
Power On
Make sure the unit is plugged into the
wall. Press the Power button to turn the
Feeder-Robot ON.
Setting an Automatic Feeding Schedule
via Control Panel
Power Button
Note: Your individual pet's needs may vary
from these recommendations and it is best
to check with your veterinarian for required
daily portions depending on food type.
Feeding Modes
Gravity Feed Mode
An automatic feeding option that tops off the Food Bowl every 6 hours.
Snack or Manual Feed
A way to dispense a single portion, or ‘snack’, on demand and separate
from programmed scheduled meals.
Automatic Feeding
An automatic feeding schedule can be programmed, via the Control
Panel or app, to dispense food in 1/4 cup increments at a selected daily
frequency.
Programmed via Control Panel
●Maximum daily feeding available is 4 cups per day.
●See page 17 for instructions.
Programmed via App
●Maximum daily feeding available is 8 cups per day.
●See page 20 for instructions.
877. 250.7729 | feeder-robot.com877. 250.7729 | feeder-robot.com
18 19
●Press and hold the Feed button for 3 seconds to enter or exit Control
Panel Lockout. The Status Indicator Light on the top of the unit will
flash white to confirm the status has changed.
●While in Control Panel Lockout, you can turn the unit OFF by
pressing and holding the Power button for 3 seconds.
Control Panel Lockout
Control Panel Lockout disables button functions to prevent unwanted
changes. The Feeder-Robot functions normally in Automatic Feeding
Mode during Control Panel Lockout.
Night Mode
A 3-second press of the Gravity Mode button enables or disables Night
Mode. When Night Mode is enabled, all lights on the Control Panel and
Status Indicator Lights (top of unit) are automatically dimmed when
ambient light is low. The Ambient Light Sensor is located on the Control
Panel to the right of the Connect button (see page 12). Test Night Mode
by placing your hand or finger over the Ambient Light Sensor. All lights
should dim with your hand or finger covering the Ambient Light Sensor.
Setting an Automatic Feeding Schedule
via Control Panel
Set Portion
1. Press the Portion button once to
see the current setting - all four
lights flashing indicates zero cups
set.
2. Press the Portion button again and
then repeatedly to continue incre-
menting the quantity. Note that
the Portion will increment from left
to right. Setting will automatically
save after 2 seconds of inactivity.
3. The maximum dispensed per meal
is 1 cup (4 x 1/4 cups). You will see
the Quantity Indicator Lights (see
image above) between the Portion
and Meals buttons correspond to
how many 1/4-cup increments will
dispense per meal.
Set Feeding Frequency
1. Press the Meals button once to see
the current setting - all four lights
flashing indicates zero meals set.
2. Press the Meals button again, and
then repeatedly to continue incre-
menting the quantity. Note that
the Meals will increment from right
to left. Setting will automatically
save after 2 seconds of inactivity.
3. The maximum number of meals
dispensed per day is 4. You will
see the Quantity Indicator Lights
between the Portion and Meals
buttons correspond to how many
meals will dispense per day.
4. After the number of meals has
been set, the first meal will be
immediately dispensed, and the
24-hour period (or day) begins
upon the first meal dispensed.
Portion
Quantity Indicator
Meals
Quantity Indicator
Note: All four Quantity Indicator Lights may
flash upon initial press of the Portion or Meals
buttons to indicate zero Portion or Meals set.
Once a schedule is set from the Control Panel, you can adjust the portion without
affecting the timing of the scheduled meal. If the number of meals is changed,
then the scheduled timing will be restarted and the first programmed meal will
be dispensed immediately. Setting either Portion or Meals back to zero (all four
Quantity Indicator Lights blinking) will turn the schedule off.
Note: The unit will start the feeding schedule immediately after both portion and meals are
initially entered, and the first meal will be dispensed.

877. 250.7729 | feeder-robot.com877. 250.7729 | feeder-robot.com
20 21
Installing the AutoPets Connect App
1. Press the Power button to turn the Feeder-Robot ON.
2. Download the AutoPets Connect app from the App Store or Google
Play.
3. Make sure Bluetooth is enabled on your mobile device.
4. Put the Feeder-Robot into Onboarding Mode: Press and hold the
Connect button for 3 seconds or until the Onboarding Light above
the Connect button blinks yellow.
5. The Onboarding Light will blink yellow to show that onboarding is in
progress. Follow the prompts in the app and scan the QR code on
the back of the unit as directed.
6. Once the Feeder-Robot is successfully connected to WiFi, the
Onboarding Light on the Control Panel will display a solid blue light.
7. If Onboarding fails, you will be prompted to retry or cancel. If you
retry, the process is started over.
8. Once you have successfully Onboarded, select the
Feeder-Robot unit on the home screen and click “Schedule”
in the bottom menu of the app to set up your first feeding schedule.
The AutoPets Connect app offers customizable programming
options for your pet’s mealtime needs from the convenience of your
phone. You can monitor and control your pet’s feeding habits, receive
notifications for when you’re getting low on food, get feeding
insights by comparing weekly and monthly stats, and more.
AutoPets Connect App Introducing Your Pet to the Feeder-Robot
Location Is Key
Place the Feeder-Robot next to the current food bowl(s). Set it up, and
use the Feed button to dispense some familiar food. Do not start a
feeding schedule yet (Control Panel Mode or App Mode). Give your pets
a day or two to explore the Feeder-Robot. If your pets show no interest,
entice them to approach the Feeder-Robot by using some treats in the
Food Bowl.
Introduce Automatic Feeding
Once you notice that your pets have eaten from the Feeder-Robot, press
the Feed button while your pets are in the room with you so they can
observe the food dispensing and become familiar with the sound of the
Feeder-Robot while you are there to reassure them.
Set Your Automatic Feeding Mode
Take away your pets’ old food bowls and set your choice of Automatic
Feeding Mode:
●Control Panel Mode: Meals scheduled via the Control Panel
●App Mode: Meals scheduled via the app
●Gravity Mode: Food Bowl automatically topped off every 6 hours
For the next few days, keep an eye on your pet and the Feeder-Robot to
confirm that your pet is eating comfortably from the unit.
877. 250.7729 | feeder-robot.com877. 250.7729 | feeder-robot.com
22 23
The Feeder-Robot can be easily disassembled for cleaning. Use mild
soap and hand-wash removable parts. Wipe clean non-removable parts
and let parts air dry completely before reassembling the Feeder-Robot.
DO NOT immerse the Control Panel or Base in water, as this may
damage electronic components.
Removable Parts
Non-Removable Parts
Care and Cleaning
Food Bowl
Hopper Insert
Hopper
Dispenser
Hopper Lid
Dispenser Flap
Status Indicator Tower
Food Chute
Food Bowl Holder
We recommend
that you clean
the Feeder-Robot
before its first use,
and at least once
a month after that.
The best time to
clean is when the
Hopper and Food
Bowl are already
empty.
To Clean the Feeder-Robot:
1. Turn the unit OFF and unplug the unit.
2. Remove the Food Bowl from the Food Bowl Holder and discard any
remaining food in the Food Bowl or Food Bowl Holder.
3. Remove the Hopper Lid by squeezing the handles toward one another.
4. If there is any food in the Hopper, pour it into a container or bag for
temporary storage. Ensure that there are no pieces of kibble trapped
in the Food Chute or Dispenser.
5. Lift the Hopper Insert out of the Hopper if using.
Food Ramp
877. 250.7729 | feeder-robot.com877. 250.7729 | feeder-robot.com
24 25
6. Remove the Hopper by rotating the Hopper Lock Knob
counterclockwise. Lift the Hopper away from the Base of the unit.
7. Remove the Dispenser by simply sliding the Dispenser away from
the unit. The rubber Dispenser Flap can also be removed from the
Dispenser for cleaning.
8. You may hand-wash with mild soap these removable parts: the
Hopper Lid, Hopper Insert, Hopper, Dispenser, Dispenser Flap, and
Food Bowl(s). (See chart on page 22)
9. Wipe down non-removable parts that touch pet food with a mild
cleaner: the Food Chute, the Food Bowl Holder, and the Status
Indicator Tower. You may wish to use a small cleaning brush or
toothbrush to clean food debris and residue from the Food Chute
(with Dispenser removed). Test a small area, as some brushes could
scratch plastic parts.
10. Rinse (only removable parts) and let all parts air dry completely before
reassembling the Feeder-Robot. Reinstall the Dispenser, Hopper, and
the Hopper Insert.
11. Plug the Feeder-Robot back in and press the Power button.
12. Add and level out food to the fill line (see page 15), then replace the
Hopper Lid.
Ongoing Maintenance
Fill the Hopper when indicated by the app and/or the solid red Status
Indicator Light at the top of the Status Indicator Tower.
How often you need to fill the Hopper depends on the feeding schedule
of your pet. For an average-sized cat eating 1/2 cup of food per day,
kibble will typically need to be replaced once every 7-8 weeks.
A small- to medium-sized dog may need kibble replaced every 2-4 weeks.
Backup Battery
The Backup Battery provides approximately 24 hours of operation in
power-saving mode if power is interrupted. When power is interrupted,
the unit will automatically switch to battery power and a blinking
yellow light will illuminate the Power button on the Control Panel. The
Feeder-Robot will switch back to household power when it returns,
and the unit will begin recharging the battery.
Hopper Lock Knob

877. 250.7729 | feeder-robot.com877. 250.7729 | feeder-robot.com
26 27
Frequently Asked Questions
How much food does the Feeder-Robot dispense?
The Feeder-Robot dispenses up to 1 cup of food in 1/4-cup increments,
1 to 4 times per day (or up to 8 times if using the app).
What type of food can the Feeder-Robot dispense?
You can use any dry or semi-moist kibble, 5/8 inch or smaller.
Should I schedule my pet’s meals or use Gravity Mode?
Deciding how to use the Feeder-Robot depends on your pet’s eating hab-
its. If your dog or cat has a habit of overeating or eating very quickly, you
may wish to schedule your pet’s meals. By scheduling meals, your pet will
be eating a measured amount, 1 to 8 times a day. If your pet has no issue
with overeating and tends to “graze” throughout the day (this is more
likely with cats than dogs), you may wish to use Gravity Mode. In Gravity
Mode, the Feeder-Robot Food Bowl remains full based on a check every
6 hours.
How do I clean the Feeder-Robot?
Hand-wash removable parts with mild soap; let completely air dry before
re-assembling the Feeder-Robot. The Food Bowl(s), Hopper Lid, Hopper
Insert, Hopper, and Dispenser are removable. Wipe down non-removable
parts that touch pet food. Do NOT submerge the Feeder-Robot Base or
Control Panel in water.
When and how often should I clean the Feeder-Robot?
We recommend that you clean the Feeder-Robot before its first use, and
at least once a month after that. The best time to clean is when the Hopper
and Food Bowl are already empty.
Can I use the AutoPets Connect app with both iOS and Android?
The AutoPets Connect app is compatible with Apple mobile devices with
iOS 9.0 or greater and Android devices 8.0 or greater.
877. 250.7729 | feeder-robot.com877. 250.7729 | feeder-robot.com
28 29
Troubleshooting
Problem Solution
Control Panel is locked/ buttons
do not work
You are most likely in Control Panel
Lockout. Press the Feed button for
approximately 3 seconds to
disable Control Panel Lockout.
Hopper Lid is not fitting properly You may have added too much pet
food, causing the Hopper Lid not to
lock in place properly. Or, the Hopper
may not be sitting down all the way;
check the Hopper and the Hopper
Insert to ensure the pieces are locked
in place.
Hopper not snapping down Check to make sure there are no pieces
of dry food / kibble beneath the Hop-
per.
Hopper Insert is not fitting properly Check to make sure there are no pieces
of dry food / kibble beneath the Hop-
per Insert.
Not dispensing meal sizes programmed
or not dispensing food at all
Check that the Dispenser is properly
installed. Check the Food Chute to
make sure it is clear of food.
Dispensing extra meals Check your programming on the
Control Panel: Press the Portion button
to check portions and Meals button to
check meals. If you set up the schedule
in the app, check your app again as
well.
Dispensing food inconsistently Any inconsistency with the volume of
food dispensing may indicate that you
should be using the Hopper Insert. The
Hopper Insert is used for large, square,
and/or oddly-shaped pet food kibble.
Troubleshooting
Problem Solution
Not dispensing meals at
scheduled times
Check your programming on the
Control Panel: Press the Portion button
to check portions and Meals button to
check meals. If you set up the schedule
in the app, check your app again as
well.
Not dispensing meals because there is
too much food in the Food Bowl
You may be feeding your pets a larger
amount of kibble than they need each
day. If your pets aren't consistently
eating the same amount of food that
the feeder is dispensing, the food
will begin to build up and the next
scheduled meal will not dispense until
the Food Chute is clear. Consider
reducing the portion per meal or the
number of meals.
Food is building up against the
Food Bowl
The Food Bowl is likely not situated
below the Food Ramp Lip. Make sure
the narrow end of the Food Bowl fits
snugly below the Food Ramp Lip.
Status Indicator Tower shows a solid
red light but the Hopper is more than
5% full.
The Status Indicator Tower may also go
solid red if the Hopper is unevenly filled
with pet food; for example, one side of
the Hopper may be completely empty
while the other side has built-up food.
Make sure the food level is even.
Status Indicator Light is flashing red. Feeder-Robot is equipped with
anti-jam technology. If the Dispenser
fails to clear after 5 attempts, the
Status Indicator Light will flash red.
Please check the Food Chute and
Dispenser to clear any food that may
be jammed.

877. 250.7729 | feeder-robot.com877. 250.7729 | feeder-robot.com
30 31
Key Definitions
Anti-Jam Technology: If the Feeder-Robot Dispenser jams, it will retract,
and try again up to 5 times.
Automatic Feed Mode: The Feeder-Robot feeds without manual
manipulation; refer to scheduled feeding (Control Panel Mode or App
Mode) or Gravity Mode.
Base: Holds Hopper and Food Bowl.
Control Panel: Circular area on the front of the Feeder-Robot with six
buttons for powering the unit, scheduling meals in Control Panel Mode,
Onboarding, and manual feeding.
Control Panel Lockout: Disables the buttons. Note that the unit may be
turned off in this mode by pressing and holding the Power button for 3
seconds.
Control Panel Mode: An automatic scheduled feeding mode set up on the
Control Panel via the Portions button and Meals button.
Dispenser: Dispenses a defined volume of kibble with alternating rotations.
Dispenser Flap: A soft, flexible vane attached to the Dispenser to avoid
jamming.
Food Bowl Holder: Integral part of the Base that holds the removable
Food Bowl.
Food Chute: Opening above the Food Ramp where food passes through
and dispenses into the Food Bowl.
Food Ramp Lip: Area of the Food Ramp that overlaps the narrow end of
the Food Bowl.
Gravity Mode: An automatic feeding mode that ensures that the
Feeder-Robot Food Bowl remains full based on a check every 6 hours
Hopper: Holds dry or semi-moist pet food with a 30- to 32-cup
capacity; removable.
Hopper Insert: A removable insert located within the Hopper that assists
proper dispensing of large, square, and/or oddly-shaped pet food kibble.
The Hopper Insert holds 25 cups, and is not required for smaller kibble
sizes. Feeder is compatible with all dry/semi-moist kibble sizes with the
Hopper Insert installed.
Hopper Lid: Covers the Hopper and food.
Status Indicator Tower: Light indication at the top of the Hopper that
shows the status of the unit or if an error has occurred.
877. 250.7729 | feeder-robot.com877. 250.7729 | feeder-robot.com
32 33
Money-Back Guarantee and Warranty
90-Day Trial Period
If you or your pets are not completely satisfied with
the Feeder-Robot, just return the unit within 90 days
for a full refund of the purchase price. Please note
that you are responsible for return shipping costs.
If you purchased your Feeder-Robot through a source other than
AutoPets, you must coordinate the return with that source according
to their return policy.
If you have purchased directly from AutoPets, email
number. We cannot accept shipments without an RMA number. Please
refer to the Return Instructions insert.
Please make sure the Feeder-Robot is clean and carefully packaged
(the original packing materials are best) in order to avoid damage in
shipment. The Return Instructions insert shows a packaging diagram
for the Feeder-Robot.
18-Month Full Warranty
Your Feeder-Robot is covered by a full warranty
for 18 months, starting from the date of shipment
regardless of where purchased. The warranty covers
all parts, labor, and shipping costs within the lower 48
states. Customers in Alaska, Hawaii, and Puerto Rico as well as APO,
FPO, and international shipments may incur additional shipping costs.
Contacting Customer Service
If you have questions or concerns or need assistance, contact us!
We’ll be glad to help.
Email Support
Phone Support
M-F: 9 AM – 5 PM EST
877.250.7729
Online Troubleshooting
support.feeder-robot.com
Mailing Address
AutoPets
1080 West Entrance Drive
Auburn Hills, MI 48326
Return Address
AutoPets Returns
561 S. Fairfield Ave.
Juneau, WI 53039
Repair & Returns
If repairs are necessary, call us at 877.250.7729 or email
sending in your AutoPets product.

877. 250.7729 | feeder-robot.com877. 250.7729 | feeder-robot.com
34 35

Version: RF1-8004-0b
1080 West Entrance Drive | Auburn Hills, MI 48326
MADE IN THE USA
WITH GLOBAL MATERIALS
feeder-robot.com
Other manuals for Feeder-Robot
1
Table of contents
Other AutoPets Pet Care Product manuals


Popular Pet Care Product manuals by other brands

Great American
Great American Deluxe Paw Pal installation guide

Prevue Pet Products
Prevue Pet Products F075 Assembly instructions

Double K Industries
Double K Industries Challengair 2000XL instruction manual

Petsafe
Petsafe Dancing Dot Get started

Willoughby
Willoughby WODF-1-PET Series Operation manual

Premier Pet
Premier Pet GBC00-16997 product manual


