ERICO SBG200 Instructions for use

Instruction and
Maintenance Manual
ERICO®RAIL GRINDER
Model SBG200

i
www.erico.com
WARNING:
1. ERICO products shall be installed and used only as indicated in ERICO product instruction sheets and training materials.
Instruction sheets are available at www.erico.com and from your ERICO customer service representative.
2. ERICO products must never be used for a purpose other than the purpose for which they were designed or in a manner
that exceeds specified load ratings.
3. All instructions must be completely followed to ensure proper and safe installation and performance.
4. Improper installation, misuse, misapplication or other failure to completely follow ERICO’s instructions and warnings
may cause product malfunction, property damage, serious bodily injury and death.
SAFETY INSTRUCTIONS:
All governing codes and regulations and those required by the job site must be observed. Always use safety equipment
such as eye protection, hard hat, and gloves as appropriate to the application.
For Service, call 1-800-447-RAIL (7245).
General Safety Information ............................................................................................. ii-iii
Fuel .................................................................................................................................... iv
Specifications ..................................................................................................................... 1
Ordering Spare Parts ........................................................................................................... 1
Warranty Service ................................................................................................................. 1
Grinder Part Identification ................................................................................................... 2
Instructions for Starting ...................................................................................................... 3
Rail Grinding Procedure ....................................................................................................... 4
Engine Maintenance Schedule ............................................................................................ 5
Torque Chart ...................................................................................................................... 5
Trouble Shooting Chart ....................................................................................................... 6
Grinding Wheel .................................................................................................................. 7
Part List SBG200 Rail Grinder .............................................................................................. 8
SBG200 Exploded View ...................................................................................................... 9
Accessories ...................................................................................................................... 10
ERICO®Rail Products Limited Warranty .............................................................................. 11
TABLE OF CONTENTS

ii
www.erico.com
GENERAL SAFETY INFORMATION
Read, understand, and follow all safety instructions before operating or performing maintenance on the equipment.
DEFINITIONS OF FLAG WORDS:
DANGER: Indicates an imminent hazardous situation, which, if not avoided, will result in death or serious injury.
Its use is limited to the most extreme situation.
WARNING: Indicates a potentially hazardous situation, which, if not avoided, could result in death or serious injury.
CAUTION: Indicates a hazardous situation, which, if not avoided, will result in minor or moderate injury.
It is also used to alert against unsafe practices.
NOTICE: Is used only with alerts that warn against property damage.
During the operation of the equipment, the user must be familiar with and follow all applicable statutes, codes, and regulations
governing the workplace.
DANGER
EXPLOSIVE DISINTEGRATION HAZARD: Worn or damaged grinding wheels can explosively disintegrate when turning at high
speeds causing death or serious injury from flying debris. Prior to use, always check wheel for nicks, flat spots or excessive wear.
Worn or damaged wheels must be immediately discarded. Never operate the wheel above its rated speed. Ensure that all guards
are in place prior to operating tool. Always operate the grinder in a position that places the guard between the wheel and the
operator. New wheels must be run at operating speed for one minute before any actual grinding. Never grind with the side of a
conventional straight or Type 1 grinding wheel.
WARNING
EYE DAMAGE HAZARD: Failure to wear approved safety eye protection can result in permanent sight loss from flying debris.
CLOTHING, JEWELRY AND HAIR ENTANGLEMENT HAZARD: Loose clothing, jewelry and hair can be entangled on projections
or moving parts, and result in fatal or serious injury. If gloves are used, they must be easily removable and of nonslip material.
Always allow the grinder wheel to fully stop before setting the grinder down and never touch moving parts.
HEARING LOSS HAZARD: Failure to wear approved hearing protection when operating this equipment may result in permanent
hearing loss.
EXPLOSIVE DISINTEGRATION HAZARD: Damage to flywheel or clutch due to use of improper tools may result in their
disintegration when used, resulting in fatal or serious injury.
!
!

iii
www.erico.com
GENERAL SAFETY INFORMATION
POTENTIAL PHYSICAL HEALTH PROBLEM
PROTECTION FROM VIBRATION: Vibrations from hand-held tools of this type may contribute to a condition called Raynaud’s
Syndrome in certain individuals. Symptoms may include tingling, numbness and blanching of the fingers, usually apparent under
exposure to cold. Hereditary factors, exposure to cold and dampness, diet, smoking and work practices are all thought to contribute
to the development of these symptoms. If you experience any of the symptoms of this condition, immediately discontinue
use and see your physician about these symptoms.
This grinder is classified in the “occasional use” category by many current regulations. To reduce the effects of vibration:
a) Keep your body warm in cold weather. When operating the unit, wear gloves to keep the hands and wrists warm.
b) Refrain from smoking.
c) After each period of operation, exercise (move arms, etc.) to increase blood circulation.
d) Take frequent work breaks. Limit the amount of exposure per day.
e) Keep the grinder well maintained, fasteners tightened and worn parts replaced.
CAUTION
HAND INJURY HAZARD: Do not allow the grinder or other moving parts to make contact with unprotected skin on the hand
or elsewhere on the body. Failure to wear gloves may result in cuts and bruises to the hand. Gloves must be easily removable and
of a non-slip material.
!
!

iv
www.erico.com
FUEL
DANGER
DO NOT SMOKE or bring any flame or sparks near fuel. Failure to observe this precaution can be fatal or result in serious injury.
EXPLOSION, FLAMMABILITY HAZARD: Failure to refuel the equipment away from open flame, spark generators, or other
ignition sources, including smoking (cigarette or other), will result in a fatal or serious injury accident. Never start the engine in
an explosive atmosphere or near flammables.
WARNING
EXPLOSION FLAMMABILITY HAZARD: Failure to remove fuel cap slowly to release pressure and/or re-install fuel cap properly
may cause spurting of gasoline onto hot parts of the engine and possible fire resulting in serious or fatal burns. Use only approved
safety fuel-containers for storage and transport of fuel.
CAUTION
INSTRUCTIONS FOR ADDING FUEL:
Select a safe area for fueling. Move at least 10 feet (3 m) from the fueling spot before starting the engine.
1. Ensure area around fuel cap is free of dirt. Loosen fuel cap slowly.
2. Add fuel to reservoir and avoid spillage by not overfilling.
3. Immediately replace fuel cap and hand tighten. Wipe up any fuel spillage
4. For long-term storage of the grinder, drain and clean the fuel tank and run engine to ensure that no fuel is in carburetor.
Store the grinder in the toolbox provided. Ensure the storage area is secure and not accessible to children or other
unauthorized persons.
This tool is designed to operate on unleaded gasoline. A high quality/name-brand gasoline is recommended.
The unleaded gasoline requires a minimum octane number 86. Fuels with a lower octane level may result in premature engine
failure and may void the warranty.
The chemical composition of the fuel is also important. Various additives may affect seals, fuel lines, diaphragms and metal cast
materials. Therefore it is essential that only high quality/name brand fuels be used.
OXYGENATED FUELS:
The following are maximum recommended percentages of oxygenates:
ETHANOL (ethyl or grain alcohol) 10% max by volume
MTBE (methyl tertiary butyl ether) 15% max by volume
METHANOL (methyl or wood alcohol) 5% max by volume
Fuel system damage or performance problems resulting from the use of an oxygenated fuel containing more than the
percentages of oxygenates mentioned above are not covered under warranty.
RECOMMENDED ENGINE OIL: We recommend the use of any high quality/name brand SAE 10W-30-engine oil.
!
!
!

1
www.erico.com
SPECIFICATIONS
ENGINE: ERICO®Part No. SBG20023
Type: Single Cylinder, 4-Stroke Engine
Power Head: Honda®GX25/ 1.1Hp
Displacement: 25cc
IGNITION:
Spark Plug: CMR5H
Spark Plug Gap: 0.65 mm (.026”in)
GRINDING WHEEL:
Type: ERICO Approved (see page 10)
Rated RPM: 10,500 max.
FUEL/OIL SYSTEM:
Air Filter: Special filter (Reusable)
Fuel Capacity: 0.55 Liter (0.145 US gal)
Engine oil: SAE 10W - 30
WEIGHT:
Model SBG200: 13.5 lbs dry weight
ORDERING SPARE PARTS
Please provide the Model No. and Item No. as noted on the appropriate exploded views found in this manual.
WARRANTY SERVICE
You must use the ERICO factory or an authorized ERICO service center to perform all repairs of grinders. Any repairs made by
non-authorized service centers and/or personnel will void all warranties.

2
www.erico.com
GRINDER PART IDENTIFICATION
BEARING
HOUSING
CARRY
HANDLE
ENGINE
CHOKE
ON/OFF
SWITCH
THROTTLE
TRIGGER
ENGINE STARTER
PULL CORD
ENGINE OIL FILLER CAP
(Far Side Bottom)
GASOLINE
FILLER CAP

3
www.erico.com
INSTRUCTIONS FOR STARTING
“COLD STARTING” PROCEDURES: The Choke must be in the “CLOSED” position, and the On/Off switch must be in the “ON”
position. Push primer button until fuel is seen in the fuel line under the carburetor. Pull the starter cord until the engine starts.
Turn the choke to the “OPEN” position once the engine starts.
“WARM STARTING” PROCEDURES: If the engine is warm, the choke is not required. With the choke in the “OPEN” position
and On/Off switch in the “ON” position, pull the starter cord until the engine starts
To STOP the engine, move the On/Off switch to the "OFF" position.
REMINDERS: Speed up the engine to full speed just before making grinder wheel contact. Perform all grinding at full throttle so
as not to slip the clutch. Get ready to throttle down to idle so as not to over speed the engine when it becomes load free.
NOTE! A new grinder must not be run at full throttle with no load until at least 3 full tanks of fuel have been used. This ensures
that the engine will not fail prematurely due to higher loads during the break-in period. After the break-in period the engine will
start reaching maximum horsepower after 5 full tanks of fuel.
GRIP ON HANDLES
1. Wear non-slip gloves for maximum grip and protection.
2. Proper grip is important! Maintain a proper grip on the grinder whenever the engine is running and/or the
grinding wheel is rotating. Grasp the BEARING HOUSING with your left hand. With your right hand, grasp
the CARRY HANDLE (foam handle) so you can control the THROTTLE TRIGGER properly as shown below.
GRINDING STANCE: Always keep your weight well balanced when grinding. Since you will exert moderate pressure when grinding,
guard against loss of balance by assuring that you are able to pull the grinder free and clear in the event that the grinding wheel
slips on the work piece.

4
www.erico.com
RAIL GRINDING PROCEDURE
Before grinding, wipe the rail surface clean with a cloth saturated with mineral spirits, followed by a wipe with a clean dry cloth.
Surface contaminants such as rust, grease, oil, and water condensation will affect the integrity of a CADWELD®bond. Discard
soiled rags and debris in an approved manner.
1. Wear proper safety equipment! Gloves made of a non-slip material, eye protection, hearing protection, hardhat,
safety shield, steel-toed boots, and other appropriate safety equipment must be used.
2. Stance: Take the proper stance in front of the area to be ground with the grinder idling. Rest right arm on knee
while in squatting position. Lift with your legs, not your back.
3. Wheel Position:
Grinding for Head Bonds Wheel must be used only at the center of the head of the rail, within the confines of
the splice plate.
Web Grinding Wheel must be used only at the neutral axis of the rail.
4. Wheel Guard Adjustment: If desired, you may adjust the orientation of the wheel guard by loosening the clamping screws
and rotating the guard to the desired position. Retighten the screws before grinding. (Note: The guard for the Type 27, cone-
shaped wheels, part no. SBG20015G, has an adjustable skirt. The skirt must be adjusted to within 1/8” of the face of the
wheel per ANSI®B7.1-2000. The skirt or the entire guard may be removed when using the Type 18 plug wheel as ANSI B7.1-
2000 does not require a guard for Type 18 wheels of this size.)
5. Grip: Grasp the BEARING HOUSING with your left hand while gripping the CARRY HANDLE (foam handle) with your
right hand.
6. Accelerate the engine to full throttle just before wheel touches grinding surface.
7. Begin grinding with the wheel against the rail moving with a side-to-side motion until bright base metal is shown.
8. Allow wheel to do grinding for you. Exert only slight pressure to prevent loading of grinding wheel.
9. Release the THROTTLE TRIGGER as soon as the wheel loses contact with the rail, allowing the engine to idle.
Note: See instructions provided with ERICO®frame assemblies, molds, and/or welding material for the proper procedure
for preparing and installing ERICO’s exothermic rail bonds.
5
www.erico.com
ENGINE MAINTENANCE SCHEDULE
REGULAR SERVICE PERIOD (3)
ITEM
Perform at every indicated
month or operating hour
interval, whichever comes first.
Each use
First
month or
10 hours
Every
3 months
or
25 hours
Every
6 months
or
50 hours
Every
year
or
100 hours
Every
2 years
or
300 hours
Refer
to
page
Engine Oil
Air Filter
Spark Plug
Spark Arrester
(optional parts)
Engine Cooling Fins
Nuts, Bolts, Fasteners
Clutch Shoes
Idle Speed
Valve Clearance
Combustion Chamber
Fuel Filter
Fuel Tank
Fuel Tubes
Oil Tube
Check Level
Change
Check
Clean
Check - Adjust
Replace
Clean
Check
Check
(Retighten if necessary)
Check
Check - Adjust
Check - Adjust
Clean
Check
Clean
Check
Check
27
29
32
33
34
40
37
–
–
–
–
–
38
38
–
–
●
●
●
●
●
●
●
●
●
●
★
★
★
★
★ (1)
★
★
★ (2)
★
★
★ (2)
★ (2)
★
★
★
After every 300 hours (2)
Every 2 years (replace if necessary) (2)
Every 2 years (replace if necessary) (2)
●Emission-related items.
(1) Service more frequently when used in dusty areas.
(2) These items should be serviced by your servicing dealer, unless you have the proper tools and are mechanically proficient.
Refer to Honda®shop manual for service procedures.
(3) For commercial use, log hours of operation to determine proper maintenance intervals.
Pages referenced in the maintenance schedule and trouble shooting chart are in the Honda engine owner’s manual GX2
provided with your SBG200 rail grinder.
ERICO®Required
Screw Part No. Item No. Quantity Torque
3/8-16 x 1 A927D038 12 1 75 in-lbs (8.47 N-m)
1/4-20 x 3/4 A927F179 17 2
M6-1 x 25 A927K029 13 4
M6-1 x 12 A927K097 15 2 45 in-lbs (5.08 N-m)
M5-0.8 x 10 A927K099 38 1
#8-32 x 5/8 A927P028 14 6
#10-32 x 1 SBG20015G 33 2 8 in-lbs (0.90 N-m)
#10-32 x 1 SBG20027G Sold Separately 2
M3-0.5 x 18 A927K061 42 1
#10-32 x 1/2 A927K098 29 1 60 in-lbs (6.78 N-m)
Torque Chart: SBG200
NOTE:
1. Apply LOCTITE®to fasteners prior to tightening. See torque chart for required torque levels.

6
www.erico.com
TROUBLE SHOOTING CHART
Pages referenced in the maintenance schedule and trouble shooting chart are in the Honda engine owner’s manual GX2
provided with your SBG200 rail grinder.
ENGINE WILL NOT START POSSIBLE CAUSE CORRECTION
1. Check control positions.
2. Check fuel.
3. Remove and inspect spark plug.
4. Take engine to an authorized
Honda®servicing dealer,
or refer to shop manual.
Choke open.
Ignition switch OFF (on the equipment).
Out of fuel.
Bad fuel; engine stored without treating
or draining gasoline, or refueled with
bad gasoline.
Spark plug faulty, fouled, or improperly
gapped.
Spark plug wet with fuel (flooded engine).
Fuel filter clogged, carburetor malfunction,
ignition malfunction, valves stuck, etc.
Move the choke lever to CLOSED
position unless engine is warm.
Turn ignition switch to ON.
Refuel.
Drain fuel tank and carburetor (p. 46).
Refuel with fresh gasoline.
Gap or replace spark plug (p. 34).
Dry and reinstall spark plug. Start engine
with throttle lever in FAST position, with
choke lever in OPEN position.
Replace or repair faulty components as
necessary.
ENGINE LACKS POWER POSSIBLE CAUSE CORRECTION
1. Check air filter.
2. Check fuel.
3. Take engine to an authorized
Honda servicing dealer,
or refer to shop manual.
Filter element clogged.
Bad fuel; engine stored without treating
or draining gasoline, or refueled with
bad gasoline.
Fuel filter clogged, carburetor malfunction,
ignition malfunction, valves stuck, etc.
Clean or replace filter element (p. 33).
Drain fuel tank and carburetor (p. 46).
Refuel with fresh gasoline.
Replace or repair faulty components as
necessary.
CARBURETOR ADJUSTMENTS
The carburetor is designed to provide optimum performance from the factory. The settings of the carburetor are adjusted to ensure
that the tool will deliver maximum horsepower, fuel efficiency and operate reliably. There are no user adjustments on this carburetor.
The carburetor can be tuned for high altitude operation by a qualified Honda service shop.

7
www.erico.com
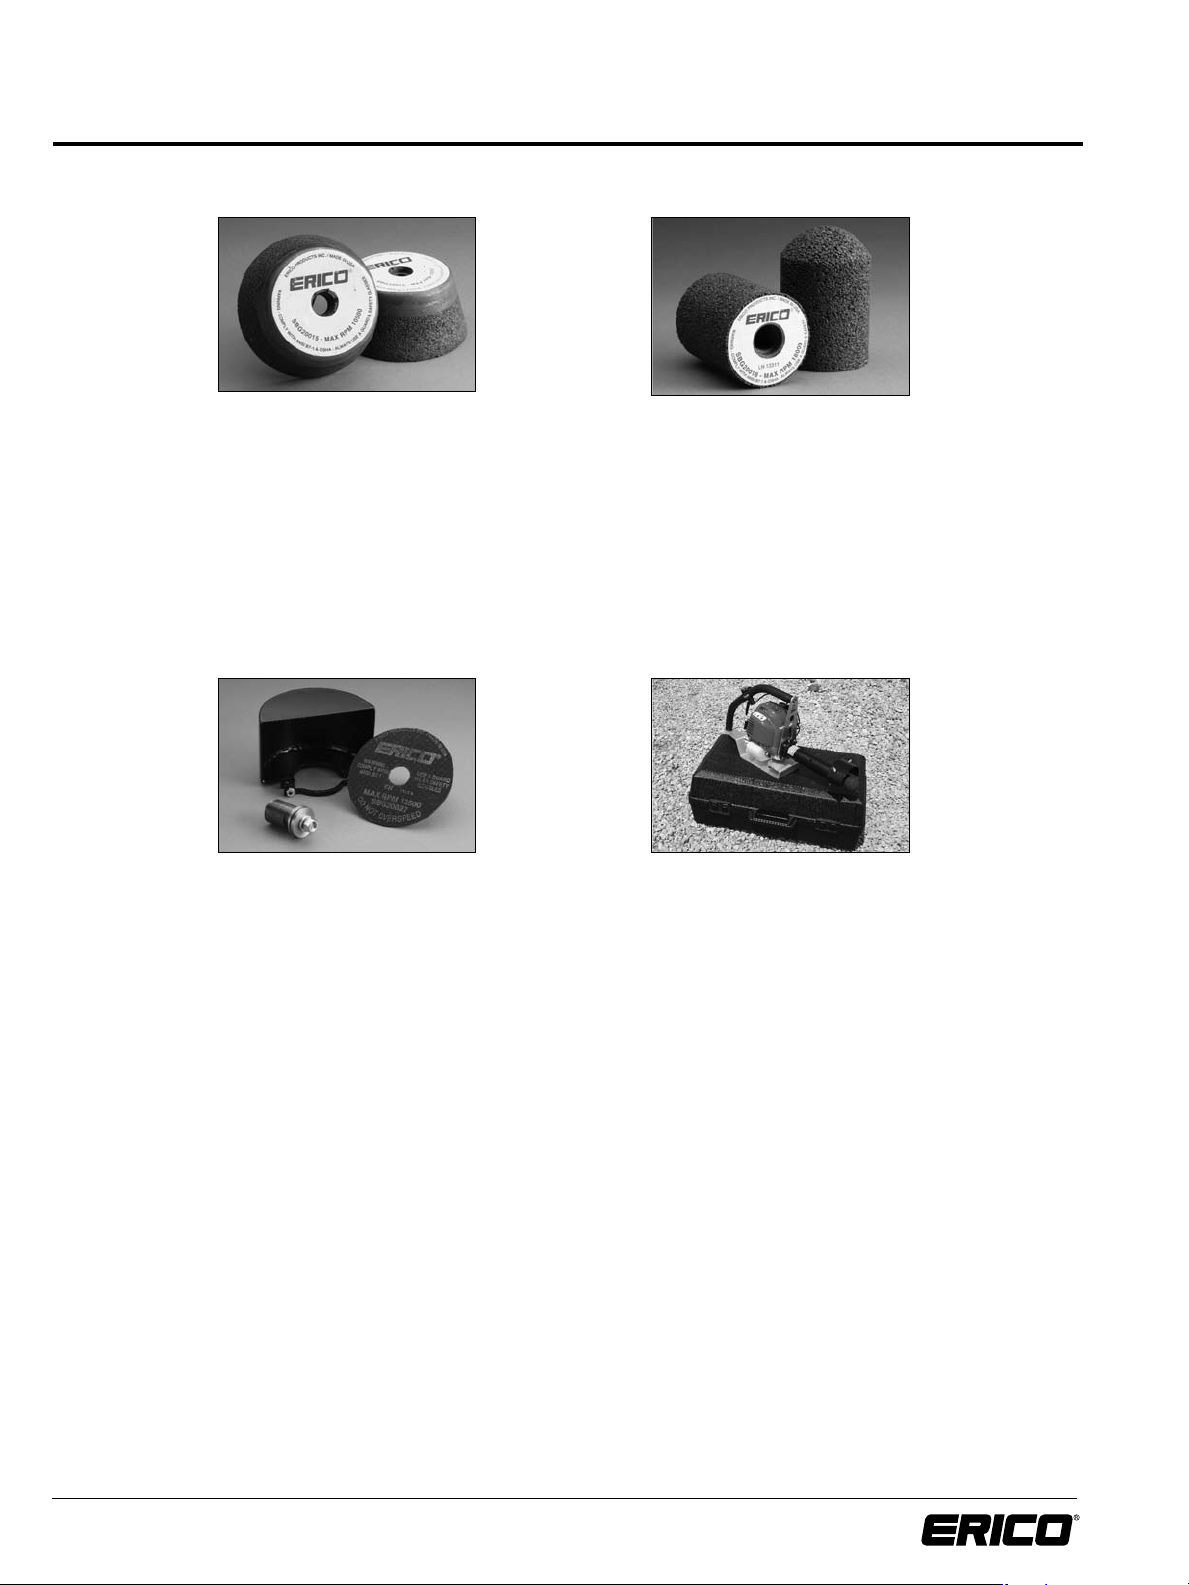
GRINDING WHEEL
DANGER
EXPLOSIVE DISINTEGRATION HAZARD: Worn or damaged grinding wheels can explosively disintegrate when turning at high
speeds causing death or serious injury from flying debris. Prior to use, always check wheel for nicks, flat spots or excessive wear.
Worn or damaged wheels must be immediately discarded. Never operate the wheel above its rated speed. Ensure that all guards
are in place prior to operating tool. Always operate the grinder in a position that places the guard between the wheel and the
operator. New wheels must be run at operating speed for one minute before any actual grinding. Never use the side of a cut-off
wheel for grinding. Only use the proper grinding surface of the wheel.
GRINDING WHEEL REMOVAL
1. On the cup grinding wheel part no. SBG20015 only: Using a 5/32” allen wrench (supplied), remove the retaining bolt
and washers from the tip of the shaft/wheel. This is a left hand thread. Turn clockwise to loosen.
2. On all grinding wheels: With the motor pointing away (as shown), and using a 5/8” open-end wrench (supplied),
hold the shaft and rotate wheel counter clockwise to loosen and remove.
3. On all grinding wheels: Inspect all replacement wheels, and ensure that they have not been dropped and/or abused.
4. On all grinding wheels: Install the new wheel and hand tighten. Do not use pliers or other devices to grip the wheel,
as damage may occur.
5. On the cup grinding wheel part no. SBG20015 only: Reinstall oversized washer, lockwasher and retaining bolt.
The bolt has a left hand thread, turn counter clockwise to tighten per recommended torque (see Torque Chart, page 5).
!

8
www.erico.com
SBG200 RAIL GRINDER PART LIST
Item ERICO®Part No. Quantity Description
SBG200 Rail grinder assembly
1 SBG20001 2 Bearing housing
2 SBG20002 1 Drive shaft
3 SBG20003 1 Clutch guard
4 SBG20007 1 Throttle trigger
5 SBG20008 1 Base plate
6 SBG20009 1 Front plate
7 SBG20010 1 Handle assembly
8 SBG20014 1 Throttle cable
9 SBG20023 1 Engine
10 SBG20024 1 On/Off switch
11 A930U009 2 Bearing
12 A927D038 1 Screw, 3/8-16 x 1 in.
13 A927K029 4 Screw, M6 x 25 mm
14 A927P028 6 Screw, #8-32 x 5/8 in.
15 A927K097 2 Screw, M6 x 12 mm
16 A929A054 6 Flat washer, 6 mm
17 A927F179 2 Screw, 1/4-20 x 3/4 in.
18 A929E008 2 Belleville washer, 1/4 in.
19 SBG20026 2 Grip
20 SBG20029 1 Carrying case
21 B295X37 1 Precaution label
22 B295X38 1 Equipment safety label
23 B295X130 1 SBG200 label
24 B295X131 1 Recommended wheels label
25 B295X132 1 Service tag label
26 SBG200M 1 Instruction manual
27 SBG20015 1 Grinding wheel, Type 11 cup
28 G144A3 1 Wrench, 5/8-15/16
29 A927K098 1 Screw, #10-32 (LH) x 1/2 in.
30 A929B043 1 Lock washer, #10
31 A929A113 1 Fender Washer, #10
32 T391 1 Allen wrench, 5/32
33 SBG20015G 1 Grinding wheel guard (Type 11 & 18R)
34 SBG20018 3 Grinding wheel, Type 18R plug
35 A929B044 6 Lock washer, M6
36 A172A 2 Tie wrap
37 A929B045 1 Lock washer, M5
38 A927K099 1 Screw, M5 x 10 mm
39 SBG20028 1 Exhaust guard
40 A930A015 2 Rivet, 1/8 x 1/8 in.
41 B295X136 1 On/Off switch label
42 A927K061 1 Screw, M3 x 0.5 x 18 mm
Note: Items 20-26, 28, 32, and 41 are not shown in the assembly drawing.

9
www.erico.com
SBG200 RAIL GRINDER EXPLODED VIEW
NOTES:
1. Apply LOCTITE®to fasteners prior to tightening. See torque chart for required torque levels.
2. Items 20-26, 28, 32, and 41 not shown.
*INCLUDES WASHERS
10
www.erico.com
Cup Grinding Wheel Part No. SBG20015 Plug Grinding Wheel Part No. SBG20018
Grinding Wheel Guard for above Part No. SBG20015G (not pictured)
(for use with SBG20015 & SBG20018)
Cut-off Wheel Part No. SBG20027
Cut-off Wheel Adapter Part No. SBG20019
Cut-off Wheel Guard Part No. SBG20027G
Kit w/Wheel & Guard Part No. SBG200COFF Grinder Case Part No. SBG20029
ACCESSORIES

11
www.erico.com
ERICO®RAIL PRODUCTS LIMITED WARRANTY
SBG200 Series Rail Grinder
ERICO Inc. will repair or replace, at its option, any part that is proven to be defective in material or workmanship under normal use during
the applicable warranty time period. Warranty repairs and replacements will be made without charge for parts or labor. Anything replaced
under warranty becomes the property of ERICO Inc. All parts replaced under warranty will be considered as part of the original product and
any warranty on those parts will expire coincident with the original product warranty.
Length of limited warranty from date of original purchase:
• 12 months on all components of SBG200 style grinder except Honda®engine.
• 12 months Honda factory warranty on GX25 engine. (See GX25 engine Warranty from Honda for specifics)
• 24 months Honda factory warranty on emission control system parts. (See Emission Control System Warranty from Honda for specifics).
This warranty is not transferable and does not cover damage caused by unreasonable use, including the failure to provide necessary
maintenance. In addition, this warranty does not cover general check-ups on electrical equipment, tune-ups on gasoline engines or
replacement of non-defective parts (such as electrical ignition, cables, sparkplugs, filters, grinding wheels, etc.) that may wear and need
to be replaced with reasonable use within the warranty period or which may require replacement in connection with normal maintenance.
Proof of purchase is required. This may be in the form of a purchase order number and date, or ERICO order number. Also, the part
number and serial number notation will be required.
You must at your own expense arrange to deliver or ship the product for warranty repairs.
OTHER THAN THE LIMITED WARRANTY SET FORTH ABOVE, ERICO MAKES NO OTHER WARRANTIES OR REPRESENTATIONS OF ANY KIND,
EITHER EXPRESS OR IMPLIED, ORAL OR WRITTEN, INCLUDING BUT NOT LIMITED TO THE IMPLIED WARRANTIES OF MERCHANTABILITY
AND FITNESS FOR A PARTICULAR PURPOSE. NO ORAL OR WRITTEN INFORMATION OR REPRESENTATION GIVEN BY ERICO OR ITS AGENTS,
AFFILIATES, REPRESENTATIVES OR EMPLOYEES SHALL CREATE ANY WARRANTY OR OBLIGATION, AND PURCHASER AGREES THAT IT SHALL
NOT RELY ON ANY SUCH INFORMATION OR REPRESENTATION WITH RESPECT TO THE PRODUCT.
ERICO SHALL NOT BE LIABLE UNDER ANY THEORY OF LIABILITY, HOWEVER ARISING, INCLUDING BUT NOT LIMITED TO NEGLIGENCE,
STRICT LIABILITY, OR OTHERWISE FOR ANY COSTS OF COVER OR FOR INDIRECT, SPECIAL, INCIDENTAL, OR CONSEQUENTIAL DAMAGES OF
ANY KIND (INCLUDING WITHOUT LIMITATION CLAIMS BY THIRD PARTIES AGAINST THE PURCHASER, OR CLAIMS OF CONTRIBUTION OR
INDEMNITY) ARISING OUT OF THE PURCHASE OF, USE OF, OR INABILITY TO USE THE PRODUCT, EVEN IF ERICO HAS BEEN ADVISED OF THE
POSSIBILITY OF SUCH DAMAGES. ERICO'S TOTAL LIABILITY TO PURCHASER AND ANY THIRD PARTIES FOR ANY LOSSES OR DAMAGES,
REGARDLESS OF THE BASIS OF THE LIABILITY, ARISING IN CONNECTION WITH THE PRODUCT SHALL IN NO EVENT EXCEED THE AMOUNT
OF THE PURCHASE PRICE ACTUALLY PAID BY THE PURCHASER FOR ONE OF THE PRODUCTS.
How to obtain warranty service:
Warranty service can be obtained by calling the Rail Electrical Sales Dept at ERICO, 1-800-447-RAIL (7245) and requesting a Returned
Materials Authorization number. Other instructions will be given at that time.
This warranty affords you specific legal rights, and you may also have other rights, which vary, from state to state.
ERICO Products, Inc. (d/b/a ERICO, Inc.), 34600 Solon Road, Solon, OH 44139, gives this limited warranty.

Table of contents
Popular Power Tools manuals by other brands

Bosch
Bosch Dremel VERSAFLAME 2200 Original instructions

WOLFF
WOLFF Leister Triac-Set operating manual

Festool
Festool ROTEX RO 90 DX FEQ Original operating manual/spare parts list

Parkside
Parkside PFDF 900 B2 Translation of the original instructions

Dremel
Dremel 4300 Operating/safety instructions

Draper
Draper 23312 Instructions for use


