Erone SIMPLY User manual

OPERATOR FOR SLIDING GATES
AUTOMAZIONE PER CANCELLI SCORREVOLI
AUTOMATISME POUR PORTAILS COULISSANTES
ENGLISH
EN
SIMPLY
Installation manual / Manuale di installazione/
Manuel d’installation
ITALIANO
IT
FRANÇAIS
FR

GALEO
Illuminated RF Keypad
INSTALLATION MANUEL
SIMPLY
Automation for sliding gates
INSTALLATION MANUAL EN
2erone.com
1] Product range
2] Contents of the package
Important precautIons for the safety
The present document contains important precautions for the use and the operating safety.
Read carefully the instructions before commencing the installation. Keep this document even
after installation.
!
This product if properly installed by specialized personnel able to perform the necessary risk
analysis, complies with the Regulations EN 12453 - EN 12445
Unblocking key
Capacitor ( only 230Vac versions )
These warnings are integral and essential parts of the product and must be delivered to the user. Read them
carefully as they provide important information regarding installation, use and maintenance. This form must be
kept and transmit it to any subsequent users in the use of the system. Incorrect installation or use improper use
of the product can be a source of serious danger.
Part-name Part-Number Description
EASIM230 F0544000025 SIMPLY 230V W/CONTROL UNIT + RF RECEIVER
EASIM24 F0544000026 SIMPLY 24V W/CONTROL UNIT + RF RECEIVER
Operator
Kit accessories with limit brackets

GALEO
Illuminated RF Keypad
INSTALLATION MANUEL
SIMPLY
Automation for sliding gates
INSTALLATION MANUAL EN
3
erone.com
3] Typical installation
Legend
1 - Operator 5 - Internal safety photocells
2 - External safety photocells 6 - Track
3 - Flashing light 7 - Key switch selector
4 - Antenna 8 - Remote control
4] Technical specications
Parameter 230V 24V
Max leaf weight 600 Kg 350 Kg
Motor power supply 230 Vac 24 Vdc
Motor power 250 W 50 W
Average current consumption 1 A 3 A
Motor RPM 1400 2000 1800
Encoder
Capacitor 12,5 uF /
Emergency unblocking system with key
Operating temperature -20°C / +55°C
Weight 9 Kg
Enclosure protection IP44
Opening speed 10 m/min
Travel limits Electromechanical

GALEO
Illuminated RF Keypad
INSTALLATION MANUEL
SIMPLY
Automation for sliding gates
INSTALLATION MANUAL EN
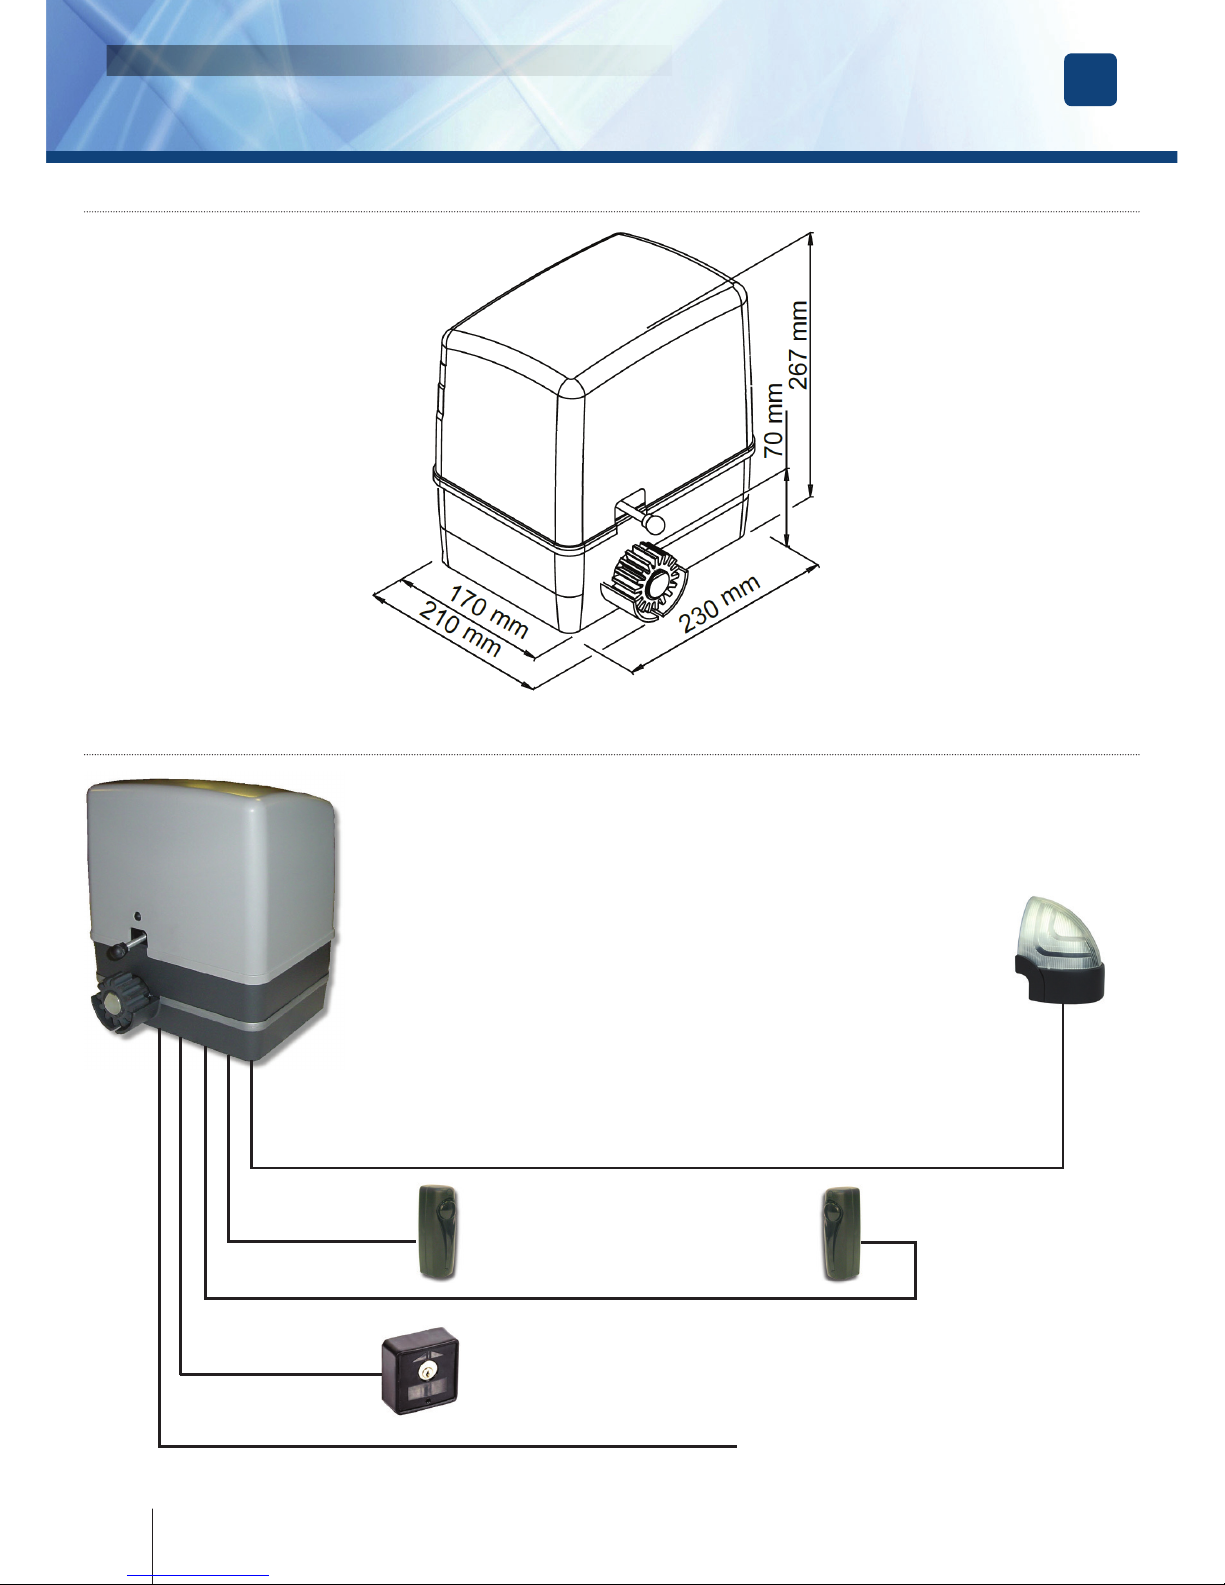
5] Dimensions
6] Wiring recommendations
2 x 0,75 mm2
4 x 0,75 mm2
2 x 0,75 mm2
Photocell RX Photocell TX
4 x 0,75 mm2
3 x 1,5 mm2 ( LINE 230 Vac)
Operator with built-in
electronic panel
4erone.com

GALEO
Illuminated RF Keypad
INSTALLATION MANUEL
SIMPLY
Automation for sliding gates
INSTALLATION MANUAL EN
5
erone.com
7] Preliminary recommendations
8] Installation details
• Installation and testing must be carried out only by qualied personnel to guarantee the
correct and safe functionality of the automatic gate.
• The manufacturer declines all responsibility for damages deriving from any incorrect
installation due to incapacity and / or negligence.
• Before proceeding with the installation of the automation, check that the gate is fully
functional. Furthermore, it is advisable to check the sliding groung guide (see Fig. 1) does
not show malformations, it is perfectly levelled and the mechanical opening stop is present
(see Fig. 2) to prevent the gate protrudes from the upper guides (see Fig. 3)
• Check that the wheels (V. Fig. 4) used are suitable for the type of ground guide
• Check the upper sliding guide (see Fig. 3) that is rm and the gate runs freely.
Rounded section Edge section
Leaf stop

GALEO
Illuminated RF Keypad
INSTALLATION MANUEL
SIMPLY
Automation for sliding gates
INSTALLATION MANUAL EN
Place the plate provided (Fig. 1) at a
distance of 50 mm from the edge of the
gate and perfectly square with angle of 90 °.
Before xing the plate with cement, dowels
or other, pass the cable sheath
by the pre-drilled holes.
Position the gearmotor and x it with the
supplied screws and washers A (Fig.2).
Unblocking procedure
Fix securely the rack on the gate,
providing a distance of 2 to 3 mm from
the motor pinion (Fig.3).
Fix the stop plates (Cams G) of the motor
on the rack, (Fig. 4)
1. Insert the supplied key into the special
cylinder and turn the key.
2. Pull the lever up to the stop
Blocked
Released
Holes for cable
passage
Counterplate
Track
Wheel
6erone.com

GALEO
Illuminated RF Keypad
INSTALLATION MANUEL
SIMPLY
Automation for sliding gates
INSTALLATION MANUAL EN
7
erone.com
10] Troubleshooting
Drawback Probable cause Solution
The gate doesn’t open or the motor
doesn’t move after a command from
remote control, key switch
Line power absent Check the main switch
Emergency STOP active
Check for any the selectors or STOP
commands. If not used check the
presence of the bridge on the STOP
input on the control panel
Blown Fuse Replace it with another identical or of
the same value
Motor power cord
disconnected or defective
Connect the motor power cord to the
corresponding terminal or replace it
Obstacle on the photocells
beam
Check the connection and / or remove
the obstacle
The command is executed by the
key switch and not by the remote
control
The remote control has
not been memorized or its
battery is low
Check the memorization of the remote
control on the receiver of the control
panelor replace the transmitter battery
The gate starts but stops
immediately
the torque of the motor is
insufcient
Change the torque useing the trimmer
“Torque” on the control panel
INSTALLATION RECOMMENDATIONS
• The installation must be performed by professionally competent personnel and in compliance with applicable
local, state, national and European legislation.
• Before starting the installation check the integrity of the product.
• Installation, electrical connections and adjustments must be made a “Rule of art”.
• Packaging materials (cardboard, plastic, polystyrene, etc.) must not be released into the environment and
must not be left within reach of children as potential sources of danger.
• Do not install the product in areas where there is a danger of explosion or high electromagnetic elds. The
presence of ammable gases or fumes is a serious danger for the safety.
• Provide protection against overvoltage on the power supply network, a switch / disconnector and / or
differential suitable for the product and in compliance with the current regulations.
• The manufacturer declines all responsibility if devices are installed and / or incompatible components for the
purposes of product integrity, safety and safety operation.
• Only original spare parts should be used for repairing or replacing defective parts.
• The installer must provide all information regarding operation, maintenance and the use of the individual
components, parts and the whole system.
WARNINGS FOR THE USER
Read carefully the instructions and the attached documentation.
The product is intended for the used for which it was expressly designed. Every different use mus be considered
improper and therefore dangerous. Furthermore, the information contained in this document and in the attached
documentation, may be subject of changes without notice. They are, in fact, provided as an indication for the
application of the product. The manufacturer declines any and every responsibility. Keep products, devices,
documentation and anything else out of the reach of children.
In case of maintenance, cleaning, breakdown or malfunction of the product, remove power, avoinding any attempt
of intervention. Contact only professional and competent personnel, responsible for the purpose. Failure to
comply with the above warningd can cause situations of serious danger.

GALEO
Illuminated RF Keypad
INSTALLATION MANUEL
SIMPLY
Automazione per cancelli scorrevoli
MANUALE DI INSTALLAZIONE IT
1] Gamma prodotti
2] Contenuto dell’imballo
ImportantI avvertenze per la sIcurezza
Il presente documento contiene importanti indicazioni per l’utilizzo e la sicurezza di
funzionamento. Leggere attentamente le istruzioni prima di iniziare l’installazione
dell’apparecchiatura. Conservare questo documento anche dopo l’installazione.
!
Questo prodotto, se installato da personale specializzato idoneo alla valutazione dei rischi,
risponde ai requisiti delle normative EN 12453 - EN 12445.
Motoriduttore
Kit accessori necorsa
Coppia chiavi di sblocco
Articolo Part-Number Descrizione
EASIM230 F0544000025 OPERATORE PER CANCELLI SCORREVOLI 230 Vac C/UNITA’ DI CONTROLLO E RICE-
VITORE RADIO
EASIM24 F0544000026 OPERATORE PER CANCELLI SCORREVOLI 24 Vdc C/UNITA’ DI CONTROLLO E RICEVI-
TORE RADIO
Condensatore ( solo versione a 230 Vac)
8erone.com

GALEO
Illuminated RF Keypad
INSTALLATION MANUEL
SIMPLY
Automazione per cancelli scorrevoli
MANUALE DI INSTALLAZIONE IT
9
erone.com
3] Automazione tipo e nomenclatura dei componenti
1 - Motoriduttore con elettronica incorporata 5 - Fotocellule interne
2 - Fotocellule esterne 6 - Cremagliera
3 - Lampeggiante 7 - Selettore a chiave
4 - Antenna 8 - Radiocomando
4] Caratteristiche tecniche
Parametro 230V 24V
Peso Max anta 600 Kg 350 Kg
Alimentazione motore 230 Vac 24 Vdc
Potenza motore 250 W 50 W
Assorbimento medio motore 1 A 3 A
Giri motore RPM 1400 2000 1800
Encoder
Condensatore 12,5 uF /
Sblocco meccanico per manovra di emergenza Con chiave
Temperatura di funzionamento -20°C / +55°C
Peso 9 Kg
Grado di protezione IP44
Velocità di apertura 10 m/min
Finecorsa Elettromeccanico
GALEO
Illuminated RF Keypad
INSTALLATION MANUEL
SIMPLY
Automazione per cancelli scorrevoli
MANUALE DI INSTALLAZIONE IT
5] Dimensioni
6] Collegamento tipo e sezione dei cavi
2 x 0,75 mm2
4 x 0,75 mm2
2 x 0,75 mm2
Fotocellula RX Fotocellula TX
4 x 0,75 mm2
3 x 1,5 mm2 ( LINEA 230 Vac)
Motore con elettronica
incorporata
10 erone.com

GALEO
Illuminated RF Keypad
INSTALLATION MANUEL
SIMPLY
Automazione per cancelli scorrevoli
MANUALE DI INSTALLAZIONE IT
11
erone.com
7] Raccomandazioni preliminari
• Le operazioni di installazione e collaudo devono essere eseguite solo da personale qualicato
ai ni di garantire la corretta e sicura funzionalità del cancello automatico.
• La casa costruttrice, declina ogni responsabilità per i danni derivati da eventuali errate
installazioni dovute ad incapacità e/o negligenza.
• Prima di procedere al montaggio dell’automatismo, si verichi che il cancello sia
perfettamente funzionante. Inoltre, è opportuno vericare che la guida di scorrimento a terra
(V. Fig. 1) non presenti malformazioni, che sia perfettamente a livello e che sia presente il
fermo meccanico in apertura (V. Fig. 2) al ne di evitare che il cancello fuoriesca dalle guide
superiori (V. Fig. 3)
• Vericare che le ruote (V. Fig. 4) utilizzate, siano idonee al tipo di guida a terra
• Vericare la guida di scorrimento superiore (V. Fig. 3) che sia ben salda e il cancello vi
scorra liberamente.

GALEO
Illuminated RF Keypad
INSTALLATION MANUEL
SIMPLY
Automazione per cancelli scorrevoli
MANUALE DI INSTALLAZIONE IT
9] Modalità di installazione
Posizionare la piastra in dotazione (Fig. 1)
ad una distanza di 50 mm dal bordo del
cancello e perfettamente in squadro con
un’angolo di 90°.
Prima di ssare la piastra con cemento,
tasselli o altro, passare la/le guaine dei cavi
dai fori predisposti.
Posizionare il motoriduttore e ssarlo con
le viti e rondelle in dotazione A (Fig.2).
Procedura di sblocco
Fissare la cremagliera sul cancello in modo
saldo prevedendo una distanza da 2 a 3
mm dal pignone del motore (Fig.3).
Fissare le piastre (Camme G) di Fine Corsa
del motore sulla cremagliera, (Fig. 4)
1. Inserire la chiave in dotazione
nell’apposito cilindro e ruotare la chiave.
2. Tirare la leva no a battuta
12 erone.com

GALEO
Illuminated RF Keypad
INSTALLATION MANUEL
SIMPLY
Automazione per cancelli scorrevoli
MANUALE DI INSTALLAZIONE IT
13
erone.com
10] Inconvenienti, cause e soluzioni
Inconveniente Causa probabile Soluzione
Ad un comando con il radiocomando o
con il selettore a chiave, il cancello non
si apre o il motore non parte
Alimentazione di rete
230 volt assente
Controllare l’interruttore
principale
Presenza di STOP di
emergenza
Controllare eventuali
selettori o comandi di
STOP. Se non utilizzati
vericare che l’ingresso STOP
della centralina sia ponticellato
Fusibile bruciato Sostituirlo con uno dello
stesso valore.
Cavo di alimentazione del
o dei motori non collegato
o difettoso.
Collegare il cavo
nell’apposito morsetto o
sostituirlo.
C’è un ostacolo in mezzo
alla fotocellula o questa non
funziona
Vericare il collegamento,
togliere eventuale ostacolo.
Il radiocomando non apre, ma funziona
con il comando a chiave
Il radiocomando non è
stato memorizzato o la sua
batteria è scarica
Eseguire la procedura di
riconoscimento del
radiocomando sul
ricevitore radio o sostituire
la batteria con una nuova .
Il cancello parte, ma si
ferma
La forza del o dei motori è
insufciente
Modicare il valore con il
trimmer FORZA posto
sulla centralina
NB - Se l’inconveniente permane, contattare il proprio Rivenditore o il più vicino Centro
Assistenza

GALEO
Illuminated RF Keypad
INSTALLATION MANUEL
SIMPLY
Automazione per cancelli scorrevoli
MANUALE DI INSTALLAZIONE IT
ISTRUZIONI PER L’INSTALLAZIONE
• L’installazione deve essere eseguita da personale professionalmente competente e inosservanza
della legislazione locale, statale, nazionale ed europee vigente.
• Prima di iniziare l’installazione vericare l’integrità del prodotto.
• La posa in opera, i collegamenti elettrici e le regolazioni devono essere effettuati a “Regola
d’arte”.
• I materiali d’imballaggio (cartone, plastica, polistirolo, ecc.) non vanno dispersi nell’ambiente e
non devono essere lasciati alla portata dei bambini in quanto potenziali fonti di pericolo.
• Non installare il prodotto in ambienti a pericolo di esplosione o disturbati da campi elettromagnetici.
La presenza di gas o fumi inammabili costituisce un grave pericolo per la sicurezza.
• Prevedere sulla rete di alimentazione una protezione per extratensioni, un interruttore/
sezionatore e/o differenziale adeguati al prodotto e in conformità alle normative vigenti.
• Il costruttore declina ogni e qualsiasi responsabilità qualora vengano installati dei dispositivi e/o
componenti incompatibili ai ni dell’integrità del prodotto, della sicurezza e del funzionamento.
• Per la riparazione o sostituzione delle parti dovranno essere utilizzati esclusivamente ricambi
originali.
• L’installatore deve fornire tutte le informazioni relative al funzionamento, alla manutenzione e
all’utilizzo delle singole parti componenti e del sistema nella sua globalità.
AVVERTENZE PER LA SICUREZZA
Le presenti avvertenze sono parti integranti ed essenziali del prodotto e devono essere consegnate
all’utilizzatore. Leggerle attentamente in quanto forniscono importanti indicazioni riguardanti l’installazione, l’uso
e la manutenzione. E’ necessario conservare il presente modulo e trasmetterlo ad eventuali subentranti nell’uso
dell’impianto. L’errata installazione o l’utilizzo improprio del prodotto può essere fonte di grave pericolo.
14 erone.com

GALEO
Illuminated RF Keypad
INSTALLATION MANUEL
SIMPLY
Automazione per cancelli scorrevoli
MANUALE DI INSTALLAZIONE IT
15
erone.com
AVVERTENZE PER L’UTENTE
• Leggere attentamente le istruzioni e la documentazione allegata.
• Il prodotto dovrà essere destinato all’uso per il quale è stato espressamente concepito. Ogni
altro utilizzo è da considerarsi improprio e quindi pericoloso. Inoltre, le informazioni contenute
nel presente documento e nella documentazione allegata, potranno essere oggetto di modiche
senza alcun preavviso. Sono infatti fornite a titolo indicativo per l’applicazione del prodotto. La casa
costruttrice declina ogni ed eventuale responsabilità.
• Tenere i prodotti, i dispositivi, la documentazione e quant’altro fuori dalla portata dei bambini.
• In caso di manutenzione, pulizia, guasto o cattivo funzionamento del prodotto, togliere
l’alimentazione, astenendosi da qualsiasi tentativo d’intervento. Rivolgersi solo al personale
professionalmente competente e preposto allo scopo. Il mancato rispetto di quanto sopra può
causare situazioni di grave pericolo.

16 erone.com
GALEO
Illuminated RF Keypad
INSTALLATION MANUEL
SIMPLY
Automatisme pour portails coulissantes
MANUEL TECHNIQUE D’INSTALLATION FR
Typ Part-Number Description
EASIM230 F0544000025 OPERATEUR POUR PARTAILS COULISSANTS 230V, AVEC UNITE’ DE CONTROLE ET
RECEPTEUR RADIO
EASIM24 F0544000026 OPERATEUR POUR PARTAILS COULISSANTS 24Vdc, AVEC UNITE’ DE CONTROLE ET
RECEPTEUR RADIO
Importants avertIssements de sécurIté
Ce document contient des indications importantes pour l’utilisation et la sécurité de
fonctionnement. Avant d’effectuer l’installation, lire attentivement le présent
manuel qui fait partie intégrante de cet emballage.
!
Ce produit, s’il est installé par un personnel spécialisé, adapté à l’évaluation des risques, répond
aux exigences des normes EN 12453 - EN 12445.
1] Gamme produits
2] Contenu de l’emballage
Moteur
Accessoires n de course
Double clé de déblocage
Condenseur ( seulement version à 230 Vac)

17erone.com
GALEO
Illuminated RF Keypad
INSTALLATION MANUEL
SIMPLY
Automatisme pour portails coulissantes
MANUEL TECHNIQUE D’INSTALLATION FR
Parametre 230V 24V
Poids Maxime du portail 600 Kg 350 Kg
Alimentation moteur 230 Vac 24 Vdc
Puissance moteur 250 W 50 W
Courant absorbé moteur 1 A 3 A
RPM moteur 1400 2000 1800
Encoder
Condenseur 12,5 uF /
Déblocage mécanique pour manoeuvre d’arrêt d’urgence Avec clé
Température de fonctionnement -20°C / +55°C
Poids moteur 9 Kg
Degré de protection IP44
Vitesse d’ouverture 10 m/min
Fin de course Électromécanique
3] Tableau automation type et nomenclature composants
1 - Moteur avec électronique incorporée 5 - Photocellule interne
2 - Photocellules d’extérieur 6 - Crémaillère
3 - Feu clignotant 7 - Sélecteur à clef
4 - Antenne 8 - Commande radio
4] Caractéristiques techniques
Installation optimale

18 erone.com
GALEO
Illuminated RF Keypad
INSTALLATION MANUEL
SIMPLY
Automatisme pour portails coulissantes
MANUEL TECHNIQUE D’INSTALLATION FR
5] Dimensions
6] Branchement type et section câbles
2 x 0,75 mm2
4 x 0,75 mm2
2 x 0,75 mm2
RX Photocellule TX Photocellule
4 x 0,75 mm2
3 x 1,5 mm2 ( LIGNE 230 Vac)
Moteur + électronique

19erone.com
GALEO
Illuminated RF Keypad
INSTALLATION MANUEL
SIMPLY
Automatisme pour portails coulissantes
MANUEL TECHNIQUE D’INSTALLATION FR
7] Considérations pour l’installation
• Les opérations d’installation et de contrôle doivent être effectuées uniquement par du
personnel qualié en vue d’assurer le fonctionnement correct et sûr de la grille automatique.
• La société, décline toute responsabilité concernant les dommages découlant d’une mauvaise
installation par incapacité et/ou négligence.
• Avant de procéder à l’assemblage de l’automatisme, vérier que le portail soit parfaitement
en fonction. Vérier aussi que le guide de écoulement au sol (Fig.1) ne présente pas de
malformations et que sois parfaitement au niveau et sois présent la butée mécanique d’arrêté
en ouverture (Fig.2) an d’éviter que le portail sorte dehors des guides supérieurs, (Fig.3)
• Vérier que les roues (Fig.4) utilisée, soient appropriées au type de guide au sol
• Vérier le guide d’écoulement supérieur (Fig.3) que sois bien solide et le portail coule
librement.
Boutée mécanique
Section arrondie Section en forme de V

20 erone.com
GALEO
Illuminated RF Keypad
INSTALLATION MANUEL
SIMPLY
Automatisme pour portails coulissantes
MANUEL TECHNIQUE D’INSTALLATION FR
Procéder à la xation du moteur sur
l’embase par les 4 vis fournies A. Régler le
moteur dans le sens horizontal en le
faisant glisser dans les fentes des pattes
d’ancrage (Fig.2).
Régler le moteur de façon à être horizontal
en profondeur et en largeur (Fig.2).
9] Modalités d’installation
Positionner la plaque en dotation (Fig.1) à
une distance de 50 mm du bord du portail
et parfaitement au niveau avec l’angle de
90°.
Avant de xer la plaque avec ciment,
chevilles ou autre, passer la/les gaines des
câbles pour les trous prédisposés.
Fixer la crémaillère sur le portail de manière
solide en fournissant une distance de 2 à 3
mm du pignon du moteur (Fig.3).
Fixer les plaques (Cames G) de Fin de
course du moteur sur la crémaillère (Fig. 4)
Procédure de débloque
1. insérer la clé en dotation en le
cylindre et tourner la clé.
2. tirer le levier jusqu’à le battement
Trou pour passage
des cables
Plaque de xation
Crémaillère
Roue
Table of contents
Languages:


