ESCALADE F1120 Technical Document

1
OWNERS ASSEMBLY MANUAL & OPERATING
INSTRUCTIONS
ESCALADE INT. LTD
PRODUCT CODE : F1120 BLK RACING BIKE
Escalade International Limited, Unit 1 Viking Way, Winch Wen Industrial Estate, Swansea.
SA1 7DA. Tel 01792 796893 Fax 01792 796627
Email: [email protected]

2
1 / IMPORTANT SAFETY INFORMATION
READ ALL INSTRUCTION BEFORE USING
1. This machine is intended for household use only. It is not designed for commercial use.
2. Read the OWNER’S OERATION MANUAL and all accompanying literature and follow it carefully before using
your machine.
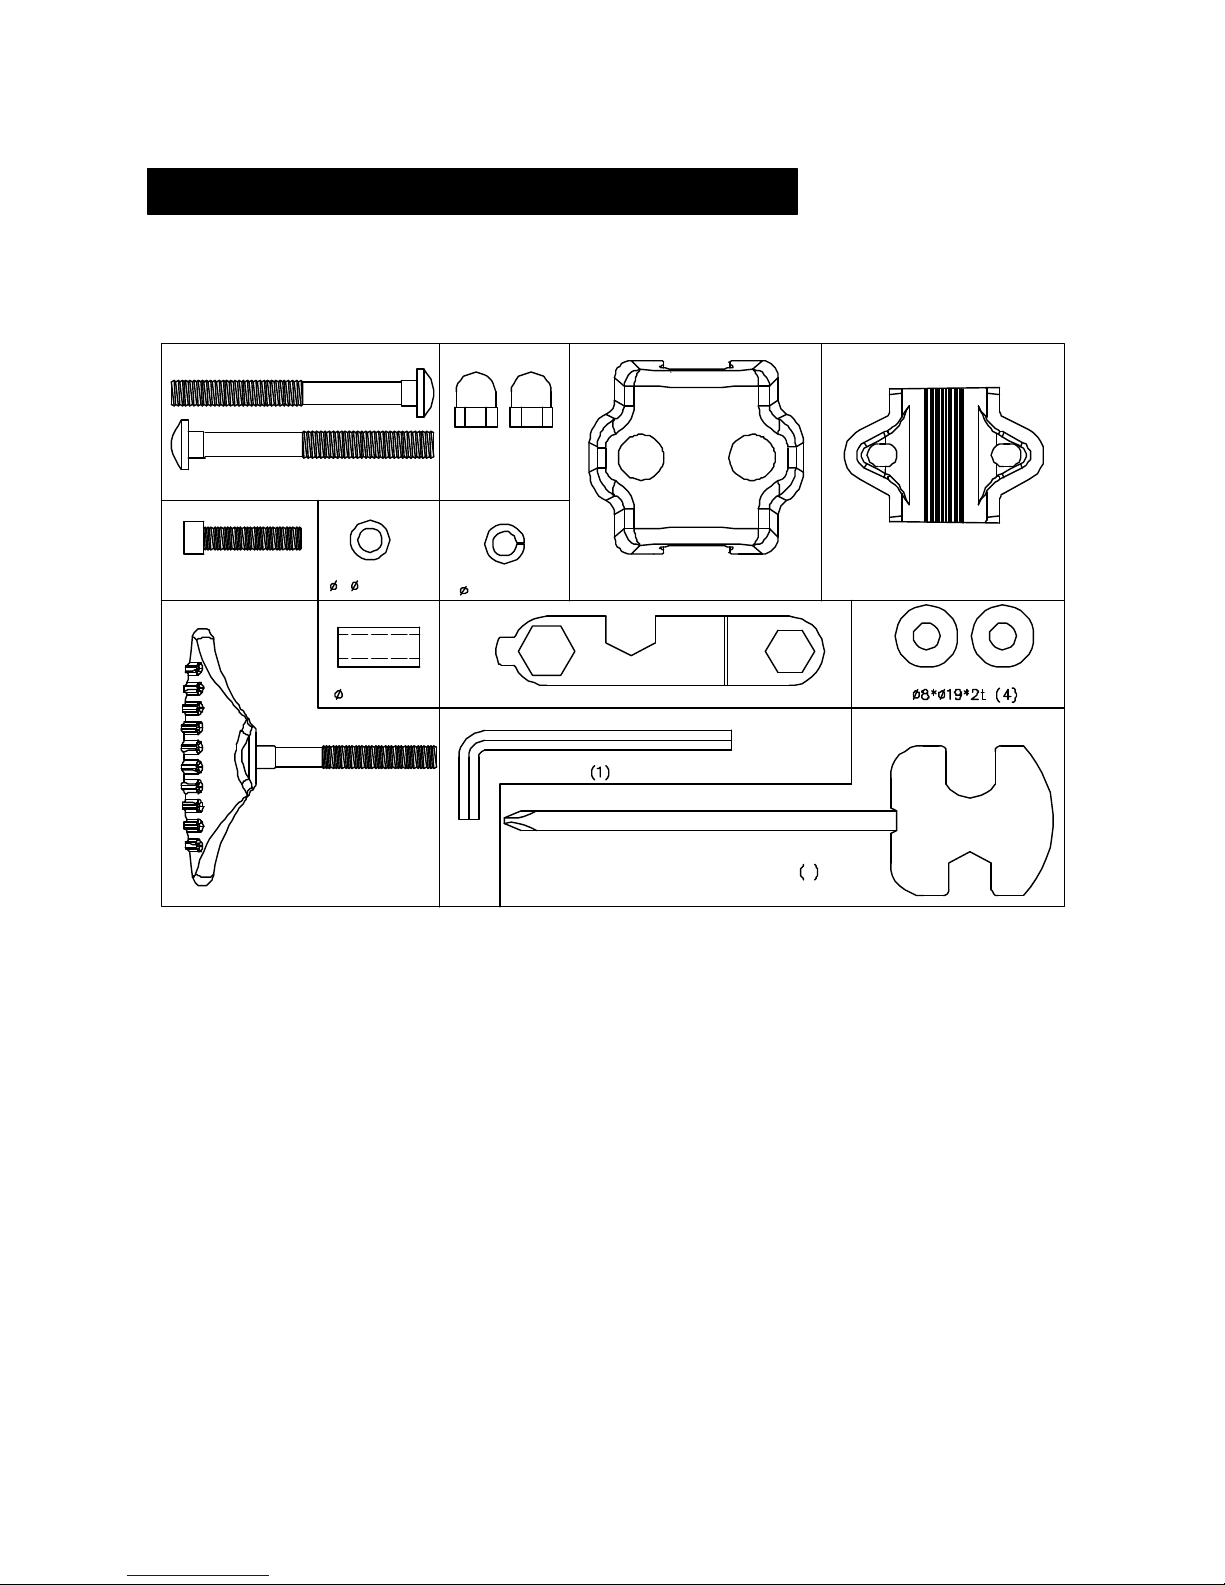
3. Inspect your exercise machine prior to exercising to ensure that all nuts and bolts are fully tightened before
each use.
4. Most exercise equipment is not recommended for small children. Children should not use the machine unless
they are under adult supervision.
5. Exercise equipment has moving parts. In the interest of safety, keep other, especially children, at a safe
distance while exercising.
6. Warm up 5 to 10 minutes before each workout and cool down 5 to 10 minutes afterward. This allows your
heart rate to gradually increase and decrease and will help prevent straining muscles.
7. Never hold your breath while exercising. Breathing should remain at a normal rate in conjunction with the level
of exercise being performed.
8. Rest adequately between workouts. Muscles tone and develop during these rest periods. Beginners should
work out twice a week and increase gradually to 4 to 5 times per week.
9. Remove all jewelry, including rings, chains and pins before commencing exercise.
10. Always wear suitable clothing and footwear during exercise. Do not wear loose fitting clothing that could
become entangled with the moving parts of your exercise machine.
IMPORTANT!!! THE MAXIMUM RECOMMENDED WEIGHT CAPACITY FOR YOUR RACING
CYCLE IS 260 LBS ( 120 KGS) , PER USER
THIS OWNER’S MANUAL CONTAINS ASSEMBLY, OPERATION, MAINTENANCE AND
SAFETY INFORMATION. IN THE INTEREST OF SAFETY, PLEASE MAKE CERTAIN THAT
YOU READ AND UNDERSTAND ALL THE INFORMATION BELOW.
The Surgeon General
Has determined that lack of
Physical activity is
Detrimental to your health
WARNING: Before commencing with any exercise program, please consult your family physician.
If at any time during exercise you feel faint, dizzy or experience pain, stop and consult your family
physician. In the event any of the above mentioned warnings are breached by the consumer, the
manufacturer may use same as a defense to any claim for injuries, damage or loss. The above
warnings are in no way intended to limit or modify the consumer’s remedies for breach of
warranties pursuant to applicable Federal and State Laws of Regulations. They are being supplied
strictly to ensure the safety of the individuals using this product.

3
2 / Before you begin
IMPORTANT: Read all instructions carefully. Assemble the RACING BIKE in
accordance with the steps in the manual. Two wrenches are included for assembly.
Lay out all parts on the floor. Make sure that you have all the parts listed below before
beginning assembly. Incase of discrepancy, please call our Customer Service
Department at the numbers listed on front cover page of this owner’s Manual.

4
NO Parts Name QUANTITY
1COMPUTER 1PCS
2SENSOR WIRE 1PCS
3SCREW FOR COMPUTER 2PCS
4INNER COVER FOR HANDLEBAR 1PCS
5FLAT WASHER 2PCS
6SPRING WASHER 2PCS
7BUSHING FOR FIXING HANDLEBAR 1PCS
8HANDLEBAR POST 1PCS
9SCREW 4PCS
10 CURVED WASHER 8PCS
11 TENSION CABLE (UPPER) 1PCS
12 TENSION CABLE (LOWER) 1PCS
13 SENSOR WIRE 1PCS
14 FRONT STABILIZER 1PCS
15 CARRIAGE BOLT 4PCS
16 PEDAL (LEFT & RIGHT) 1SET
17 ACRON NUT 4PCS
18 REAR STABILIZER 1PCS
19 MAIN FRAME 1SET
20 TENSION CONTROLLER 1PCS
21 SEAT POST 1PCS
22 LOCKNUT 3PCS
23 WASHER 3PCS
24 SEAT 1PCS
25 T KNOB 1PCS
26 VHCOVER FOR HANDLEBAR 1PCS
27 ROUND HEX-SCREW 1PCS
28 HANDLEBAR 1PCS
29 SEAT BELLOW 1PCS
F1120 BLK SPARE PARTS

5
Spring Washer
7*2t(2)
Acorn Nut for
M8 Bolt (4)
Flat Washer
7* 12*1t(2)
Allen Bolt
M7*P1.0*30MM (1)
T knob
M7*55MM(1)
Bushing
12*25MM (1)
Carriage Bolt M8*P1.25*75MM (4)
VH COVER (1)
CurvedWasher
Screwdriver 1
SPANNER(1St.)
Allen Key
INNER (1)
PRE
-
ASSEMBLY DRAWING
–
HARDWARE PACK

6
2
11
8
10
13 12
14
15
3
4
5
6
7
16R
10
17
9
16L
18
19
20
21
22
23
24
25
26
27
28
29
52
13 UP
LO
EXPLODED-VIEW ASSEMBLY DRAWING

7
14 15
16R
16L 18
17 10
19
23
22
21
24
19
20
29
STEP 1
1. Connect the FRONT STABLIZER
BAR[ # 14 ]to the MAIN FRAME [ #
19 ] assemble using two CARRIAGE
BOLTS[#15 ], two CURVED
WASHERS [# 10 ] and twoACRON
NUTS [ #17 ]
2. Repeat the same procedure to connect
the REAR STABLIZER BAR [ #18 ]to
the FRAME ASSEMBLY. Firmly tighten
the four bolts byusing CARRIAGE
BOLT [#15] and two CURVED
WASHERS[#10].
3. The PEDALS [#16] are marked “L” and
“R”-Left and Right.
Connect them to their appropriate
Crank Arm [#47]. The right crank arm
is on the right hand side of the cycle as
you sit on it. Note that the Right pedal
should be threaded on clockwise and
the Left pedal on anti-clockwise.
STEP 2
1. Fix the SEAT [# 24] to the SEAT POST
[#21] by using three WASHER [#23]
and three LOCKNUT [#22] located
under the seat, and then insert the
SEAT BELLOW [#29].
2. Insert the SEAT POST [#21] into the
seat post housing and line up the holes
that give the correct seat height. (This
can be done after it has been
assembled.) Secure the SEAT in
position with SEAT-HEIGHT
ADJUSTER [#20]. User can set just
right position to adjust seat-height.
ASSEMBLY INSTRUCTION

8
19
2
8
10
9
11
UP
13 12
13
LO
STEP 3
1. Take the HANDLEBAR POST [#8] and
connect the upper SENSOR WIRE [#11]
and the lower SENSOR WIRE [#12]. Then
connect the bottom of the TENSION
CABLE [#13 UP]and [# 13 LO]
2. Then slide the HANDLEBARPOST[#8]
into the MAIN FRAME [#19] and tighten
by four CURVED WASHER [#10] and
SCREW [#9].
27 54
6
7
2625
8
28
STEP 4
Attach the HANDLEBAR [#28] to the
HANDLEBAR POST [#8] by using the INNER
COVER [#4] (as shown) fix with two FLAT
WASHER [#5] and SPRING WASHER [#6],
ROUND HEX-SCREW [#27], VH COVER
[#26], lastly use T KNOB[#25] tighten.

9
STEP 5
1. Remove the two SCREWS [3] from the back side
of the COMPUTER[#1]. Connect the COMPUTER
to the bracket at the end of the HANDLEBAR
POST [#8] using the two SCREWS. Firmly
tighten the screws
2. Connect the plug at the end of the SENSOR
WIRE[#2] into the back side of the
COMPUTER[#1] where is says ”SENSOR INPUT”
3. Note: You will need to install two “AA” batteries
into the computer before it will work.
.
FINISHED ASSEMBLED BIKE

10
【COMPUTER STYLE: ST7100-7 BLK 】
1. Install 2 x 1.5V or UM-3 batteries to power
the computer. At this moment, the word
"GAME" is flashing andthe word "
MANUAL" is fixed. Use "UP" ("+")and
"DOWN"("-") buttons to select one of
these 2 modes. Press the
"MODE/ENTER" button to fix your
selection Please ignore the flashing word
"LINK". Note, if computer is not in use for
one minute, it will automatically switch off
to save battery power
2. If you select the "GAME" mode, there are 3
games "A", "B" and "C" The letters "B" and
"C" will be flashing. Use "UP" "+") and
"DOWN"("-") buttons to select the games
type, then press the "MODE/ENTER" button
to fix your game selection
COMPUTER OPERATING INSTRUCTIONS

11
a) If you select Game "A", the figure "20" in
time zone will flash. Use "UP"("+") and
"DOWN"("-") buttons to set up your
desired exercise period. The maximum
time possible is 99 minutes. Press the
"MODE/ENTER" button again. The level
zone of Game A will flash. There are 7
alternative exercise profiles each with 7
levels. Each level represents a "RPM"
which will be displayed in the center left
area of the LCD. Use UP"("+") and
DOWN"("-") buttons to select a level.
Press the "MODE/ENTER" button. Your
program selection is now set up. Press
the "START/STOP" button to start
exercising. Note, to follow your exercise
program you have to maintain the "RPM"
value in your pedaling speed. Whenever
you are pedaling faster than the target
"RPM" value, the top right area of the LCD
will show "?". If you are slower, it will
then show "?". Only when your
pedaling speed is same as the "RPM"
value,will itshow" " symbolwhich⊕
indicates your pedaling speed is on
target. The preset "TIME", it will be divided
by 20 to distribute the time to each
segment of the individualprofile.The
target "RPM" will vary according to the
selected profile and the programme within
each profile.

12
b) If you select Game "B", the figure "20" of
the "TIME" zone and "HI SCORE"
symbol are flashing. Use "UP"("+") and
"DOWN"("-") button to set up your desired
exercise period. Press the
"MODE/ENTER" button. This time the
figure of the "LEVEL" zone is flashing.
There are altogether 7 levels which
represent different RPM programmed into
the software. Use UP"("+") and
DOWN"("-") buttons to select a level.
level.The LCD monitor will be divided into
two areas. The Top Area represents the
user. The bottom area represents the
computer. So now you are competing your
speed with the computer. In the center left
area of the LCD, it will show the
computer RPM which is the value preset
according to your selected level. So, to
win the game, you have to pedal faster
than the computer RPM. Finally, onthe
top right area of the LCD, you will see
your scores after you complete the
game and exercise period
c) If you select Game "C", the figure "20" of
time zone is flashing. Use "UP"("+") and
"DOWN"("-") buttons to set up your target
time. Press the "MODE/ENTER" button.
Then, press the "START/STOP" button to
start the game. Game "C" is designed for the

13
user to test his(her) endurance and burst-out
strength. Within your target time, try your best
to pedal the bike as fast as you can. The
computer will automatically calculate your
average speed within the target time. As
soon as the time is up. The bike symbol
which represents the user will bump into the
bike triangle with audible alarm. And, you will
get your score shown on the top right area of
the LCD. Remember, the faster average
speed you achieve, the higher the score you
will get.
3. If you select "MANUAL" mode, press the
"MODE/ENTER" button. Then, set up your
desired exercise time by using the "UP"("+")
and "DOWN"("-") buttons. Press the "MODE/
ENTER" button again. Then, press the
"START/STOP" button to start your exercise
program. The LCD will always show the
functions and your progress.
4. Button Functions:
4.1 MODE/ENTER: To select each function and key in the preset value of each function.
4.2 UP("+") :To increase the target preset value for each function.
4.3 DOWN("-"): To decrease the target preset value for each function.
4.4 RESET:To reset the function value. To restart all the programs and functions, press this
button and hold for 4 seconds. After the 'beep' sound you can restart any procedure from
the beginning

14
Principles of Exercise
Ideal Workout
Extensive scientific research supports that both cardiovascular training (aerobic) and strength
training are important components in any health and fitness program. An ideal workout consists
of three groups of exercises, which should be completed in the following sequence: Warm-up,
Workout, and Cool-Down. Do not skip any of these stages.
Warm-up: Any workout needs to begin with a good warm-up for at least 5 minutes. The
warm-up consists of whole body, low intensity rhythmic movement, stretching. Start by moving
your legs and then your arms until you get your whole body moving.
The purpose of the warm-up is increasing your muscle and core body temperatures. Warm
muscles are more elastic and therefore, less susceptible to injury. Also, Warm muscles burn fat
more readily than cold muscles. In addition to increasing your body temperature, you are also
raising your resting heart range in preparation for more vigorous exercise.
Workout: strength or circuit training.
Cool-down: Never suddenly quit while exercising, gradually decrease your intensity and then
move into whole body stretching with movements of decreased intensity, until your heart rate
comes down a little. The rhythmic movements of a cool-down help to remove waste products
that build up in your muscles while you exercise. A good cool-down can greatly reduce muscle
cramping and muscle pain.
Aerobic Training
Aerobic exercise during which the oxygen supply is sufficient to meet the oxygen demand of
Working muscles, with the objective being the ability to continue the exercise for prolonged
periods of time (20 minutes or more). Aerobic exercises are those which utilize large muscle
groups in a rhythmical and continuous nature. Running, swimming, stair climbing, cycling, brisk
walking, etc. are all examples of aerobic exercise.
It is recommended that the average healthy adult perform aerobic exercise for a minimum of 20
to 30 minutes, three times per week, at an intensity that elevates the heart rate to within the
Target Heart Rate Zone. The Target Heart Rate Zone is between 55%, 75% and 90% of the
Age-Predicated Maximum Heart Rate. As a general rule, the age-Predicted Maximum Heart is
approximately 220 beats per minutes less your age.
Strength Training
Strength training involves the ability of a muscle or muscle group to generate force against
resistance. It is recommended that the average healthy adult perform a minimum of one set of
8-20 repetitions to near fatigue for 12 major muscle groups (Quadriceps, Hamstrings, Calves,
Chest, Back, Upper Back/Traps, Mid Back, Lower Back, Shoulders, Triceps, Biceps and
Abdominals).
Strength training should be performed a minimum of two times per week. Rest a minimum of 48
hours, but no more than 96 hours between training sessions that use the same muscles.
Getting Started

15
Circuit Training
Circuit training is a time effective method of exercise, during which the individual performs a
series of specified muscle group exercises with as little rest as possible between each muscle
group. Like strength training, circuit training should only be done every other day to give your
muscles a rest.
Table of contents
Other ESCALADE Exercise Bike manuals