Escort SOLO S4 User manual

RADAR•LASER•SAFETY•DETECTO
Cordless Long Range
Radar Laser Detector
Cordless Convenience
Long Range Radar/Laser Detection
OLED Display
OLED
Long Range Protection + Cordless Convenience
Open ➜
Quick Reference

Congratulations
The SOLO S4 introduces a new level of
revolutionary cordless performance
and innovative features:
•Long-range cordless
performance for both
radar and laser
•AutoPower feature maximizes
battery life
•Brilliant high-resolution OLED
display
•Advanced EZ-Programming lets you
customize up to 9 features
•Exclusive AutoSensitivity mode
virtually eliminates false alarms, plus
Highway and City settings
•ExpertMeter tracks and displays up to
8 radar signals simultaneously
•Detects and displays up to 64 Safety
Warning System messages
SOLO S4 Features
2
Your new
SOLO S4 is
the most advanced cordless radar, laser and
safety detector available.
The SOLO S4 includes full X, K, SuperWide Ka,
and Safety Warning System radar capability,
front and rear laser detection, digital signal
processing (DSP) for superior range and
reduced false alarms, our patented Mute and
AutoMute, audible and visual band alerts,
and all the performance you’d expect from
ESCORT.
Go to EscortRadar.com/manuals for full
featured owner’s manual.
Please drive safely.
C
o
r
d
l
e
s
s

Windshield Mount
SOLO S4’s EasyMount windshield bracket is
designed for unobtrusive and hassle-free
mounting.
SOLO S4 Mounting Location
WARNING: ESCORT cannot anticipate the
many ways SOLO S4 can be mounted. It is
important that you mount SOLO S4 where it
will not impair your view nor present a
hazard in case of an accident.
For optimum detection performance, we
recommend the following:
•
Using the supplied Windshield Mount, stick
the suction cups to the windshield, and
mount your SOLO S4 level and high enough
on your front windshield to provide a clear
view of the road ahead.
•
Mount SOLO S4 away from windshield
wipers, other solid objects, and heavily
tinted areas that might obstruct the radar
antenna or laser lens.
3
Installation
1Depress the adjustment button on the top
of SOLO S4 (above the word “RELEASE”) and
slide the EasyMount bracket into the slot
until mount is locked into the position which
best ts the angle of your windshield (there
are four settings available). For extremely
horizontal or extremely sloped windshields,
the EasyMount bracket can be bent.
To ensure that the suction cups adhere to the
windshield rmly, be sure to keep both your
windshield and the suction cups clean.
2To adjust SOLO S4 on your windshield, use
the EasyMount adjustment button located
on the top of the SOLO S4, and slide SOLO S4
forward or backward to obtain a level
horizontal position.
When installed and adjusted properly, the
back top edge of the SOLO S4 should rest
solidly against your windshield.
User’s Tip: You can leave the EasyMount
bracket in place on your windshield, and
easily remove SOLO S4 by pressing the
adjustment button and sliding SOLO S4 o
the mount. Again, be sure to position the
bracket where it won't present a hazard in
the event of an accident. Additional mounts
are available at EscortRadar.com.

4
EasyMount Slot
Insert SOLO S4’s adjustable Windshield
mount into this slot.
EasyRelease Button
Press the release button, and slide the
Windshield mount into one of its four locking
positions.
Rear Laser Port
Receives laser signals from behind the vehicle.
Power-On Indication
Three LED's (green, yellow, red) mounted
between the PWR button and the display,
indicate power (blinking in battery mode,
solid when optional 12-volt power cord is
used). These also indicate the sensitivity
mode that the unit is in,( "H" for highway, "A"
for AutoSensitivity, and "C" for city).
PWR
Press the PWR button to turn SOLO S4 on.
Press and hold the PWR button to turn SOLO
S4 o.
AutoPwr Feature
The SOLO S4 will automatically shut o
once the vehicle has
stopped moving for
approximately
25 minutes.
Controls & Features
Battery Installation
Remove the battery door, located on the
bottom of the detector, and install (2) AA
batteries (supplied). Be sure to note the
correct polarity for each battery
(See legends inside battery compartment).
Optional 12-volt SmartCord
To power SOLO S4 using 12-volts, simply
remove the power connector plug, and
insert the small end of the optional
SmartCord, (telephone-type connector) into
the modular jack on SOLO S4’s right side.
Plug the lighter plug adapter into your
vehicle’s lighter socket or accessory socket.
The SmartCord allows you to operate the
SOLO S4 on 12 volts DC negative ground only.
The lighter plug is a standard size and will
work in most vehicles. Of course,
your lighter socket must be clean
and properly connected for proper
operation.
NOTE: Depending on your vehicle the power
socket may either be continuously on, or it may
be switched on and off with your ignition switch.

Continued ➜
5
Radar Antenna and Laser Lens
The rear panel of your SOLO S4 should have a
clear view of the road ahead. For best
performance, do not mount SOLO S4
directly behind windshield wipers
or tinted areas.
Graphic OLED Display
During an alert, the display will turn on and
indicate radar band, and a precise bar-graph
of signal strength. Programming options and
SWS messages are also displayed.
NOTE: When using SOLO S4 in battery mode,
the display will turn o automatically until a
signal is detected, or you enter program mode.
This maximizes battery life. When using the
optional 12-volt SmartCord, the display will
remain on and provide several pilot options for
power-on indication.
12-volt Power Jack
For 12-volt operation, plug the optional
SmartCord into this connector.
Mute / Battery Status Button
Briey press this button (located on top) to
silence the audio for a specic alert.
Ear Phone Jack
A standard 1/8 inch (or 3.5 mm) earphone
jack is located on the right front side of the
SOLO S4.
SEN Button
Switches sensitivity between Highway,
AutoSensitivity, and City settings. In general,
we recommend the AutoSensitivity mode.
Volume Control
Press the up or down button to adjust the
volume.
EZ-Programming
SOLO S4 is ready to go, just plug it in and
turn it on. If you prefer, you can also easily
customize up to 9 features for your specic
driving preferences.
AutoMute
SOLO S4’s patented AutoMute automatically
reduces the volume level of the audio alert
after a brief period.
If you prefer, you can turn AutoMute o.

6
EZ-Programming
How to use EZ-Programming
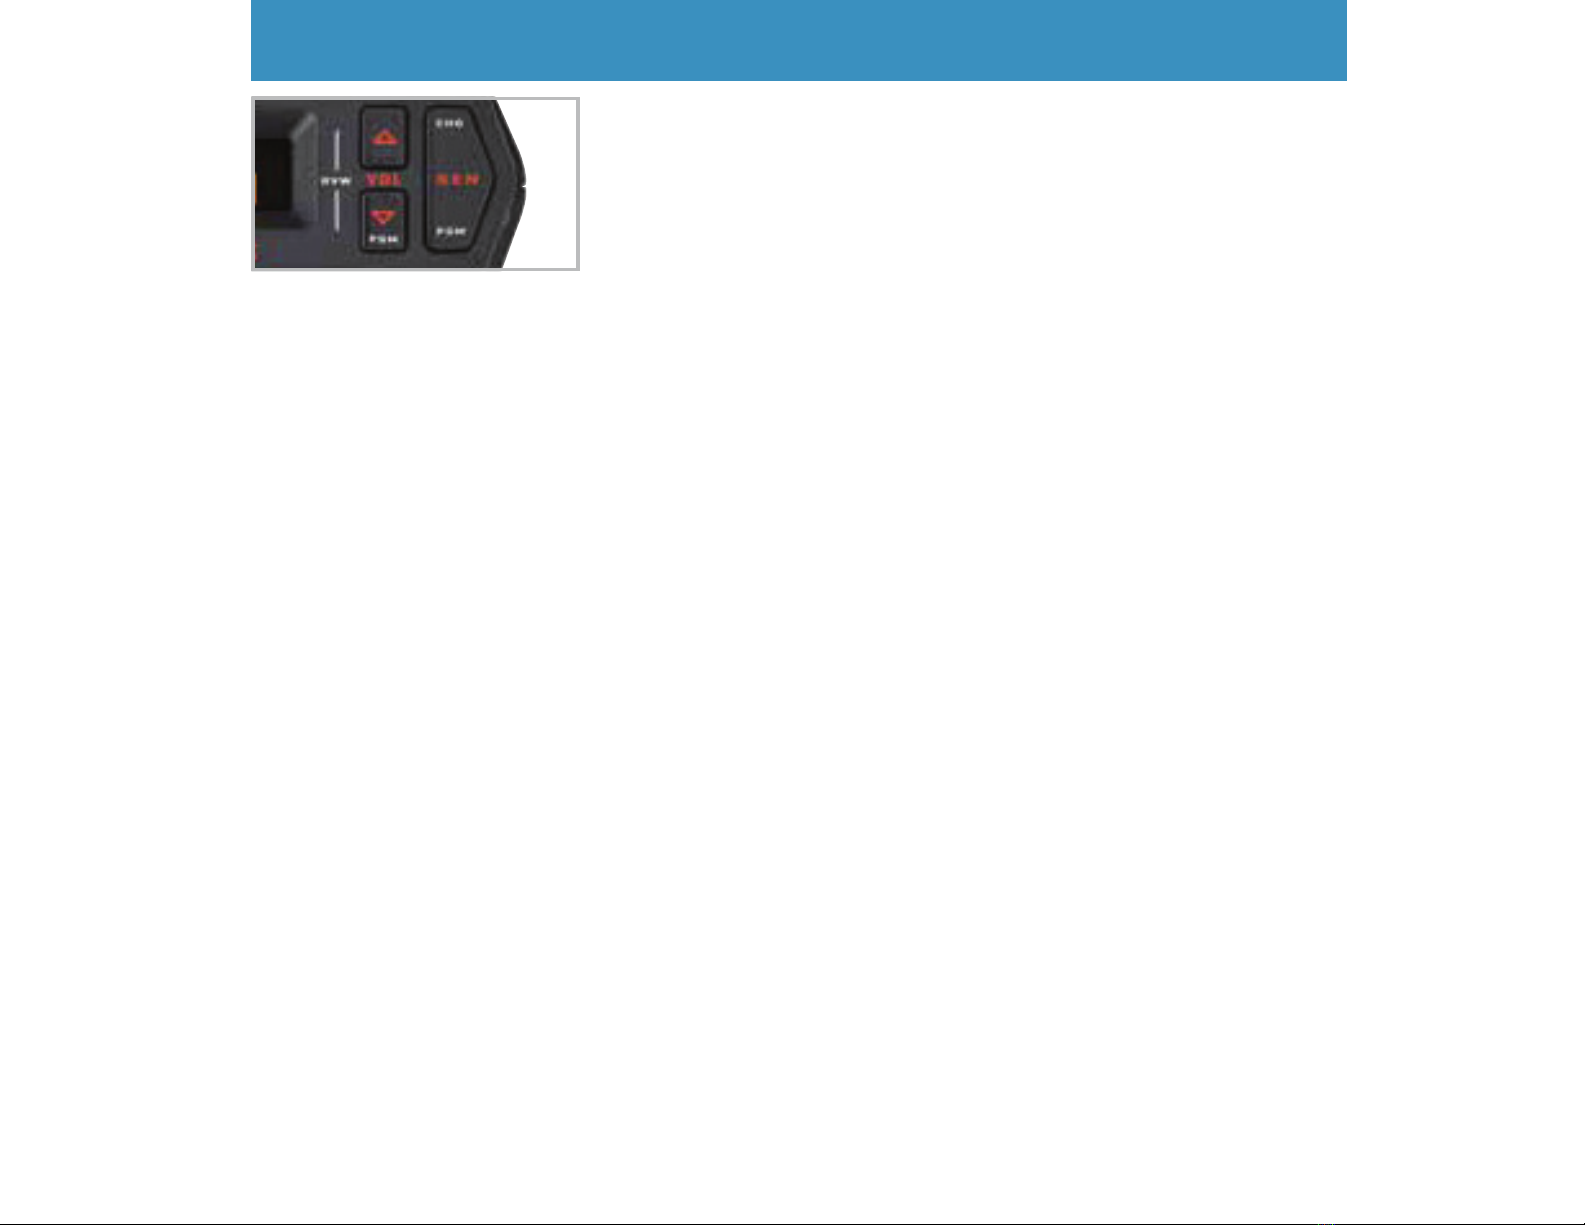
1To enter Program Mode, press and hold
both PGM buttons for 2 seconds. The unit
will beep twice, and will display the word
Program.
2Then press either RVW button to review
the current settings. You can either tap the
button to change from item to item, or press
and hold the button to scroll through the
items.
3Press the CHG button to change any
setting. You can either tap the button to
change from setting to setting, or hold the
button to scroll through all the options.
4To leave the Program Mode, simply wait 8
seconds without pressing any button. The
unit will display Complete, beep 4 times,
and return to normal operation.
To quickly reset SOLO S4 to the factory
program settings, press and hold the Mute
and SEN buttons while turning SOLO S4 on.
Example of EZ-Programming
Here is how you would turn SOLO S4’s
AutoMute feature o.
1Enter the Program Mode by holding one
of the VOL buttons and SEN button down
for 2 seconds. SOLO S4 will beep twice and
display Program.
2 Then hold the RVW button down. SOLO S4
will scroll through the categories, starting
with Pilot options, Auto-Power, Power-On
sequence, Signal Strength Meter, AutoMute,
Tones, City sensitivity, Brightness, and Bands.
3 Release the RVW button when SOLO S4
shows the AutoMute item. Since the
factory setting is for AutoMute to be on,
SOLO S4 will display aMuteON. (If you
accidentally go to the next category, press
the opposite “VOL” button to go back.)
4 Press the CHG button to change from
aMuteON to aMuteOFF.
5 To complete the Programming, simply
wait 8 seconds without pressing any
button. SOLO S4 will display Complete,
beep 4 times, and return to normal
operation.

Settings & Preferences
Press the RVW button to go Press the CHG button to change
from one category to the next your setting within a category
Pilot Light Pilot HWY *Full word: Highway or Auto or City
(Options using Pilot H Letter: H or A or C
12-volt SmartCord) Pilot H.> Letter, with scanning dot
Pilot + Symbol: + or •or –
Pilot +.> Symbol, with scanning dot
Pilot +> Scanning symbol
Auto Power aPwr Motn *Uses motion to turn SOLO S4 o
aPwr Time Uses time to turn SOLO S4 o
aPwr Off Turn SOLO S4 on and o manually
Power-On Sequence PwrOn STD *Standard power-on sequence
PwrOn FST Fast power-on sequence
Signal Strength Meter Meter STD *Standard signal strength meter
Meter EXP Expert Meter
AutoMute aMute ON *AutoMute on
aMute OFF AutoMute o
AudioTones Tone STD *Standard tones
Tone LOUD Loud tones
City Mode Sensitivity City STD *Standard City mode sensitivity
City LoX Low X-band sensitivity in City Mode
City NoX No X-band sensitivity in City Mode
Brightness Brt AUTO *Brightness is controlled automatically
Brt MIN Minimum brightness when turned on
Brt MED Medium brightness when turned on
Brt MAX Maximum brightness when turned on
Brt DARK Full Dark Mode when turned on
Bands Bands DFT *Def ault bands selected
Bands MOD One or more bands are disabled
Turn bands“ON”or“OFF”by
pressing the Mute button
X ON or OFF *X-band detection on
K ON or OFF *K-band detection on
Ka ON or OFF *Ka-band detection on
LSR ON or OFF *Laser detection on
SWS ON or OFF *SWS detection o
VG2 ON or OFF *VG2 detection o
*Default Setting
7

Contact Us
Registration
Register now to enter your new SOLO S4
for our product warranty and qualify for
special oers at EscortRadar.com
SOLO S4 Info & Accessories
800.433.3487
EscortRadar.com
ESCORT Inc.
5440 West Chester Road
West Chester OH 45069
Sales/Service 800.433.3487
www.EscortRadar.com
©2017 ESCORT Inc. ESCORT®, PASSPORT®, SOLO®, AFR®,
SmartShield®, AutoSensitivity™, MuteDisplay™, and
ExpertMeter™ are trademarks of ESCORT Inc. SWS is a
trademark of SWS, L.C.
Features, specications and prices subject to change
without notice.
Designed in the USA by Escort, Inc., manufactured in the
Philippines.
FCC NOTE: Modications not expressly approved by the
manufacturer could void the user’s FCC granted
authority to operate the equipment.
FCC ID: QKLS4
This device complies with part 15 of the FCC rules.
Operation is subject to the following two conditions: (1)
This device may not cause harmful interference, and (2) this
device must accept any interference received including
interference that may cause undesired operation.
8
Notes for Settings & Preferences
For descriptions and details of features and
functions visit EscortRadar.com to view and
download the complete SOLO S4 Owner’s
Manual.
Restoring the Factory Default Settings:
To reset SOLO S4 to its original factory
settings, press and hold the Mute and M
(Mode) buttons while turning SOLO S4 on.
SOLO S4’s display will provide a Reset
message, accompanied by an audible alert,
acknowledging the reset.
Service Procedure
If your SOLO S4 ever needs service, call us at
1-800-543-1608. We may be able to solve
your problem over the phone. If the problem
requires that you send your SOLO S4 to the
factory for repair, we will provide you with a
Service Order Number, which must be
included on the outside of your shipping box.
Enclose the following information with your
SOLO S4 and power cord:
• Your Service Order Number
• Your name and return address
• Your daytime telephone number
• A description of the problem you
are experiencing

CORDLESS
IMPORTANT NOTICE
):our
ne\v
Solo
S4
is
equipped
\Vitll
a
batterv-savin!!
feature
called
~-1\uto
Po\ver.
,,
• (. J
'fhis
feature
auton1aticallv
shuts
off
the
detector
----r-
·
once
your
vehicle
has
stopped
n1oving
for
approxin1ately
20
n1inutes.
rro
change
this
setting,
or
for
IllOfC
inforn1ation
see
page
7
in
your
Quick
Reference
(;uide.
I
IMPORTANT NOTICE

CONGRATULATIONS!
We
trust
you
will enjoy your high-performance
ESCORT
detector.
If
you
have
questions about your detector or its many features,
our Customer Service Experts are here to assist
you
.
NEED
HELP?
WAIT!
PLEASE
DO
NOT
RETURN
THIS
PRODUCT
TO
THE
STORE!
Please contact
ESCORT
directly for service
and
support.
By
phone:
1-800-5£13-1608,
8:00AM to
5:30PM
EST,
Monday-Friday
Online:
EscortRadar.com
ESCORT

ESCORT
One
Year
Limited Warranty
Whatthis warranty
covers:
ESCORT,
Inc.
("ESCORT")
warrants your Product against
all
defects
in
materials
and
workmanship.
Far
hawlang:
One
(1) year from the date of original
purchase from
an
authorized
ESCORT
dealer.
Whatwe will
do:
If a breach of warranty occurs,
ESCORT,
at its discretion, will either repair or replace your Product
free of charge.
What
we
will nat
do:
ESCORT
will not
pay
shipping
charges that
you
incur for sending your Product to
us.
What
you
must
do
to maintain this warranty:
Show
original proof of purchase or receipt from
an
authorized
ESCORT
dealer.
Warranty
exclusions:
This
warranty
does
not apply to
your product under
any
of the following conditions:
1.
The
serial number
has
been
removed or modified.
2.
Your
product
has
been
subjected to misuse or damage
(including water damage, physical
abuse,
and/or improper
installation).
3.
Your
product
has
been
modified
in
any
way.~.
Your
receipt or proof-of-purchase
is
from a non-
authorized dealer or internet auction site, including
E-bay,
U-bid, or other non-authorized resellers.
5.
You
are
not
the original purchaser of the Product from
an
authorized
dealer or
did
not receive
it
as
a gift from the original
purchaser of the Product from
an
authorized
dealer.
To
obtain service:
1.
Contact
ESCORT
[1-800-5~3-1608]
ESCORT
address, written description of the problem with your
Product daytime telephone number,
and
a copy of the
original proof of purchase or receipt.
3.
Label
the outside
of the package clearly with your Return Authorization
Number.
Ship
the Product pre-paid [insured, for your
protection] to:
ESCORT,
Inc.,
5~~0
West Chester
Rd.,
West
Chester,
OH
~5069.
LIMITATION
OF
WARRANTY:
The
obligations set forth
above
are
ESCORT's
sole
obligations
and
your exclusive
remedy.
ESCORT
makes
no
other express warranty.
Any
implied warranty of merchantability or fitness for a
particular purpose that may
be
applicable to the Product
is
limited
in
duration to the duration of this warranty.
Some
States
do
not allow limitations
on
how
long
an
implied warranty lasts,
so
the
above
limitation may
not apply to
you.
ESCORT
SHALL
NOT
BE
LIABLE
FOR
CONSEQUENTIAL
SPECIAL
OR
INCIDENTAL
DAMAGES
INCLUDING,
WITHOUT
LIMITATION,
DAMAGES
ARISING
OUT
OF
THE
USE,
MISUSE
OR
MOUNTING
OF
THE
PRODUCT.
Some
States
do
not allow the exclusion or limitation
of incidental or consequential damages,
so
the
above
limitation or exclusion may not apply to
you.
ESCORT
is
not responsible for products lost
in
shipment between the
owner
and
our service center.
Other legal rights:
This
warranty gives
you
specific legal
rights,
and
you
may
also
have
other rights which vary from
State to State.
to obtain a Return Authorization
Number.
2.
Properly pack ©2015
ESCORT
Inc.
ESCORT®
is
a registered trademark of
your Product
and
include: your name, complete return
ESCORT
Inc.
Other manuals for SOLO S4
1
Table of contents
Other Escort Security Sensor manuals
Popular Security Sensor manuals by other brands

Tattletale
Tattletale Borderguard Tech sheet

PCB Piezotronics
PCB Piezotronics TORKDISC 5309D-02A Installation and operating manual

Oxford Instruments
Oxford Instruments ANDOR iDus 401, ANDOR iDus 416, ANDOR iDus... quick start guide

ICP DAS USA
ICP DAS USA ISN-101 user manual

Omron
Omron K8AC-H11CC-FLK manual

DoCash
DoCash Vega user manual

YOKOGAWA
YOKOGAWA TB820D user manual

Ferno
Ferno Arachnipod user manual

Zimmer
Zimmer MFS02-S-KHC-IL Installation and operating instructions

Guardian
Guardian Halo Big Block SRL instruction manual

PCB Piezotronics
PCB Piezotronics TORKDISC 5302D-02A/TCS-0X Installation and operating manual

AVIRE
AVIRE E-MOTIVE EPS installation guide