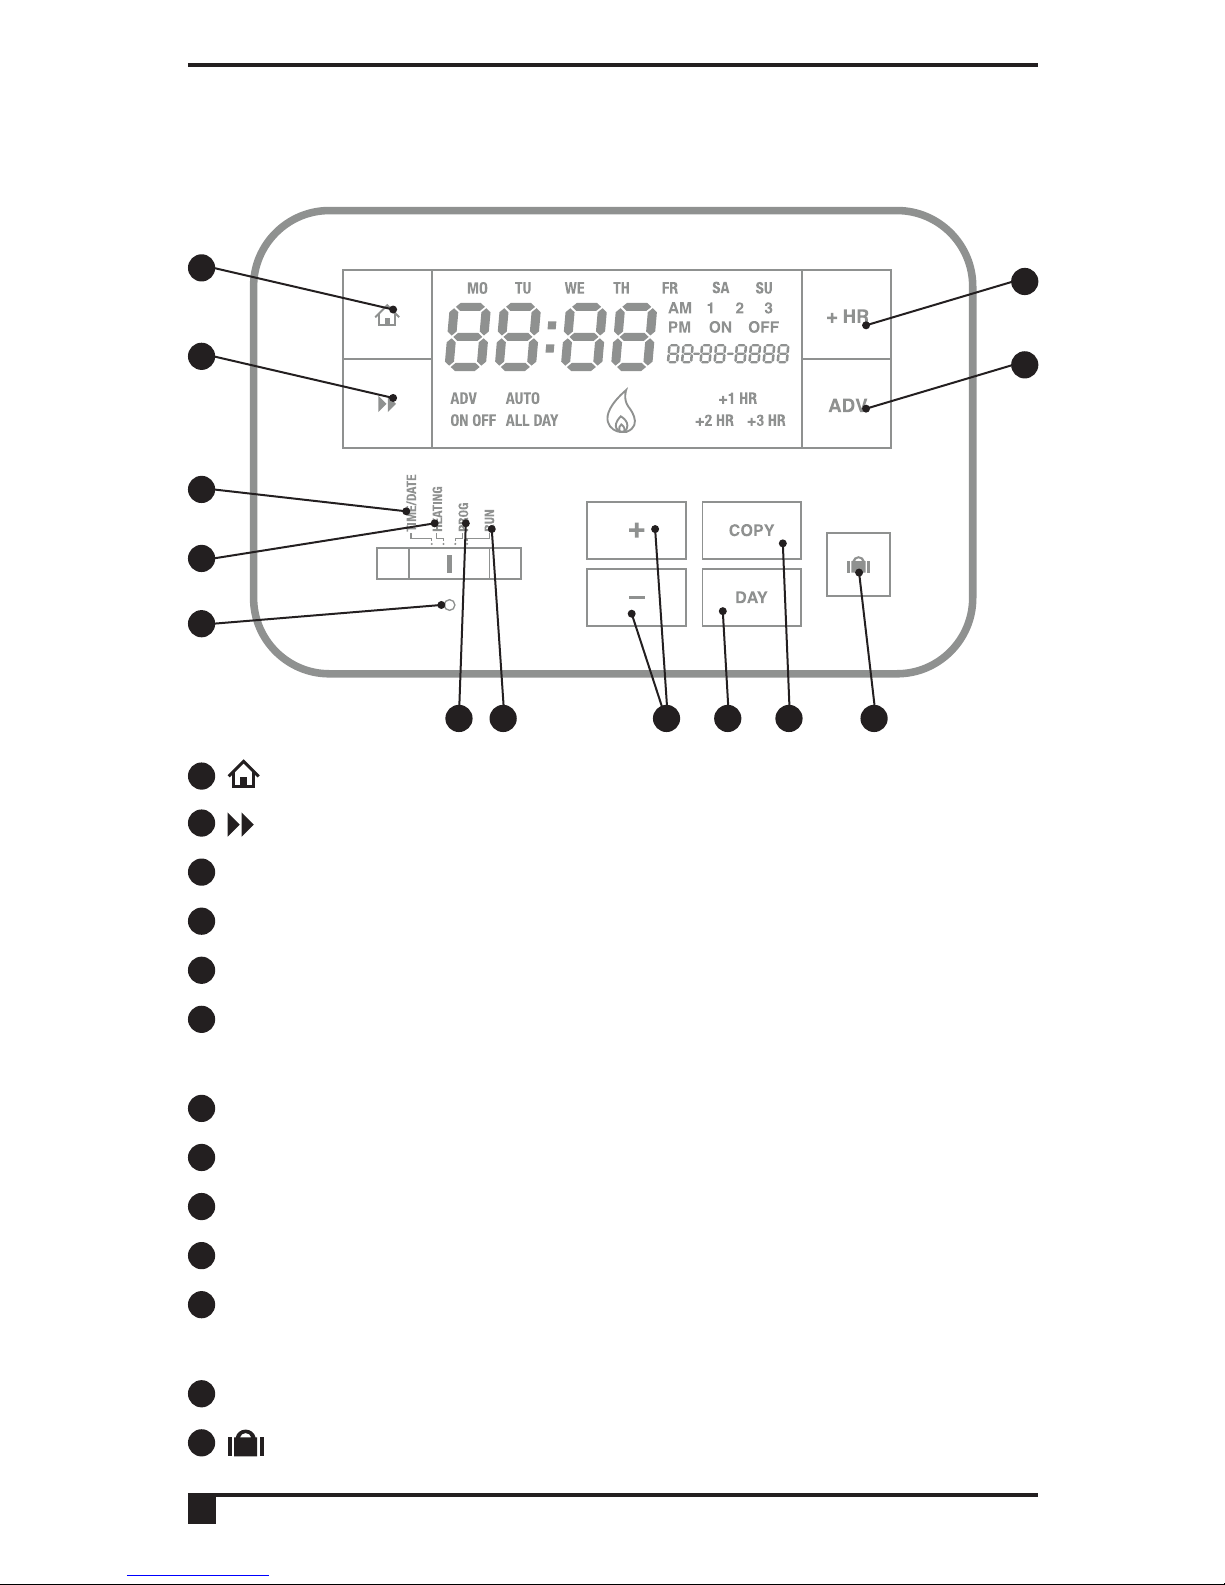
ESI ES1247B16A User manual

ES1247B16A
16 Amp 1 Channel Multi
Purpose Programmer
User Instructions

Thank you for choosing ESi Controls.
All our products are tested in the UK so we are
confident this product will reach you in perfect
condition and give you many years of service.
However, for additional peace of mind, we
recommend you register your product online at
www.esicontrols.co.uk/warranty for your
extended warranty.
2

3
Introduction to the 1 Channel Programmer 5
Quick Operating Guide 8
Programming the Unit 11
The Factory-set Programme 11
Setting the Programmer Option (5/2, 7 Day, 24hr) 12
Setting the Central Heating/Hot Water Programme 12
Setting the Operation (ON/OFF/AUTO/ALL DAY) 13
Operating the Unit 14
Temporary Overrides 14
The Advance Function 14
The +HR Boost Function 15
Holiday Mode 15
Basic Settings 16
Setting the Time & Date 16
Setting the Backlight 16
Resetting the Unit 17
Power Interruption 17
Contents

4

5
As with all ESI’s range of programmers, the ES124716A 16
Amp 1 Channel Time switch, is featured packed, offering
flexibility and reliability making it ideal for use with immersion
heaters and electric boilers.
It has been designed with the homeowner and simplicity in
mind, with an easy-to-use slider to operate the permanent
settings underneath the facia, whilst the temporary settings
are easily accessible and clear with easy-to-use function
buttons, simple overrides and a clear backlit LCD display. The
programmer can be configured for 24 hour, 5/2 day or 7 day
operation with pre-set programs for each mode and the Holiday
mode provides a simple means of adjusting the heating/hot
water quickly.
This programmer can automatically switch your Central
Heating or Hot Water ON and OFF either 2 or 3 times a day,
at whatever times you choose. Timekeeping is maintained
through power interruptions by a replaceable internal battery
(by Qualified Installer / electrician only) designed to last for the
lifetime of the programmer and the clock is automatically put
forward 1 hour at 1:00am on the last Sunday of March and
back 1 hour at 2:00am on the last Sunday of October. The clock
is factory pre-set to UK time and date, but you can alter it if you
want. During installation, the installer selects 24-hour, 5/2 day,
or 7 day programming and either 2 or 3 on/off periods per day,
via the Technical Settings (see installation instructions.
The large, easy to read display makes programming easy and
the unit is designed to eliminate the possibility of accidental
changes to your programme. Buttons normally visible, only
Introduction to the 1 Channel
Programmer

affect your set programme temporarily. All buttons which can
permanently change your programme are located behind the
flip over facia.
Although the ES124716A comes factory set as a standard 1
channel programmer, there also are a number of Installer set
options and if one of these options has been chosen during
installation then the programmer becomes a multifunctional
Power Saver. If the Power saver option is chosen then this may
disable a number features that are set as standard.
Installer Set Programs:
Program 0: Functions as a standard 1 Channel Programmer
Program 1: When the ESI124716A has been set to program
1, the time switch becomes a simple to use Electronic Boost
controller with a single button operation, offering three user-
selectable boost periods of 1 hour, 2 hour or 3 hours and all
other functions have been disabled.
Program 2: If program 2 is selected, then this allows the
user to boost the power as above, but also allows the
installer to set On and Off times. Once the On/Offs have
been set, all other functions apart for the standard 1, 2 or 3
hour boost, all other functions are disabled.
6
Programme / Functions Prog 0 Prog 1 Prog2 Prog 3
Set Time / Date Yes Yes Yes Yes
Set Programme Times Yes No No No
Boost 1/2/3 Hour Yes Yes Yes No
Advance Yes No No No
Holiday Yes Yes Yes Yes
Run Programme Yes No Yes Yes
Change Auto/On / Off / Run Yes No No No

7
Program 3: Program 3 allows the installer to set the On and
Off times and all other functions including the boost, will be
disabled.
N.B: If the reset is pushed at any time, the programmer will
default to Program 1, which is boost only. If this happens,
then the installer code will be needed to unlock the other
features.
IMPORTANT: These settings should only be changed by a
qualified person. Contact your installer. This programme is not
suitable for the switching of devices greater than 16Amp rated.

8
Quick operating guide
1Home (takes you back to home screen)
2Next (moves you to the next option within a function)
3Advance to the next programmed ON/OFF (ADV)
4Add up to 3 hours of extra Central Heating/Hot Water (+HR)
5Set Time and Date
6Set Programmer Option (24hr, 5/2, 7 Day) & Central
Heating/Hot Water
7Reset
8Set Operation Mode (ON/AUTO/ALL DAY/OFF)
9Runs the programme
10 +/- buttons for settings adjustment
11 Moves between days when programming Central Heating/
Hot Water (DAY)
12 Copy function (COPY)
13 Holiday Mode
1
2
5
6
7
8 9 10 11 12 13
3
4

9
14 Day of the week
15 Time Display
16 AM/PM
17 Date Display
18 Displays which ON/OFF period (1/2/3) is being set when
programming Central Heating/Hot Water
19 Displays whether setting the ON time or OFF time when
programming Central Heating/Hot Water (ON/OFF)
20 Advanced temporary override is active (ADV)
21 Operating Mode (ON/OFF/AUTO/ALL DAY)
22 Flame symbol shows that system is calling for heat
23 + 1hr / 2hr / 3hr temporary override is active
14 15 16 17 18
19
20 21 22 23

10

11
The Factory Pre-Set Programme
This Channel Programmer has been designed to be simple
to use, requiring minimal user intervention with a pre-
programmed heating profile.
The pre-set heating times and temperatures will suit most
people (see table below). To accept the factory pre-set settings,
move the slider to RUN which will revert the programmer to
Run Mode (the colon (:) in the LCD display will begin to flash).
N.B. Every time the reset is pressed, the programmer will default
to prog1 boost only.
7 Day:
In 7 day setting, the pre-set settings are the same as 5/2 Day
programme (Mon to Fri and Sat/Sun).
24 Hr:
In 24hr setting, the pre-set settings are the same as Mon to Fri
of the 5/2 Day programme.
Programming the unit
(Only when in program 0)
Event Std Time Econ
Time Std Time Econ
Time
Week Days
1st ON 06:30 00:00
Weekends
07:30 00:00
1st OFF 08:30 05:00 10:00 05:00
2nd ON 12:00 13:00 12:00 13:00
2nd OFF 12:00 16:00 12:00 16:00
3rd ON 17:00 20:00 17:00 20:00
3rd OFF 22:30 22:00 22:30 22:00
N.B. If 2PU or 2GR is selected, then events 2nd ON and 2nd OFF
are skipped

12
Setting the Programmer Option (5/2, 7 day, 24hr)
1. Switch the slider to HEATING. Press either the +/– button
to move between 7 day, 5/2 day or 24hr operation.
5/2 Day operation is shown by MO, TU, WE, TH, FR
flashing (5 Day) and then SA, SU flashing (2 Day)
7 Day operation is shown by just one day flashing at
a time
24 hr operation is shown by MO, TU, WE, TH, FR, SA, SU
flashing at the same time.
2. Wait 15 seconds to automatically confirm or press the
Home button. Move the slider to RUN to return to
Run Mode.
Setting the Central Heating/Hot Water Programme
1. Move the slider to HEATING. Choose between 5/2 day, 7
day or 24 hr programmer operation (see above steps 1-2).
2. Press the Next button. Press the Day button until
the desired day/block of days you want to programme
is flashing.
3. The display shows the 1st ON time. Press +/– to set the
time (10 minutes increments). Press the Next button.
4. The display shows the 1st OFF time. Press +/– to set the
time (10 minutes increments). Press the Next button.
5. The display will now show the 2nd ON time. Repeat steps
3-4 until all remaining ON/OFF periods have been set.
On the last OFF period, press the Day button until the
next desired day/block of days you want to programme
is flashing.

13
Setting the Operation
1. Switch the slider to PROG. Press either the +/– button to
move between ON/OFF/AUTO/ALL DAY.
ON: Central Heating/Hot Water is ON continuously
AUTO: Central Heating/Hot Water will be switched ON
and OFF in accordance with set programmes
ALL DAY: Central Heating/Hot Water will switch ON at
the first ON and switch OFF at last OFF
OFF: Central Heating/Hot Water will be permanently OFF
2. Wait 15 seconds to automatically confirm or press the
Home button. Move the slider to RUN to return to
Run Mode.

14
Temporary Manual Overrides
The Advance Function
The ADVANCE function allows the user to move to the next
ON/OFF programme for a “one off” event, without having to
change the programme or use the ON or OFF buttons.
N.B: The ADVANCE function is only available when the
programme is in AUTO or ALL DAY operating modes
and the slider must be switched to RUN.
To Advance Central Heating/Hot Water
1. Press the ADV button. This will turn the Central Heating/
Hot Water ON if it is in an OFF period and OFF if it is in
an ON period. The word ADV will appear to the left hand
side of the LCD display.
2. It will stay in this state until either the ADV button is
pressed again, or until a programmed ON/OFF period
commences.
The +HR Boost Function
The +HR function allows the user to have up to 3 hours of
extra Central Heating/Hot Water, without having to change the
programme.
N.B: The +HR function is only available when the programme is
in AUTO, ALL DAY or OFF operating modes and the slider
must be switched to RUN. If the programmer is in AUTO
or ALL DAY mode when the +HR button is pressed and the
resulting time of the boost overlaps a START/ON time, the
boost will disengage.
Operating the unit

15
To +HR Boost Central Heating/Hot Water
1. Press the +HR button.
2. One press of the button will give one extra hour of Central
Heating/Hot Water; two presses of the button will give
two extra hours; three presses of the button will give the
maximum three extra hours. Pressing it again will switch
off the +HR function.
3. The + 1HR , +2HR or +3HR status will appear on the right
hand side of the LCD display.
Holiday Mode
Holiday Mode saves energy by letting you reduce the
temperature for 1 to 99 days while you are away from home,
resuming normal operation on your return.
1. Press to enter Holiday Mode and the screen will
display d:1.
2. Press +/– buttons to select the number of days you would
like the Holiday Mode to run for (between 1-99 days).
3. Press the Home button to confirm. The system will
now turn OFF for the number of days chosen. The
number of days will alternate with the time symbol on
display and the number of days will count down.
4. Once the countdown has finished, the programmer will
return to normal operation. It may be advisable to set
the holiday mode 1 day less so the house is back up to
temperature for your return.
5. To cancel the Holiday Mode, press the button to revert
back to run mode.

16
Setting the Time and Date
The time and date are factory set and changes between
summer and winter time are handled automatically by
the unit.
1. Switch the slider to TIME/DATE.
2. The hour symbols will flash, use the +/- buttons to adjust.
3. Press the Next button and the minute symbols will
flash, use the +/- buttons to adjust
4. Press the Next button and the day date will flash,
use the +/- buttons to adjust the day.
5. Press the Next button and the month date will flash,
use the +/- buttons to adjust the month.
6. Press the Next button and the year date will flash,
use the +/- buttons to adjust the year.
7. Press the Next button or wait for 15 seconds to
automatically confirm and return to Run Mode.
Setting the Backlight
The backlight can either be set permanently ON or OFF.
The programmer backlight is pre-set to be permanently OFF.
When the backlight is permanently OFF, the backlight will
turn ON for 15 seconds when +or –button is pressed, then
turn OFF automatically.
To change setting to permanently ON, move the slider to
TIME/-DATE. Press the Next button repeatedly until Lit is
displayed.
Basic settings

17
Press +or – to turn backlight ON or OFF. Press the Next
button or wait for 15 seconds to automatically confirm and
return to Run Mode.
N.B: Do not use Advance or +HR Boost Button to activate the
backlight as it may engage the Advance or +HR facility
and turn on the boiler. Only use the Home button.
Resetting the Unit
Press the reset button with a non-metallic pointed tool to
reset the unit.
N.B: If the reset is pushed at any time, the programmer
will default to Program 1, which is boost only. If this
happens, then the installer code will be needed to
unlock the other features.
Power Interuption
In the event of a mains supply failure the screen will go
blank but the back-up battery ensures that the programmer
continues to keep the time and retain your stored programme.
When power is restored, switch the slider to RUN to return to
Run Mode.

18

19
WARNING: Interference with sealed parts renders the
guarantee void.
In the interests of continuous product improvement we reserve
the right to alter designs, specifications and materials without
prior notice and cannot accept liability for errors.
We are continuously developing our products to
bring you the very latest in energy saving technology
and simplicity. However, should you have any questions
setting up your controls please email us at
sales@esicontrols.co.uk or for technical queries call
us on our dedicated technical helpline 07539 117468.

Version 6.10.2
© ESi Controls Limited 2017
Other manuals for ES1247B16A
1
Table of contents
Other ESI Motherboard manuals