Espressions EP0700 User manual

EM0490
PRECISION GRINDER
PRECISION GRINDER
EP0700
EP0700_IB.indd 1 02-04-14 09:56

2
Heading
EP0700_IB.indd 2 02-04-14 09:56

Important instructions – retain for
future use.
Contents
Espressions Safety Precautions 2
Congratulations 3
Features of your Precision Grinder 4
Functions of your Precision Grinder 6
Operating your Precision Grinder 8
Adjusting the Grind Setting 11
Care and Cleaning 12
Advanced Settings for Recalibration 14
EP0700_IB.indd 1 02-04-14 09:56

2
Espressions Safety Precautions
SAFETY PRECAUTIONS FOR YOUR
ESPRESSIONS COFFEE GRINDER
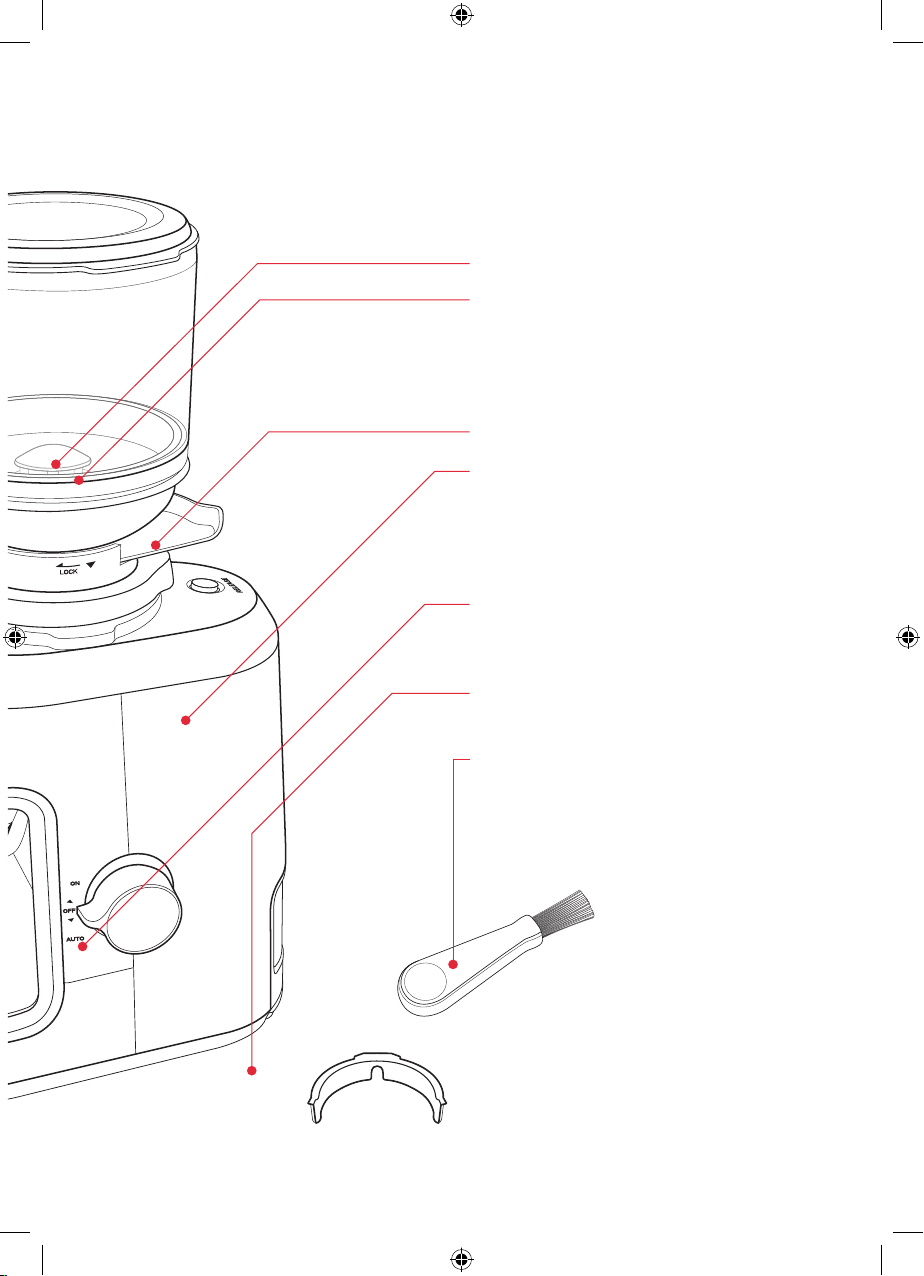
• Check the hopper for the presence of foreign
objects before using.
• Always operate the grinder with the hopper
properly inserted in the grinder.
• Do not place your hand in or near the burrs
while the grinder is in operation.
• Always place the unit on a flat, level surface.
• Always disconnect the appliance from
the supply if it is unattended and before
assembling, disassembling or cleaning.
• Do not attempt to re-grind ground coffee.
• Do not grind more than 250g of coffee beans in
each single grind.
• Switch off the appliance and disconnect from
power supply before touching any part of the
grinder that moves during use.
• For cleaning: refer to the “Care and Cleaning”
section.
Espressions is very safety conscious when
designing and manufacturing consumer products,
but it is essential that the product user also exercise
care when using an electrical appliance. Listed
below are precautions which are essential for the
safe use of an electrical appliance:
• Read carefully and save all the instructions
provided with an appliance.
• Always turn the power off at the power outlet
before you insert or remove a plug. Remove by
grasping the plug - do not pull on the cord.
• Turn the power off and remove the plug when the
appliance is not in use and before cleaning.
• Do not use your appliance with an extension cord
unless this cord has been checked and tested by
a qualified technician or service person.
• Always use your appliance from a power outlet of
the voltage (A.C. only) marked on the appliance.
• The appliances shall not be used by children.
Keep the appliance and its cord out of reach of
children. Appliances can be used by persons with
reduced physical, sensory or mental capabilities
or lack of experience and knowledge if they have
been given supervision or instruction concerning
use of the appliance in a safe way and if they
understand the hazards involved.
• Children should be supervised to ensure that they
do not play with the appliance.
• The temperature of accessible surfaces may be
high when the appliance is operating.
• Never leave an appliance unattended while
in use.
• Do not use an appliance for any purpose
other than its intended use.
• Do not place an appliance on or near a hot gas
flame, electric element or on a heated oven.
• Do not place on top of any other appliance.
• Do not let the power cord of an appliance hang
over the edge of a table or bench top or touch any
hot surface.
• In order to avoid a hazard, do not operate any
electrical appliance with a damaged cord or after
the appliance has been damaged in any manner.
If damage is suspected, return the appliance to
the nearest Espressions Appointed Service Centre
for examination, repair or adjustment.
• For additional protection, Espressions
recommends the use of a residual current device
(RCD with a tripping current not exceeding
30mA) in the electrical circuit, supplying power
to your appliances.
• Do not immerse the appliance in water
or any other liquid unless recommended.
• Appliances are not intended to be operated
by means of an external timer or separate remote
control system.
• This appliance is intended to be used in
household and similar applications such as: staff
kitchen areas in shops, offices and other working
environments; farm houses; by clients in hotels,
motels and other residential type environments;
bed and breakfast type environments.
If you have any concerns regarding the performance and use of your appliance, please contact your
dealer. Ensure the above safety precautions are understood.
EP0700_IB.indd 2 02-04-14 09:56

3
Congratulations on the purchase of your
Espressions Precision Grinder, designed and
engineered in Australia.
Espressions delivers quality, style and
superior performance capturing the essence
of the commercial kitchen. Inspired by heavy-
duty equipment found in restaurants, cafes
and bars, the Precision Grinder is built to
last. It brings together a range of appliances
designed to expertly create authentic café
food and beverages at home.
Uncompromising blends of stainless steel
and die-cast alloy characterise the range.
This, combined with advanced technology
and functional design, guarantee that each
product will surpass expectations.
When making coffee regardless of the
brewing method the flavour of the resulting
brew depends largely on the quality,
freshness and roast of the coffee beans used.
Other factors that can also affect the taste of
the final cup include the purity of the brew
water, the condition of the grinder and the
actual design of the burr mechanism within
the grinder.
The Espressions grinder features tool
hardened steel conical burrs for extra long
life. The conical burr design ensures that
the particle size of the coffee is consistent
and even. This is especially important for
espresso, if the particle size of the coffee
is uniform equal amounts of the coffee’s
aromatic profile will be extracted.
If, however, the particle size of the coffee
varies some particles will be over-extracted
and some will be under-extracted, resulting in
a poor tasting coffee.
Another advantage of the conical burr design
is its slow rotating operation. This combined
with a belt-driven motor, minimises heat
transfer to the burrs and thus protects the
aromatic profile of the coffee and ultimately
enhances the quality of the resulting brew.
The Espressions Precision Grinder is
constructed with quality die-cast metal
components and includes many features that
make grinding coffee at home easy so you
can enjoy a lovely fresh cup of coffee every
time. We hope you enjoy your new coffee
grinder!
Congratulations
EP0700_IB.indd 3 02-04-14 09:56

4
Features of your Espressions
Precision Grinder
450g Bean hopper
The 450g capacity bean hopper has a closure arm for
easy removal. This allows the user to remove the hopper
without taking out the beans.
Grind adjustment collar
Large and easy to use, the collar has a range of
30 grind settings. This allows the user to select a fine
grind for an espresso or a coarser grind for brew styles
such as plunger. With such precise settings the user
controls the particle size and ultimately the quality of the
brew.
LED lighting
The grind delivery outlet is illuminated with LED lighting
when grinding begins.
Tap & Go™easy use function
Grinding into the group handle is seamless with the
unique Tap & GoTM technology. Simply position the group
handle and gently press down for freshly ground coffee.
Group handle cradle
A stylish and sturdy metal cradle designed for 58mm
group handles that allows hands free operation.
Also comes with a 50mm group handle adapter.
Grind spill tray and storage area
Positioned under the grinding spout the grind spill tray
catches any loose coffee grinds. Underneath the tray is a
storage area for the burr cleaning brush and 50mm
group handle adapter.
Rubber feet
The non-slip rubber feet ensure the grinder remains
stable and prevents slipping on the bench top during use.
EP0700_IB.indd 4 02-04-14 09:56

5
Burr shield
Conical burrs
The hardened steel conical burrs achieve
excellent grind consistency and minimises
heat transfer to the coffee due to their slow
rotation.
Hopper closure arm
Stainless steel housing
Built to last, the heavy-duty Stainless Steel
body encases a powerful belt driven motor
and provides a stable base foundation for the
grinder.
Operation dial
Allowing both automatic and manual
grinding.
Cord wrap
Cord wraps away to keep bench top clean.
Burr cleaning brush
Strong bristles help sweep out grinds from
the burrs.
Features of your Espressions
Precision Grinder
50mm group
handle adapter
EP0700_IB.indd 5 02-04-14 09:56

6
Functions of your Espressions
Precision Grinder
Tap & Go™technology
The new patent pending Tap & Go™function
allows an easy one touch grind directly into
the group handle. Simply set the operation
dial to auto and place the handle into the
group handle cradle then gently depress
the handle downward to fill the basket with
freshly ground coffee on demand.
Adjustable grind settings
Accurate and adjustable grind settings give
the flexibility to create the right grind size
for different coffee styles and extraction
rates. The unique grind cartridge and
easy recalibration system ensures ongoing
precision.
Slow speed grinding
The combination of a powerful yet quiet,
belt-drive system and hardened steel conical
burrs deliver a slow speed grinding process.
This minimises the heat transfer to the
coffee, protecting its aromatic profile.
EP0700_IB.indd 6 02-04-14 09:56

7
Functions of your Espressions Precision Grinder (continued)
LED Lit Grind Area
Seamless grind delivery is assisted by LED
illumination that engages when grinding
begins. An auto dimming feature then dims
the light when grinding is complete.
Easy clean without recalibration
The patent pending grind cartridge enables
easy access to the lower burr chamber
without altering your grind settings.
EP0700_IB.indd 7 02-04-14 09:56

8
Operating your Espressions
Precision Grinder
Before using the coffee grinder, wipe the
base exterior with a damp cloth. Wash the
bean hopper and hopper lid in warm soapy
water, then rinse and dry thoroughly.
Note: Do not immerse the grind cartridge in
water or any other liquid.
Note: Do not place any parts of the coffee
grinder in the dishwasher.
1.Place the coffee grinder on a dry, level
surface.
2.To attach the bean hopper, align the arrow
on the hopper with the arrow on the top of
the grind cartridge and turn clockwise to
lock. See figure 1.
The grinder will not function without the
hopper in place.
3.Fill the bean hopper with coffee beans.
Tip: To maintain an even weight bearing down
on the burrs, we recommend keeping the
hopper at least half full. This ensures a more
consistent grind is achieved.
Note: This coffee grinder is intended to grind
whole coffee beans only.
4.Place the hopper lid onto the bean hopper
and open the hopper closure arm.
5.Ensure operation dial is off, plug the power
cord into a 230-240V AC power outlet and
switch the power on.
6.Select the grind by turning the grind
adjustment collar to the desired setting,
see figure 2.
Refer to the grind setting table on page 11 to
assist you in selecting the correct grind level
for the desired brewing method.
Figure 1
Figure 2
EP0700_IB.indd 8 02-04-14 09:56

9
Operating your Espressions Precision Grinder (continued)
For grinding into the group handle
7.Insert the group handle into the group
handle cradle at an inclined angle placing
the front edge under the lip of the group
handle cradle. See figure 3.
Note: The group handle cradle accepts 58mm
group handles. To use a 50mm group handle
attach the adapter located in the storage area
under the drip tray.
8.Turn the dial to the ‘Auto’ position and
gently press down on the handle to grind
into the basket. See figure 4.
Note: With the dial at ‘Auto’ you have the
option to leave the group handle in the group
handle cradle without grinding coffee.
9.Once the basket is full, remove the group
handle from the group handle cradle.
See figure 5. Collapse the coffee in the
basket by tapping it on the bench. Repeat
the grinding process until the desired
amount of coffee has been ground and
tamp to finish.
Figure 3
Figure 4
Operating your Espressions
Precision Grinder
Figure 5
Figure 6
EP0700_IB.indd 9 02-04-14 09:56

10
For hands free grinding
10. Insert the group handle into the group
handle cradle at an inclined angle
placing the front edge under the lip of
the group handle cradle. See figure 3.
11. To continuously grind coffee, turn the
dial to the ‘On’ position, see figure 7.
12. When the desired amount of coffee has
been ground, return dial to the ‘Off’
position.
Operating your Espressions Precision Grinder (continued)
Figure 7
EP0700_IB.indd 10 02-04-14 09:56

11
The range of 30 grind settings allows for
precision adjustment. The coffee maker has
control of the particle size and ultimately the
quality of the resulting brew.
Some things to remember when using the
coffee grinder;
• The smaller the particle size the longer it
will take to grind.
• After long periods of using the finer
settings we recommend removing the grind
cartridge and sweeping away any residual
coffee to avoid clogging. See the Care
and Cleaning section on page 12 for more
details.
Tips
1.Select the correct grind for the brewing
method you are using. 30 grind settings
are available to ensure precision
adjustment. The lower settings deliver
finer grinds while the higher settings
deliver coarser grinds. It is important
to experiment with the grind settings to
achieve the ideal brew that best suits your
palate.
2.Coffee that is ground too fine for a
particular brewing process will result in
over-extraction and the coffee will taste
bitter. On the other hand, coffee that is too
coarse for a particular brewing method will
result in under-extraction and the coffee
will be thin and poor in flavour.
3.Once coffee is ground it quickly loses its
flavour and aroma. For the best results we
recommend you grind beans immediately
prior to brewing.
4.Buy fresh whole coffee beans weekly.
5.To retain freshness, store whole coffee
beans in an airtight container in a cool,
dark, dry place. It is not recommended
that you store beans in the grinder’s bean
hopper for a prolonged period.
6.To ensure the best results from the coffee
grinder clean the bean hopper and conical
burrs regularly.
Adjusting the Grind Setting
Grind setting table
SETTING BREWING METHOD
0 - 7 Turkish
7 - 15 Espresso
7 - 15 Stove Top
10 - 20 Syphon Brew Method
15 - 30 Aero Press, Drip Filter, V-60 Dripper
25 - 30 Plunger, Clever Coffee Dripper
EP0700_IB.indd 11 02-04-14 09:56

12
Important Notes:
• Spots and marks on the surface of the
burrs are part of the hardening process.
These marks do not affect the performance
of the grinder or the taste of the coffee.
• Ensure the coffee grinder is switched off
and unplugged from the power outlet prior
to cleaning.
• Do not immerse the motor base of the
coffee grinder in water.
• Do not immerse any part of the grind
cartridge in water or any other liquid.
• Do not place any parts of the coffee grinder
in the dishwasher.
• Do not use abrasive cleansers or scouring
pads.
Cleaning the motor base and bean hopper
1.Close the hopper closure arm and remove
the bean hopper from the motor base, see
figure 8. Store unused beans in an airtight
container to preserve their freshness.
2.Wipe the motor base exterior with a damp
cloth and dry.
3.Wash the bean hopper in warm soapy
water, then rinse and dry.
Cleaning the burrs
If the coffee grinder is used frequently (every
day), the burrs need to be cleaned every
three weeks to ensure best performance of
the coffee grinder. Regular cleaning helps
the burrs achieve consistent grinding results,
which is especially important when grinding
coffee for espresso.
1.Close the hopper closure arm and purge
the grinder by turning on until no more
grinds come out.
2.Ensure the coffee grinder is switched off
and unplugged from the power outlet.
Remove the bean hopper from the motor
base, see figure 8.
3.To remove the grind cartridge, press and
hold down the ‘RELEASE’ button on the
top of the grinder base and with the other
hand hold the cartridge grip tabs and turn
anti-clockwise, see figure 9.
Note: Using the cartridge grip tabs enables
removal of the grind cartridge without
changing your grind settings.
Care and Cleaning
Figure 8
Figure 9
EP0700_IB.indd 12 02-04-14 09:56

13
Care and Cleaning (continued)
5.Lift the grind cartridge away from the
grinder base, see figure 10.
6.Clean the grind cartridge and bottom burr
using the burr cleaning brush (located
under the grind spill tray), see figure 11.
7.Once both burrs are cleaned, return the
grind cartridge to the grinder base so that
the arrow on the side of the grind cartridge
is aligned with the ‘ALIGN’ arrow on the
grinder base. Turn clockwise until the arrow
on the grind adjustment collar is aligned
with ‘LOCK’ arrow and the ‘RELEASE’
button pops out.
Figure 11
Figure 10
EP0700_IB.indd 13 02-04-14 09:56

14
Advanced Settings
Recalibration of the EP0700
To recalibrate for a coarser grind
6. Take note of your current grind setting
position.
7. Rotate the grind adjustment collar to
position 15 on the grind settings, see
figure 12.
8. Lift the recalibration release lever and
remove grind adjustment collar, see figure
13 and 14.
9. To make the grind coarser, reposition the
collar to setting 10 on the grind settings.
10. Re-assemble the collar by pressing down
the front and then the rear ensuring two
clicks are heard.
11. Return the grind setting back to your
original grind setting position. Your grind
will now be coarser.
12. Attach the hopper, open the hopper
closure arm and turn on the grinder.
Note: Check the new setting delivers the
required grind before use.
To recalibrate for a finer grind
Note: The grinder is factory set for fine
grinding. Only re-calibrate finer if the 0
setting does not achieve the desired grind
fineness.
6. Rotate the grind adjustment collar to
position 15 on the grind settings,
see figure 12.
7. Lift the recalibration release lever and
remove grind adjustment collar, see figure
13 and 14
8. To make the grind finer, reposition the
collar to setting 17 on the grind settings.
9. Re-assemble the collar by pressing down
the front and then the rear ensuring two
clicks are heard.
10. Attach the hopper and run the grinder to
ensure smooth operation.
Caution: Re-calibrating too fine may cause
burrs to collide resulting in a metallic
grinding noise. If this occurs turn off the
grinder and move to a coarser setting (a
setting towards 30) or re-calibrate for a
coarser grind.
11. Open hopper closure arm and adjust
grind settings to deliver required grind
size.
Note: Further tuning may be required.
Note: Recalibration will change all previous settings on the grinder
1. Close hopper closure arm.
2. Purge beans through the grinder.
3. Turn the operation dial to the ‘off’ position.
4. Disconnect the plug from the power socket.
5. Remove the bean hopper by turning anticlockwise.
EP0700_IB.indd 14 02-04-14 09:56

15
Figure 12
Figure 13
Advanced Settings (continued)
Figure 14
EP0700_IB.indd 15 02-04-14 09:56

Sunbeam ‘Cafe Series’ logo and words ‘Cafe Series’ are
trademarks of Sunbeam Corporation
. ACN 000 006 771.
© Sunbeam Corporation Limited 2004.
Warranty Conditions
This ESPRESSIONS kitchen appliance is of excellent
quality and construction. However, in the event of
defects in the product material or in the finishing
of the product during the warranty period, we will
determine, in our sole discretion, whether the defective
components will be replaced or repaired free of charge,
in accordance with the warranty conditions stated
below. The two-year warranty covers parts, labour and
exclusively domestic use.
These warranty conditions are complementary to your
legal rights. This warranty does not cover the shipping
or transportation costs of returning the appliance. This
warranty applies only to those products, which are sold
and have remained within the Benelux region. The
warranty does not apply to the plugs, electrical cords or
fuses, and also does not apply to defects caused by:
• Regular wear and tear to the appliance or its
components through general use.
• Acts of operation and/or maintenance that do not
comply with the user instructions.
• Connecting the product to an unsuitable electrical
source.
• Any damage caused by misuse or abuse of the
product.
• When modifications have been made to the product
by parties other than an IT&M authorised service
company.
• Disassembling or interfering with the product.
• Theft or attempted theft of the product.
• Breakage or defects caused by transport.
Before returning a product under these warranty
conditions, please check whether:
• The product’s instructions and guidelines have been
followed correctly.
• The power leading to the appliance works correctly
and that the appliance is switched on.
• The defect is not due to a faulty fuse.
If you wish to make a claim on this warranty, we kindly
request that you:
• Return the product by post or courier service to the
dealer where it was purchased or directly to IT&M.
• Ensure the product is clean and packed securely for
transport, preferably in the original packaging.
• Enclose information with your contact details (name,
address, telephone number), as well as where and
when the product was purchased, together with a
copy of the purchase receipt.
• Provide the exact nature of the defect.
This warranty offers no legal entitlement to
compensation of other claims, irrespective of their
nature, including and without exception claims for
secondary, indirect or incidental damages. This warranty
also does not offer any right for reimbursement of
modification or repair costs carried out by third parties
without prior permission by IT&M.
EP0700_IB.indd 16 02-04-14 09:56

Sunbeam ‘Cafe Series’ logo and words ‘Cafe Series’ are
trademarks of Sunbeam Corporation
. ACN 000 006 771.
© Sunbeam Corporation Limited 2004.
Consumer Hotline
Australia
1800 025 059
New Zealand
0800 786 232
www.sunbeam.com.au
is a registered trademark.
Need help with your appliance?
Contact our customer service team or visit
our website for information and tips on
getting the most from your appliance.
Park Forum 1110
NL-5657 HK Eindhoven
www.itmonline.nl
Tel. +31 (0)40 290 11 30
Due to minor changes in design or otherwise,
the product may differ from the one shown in this leaflet.
© Copyright. IT&M B.V. 2014.
5/13
EP0700_IB.indd 17 02-04-14 09:56
Table of contents