ESSEDUE ATC350 Operating manual

Slicer ATC350 CE ESSEDUE
OWNER'S AND MAINTENANCE MANUAL
ESSEDUE slicer for professional use compliant to CE norms
ATC350 – Knife Cut Slicer 350
Patented Equipment
IMPORTANT SAFETY NOTICE
This manual contains important safety instructions which
must be strictly followed when using this equipment.
Dear Customer,
OWNER'S AND MAINTENANCE MANUAL Original Manual
1

Slicer ATC350 CE ESSEDUE
ESSEDUE slicer and its components are built in compliance with Machinery Directive 2006/42/CE
and with safety regulations transcribed hereunder and amendments, in order to meet requirements.
The regulations which rule machinery constructions are:
EN 1974:1998+A1:2009
Slicers. Safety and hygiene requirements.
EN 60204-1:2006/A1:2009
Safety of machinery. Electrical equipment of machines. General requirements
2003/108/CEE
Relating to Waste Electrical and Electronic Equipment.
Guideline 1935/2004/CE
Relating to materials and articles intended to come into contact with food
2004/108/CE
Electro Magnetic Compatibility (EMC).
EN 55014-1:2006 + A1:2009
Electromagnetic compatibility. Requirements for household appliances, electric tools and similar
apparatus -- Part 1: Emission.
EN 55014-2:1997+A2:2008
Electromagnetic compatibility - Requirements for household appliances, electric tools and similar
apparatus -- Part 2: Immunity - Product family standard
EN 61000-3-2:2006
Electromagnetic compatibility -- Part 3-2: Limits - Limits for harmonic current emissions
(equipment input current <= 16 A per phase).
EN 61000-3-3:2008
Electromagnetic compatibility (EMC) - Part 3-3: Limits - Limitation of voltage changes, voltage
fluctuations and flicker in public low-voltage supply systems, for equipment with rated current <=
16 A per phase and not subject to conditional connection.
2006/95/CE
Low Voltage Directive.
2011/65/EU
Directive on the restriction of the use of certain hazardous substances in electrical and electronic
equipment
CE Declaration of Conformity and Wiring Diagram are contained in this Manual.
ESSEDUE thanks you for choosing this product. Please do not hesitate to contact us if you need any
further information.
ESSEDUE SRL
VIA DELL’ELETTRONICA 53
OWNER'S AND MAINTENANCE MANUAL Original Manual
2

Slicer ATC350 CE ESSEDUE
27010 CURA CARPIGNANO (PV) - ITALY
PHONE : 39-0382-474396
FAX: 39-0382-483096
E-MAIL: [email protected]
WEBSITE: www.essedue.com
INDEX
1 GENERAL INFORMATION...........................................................................................................5
1.1 General precautions.............................................................................................................. 5
1.2 Safety devices....................................................................................................................... 7
1.2.1 Mechanical safety devices.................................................................................................7
1.2.2 Electrical safety devices.....................................................................................................7
1. Description of the Machine....................................................................................................8
1. .1 General description............................................................................................................8
1. .2 Characteristic of construction............................................................................................8
1. . Components definition.......................................................................................................8
1. .4 Sliceable products..............................................................................................................9
2 TECHNICAL DATA......................................................................................................................10
2.1 Dimension, weight and other characteristics........................................................................10
RECEIVING THE MACHINE.......................................................................................................10
.1 Remarks on delivery............................................................................................................ 10
.2 Packaging............................................................................................................................ 11
. Disposal of the packaging....................................................................................................12
4 INSTALLATION............................................................................................................................12
4.1 Positioning and mounting.....................................................................................................12
4.2 Power supply connection.....................................................................................................1
4.2.1 Slicer equipped with mono-phase motor.........................................................................1
4.2.2 Slicer Data........................................................................................................................1
4. Wiring Diagram....................................................................................................................14
4.4 General operation control....................................................................................................14
5 OPERATING THE MACHINE......................................................................................................15
5.1 Control panel....................................................................................................................... 15
5.2 Semiautomatic operation.....................................................................................................16
5. Loading and slicing of the product.......................................................................................17
5. .1 Salami chute.....................................................................................................................17
5.4 Sharpening the blade...........................................................................................................18
6 CLEANING.....................................................................................................................................19
6.1 General information.............................................................................................................20
6.2 How to clean the slicer machine..........................................................................................20
6.2.1 Cleaning the food chute...................................................................................................20
OWNER'S AND MAINTENANCE MANUAL Original Manual
3

Slicer ATC350 CE ESSEDUE
6.2.2 Cleaning the deflector......................................................................................................21
6.2. Cleaning the blade............................................................................................................22
6.2.4 Cleaning of removable parts............................................................................................22
6.2.5 Cleaning the sharpener.....................................................................................................2
7 EXTRAORDINARY MAINTENANCE........................................................................................2
7.1 General Information............................................................................................................. 2
7.2 Maintenance........................................................................................................................ 2
7.2.1 Gear..................................................................................................................................24
7.2.2 Feet...................................................................................................................................24
7.2. Power cord.......................................................................................................................24
7.2.4 Blade................................................................................................................................24
7.2.5 Truing and Sharpening Stones.........................................................................................24
7. Lubrification.........................................................................................................................24
7. .1 Lubrificating the End Weight sliding rod........................................................................24
7. .2 Lubrificating the food chute sliding rod..........................................................................25
7. . Lubrificating the sharpener..............................................................................................25
8 DEMOLITION AND DISPOSAL..................................................................................................26
9 TRUBLESHOOTING GUIDE........................................................................................................26
9.1 Trubleshooting.....................................................................................................................26
INDEX OF PICTURES
Figure 1 – Overview of the slicing machine........................................................................................8
Figure 2 – Overview of the sharpener..................................................................................................9
Figure – Dimension drawing...........................................................................................................10
Figure 4 – Packaging content.............................................................................................................11
Figure 5 – Description of the packaging............................................................................................11
1
Figure 6 – Slicer view........................................................................................................................1
Figure 7 – Data label..........................................................................................................................14
Figure 8 – Monophase wiring diagram..............................................................................................14
Figure 9 – Control panel.....................................................................................................................16
Figure 10 – Overview of the slicer equipped with salami chute........................................................18
Figura 11 – Overview of tiltable chute...............................................................................................18
Figure 12 – Sharpening: Dismounting, rotation and positioning of the sharpener............................19
Figure 1 – Dismounting the food chute............................................................................................21
OWNER'S AND MAINTENANCE MANUAL Original Manual
4

Slicer ATC350 CE ESSEDUE
Figure 14 – Dismounting the deflector...............................................................................................21
Figure 15 – Dismounting the blade....................................................................................................22
Figure 16 – Lubrificating the end weight sliding rod.........................................................................25
Figure 17 – Lubrificating the food chute sliding rod.........................................................................25
Figure 18 – Sharpener dismounting...................................................................................................26
Figure 19 – Sharpener........................................................................................................................26
1 ENERAL INFORMATION
1.1 General precautions
ESSEDUE’s equipment is designed to provide safe and productive processing of food
products as long as the equipment is used in accordance with the instructions in this manual
and with good hygiene practices principles, and is properly maintained.
Important: unless the operator is adequately informed, trained and supervised, there is a
possibility of serious injury.
Owners of this equipment bear the responsibility to make certain that this equipment is used
properly and safely, strictly following all the instructions contained in this manual and the
requirements of local, state or federal law.
The machine must be used only by trained and qualified personnel, that have read and
completely understood instructions in this manual. In the event of staff turnover, ensure that
training is provided.
Owners should not permit anyone to touch this equipment unless they are over 18 years old,
are adequately trained and supervised and have read and understood this manual.
Owners must also ensure that no customers, visitors or other unauthorized personnel come in
contact with this equipment.
Please remember that ESSEDUE cannot anticipate every circumstance or environment in
which its equipment will be operated. It is the responsibility of the owner and the operator to
remain alert to any hazards posed by the function of this equipment, particularly the sharp
knife blade and all moving parts. Specific warnings are included in this manual to alert the
user on potential risks.
If you are uncertain about a particular task or the proper method of operating this equipment,
ask your supervisor and, if necessary, the manufacturer.
Ensure that the owner’s manual is available for easy reference by any operator. The Manual
must be kept in good condition, readable and available by any operator. If the manual becomes
misplaced, damaged, illegible or if you require additional copies, please contact your nearest
representative or ESSEDUE directly, providing all information necessary for identification of
the machine.
OWNER'S AND MAINTENANCE MANUAL Original Manual
5

Slicer ATC350 CE ESSEDUE
Please remember that this manual or the warnings do not replace the need to be always alert
when using this equipment, to properly train and supervise operators and to use common
sense and follow safety instructions when using this equipment.
As far as the machines are prone to possible updates, this manual may feature different details
from the ones depicted. This possibility does not in any way compromise the content of the
manual.
TO PRE ENT SERIOUS PERSONAL INJURIES:
• Owners must not permit anyone to touch this equipment unless they are over
18 years old, are adequately trained and supervised and have read and
understood this manual.
• Select a location for the slicer that has a perfect horizontal level, solid, non-
skid surface that is non-flammable and is in a well-lit work area that is away
from children and visitors.
• Always plug the slicer to a suitable power supply.
• NE ER touch the blade. Keep hand and arms away from all moving parts.
• NE ER use the slicer with safety devices on the blade unmounted and
uninstalled.
• NE ER put hands into the gap of the end weight, on the right side of the
slicer.
• Use only end weight handle to push the product during slicing.
• Use only end weight, never hands, to block the product during slicing. Never
put hands over the blade or the food chute nearby while operating the slicer.
• NE ER receive slices with your hands. Receive them ALWAYS with an
ham clamp or let them drop onto the base.
• Stay focused on the operation in progress when performing maintenance and
cleaning procedures.
• Before performing clearing, sharpening, maintenance or parts
dismounting, ensure you switched off the slicer, turn index knob dial
completely clockwise until it stops, block the food chute and unplug power cord.
• Carefully evaluate remaining risks when performing cleaning, sharpening,
maintenance and parts replacement, and when safety devices are removed.
• Use ONLY mild disinfectant detergent specific for food equipment when
performing cleaning. NE ER use corrosive or flammable substances.
• Avoid water jet in cleaning the slicer, and NEVER submerge it in water or other
liquids. Do not put components in dishwasher.
• When cleaning, please follow instruction on section 6 “Cleaning”.
• Regularly check conditions of power cord; a worn or damaged cord imply serious
electrocution danger.
• NE ER pull the power cord of the slicer or the slicer itself to unplug it.
• NE ER use slicer when, after several sharpening, blade diameter is reduced to less
than 10 mm from its original dimension.
OWNER'S AND MAINTENANCE MANUAL Original Manual
6

Slicer ATC350 CE ESSEDUE
• If you believe or note that the slicing machine is malfunctioning, do not use it, do
not attempt to repair it directly and contact the “Service Centre”.
• Do not use the slicing machine for frozen products, meat and fish with bones and
non-food products.
• Do not leave the slicing machine exposed to adverse weather conditions: sun, rain,
spray, ice, humidity.
• If the machine remains unused for a long period, unplug it; if the period lasts,
please ensure to have the machine checked by a “Service Centre” before using it
again.
• Use only ESSEDUE slicer accesories properly installed.
1.2 Safety devices
1.2.1 Mechanical safety devices
The slicer has been built complying to the Machine Directive 2006/42/CE and the EN 1974 Norm
(Slicers. Safety and hygiene requirements) and following updates.
Mechanical safety devices are:
- Food chute could be removed only after turning slice thickness knob until O (zero), with
slicer table completely closed; when removing food chute, slicer table keeps closed and
protect the blade;
- Unremoveable rim guard, which protects all the surface of the blade, except cutting zone;
- Removeable deflector;
- Handle applied on end weight;
- End weight not completely tiltable.
N.B. In compliance to section 1.7.2 “Information about remaining risks”, attached file 1, Machine
Directive 2006/42/CE, ESSEDUE warns that rim guard, in sharpening zone, even reducing risks of
injury do not eliminate it. Rim guard is built in compliance to European Norm EN 1974.
1.2.2 Electrical safety devices
Electrical safety devices are realised in compliance to norms:
-EN 60204 (Safety of machinery. Electrical equipment of machines. General requirements);
-EN 60335-1 (Safety of household and similar electrical appliances - Part 1: General
requirements);
-EN 60335-2-64 (Safety of household and similar electrical appliances Part 2-64:
Particular requirements for commercial electric kitchen machines);
-2006/95/CE;
-2004/108/CE.
Electrical safety devices are:
- Start/stop control panel;
- Circuit control: manual start is required after each blade stop;
When non operating, please ensure that the machine is switched off.
Always turn index knob dial until O (zero).
Ensure that all the labels on the machine are present; if damaged, illegible or misplaced,
please replace them.
OWNER'S AND MAINTENANCE MANUAL Original Manual
7

Slicer ATC350 CE ESSEDUE
1.3 Description of the Machine
1.3.1 General description
CE Professional slicers are designed and built by ESSEDUE to guarantee:
- Easy use and maintenance;
- Toughness and stability of the machine;
- Service Temperature: from 2°C to +20°C;
- Slice thickness adjusting from 0 to 14.5 mm;
- Thickness accuracy due to cam mechanism;
- Blade rotation pro minute: 160-200-240 rpm;
- Low noise due to gear transmission;
- Airborne noise low than 70 dB(A);
- Insulation level on electrical system and control panel: IP55;
- Safe use, cleaning and maintenance of the slicer;
- Hygiene guaranteed by choosing safe and foodcontact material and by design that create
easy cleaning and flowing of liquids.
1.3.2 Characteristic of construction
CE Professional slicers are made in an aluminium alloy which guarantees hygiene of material that
come in contact with foodstuff, sliceable by this slicers (section 1.3.4 of this manual “Sliceable
products”). Some machine components are made in Inox Steel AISI 304 and plastic.
1.3.3 Components definition
Salami food chute
Figure 1 Overview of the slicing machine
OWNER'S AND MAINTENANCE MANUAL Original Manual
8
Slicer ATC350 CE ESSEDUE
Figure 2 Overview of the sharpener
Legend referred to Fig 1-2, Pag 9-10
A) Data label
B) Cover release knob
C) Sharpener
D) Food Chute
E) End Weight
F) Index knob
G) Control panel
H) Sharpening stone
I) Slicer table
J) Food chute handle
K) Sharpener release knob
L) Blade
M) Truing stone
N) Truing stone button
O) Oil hole sliding bar
P) Food chute release knob
Q) End weight blockage handle
R) Sliding chute
S) End Weight handle
T) Rubber Foot
W) Sharpening stone button
1.3.4 Sliceable products
Please slice only salami and meat without bones (with meat chute only); to cut bread and cheese
please ask for special blades.
Do not slice:
Non food products;
Salami and meat with bones;
Frozen foodstuffs (below 2°C);
Fruit;
etc.
OWNER'S AND MAINTENANCE MANUAL Original Manual
9

Slicer ATC350 CE ESSEDUE
2 TECHNICAL DATA
2.1 Dimension, weight and other characteristics
Figure 3 Dimension drawing
Model Blade
(mm)
Cutting cross
section (mm)
Food Chute
(mm)
Chute Stroke
(mm)
Minimum
Dimensions (mm)
A x B x H
Maximum
Dimension (mm)
A x B x H
Net
Weight
(kg)
ATC350 350 250h x 370 340 x 330 370 620 x 465 x 580h 870 x 680 x 700 48
3 RECEIVIN THE MACHINE
Ensure all the operators have read and understood this manual before installation and operating. If
you are uncertain about a particular task or the proper method of operating this equipment, do not
proceed with installation and operating; ask your supervisor.
3.1 Remarks on delivery
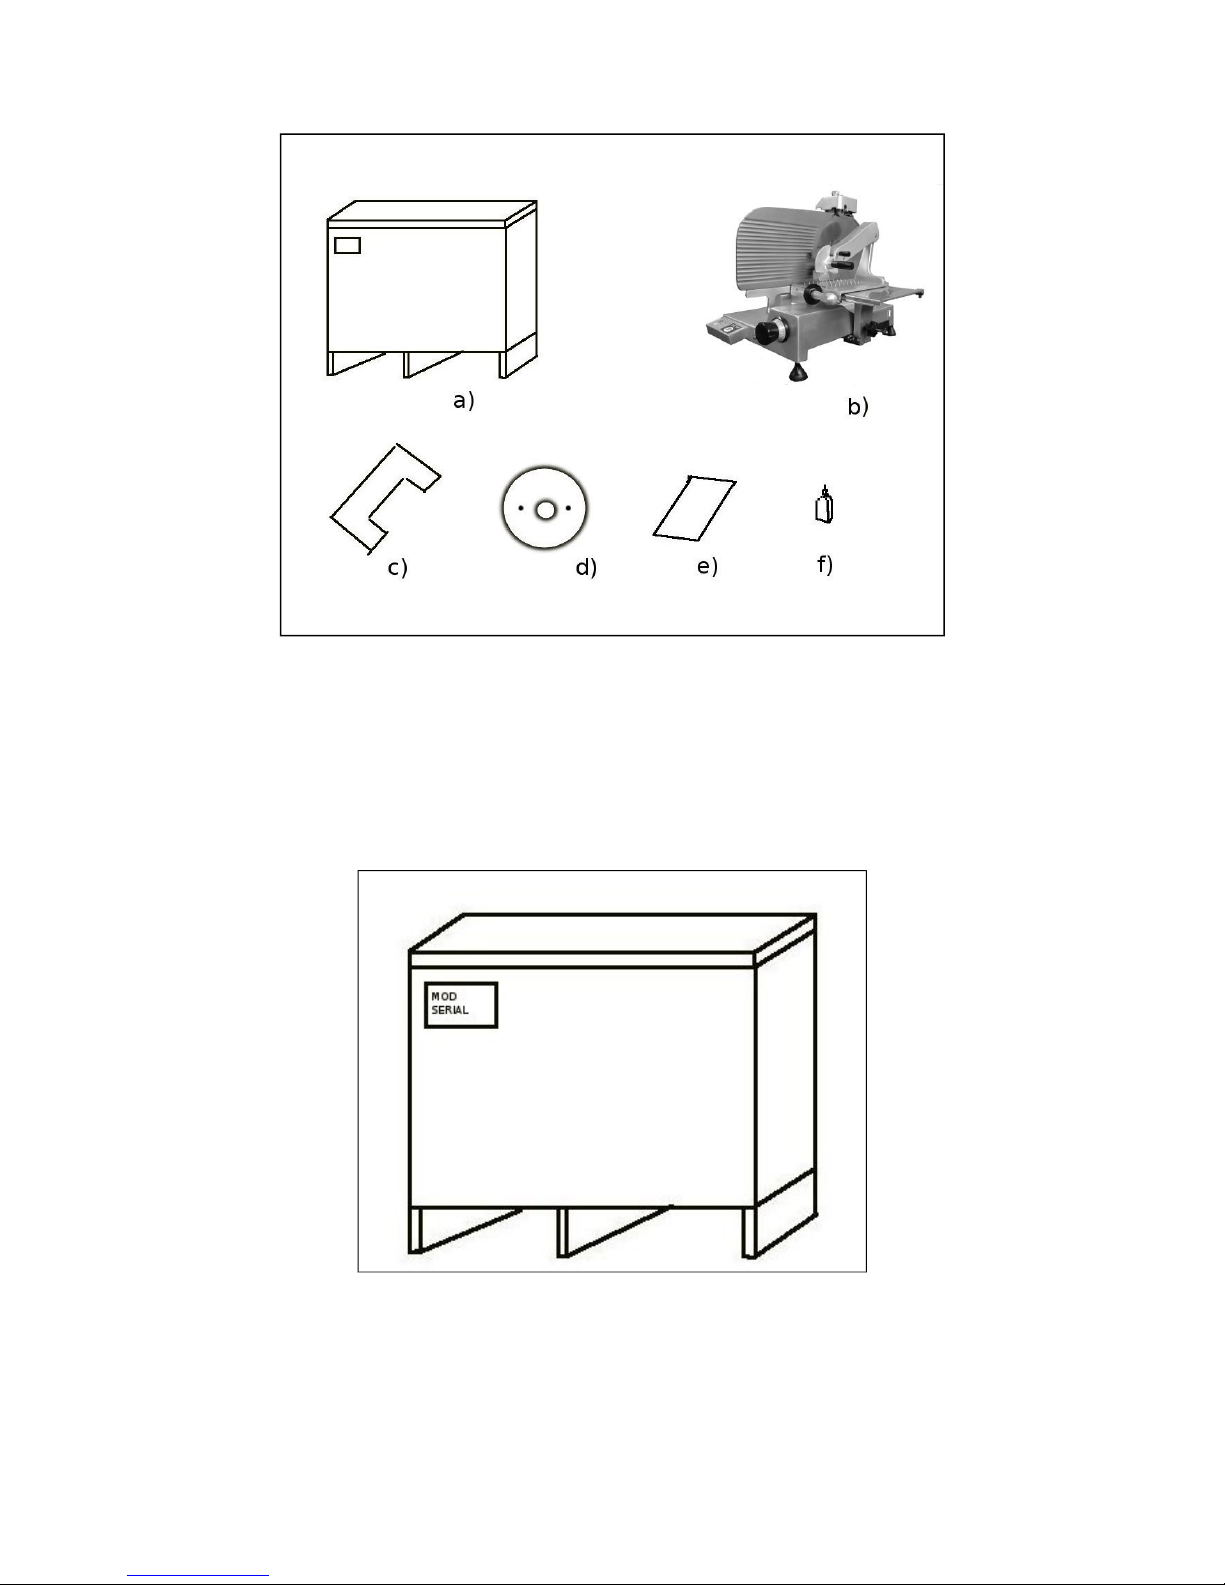
The slicer is shipped from our warehouse properly packaged. The package contains:
a) Wooden box;
b) Slicer;
c) Two transport protections made in polystyrene;
d) Blade extractor (on request);
e) Owner’s and maintenance manual;
f) Oiler.
OWNER'S AND MAINTENANCE MANUAL Original Manual
10
Slicer ATC350 CE ESSEDUE
Figure 4 – Packaging content
On the box, in addition to conventional symbols, are listed:
- Slicer model;
- Slicer Serial number.
Figure 5 Description of the packaging
3.2 Packaging
OWNER'S AND MAINTENANCE MANUAL Original Manual
11

Slicer ATC350 CE ESSEDUE
Check that packaging has not been damaged and that the machine corresponds to the accompanying
document immediately after receipt, otherwise do not collect the goods. Open the packaging and
check that it contains all the item listed in section 3.1 “Remarks on delivery”.
Use at least two poeple to lift and move the slicer; install it on a suitable support (Page 13 and
following) and make sure that rubber feet are straight and firmly tightened.
If significant differences in the functioning of the machine may occurs, make a report of damages of
the machine within 3 days from delivery date indicated on the documents and submit it to the
carrier. Contact the Manufacturer within 10 days.
NE ER put packaging upside down.
NE ER use slicer without rubber feet installed
Use at least two people to lift the slicer. NE ER attempt to lift the slicer alone.
3.3 Disposal of the packaging
In case of movement of the slicer, please keep the box and all packaging material.
The packaging is made of wood and polystyrene and must be disposed in according to local
regulations.
Decommissioning and Disposal: Do not dispose in the environment. The symbol on the machine
indicates the prohibition of disposal with municipal solid waste according to Directive 2002/96 EC
WEEE.
Waste disposal should be performed in compliance with international and local regulations.
4 INSTALLATION
4.1 Positioning and mounting
Install the slicer on a perfect horizontal level, solid, non-skid surface.
Recommended height of work surface: about 800 mm.
Make sure the work area is sufficient to support the slicer, taking into account the dimensions
shown, according to the model in the table contained in section 2.1 "Dimensions, weight and
features", such that the cutting operations are not hampered.
Thoroughly clean the machine before connecting the power supply.
The work surface should always be clean.
OWNER'S AND MAINTENANCE MANUAL Original Manual
12
Slicer ATC350 CE ESSEDUE
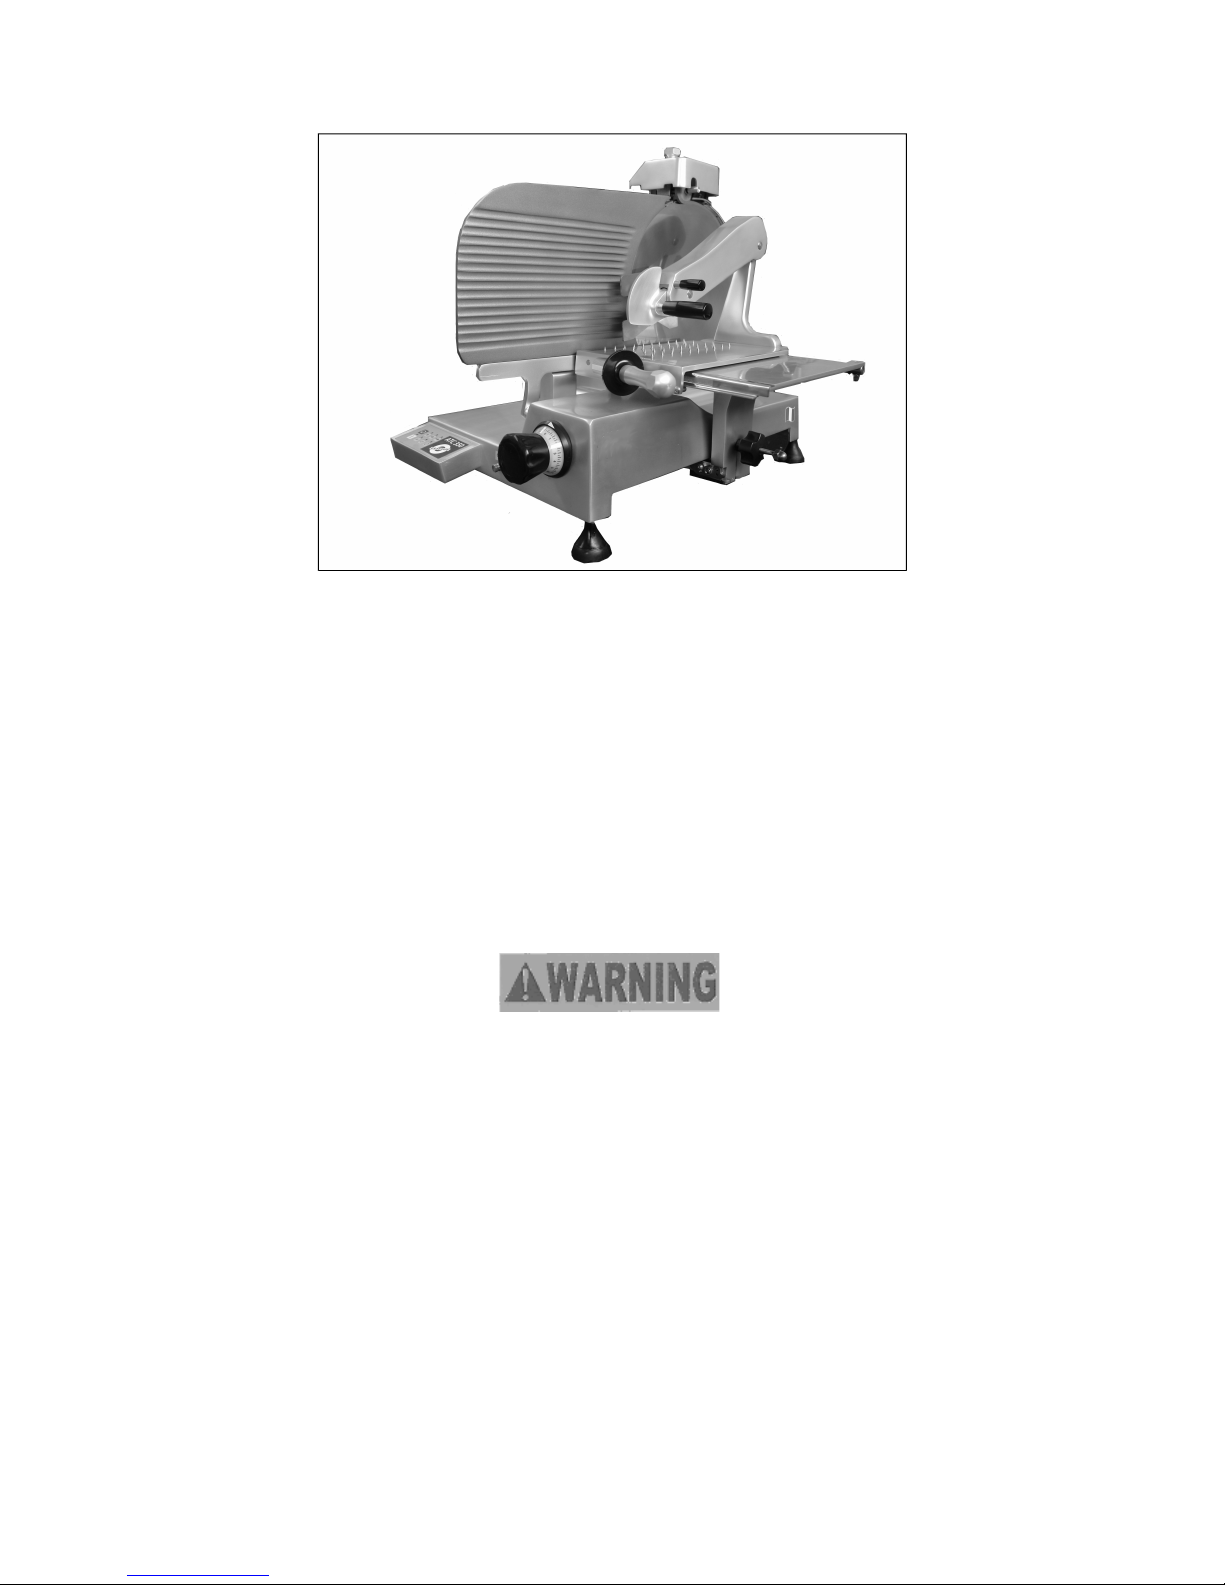
Figure 6 Slicer view
4.2 Power supply connection
The slicer must be installed the nearby socket, never operate slicer with an extension cord. Make
sure that the voltage corresponds to the data present on the data label (Fig 7) and that the plug is
proper and grounded. Make also sure that the power supply and power cord are not damaged.
•Make sure that the sharpener IS NOT in sharpening position;
•Connect the machine to power supply;
•Press On Switch on control panel: Machine starts;
•Make sure that the blade rotate counter clockwise;
•The machine is forwarded with a sharpened blade.
DO NOT tamper with, bypass, or remove any devices on the machine. Damages may occur.
4.2.1 Slicer equipped ith mono-phase motor
The slicer is equipped with a power cord 3x1 mm2 in section, 1.5 m in length and a SHUKO (or
specific to the country of destination) plug to be connected to the power supply in compliance to EC
regulations. Connect the slicer to a 230 V 50 Hz power supply, interposing a 10°, IAn = 0.03A
circuit breaker.
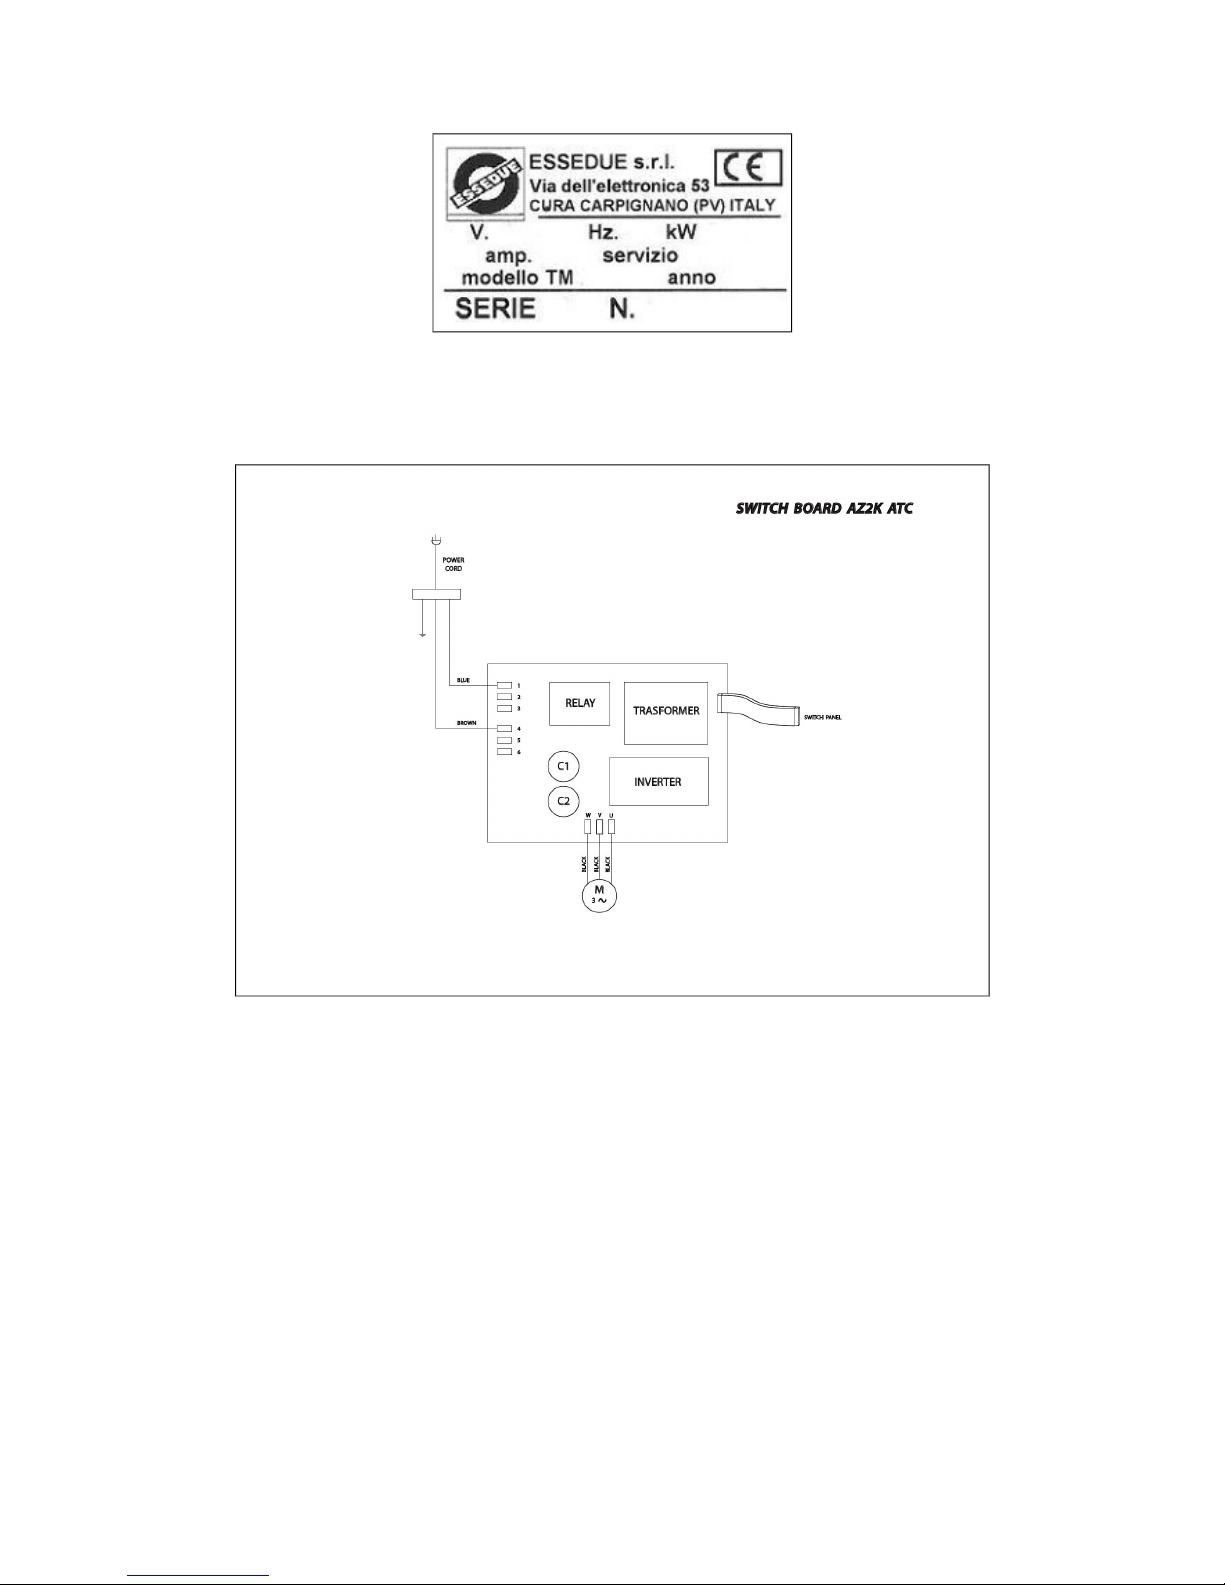
4.2.2 Slicer Data
Please contact the manufacturer for information about the slicer, always providing the serial number
and model as indicated on the data label affixed on the back of the slicer, the power cord nearby.
OWNER'S AND MAINTENANCE MANUAL Original Manual
13
Slicer ATC350 CE ESSEDUE
Figure 7 Data label
4.3 Wiring Diagram
Figure 8 Monophase wiring diagram
4.4 General operation control
Before testing make sure that the food chute is securely blocked, then test the operation following
next steps:
•Press On switch (I) (Fig 1, G) and check that the blade is in motion;
•Press Off switch (O) and check that the blade stops;
•Pull the food chute back and lower the food chute blockage device to block it and loosen
the food chute release knob;
•Lift the food chute blockage device to release the food chute
OWNER'S AND MAINTENANCE MANUAL Original Manual
14

Slicer ATC350 CE ESSEDUE
5 OPERATIN THE MACHINE
5.1 Control panel
OWNER'S AND MAINTENANCE MANUAL Original Manual
15

Slicer ATC350 CE ESSEDUE
Figure 9 Control panel
1 OFF switch
2 ON switch
3 Blade speed 160 rpm
4 Blade speed 200 rpm
5 Blade speed 240 rpm
5.2 Semiautomatic operation
Make sure that power supply corresponds to that indicated on data label fixed on the machine.
•Make sure that the slicer is switched off and turn index knob dial until O (zero);
•Pull food chute back;
•Set sliding chute 20/30 mm away from slicer table;
•Put the product to cut onto the food chute and towards the slicer table and block it with the end
weight;
•Push the sliding chute towards the slicer table;
•Turn index knob to the desired slice thickness;
•Press on switch: slicer is ready (slicer blade turns always at 200 rpm when switching on);
•Press speed switch to select the desired blade speed on control panel. It depends on the product
you want to slice;
•To operate use the handle on the front side of the food chute: apply a slight pressure on the
slicer table and press the food chute cutting zone;
NE ER catch slices with your hand. Let it drop onto the base or use an ham clamp.
•Pull the food chute back to the operator and repeat same operation up to desired slices quantity;
•In case of product misplacing during slicing operations pull ALWAYS food chute back to
operator, switch the slicer off and remove the product.
•At the end of slicing operations pull the food chute towards operator, press the off switch; when
the slicer stops, turn index knob dial until O (zero) and take the salami off the food chute.
OWNER'S AND MAINTENANCE MANUAL Original Manual
16

Slicer ATC350 CE ESSEDUE
N.B. The quality of the cut depends on the pressure exerted and on the sharpening of the blade.
When operating the slicer you must move the product only by pushing back and forth the food
chute, apply a slight pressure on the slicer table, firmly holding the end weight handle with your
right hand and NE ER put your hands nearby the blade.
5.3 Loading and slicing of the product
5.3.1 Salami chute
N.B. The product to be cut must be loaded on the food chute only with the index knob on O
(zero) and the motor stopped (Fig 10).
Proceed as follows:
•Pull the sliding chute (R) into the position of maximum distance from the slicer table (I);
•Take end weight handle (S) and at the same time press the end weight blockage handle (Q),
pulling up to lift the end weight (E);
•Load the product on the sliding chute (R) to make it rest against the slicer table (I);
•Block firmly the product on the upper side with the end weight (E), holding the end weight
handle (S), and at the same time pressing the end weight blockage handle (Q) and pushing
down;
•The product, due to its own weight, will push the sliding chute (R) towards the slicer table (I);
•Adjust desired thickness by turning the index knob (F) counterclockwise;
•Press ON switch (G) to start the slicer;
•Press speed switch on control panel (G) to select the desired blade speed;
•Hold food chute handle (J), and push food chute (D) forth;
Do not idle the slicer.
Perform the sharpening of the blade as soon as the slices have a frayed or non-uniform
surface and when you have a poor cut quality.
•Let the slices drop onto the base or use an ham clamp.
•At the end of slicing operations turn index knob dial on O (zero) and press off switch (G) to stop
the machine.
C) Sharpener
D) Food chute
E) End Weight
F) Index knob
G) Control Panel
I) Slicer Table
J) Food chute handle
L) Blade
O) Oil hole Sliding bar
OWNER'S AND MAINTENANCE MANUAL Original Manual
17
Slicer ATC350 CE ESSEDUE
P) Food chute release knob
Q) End weight blockage handle
R) Sliding chute
S) End weight handle
T) Rubber foot
Figure 10 Overview of the slicer equipped with salami chute
Figura 11 Overview of tiltable chute
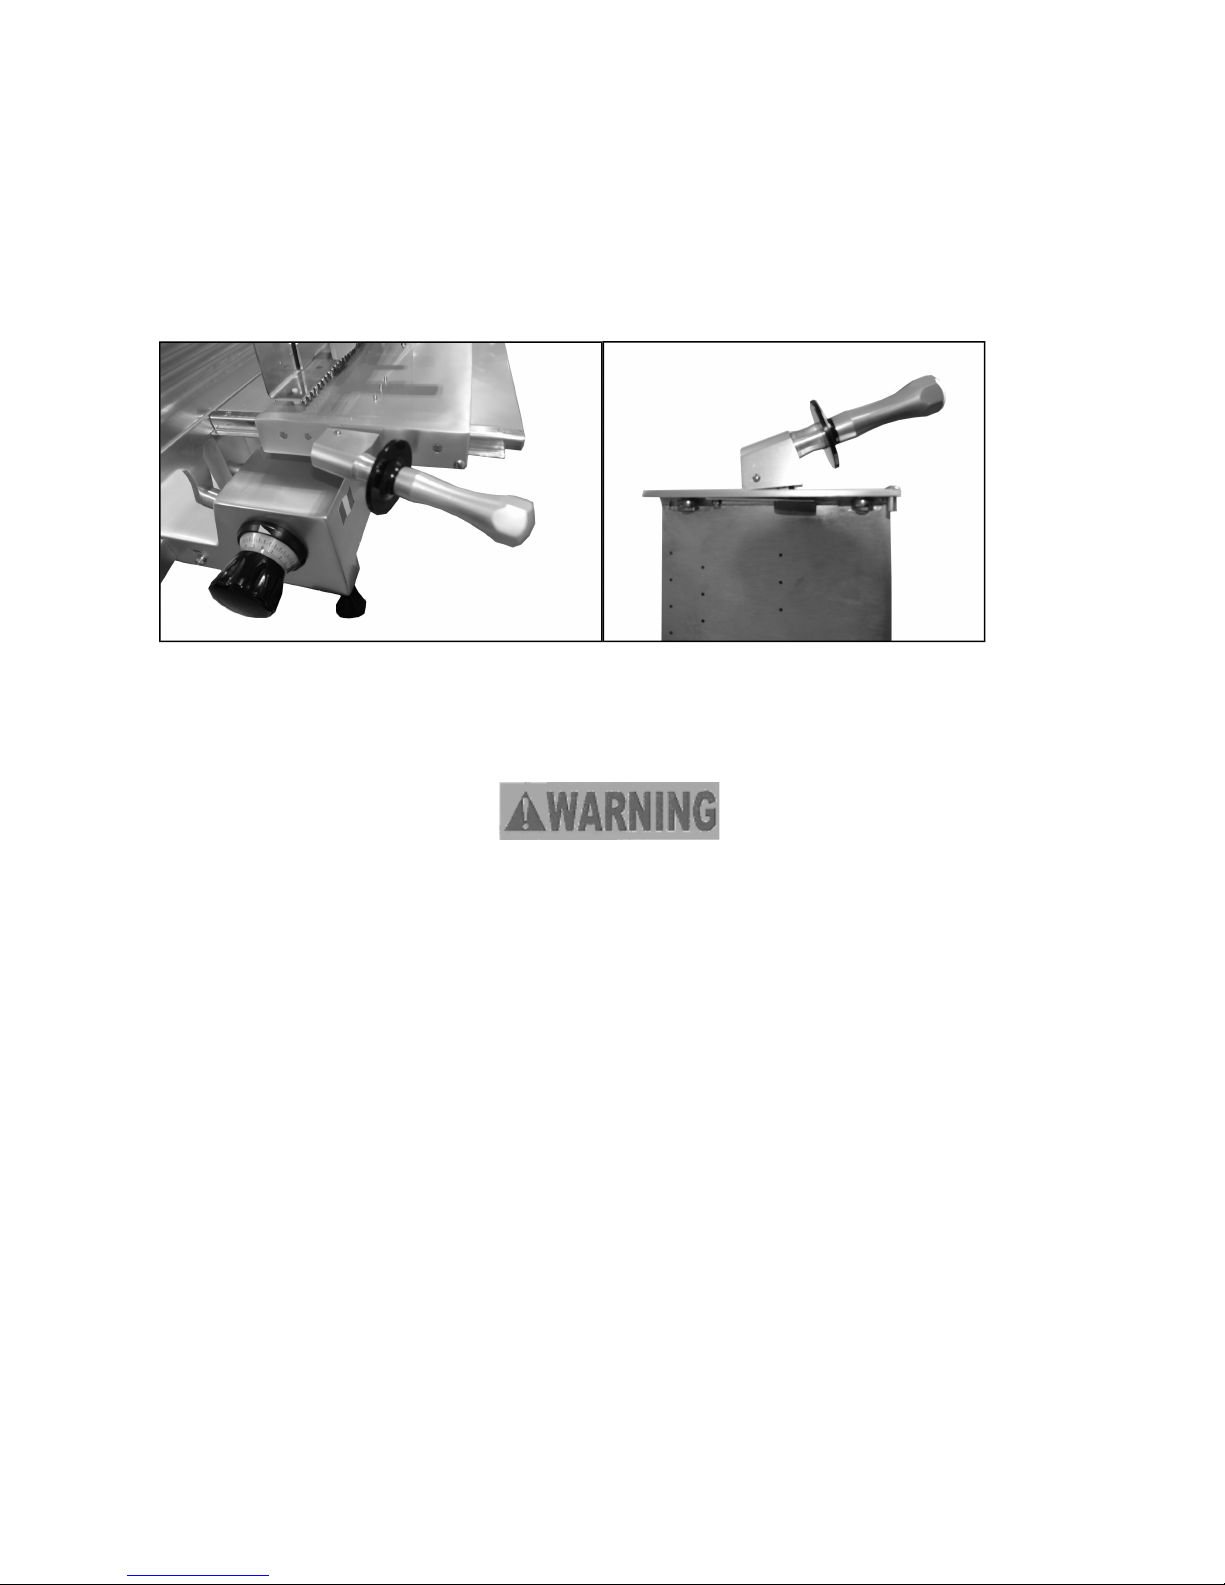
5.4 Sharpening the blade
Before sharpening make sure the slicer is turned off, turn the index knob until O (zero) and
unplug from power supply.
NE ER remove the blade when sharpening. It must be always installed.
Use only the sharpener provided with the slicer or a spare part from manufacturer.
When you notice a decrease in cutting quality or the product waste increases you must sharpen the
blade. To perform this operation, proceed as follows:
•Press off switch and make sure that slicer is turned off;
•Unplug the slicer from power supply by removing power cord;
•Carefully clean the blade from grease and any residues with a cloth soaked in a mild detergent;
NB: During following operation blade is protected. Refer to section 1.2.1 “Mechanical safety
devices”.
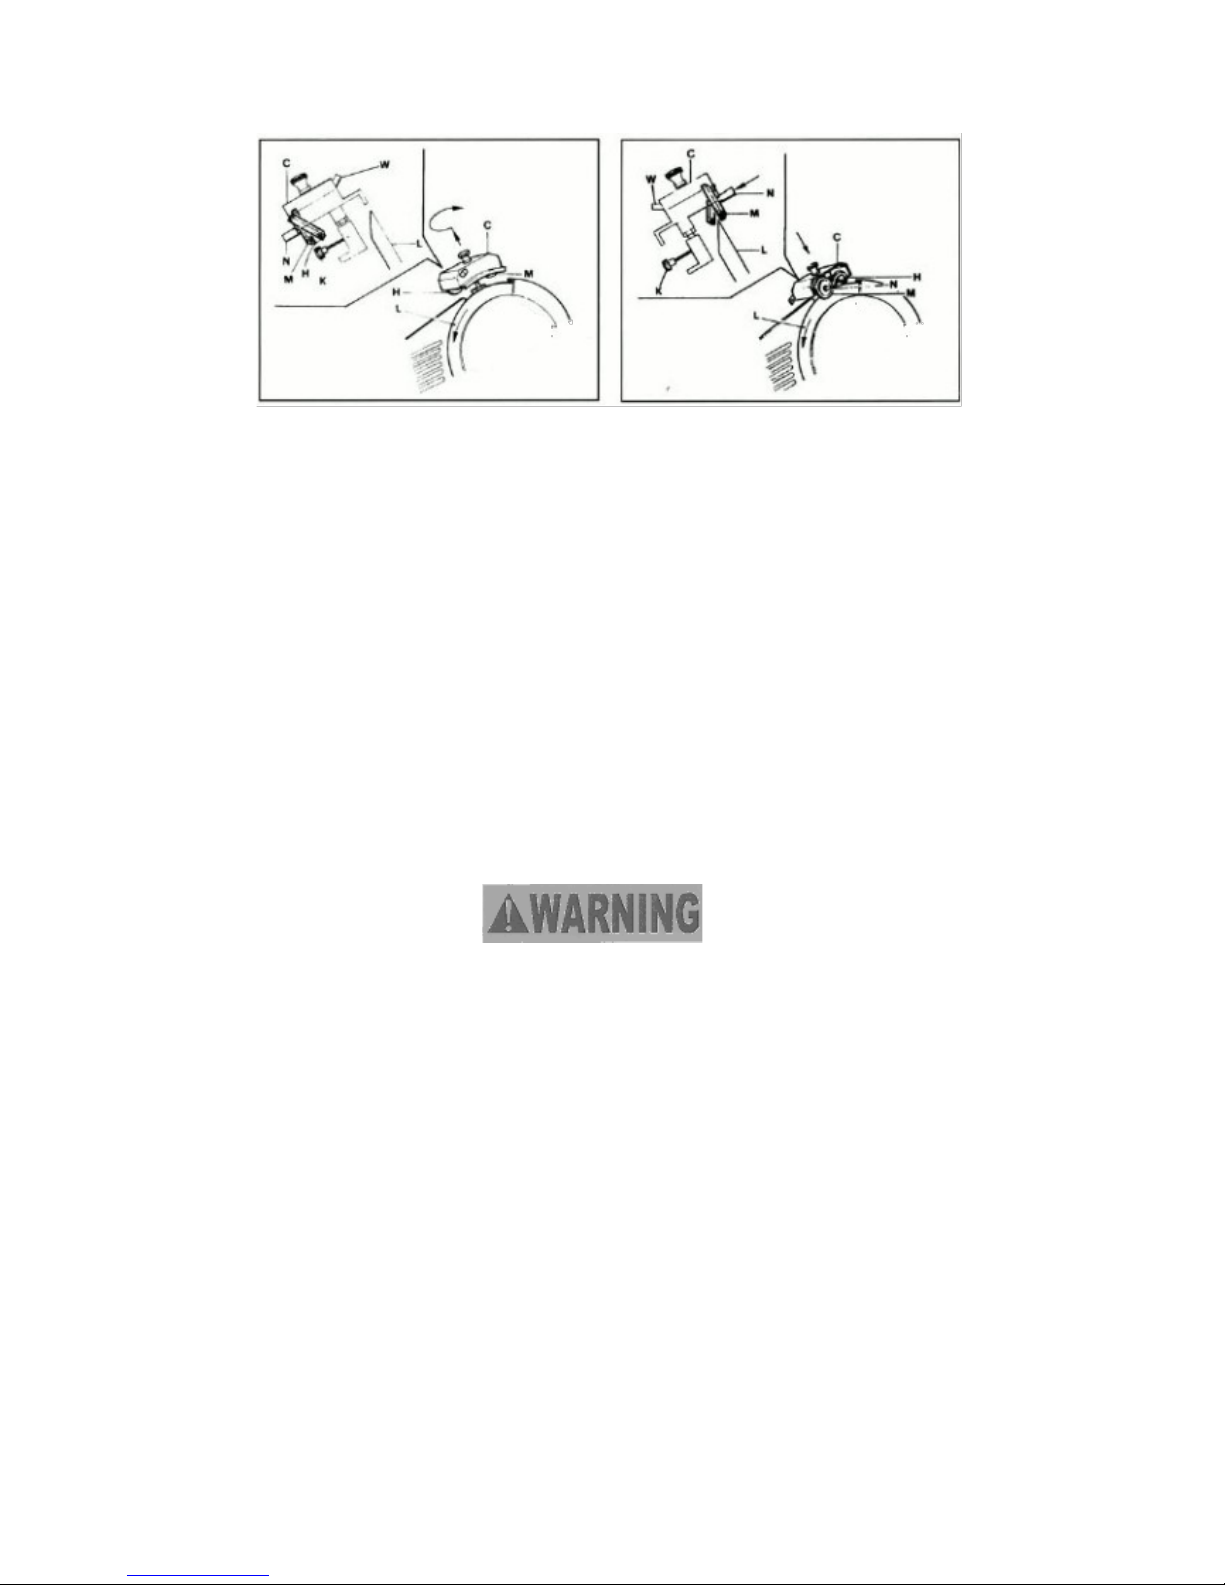
•Loosen sharpener release knob (Fig 12, );
•Lift the sharpener cover, do not remove it, and rotate 180 ° (Fig 12);
•Lower sharpener into position, with the blade fitting between the two stones and tighten the
sharpener release knob to secure the sharpener. Ensure not to touch the blade with the stones;
•Connect slicer to power supply and press the ON switch to start the machine;
•Press sharpening stone button (Fig 2, W) for 3-4 seconds; if necessary, repeat the process up to
2 times, then press truing stone button (Fig 2, N) for 1-2 seconds;
•After sharpening press OFF switch and unplug the slicer;
OWNER'S AND MAINTENANCE MANUAL Original Manual
18

Slicer ATC350 CE ESSEDUE
•Loosen sharpener release knob, lift the sharpener cover and rotate 180°, lower sharpener into
position, then tighten the sharpener release knob.
Figure 12 Sharpening: Dismounting, rotation and positioning of the sharpener
NB: After sharpening user must thoroughly clean sharpener with a mild detergent, warm water
and a brush. Refer to section 6.2.5 “Cleaning the sharpener”.
Replace worn blade when blade diameter reduces to less than 10 mm from its original
dimension or when, turning index knob dial until O (zero) blade edge is not protected by
slicer table anymore. In case of blade replacement due to wearing, please contact a “Service
Centre”.
6 CLEANIN
CE Professional slicer are equipped with electrical and mechanical safety devices for both operating
and clearing and maintenance procedures, in compliance with European safety regulations,
Machine Directive 2006/42/CE and EN 1974 Norm (Slicers. Safety and hygiene requirements)
and following updates. Nevertheless, some unavoidable RESIDUAL RISKS may remain. They are
listed in this manual following the sign WARNING! These concern the danger of injuring
resulting from handling the blade during cleaning and maintenance.
OWNER'S AND MAINTENANCE MANUAL Original Manual
19

Slicer ATC350 CE ESSEDUE
.
6.1 General information
Before cleaning make sure that the slicer is turned off and disconnected from the power
supply, and that the slicer table is completely closed with the index knob dial turned until O
(zero).
Clean the slicer after each use or at least once a day after use.
Cleaning must be carefully performed on all the food contact parts that comes in direct or
indirect (eg. flowing) contact with the product to cut.
Use only mild detergent specific for cleaning and sanification, and only a soft cloth soaked in
warm water.
N.B. User should clean the slicer before each use and after long periods of inactivity using specific
products to avoid the growth of harmful bacteria on the surface.
DO NOT put components in dishwasher.
DO NOT pressure wash or pour water on the slicer.
NE ER USE corrosive substances or solutions not specific for food contact surfaces cleaning.
DO NOT use bleach, products containing sodium hypochlorite or other caustic/strong detergents on
the slicer base or removable parts. These products will discolour and destroy the parts.
NE ER use a scrubber pad, steel wool or abrasive material. They could damage the slicer. Before
cleaning make sure that slicer is turned off, turn index knob dial until O (zero), and disconnect
slicer from power supply.
Be always alert when performing cleaning.
ALWAYS wear safety gloves. All these operations must be performed by trained and
authorised personnel.
6.2 How to clean the slicer machine
Before clearing operator must:
- Unplug the slicer from power supply;
- Turn index knob dial until O (zero), and make sure the slicer table is completely closed;
- Remove food chute.
6.2.1 Cleaning the food chute
•Turn the index knob dial until O (zero) and make sure the slicer table is completely closed;
•Unplug the slicer to disconnect it from power supply;
•Pull the food chute back;
•Lower the food chute blockage device to block it and loosen the food chute release knob;
•Lift the food chute: the index knob is now blocked (Fig 13);
•Clean food chute and slicer base using a soft cloth soaked in warm water and mild detergent;
•Remove excess of detergent using a clean cloth, then allow air dry before use.
OWNER'S AND MAINTENANCE MANUAL Original Manual
20
This manual suits for next models
18
Table of contents
Other ESSEDUE Kitchen Appliance manuals


