ET2 E42014-90 User manual
C o n t e m p o r a r y
L i g h t i n g
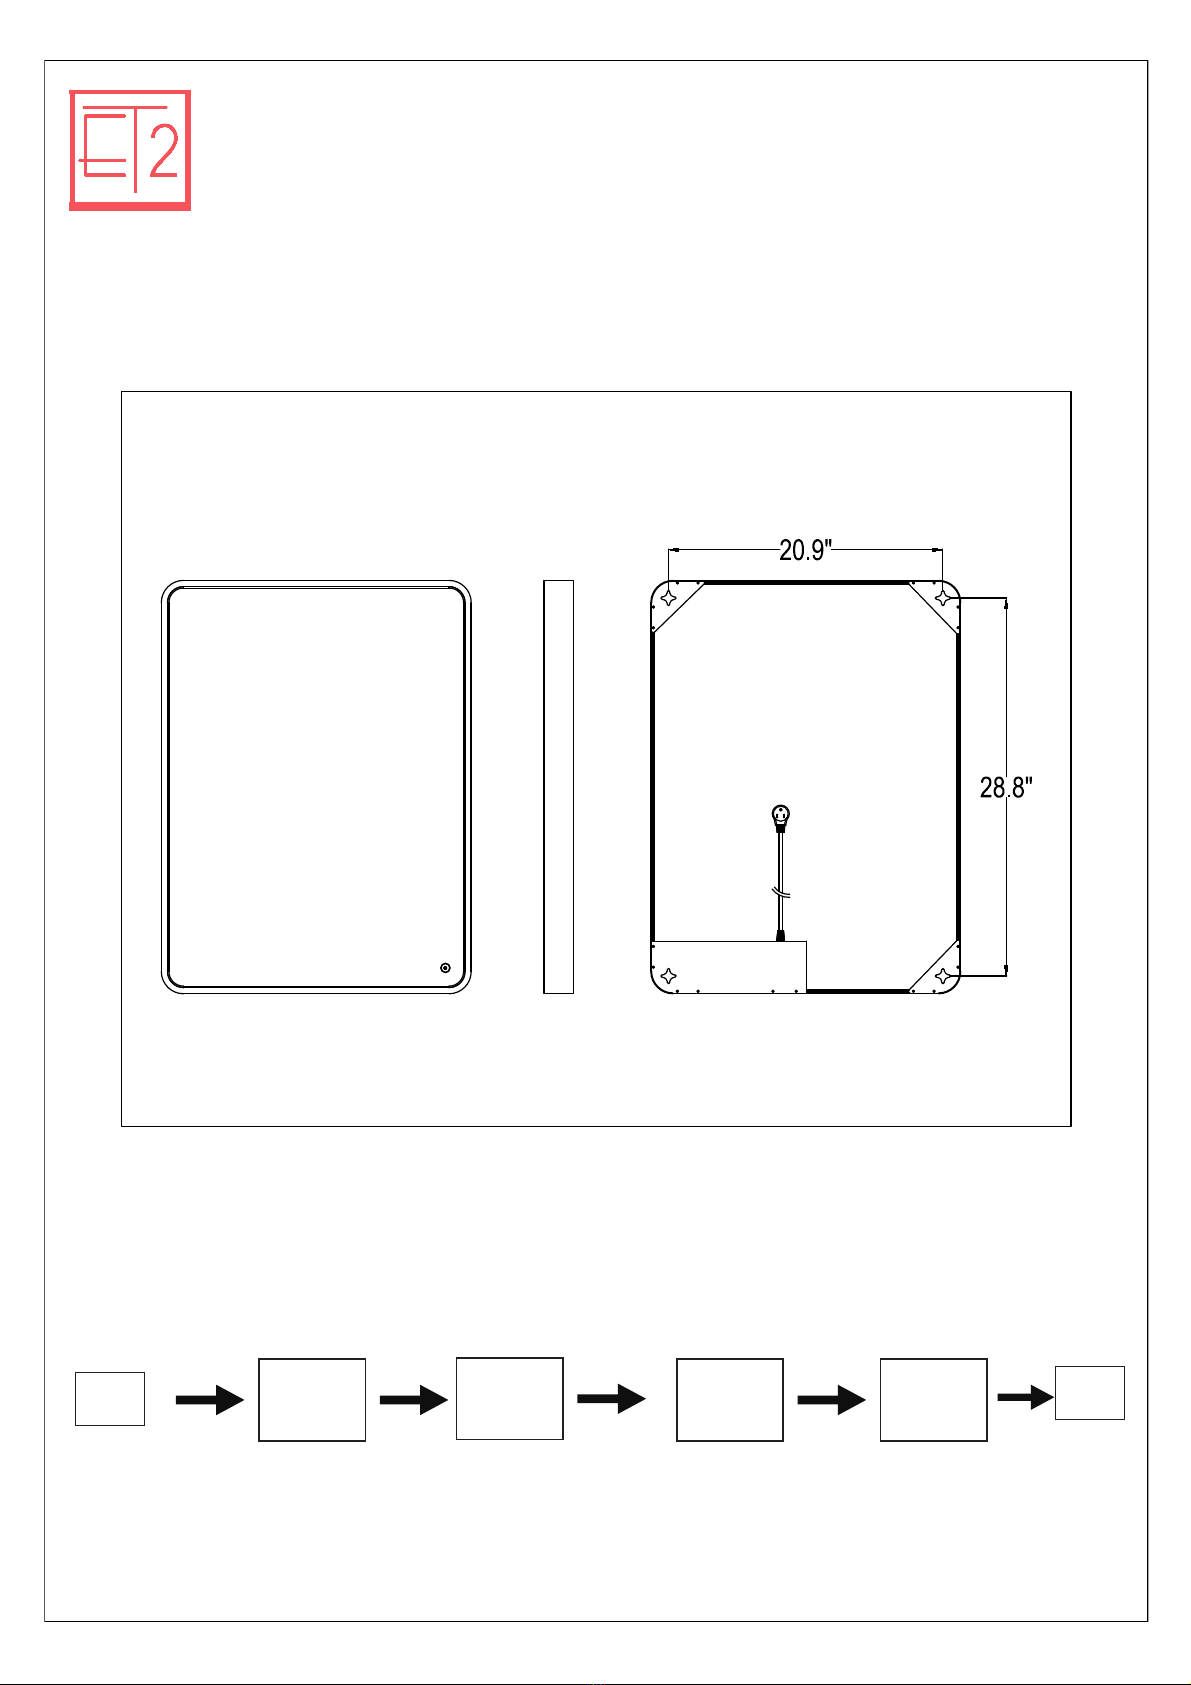
PRODUCT NAME: LED MIRROR
ITEM NUMBER: E42014-90
Please consult your electrician for installing fixture and wiring.
MADE IN CHINA
Page 1 of (4)
Light Source: Integrated LED 25W
20.9"
28.8"
Dimming and Color Temperature Change Instructions:
This LED fixture is compatible with wall dimmer switches.
Light output can ONLY be adjusted by using the wall dimmer switch.
1) To change the color temperature of the light by touching touch symbol on mirror face.
ON3000K
tap tap
6400K
4500K
tap
By wall switch
OFF
By wall switch
3000K-4500K
-6400K
circulation
General Lighting (Including AC LED)
BeforeGetting Started Antes decomenzar Avantde
commencer
Read
the
instructionscarefully
priorto
assembling
the product.
Lire attentivement les instructions avant d'assembler
leproduit
.
Lea atentamentelas instrucciones antes de
ensamblar elproducto
.
When
you open the packagewithasharptool
like
acutter
knife,
be
careful
not todamagethe
componentsinside.
Lorsque vous ouvrez lepaquet avecun outil pointu
commeun couteau de coupe, veillez ne pas
endommager les composants l'intérieur
.
Cuando abra elpaquetecon una herramienta
afilada comoun cuchillode corte,tenga
cuidado de no dañar los componentes dentro
.
Carefullyremoveall packagingmaterials
and
retain
for futureuse.
Retire
con cuidadotodos los
materiales
de
embalaje
y
consérvelos
para
usarlos
enelfuturo.
Retirezsoigneusement
touslesmatériaux
d’emballage
et
conservez-les
pour un usage
ultérieur.
Keep
allhardware
parts and
packaging
outof
reachof
small
children. Conserveztouteslespièces matériellesetles
emballages hors deportéedes petits enfants. Mantenga todaslaspiezas yembalajes de
hardware fuera delalcancedelos niños
pequeños.
Choosea
clean,level,spaciousassembly
area.
Avoid
hard
surfaces
thatmaydamagethe
product.
Choisissezune zone d'assemblagepropre, de
niveau etspacieuse. Évitezlessurfaces duresqui
pourraient endommager leproduit. Elijaunazona de ensamblajelimpia, nivelada
yespaciosa.Evitesuperficiesduras que
puedan dañar elproducto.
Ensure
thatyou
haveall required
contentsfor
completeassembly.
Assurez-vousquevousaveztouslescontenusrequis
pourl'assemblagecomplet
.
Asegúresede quetienetodosloscontenidos
necesariosparael ensamblaje completo
.
Take
carewhen
lifting.Assemble
the productin
close
proximity
towhereyouintendtopositionthe
item.
Prenezsoin de soulever. Assemblezle produit
proximitédel'endroit oùvouscomptezpositionner
l'élément.
Tengacuidadoal levantar.Ensambleel producto
cercadedonde tienela intencióndeposicionar
el artículo.
Do notovertighten thescrewsandbolts asthis
maydamagethe threads. Ne serrezpastrop les vis et les boulonscar cela
pourrait endommager lesfilets. Noaprieteexcesivamentelostornillos y
pernos, yaque estopuede dañar los hilos.
Do notlet
children
playwiththisproduct. No permitaque losniños
jueguen
con este
producto. Ne
laissez
pasles
enfants
joueravecce
produit.
Risk ofsuffocation!
Keepanypackaging
materials
awayfrom
children.
Riesgo de sofocación!Mantengalos
materialesdeembalajelejosdelosniños. Risque d’asphyxie!Tenez tousles
matériauxd’emballage àl’écartdes
enfants
GENERAL Lighting
Instructions
Instrucciones
de
lámparas
GENERAL
Instructions générales
d’éclairage
Carefully
read through the
instruction
sheet
before
assembly
and usingthe product. Lea
cuidadosamente
lahojade
instrucciones
(si
fue
proporcionada)
antesde
armar
y
utilizar
la
lámpara.
Avant
de procéder
l'assemblage
et
l'utilisation de la
lampe,lisezattentivement
le
mode
d'emploi.
Caution
thereisariskofshock.
Disconnect
frompower sourcebefore
assembling
or
cleaning.
Peligro
por
descargaeléctrica.Desconecte
la
lámpara
de la
fuente
de
electricidad
antesde
armarla
olimpiarla.
Pour
éviter
tout
risque
d'électrocution,
débranchez
lalampede laprise
électrique
avant de procéder
l'assemblage
ou au
nettoyage
de lalampe.
Switchoff,unplugand
allow
bulbtocool
before
replacing
bulbor cleaning.
Apáguela,desenchúfela
ydejeque la
bombilla
se
enfríe
antesde
reemplazarla
olimpiarla.
Avant
de
remplacer
ou de
nettoyer
l'ampoule,
éteignez
et
débranchez
la
lampe,.
Only
usethe
recommended
bulbtype and do
not exceedthe
maximum
wattageasit could
causefire.
Solo
utilice
eltipode
bombillarecomendado
y
no excedalapotencia
eléctricamáxima
yaque
puede
causar
un incendio.
Afin
d'éviter tout
risque
de feu,
utilisez
le
type et la
puissance
d'ampoule
recommandés.
Do notplug the productinifcordis
tornor frayed. No conectela
lámpara
sielcable
eléctrico
está
dañadoodeshilachado. Ne
branchez
paslalampesison
cordon
d’alimentation
est
déchiré
ou
effiloché
Cleaning &
Maintenance
Limpiezay
mantenimiento
Nettoyageet
maintenance
Onpolishedfinishes,oftenusing talc powder
reducesthe appearanceoffingerprintsand
other smudges.
Enacabados pulidos,amenudo usando
polvode talcoreducelaapariciónde huellas
dactilares yotras manchas.
Sur lesfinitions polies,souvent enutilisantla
poudre de talcréduitl’apparencedes
empreintesdigitaleset d’autrestaches.
For respectiveshade surfaces,usethe
appropriatecleansers,i.e. glasscleaner,
acrylicpolish, andwood polish.
Para lasrespectivassuperficiesdesombra,
utilicelos limpiadoresapropiados, es decir,
limpiador de vidrio,esmalteacrílicoypulido
de madera.
Pour les surfaces d’ombrage respectives,
utilisezlesnettoyantsappropriés, c’est- -dire
lenettoyantpour vitres, leVernis acrylique et
levernis bois.
Clean withsoftclothand amilddetergent.
DOnot useabrasivecleaner. Utiliceun trapo limpio,suavey secoque no
rayenimanchelasuperficiecuando quiteel
polvo.
Nettoyer avec un chiffondouxet un détergent
doux. N'utilisezpas de nettoyantabrasif.
Periodically(every
90
days)
makesurethat
the screwsare
fully
tightened.
Periódicamente(cada
90
días)asegúrese
de
que los
tornillos
esténbienapretados.
Périodiquement(tous
les90
jours),
assurez-
vous que lesvissontbienserrées.
Prolonged exposure
toheatsourcesmay
cause
glazing,melting
and scorching,or
even
causecolor tofade.
La
exposiciónprolongada
alas
fuentes
decalor
causa
cristalización,derretimiento,quemadura
y
decoloración
deltapizado.
Siletissusubitune
expositionprolongée
auxsourcesde
chaleur,il
pourrait
commencer
reluire,
roussir,
s’estomperou même sedécolorer.
PG 2

Page 3 of (4)
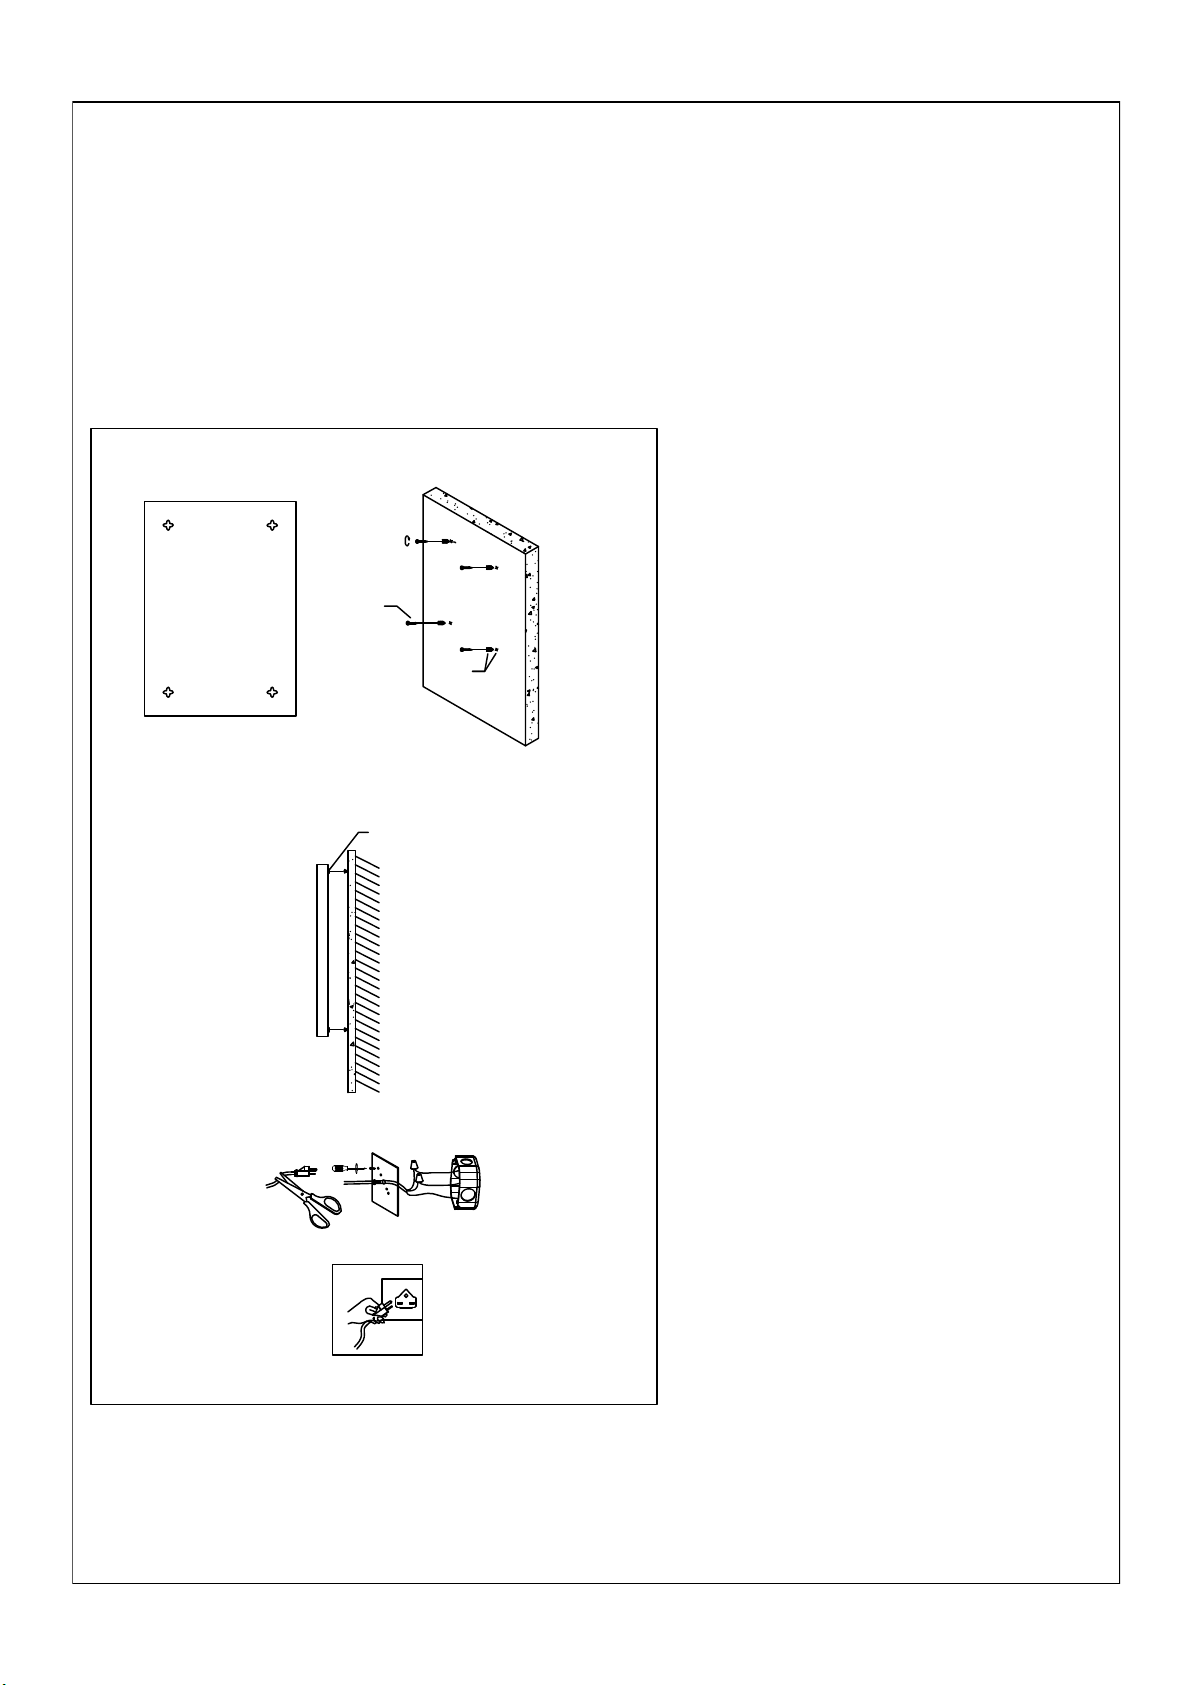
x4
LED MIRROR
ANCHOR
WIRE NUT
SCREW
x3
x4
x1
LED DRIVER
PYB050V0120LXD1P
Length 1.4'' (36)
St4 *30
Cleaning & Care:
Clean glass with household glass cleanser.
Step 4
C
Step 5
Step 2 - Step 4
A
B
WALL TEMPLATE
4PCS
4PCS
MARK
1.) Place the wall template or the
mirror on the wall in the location
selected for the mirror. Make sure the
wall template or mirror is level and in
the correct position. Secure the wall
template to the wall then mark location
of the 4 wall anchors(A) as indicated
on the template from the wall.
Remove the wall template from the
wall.
2.) Create holes on wall marks and
screw the (X4) wall anchors (A).
3.) Secure (X4) nails (B) into (X4) wall
anchors (A).
4.) Hang (X4) wall hangers (C) on the
back of mirror onto (X4) nails (B). If
wall is not mounted parallel to floor,
repeat step 4.
5.) Plug cord into closest power outlet.
OR before step 5, cut the plug and
connect the wire with junction box
wire.
*IMPORTANT SAFETY INSTRUCTIONS
This mirror has a 3 pins plug, once the
plug is cut, the 3 core
wire(phase/neutral/ground) will be
exposed then can connect with
phase/neutral/ground which come out
from junction box
Step 1
IMPORTANT:
-Turn off the power at the main fuse or circuit breaker box before starting installation
-This mirror can be mounted over an electrical outlet box or on the wall and
plugged into an outlet
-Carefully remove all parts from the box, and place on a flat surface. Throughout
the assembly, be careful to avoid scratching the surface of the mirror.
MADE IN CHINA
Page 4 of (4)
This manual suits for next models
1
Other ET2 Indoor Furnishing manuals

Popular Indoor Furnishing manuals by other brands


Furniture of America
Furniture of America CM3882PC - 2PK Assembly instructions

WASHTOWER
WASHTOWER 70-183-17 Assembling Instruction

DREAMS
DREAMS Angel manual

IKEA
IKEA FLÄRKE BOOKCASE 23X67" instructions

Argos
Argos HOME LARGE TRESTLE TABLE DESK Assembly instructions

Office Star Products
Office Star Products S2721 operating instructions


