EtiamPro ECAMIP801 User manual


ECAMIP801·Quick Start Guide
Regulatory Information
FCC Information
Please take attention that changes or modification not expressly approved by the party
responsible for compliance could void the user’s authority to operate the equipment.
FCC compliance: This equipment has been tested and found to comply with the limits
for a Class A digital device, pursuant to part 15 of the FCC Rules. These limits are
designed to provide reasonable protection against harmful interference when the
equipment is operated in a commercial environment. This equipment generates, uses,
and can radiate radio frequency energy and, if not installed and used in accordance with
the instruction manual, may cause harmful interference to radio communications.
Operation of this equipment in a residential area is likely to cause harmful interference
in which case the user will be required to correct the interference at his own expense.
FCC Conditions
This device complies with part 15 of the FCC Rules. Operation is subject to the following
two conditions:
1. This device may not cause harmful interference.
2. This device must accept any interference received, including interference that may
cause undesired operation
EU Conformity Statement
This product and - if applicable - the supplied accessories too are marked
with "CE" and comply therefore with the applicable harmonized European
standards listed under the EMC Directive 2014/30/EU, the RoHS Directive
2011/65/EU.
2012/19/EU (WEEE directive): Products marked with this symbol cannot be
disposed of as unsorted municipal waste in the European Union. For proper
recycling, return this product to your local supplier upon the purchase of
equivalent new equipment, or dispose of it at designated collection points.
2006/66/EC (battery directive): This product contains a battery that cannot
be disposed of as unsorted municipal waste in the European Union. See the
product documentation for specific battery information. The battery is
marked with this symbol, which may include lettering to indicate cadmium
(Cd), lead (Pb), or mercury (Hg). For proper recycling, return the battery to your supplier
or to a designated collection point.
Industry Canada ICES-003 Compliance
This device meets the CAN ICES-3 (A)/NMB-3(A) standards requirements.
Warning:
This is a class A product. In a domestic environment this product may cause radio
interference in which case the user may be required to take adequate measures.

ECAMIP801·Quick Start Guide
Safety Instruction
These instructions are intended to ensure that user can use the product correctly to
avoid danger or property loss.
The precaution measure is divided into Warnings and Cautions:
Warnings: Neglecting any of the warnings may cause serious injury or death.
Cautions: Neglecting any of the cautions may cause injury or equipment damage.
Warnings
Laws and Regulations
The device should be used in compliance with local laws, electrical safety regulations,
and fire prevention regulations.
Electrical Safety
CAUTION: To reduce the risk of fire, replace only with the same type and rating of fuse.
This equipment shall be installed incorporated with UPS to avoid the risk of restart.
Battery
This equipment is not suitable for use in locations where children are likely to be
present.
CAUTION: Risk of explosion if the battery is replaced by an incorrect type.
Improper replacement of the battery with an incorrect type may defeat a safeguard (for
example, in the case of some lithium battery types).
Do not dispose of the battery into fire or a hot oven, or mechanically crush or cut the
battery, which may result in an explosion.
Do not leave the battery in an extremely high temperature surrounding environment,
which may result in an explosion or the leakage of flammable liquid or gas.
Do not subject the battery to extremely low air pressure, which may result in an
explosion or the leakage of flammable liquid or gas.
Dispose of used batteries according to the instructions.
L’utilisation ou le remplacement inadéquats de la pile peuvent entraîner un risque
d’explosion. Remplacez-la par le même type ou l’équivalent du même type seulement.
Jetez les piles usagées conformément aux directives fournies par le fabricant de la pile.
Warnings Follow
these safeguards to
prevent serious
injury or death.
Cautions Follow these
precautions to prevent
potential injury or
material damage.

ECAMIP801·Quick Start Guide
Cautions
Fire Prevention
No naked flame sources, such as lighted candles, should be placed on the equipment.
The serial port of the equipment is used for debugging only.
Hot Surface
CAUTION: Hot parts! Burned fingers when handling the parts.
This sticker is to indicate that the marked item can be hot and should not
be touched without taking care. Wait one-half hour after switching off
before handling parts.
The device with this sticker is intended for installation in a restricted access location.
Access can only be gained by service persons or by users who have been instructed
about the reasons for the restrictions applied to the location and about any precautions
that shall be taken.
Installation
Install the equipment according to the instructions in this manual.
To prevent injury, this equipment must be securely attached to the ceiling/wall in
accordance with the installation instructions.
Be sure that there is enough space to install the device and accessories.
Make sure that the wall is strong enough to withstand at least 8 times the weight of the
device and the mount.
Make sure that the power has been disconnected before you wire, install, or
disassemble the device.
Transportation
Keep the device in original or similar packaging while transporting it.
Do not drop the product or subject it to physical shock.
Power Supply
The power source should meet limited power source or PS2 requirements according to
IEC 60950-1 or IEC 62368-1 standard.
Refer to the device label for the standard power supply. Please make sure your power
supply matches with your device.
Use a power adapter provided by qualified manufacturers. It is recommended to provide
an independent power adapter for each device as adapter overload may cause
over-heating or a fire hazard.
System Security
Please understand that you have the responsibility to configure all the passwords and
other security settings about the device and keep your username and password.

ECAMIP801·Quick Start Guide
Maintenance
If the product does not work properly, please contact your dealer or the nearest service
center. We shall not assume any responsibility for problems caused by unauthorized
repair or maintenance.
A few device components (e.g., electrolytic capacitor) require regular replacement. The
average lifespan varies, so periodic checking is recommended. Contact your dealer for
details.
Cleaning
Please use a soft and dry cloth to clean the interior and exterior surfaces. Do not use
alkaline detergents.
Using Environment
When any laser equipment is in use, make sure that the device lens is not exposed to
the laser beam, or it may burn out.
Do not aim the lens at the sun or any other bright light.
To avoid heat accumulation, good ventilation is required for a proper operating
environment.
DO NOT expose the device to extremely hot, cold, dusty, corrosive, saline-alkali, or damp
environments. For temperature and humidity requirements, see device specification.
DO NOT expose the device to high electromagnetic radiation.
Illuminator
Make sure that there is no reflective surface too close to the device lens. The light from
the device may reflect back into the lens causing reflection.
The beam of the light at the distance of 200 mm is classified as Risk Group 1 (RG1).
Possible hazardous optical radiation emitted from this product. DO NOT stare at
operating light source. May be harmful to the eyes.
If appropriate shielding or eye protection is not available, turn on the light only at a safe
distance or in the area that is not directly exposed to the light when installing or
maintaining the device.
Emergency
If smoke, odor, or noise arises from the device, immediately turn off the power, unplug
the power cable, and contact the service center.
Time Synchronization
Set up device time manually for the first time access if the local time is not synchronized
with that of the network. Visit the device via web browser/client software and go to
time settings interface.

ECAMIP801·Quick Start Guide
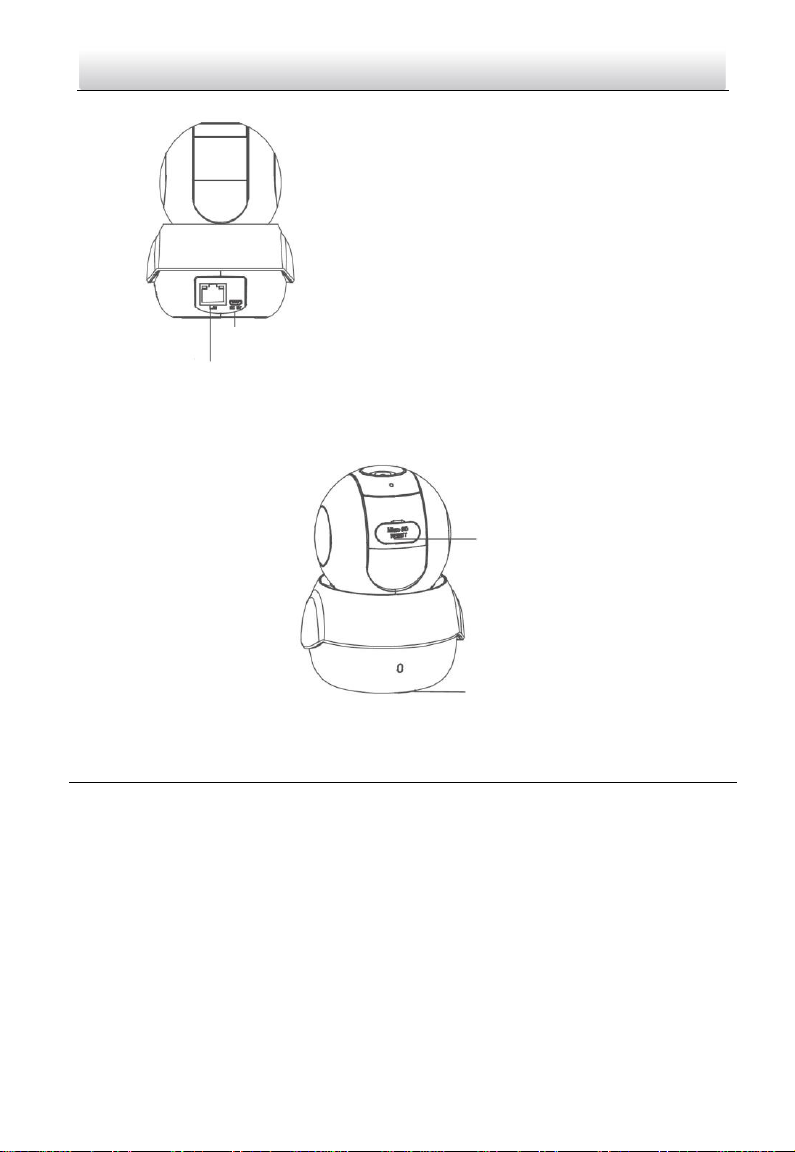
Speaker
1Appearance
Name
Description
Status
indicator
•Solid red: camera starting up.
•Slow-flashing red: Wi-Fi connection failed.
•Fast-flashing red: camera exception (e.g. microSD card error).
•Fast-flashing blue: camera ready for Wi-Fi connection.
•Slow-flashing blue: camera running properly.
Lens
Microphone
Status
indicator
ECAMIP801·Quick Start Guide
Name
Description
Power input
Micro USB for power supply, 5 VDC. Plug the power cable into the
power input interface to power on the camera.
Memory card
slot
For microSD card. If a memory card is used, video files will be stored in
the memory card. You would need to initialize it in the Guarding Vision
app.
RESET
Hold down the button for 4 seconds when the camera is running.
Power input
RJ-45 self-adaptive
Ethernet port
Memory card slot
RESET
Silicone gasket
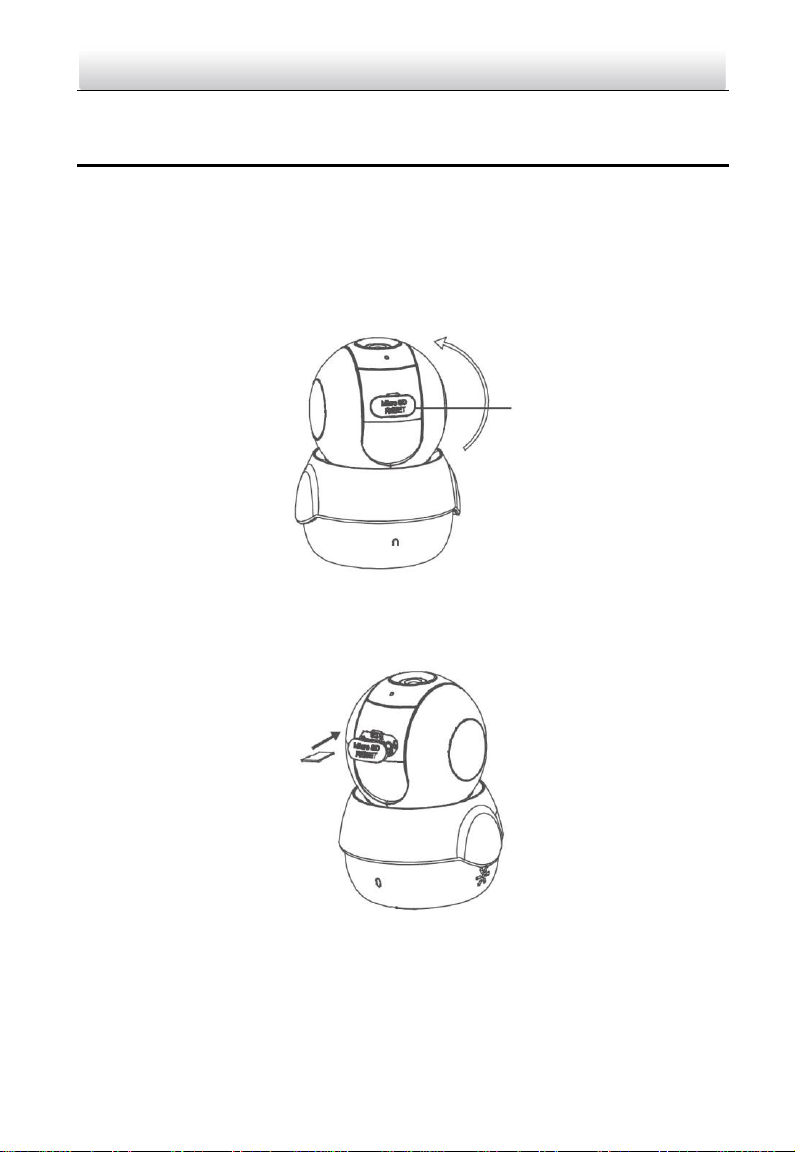
ECAMIP801·Quick Start Guide
2Installation
2.1 Install the Memory Card
1. Adjust the tilting position of the camera to expose the removable cover.
2. Open the cover to expose the memory card slot and insert the memory card.
3. Re-install the cover.
Removable cover

ECAMIP801·Quick Start Guide
2.2 Install the Camera
1. Take out the drill template from the package. Paste it to the desired mounting place.
2. Drill two screw holes according to the drill template if you sue expansion screws.
3. Take out the adapter from the package. Align the screw holes and fix the adapter.

ECAMIP801·Quick Start Guide
4. Fix the adapter into the camera bottom and rotate the camera base clockwise to get
it fixed.
2.3 Adjust the Surveillance Angle
1. Rotate the camera body to adjust the panning position.
2. Move the dome drive upwards or downwards to adjust the tilting position.
Dome drive
1. Rotation
2. Tilt: -10° to 90°
Camera body

ECAMIP801·Quick Start Guide
3Operation
3.1 Power On the Camera
Connect the camera to the power adapter with the micro-USB cable and then plug the
power adapter into the power outlet. When the blue light flashes, the camera is
powered on. You can set the Wi-Fi connection.
3.2 Guarding Vision Setup
1. Connect your mobile device to Wi-Fi.
2. Download and install the Guarding Vision app by searching “Guarding Vision” in the
App Store or Google Play™. If you want to use the AP function, download Guarding
Vision 3.10.0 or above.
or
3. Launch the app and register for a Guarding Vision user account.
Power outlet
Micro-USB cable

ECAMIP801·Quick Start Guide
3.3 Add the Camera to Your Guarding Vision Account
NOTE: Start the adding process only when the indicator flashes blue.
1. Connect your mobile phone to a Wi-Fi (5G Wi-Fi is not supported yet).
2. Log into the Guarding Vision app.
3. In the Home page, tap “+” on the upper-right corner to add a camera.
4. Scan the QR code on the bottom of the camera.
5. Follow the prompts to set the network connection and add the camera to your
Guarding Vision account. (Locate the camera within 3 meters from the router when
setting up the Wi-Fi.)
4Guarding Vision
With the Guarding Vision service, you will be able to use the functions of this product
(including, but not limited to, live view, and remote playback), which depend on the
Internet and telecom value-added services.
4.1 Live View
Launch the Guarding Vision app and to enter the live view of the connected devices.

ECAMIP801·Quick Start Guide
4.2 Recording
1. Check the memory card status by tapping on the Storage Status in the Device
Settings interface.
2. If the memory card status displays as Uninitialized, tap to initialize it. The status will
then change to Normal. You can then start recording any event-triggered video in
the camera such as motion detection.
4.3 Playback
Launch the Guarding Vision app, tap a connected device and tap the Gallery button to
play back.
4.4 Alarm Notification
Launch the Guarding Vision app and tap Message to see the alarm messages.
Made in PRC
Imported by Velleman Group nv
Legen Heirweg 33, 9890 Gavere, Belgium
www.velleman.eu
Table of contents


