ETNA AFI8532ZT User manual

INSTRUCTIONS FOR USE
ANLEITUNG
DISHWASHER
GESCHIRRSPÜLER
AFI8532ZT

EN User instruction EN 3 - EN 25
DE Anleitung DE 3 - DE 25
Pictograms used - Benutzte Piktogramme
Important information - Wissenswertes
Tip - Tipp

EN 3
CONTENTS
Your dishwasher
Introduction 4
Description
Control panel 5
Interior 6
Operation
Switching on 7
Cycle selection table 9
Regeneration salt (water softener) 10
Reset 11
Setting the water hardness 11
Rinse agent reservoir 11
Dishwasher detergents 13
Loading
Loading the baskets 15
Damage to glassware and other crockery 17
Maintenance
Filter system 18
Cleaning the spray arms 19
Cleaning the door 19
Errors
What should I do, if... 20
Interference table 20
Error codes 22
Technical data
23
Appendix
Disposal 24

EN 4
Introduction
You have opted to purchase an Etna dishwasher.
Optimum user comfort and easy operation were paramount during
the development of this product.
This manual describes how you can get the most out of your
dishwasher. It provides you with information on how to operate the
appliance, as well as background information about how it works.
You will furthermore also find maintenance tips.
The safety instructions that are relevant during the installation are
included in the installation guide. This is intended for the installation
technician.
Read this manual before using the appliance.
Keep this manual in a safe place so that the next possible user can also
benefit from it.
Before use, read the separate safety
instructions first!
YOUR DISHWASHER

EN 5
DESCRIPTION
Control panel
1. On/Off button
2. Program button
3. Test delayed start time
4. Water softener/detergent/end program indication

EN 6
Interior
1. upper basket
2. upper spray arm
3. lower basket
4. lower spray arm
5. sieves
6. type plate
7. operating panel
8. washing product and detergent reservoir
9. cutlery basket
10. salt reservoir
11. guide rail top basket
12. turbo drying unit
2
5
7
4
6
8
9
10
3
1
11
12
DESCRIPTION

EN 7
OPERATION
Switching on
• Open the door to the dishwasher.
• Press the ‘on-off’ button (1) to switch on the device.
The check light End Program (4) is on |
• Select the desired program (see ‘program selection table’).
Select a cycle using the programming button (2).
The check light that is part of the selected program is on.
• Close the door to the dishwasher.
The dishwasher will automatically start running the selected cycle.
Delayed start time
If you want the dishwasher to switch on at a later time, you can used
the ‘delayed start’ button (3). You can choose between a delay time of
3, 6 or 9 hours. Each press of the button (3) changes the delay time.
The indicator of the selected delay time is on.
Then select the desired program and close the door of the dishwasher.
Pre-rinse
The pre-rinse program helps you improve the cleaning result for extra
dirty dishes. You can set this program both independently from and in
combination with another program.
Indicators (4)
• Water softener.
The indicator shows that you have to fill the salt container with
regeneration salt.
• Detergent.
The indicator shows that you have to fill the detergent reservoir.
• End program.
The indicator shows that the washing program has finished.
In addition, you will hear a sound signal five times.

EN 8
Stopping or changing a wash cycle
Open the door.
Press and hold the programming button (3) for more than 3 seconds.
The ‘End Program’ indicator is flashing.
Close the door of the dishwasher.
The machine pumps out for about 30 seconds Following the end of this,
a sound signal will click 5 times and the indicator shows that the program
has finished.
You can now select the desired program again (see page xx ‘program
selection table’). Now close the door.
Note! A cycle that has already begun can only be changed in the start-
up phase. After this, the detergent will be sprayed all over the dishes or
the machine may have already pumped out the water. In that instance,
you must refill the detergent compartment (see section on Dishwasher
detergent).
Warning!
Opening the door fully during the wash cycle is dangerous. You may be
splashed with hot water from the machine.
Following the end of the wash cycle
After the washing program has finished, the ‘End program’ indicator
is flashing and a sound signal will click 5 times. Open the door of the
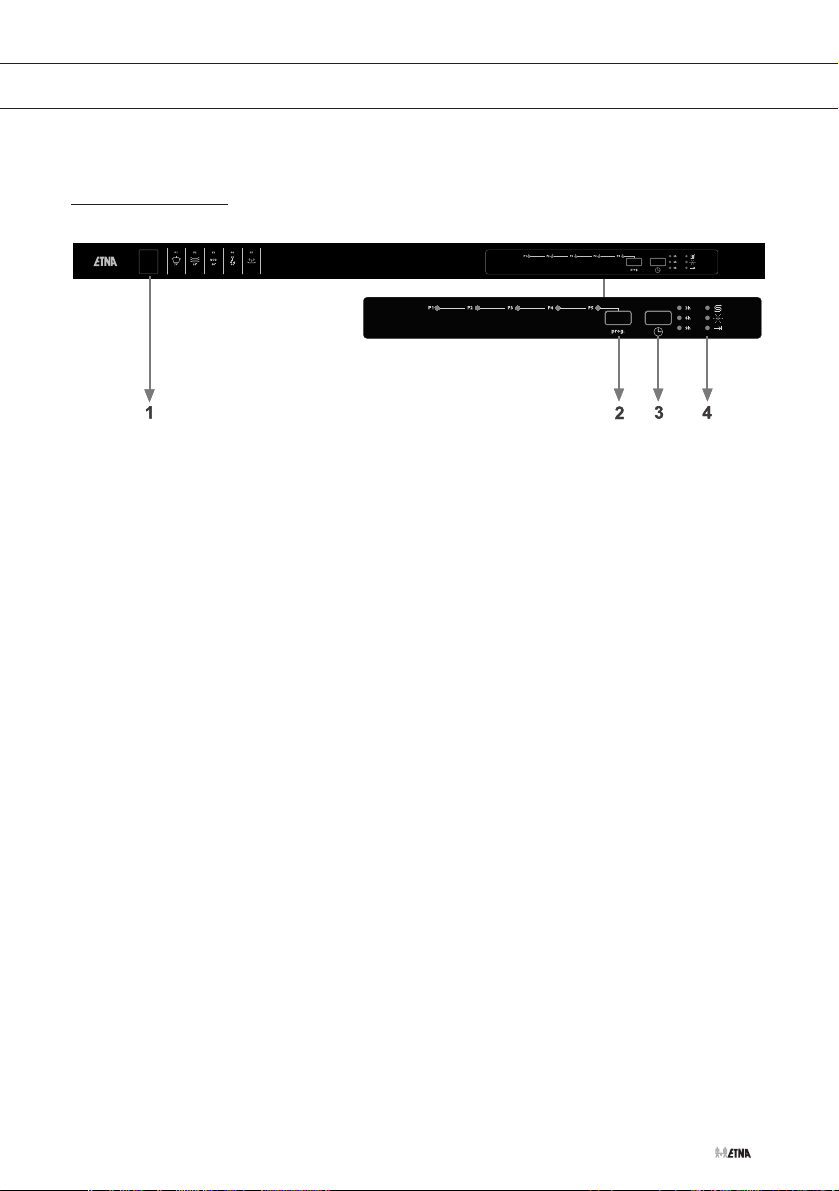
dishwasher Switch off the device with the on/off button (1).
Wait a few minutes before unloading the dishwasher. The dishes
and cutlery will still be very hot immediately following the end of the
cycle. There is a chance that dishes may break as a result of the
heat. Moreover, the dishes dry better when allowed to stand for a few
minutes.
Flood protection switch
Your dishwasher is fitted with a safety switch that prevents too much
water from running into the appliance. The safety switch closes the
inlet valve and instructs the dishwasher to pump out the surplus
water. If there is water in machine (due to too much water being fed in
previously, or as a result of a leak), this must first be removed before the
appliance is switched on again.
OPERATION

EN 9
OPERATION
Cycle selection table
Program Cycle selection information Description of
cycle
Detergent
pre/main
Time
(min.)
Energy
(KWh)
Water
(L)
Intensive Heavily soiled dishes, such as
dishes pans, casseroles, plates
plates with dried-on leftover food.
Prewash
Main wash (70 °C)
Cold Rinse
Hot rinse
Dry
5/25 gr. 127 1.55 16.5
50 minutes Daily dishes in 50 minutes. For
day-to-day dishes, such as
lightly soiled or normal plates
and pans.
No drying.
Main wash (65 °C)
Cold Rinse
Hot rinse
5/25gr. 50 1.35 12.7
Eco* This is standard programme, it is
suitable to clean normally soiled
tableware and it is the most
efficient programme in terms of
its combined energy and water
consumption for that type of
tableware.
Prewash
Main wash (50 °C)
Cold Rinse
Hot rinse
Dry
5/25 gr. 187 0.90 12.0
Quick Lightly soiled dishes, such as
glasses, crystal and fragile
porcelain. No drying.
Main wash (40 °C)
Cold Rinse
Hot rinse
25 gr. 30 0.90 12.4
Prewash To rinse dishes that you plan to
wash later that day.
Prewash 15 0.02 4.5
*EN 50242: This is a test cycle. The information for a comparison test in
accordance with EN 50242 is as follows:
• Capacity: 12 place settings
• Position of top basket: wheels on guides / rinse condition: 6

EN 10
Regeneration salt (water softener)
This machine is equipped with a water softener. To use the water softener,
fill the dishwasher with salt.
• After first having removed the bottom basket, loosen the cap
of the reservoir (1 and 2).
• Prior to filling the reservoir for the first time, pour one litre of water
in it (3).
• Place the funnel in the reservoir opening. Pour about 2 kg of salt in
it (4). It is normal for a little water to flow out of the opening when
doing this. Note! Clear up any spilled salt and always run a full
cycle immediately afterwards to prevent damage to the bottom.
• Carefully tighten the cap of the reservoir.
Note! Always fill the salt reservoir and adjust the water hardness
setting before using the dishwasher. Refill the salt reservoir when the
water softener indicator (2) lights up. It is possible that the light will
remain lit for a short while after the salt reservoir is filled. It will go out
automatically when enough salt has been dissolved in the water.
Setting the salt consumption
Adjust the salt consumption according to the table below:
Water
hardness
level
German
hardness
dH
French
hardness
dF
English
hardness
dE
Water hardness indicator
1 0-5 0-9 0-6 P1 and P5 light up
2 6-11 10-20 7-14 P2 and P5 light up
3 12-17 21-30 15-21 P3 and P5 light up
4 18-22 31-40 22-28 P4 and P5 light up
5 23-31 41-55 29-39 P1, P4 and P5 light up
6 32-50 56-90 40-63 P2, P4 and P5 light up
Your local water authority can inform you how hard your mains water is.
Adjustments can then be made according to the above table.
The standard water hardness is set at level 3.
OPERATION
SALT
SALT

EN 11
OPERATION
Reset
Open the door of the dishwasher
The indicator of the program selected last is flashing.
Press and hold the programming button (2) for more than 3 seconds.
The ‘End Program’ indicator is flashing. The indicator of the program
selected last turns off
Close the door of the dishwasher.
The machine pumps out for about 30 seconds. Following the end of
this, a sound signal will click 5 times and the indicator shows that the
program has finished.
Switch off the dishwasher with the on/off button (1).
Setting the water hardness
Press the program button (2) and keep it pressed.
Switch on the dishwasher simultaneously with the on/off button (1).
Keep the program button pressed until the indicators P1-P2-P3-P4-P5
and the indicator ‘End program’ light up and then turn off.
Set the desired water hardness by repeatedly pressing the program
button (2).
After selecting the desired setting, press the on/off button (1).
The set value is stored in the memory.
Rinse agent reservoir
Rinse agent is added during the final rinse. Rinse agent prevents traces
of water droplets being left behind on the clean dishes. Moreover, it
ensures that the dishes dry quicker, since the water drains off more easily.

EN 12
OPERATION
The dishwasher is designed for use with liquid rinse agent. The rinse
agent reservoir is located on the inside of the door, alongside the
detergent compartment.
Attention: replenish the rinse agent when the warning light of the
rinse agent turns on. The reservoir has a capacity of approximately
100 ml. Do not overfill the rinse agent reservoir, this will cause the rinse
agent reservoir to overflow. Rinse agent spillages must be cleaned up,
otherwise they may lead to leakages as a result of extreme foaming.
1. Unscrew the cap from the rinse agent reservoir (to the left, toward
the arrow with “open”).
2. Pour the rinse agent into the reservoir, taking care not to overfill it.
The reservoir has a capacity of approximately 100 ml. When the
indicator is dark (b), this means that there is sufficient rinse agent
present. When the indicator is light-coloured (a), this means that
you need to replenish the rinse agent.
3. Replace the cap.
Setting the quantity of rinse agent
A fixed amount of rinse agent is added during the final rinse. As is the
case with detergent, the amount of rinse agent needed is dependent on
the hardness of the water in your area. Too much rinse agent can lead
to streaks on the dishes.
The rinse agent reservoir has 6 settings. The standard setting for the
reservoir is setting 3. To begin with, set the reservoir to setting 2. If this
still causes spotting on the dishes, you can increase the amount of
rinse agent added by turning the selector knob on the reservoir to
setting 3. If there is still no improvement, turn the selector knob to
a higher setting. Repeat this action until the dishes are streak-free when
they emerge from the dishwasher.

EN 13
Dishwasher detergents
The chemicals in the dishwasher detergents remove the dirt, break it
down and make sure that the dirt is drained from the dishwasher. Most
dishwasher detergents available in stores are suitable for this purpose.
Warning!
Dishwasher detergent is a corrosive product. It should therefore be kept
out of the reach of children. If swallowed, consult a doctor immediately
and take the packaging with you.
Concentrated detergent
Based on their chemical composition, 2 different types of concentrated
detergent can be distinguished:
• Conventional alkaline detergents with corrosive ingredients.
• Low-alkaline concentrated detergents with natural enzymes.
The use of concentrated dishwasher detergent in combination with
“normal” wash programs produces less contamination and is good for
your dishes: these wash programs are specifically geared to the dirt-
dissolving characteristics of the enzymes in the concentrated dishwasher
agent. This means that “normal” wash cycles with concentrated
detergent achieve the same results as an intensive wash cycle.
Dishwasher tablets
Dishwasher tablets from different manufacturers dissolve at different
rates. This means that, during short wash cycles, certain types of
dishwasher tablet do not fully dissolve, as a result of which their
cleaning action is reduced. Dishwasher tablets should therefore chiefly
be used in combination with long wash cycles, so that the dish washer
tablet has time to fully dissolve.
When you switch from dishwashing tablets to a traditional dishwashing
agent, you have to make sure that the salt reservoir and the rinse agent
reservoir are completely filled.
OPERATION

EN 14
OPERATION
Detergent compartment
Your dishwasher uses less detergent and rinse agent than conventional
dishwashers. Generally speaking, just one measuring spoon of detergent
powder is needed for a normal wash cycle. Use more detergent if your
dishes are more heavily soiled. Fill the soap compartment immediately
prior to starting the cycle. Filling it prior to this may result in the detergent
becoming damp and therefore not fully dissolving.
Note! The table on page 12 shows the amount of detergent required
for the different cycles. These are averages. A different dosage may be
necessary, depending on the hardness of the water and how soiled the
dishes are.
Filling
1. Press the release catch if the lid is closed.
The lid will spring open.
2. Fill the detergent compartment immediately prior to starting a wash
cycle.
The markings in the detergent compartment indicate the dosage.
• Small container for the main detergent (b). The small container has
a capacity of maximum 40 cm3.
Fill up the container with 25 cm3of the detergent for very dirty dishes
or 15 cm3for normal dishes.
• Container for pre-wash detergent (a). The container has a capacity
of 5 cm3. Use the small container in case of caked on dirt or if the
dishwasher is packed.
Use only detergents that are specifically designed for dishwashers. Store
the detergent in a cool and dry place. Only fill the detergent compartment
with detergent when you are running a wash cycle immediately afterwards.

EN 15
LOADING
Loading the baskets
Using the upper basket
The upper basket is designed for fragile, light dishes, such as glasses,
cups and saucers, plates, small bowls and shallow (not particularly
dirty) pans.
Place the dishes in the basket in such a way as to ensure they cannot
move when sprayed. The height of the top basket can be adjusted.
Adjusting the height of the upper basket
You can adjust the height of the upper basket and thus create more
space for large objects in the upper or lower basket. You can adjust
the height of the upper basket by moving the basket itself up or down.
Long objects such as scooping spoons and knives must be placed on
the central section (see illustration above).
Cup rack
The cup rack can be used for cups when you unfold it (a). When you
fold it back in (b), you can use that space underneath for long glasses.
Using the lower basket
We advise you to place large objects that are hardest to clean in the
bottom basket: pots, pans, pan lids, oven dishes and bowls. Casserole
dishes and pan lids should preferably be placed at the side of the
basket. This will ensure that they do not obstruct the spray arm when it
is turning.
• Saucepans, serving dishes etc. must always be placed upside
down in the basket.
• Deep bowls should be tilted, with the opening facing downwards to
allow water to escape.
• The lower basket can be adjusted to allow for larger, or more, pots
and pans.
Low position High position

EN 16
LOADING
Cutlery basket
The cutlery basket is used in the bottom basket. Cutlery should be
placed in the cutlery basket with the handles pointing down. Long
kitchen utensils such as wooden spoons have to be in a position lying
down (horizontal) on the middle rack in the top basket.
Warning!
Take care to ensure that no objects are sticking through the bottom
of the cutlery basket, as this will obstruct the spray arm.
Cutlery/crockery unsuitable for the dishwasher
• Cutlery with a wooden, porcelain or mother of pearl handle
• Plastic objects that are not heat-resistant
• Cutlery with glued elements that are not heat-resistant
• Glued cutlery or crockery
• Pewter or copper objects
• Lead crystal glassware
• Steel objects that are prone to rust
• Wooden dishes
• Objects manufactured from synthetic fibres
Cutlery/crockery with limited suitability for use in the dishwasher
• Certain types of glass can become dull after undergoing a large
number of wash cycles
• Silver and aluminium may tarnish after use in the dishwasher
• Glazed patters may fade as a result of regular washing
Note! Do not place any objects soiled with cigarette ash, candle wax,
varnish or paint in the dishwasher. When buying new kitchen utensils,
ensure that they are suitable for the dishwasher.
Do not overload the dishwasher. There is only room for 12 standard
settings. Do not place cooking utensils that are unsuitable for
dishwashers inside. This is essential to ensure good washing results
and a low energy consumption.
Placing cutlery and crockery in the dishwasher
Before placing the dishes in the dishwasher, you must:
• Remove any large bits of leftover food.
• Leave caked and burnt on leftover food to soak for a while.

EN 17
LOADING
When inserting the dishes, take care to ensure that:
• The spray arm is not obstructed by the dishes.
• Hollow objects are placed with the opening facing downwards,
to ensure that that cannot hold the water.
Plates and cutlery must not cover each other
• Glassware items must not touch, otherwise damage can occur.
• Place large objects that are difficult to clean in the lower basket.
• The upper basket is specially designed for lighter objects, such as
glasses and coffee and tea cups.
Warning!
• Long knives standing upright in the cutlery basket can cause injury!
• Long and/or sharp items of cutlery, such as carving knives, should
be laid (placed horizontally) in the upper basket.
Damage to glassware and other crockery
Potential causes:
• Type of glass or manufacturing process. Chemical composition
of the dishwasher detergent.
• Water temperature and duration of the wash cycle.
Proposed solution:
• Use glassware and porcelain crockery produced by manufacturers
that state that it is suitable for dishwashers.
• Use a milder/less corrosive dishwasher detergent. If needed, ask
detergent manufacturers for more information.
• Select a wash cycle with a lower temperature.
• Remove glassware and cutlery from the dishwasher as soon as
possible after the cycle has finished, to prevent damage.

EN 18
MAINTENANCE
Filter system
Depending on usage, the filters may require regular rinsing under a tap.
The filtration system consists of three components: the large sieve, the
coarse sieve and the fine sieve.
1. Fine filter: This filter prevents waste and leftover food from entering
the drainage pump and ensures that said leftovers are not spread
over the dishes again during the cycle.
2. Coarse filter: Larger articles, such as leftover bones or pieces of
glass that could block the drain, are trapped in the coarse filter. In
order to remove the waste from the filter, you must lightly squeeze
the lips on top of the filter together and then pull the filter upwards.
3. Large filter: Leftover food and waste that lands on this filter is rinsed
through to the coarse filter by a special jet on the lower spray arm.
Clean the filter group
In order to ensure the dishwasher operates at maximum efficiency,
the whole filter section must be cleaned.
The filter group efficiently removes food remains from the water and
makes sure that the washing water can continue circulating during
the washing program. It is therefore a good idea to remove larger food
remnants from the filter section after each wash cycle, by cleaning
the half-round filter and filter housing under running water.
• Remove the filter section by grasping the handle and pulling upwards.
All components in the filter section must be cleaned at least once per
month.
• Use a dishwashing brush to clean the coarse and fine filter. Put
the filter section back together again according to the illustration
opposite and then re-fit the whole filter section back into the tub
of the dishwasher.
Never use the dishwasher without the filter section. Incorrect fitting
of the filter section will result in the dishwasher no longer delivering
maximum performance. Damage to cutlery and dishes is a further
possible consequence.

EN 19
MAINTENANCE
Cleaning the spray arms
It is essential that you clean the spray arms on a regular basis. In the
longer term, waste can block the nozzles and the bearings in the spray
arms. Clean the spray arms as follows:
• Loosen and turn the nut of the top spray arm to the left to remove
the arm.
• Next remove the spray arm.
• Pull the bottom spray arm upward from the retainer.
• Clean the spray arms in warm, soapy water, using a soft brush
to clean the nozzles.
• Rinse the spray arms thoroughly before fixing back in place.
Cleaning the door
Clean the edge of the door, including the sealing rubber, with a soft,
damp cloth. Take care to ensure that water does not enter the door
locking mechanism or electrical components. Spray-type cleaning
products should not be used, nor aggressive cleaning products such as
scourers. These cleaning products can damage the finish.

EN 20
ERRORS
What should I do, if...
If the appliance is not functioning well, this does not always mean that
it is faulty. Try to resolve the fault yourself first. If the recommendations
below does not solve your problem, telephone our service department.
Note!
Disconnect the appliance from the power supply before beginning repairs.
Preferably by pulling out the plug from the wall socket.
Interference table
Problem
The dishwasher is not working.
The drainage pump does not
shut off.
Noise.
Contamination of the tub.
Potential causes
Fuse is faulty or the earthing switch has been
activated.
The power supply is not switched on
The water pressure is too low.
The water is running over.
Some noises are normal.
Cutlery is rattling in cutlery basket or
something small has fallen out of the basket.
The motor makes an unusual noise.
Poor quality detergent.
Blocked filters
Rinse agent has been spilled.
Solution
Replace the fuse or reset the isolating switch.
Remove other appliances that are connected to
the same group.
Make sure that the dishwasher is switched on
and the door closed.
Make sure that the plug is correctly inserted into
the socket.
Check whether the dishwasher is correctly
connected to the water mains and that the tap
is open.
The system is designed so that it can
automatically detect overflowing water. In that
instance, the appliance shuts off the circulation
pump and switches on the drainage pump.
Noise of rotating pump/washing noises; the
detergent compartment opening.
Ensure that everything is loaded securely in the
dishwasher.
The pump is blocked. Contact an installer.
Only use detergent suitable for dishwashers
to prevent contamination.
Open the door and clean the filters. Run the pre-
wash cycle.
Always wipe up spilled rinse agent immediately.
This manual suits for next models
1
Table of contents
Languages:
Other ETNA Dishwasher manuals

ETNA
ETNA AFI8527ZT/E07 User manual

ETNA
ETNA TFI8016ZT User manual

ETNA
ETNA AFI8534ZT/E02 User manual

ETNA
ETNA VW544N User manual

ETNA
ETNA VWV547SWIT User manual

ETNA
ETNA VWV242CWIT/E01 User manual

ETNA
ETNA VW644RVS User manual

ETNA
ETNA VW547ZT User manual

ETNA
ETNA VW149ZIL User manual

ETNA
ETNA VW647RVS User manual

ETNA
ETNA VW149AZT User manual

ETNA
ETNA AFI8529ZT User manual

ETNA
ETNA VW942HN User manual

ETNA
ETNA VW147SRVS User manual

ETNA
ETNA VW549M/E01 User manual

ETNA
ETNA VW842N User manual

ETNA
ETNA TI8021ZTUU/E02 User manual

ETNA
ETNA VW842N/E04 User manual

ETNA
ETNA VW344N/E04 User manual

ETNA
ETNA VW149WIT User manual