ETNA EEK263VA User manual

INSTRUCTIONS FOR USE
UPRIGHT REFRIGERATOR-FREEZER
EEK263VA
AK2378DC
KCS50178
KCD50178

444334
Thank you for your confi dence in buying our appliance and congratulations on the excellent choice.
We hope it will successfully serve its purpose for many years.
The appliance is intended solely for household use.
Upright refrigerator - freezer (hereinafter: the appliance) consists of two parts: top part is
refrigerator and bottom part is upright freezer.
Refrigerator is used in households for storage of fresh food at temperatures above 0°C.
Freezer is used in households for freezing fresh food and storage of frozen food for up to one year
(depending on the type of food).
Before fi rst operation .................................................. 3
A few tips on how to save power with your
refrigerator-freezer ..................................................... 4
Description of the appliance ...................................... 5
Installation and connections ...................................... 6
Control panel - Appliance with mechanical
regulation .................................................................... 7
Refrigerator accessories ............................................ 8
Storage of food in the refrigerator ........................... 10
Storing food in the FreshZone compartment ......... 11
Freezing and storing frozen food ............................. 12
Defrosting the appliance ........................................... 14
Cleaning the appliance ............................................. 15
Troubleshooting guide .............................................. 16
Noise level .................................................................. 17
2
Upright refrigerator-freezer

444334
Before fi rst operation
• This appliance can be used by children aged from 8 years and above and persons with reduced
physical, sensory or metal capabilities or lack of experience and knowledge if they have been
given supervision or instruction concerning use of the appliance in a safe way and understand
the hazards involved. Children shall not play with the appliance. Cleaning and user maintenance
shall not be made by children without supervision.
• Before connecting the appliance read these instructions carefully. They describe the appliance
and provide instructions for its safe and correct use. The instructions are prepared for different
types and models of the appliance so they may contain descriptions of functions and compo-
nents your appliance may not have.
• These instructions also contain the NO FROST version of the freezer, fi tted with the fan and
featuring automatic defrosting.
• Remove the wrapping protecting the appliance during transport.
• Wrappings contain environmentally friendly materials which can be recycled, recovered or dispo-
sed off without threat to the environment.
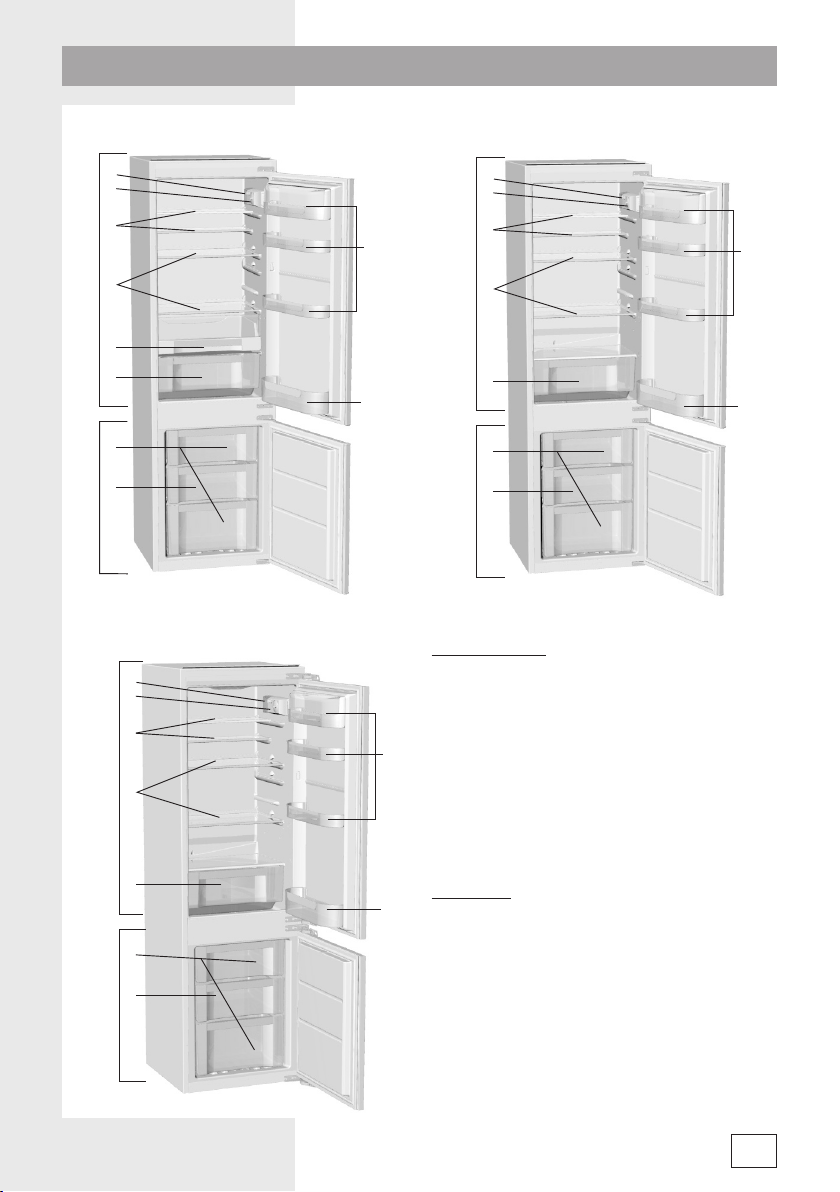
• On the door corners (on freestanding appliances) or on the housing of the appliances (on built-in
appliances) the spacers are installed, which should be removed and replaced with the attached
spacer-plugs.
• Before connecting the appliance to the mains supply, leave it in upright position for about 2 ho-
urs. This will reduce possibility of malfunctions in the cooling system resulting from prior transport
and handling.
• The appliance must be connected to the mains supply in accordance with the standing regulati-
ons and local requirements.
• The appliance must not be used in open air or exposed to weather precipitation.
• Always disconnect the appliance from power supply (pull the power cord from wall socket) before
cleaning and before replacing the light bulb.
• If the power supply cord is damaged, in order to avoid hazard it must be replaced by the service
or by qualifi ed personnel.
• In case of longer disuse fi rst turn the appliance off with the ON/OFF button and disconnect it
from mains supply. Empty the appliance, clean the interior and leave the door ajar.
• For the protection of environment deliver the obsolete appliance to the authorized scrap applian-
ce dealers.
• Never let the children play with the appliance.
• Self closing shear door hinge pulls the door to the cabinet just before closing, thereby preventing
the door to remain ajar. Equally it limits the door opening angle and prevents damage to adjacent
elements.
• Rating plate with basic information is located in the interior of the appliance. If the sticker plate is
not suitable for your language, replace it with the attached one.
• Warning: Ventilation slots on the appliance or built-in ele-
ment should always be kept clean and unobstructed.
• Warning: Do not use any mechanical accessories
when thawing the refrigerator, except for those explici-
tly recommended by the manufacturer.
3

444334
• Observe the installation instructions.
• Do not open the appliance door more frequently than necessary.
• Occasionally check whether air can circulate freely behind the appliance.
• Condenser unit mounted on the appliance back wall must be kept clean at all times (see section
“Cleaning the appliance”).
• If the seal is damaged or loose, replace it as soon as possible.
• Store your food in closed containers or other appropriate packaging.
• Before placing the food in the refrigerator, let it cool down to room temperature.
• Defrost your frozen food in the refrigerator compartment.
• Remove the freezer drawers and door as described in the instructions, in order to make use of
the entire capacity.
• Defrost your conventional freezer when a frost layer approximately 3-5 millimetres thick has
accumulated on the surfaces in the freezer compartment.
• Make sure the shelves are evenly distributed and that the food is arranged in a way that
allows free circulation of air (heed the recommended food arrangement as described in the
instructions).
• In appliances fi tted with a fan, do not block the fan slots.
• Warning: To prevent any pollution be careful not to
damage the insulation or refrigeration tubes at the rear
wall during the installation, cleaning and disposal of the
appliance.
• Warning: Do not use any electrical devices inside the
appliance, except for those explicitly recommended by
the manufacturer.
The symbol on the product or on its packaging indicates that this product may not
be treated as household waste. Instead it shall be handed over to the applicable
collection point for the recycling of electrical and electronic equipment. By ensuring
this product is disposed of correctly, you will help prevent potential negative consequences
for the environment and human health, which could otherwise be caused by inappropriate
waste handling of thisproduct. For more detailed information about recycling of this product,
please contact your local city offi ce, your household waste disposal service or the shop
where you purchased the product.
4
A few tips on how to save power with your
refrigerator-freezer

444334
Interior equipment of the appliance will typically vary according to the specifi c model.
A
1
2
3
4
7
A
1
2
3
4
7
8
B
5
6
8
9
10 B
6
9
10
A
B
1
2
3
4
6
7
8
9
10
A Refrigerator
1 Interior light
2 Control panel
3 Adjustable glass shelves
4 Pull-out glass shelf (adjustable height)
5 FreshZone pan
6 Vegetable crisp pan
7 Refrigerator door pans (options: deep,
shallow; covered or no cover)
8 Door bottle rack
B Freezer
9 Storage compartment
10 Freezing compartment
5
Description of the appliance

444334
• Place the appliance in dry and well aired room. The appliance
operates best at temperature ranges indicated in the chart be-
low. Relevant class of the appliance is indicated on the rating
plate.
Class Ambient temperature
SN (subnormal) from + 10°C to + 32°C
N (normal) from + 16°C to + 32°C
ST (subtropical) from + 16°C to + 38°C
T (tropical) from + 16°C to + 43°C
Positioning the appliance requires two persons in order to avoid
injuries or damage to the appliance.
• Avoid exposing the appliance to direct sunlight or heat sour-
ces. If this is not feasible, install insulation plate between the
appliance and adjacent heat source.
• The appliance may stand independently or you may incorpo-
rate it into the kitchen cabinet. Be sure to leave enough space
for cooling of condenser (distance from the wall or the opening
should be 200 cm2). Distance to the cabinet above the applian-
ce should be at least 5 cm.
After the installation, the appliance mains plug should be
accessible!
• Use the power cord to connect the appliance to the mains
power. Wall outlet must be fi tted with ground terminal (safety
socket). Required nominal voltage and frequency are indicated
on the relevant label or rating plate of the appliance.
• Mains power connection and grounding must be made in line
with standing regulations and local requirements.
The appliance is able to accommodate minor temporary voltage
tolerances, but they may not exceed -6% to +6%.
Selecting the location
Positioning the
appliance
Connecting to power
supply
6
Installation and connections

444334
A Temperature setting and on/off knob
Turn on: rotate the thermostat knob clockwise towards position 7.
Turn off: rotate the knob back to position STOP (0).
Setting the temperature
• Higher settings (towards 7) selected with the knob
correspond to lower (cooler) temperatures. The temperature
in the refrigerator interior may drop below 0°C. Only use
higher settings when a lower temperature is desired and
recommended or when environment temperature is lower than
16°C. When the environment temperature is normal, a medium
setting is recommended.
• A change in the environment temperature affects the
temperature in the appliance. Hence, the thermostat setting
should be adjusted accordingly.
• When the thermostat knob is set to position STOP (0), the
appliance will not operate (cooling system is off); however,
the appliance is still powered (a light will illuminate the interior
when the refrigerator door is opened).
Turning the appliance
on/off
7
Control panel - Appliance with mechanical regulation

444334
(Equipment depends on the model)
• Shelves can be optionally placed on the guides inside the
appliance. To remove the shelf, fi rst slide it out as far as the
guide allows it, then slightly lift it up and pull it out. Quickly
perishable food should be stored on the back i.e. the coldest
part of the shelves.
If you need space to store higher objects (bottles, jars, jugs)
in the refrigerator you can remove the front part of the shelf,
relocate it to a lower level, and obtain the required space.
• Crisp tray below the glass shelf at the bottom of the
refrigerator is used for storage of fruit and vegetables. It
retains the right level of moisture and prevents drying out.
• Pulling out the drawer:
- Pull the drawer towards yourself (in the direction of arrow 1)
– as far as the door stopper. On the opposite side, continue
to pull the drawer out of the refrigerator (in the direction of
arrow 2 – rotation) while lifting the drawer at the same time
(in the direction of arrow 3).
• The refrigerator door lining consists of various shelves or
holders used for storing cheese, butter, eggs, yogurt, and a
stock of other smaller packages, tubes, cans etc. The bottom
shelf is used for storing bottles.
Shelf
Adjustable glass shelf
Vegetable crisp pan
Single drawer
Refrigerator door lining
8
Refrigerator accessories

444334
Refrigerator compartments:
- top section: canned food, bread, wine, cake, …
- middle section: dairy products, readymade food, desserts,
juices, beer, TV-dinners, …
- bottom section: meat, meat products, delicatessen, …
- crisp pan: fresh fruit, vegetables, salads, root vegetables,
potatoes, onions, garlic, tomato, tropical fruit, sauerkraut,
turnips ...
Refrigerator door lining compartments:
- top/middle section: eggs, butter, cheese, …
- bottom section: beverages, cans, bottles, …
Freezer compartments:
- freezing, storage of frozen food (see section Freezing and
storage of frozen food).
Recommended
distribution of food
9

444334
• Proper use of the appliance, adequately packed food, correct
temperature and hygienic precautions produce substantial
impact on the quality of stored food.
• Always respect the best before date, printed on the packaging.
• Food to be stored in the refrigerator should be properly packed
as to prevent emission and/or reception of moisture and odors.
• Never store infl ammable, volatile or explosive substances.
• Beverages with high alcohol percentage shall be stored in
tightly sealed bottles in vertical position.
• Some organic solutions like volatile oils in lemon or orange
peel, acids in butter etc. can cause damage in prolonged
contact with plastic surfaces or gaskets for longer period of
time they can cause accelerated aging of the plastic material.
• Unpleasant odor inside the refrigerator is a sign that something
is wrong with food or that your refrigerator needs cleaning (see
chapter Cleaning).
• If you plan a longer absence, make sure you removed quickly
perishable articles of food from the appliance before you
leave.
Recommended periods of storing fresh food in the
refrigerator
Food Storage period
eggs, marinades, smoked meat, up to 10 days
cheese up to 10 days
carrots, etc… up to 8 days
butter up to 7 days
cake, fruit, TV-dinner dishes, raw chunks
of meat up to 2 days
fi sh, raw minced meat, seafood up to 1 day
Important precautions
and hints
Storage periods
10
Storage of food in the refrigerator

444334
The FreshZone drawer allows storing a wide variety of fresh
food to keep longer than in a conventional refrigerator. The food
stays fresh longer, retaining the fl avour and nutrients.
It lows down decay and loss of mass; therefore, fruit and
vegetables remain fresh and natural longer.
For optimum performance, the drawer should be fully closed.
• When buying food, make sure it is fresh as this will determine
the quality of the food, as well as how long it will keep in the
fridge.
• Store your food in closed containers or appropriate packaging
to prevent it from emitting or receiving odours and moisture.
• Take the food from the drawer 30-60 minutes before use to
allow the aroma and fl avour develop at room temperature.
• Food sensitive to low temperature and not appropriate for
storage in the FreshZone drawer include the following:
pineapple, avocado, bananas, olives, potatoes, eggplant,
cucumbers, beans, peppers (capsicum), melons, watermelons,
pumpkins and squash, etc.
• Pulling out the drawer:
1. Pull out the drawer along the guides at the sides as far as
the door;
2. Lift the fl ap and hold it;
3. Slowly turn the drawer upwards and pull it out.
11
Storing food in the FreshZone compartment

444334
• Activate the freezer boost (super freeze) function 24 hours
before freezing fresh food:
- set the dial between positions 4 and 6.
After 24 hours of super freeze operation, insert the fresh food
into the freezer compartment. Make sure the fresh food does
not come into contact with the food that is already frozen!
Be sure to provide the NO FROST freezer models with enough
room below the ceiling for cool air circulation, so avoid storing
food over the marked maximum storage level (see Fig.).
• After 24 hours you may relocate the food to the storage
compartment, and repeat the freezing procedure if required.
You may also remove the drawers and store frozen food
directly on cooling shelves. Do not remove the lower drawer if
you have a NO FROST appliance!
• For freezing smaller quantities of fresh food (1-2 kg), the
engagement of the fast freeze function is not required.
• Freeze only such food which is suitable for freezing and sustain
low temperatures. Food should be of adequate quality and
fresh.
• Select adequate packaging for each kind of food and pack it
correctly.
• The packaging should be air tight and well sealed without
leaking since this could cause substantial vitamin loss and
dehydration.
• Mark packages with following data: kind and amount of foods
and the date of loading.
• It is imperative that food is frozen as quickly as possible. We
therefore recommend the size of the package not to be too
large and to be cooled before loading into the freezer.
• The amount of the fresh foods that can be loaded in the freezer
as a single load is declared on the rating plate. If the loaded
amount is too large, the quality of freezing is reduced which in
turn affects the quality of frozen foods.
Important precautions
and hints for freezing
fresh food
Freezing process
12
Freezing and storing frozen food

444334
The storage time and recommended temperature for storing
commercially frozen foods is indicated on the packaging. Always
follow manufacturer’s instructions for storage and use of frozen food.
When shopping be careful to choose only food which is adequately
packed and provided with complete data and stored in freezers where
the temperature never rises above -18°C.Do not buy packages of
food wrapped with frost. This indicates that the package was thawed
before at least once. Take care that packages don’t start to thaw
during transport to your home. Temperature rise shortens the storage
time and affects the quality of commercially frozen foods.
Recommended periods of storing frozen food in the freezer
Food Period
Fruit, beef from 10 to12 months
Vegetables, veal, poultry from 8 to 10 months
Venison from 6 to 8 months
Pork from 4 to 6 months
Chopped (minced ) meat 4 months
Bread, pastry, TV-dinners, fat free fi sh 3 months
Intestines 2 months
Smoked sausages, fat fi sh 1 month
Partially thawed or defrosted foods should be used as soon as
possible. Cold air preserves the food but it does not destroy
microorganisms which rapidly activate themselves after
defrosting and make foods perishable.
Partial defrosting reduces the nutritional value of food, especially
fruits, vegetables and readymade meals.
Storage of industrially
frozen food
Storage periods of
frozen food
Defrosting frozen food
13

444334
Refrigerator needs no special defrosting procedure, because ice
deposited at the inner back wall is defrosted automatically.
Ice deposited on the inner back wall during the compressor operation
is defrosted when the compressor stops operating, and condensed
water drops are drained through the outlet in the inner back wall into
the drain pan situated above the compressor where it evaporates. In
case you should notice excessive ice formation at the rear refrigerator
panel (3-5 mm thick), switch the appliance off and thaw it manually.
• Clean the freezer when the frost layer in the freezer reaches
thickness of around 3-5 mm.
• 24 hours before defrosting activate the fast freeze function
(see relevant control chapter depending upon the model of the
appliance – fast freezing) for continuous operation in order to
additionally freeze the food inside. After that period take the food
out of the freezer and protect them from excessive thawing.
• Switch the appliance off (see the relevant control chapter for
ON/OFF function) and pull the power cord from the wall socket.
• Place a convenient absorbent cloth underneath to collect the
defrost water and change it periodically.
• Never use powered appliances to defrost the freezer (hair
dryer, etc.) - LIFE THREATENING!
• Avoid using defrosting sprays, as they may cause damage to
the plastic parts and may be hazardous to health.
• Clean the interior of the appliance and wipe it dry (see chapter
Cleaning).
• Before reloading food into the freezer switch the appliance on.
• Defrosting the NO FROST freezer model is completely
automatic. Periodical appearance of frost deposits disappear
after certain period of time.
• Build-up of ice or frost in the freezer compartment can be
a result of abnormal use of appliance (door opened too
frequently and/or too long, door not properly closed etc.). In
this case, unplug the appliance, remove the food from the
freezer and protect them from defrosting.
Clean and dry the freezer interior. Before returning the frozen
food into the freezer, switch on the appliance and select the
desired setting.
Automatic defrosting of
the refrigerator
Defrosting classical
freezer
Defrosting NO FROST
freezer
14
Defrosting the appliance

444334
Prior any cleaning attempt disconnect the appliance from the
mains (see the control chapter for ON/OFF function), and pull the
power cord from the mains wall outlet.
Make sure to remove traces of any cleansing agents you had
been using.
• Clean the exterior of the appliance with water and liquid detergent.
• Do not use abrasive or aggressive agents (such as stainless
steel cleansers) for cleaning of plastic and coated surfaces as
you can damage them.
• Clean coated and/or aluminum surfaces with soft cloth and
alcohol based cleansing agent (for example glass cleaners).
• Wash the interior of the appliance with liquid detergent and
lukewarm water, mixed with a little vinegar.
• Containers, shelves, and drawers with a decorative profi le (metallic
appearance) are not dishwasher safe! They can only be cleaned
with a dissolved liquid detergent and a soft cloth. Do not rub them!
• Groove and drain outlet located underneath the cooling panel at
the rear wall collect the drained water, so they must not be clogged
(with food particles, for example). Make sure you inspect them
periodically and clean if necessary (use plastic straw to free the
outlet hole).
• The condenser on the rear wall must always be clean and free of
dust or kitchen fumes deposits, therefore clean the dust periodically
with non-metallic brush or vacuum cleaner..
• Clean also the drip pan above the compressor. If you removed
the pan, please make sure you replace it to the same position, and
check that it is in completely horizontal position!
• Ice and/or frost deposits exceeding 3-5 mm increase energy
consumption, so you need to remove them regularly (with the
exception of the NO FROST model). Do not use sharp pointed
objects, solvents or sprays.
• After cleaning switch the appliance on and reload the food.
15
Cleaning the appliance

444334
Fault: Cause/Remedy
The appliance does not
operate after connection to the
mains:
• Check if there is power in the socket and if the appliance is
switched on.
Cooling system operates
continuously without
intermittent stoppages:
• Ambient temperature too high.
• Frequent opening of the door, door open too long.
• Door not closed properly (particle between door gasket, sagged
door, check gasket sealing, etc...).
• Excessive quantity of fresh food inserted at once.
• Refrigerator probe (A) is clogged with fresh food. Relocate the food to
provide air circulation around the probe (certain models only).
• Check air circulation for suffi cient cooling of the compressor, and
clean the condenser.
Excessive ice formation at the
rear interior wall of the freezer:
• Frequent opening of the door, door open too long.
• Inserting hot food in the freezer.
• Food or dish is touching the rear interior panel of the refrigerator.
• Bad door sealing; clean or replace the gasket if dirty or damaged.
Build-up of ice or frost in the
freezer interior may be a result
of the following:
• Door opened too frequently or too long.
• Door not properly closed.
• Poor door sealing.
• If the seal is dirty or damaged, clean or replace it.
Water dripping from the
appliance:
• Drain outlet is clogged, drain water drips past the collection groove.
• Clean the clogged outlet using plastic straw.
• Thaw thick ice deposits manually (see chapter Defrosting).
Diffi cult door opening: • If you attempt to open the immediately closed door of the freezer
you may experience resistance. This happens because certain
quantity of cold air escapes from the appliance through the open
door and is replaced by warm ambient air. Cooling of such air
creates negative pressure (vacuum) and suction, which prevents
easy opening of the door. Situation is normalized after a few
minutes (5-10), and you can open the door with ease.
Bulb replacement: • Before replacing the LED bulb, disconnect the appliance form the
power supply (pull the power cord from the wall socket).
Insert the screwdriver into the cover slot, lift it and remove the
cover.
Replace the bulb with the equivalent new bulb (only use an original
replacement from the supplier) and replace the cover back to its
position.
• Don’t forget: the old bulb does not belong to organic waste.
• Light bulb is consumption material and is not covered by the
warranty!
• Bulb lamps used in this appliance are special purpose lamps
selected for household appliances use only. They are not suitable for
household room illumination.
If none of the above reasons seems to match your problem, please contact the nearest service
center and state the type, model and serial number as indicated on the label with basic information
attached in the appliance interior.
16
Troubleshooting guide

444334
The refrigerator – freezer appliances are cooled by the
refrigeration system with a compressor (assisted by fan in certain
models) whose operation may produce certain noise. The level
of such noise depends upon the location, correct use and age of
the appliance.
• After starting the appliance, the operation of the compressor
(the refrigerant fl ow) may be somewhat louder. This does not
mean that something is wrong with the appliance, neither has
it any infl uence on the lifetime of the appliance. Gradually the
noise is reduced and eventually subsides.
• Sometimes the appliance produces unusual and stronger
noise which is rather unusual for the appliance. This noise
is often the consequence of inadequate positioning of the
appliance:
- The appliance should be placed and leveled fi rmly on solid
base.
- It should not touch the wall or adjacent kitchen units
standing next to it.
- Check whether the accessories in the interior of the
appliance are placed correctly in their positions; also check
the bottles, tins and other vessels that might touch each
other and rattle.
Declaration of conformity
We declare that our products meet the applicable
European Directives, Decisions and Regulations and
the requirements listed in the standards referenced.
THE MANUFACTURER RESERVES THE RIGHT TO
ALTER THE SPECIFICATIONS WITH NO IMPACT TO THE
FUNCTIONAL OPERATION OF THE APPLIANCE.
17
Noise level

444334
18


en (09-17)
444334 / 21-09-2017
COMBI 54-2 MEH ETN
This manual suits for next models
3
Table of contents
Other ETNA Refrigerator manuals

ETNA
ETNA EKK0842WIT User manual

ETNA
ETNA KVS5088 User manual

ETNA
ETNA AKV178RVS User manual

ETNA
ETNA KKO682 User manual

ETNA
ETNA KKV655 Series User manual

ETNA
ETNA KCS5178NF User manual

ETNA
ETNA EKT1432WIT User manual

ETNA
ETNA KKV655WIT User manual

ETNA
ETNA KKS5178 User manual

ETNA
ETNA KCV3161RVS User manual

ETNA
ETNA EEK141VA User manual

ETNA
ETNA EKK0860WIT User manual

ETNA
ETNA KVV128ZWA User manual

ETNA
ETNA KKV856 Series User manual

ETNA
ETNA KCS5178 User manual

ETNA
ETNA KCV161RVS User manual

ETNA
ETNA KKV1143WIT User manual

ETNA
ETNA KCV143WIT User manual

ETNA
ETNA KCV286W Series User manual

ETNA
ETNA KVO482 User manual