ETOE A1192 User manual

Projector A1192
User Manual

Read all instructions before you use this device. Do not make any changes
that are not described in this manual. If physical injury, loss of data, or
damage is caused by failure to follow instructions, the warranty does not
apply.
Setup
• To prevent overheating, do not block or clog the ventilation openings.
Never place the device in a confined space. Always leave enough
space around the device for ventilation.
• When the device runs for a long period of time and the surface
becomes hot, shut it down and unplug the power cord. Resume
operation only after the device has cooled.
• Only use attachments or accessories specified by the manufacturer.
not allow children to handle the device without supervision.
.
the bag.
EN 01
device.
Power Supply
Cleaning
Repairs
Caution
EN 02

User manual x 1
Adapter x 1
Remote control x1
Projector x 1 Adapter AC cord x 1
Overview
1
3
Projector A1192
User Manual
Front View
4
2
Projector
Rear View
67
58
9
10
EN 03
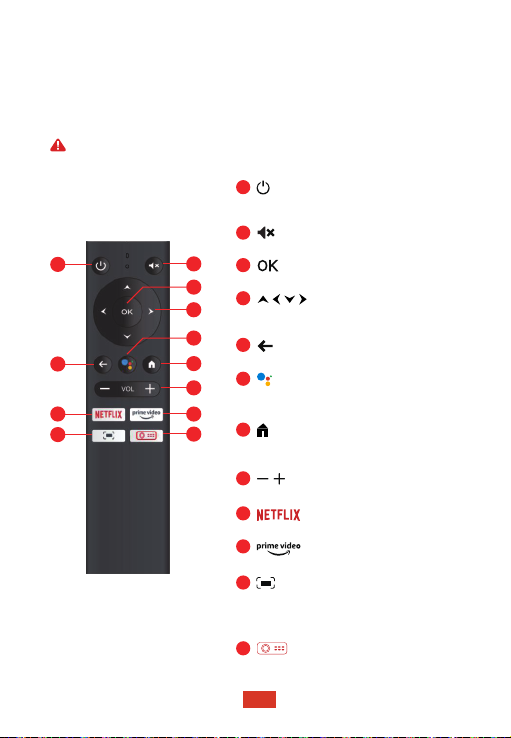
①Power
② Lens
③Tripod Screw Hole
④Pads
⑤DC In
⑥USB 2.0 port
⑦HDMI 1.4 port
⑧Led Indicator
⑨IR Receiver
⑩3.5mm AUX Port
Attention: Please do not look into the lens directly to avoid harm for
your eyes.
Mutes the projector’s audio
Long-press to launch the projector's
on-screen settings menu.
Press to confirm a selection or entry
Navigate menus or adjust the
selected content
Return to the previous menu
Activate Google assistant, Google's
voice-powered virtual assistantservice
Press the button for once, go to
Android TV homepage
Volume down / up
Preset Netflix button
Preset Prime Video button
Adjust the focus for the projector
Press the button once, go to projector
Homepage
1
2
3
4
5
6
7
8
9
10
11
12
3
4
7
8
10
12
9
11
2
6
5
1
• Press the button once: power on
• Press the button twice: power off
EN 04
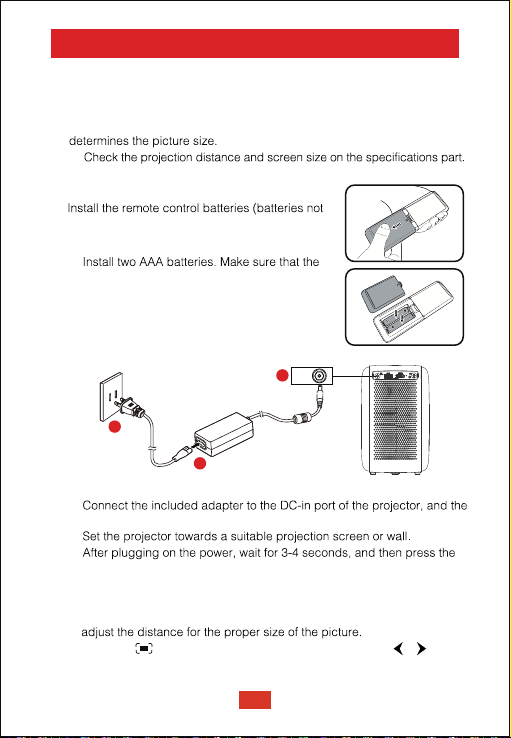
Get started
Placement
①Place the projector right towards the projection surface to get a
rectangle picture.
②The distance between the projector and the projection surface
③
Prepare the Remote Control
included).
①Press and open the battery cover, as illustrated.
②
positive and negative ends are positioned
correctly, as illustrated.
③Place the battery cover back until it clicks
into place.
Power On
①Connect the AC cord to the adapter, Plug the adapter into the outlet
②
LED indicator will be on red light.
③
④
power button. The LED indicator will turn green.
Focus
2
1
3DC IN
①Place the projector towards a suitable projection surface or wall and
②press the button on the remote control, and press the or
button, until the picture is clear.
Note: The projection distance must between 1.1m to 5.4m.
EN 05
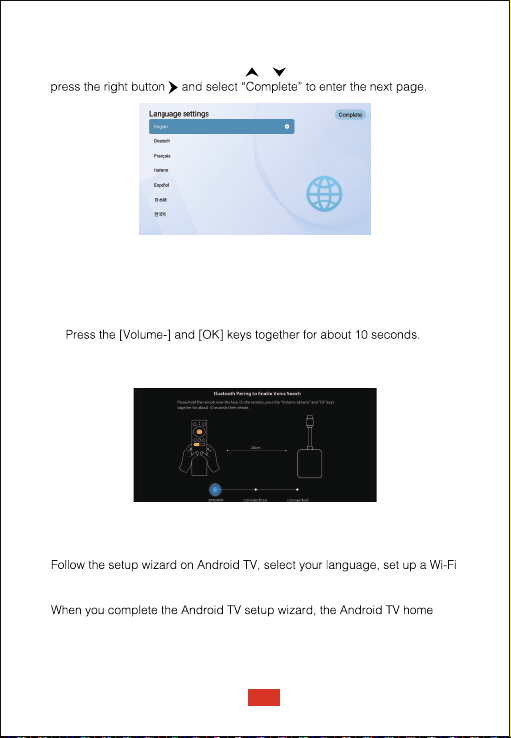
After selecting a language, you will be at a Bluetooth remote pairing page,
follow the instructions on the page.
①Please hold the remote near the projector.
②
③When the screen shows “Connected”, your remote LED indicator turn to
blue, and the remote control is paired
Select Your Language
Pair Remote Control in Bluetooth Mode
Set up Android TV
When start the projector for the first time, you will be guided to a page to
select language, use remote control or to select your language. Then
connection, sign in to a Google account, and carry out other related
procedures.
screen will appear. Now you can start watching your favorite shows by
downloading streaming apps.
EN 06

Settings
Android TV Setting
Bluetooth pairing
TV interface, select Settings→Remotes&Accessories→Add
accessory, then select the device to be connected.
Bluetoothconnection can only work while you areon the Android TV system.
Projection settings
Projection mode
Android TV Remote App
The Android TV system could be controlled by downloading the remote
app on a smartphone.
to the newest version.
Android devices:
Download the “Android TV Remote” app from Google Play, open the app,
verification code displayed on the projector screen.
iOS devices:
it to use the local network to set up and control your connected devices,
verification code displayed on the projector screen.
Adding Accounts
For new Google users, sign up for a new Google account using the TV for
easier login and payment security. Add an account or switch accounts
Dolby Audio not supported
the projector does not support Dolby Audio. If you are watching videos
video resource.
Press the button on the remote control, go to projector homepage,
and select Settings.
EN 07

Keystone correction
Zoom in/out
without moving the projector.
projected image is noticeably wider at one side. It occurs when the
projector is not perpendicular to the screen.
①To correct the keystone effect, press the button to go to
projector homepage, and select Settings→Projection Settings →
Vertical Correction/Horizontal Correction to adjust.
Vertical Correction
Horizontal Correction
EN 08

Keystone correction reset
Other settings
Default Input Signal
Screen Saver
The screen saver automatically starts whenever your projector sits idle for the
default time. You could change the default time or turn it off.
Shutdown
Language Settings
To restore the default settings, select Keystone Correction Reset
②
the angle of the projection, select Settings →Four Point Correction,
instructions to correct the image.
Four Point Correction
EN 09
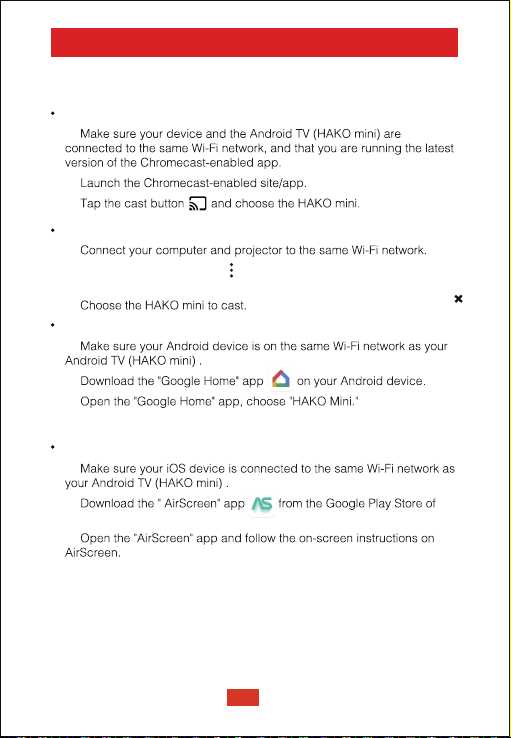
Chromecast (wireless connection)
The Chromecast feature only works while you are in the Android TV system.
Cast from Chromecast-enabled sites/apps (for Android/iOS devices)
①
②
③
Cast from Chrome browser tab (for computers)
①
②Click "Cast" at the top right of the Chrome browser tab, and then
choose from the sources whether you want to cast the tab or the screen.
③
Mirror from Android devices
①
②
③
④Tap "Cast my screen".
Mirror from iOS devices
①
②
Android TV system.
③
EN 10
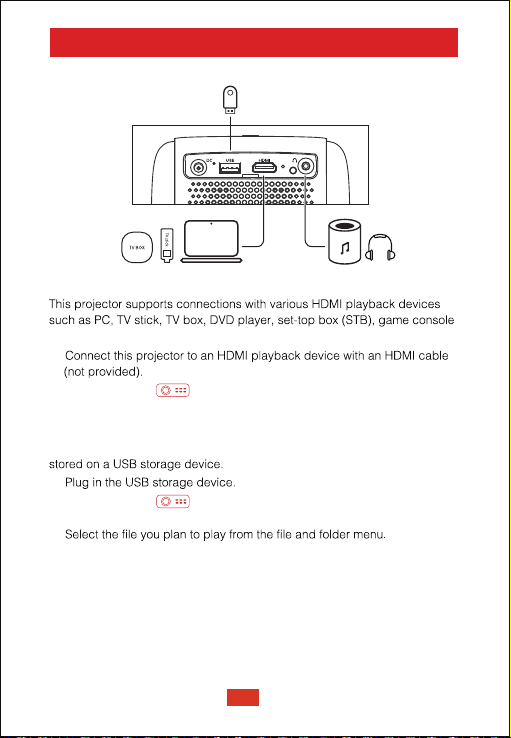
Wired Connections
1. Connect to an HDMI playback device
2. Connect to a flash drive
With this projector, you can enjoy music, video, and pictures, that are
①Plug in the 3.5mm AUX cable connector to ETOE projector AUX port.
②Plug the other connector of the 3.5mm AUX cable to your headphone or speaker.
③ Play your media on projector.
3. Connect to a headphone via AUX cable
You can connect a headphone or speaker to ETOE Projector via AUX cable
as well.
①
②Press the button on remote control to go to projector homepage,
select [HDMI], and press.
or other devices.
①
②Press the button on remote control to go to projector homepage,
select [USB], and press.
③
④Press [OK] to start playing.
EN 11

Specifications
CPU: ARM Quad 64-bit Cortex-A53
Android OS: Android ™ 10.0
Bluetooth: Bluetooth 5.1
Wi-Fi: 2.4G/5 G Hz 802.11a/b/g/n/ac
Native Resolution: 1920*1080
Throw ratio: 1.22
Contrast ratio: 3000:1
Aspect Ratio: 16:9 / 4:3 Adaptive
Speaker: 8W*2 Stereo Speaker
Connection port: HDMI*1; USB*1; AUX*1
Projection size: 40"-200"
Zoom: 50%-100%
Keystone Correction: ±45°
Recommended ambient: 41°F to 95°F / 5°C to 35°C
Relative humidity: 15% ~ 85% (non-condensing)
Warranty: 12-Month
Projection distance and Screen Size
Hight
(inch)
19.6
24.5
29.4
34.3
39.2
44.1
49.0
Width
(inch)
34.9
43.6
52.3
61.0
69.7
78.4
87.2
Width
(cm)
88.6
110.7
132.8
155.0
177.1
199.2
221.4
Screen size
(inch)
40
50
60
70
80
90
100
Hight
(cm)
49.8
62.3
74.7
87.2
99.6
112.1
124.5
Distance
(cm)
108.0
135.0
162.1
189.1
216.1
243.1
270.1
Distance
(ft)
3.5
4.4
5.3
6.2
7.1
8.0
8.9
EN 12

FCC Notice
Warranty
30-Day Money-Back Guarantee for Any Reason
purchase to receive a full refund for any reason.
shipping costs.
12-Month Warranty for Quality-Related Issues
model and cover any return shipping costs.
uncontrolled environment. This equipment shall be installed and operated
including interference that may cause undesired operation.
Warning:
equipment.
Note: This equipmenthas been tested and found to comply with the limits
These limits are designed to provide reasonable protection against harmful
interference in a residential installation.
This equipmentgenerates, uses and can radiate radio frequency energy and,
if not installed and used in accordance with the instruction energy and, if not
installed and used in accordance with the instruction manual, may cause
harmful interference to radio communications.
installation. If thisequipment does cause harmful interference to radioor
televisionreception, which can be determined by turning the equipment off
and on,the user is encouraged to try to correct the interference by one or more
Reorient or relocate the receiving antenna.
Increase the separation between equipment and receiver.
Connect the equipment into an outlet on a circuit different from that to which the
receiver is connected.
EN 13

© ETOE Technology Limited.
All rights reserved. ETOE and the ETOE logo are trademarks of ETOE Technology Limited, which is
registered in the United States and other countries. All other trademarks are the property of the
irrespective owners.
Model: A1192
Manufacturer: HUNAN ETOE Technology Co., Ltd
Made in China
E-mail: [email protected]
Address: Room 603, Building 3, Zone A, Jindaoyuan, NO.169, Huizhi Zhong Road, High-tech District,
Changsha
Other manuals for A1192
1
Table of contents
Other ETOE Projector manuals


