Eton SolarLink FR600 User manual

SOLARLINK FR
600
Self-Powered and Solar-Powered AM/FM/Shortwave Radio with
NOAA Weatherband, Flashlight, Siren and Cell Phone Charger
Owner’s manual

3
SOLARLINLK FR600 OWNER’S MANUAL
DO YOU NEED HELP?
If you need help, please contact us, Monday-Friday, 8:30 a.m.-4:00
p.m., North American Pacic Time. 1-800-872-2228 from the U.S;
1-800-637-1648 from Canada; 650-903-3866, worldwide; FAX:
650-903-3867; web site, www.etoncorp.com; Etón Corporation,
1015 Corporation Way, Palo Alto, CA 94303, USA
WARNING
• Do not expose this appliance to rain or moisture.
• Do not submerge or expose for extended period to water.
• Protect from high humidity and rain.
• Unplug immediately if liquid has been spilled or object have
fallen into the apparatus.
• Clean only with a dry cloth. Do not use detergents or chemical
solvents as this might damage the nish.
• Unplug and disconnect external antennas (not included) during
lightning storms.
• Do not remove cover [or back].
• Refer servicing to qualied service personnel.
Environment
Disposal
According to the European Directive 2002/96/EC all
electrical and electronic products must be collected
separately by a local collection system.
Please act according to your local rules and do not
dispose of your old products with your normal household waste.

SOLARLINLK FR600 OWNER’S MANUAL
4
5
SOLARLINLK FR600 OWNER’S MANUAL
14) Power Supply Knob
15) Band Selecting Knob
16) Volume Adjusting Knob
17) Speaker
18) PHONE CHARGER:USB Jack for Charging the Cellphone
19) DC in:USB Jack for charging the Radio(small)
20) DC in Jack (Adaptor)
21) Earphone Jack
22) Audio Jack
23) Battery Compartment
POWERING AND TURNING ON THE RADIO
The unit is powered with 3 AA batteries, the solar cell, the Dy-
namo (rechargeable Ni-MH battery), the AC adaptor (not included)
or the DC computer input. Select BATTERY, SOLAR or DYNAMO
power with the Power Supply Knob on the upper right side of the
radio. The power sockets are on the back of the radio, under the
LOCATION OF CONTROLS
1) Snooze: 5 Min Snooze
2) Alarm ON/OFF: actiivate/deactivate alarm function
3) ALERT ON/OFF:open/close alert bell
4) Select Button
5) Direction Buttons
6) Flashlight
7) Hand Crank
8) Multifunctional Knob
9) Alert Indicator Light
10) Statement Indicator Light
11) Emergency Indicator Light
12) Watch Indicator Light
13) Warning Indicator Light
1.
3.
4.
5.
9.
10.
11.
12.
13.
14.
5.
5.
15.
16.
18.
19.
23.
20.
21.
22.
17.
5.
6.
7.
8.
2.

SOLARLINLK FR600 OWNER’S MANUAL
6
7
SOLARLINLK FR600 OWNER’S MANUAL
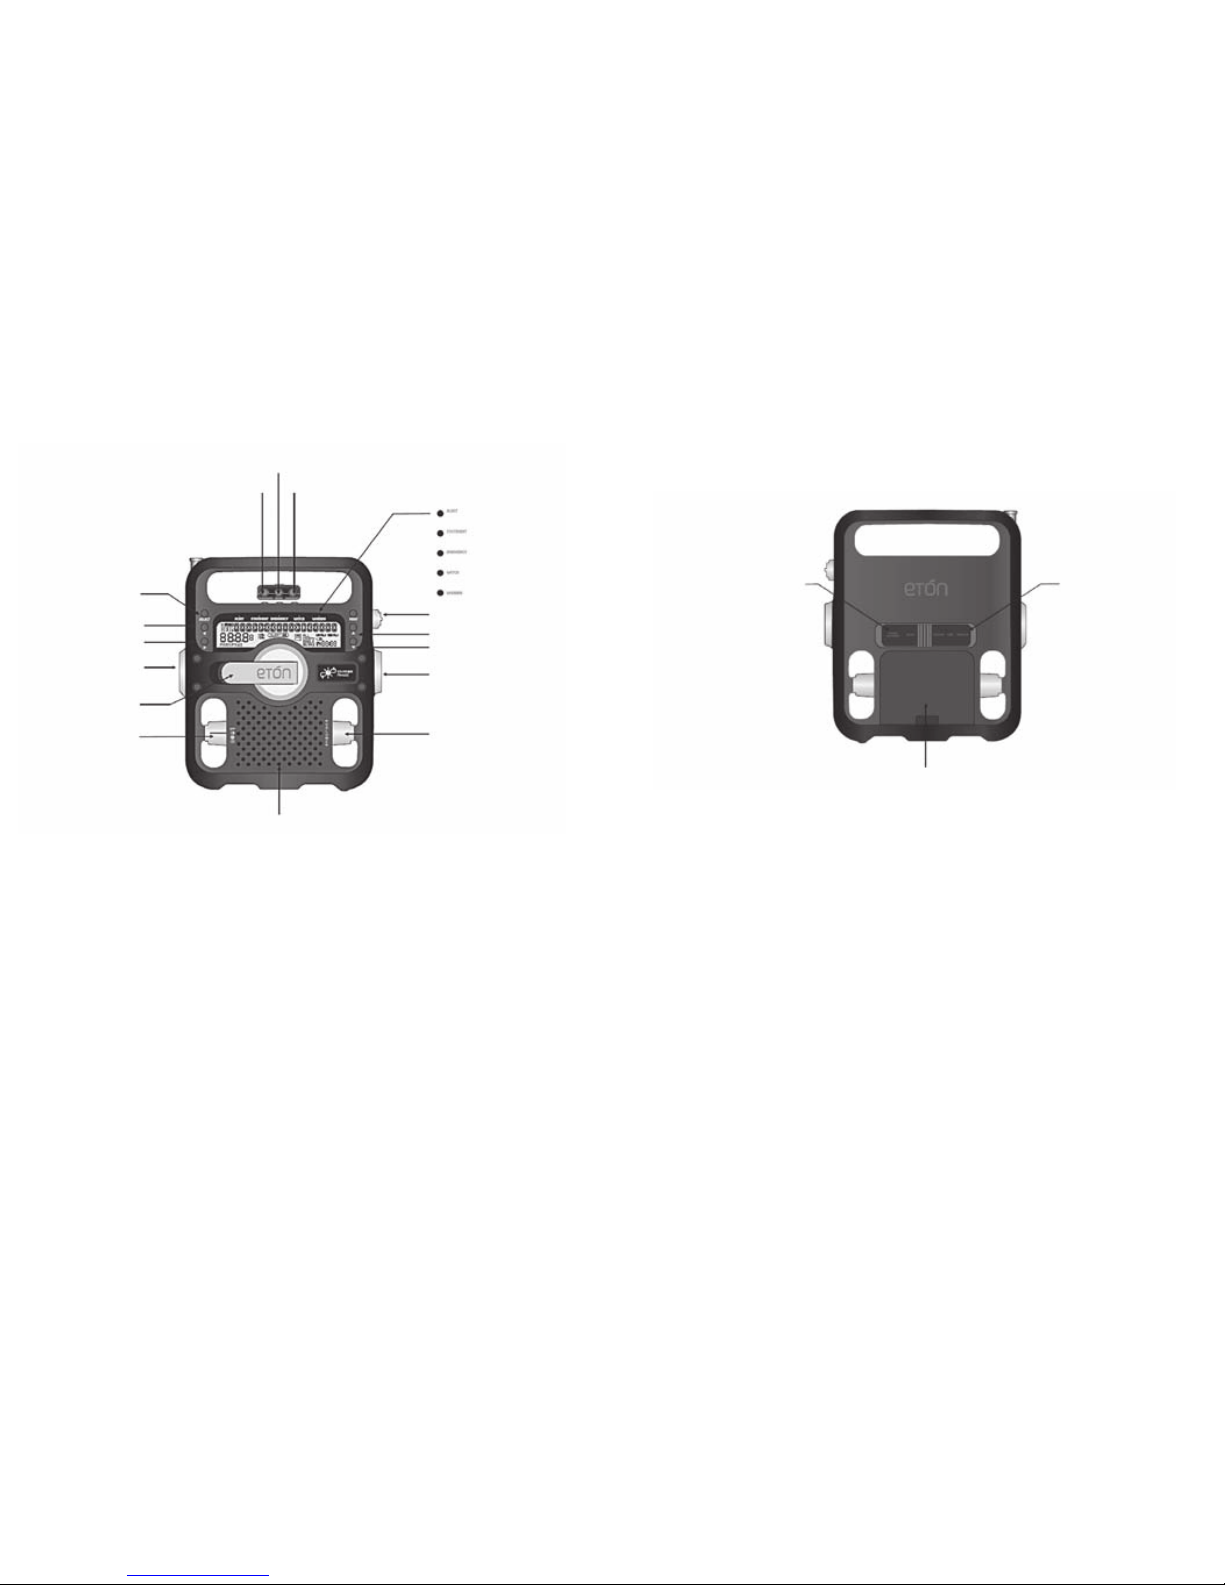
rubber covers. After applying power, select the correct position
with the Power Supply Knob and place the Band Selecting Knob
in the AM, FM, SW, WB or Alert position to turn it on. Turn it off by
placing the Band Selecting Knob in the OFF position.
Note: The radio can be played while it’s charging.
BATTERY POWER
Open the battery compartment cover, you can nd two groups of
sockets for installing the batteries. One group of sockets is for the
rechargeable Ni-MH batteries and the other group of sockets is for
the AA batteries.
Install 3 AA batteries and set the power selector switch to the
BATTERY position.
SOLAR POWER
When you’re in sunlight set the power switch to the SOLAR posi-
tion. This position also recharges the Ni-MH rechargeable battery.
Note: The rechargeable Ni-MH batteries have been disconnect
for transportation purposes. To use the crank-charge system,
open the battery compartment cover and connect the recharge-
able batteries’ plug into its socket.
DYNAMO POWER
The rechargeable Ni-MH (nickel-metal-hydride) battery is in the
battery compartment. To use it plug the battery into the socket
adjacent to it, then set the power switch to the DYNAMO position.
You may have to charge the battery; to do this turn the crank for
90 seconds. The rechargeable battery will eventually lose its abil-
ity to hold a charge.
DC-IN 5V ADAPTOR (not included)
This socket is located on the back of the radio, under the rubber
plugs. Plug in the AC adapter to the DC IN 5 volt socket. This also
charges the Ni-MH battery.
DC-IN USB COMPUTER SOCKET (USB cord not included)
This socket is located on the back of the radio, under the rubber
plugs. Plug in the USB cord to the DC IN socket. This also charges
the Ni-MH battery.
VOLUME CONTROL
Turning the Volume Adjusting Knob (located on the lower right of
the radio) clockwise turns up the volume; counterclockwise turns
down the volume. Always turn down the volume before using
earphones.
CHARGING CELL PHONES (cell phone charging cord in-
cluded)
If you revolve the Power Supply Knob to the OFF/PHONE CHAR-
GER position the radio will charge cell phones. Plug the cell phone
charging cord into the USB PHONE CHARGER jack at the rear of
the radio. Plug the cell phone charging adapter tip into the other
end of the cord and then into the jack of the cell phone. Then put
the radio in the sun or revolve the hand crank to charge the cell
phone. About 10 minutes of cranking results in one or two short
emergency calls.
NOTE: When charging a cell phone via the USB cell phone charger,
it is important to turn the crank at least 2 revolutions per second,
or until you see the green or orange LED above the crank handle

SOLARLINLK FR600 OWNER’S MANUAL
8
9
SOLARLINLK FR600 OWNER’S MANUAL
turn on. This is an indication that the phone is receiving enough
power from the radio. Continue to crank at this rate until you are
satised that an appropriate level of charge has been received
by your cell phone. If you decide to stop cranking for whatever
reason, please wait at least 5 seconds before beginning to crank
again. Not following these instructions may cause damage to
your cell phone for which Eton disclaims any liability and will not
be held liable for any actual or consequential damages related to
this matter.
SETTING THE DATE
1. Revolve the <Band Selecting Knob> to the “OFF” position.
2. Press <MENU> button shortly to enter the setting menu.
3. Press <> or <> shortly to select “SET UP---DATE” option.
4. Press <SELECT> shortly once to enter the date setting mode.
5. Press <> or <> shortly to select “MONTH--DAY--YEAR”
option.
6. Press <> or <> shortly to set “MONTH--DAY--YEAR” option.
7. After setting, press <SELECT> shortly to save.
SETTING THE CLOCK
1. Revolve the <Band Selecting Knob> to the “OFF” position.
2. Press <MENU> button shortly to enter the setting menu.
3. Press <> or <> shortly to select “SET UP---TIME” option.
4. Press <SELECT> shortly once to enter the time setting mode.
5. Press <> or <> shortly to select “HOUR : MINUTE” option.
6. Press <> or <> shortly to set “HOUR : MINUTE” option.
7. After setting, press <SELECT> shortly to save.
Note: The clock is a 12-hour clock, showing “AM” in the display
in the morning, and showing “PM” in the display starting at
noon.
SETTING THE BEEPER ALARM
This radio’s alarm beeps when it activates.
1. SETTING THE ALARM TIME
1) Revolve the <Band Selecting Knob> to the “OFF” position.
2) Press <MENU> button shortly to enter the setting menu.

SOLARLINLK FR600 OWNER’S MANUAL
10
11
SOLARLINLK FR600 OWNER’S MANUAL
3. SNOOZE BUTTON
When the alarm activates, pressing the <SNOOZE> button
shortly deactivates it for 5 minutes (“
“ appears in the dis-
play), then it starts again.
BROADCAST RECEPTION
1. Select the power supply mode.
2. Select the band:
FM Band: Revolve the <Band Selecting Knob> to “FM”
position.
AM Band: Revolve the <Band Selecting Knob> to “AM”
position.
SW Band: Revolve the <Band Selecting Knob> to “SW”
position.
3. Adjust the volume: Revolve <Volume Adjusting Knob> to
adjust the volume level.
4. Tuning in stations:
Manual Tuning: Press <> or <> shortly to tune.
Auto Tuning: Press and hold <> or <> to tune.
Note: When listening to FM, pull up the telescopic antenna all
the way. When tuning AM stations the telescopic antenna is not
needed and can be lowered.
3) Press <> or <> shortly to select “SET UP ALARM--ALM”
option.
4) Press <SELECT> shortly once to enter the date setting mode.
5) Press <> or <> shortly to select “HOUR : MINUTE” option.
6) Press <> or <> shortly to set “HOUR : MINUTE” option.
7) After setting, press <SELECT> shortly to save.
2. ACTIVATING AND DEACTIVATING THE ALARM
Press <ALARM ON/OFF> shortly to activate or deactivate the
alarm.
If the alarm function is activated, the alarm symbol “ AL”
and alarm time will appear in the display. When the alarm time is
reached, the unit will beep.
If the alarm function is deactivated, the alarm symbol “AL “
and alarm time will disappear from the display.

SOLARLINLK FR600 OWNER’S MANUAL
12
13
SOLARLINLK FR600 OWNER’S MANUAL
5. Save stations: While receiving the approving station, press
<MENU> shortly once, “MEMORY” appears in the display. Press
<> or <> shortly to select the address for saving. Then
press <SELECT> shortly to save the station. (Note: FM: 20
memories; AM: 10 memories.)
6. Recall stations: When listening to the radio, press <> or <>
shortly.
7. Turn off: Revolve the <Band Selecting Knob> to “OFF”
position.
SHORTWAVE LISTENING
To learn about shortwave we recommend the two publications
below, published yearly and available from major booksellers.
Additionally, the Internet is a great resource for learning about
shortwave. Type ‘shortwave reception’ into your favorite search
engine.
PASSPORT TO WORLD BAND RADIO Published by Internation-
al Broadcasting Services (IBS); IBS North America, Box 300, Penn’s
Park PA 18943. Phone: (215) 598-9018. www.passband.com.
WORLD RADIO TV HANDBOOK Published in the USA by
Watson-Guptill Publications, 770 Broadway, 7th Floor, New York,
NY 10003-9595. www.watsonguptill.com.
OPTIMIZING SHORTWAVE RECEPTION
Shortwave enables listening to broadcasts over vast distances
including other countries and continents. The following informa-
tion will help you get the best results.
• During the day, frequencies above 13 MHz are usually best.
• At night, frequencies below 13 MHz are usually best.
• Around sunset and sunrise, the entire shortwave range may be
good.
• Getting very close to a window and holding the radio improves
shortwave reception.
Use the frequency ranges (Bands) below for shortwave broadcast
reception:
BANDE MEGAHERTZ (MHz) KILOHERTZ (KHz)
120 m 2.300-2.495 MHz 2300- 2495 KHz
90 m 3.20-3.40 MHz 3200- 3400 KHz
75 m 3.90-4.05 MHz 3900- 4050 KHz
60 m 4.750-5.1 MHz 4750- 5100 KHz
49 m 5.8-6.2 MHz 5730- 6300 KHz
41 m 7.1-7.60 MHz 6890-7600 KHz
31 m 9.4-10 MHz 9250-9995 KHz
25 m 11.5-12.2 MHz 11500-12200 KHz
22 m 13.57-13.87 MHz 13570-13870 KHz
19 m 15.000-15.800 MHz 15005-15825 KHz
16 m 17.55-18 MHz 17480-17900 KHz
15 m 18.9-19.02 MHz 18900-19020 KHz
13 m 21.45-21.85 MHz 21450-21850 KHz

SOLARLINLK FR600 OWNER’S MANUAL
14
15
SOLARLINLK FR600 OWNER’S MANUAL
RECEPTION OF WEATHER FREQUENCIES
To hear your local weather station, pull up the antenna, turn
on the radio and select WB with the band selector. Turn up the
volume and press the buttons to hear all 7 weather channels.
You’ll probably only hear one channel, but if you hear a weather
broadcast on more than one, select the strongest. The strongest
one will usually be your local weather station. Below are the
frequencies that correspond to the radio’s channels:
Channel 1 162.400 MHz
Channel 2 162.425 MHz
Channel 3 162.450 MHz
Channel 4 162.475 MHz
Channel 5 162.500 MHz
Channel 6 162.525 MHz
Channel 7 162.550 MHz
SETTING TO RECEIVE WEATHER ALERTS
Weather alerts are received in three ways:
1. Alert indicator light is on.
2. Alert forecast appears in the display.
3. Alert bell rings.
To set the channel for receiving alerts, use the method below and
set it to your strongest channel.
1) Revolve the <Band Selecting Knob> to “OFF” position.
2) Press <MENU> button shortly to enter the setting menu.
3) Press <> or <> shortly to select “WEATHER” option.
4) Press <SELECT> shortly once to enter the weather setting
mode.
5) Press <> or <> shortly to select the strongest weather
channel (CH1~7).
6) After setting, press <SELECT> shortly to save.
SETTING ALERT MODE
1) Revolve the <Band Selecting Knob> to “OFF” position.
2) Press <MENU> button shortly to enter the setting menu.
3) Press <> or <> shortly to select “ALERT MODE” option.
4) Press <SELECT> shortly once to enter the alert mode setting
mode.
5) Press <> or <> shortly to select the alert mode (SIREN &
VOICE).
Note: The selected alert mode will appear in the display.
6) After setting, press <SELECT> shortly to save.

SOLARLINLK FR600 OWNER’S MANUAL
16
17
SOLARLINLK FR600 OWNER’S MANUAL
SETTING COUNTY CODES (CLC CODES IN CANADA)
County code setting is described below.
A county code instructs the radio only to receive an ALERT when
the code is programmed in. Look up a United States county code at
the following web site:
http://www.nws.noaa.gov/nwr/indexnw.htm#sametable
Look up a Canadian CLC code at:
http://www.msc-smc.ec.gc.ca/msb/weatheradio/transmitter/
index_e.cfm
Your radio can be set for one (SINGL) to 23 (MULTI) codes, or can
be set to receive ALL coded information sent from any transmit-
ter, if your within range. When you set codes, it will only pick up
alerts when you’re in that county or within reception distance of
the signal.
To set codes:
1) Revolve the <Band Selecting Knob> to the “OFF”
position.
2) Press the <MENU> button shortly to enter the setting
menu.
3) Press or shortly to select the “COUNTY CODE” option.
4) Press <SELECT> shortly once to enter the county code setting
mode (MULTI, SINGL or ALL), which blinks in the display.
5) If you don’t know your county code, select ALL with or and
press <SELECT> and then <MENU> TO EXIT. If you know your
code, don’t press SELECT and go to the next section.
6) Press or shortly to select MULTI or SINGL and press
<SELECT>.
7) Press <SELECT> shortly again to enter the code. CODE 01
XXXXXX appears in the display, with 01 ashing.
8) Press <SELECT> again and the rst digit of six starts ashing.
Press or to set the rst digit and then press to go to the
second digit, doing this again and again until all six digits are
entered.
9) If you’re in SINGL, press <SELECT> and then <MENU> to exit.
If in MULTI, go to the next step.
10) If you’re in MULTI and wish to enter more codes, press
<ENTER>.
11) 01 ashes. Press or to go to another code setting num-
ber (1-23 ashes) and press <ENTER>.
12) The rst digit of six ashes, use or to set it and press to
enter the next number, doing this again and again until all six
digits are entered.
13) Press <ENTER> to choose another code number (1-23) and
when your nished press <ENTER> and then MENU to exit.
RECEPTION OF EVENT CODES
Your radio can receive ‘event code’ information during weather
alerts. These codes are identied at http://www.nws.noaa.gov/os/
eas_codes.shtml.
Canadian Weather Alerts are addressed at: http://www.msc-smc.
ec.gc.ca/cd/brochures/warning_e.cfm#top.

SOLARLINLK FR600 OWNER’S MANUAL
18
19
SOLARLINLK FR600 OWNER’S MANUAL
SELECTING DISABLE/ENABLE
Alert modes can be selected to not appear by selecting DISABLE
or to appear by selecting ENABLE.
1) Revolve the <Band Selecting Knob> to “OFF” position.
2) Press <MENU> button shortly to enter the setting menu.
3) Press <> or <> shortly to select “DEFEAT” option.
4) Press <SELECT> shortly once to enter the DEFEAT setting
mode.
5) Press <> or <> shortly to select the alert message you
wish to defeat or enable.
6) Press <> or <> to select DISABLE or ENABLE (printed
under the message on right side of display).
7) After setting, press <SELECT> shortly to save.
ALERT
Before using the ALERT function, set the radio to the strongest
weather band station. After setting, revolve the <Band Select-
ing Knob> to “ALERT” position. The alert indicator light will be
on.
OPEN / CLOSE THE ALERT BELL
While the alert bell is ringing, you can press the <ALERT-ON/
OFF> button (in the space above the display – right side) shortly
to shut off the ringing, then press it shortly again to resume
ringing.
MULTIFUNCTION KNOB
The function switch has four positions. The top position is the
OFF position, then the FLASHLIGHT, SOS and SIREN position.
All positions except OFF are labeled with an icon.
The OFF position turns the function switch off.
The FLASHLIGHT position “ “ turns the white lights on (left
side of radio) with the radio on or off.
The SOS position “ “ turns the red ashing light on. Can be
used with the radio on or off.
The SIREN position “ “ turns on the siren. Can be used with the
radio on or off.
WARRANTY REGISTRATION
To ensure full warranty coverage or product updates, registration
of your product should be completed as soon as possible after
purchase or receipt. You may use one of the following options to
register your product:
1. By visiting our website at http://www.etoncorp.com.
2. Mail in enclosed warranty card.
3. Mail your registration card or information to following address;
include your name, full mailing address, phone number, email
address, model purchased, date purchased, retail vendor name:
Etón Corporation
1015 Corporation Way
Palo Alto, CA 94303 USA

SOLARLINLK FR600 OWNER’S MANUAL
20
21
SOLARLINLK FR600 OWNER’S MANUAL
LIMITED WARRANTY
Retain the warranty information from your warranty card with
your proof of purchase or the Limited Warranty information can
also be viewed at www.etoncorp.com.
SERVICE FOR YOUR PRODUCT
To obtain service for your product, we recommend rst contacting
an Etón service representative at 1-800-872-2228 US, 1-800-
637-1648 Canada, (650) 903-3866 US, customersvc@etoncorp.
com or your respective country distributor in Europe (see enclosed
list) for problem determination and trouble-shooting. If further
service is required, the technical staff will instruct how to proceed
based on whether the radio is still under warranty or needs non-
warranty service.
WARRANTY – If your product is still in warranty and the Etón
service representative determines warranty service is needed,
a return authorization will be issued and instructions will be
given. DO NOT ship your radio back without obtaining the return
authorization.
NON-WARRANTY – If your product is no longer under warranty
and requires service, the Etón service representative will refer you
to the nearest repair facility that will best handle the repair.
For service outside North America, please refer to the distributor
information included at time of purchase/receipt.

GUIDE DE L’UTILISATEUR DU SOLARLINK FR600
23
AVEZ-VOUS BESOIN D’AIDE?
Si vous avez besoin d’aide, veuillez nous contacter, Du Lundi au
Vendredi, 8:30 à.- 16:00., Fuseau horaire du Pacique Amérique
du Nord. 1-800-872-2228 depuis les U.S.A; 1-800-637-1648
depuis le Canada; 650-903-3866, ailleurs dans le monde; FAX:
650-903-3867; site Internet, www.etoncorp.com; Etón Corpora-
tion, 1015 Corporation Way, Palo Alto, CA 94303, USA
AVERTISSEMENT
• Ne pas exposer cet appareil à la pluie ou à l’humidité.
• Ne pas immerger ou exposer à l’eau pendant une longue période.
• Protéger d’une grande humidité et de la pluie.
• Débrancher immédiatement si un liquide a été renversé sur
l’appareil ou si un objet quelconque est tombé à l’intérieur.
• Nettoyer seulement avec un chiffon sec. Ne pas utiliser de
détergents ni de solvants chimiques qui pourraient endommager
le ni.
• Débrancher et déconnecter l’antenne extérieure en cas d’orages.
• Ne pas enlever le couvercle [ou l’arrière].
• S’adresser à du personnel qualié pour la maintenance.
Environnement
Mise au rebut
Conformément à la Directive Européenne 2002/96/EC tous les
produits électriques et électroniques doivent être récupérés
séparément par un système local de collecte.
Veuillez agir suivant les règles locales et ne pas
mettre au rebut vos vieux appareils avec vos
déchets ménagers ordinaires.

GUIDE DE L’UTILISATEUR DU SOLARLINK FR600
24
GUIDE DE L’UTILISATEUR DU SOLARLINK FR600
25
EMPLACEMENT DES COMMANDES
1) SNOOZE (Répétition d’alarme) : Snooze de 5 Min
2) ALARME Marche/Arrêt:Activer/Désactiver la fonction alarme
3) ALERTE Marche/Arrêt: lance/ferme la sonnerie d’alerte
4) Bouton de sélection
5) Bouton de direction
6) Flash
7) Manivelle
8) Molette multifonctionnelle
9) Indicateur lumineux d’alerte
10) Indicateur lumineux d’état
11) Indicateur lumineux d’urgence
12) Indicateur lumineux de l’horloge
13) Indicateur de mise en garde
14) Molette d’alimentation
15) Molette de sélection de bande
16) Molette de réglage du volume
17) Haut parleur
18) CHARGEUR DE TÉLÉPHONE: prise USB pour charger un télé-
phone portable (grosse)
19) Entrée courant continu: prise USB pour charger la radio (petite)
20) Entrée courant continu (Adaptateur)
21) Prise écouteurs
22) Prise audio
23) Compartiment des piles
ALIMENTATION ET MISE EN MARCHE DE LA RADIO
L’appareil est alimenté par 3 piles de type AA, par cellule solaire,
par Dynamo ( batterie rechargeable au Ni-MH), par adaptateur de
courant secteur (non inclus) ou par entrée d’ordinateur courant
continu. Sélectionnez l’alimentation par BATTERY (piles), SOLAR
(cellule solaire) ou DYNAMO au moyen de la molette d’alimentation
sur le côté supérieur droit de la radio. Les prises d’alimentation
sont à l’arrière de la radio, sous le couvercle en caoutchouc. Après
1.
3.
4.
5.
9.
10.
11.
12.
13.
14.
5.
5.
15.
16.
17.
5.
6.
7.
8.
2.
18.
19.
23.
20.
21.
22.

GUIDE DE L’UTILISATEUR DU SOLARLINK FR600
26
GUIDE DE L’UTILISATEUR DU SOLARLINK FR600
27
mise en place de l’alimentation, sélectionnez la bonne position
avec la molette d’alimentation et mettez la molette de sélection
de bande sur AM, FM, SW (Onde Courte OC), WB (Emission météo
ou sur la position Alerte pour la mettre en marche. Eteignez la
radio en mettant la molette de sélection de bande sur la position
Arrêt (OFF).
REMARQUE: La radio peut marcher tout en étant en charge.
ALIMENTATION PAR PILES
Ouvrez le couvercle du compartiment des piles, vous verrez deux
groupes de prises pour l’installation des piles. Un groupe de prises
est pour la batterie rechargeable au Ni-MH et l’autre groupe de
prises est pour les piles de type AA.
Installez 3 piles AA et mettez le sélecteur sur la position BAT-
TERY (piles).
ALIMENTATION PAR CELLULE SOLAIRE
Lorsque vous êtes au soleil mettez le commutateur d’alimentation
sur la position SOLAR. Cette position recharge également la bat-
terie rechargeable au Ni-MH.
REMARQUE: Les batteries rechargeables au Ni-MH sont décon-
nectées lors du transport. Pour utiliser le système de chargement
avec manivelle, ouvrez le couvercle du compartiment des piles et
connectez la che de batteries rechargeables à sa prise.
ALIMENTATION PAR DYNAMO
La batterie rechargeable au Ni-MH (hydrure nickel-métal) est
dans le compartiment à piles. Pour l’utiliser branchez la batterie à
la prise adjacente à cette dernière, puis mettez le commutateur
d’alimentation sur la position DYNAMO. Vous pouvez avoir besoin
de charger la batterie; pour cela tournez la manivelle pendant 90
secondes. La batterie rechargeable va éventuellement perdre sa
capacité à tenir la charge.
ADAPTATEUR COURANT CONTINU 5V (non inclus)
Cette prise est située à l’arrière de la radio, sous les prises en
caoutchouc. Branchez l’adaptateur secteur dans la prise d’entrée
de courant continu 5 volts. Cela va également charger la batterie
au Ni-MH.
PRISE ORDINATEUR USB DE COURANT CONTINU (le cor-
don USB n’est pas inclus)
Cette prise est située à l’arrière de la radio, sous les prises en
caoutchouc. Branchez le cordon USB à la prise d’entrée de courant
continu. Cela va également charger la batterie au Ni-MH.
CONTRÔLE DU VOLUME
En tournant la molette de réglage du volume (située sur le coté
inférieur droit de la radio dans le sens des aiguilles d’une montre,
cela va augmenter le volume; tournez dans le sens contraire des
aiguilles d’une montre pour diminuer le volume. Baissez toujours le
volume avant d’utiliser des écouteurs.

GUIDE DE L’UTILISATEUR DU SOLARLINK FR600
28
GUIDE DE L’UTILISATEUR DU SOLARLINK FR600
29
CHARGEMENT DE TÉLÉPHONES PORTABLES (le cordon de
chargement de téléphone portable n’est pas inclus)
Si vous tournez la molette d’alimentation sur la position OFF/
PHONE CHARGER, la radio va charger le téléphone portable.
Branchez le cordon de charge du téléphone portable dans la prise
USB PHONE CHARGER (USB DE CHARGEMENT DU TÉLÉPHONE)
à l’arrière de la radio. Branchez l’embout de l‘adaptateur de charge
du téléphone portable de l’autre extrémité du cordon et puis dans
la prise du téléphone portable. Puis mettez la radio au soleil ou
tournez la manivelle pour charger le téléphone portable. Environ
10 minutes de manivelle vont permettre un ou deux appels
d’urgence.
REMARQUE: Lors du chargement d’un téléphone portable via le
chargeur de téléphone USB, il est important de tourner la maniv-
elle au moins 2 tours par seconde, ou jusqu’à ce que vous voyez
un voyant vert ou orange au dessus de la manivelle. C’est une in-
dication que le téléphone reçoit sufsamment de puissance de la
radio. Continuez à tourner la manivelle à ce rythme jusqu’à ce que
vous soyez satisfait du niveau de charge reçu par votre téléphone
portable. Si vous décidez d’arrêter de tourner pour n’importe
quelle raison, veuillez attendre au moins 5 secondes avant de re-
commencer à tourner la manivelle. Ne pas suivre ces instructions
peut endommager votre téléphone portable pour lequel Eton se
déclare non responsable et ne sera pas tenu responsable pour
tout dommages réel ou consécutif relatif à ce cas.
RÉGLAGE DE LA DATE
1. Tournez la <Molette de sélection de bande> sur la posi-
tion Arrêt (OFF).
2. Appuyez brièvement sur le bouton <MENU> pour entrer dans
le menu de conguration.
3. Appuyez brièvement sur <> ou <> pour sélectionner
l’option “Réglage de la date” (“SET UP---DATE”).
4. Appuyez brièvement une fois sur <SELECT> pour entrer le
mode de conguration de la date.
5. Appuyez brièvement sur < > ou < > pour sélectionner
l’option “MOIS-JOUR-ANNÉE” (“MONTH--DAY--YEAR”).
6. Appuyez brièvement sur <> ou <> pour régler l’option
“MOIS-JOUR-ANNÉE” ( “MONTH--DAY--YEAR”).
7. Après réglage, appuyez brièvement sur <SELECT> pour
sauvegarder.
RÉGLAGE DE L’HORLOGE
1. Tournez la <Molette de sélection de bande> sur la position
Arrêt (“OFF”).
2. Appuyez brièvement sur le bouton <MENU> pour entrer dans
le menu de conguration.
3. Appuyez brièvement sur <> ou <> pour sélectionner
l’option “REGLAGE—HEURE” ( “SET UP---TIME”).

GUIDE DE L’UTILISATEUR DU SOLARLINK FR600
30
GUIDE DE L’UTILISATEUR DU SOLARLINK FR600
31
4. Appuyez brièvement sur <SELECT> une fois pour entrer dans
le mode de conguration de l’heure.
5. Appuyez brièvement sur <> ou <> pour sélectionner
l’option “HEURE: MINUTE” ( “HOUR : MINUTE”).
6. Appuyez brièvement sur <> ou <> pour régler l’option
“HEURE:MINUTE” (“HOUR : MINUTE”).
7. Après réglage, appuyez brièvement sur <SELECT> pour
sauvegarder.
REMARQUE: L’horloge est une horloge 12-heures, afchant
“AM”(matin) le matin, et afchant “PM” (Après-midi) l’après-midi.
RÉGLAGE DE L’ALARME QUI EMET UN BIP
Cette alarme de radio émet un bip lorsqu’elle est active.
1. RÉGLAGE DE L’HEURE DE L’ALARME
1) Tournez la <Molette de sélection de bande> sur la posi-
tion Arrêt (“OFF”).
2) Appuyez brièvement sur le bouton <MENU> pour entrer dans
le menu de conguration.
3) Appuyez brièvement sur <> ou <> pour sélectionner
l’option “CONFIGURATION DE L’ALARME—ALM” (“SET UP
ALARM--ALM”).
4) Appuyez brièvement une fois sur <SELECT> pour entrer dans
le mode de conguration de la date.
5) Appuyez brièvement sur <> ou <> pour sélectionner
l’option “HEURE:MINUTE” (“HOUR : MINUTE”).
6) Appuyez brièvement sur <> ou <> pour régler l’option
“HEURE:MINUTE” (“HOUR : MINUTE”).
7) Après réglage, appuyez brièvement sur <SELECT> pour
sauvegarder.
2. ACTIVATION ET DÉSACTIVATION DE L’ALARME
Appuyez brièvement sur <ALARM MARCHE/ARRÊT (ON/
OFF)> pour activer ou désactiver l’alarme.
Si la fonction alarme est activée, le symbole “ AL” et l’heure
de l’alarme apparaissent à l’afchage. Lorsque c’est l’heure de
l’alarme, l’appareil va émettre un bip.
Si la fonction alarme est désactivée, le symbole “ AL “ et
l’heure de l’alarme vont disparaître de l’afchage.

GUIDE DE L’UTILISATEUR DU SOLARLINK FR600
32
GUIDE DE L’UTILISATEUR DU SOLARLINK FR600
33
3. BOUTON SNOOZE (Répétition d’alarme)
Lorsque l’alarme est active, le fait d’appuyer brièvement sur le
bouton <SNOOZE> désactive l’alarme pendant 5 minutes
(“
“ apparaît sur l’afchage), puis elle redémarre.
RÉCEPTION D’ÉMISSIONS
1. Sélectionnez le mode d’alimentation.
2. Sélectionnez la bande:
Bande FM: mettez la <molette de sélection de bande>
sur la position “FM”.
Bande AM : mettez la <molette de sélection de bande >
sur la position “AM”.
Bande OC (SW): mettez la <molette de sélection de
bande > sur la position “SW”.
3. Réglez le volume: tournez la <molette de réglage du vol-
ume> pour régler le niveau du volume.
4. Syntonisation de stations:
Syntonisation manuelle: Appuyez brièvement sur <> ou <>
pour syntoniser.
Syntonisation automatique: Appuyez et restez appuyé sur
<> ou <> pour syntoniser.
REMARQUE: Lors de l’écoute de la FM, dépliez entièrement
l’antenne télescopique Lors de la syntonisation de stations AM,
l’antenne télescopique n’est pas nécessaire et peut être rabais-
sée.
5. Sauvegarde de stations: Pendant la réception de la station,
appuyez brièvement une fois sur <MENU> , “MEMORY” ap-
paraît à l’afchage. Appuyez brièvement sur <> ou <> pour
sélectionner l’adresse de sauvegarde. Puis appuyez brièvement
sur <SELECT> pour sauvegarder la station. (REMARQUE: FM:
20 mémoires; AM: 10 mémoires.)
6. Rappel des stations: Lors de l’écoute de la radio, appuyez
brièvement sur <> ou <>.
7. Pour éteindre: tournez la <molette de sélection de bande>
sur la position “OFF”.
BANDE MEGAHERTZ (MHz) KILOHERTZ (KHz)
120 m 2.300-2.495 MHz 2300- 2495 KHz
90 m 3.20-3.40 MHz 3200- 3400 KHz
75 m 3.90-4.05 MHz 3900- 4050 KHz
60 m 4.750-5.1 MHz 4750- 5100 KHz
49 m 5.8-6.2 MHz 5730- 6300 KHz
41 m 7.1-7.60 MHz 6890-7600 KHz
31 m 9.4-10 MHz 9250-9995 KHz
25 m 11.5-12.2 MHz 11500-12200 KHz
22 m 13.57-13.87 MHz 13570-13870 KHz
19 m 15.000-15.800 MHz 15005-15825 KHz
16 m 17.55-18 MHz 17480-17900 KHz
15 m 18.9-19.02 MHz 18900-19020 KHz
13 m 21.45-21.85 MHz 21450-21850 KHz

GUIDE DE L’UTILISATEUR DU SOLARLINK FR600
34
GUIDE DE L’UTILISATEUR DU SOLARLINK FR600
35
RÉCEPTION DES FRÉQUENCES MÉTÉO
Pour écouter votre station locale météo, dépliez l’antenne,
allumez la radio et sélectionnez WB avec le sélecteur de bande.
Augmentez le volume et appuyez sur les boutons pour en-
tendre les 7 canaux météo. Vous n’entendrez probablement qu’un
canal, mais si vous entendez plus d’un canal météo, sélectionnez
le plus puissant. Le plus puissant sera habituellement votre sta-
tion météo locale. Ci-dessous, voici les fréquences correspondan-
tes aux canaux radio:
Canal 1 162.400 MHz
Canal 2 162.425 MHz
Canal 3 162.450 MHz
Canal 4 162.475 MHz
Canal 5 162.500 MHz
Canal 6 162.525 MHz
Canal 7 162.550 MHz
RÉGLAGE POUR RECEVOIR LES ALERTES MÉTÉO
Les alertes météo sont reçues de trois façons:
1. Indicateur lumineux d’alerte.
2. Emission d’alerte (Alert forecast) apparaît sur l’afchage.
3. Sonnerie d’alerte.
Pour régler le canal de réception d’alertes, utilisez la méthode ci-
dessous et réglez-le sur votre canal le plus puissant.
1) Tournez la <molette de sélection de bande> sur la posi-
tion Arrêt (“OFF”).
2) Appuyez brièvement sur le bouton <MENU> pour entrer dans
le menu de conguration.
3) Appuyez brièvement sur <> ou <> pour sélectionner
l’option “METEO” (“WEATHER”).
4) Appuyez brièvement une fois sur <SELECT> pour entrer dans
le mode de conguration météo.
5) Appuyez brièvement sur <> ou <> pour sélectionner le
canal météo le plus puissant (CH1~7).
6) Après réglage, appuyez brièvement sur <SELECT> pour
sauvegarder.
RÉGLAGE DU MODE ALERTE
1) Tournez la <molette de sélection de bande> sur la posi-
tion Arrêt (“OFF”)..
2) Appuyez brièvement sur <MENU> pour entrer dans le menu
de conguration.
3) Appuyez brièvement sur <> ou <> pour sélectionner
l’option “MODE D’ALERTE” (“ALERT MODE”).

GUIDE DE L’UTILISATEUR DU SOLARLINK FR600
36
GUIDE DE L’UTILISATEUR DU SOLARLINK FR600
37
4) Appuyez brièvement une fois sur <SELECT> pour entrer dans
le mode de conguration d’alerte.
5) Appuyez brièvement sur <> ou <> pour sélectionner le
mode d’alerte (SIRÈNE & VOIX).
REMARQUE: le mode d’alerte sélectionné va apparaître à
l’afchage.
6) Après réglage, appuyez brièvement sur <SELECT> pour
sauvegarder.
RÉGLAGE DES CODES DE RÉGION (COMTÉ) (Codes CLC Au
Canada)
Le réglage de code de comté est décrit ci-dessous.
Un code de comté indique à la radio de ne recevoir qu’une Alerte
lorsque le code est programmé dans la radio. Consultez le code
des Etats-Unis sur le site Internet suivant:
http://www.nws.noaa.gov/nwr/indexnw.htm#sametable
Consultez le code CLC Canadien sur:
http://www.msc-smc.ec.gc.ca/msb/weatheradio/transmitter/
index_e.cfm
Votre radio peut être réglée pour un code (SINGL) jusqu’à 23
codes (MULTI), ou peut être réglée pour recevoir TOUTES (ALL)
les informations codées envoyées par n’importe quel émetteur,
si vous êtes dans la zone de réception. Lorsque vous réglez les
codes, cela va uniquement déclencher les alertes lorsque vous
êtes dans le comté ou dans la zone de réception couverte par le
signal.
Pour dénir les codes:
1) Tournez la <Molette de sélection de bande> sur la posi-
tion Arrêt (“OFF”).
2) Appuyez brièvement sur le bouton <MENU> pour entrer dans
le menu de conguration.
3) Appuyez brièvement sur ou pour sélectionner l’option
“CODE DE COMTÉ” (“COUNTY CODE”).
4) Appuyez brièvement une fois sur <SELECT> pour entrer dans
le mode de conguration du code de comté (MULTI, SINGL ou
ALL), qui va clignoter à l’afchage.
5) Si vous ne connaissez pas votre code de comté, sélection-
nez ALL avec ou et appuyez sur <SELECT> et puis
sur <MENU> pour quitter. Si vous connaissez votre code,
n’appuyez pas sur SELECT et passez à la section suivante.
6) Appuyez brièvement sur ou pour sélectionner MULTI ou
SINGL et appuyez sur <SELECT>.
7) Appuyez brièvement de nouveau sur <SELECT> et entrer
le code. CODE 01 XXXXXX apparaît sur l’afchage, avec 01
clignotant.
8) Appuyez de nouveau sur <SELECT> et le premier des six chif-
fres commence à clignoter. Appuyez sur ou pour dénir
le premier chiffre et puis appuyez sur pour passer au second
chiffre, répétez cela pour entrer les six chiffres.
9) Si vous êtes sur SINGL, appuyez sur <SELECT> et puis sur
<MENU> pour quitter. Si vous êtes sur MULTI, passez à la
prochaine étape.
10) Si vous êtes sur MULTI et que vous souhaitiez entrer plus de
codes, appuyez sur <ENTER>.

GUIDE DE L’UTILISATEUR DU SOLARLINK FR600
38
GUIDE DE L’UTILISATEUR DU SOLARLINK FR600
39
11) 01 clignote. Appuyez sur ou pour un autre nombre de
conguration de code (1-23 clignote) et appuyez sur <EN-
TER>.
12) Le premier des six chiffres clignote, utilisez ou pour le
dénir et appuyez sur pour entrer le chiffre suivant, répétez
cela pour entrer les six chiffres.
13) Appuyez sur <ENTER> pour choisir un autre nombre de code
(1-23) et quand vous avez ni, appuyez sur <ENTER> et sur
MENU pour quitter.
RÉCEPTION DES CODES D’ÉVÈNEMENT
Votre radio peut recevoir des informations de type ‘Code
d’évènement’ durant les alertes météo. Ces codes sont identiés
sur http://www.nws.noaa.gov/os/eas_codes.shtml.
Les alertes météo canadienne sont sur: http://www.msc-smc.ec.gc.
ca/cd/brochures/warning_e.cfm#top.
SÉLECTION DE DÉSACTIVER (DISABLE)/ ACTIVER (EN-
ABLE)
Les modes d’alerte peuvent être sélectionnés pour ne pas apparaî-
tre en sélectionnant DISABLE ou pour apparaître en sélectionnant
ENABLE.
1) Tournez la <Molette de sélection de bande> sur la position
Arrêt (“OFF”).
2) Appuyez brièvement sur le bouton <MENU> pour entrer dans
le menu de conguration.
3) Appuyez brièvement sur <> ou <> pour sélectionner
l’option “REJETER” (“DEFEAT”).
4) Appuyez brièvement une fois sur <SELECT> pour entrer dans
le mode de conguration REJETER (DEFEAT).
5) Appuyez brièvement sur <> ou <> pour sélectionner le
message d’alerte que vous souhaitez rejeter ou autoriser.
6) Appuyez sur <> ou <> pour sélectionner
DESACTIVER(DISABLE) ou ACTIVER (ENABLE) (imprimé sous le
message sur le côté droit de l’afchage).
7) Après réglage, appuyez brièvement sur <SELECT> pour
sauvegarder.
ALERTE
Avant d’utiliser la fonction ALERTE, réglez la radio sur la station
météo la plus puissante. Après réglage, tournez la <Molette
de sélection de bande> sur la position “ALERT”. Le voyant
indicateur d’alerte s’éclaire.
MARCHE/ARRËT DE LA SONNERIE D’ALERTE
Lorsque la sonnerie d’alerte retentit, vous pouvez appuyez sur le
bouton <ALERT-ON/OFF> (dans l’emplacement au dessus de
l’écran – côté droit) brièvement pour couper la sonnerie, puis ap-
puyez brièvement de nouveau dessus pour réactiver la sonnerie.`
MOLETTE MULTIFONCTIONNELLE
Le commutateur de fonction possède quatre positions. La posi-
tion du haut est la position Arrêt (OFF), puis il y a la position
FLASH, SOS et SIRÈNE. Toutes les positions sauf Arrêt (OFF)
sont indiquées avec un icône.
La position Arrêt (OFF) éteint le commutateur de fonction.
La position FLASH “ “ allume une lumière blanche lorsque la
radio est allumée ou éteinte (côté gauche de la radio).
Other manuals for SolarLink FR600
4
Table of contents
Languages:
Other Eton Portable Radio manuals

Eton
Eton MICROLINK FR150 User manual

Eton
Eton S350DL User manual

Eton
Eton E5 User manual

Eton
Eton MINI 300PE User manual

Eton
Eton Microlink FR140 User manual

Eton
Eton E4 User manual

Eton
Eton SOLARLINK FR360 Owner's manual

Eton
Eton SOLARLINK FR360 User manual

Eton
Eton MICROLINK FR150 User manual

Eton
Eton MICROLINK FR150 User manual
Popular Portable Radio manuals by other brands

Samhoo
Samhoo D618U1 owner's manual

Motorola
Motorola SYSTEMS SABER SECURENET Handie-Talkie... Service manual

Motorola
Motorola Astro APX 3000 quick start guide

Sylvania
Sylvania SRCD202DG instruction manual

Vertex Standard
Vertex Standard PEP9000 - UPDATE V0521 AND V11.54 Update

Philips
Philips AE6370 brochure