EuropAce ERJ 185P User manual
Multi- Function Rice Cooker | ERJ 185P
Multi-Function Rice Cooker.
1

1
CONTENTS
IMPORTANT SAFEGUARDS
PRODUCT INTRODUCTION
Control Panel
QUICK GUIDE TO COOK RICE
GUIDE TO COOKING/FAST COOKING
GUIDE TO PORRIDGE/CONGEE COOKING
GUIDE TO SOUP/STEW MAKING
GUIDE TO BROWN RICE COOKING
GUIDE TO YOGURT MAKING
GUIDE TO CAKE MAKING
GUIDE TO PASTA/STEAMING
KEEP WARM
PRESET TIMER
SPECIFICATIONS
PRECAUTIONS
CLEANING INSTRUCTIONS
Water Holder Cleaning
CARE AND MAINTENANCE
TROUBLESHOOTING
2
3
3
4
6
7
7
8
8
9
9
10
10
10
11
11
11
12
12
ERJ 185P IM.indd 1 5/23/2014 4:33:01 PM
2
IMPORTANT SAFEGUARDS
Read all instructions before using this appliance.
Ensure that the voltage indicated on the appliance corresponds with the
voltage of your electrical outlet.
Do not plug in any other appliance at the same power point as your appliance
or use extension cords or double adapters.
Never unplug this appliance by pulling on the power cord. Always grip the
Do not allow the power cord to hang over of a table or counter, or
touch hot surfaces. Do not operate or place any part of the appliance on or
near a hot gas or electric burner, or on a heated oven.
Do not operate the appliance if it has a damaged power cord or plug, if it is
not working properly, or if it has been damaged in any manner. The appliance
to our service centre for examination, repair or adjustment.
Do not use the appliance under a wall cupboard, shelves or other overhanging
fumes.
Children should be supervised to ensure that they do not play with the
appliance.
Close supervision is necessary when the appliance is used by or near children
and persons with reduced capabilities.
This appliance is not intended for use by persons (including children) with
reduced physical, sensory or mental capabilities, or lack of experience and
knowledge unless they have been given supervision or instruction concerning
use of the appliance by a person responsible for their safety.
Do not leave the appliance unattended when it is switched on or operating.
Never use any accessories or parts that are not recommended or sold by the
manufacturer. If you use such accessories or parts, the warranty becomes
invalid.
U
To protect against the risk of electrical shock, do not immerse
in water or other liquid.
Do not use the appliance for anything other than its intended use. The
appliance is intended for household use only.
This appliance is intended to be used in household and similar applications such
bed and breakfast type environments.
ERJ 185P IM.indd 2 5/23/2014 4:33:01 PM
3
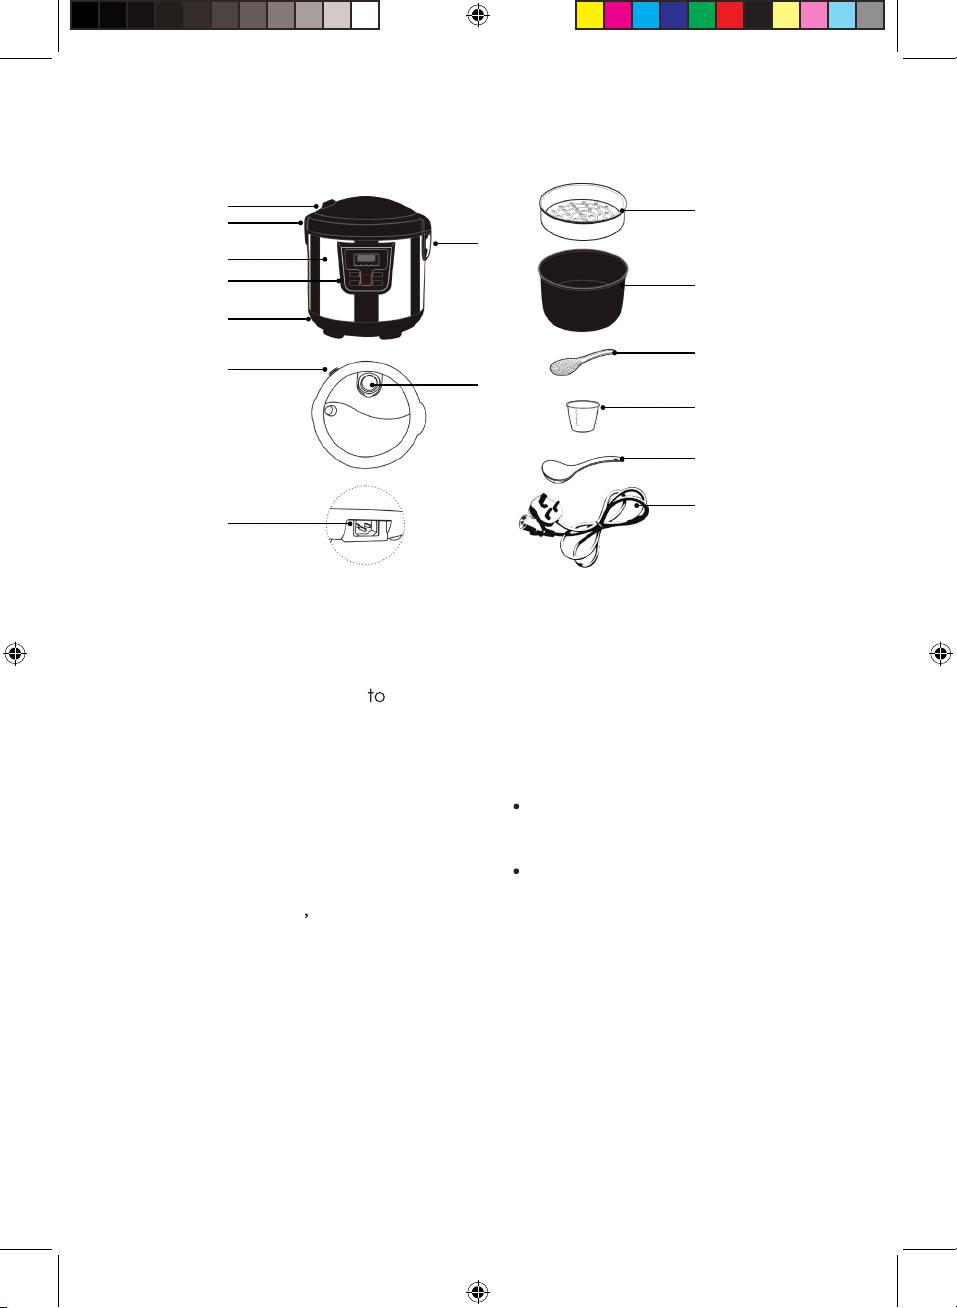
PRODUCT INTRODUCTION
Lid Release
Button
Lid
Water
Holder
Steam
Vent
Outer Housing
Control Panel
Bottom Housing
Spatula Holder
Steamer
Pot
Spatula
Measuring Cup
Soup Ladle
Power Cord
Socket Outlet
Control Panel
1. KEEP WARM/CANCEL
Press this button to start Keep
Warm function or turn off any Menu
functions.
4. MENU
Press this button to select the
desired Menu function.
2. PRESET
Press this button and then press
“TIMER” to set the required delay
time to start the cooking.
NOTE: Preset function is available for
COOK, PORRIDGE, CONGEE, SOUP,
STEW, BROWN RICE and PASTA/
STEAM only.
5. TIMER
After press “PRESET”, press this
button to set the desired delay
time to start the cooking.
After selected the desired
function, press this button to
extend the cooking.
NOTE: Timer function is not available
for COOK and FAST COOK.
3. START
Press this button to start the
cooking.
ERJ 185P IM.indd 3 5/23/2014 4:33:02 PM
4
QUICK GUIDE TO COOK RICE
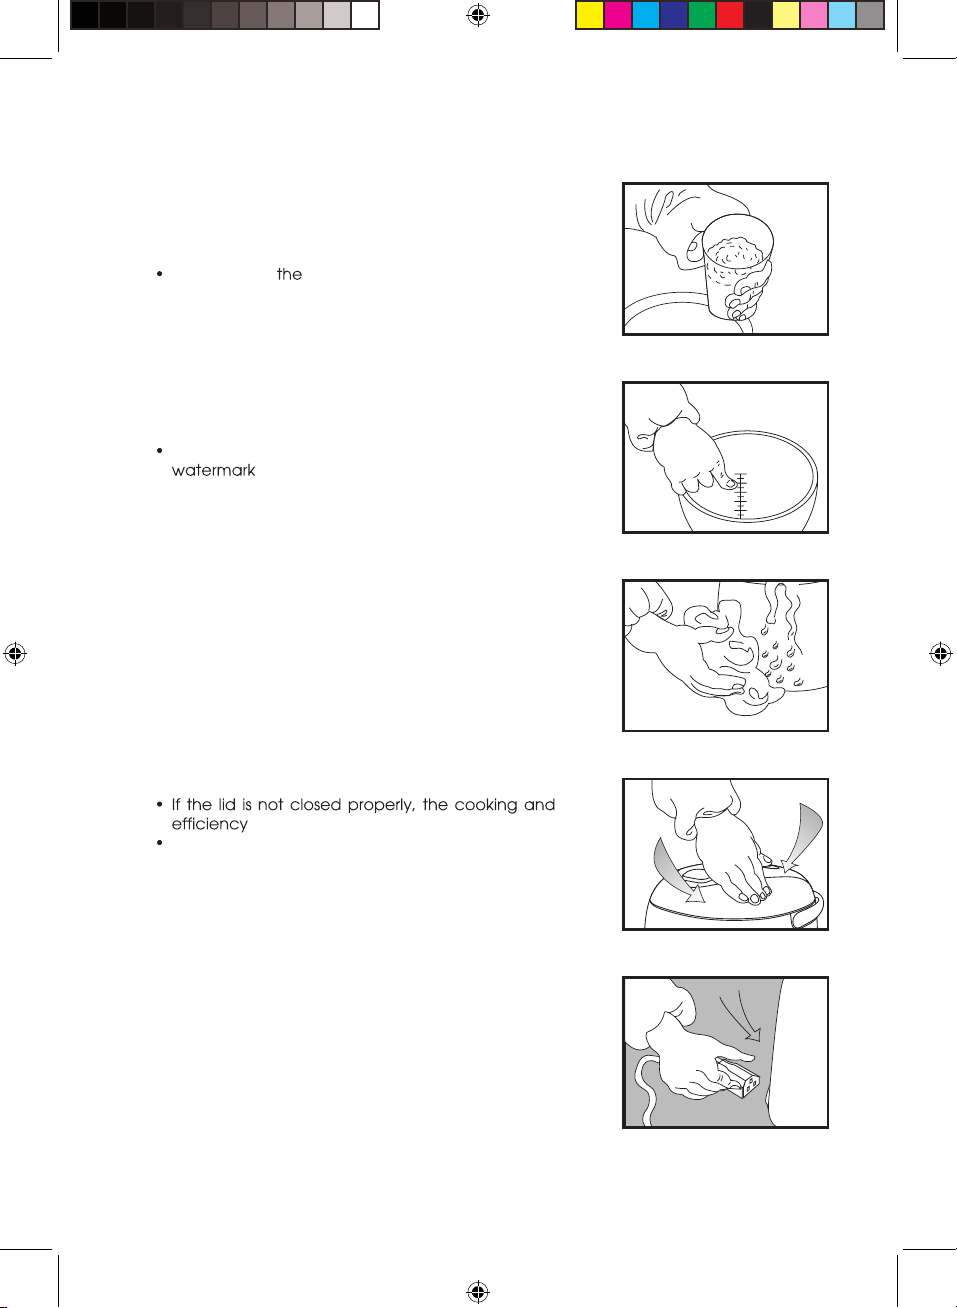
1. Measure the desired amount of rice with the
measuring cup supplied with the rice cooker. Rinse
the rice several times until the water in the bowl
shows relatively clear.
Do not rinse rice in the pot, if the pot is used for
washing rice, the non-stick coating may be deformed
which will result in poor conduction because it
cannot contact with heating plate properly.
2. Put the washed rice into the pot and add water to
the corresponding level. Add or reduce the amount
of water depending on your personal preference.
Do not over add water and exceed the “MAX”
.
3. Wipe the water outside the pot, place the pot into
the cooker, turn it slightly left to right, ensure that the
pot contacts with the heating plate properly, level
the rice inside the pot.
4. Close the lid. Push it in securely until the lock clicks.
will be affected.
Make sure the lid is closed and locked before moving
the rice cooker.
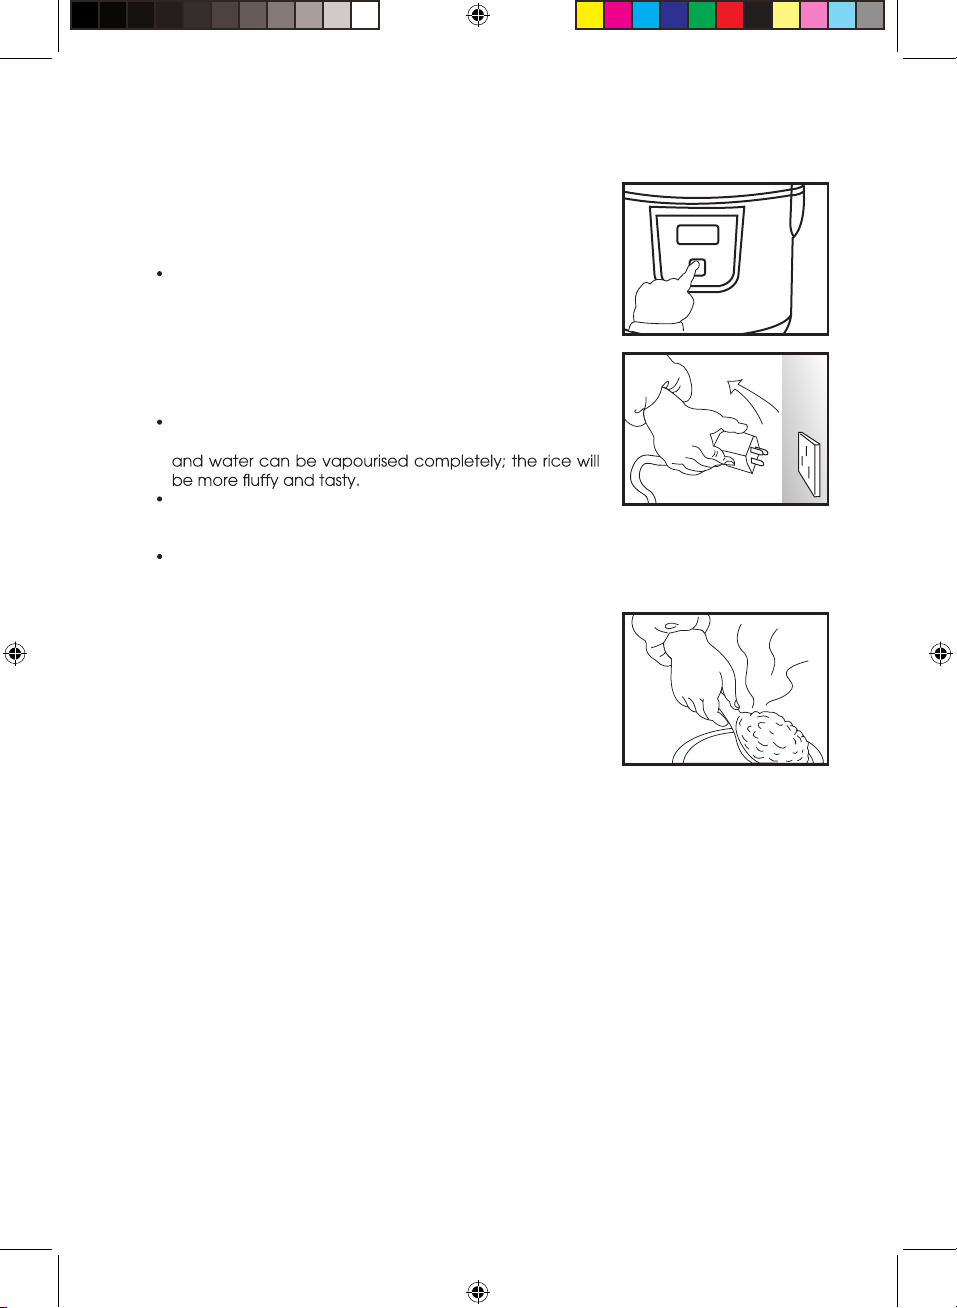
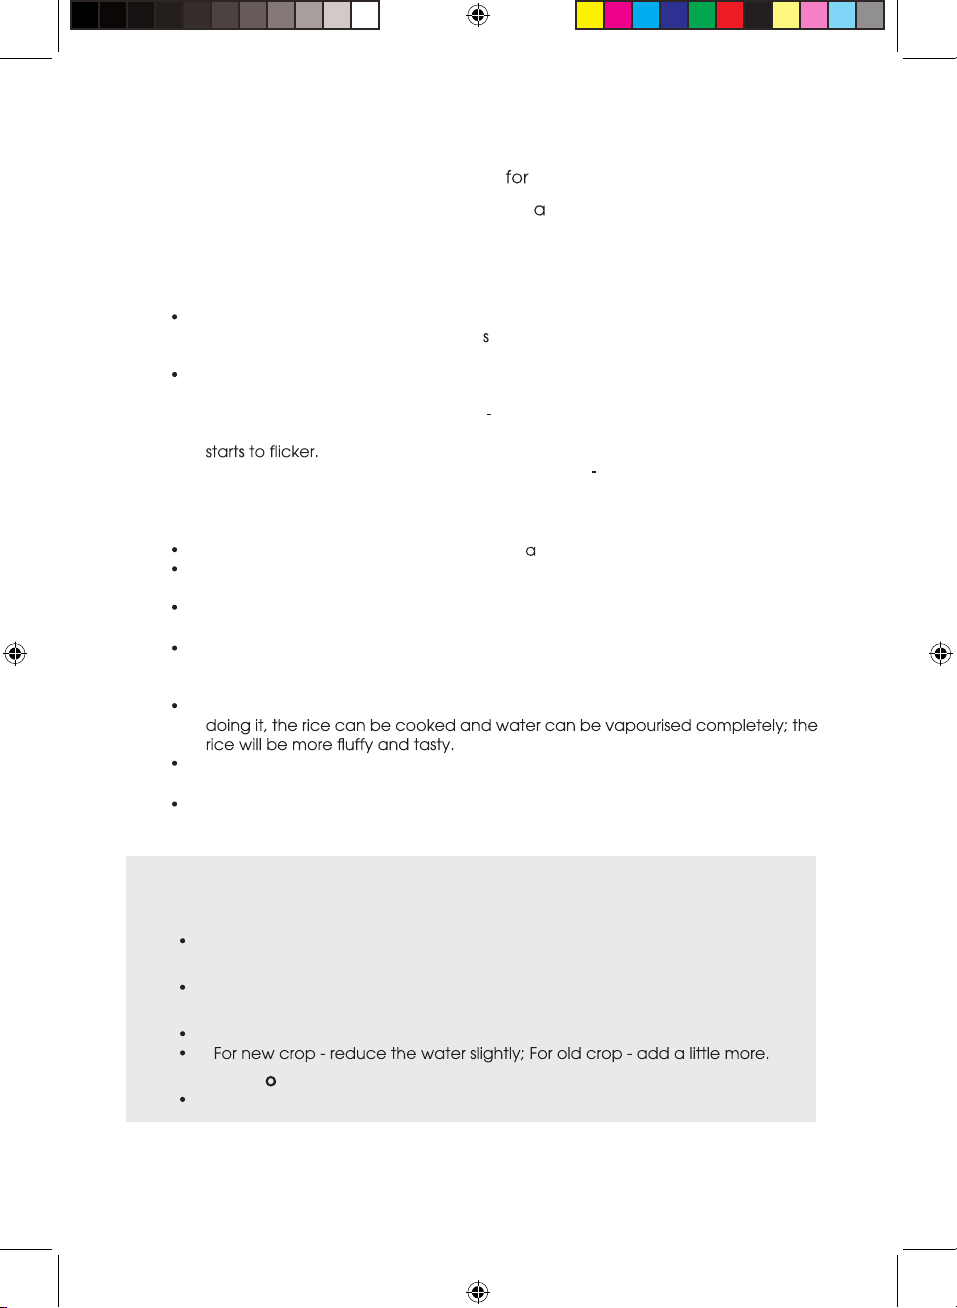
5. When it is ready to cook, connect by plugging the
power supply cord between the rice cooker and
the AC wall outlet.
ERJ 185P IM.indd 4 5/23/2014 4:33:03 PM
5
QUICK GUIDE TO COOK RICE (continue)
6. After switch on the rice cooker, the display shows
“---- ”. Press “MENU” to select “COOK” or “FAST
COOK” and press “START” to begin the cooking
process.
For detailed information, refer to “GUIDE TO COOK/FAST
COOK”.
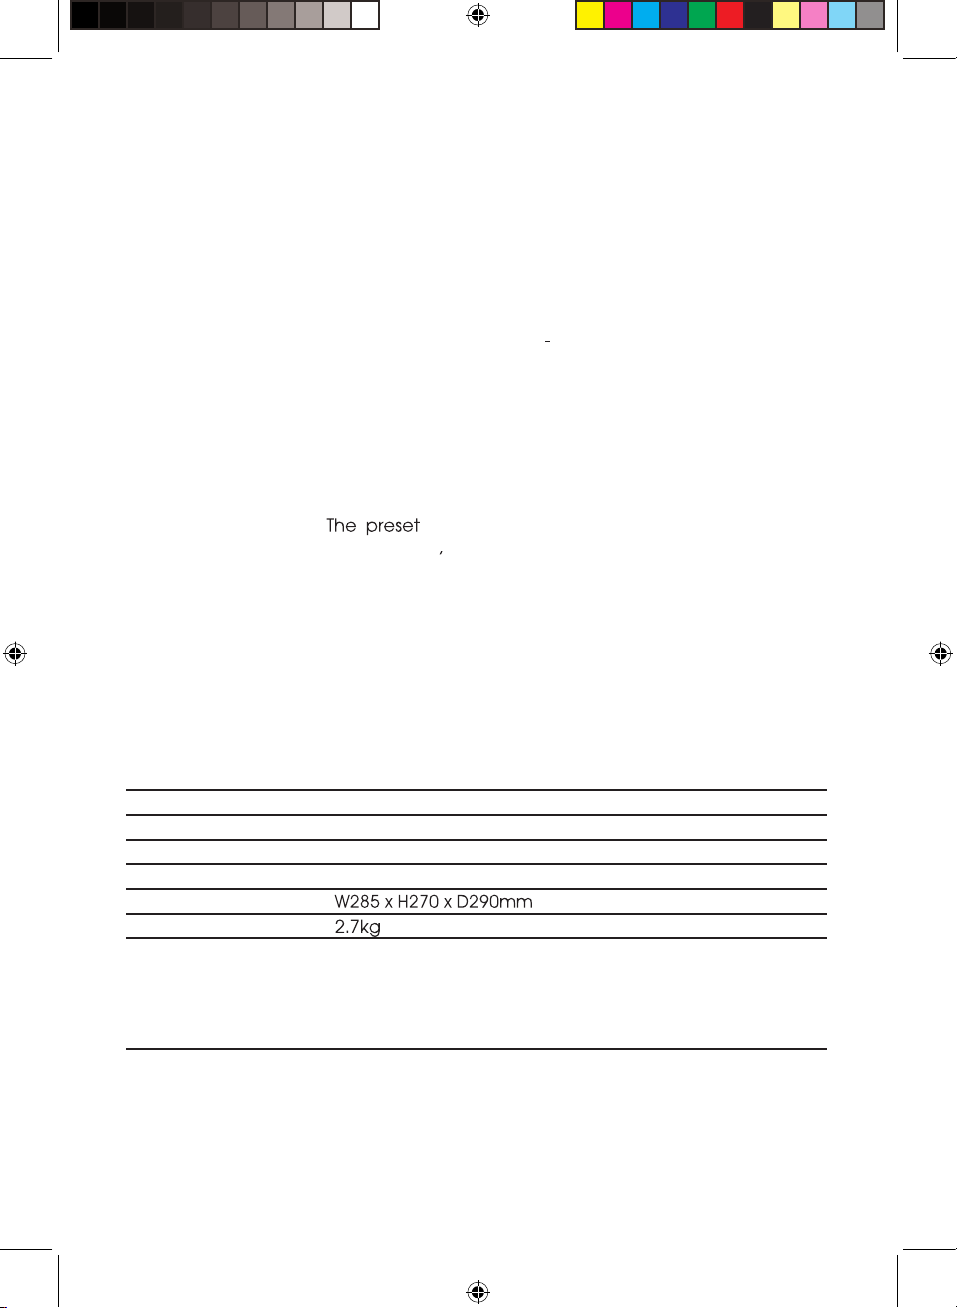
7. When the rice is cooked, a beeping sound will be
heard. Thereafter, the “KEEP WARM” Indicator Light
will light up.
Once the cooking cycle ends, keep the lid closed for
about 10 minutes. By doing it, the rice can be cooked
After the rice is fully steamed, open the lid and stir
the rice well, the cooked rice can then be served
immediately or it will be kept warm automatically.
The display counts up the keep warm time. To turn off
the keep warm mode, press “KEEP WARM/CANCEL”
once.
8. Unplug the cord before serving.
9. Only use the spatula supplied with the rice cooker.
Do not use a metal scoop so as to avoid scratching
non-stick coating pot.
ERJ 185P IM.indd 5 5/23/2014 4:33:04 PM
6
GUIDE TO COOKING/FAST COOKING
The COOK function allows you to cook rice a softer texture. The
FAST COOK function allows you to cook rice in shorter time.
1. Fill the pot with ingredients.
2. Press “MENU” to select “COOK” or “FAST COOK”
3. Start cooking
To start cooking immediately, press “START” to start the cooking process. The
perforated line on the display start to move in cycle indicating that the unit
is cooking.
(For COOK only) To start cooking with a delay, press “PRESET” and then press
“TIMER” to set the desired delay time. The delay time can be adjusted with the
range of 30 minutes - 24 hours, in 30 minute increments. After the timer setting,
press “START” to begin the preset timer countdown. The symbol “:” on the display
TIPS: Press and hold “TIMER” to quickly adjust in 30 minute increments.
Soaking the rice will soften the textur e of the rice.
NOTE: The preset timer is not available for FAST COOK function.
4. During cooking
The perforated line on the display moves cycle.
The unit will count down during the last 6 minutes for COOK or 4 minutes for FAST
COOK of the cooking process.
To cancel the function at any time, press “KEEP WARM/CANCEL”.
5. After cooking
Once the cooking cycle ends, the unit will automatically switch to Keep Warm
function. The unit will remain on Keep Warm for up to 24 hours. When the Keep
Warm time expires, the unit will turn off automatically.
Once the cooking cycle ends, keep the lid closed for about 10 minutes. By
After the rice is fully steamed, open the lid and stir the rice well, the cooked rice
can then be served immediately.
To cancel the Keep Warm function at any time, press “KEEP WARM/CANCEL”.
TIPS TO COOK FLUFFY & TASTY RICE
1. Measure the rice accurately.
Use the measuring cup provided.
2. Rinse, wash and rinse the rice.
Do not wash the rice in the pot provided.
3. Adjust the amount of water accordingly.
When cooking 1 cup of rice, add 1 cup of water.
4. Stir and lo sen rice immediately after cooking has completed.
Loosen the rice within 10 minutes after cooking completes.
ERJ 185P IM.indd 6 5/23/2014 4:33:04 PM

7
GUIDE TO PORRIDGE/CONGEE COOKING
These functions allow you to cook porridge or congee.
1. Fill the pot with ingredients.
2. Press “MENU” to select “PORRIDGE” or “CONGEE”.
3. Start cooking
The default cooking time is 45 minutes for PORRIDGE or 1 hour for CONGEE.
However, you may adjust the cooking time before the cooking starts.
To adjust the cooking time, press “TIMER” repeated to the desired cooking
time. (PORRIDGE) The cooking time range from 5 to 130 minutes, in 1 minute
increments.
(CONGEE) The cooking time range from 5 minutes to 4 hours, in 1 minute
increments.
To start cooking immediately, press “START” to start the cooking process.
To start cooking with a delay, press “PRESET” and then press “TIMER” to set the
desired delay time. After the timer setting, press “START” to begin the preset
timer countdown.
4. During cooking
To cancel the function at any time, press “KEEP WARM/CANCEL”.
5. After cooking
Once the cooking cycle ends, the unit will automatically switch to Keep Warm
function. The unit will remain on Keep Warm for up to 24 hours. When the Keep
Warm time expires, the unit will turn off automatically.
To cancel the Keep Warm function at any time, press “KEEP WARM/CANCEL”.
GUIDE TO SOUP/STEW MAKING
These functions allow you to cook soup or stew.
1. Fill the pot with ingredients.
2. Press “MENU” to select “SOUP” or “STEW”.
3. Start cooking
The default cooking time is 1 hour for SOUP or 2 hours for STEW. However, you
may adjust the cooking time before the cooking starts.
To adjust the cooking time, press “TIMER” repeated to the desired cooking time.
(SOUP) The cooking time range from 1 to 4 hours, in 5 minutes increments.
(STEW) The cooking time range from 2 to 12 hours, in 5 minutes increments.
To start cooking immediately, press “START” to start the cooking process.
To start cooking with a delay, press “PRESET” and then press “TIMER” to set the
desired delay time. After the timer setting, press “START” to begin the preset
timer countdown.
4. During cooking
To cancel the function at any time, press “KEEP WARM/CANCEL”.
5. After cooking
Once the cooking cycle ends, the unit will automatically switch to Keep Warm
function. The unit will remain on Keep Warm for up to 24 hours. When the Keep
Warm time expires, the unit will turn off automatically.
To cancel the Keep Warm function at any time, press “KEEP WARM/CANCEL”.
ERJ 185P IM.indd 7 5/23/2014 4:33:04 PM

8
GUIDE TO BROWN RICE COOKING
This function allows you to cook brown rice or similar grains.
1. Fill the pot with ingredients.
2. Press “MENU” to select “BROWN RICE”.
3. Start cooking
The default cooking time is 1.5 hours. However, you may adjust the cooking time
before the cooking starts.
To adjust the cooking time, press “TIMER” repeated to the desired cooking time.
The cooking time range from 1 to 2 hours, in 5 minutes increments.
To start cooking immediately, press “START” to start the cooking process.
To start cooking with a delay, press “PRESET” and then press “TIMER” to set the
desired delay time. After the timer setting, press “START” to begin the preset
timer countdown.
4. During cooking
To cancel the function at any time, press “KEEP WARM/CANCEL”.
5. After cooking
Once the cooking cycle ends, the unit will automatically switch to Keep Warm
function. The unit will remain on Keep Warm for up to 24 hours. When the Keep
Warm time expires, the unit will turn off automatically.
To cancel the Keep Warm function at any time, press “KEEP WARM/CANCEL”.
GUIDE TO YOGURT MAKING
This function allows you to make yogurt.
1. Sterilization
Fill the pot with 1L of water.
Press “MENU” to select “PASTA/STEAM”.
Press “START” to start the cooking process.
Once the cooking cycle ends, pour the water out of the pot and let it cool
down to room temperature.
Wipe the pot and inner lid dry.
2. Fill the pot with milk and yogurt. Mix them thoroughly.
The recommended ratio of milk to yogurt is 10:1.
3. Press “MENU” to select “YOGURT”.
4. Start cooking
The default cooking time is 8 hours. However, you may adjust the cooking time
before the cooking starts.
To adjust the cooking time, press “TIMER” repeated to the desired cooking time.
The cooking time range from 6 to 12 hours, in 5 minutes increments.
To start cooking immediately, press “START” to start the cooking process.
5. During cooking
To cancel the Yogurt function at any time, press “KEEP WARM/CANCEL”.
6. After cooking
Once the cooking cycle ends, the yogurt is ready to be served.
TIPS: Add some fruits or honey to the yogurt before serving.
NOTE: To serve the yogurt cold, put it in the fridge only after it has cooled down.
ERJ 185P IM.indd 8 5/23/2014 4:33:05 PM

9
GUIDE TO CAKE MAKING
This function allows you to make cake.
1. Grease the pot.
2. Pour the cake mixture into the pot.
3. Press “MENU” to select “CAKE”.
4. Start cooking
The default cooking time is 50 minutes. However, you may adjust the cooking
time before the cooking starts.
To adjust the cooking time, press “TIMER” repeated to the desired cooking time.
The cooking time range from 50 minutes to 1 hour and 10 minutes, in 5 minutes
increments.
To start cooking immediately, press “START” to start the cooking process.
5. During cooking
To turn off the unit at any time, press “KEEP WARM/CANCEL”.
6. After cooking
Once the cooking cycle ends, the unit will automatically switch to Keep Warm
function. The unit will remain on Keep Warm for up to 24 hours. When the Keep
Warm time expires, the unit will turn off automatically.
To cancel the Keep Warm function at any time, press “KEEP WARM/CANCEL”.
GUIDE TO PASTA/STEAMING
This function allows you to cook pasta or steam food.
1. Fill the pot with water. The amount of water will depend on the ingredient
to cook or the amount of food to be steamed.
(For STEAM only) Place the food inside the steamer and then place the steamer
inside the pot.
2. Press “MENU” to select “PASTA/STEAM”.
3. Start cooking
The default cooking time is 8 minutes. However, you may adjust the cooking
time before the cooking starts.
To adjust the cooking time, press “TIMER” repeated to the desired cooking time.
The cooking time range from 8 to 20 minutes, in 5 minutes increments.
To start cooking immediately, press “START” to start the cooking process.
To start cooking with a delay, press “PRESET” and then press “TIMER” to set the
desired delay time. After the timer setting, press “START” to begin the preset
timer countdown.
4. During cooking
(For PASTA only) Once the water boiled, put the ingredient into the pot. Keep
the lid open during the cooking progress.
To cancel the function at any time, press “KEEP WARM/CANCEL”.
5. After cooking
Once the cooking cycle ends, the unit will automatically switch to Keep Warm
function. The unit will remain on Keep Warm for up to 24 hours. When the Keep
Warm time expires, the unit will turn off automatically.
To cancel the Keep Warm function at any time, press “KEEP WARM/CANCEL”.
ERJ 185P IM.indd 9 5/23/2014 4:33:05 PM
10
KEEP WARM
The KEEP WARM function allows you to keep the rice or food warm for a longer
period of time.
NOTE: It is recommended not to keep warm the rice or food for more than
12 hours to preserve its taste.
1. In standby mode (display shows “-- --”), press “KEEP WARM/CANCEL” to
activate the Keep Warm mode. The keep warm light turns on. During the
keep warm process, the display counts up.
2. To cancel the Keep Warm mode at any time, press “KEEP WARM/CANCEL”.
PRESET TIMER
This function delays start cooking timing. The preset time range from 30
minutes to 24 hours. function is available for COOK, PORRIDGE,
CONGEE, SOUP, STEW, BROWN RICE and PASTA/STEAM only.
1. Press “MENU” to select the desired function.
2. Press “PRESET” (display shows “00 00”), press “TIMER” to set the desired
delay time (in 30 minutes increments).
3. Press “START” to begin the preset timer countdown. Once, the preset
countdown ends, the cooking process starts.
SPECIFICATIONS
Model ERJ 185P
Power Requirement 220 240V~, 50/60Hz
Power Consumption 860W
Cooking Capacity 1.8L
Dimensions
Weight
Accessories Spatula
Soup Ladle
Steamer
Measuring Cup
Power Cord
ERJ 185P IM.indd 10 5/23/2014 4:33:05 PM

11
PRECAUTIONS
be deformed easily.
When the cooked rice starts to keep warm, it is not suitable for
eating immediately. The rice will be softer and more delicious if it
continue to steam for another 10 minutes before serving.
The duration for “keeping warm” must not be exceeded 12 hours in
The product does not have the function of cooking porridge. Thus it
cannot be used for cooking porridge and soup in order to avoid a
heating plate.
CLEANING INSTRUCTIONS
1. Take the pot out of the electric rice cooker, wash it with
detergent. Rinse it with water and then wipe it dry
with soft cloth.
Do not use metal brush or other harsh tool to wash pot in order
to avoid damaging the non-stick coating on its surface.
2. Remove the water holder and wash it with water and then
replace it after cleaning.
3. The grain of cooked rice or other sundries may attach to
grind them away and wipe it with soft cloth to keep the
full contact between pot and electric heating plate.
Water Holder Cleaning
Disassembling
holder and pull it out for cleaning.
Assembling
After washing the water holder, it should be place
correctly to the seat and then push it in to secure it
to the right position.
ERJ 185P IM.indd 11 5/23/2014 4:33:06 PM

1.
2.
3.
4.
5.
6.
7.
8.
9.
10.
11.
12.
13.
14.
15.
16.
17.
18.
19.
20.
21.
22.
23.
24.
25.
26.

1. KEEP WARM/CANCEL
a. 24
b.
2. PRESET
“Timer”30 -24
“Timer” 30
COOK, PORRIDGE, CONGEE, SOUP, STEW, BROWN RICE
PASTA/STEAM
3. START
4. MENU
5. TIMER
•PRESET”
•
COOK FAST COOK

1.
* 180ml 10 (1.8L)
2.
3.
4. “ ”
5.
6. “MENU”COOK FAST COOK, ”START”
7. COOK “PRESET”“TIMER”
“START
* COOK
* FAST COOK
8. “KEEP WARM/CANCEL”
9. 24
10. “KEEP WARM/CANCEL
a. 1 1
b.
c.
PORRIDGE/CONGEE
1.
2.
3. “ ”
4.
5. “MENU”PORRIDGE CONGEE
6. PORRIDGE 45 CONGEE 1
7. “TIMER” PORRIDGE 50-120
5 CONGEE 1-4 5
8. “START”
9. “PRESET “TIMER”
“START
10. “KEEP WARM/CANCEL”
11. 24
12. “KEEP WARM/CANCEL”
SOUP/STEW
1.
2.
3. “ ”
4.
5. “MENU”SOUP STEW
6. SOUP 1 STEW 2
7. “TIMER” SOUP 1-4 5
STEW 2-12 5
8. “START”
9. “PRESET “TIMER”
“START
10. “KEEP WARM/CANCEL”
11. 24
12.“KEEP WARM/CANCEL”
BROWN RICE
1. brown rice
* 180ml brown rice 6
2. brown rice
3.
4. “ ”
5. “MENU”BROWN RICE
6. 1.5
7. “TIMER” 1-2 5
8. “START”
9. “PRESET “TIMER”
“START
10. “KEEP WARM/CANCEL”
11. 24
12. “KEEP WARM/CANCEL”
YOGHURT
1. yoghurt yoghurt
a. 1L
b. “MENU”“PASTA/STEAM”
c. “Start”
d.
e.
2.
*10:1.
3.
4. “ ”
5.
6. “MENU”YOGHURT
7. YOGHURT 8
8. “TIMER” 6-12 5
9. “START”
10. “KEEP WARM/CANCEL”
11.
CAKE
1.
2.
3.
4. “ ”
5.
6. “MENU”CAKE
7. CAKE 50
8. “TIMER” 50 - 1 10
1
9. “START”
10. “KEEP WARM/CANCEL”
11. 24
“KEEP WARM/CANCEL”
PASTA/STEAM
1.
*( steam )
2.
3. “ ”
4.
5. “MENU”PASTA/STEAM
6. PASTA/STEAM 8
7. “TIMER” 8-20 1
8. “START”
*“
9. “PRESET “TIMER”
“START
10. PASTA, “ ”
11. “KEEP WARM/CANCEL”
12. 24
13. “KEEP WARM/CANCEL”

Product Warranty
The Warranty Card is not provided in the product packaging. You can register the product war-
ranty online at our website https://www.europace.com.sg/ewarranty/ within 7 (seven) days
from the date of purchase. You will enjoy an additional 3 months of the product
standard warranty when you register online. Please produce your E-warranty registration when
requesting for repair and service at our Service Centres nearest to you.
In the event, if you are unable to register the product warranty online you must produce your
purchase receipt/tax invoice and such other documentary proof of purchase of the appliance
when requesting for repair and service.
Product Warranty Coverage
Service Hotline (65) 6457 3678 or visiting our Service Centre.
http://europace.com.sg/ewarranty/src/cupload/settings_pd-
f/1/1-1-2c899-1563960978-WARRANTY-COVERAGE-19_0221.pdf
TERMS & CONDITIONS OF WARRANTY (THIS WARRANTY IS VALID IN SINGAPORE ONLY)
Your appliance is warranted against faulty design, workmanship or materials for a period of
12 months unless otherwise stated from the date of purchase, subject to the following terms &
conditions herein below:-
1) That the owner shall register the product warranty online at our website www.eu-
ropace.com.sg within 7 (seven) days from the date of purchase.
2) That the appliance shall be used solely for domestic purposes and not for commercial pur-
poses or any other purposes whatsoever and used strictly under the instruction for
operation as provided by the manufacturers or the appliance.
3) That if any time during the warranty period any part or parts of this appliance is removed,
sons other than those authorized by Strategic Marketing (S) Pte Ltd, this warranty shall immedi-
ately cease to be valid and become void.
4) That the owner shall produce the E-warranty registration or tax invoice/receipt and such
other documentary proof of purchase of the appliance to our satisfaction as we may deem nec-
essary when requesting for repair and service.
5) That our decision on all queries relating to complaints as to defects either of workmanship or
of materials shall be conclusive and the owner shall agree to abide by such a decision. Any ap-
pliance or defective part which has been replaced shall become our property.
6) The terms and conditions of this warranty shall be contained exclusively in this document
and no other presentation of provision, either written or otherwise, regardless of the origin of
the same, shall be accepted as either adding or removing from these terms and conditions.
7) That this warranty shall cease to be valid and void if the appliance is exported or
relocated from Singapore.
8) That there shall be no removal, alteration, defacement, or made illegible/tampered or any
kind of the serial number on the appliance.
9) That the owner shall be fully responsible for the due delivery and collection of the appliance
for any work done according to this warranty. Transportation expenses incurred for delivery or
handling the appliance are chargeable to the owner.
10) Transportation and labour charges apply after the full parts warranty expires. Refer to
https://www.europace.com.sg/ewarranty/ for more information.

In addition to the above, this warranty shall be subjected to the following limitations and exclu-
sions:-
a)The appliance shall be warranted by STRATEGIC MARKETING (S) PTE. LTD. from date of purchase
only for a period of:-
10 years - Heating Element warranty applies to selected models of Storage Water Heaters.
- Tank Leakage warranty applies to selected models of Storage Water Heaters.
8 years - Motor warranty applies only to selected models of Stand Fans (Walk-in warranty).
10 years - Compressor warranty applies to selected models of Refrigerators.
6 years - Motor warranty applies only to selected models of Stand Fans (Walk-in warranty).
- Compressor warranty applies only to selected models of System Air Conditioners
and Portable Air Conditioners.
5 years - Compressor warranty applies to Refrigerators, Freezers, Wine Coolers, Portable Air Condi-
tioners & Casement Air Conditioners (Outdoor warranty). Transportation is chargeable from the 2nd
year to 5th year.
- Motor warranty applies only to selected models of Stand Fans (Walk-in warranty).
- Heating Element warranty applies only to selected models of Garment Steamers
(Walk-in warranty).
- Motor warranty applies only to selected models of Jet Turbine Fans & selected
models of Air Coolers (Walk-in warranty).
2 years - Motor and internal parts warranty applies only to selected models of Stand Fans,
(Walk-in warranty).
- Heating Element warranty applies to selected models of Electric Ovens &
selected models of Kettle Jugs. (Walk-in warranty)
- Motor warranty applies only to selected models of Jet Turbine Fans
(Walk-in warranty).
- Full parts warranty applies only to Wine Coolers of 34 Bottles & above.
1 year - Full parts warranty applies to *Lifestyle Products (cash & carry items), Small
Kitchen Appliances, Fans, Air Coolers, Wine Coolers of 20 Bottles & below, Mini
Bar Fridge (Walk-in warranty)
- Full parts warranty apply to Refrigerators, Air Conditioners & Freezers
(Outdoor warranty).
Check out the warranty coverage of your appliance at www.europace.com.sg
b) The owner waives all or any claims to compensation monetary or otherwise which he/she may be
entitled to and shall agree to accept any compensation whatsoever by way of additional repairs or
shall be subjected to the other provisions of the warranty.
c) This warranty shall not be transferable, negotiable or assignable to any third party.
d) The warranty does not include transport delivery or handling charges incurred in the transporta-
tion of the appliance to and from Strategic Marketing (S) Pte Ltd.
e) Damage caused during transit where the appliance is transported for servicing, repair, or in rela-
tion thereof or connection therewith.
f) In respect of refrigerator and air conditioner only, upon the expiry of 12 months from the date of
purchase, this warranty will not cover transport, refrigerant and labour to install a new compressor.
Other manuals for ERJ 185P
1
Table of contents
Other EuropAce Rice Cooker manuals


