- 4 - 10/2022
2022, .
• Prior to using this appliance, please read the user’smanual thoroughly,
even in cases, when one has already familiarised themselves with
previous use of similar types of appliances. Only use the appliance in
the manner described in this user’smanual. Keep this user’smanual in
asafe place where it can be easily retrieved for future use.
• We recommend saving the original cardboard box, packaging material,
purchase receipt and responsibility statement of the vendor or warranty
card for at least the duration of the legal liability for unsatisfactory
performance or quality. In the event of transportation, we recommend
that you pack the appliance in the original box from the manufacturer.
. . . . . . . . . . . . . . . . . . . . . . . . . . . . . . . . . . . . . . . . . . . . . . . . . . . . . . . . . . . . . . . . . . . .
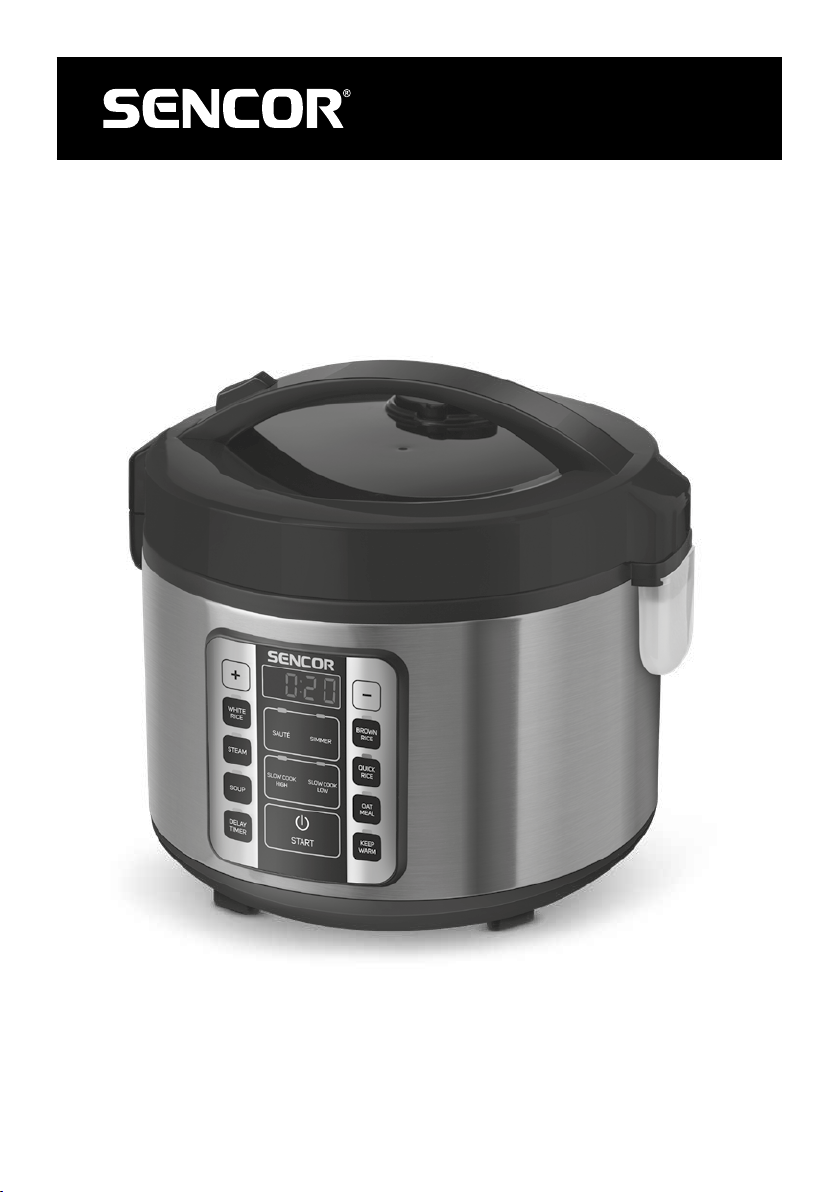
DESCRIPTION OF THE APPLIANCE
A1 Steam exhaust valve
A2 Carry handle
A3 Unlock lid button
A4 Tilt-open lid
A5 Rice cooker unit
A6 Control panel
A7 Rice and water measuring cup
A8 Ladle
A9 Stirring spoon
A10 Steamer insert
A11 Removable inner bowl with
anon-stick surface
A12 Power cord (not shown)
. . . . . . . . . . . . . . . . . . . . . . . . . . . . . . . . . . . . . . . . . . . . . . . . . . . . . . . . . . . . . . . . . . . .
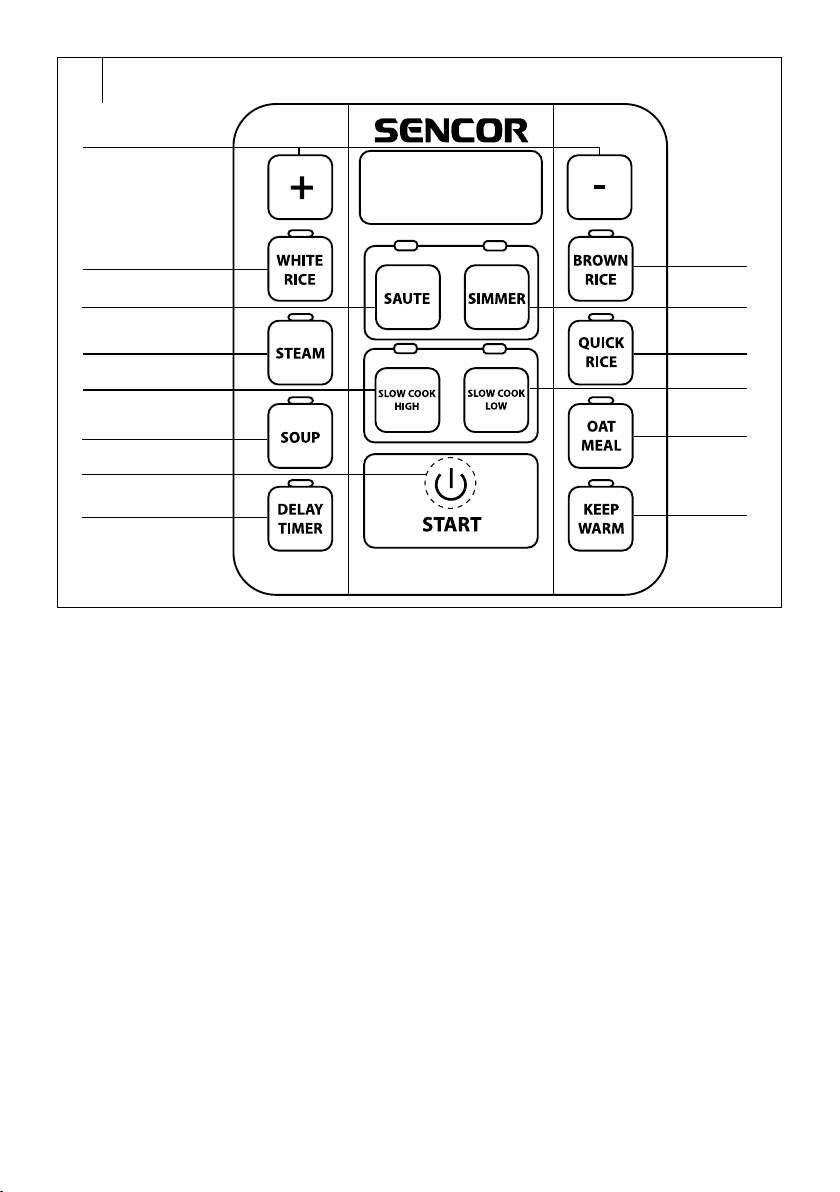
DESCRIPTION OF THE CONTROLPANEL
B1 Buttons (+/–)
Serve to set the cooking
time and delayed start time
(DELAY TIMER).
B7 START button
Serves to start the preset
cooking process or to stop it
prematurely.
B8 DELAYTIMER button
(delayed start timer)
B14 KEEP WARM button
(maintain temperature)
. . . . . . . . . . . . . . . . . . . . . . . . . . . . . . . . . . . . . . . . . . . . . . . . . . . . . . . . . . . . . . . . . . . .
Cooking function buttons:
B2 WHITE RICE
B3 SAUTÉ
B4 STEAM
B5 SLOW COOK HIGH
B6 SOUP
B9 BROWN RICE
B10 SIMMER
B11 QUICK RICE
B12 SLOW COOK LOW
B13 OAT MEAL
. . . . . . . . . . . . . . . . . . . . . . . . . . . . . . . . . . . . . . . . . . . . . . . . . . . . . . . . . . . . . . . . . . . .
OPERATING INSTRUCTIONS
Before first use of the rice cooker
• First wash all the parts that come into contact with food (removable
inner bowl A11, measuring cup A7, ladle A8, stirring spoon A9
and steamer insert A10) in warm water with an addition of kitchen
detergent, then rinse them under running water and dry thoroughly.
• Before using the rice cooker, always check that nothing has adhered
to the heating element or on the underside of the inner bowl. If you
find any material on the contact surfaces, it is necessary to remove it.
After inserting the inner bowl into the rice cooker unit, turn the inner
bowl to check that it is tightly seated on the heating element.
Standard use of the rice cooker
1. Place the removable bowl A11 on the kitchen countertop or
another even, stable surface. With the supplied measuring cup A7
measure out the required amount of rice. The measuring cup holds
approximately 150 g of uncooked rice. Rice must not be rinsed
directly inside the inner bowl, so pour it into astrainer and rinse it out
with clean running water. Transfer the rinsed rice into the removable
bowl A11 and evenly spread it out from the centre towards the sides
of the bowl. Add the appropriate amount of cold water.
The maximum number of measuring cups per batch is 10. Based
on the amount of rice that needs to be cooked, the recommended
rice to water ratio is 1 : 1.2. Water may be added to rice according
to the marks on the inner wall of the bowl. For example, when two
measuring cups of rice are rinsed and transferred into the inner bowl,
pour in water up to the “2” mark. The rice to water ratio may be
adjusted based on the personal preferences of the customer.
Do not exceed the highest water level mark inside the inner bowl.
2. Place the bowl A11 into the rice cooker unit A5 and tilt down the lid
A4. Make sure that the bowl is properly seated, that the lid is fully
closed and locked in position (button A3 is used to release it). Also
check that the steam exhaust valve A2 is properly seated in the lid
A4. If you start cooking without it, the cooked food may boil over.
3. Connect the power cord to the rear of the appliance and insert its
plug into apower socket.
4. Select the desired cooking function by pressing the appropriate
cooking function button, the indicator light above the button will be
lit. When not using the delayed start function (see below), then after
pressing button B7 – START, the cooking process will start.
5. When the cooking process is complete, the user is informed of this
by five beeps and the rice cooker automatically switches to the
“Keep Warm” mode (maintains temperature for up to 6 hours), the
indicator light is lit above the B14 – KEEPWARM button and the
display counts up the duration of this mode.
–If you press the B7 – START button during the cooking process,
the selected cooking function will be cancelled and the rice
cooker will switch to stand-by mode.
6. When you wish to serve the rice, unlock the lid by pressing button
A3 and carefully tilt open the lid. Gently stir the rice using the spoon
A9 and serve.
Attention:
To avoid damaging the non-stick surface of the
removable bowl A11, do not use metal kitchen utensils
to stir the rice.
. . . . . . . . . . . . . . . . . . . . . . . . . . . . . . . . . . . . . . . . . . . . . . . . . . . . . . . . . . . . . . . . . . . .
Other cooking options
Buttons B1 (+/–): Serve to set the cooking time and delayed start time.
Cooking time can be set in 5-minute intervals and the delayed start in
10-minute intervals.
Note:
It is not possible to set an unreal cooking time.
Button B8 – DELAY TIMER: Select the desired function from the
following cooking functions: B2 – WHITE RICE, B4 – STEAM, B6
– SOUP, B9 – BROWN RICE, B13 – OAT MEAL, B10 – SIMMER, B5 –
SLOW COOK HIGH / B12 – SLOW COOK LOW, press button B8 – DELAY
TIMER, set the desired delayed start time and then press the B7 – START
button. The rice cooker will start counting down the delayed start time.
Notes:
- Certain cooking functions (B3 – SAUTÉ aB11 – QUICK
RICE) do not enable the delayed start function.
- The longest possible delayed start time is 24 hours.
- To prevent problems with soaking food in water, which
may result in unpleasant odours, do not set the delayed
start time to periods lasting longer than 12 hours.
- If the delayed start time is shorter than the cooking time,
the rice cooker will disregard it and will immediately start
the cooking function as if the delayed start function was
not set.
-
After setting the delayed start function, activate it by
pressing the B7 – START button.
EN Fully Automatic Rice Cooker
User'smanual