EuropAce ERJ 185P User manual

Thank you for purchasing Multi-Function Rice Cooker.
For safety purpose, please read this operating instruction manual carefully before using
and keep it for future reference.
Instruction Manual
Multi-Function Rice Cooker IERJ 185P
RELISHING YOUR COOKERY

1
CONTENTS
IMPORTANT SAFEGUARDS
PRODUCT INTRODUCTION
Control Panel
QUICK GUIDE TO COOK RICE
GUIDE TO COOKING/FAST COOKING
GUIDE TO PORRIDGE/CONGEE COOKING
GUIDE TO SOUP/STEW MAKING
GUIDE TO BROWN RICE COOKING
GUIDE TO YOGURT MAKING
GUIDE TO CAKE MAKING
GUIDE TO PASTA/STEAMING
KEEP WARM
PRESET TIMER
SPECIFICATIONS
PRECAUTIONS
CLEANING INSTRUCTIONS
Water Holder Cleaning
CARE AND MAINTENANCE
TROUBLESHOOTING
2
3
3
4
6
7
7
8
8
9
9
10
10
10
11
11
11
12
12
[ERJ 185P] IM [14_0527].indd 1 5/27/2014 4:32:36 PM

2
IMPORTANT SAFEGUARDS
• Read all instructions before using this appliance.
• Ensure that the voltage indicated on the appliance corresponds with the
voltage of your electrical outlet.
• Do not plug in any other appliance at the same power point as your appliance
or use extension cords or double adapters.
• Never unplug this appliance by pulling on the power cord. Always grip the
plugrmlyandpullstraightoutfromtheelectricaloutlet.
• Do not allow the power cord to hang over edge of a table or counter, or
touch hot surfaces. Do not operate or place any part of the appliance on or
near a hot gas or electric burner, or on a heated oven.
• Do not operate the appliance if it has a damaged power cord or plug, if it is
not working properly, or if it has been damaged in any manner. The appliance
shouldbeservicedonlybyqualiedservicepersonnel.Returntheappliance
to our service centre for examination, repair or adjustment.
• Alwaysusetheapplianceonaatsturdy,dryandheatresistantsurface.
• Do not use the appliance under a wall cupboard, shelves or other overhanging
objectsornearammablematerialssuchasblinds,curtainsorwallhangings.
• Do not use the appliance in the presence of explosive and/or ammable
fumes.
• Children should be supervised to ensure that they do not play with the
appliance.
• Close supervision is necessary when the appliance is used by or near children
and persons with reduced capabilities.
• This appliance is not intended for use by persons (including children) with
reduced physical, sensory or mental capabilities, or lack of experience and
knowledge, unless they have been given supervision or instruction concerning
use of the appliance by a person responsible for their safety.
• Do not leave the appliance unattended when it is switched on or operating.
• Never use any accessories or parts that are not recommended or sold by the
manufacturer. If you use such accessories or parts, the warranty becomes
invalid.
• Unplug the appliance from electrical outlet when not in use, before assembling
or taking off parts, and before cleaning.
• To protect against the risk of electrical shock, do not immerse body unit in
water or other liquid.
• Do not use the appliance for anything other than its intended use. The
appliance is intended for household use only.
• This appliance is intended to be used in household and similar applications such
as:staffkitchenareasinshops,ofcesandotherworkingenvironments;farm
houses;byclientsinhotels,motelsandotherresidentialtypeenvironments;
bed and breakfast type environments.
[ERJ 185P] IM [14_0527].indd 2 5/27/2014 4:32:36 PM

3
PRODUCT INTRODUCTION
Lid Release
Button
Lid
Water
Holder
Steam
Vent
Outer Housing
Control Panel
Bottom Housing
Spatula Holder
Steamer
Pot
Spatula
Measuring Cup
Soup Ladle
Power Cord
Socket Outlet
Control Panel
1. KEEP WARM/CANCEL
Press this button to start Keep Warm
function or turn off any Menu
functions.
4. MENU
Press this button to select the
desired Menu function.
2. PRESET
Press this button and then press
“TIMER” to set the required delay
time to start the cooking.
NOTE: Preset function is available for
COOK, PORRIDGE, CONGEE, SOUP,
STEW, BROWN RICE and PASTA/STEAM
only.
5. TIMER
•After press “PRESET”, press this
button to set the desired delay
time to start the cooking.
•After selected the desired
function, press this button to
extend the cooking.
NOTE: Timer function is not available
for COOK and FAST COOK.
3. START
Press this button to start the
cooking.
[ERJ 185P] IM [14_0527].indd 3 5/27/2014 4:32:41 PM

4
QUICK GUIDE TO COOK RICE
1. Measure the desired amount of rice with the
measuring cup supplied with the rice cooker. Rinse
the rice several times until the water in the bowl
shows relatively clear.
• Do not rinse rice in the pot, if the pot is used for washing
rice, the non-stick coating may be deformed which will
result in poor conduction because it cannot contact
with heating plate properly.
2. Put the washed rice into the pot and add water to
the corresponding level. Add or reduce the amount
of water depending on your personal preference.
• Do not over add water and exceed the “4.0L” water
mark.
3. Wipe the water outside the pot, place the pot into
the cooker, turn it slightly left to right, ensure that the
pot contacts with the heating plate properly, level
the rice inside the pot.
4. Close the lid. Push it in securely until the lock clicks.
• Ifthe lid isnot closed properly,the cooking efciency
will be affected.
• Make sure the lid is closed and locked before moving
the rice cooker.
5. When it is ready to cook, connect by plugging the
power supply cord between the rice cooker and
the AC wall outlet.
[ERJ 185P] IM [14_0527].indd 4 5/27/2014 4:32:43 PM

5
QUICK GUIDE TO COOK RICE (continue)
6. After switch on the rice cooker, the display shows
“- - - - ”. Press “MENU” to select “COOK” or “FAST
COOK” and press “START” to begin the cooking
process.
• For detailed information, refer to “GUIDE TO COOK/FAST
COOK”.
7. When the rice is cooked, a beeping sound will be
heard. Thereafter, the “KEEP WARM” Indicator Light
will light up.
• Once the cooking cycle ends, keep the lid closed for
about 10 minutes. By doing it, the rice can be cooked
andwatercanbevapourisedcompletely;thericewill
bemoreuffyandtasty.
• After the rice is fully steamed, open the lid and stir
the rice well, the cooked rice can then be served
immediately or it will be kept warm automatically.
• The display counts up the keep warm time. To turn off
the keep warm mode, press “KEEP WARM/CANCEL”
once.
8. Unplug the cord before serving.
9. Only use the spatula supplied with the rice cooker.
Do not use a metal scoop so as to avoid scratching
non-stick coating pot.
[ERJ 185P] IM [14_0527].indd 5 5/27/2014 4:32:43 PM

6
GUIDE TO COOKING/FAST COOKING
The COOK function allows you to cook rice to a softer texture.
The FAST COOK function allows you to cook rice in shorter time.
1. Fill the pot with ingredients.
2. Press “MENU” to select “COOK” or “FAST COOK”
3. Start cooking
• To start cooking immediately, press “START” to start the cooking process. The
perforated line on the display start to move in cycle indicating that the unit is
cooking.
• (For COOK only) To start cooking with a delay, press “PRESET” and then press
“TIMER” to set the desired delay time. The delay time can be adjusted with the
range of 30 minutes - 24 hours, in 30 minute increments. After the timer setting,
press “START” to begin the preset timer countdown. The symbol “:” on the display
starttoicker.
TIPS: Press and hold “TIMER” to quickly adjust in 30 minute increments.
Soaking the rice will soften the texture of the rice.
NOTE: The preset timer is not available for FAST COOK function.
4. During cooking
• The perforated line on the display moves in cycle.
• The unit will count down during the last 6 minutes for COOK or 4 minutes for FAST
COOK of the cooking process.
• To cancel the function at any time, press “KEEP WARM/CANCEL”.
5. After cooking
• Once the cooking cycle ends, the unit will automatically switch to Keep Warm
function. The unit will remain on Keep Warm for up to 24 hours. When the Keep
Warm time expires, the unit will turn off automatically.
• Once the cooking cycle ends, keep the lid closed for about 10 minutes. By
doingit,thericecanbecookedandwatercanbevapourisedcompletely;the
ricewillbemoreuffyandtasty.
• After the rice is fully steamed, open the lid and stir the rice well, the cooked rice
can then be served immediately.
• To cancel the Keep Warm function at any time, press “KEEP WARM/CANCEL”.
TIPS TO COOK FLUFFY & TASTY RICE
1. Measure the rice accurately.
• Use the measuring cup provided.
2. Rinse, wash and rinse the rice.
• Do not wash the rice in the pot provided.
3. Adjust the amount of water accordingly.
• When cooking 1 cup of rice, add 1 cup of water.
• Fornewcrop-reducewaterslightly;Foroldcrop-addalittlemore.
4. Stir and lossen rice immediately after cooking has completed.
• Loosen the rice within 10 minutes after cooking completes.
[ERJ 185P] IM [14_0527].indd 6 5/27/2014 4:32:44 PM

7
GUIDE TO PORRIDGE/CONGEE COOKING
These functions allow you to cook porridge or congee.
1. Fill the pot with ingredients.
2. Press “MENU” to select “PORRIDGE” or “CONGEE”.
3. Start cooking
• The default cooking time is 45 minutes for PORRIDGE or 1 hour for CONGEE.
However, you may adjust the cooking time before the cooking starts.
• To adjust the cooking time, press “TIMER” repeated to the desired cooking
time. (PORRIDGE) The cooking time range from 50 to 120 minutes, in 5 minutes
increments.
• (CONGEE) The cooking time range from 1 to 4 hours, in 5 minute increments.
• To start cooking immediately, press “START” to start the cooking process.
• To start cooking with a delay, press “PRESET” and then press “TIMER” to set the
desired delay time. After the timer setting, press “START” to begin the preset
timer countdown.
4. During cooking
• To cancel the function at any time, press “KEEP WARM/CANCEL”.
5. After cooking
• Once the cooking cycle ends, the unit will automatically switch to Keep Warm
function. The unit will remain on Keep Warm for up to 24 hours. When the Keep
Warm time expires, the unit will turn off automatically.
• To cancel the Keep Warm function at any time, press “KEEP WARM/CANCEL”.
GUIDE TO SOUP/STEW MAKING
These functions allow you to cook soup or stew.
1. Fill the pot with ingredients.
2. Press “MENU” to select “SOUP” or “STEW”.
3. Start cooking
• The default cooking time is 1 hour for SOUP or 2 hours for STEW. However, you
may adjust the cooking time before the cooking starts.
• To adjust the cooking time, press “TIMER” repeated to the desired cooking time.
(SOUP) The cooking time range from 1 to 4 hours, in 5 minutes increments.
• (STEW) The cooking time range from 2 to 12 hours, in 5 minutes increments.
• To start cooking immediately, press “START” to start the cooking process.
• To start cooking with a delay, press “PRESET” and then press “TIMER” to set the
desired delay time. After the timer setting, press “START” to begin the preset
timer countdown.
4. During cooking
• To cancel the function at any time, press “KEEP WARM/CANCEL”.
5. After cooking
• Once the cooking cycle ends, the unit will automatically switch to Keep Warm
function. The unit will remain on Keep Warm for up to 24 hours. When the Keep
Warm time expires, the unit will turn off automatically.
• To cancel the Keep Warm function at any time, press “KEEP WARM/CANCEL”.
[ERJ 185P] IM [14_0527].indd 7 5/27/2014 4:32:44 PM

8
GUIDE TO BROWN RICE COOKING
This function allows you to cook brown rice or similar grains.
1. Fill the pot with ingredients.
2. Press “MENU” to select “BROWN RICE”.
3. Start cooking
• The default cooking time is 1.5 hours. However, you may adjust the cooking time
before the cooking starts.
• To adjust the cooking time, press “TIMER” repeated to the desired cooking time.
The cooking time range from 1 to 2 hours, in 5 minutes increments.
• To start cooking immediately, press “START” to start the cooking process.
• To start cooking with a delay, press “PRESET” and then press “TIMER” to set the
desired delay time. After the timer setting, press “START” to begin the preset
timer countdown.
4. During cooking
• To cancel the function at any time, press “KEEP WARM/CANCEL”.
5. After cooking
• Once the cooking cycle ends, the unit will automatically switch to Keep Warm
function. The unit will remain on Keep Warm for up to 24 hours. When the Keep
Warm time expires, the unit will turn off automatically.
• To cancel the Keep Warm function at any time, press “KEEP WARM/CANCEL”.
GUIDE TO YOGURT MAKING
This function allows you to make yogurt.
1. Sterilization
• Fill the pot with 1L of water.
• Press “MENU” to select “PASTA/STEAM”.
• Press “START” to start the cooking process.
• Once the cooking cycle ends, pour the water out of the pot and let it cool
down to room temperature.
• Wipe the pot and inner lid dry.
2. Fill the pot with milk and yogurt. Mix them thoroughly.
• The recommended ratio of milk to yogurt is 10:1.
3. Press “MENU” to select “YOGURT”.
4. Start cooking
• The default cooking time is 8 hours. However, you may adjust the cooking time
before the cooking starts.
• To adjust the cooking time, press “TIMER” repeated to the desired cooking time.
The cooking time range from 6 to 12 hours, in 5 minutes increments.
• To start cooking immediately, press “START” to start the cooking process.
5. During cooking
• To cancel the Yogurt function at any time, press “KEEP WARM/CANCEL”.
6. After cooking
• Once the cooking cycle ends, the yogurt is ready to be served.
TIPS: Add some fruits or honey to the yogurt before serving.
NOTE: To serve the yogurt cold, put it in the fridge only after it has cooled down.
[ERJ 185P] IM [14_0527].indd 8 5/27/2014 4:32:44 PM

9
GUIDE TO CAKE MAKING
This function allows you to make cake.
1. Grease the pot.
2. Pour the cake mixture into the pot.
3. Press “MENU” to select “CAKE”.
4. Start cooking
• The default cooking time is 50 minutes. However, you may adjust the cooking
time before the cooking starts.
• To adjust the cooking time, press “TIMER” repeated to the desired cooking time.
The cooking time range from 50 minutes to 1 hour and 10 minutes, in 1 minute
increments.
• To start cooking immediately, press “START” to start the cooking process.
5. During cooking
• To turn off the unit at any time, press “KEEP WARM/CANCEL”.
6. After cooking
• Once the cooking cycle ends, the unit will automatically switch to Keep Warm
function. The unit will remain on Keep Warm for up to 24 hours. When the Keep
Warm time expires, the unit will turn off automatically.
• To cancel the Keep Warm function at any time, press “KEEP WARM/CANCEL”.
GUIDE TO PASTA/STEAMING
This function allows you to cook pasta or steam food.
1. Fill the pot with water. The amount of water will depend on the ingredient
to cook or the amount of food to be steamed.
• (For STEAM only) Place the food inside the steamer and then place the steamer
inside the pot.
2. Press “MENU” to select “PASTA/STEAM”.
3. Start cooking
• The default cooking time is 8 minutes. However, you may adjust the cooking
time before the cooking starts.
• To adjust the cooking time, press “TIMER” repeated to the desired cooking time.
The cooking time range from 8 to 20 minutes, in 5 minutes increments.
• To start cooking immediately, press “START” to start the cooking process.
• To start cooking with a delay, press “PRESET” and then press “TIMER” to set the
desired delay time. After the timer setting, press “START” to begin the preset
timer countdown.
4. During cooking
• (For PASTA only) Once the water boiled, put the ingredient into the pot. Keep
the lid open during the cooking progress.
• To cancel the function at any time, press “KEEP WARM/CANCEL”.
5. After cooking
• Once the cooking cycle ends, the unit will automatically switch to Keep Warm
function. The unit will remain on Keep Warm for up to 24 hours. When the Keep
Warm time expires, the unit will turn off automatically.
• To cancel the Keep Warm function at any time, press “KEEP WARM/CANCEL”.
[ERJ 185P] IM [14_0527].indd 9 5/27/2014 4:32:44 PM

10
KEEP WARM
The KEEP WARM function allows you to keep the rice or food warm for a longer
period of time.
NOTE: It is recommended not to keep warm the rice or food for more than 12
hours so as to preserve its taste.
1. In standby mode (display shows “-- --”), press “KEEP WARM/CANCEL” to
activate the Keep Warm mode. The keep warm light turns on. During the
keep warm process, the display counts up.
2. To cancel the Keep Warm mode at any time, press “KEEP WARM/CANCEL”.
PRESET TIMER
This function delays start cooking timing. The preset time range from 30 minutes
to 24 hours. Preset function is available for COOK, PORRIDGE, CONGEE, SOUP,
STEW, BROWN RICE and PASTA/STEAM only.
1. Press “MENU” to select the desired function.
2. Press “PRESET” (display shows “00 00”), press “TIMER” to set the desired
delay time (in 30 minutes increments).
3. Press “START” to begin the preset timer countdown. Once, the preset
countdown ends, the cooking process starts.
SPECIFICATIONS
Model ERJ 185P
Power Requirement 220 240V~, 50/60Hz
Power Consumption 860W
Cooking Capacity 1.8L
Dimensions W285 x H270 x D295mm
Weight 2.7kg
Accessories Spatula
Soup Ladle
Steamer
Measuring Cup
Power Cord
[ERJ 185P] IM [14_0527].indd 10 5/27/2014 4:32:44 PM
11
PRECAUTIONS
• Thepotcannotbeheatedonanyotherfurnace;otherwiseitcan
be deformed easily.
• When the cooked rice starts to keep warm, it is not suitable for
eating immediately. The rice will be softer and more delicious if it
continue to steam for another 10 minutes before serving.
• The duration for “keeping warm” must not be exceeded 12 hours in
ordertoavoiddegradingtheavorofthecookedrice.
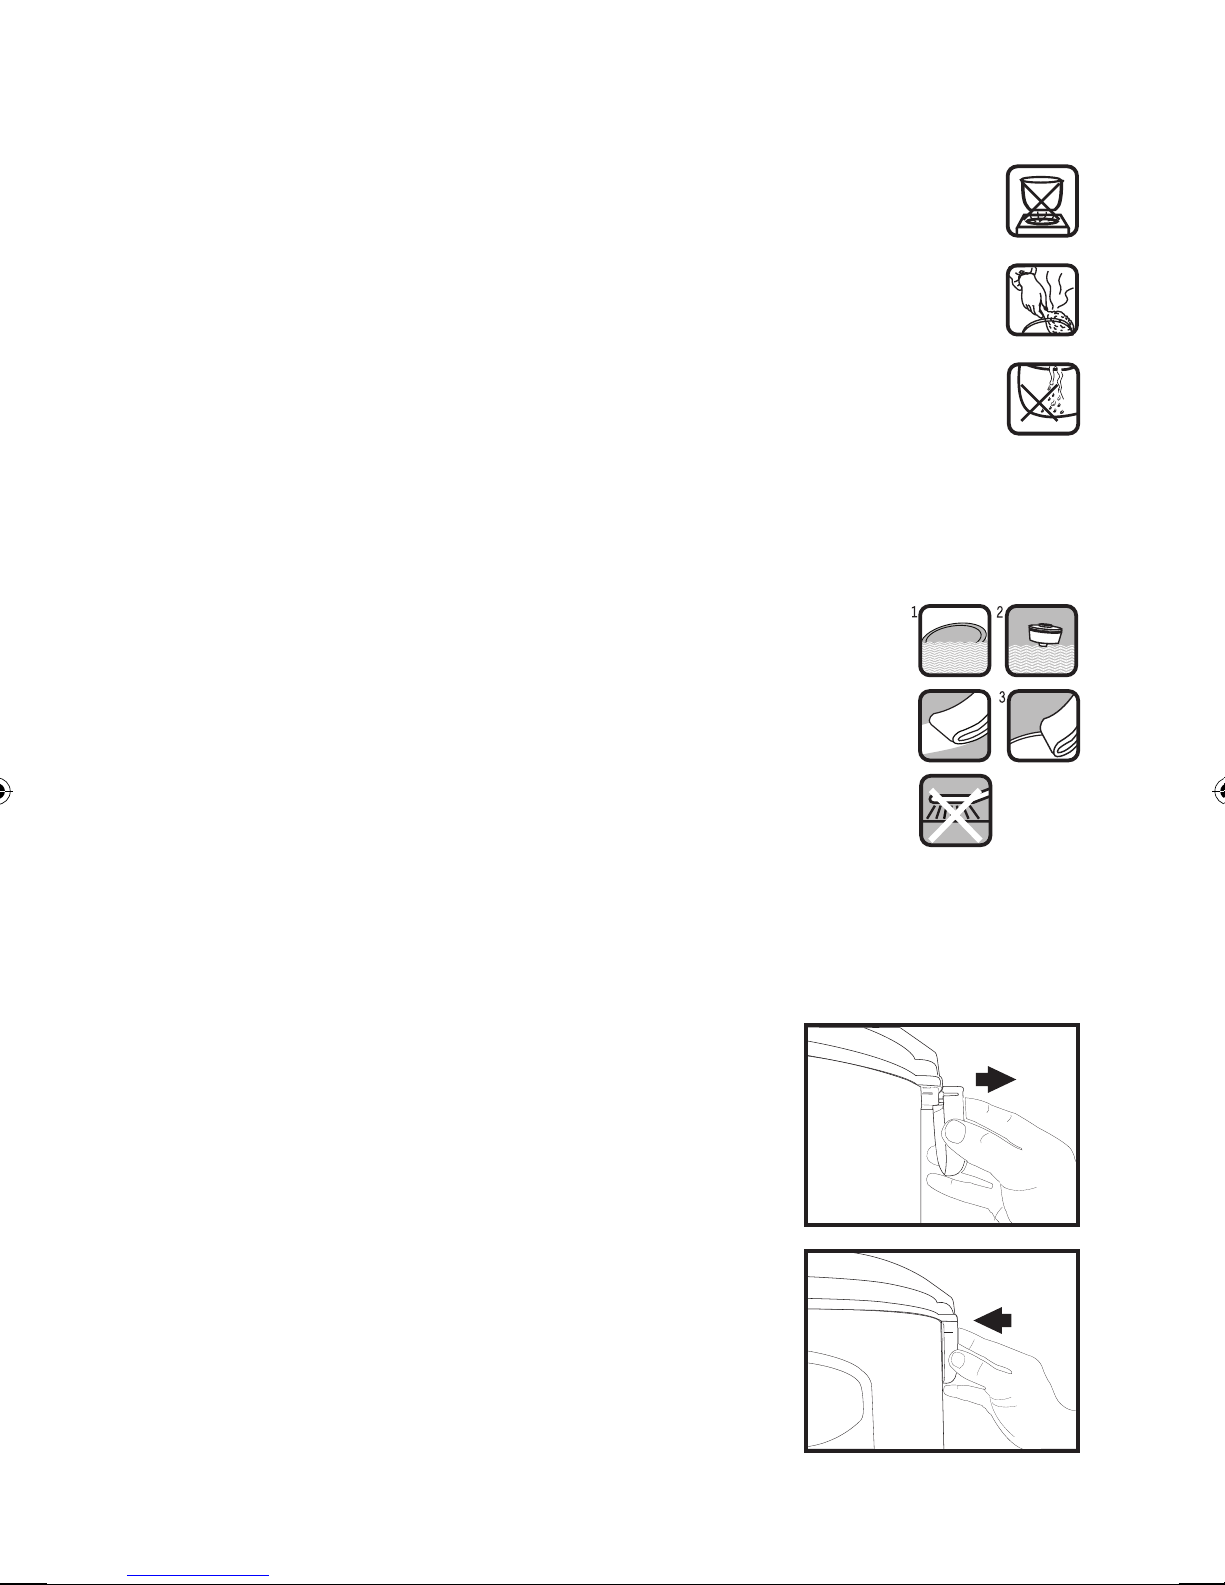
CLEANING INSTRUCTIONS
1. Take the pot out of the electric rice cooker, wash it with
detergent. Rinse it with fresh water and then wipe it dry with
soft cloth.
• Do not use metal brush or other harsh tool to wash pot in order to
avoid damaging the non-stick coating on its surface.
2. Remove the water holder and wash it with water and then
replace it after cleaning.
3. The grain of cooked rice or other sundries may attach to
electricheatingplate.Thenesandpapercanbeusedto
grind them away and wipe it with soft cloth to keep the fully
contact between pot and electric heating plate.
Water Holder Cleaning
• Disassembling
Position your ngers at both sides of the water
holder and pull it out for cleaning.
• Assembling
After washing the water holder, it should be places
correctly to the seat and then push it in to secure it
to the right position.
[ERJ 185P] IM [14_0527].indd 11 5/27/2014 4:32:46 PM

12
CARE AND MAINTENANCE
1. Wash the pot with warm and soapy water using a sponge or cloth. Rinse it
with water properly, and wipe it dry with cloth.
• Do not clean with abrasive brushes to avoid damaging the non-stick coating.
2. Take out the water holder and pour out the water. Wash it with water and
place it back to the rice cooker.
3. Rice grains or other residues may stick on the heating plate. To ensure a
proper contact with the pot, rub the grains/residues away from the heating
platewithnesandpaper(No.320),thenwipeitwithclothagain.
NOTE: The non stick coating may wear out with use.
• The non stick coating may eventually discolour or peel off. In such cases, please replace
it by purchasing a new one at our service centre.
TROUBLESHOOTING
PROBLEMS CAUSES REMEDIES
LED indicator light
does not turn on.
LED indicator light may be
malfunction.
Send to service centre for
repair.
Display does not
function
1.The unit is not connected
to power supply.
2.Display may be
malfunction.
1.Check the switch, outlet,
fuse, power cord and
connect it correctly.
2.Send to service centre
for repair.
Rice or food is not
cooked.
1.The pot may be
deformed.
2.The pot is not properly in
contact with the heating
plate.
3.The heating plate may
be malfunction.
1.Send to service centre
for repair.
2.Ensure there is no foreign
materials left between
the pot and heating
plate.
3.Send to service centre
for repair.
Cake is not properly
baked.
The cake ingredient
quantity may be too
much.
Check the quantity men-
tioned in the cake recipe.
Yogurtisnotrm
enough or does not
form at all.
The milk temperature is
over 40 degree, which has
destroyed the bacteria in
the yogurt culture.
Ensure the temperature of
the milk and pot are below
40 degree before making
the yogurt.
Rice cooker does not
warm automatically.
Thermostat is malfunction. Send to service centre for
repair.
[ERJ 185P] IM [14_0527].indd 12 5/27/2014 4:32:46 PM

MEMO
[ERJ 185P] IM [14_0527].indd 13 5/27/2014 4:32:46 PM

MEMO
[ERJ 185P] IM [14_0527].indd 14 5/27/2014 4:32:46 PM

EUROPACE SERVICE CENTRE
10 Changi South Street 3 #06-01 Singapore 486147
Tel: (65) 6457 3678 | Fax:( (65) 6741 0728
Email: sales@strategic.com.sg
www.europace.com.sg | www.strategic.com.sg
This product is distributed by Strategic Marketing (S) Pte Ltd.
If there is any technical amendment for the product, it will be edited on the updated version of the
instruction manual without prior notice. The pictures shown in the instruction manual is only for
illustration purpose only. If the appearance or colour of the product is modied, please refer to the
actual product as a standard.
Other manuals for ERJ 185P
1
Table of contents
Other EuropAce Rice Cooker manuals


