EUROPRO Bravetti TT200NB User manual
Two Slice Toaster
Tostador De Dos Rebanadas
Grille-Pain Deux Tranches
INSTRUCTION MANUAL
MANUAL DE INSTRUCCIONES
MANUEL D’INSTRUCTIONS
Model – Modelo - Modèle: TT200NB
120 V. 60 Hz. 850 W.
Copyright © EURO-PRO OPERATING LLC 2009
EURO-PRO OPERATING LLC
Boston, MA 02465
Tel.: 1 (800) 798-7398
www.euro-pro.com

IMPORTANT SAFETY INSTRUCTIONS
WARNING: A risk of fire and electrical shock exists in all electrical appliances
and may cause personal injury or death. Please follow all safety instructions.
READ ALL INSTRUCTIONS CAREFULLY BEFORE USING APPLIANCE.
1. Do not touch hot surfaces. Use
handles or knobs.
2. To protect against electrical shock,
do not immerse cord, plug, or
toaster in water or other liquid. See
instructions for cleaning.
3. This appliance is not for use by
children.
4. Close supervision is necessary
when this appliance is used near
children.
5. Unplug from outlet when not in use.
Unplug and allow to cool before
cleaning.
6. Do not operate any appliance with a
damaged cord or plug, or after the
appliance malfunctions, has been
dropped or damaged in any manner.
Return the appliance to EURO-PRO
Operating LLC for examination,
repair or adjustment. Always call
EURO-PRO Operating LLC first if
appliance needs servicing. See
warranty.
7. The use of accessory attachments
not recommended by the appliance
manufacturer may cause injuries.
8. Do not use outdoors, or while
standing in a damp area.
9. Do not let cord hang over the edge
of the table, counter or touch hot
surfaces.
10.Do not place on or near a hot gas or
electric burner, or in a heated oven.
11.Do not use appliance for other than
its intended use.
12.Oversize foods, metal foil packages
or utensils, must not be inserted in a
toaster as they may involve a risk of
fire or electric shock.
13.Do not toast “buttered” items, foods
with “runny” frostings, fillings, icings
or cheese, or try to make toasted
sandwiches in the toaster, as this
will cause or result in a fire.
14.Do not use torn, curled up, or
misshapen slices of bread in the
toaster as these may jam the eject
mechanism.
15.Do not leave toaster unattended
while in use.
16.A fire may occur if toaster is covered
or touching flammable material,
including curtains, draperies, walls
and the like when in operation.
17.Do not attempt to dislodge food
with metal utensils especially
when toaster is plugged in.
Should it be necessary to dislodge
food, always unplug the toaster and
use only a wooden utensil.
18.Do not cover crumb tray or any part
of toaster with metal foil. This will
cause overheating and risk of fire.
19.Use only with plug and cord
provided.
20.Use toaster in an open area with 4-6
inches of air space above and on all
sides for air circulation. A fire may
occur if toaster is covered or
touching flammable material,
including curtains, draperies, towels,
walls and toaster covers, etc., while
in operation.
21.Do not wrap the power supply cord
around the toaster, use the cord
storage clips underneath the base.
22.Do not defrost or toast convenience
foods under any cabinet or
overhang.
23.Do not force food into bread slots.
24.Do not clean with metal scouring
pads. Pieces can break off the pad
and touch electrical parts, creating a
risk of electric shock.
25.Keep the crumb tray clean. See
instructions for cleaning.
SAVE THESE INSTRUCTIONS
FOR HOUSEHOLD USE ONLY
1 REV. 03/09
CAUTION:
A short power supply cord is provided to reduce the risk of personal injury resulting
from becoming entangled in or tripping over a longer cord. Extension cords are
available from local hardware stores and may be used if care is exercised in their use.
If an extension is required, special care and caution is necessary. Also, the cord must
be:
1. Marked with an electrical rating of 125 V and at least 10 A, 1250 Watts.
2. The cord must be arranged so that it will not drape over the countertop or tabletop
where it can be pulled on by children or tripped over accidentally.
POLARIZED PLUG:
This appliance has a polarized plug (one blade is wider than the other). As a safety
feature to reduce the risk of electrical shock, this plug is intended to fit in a polarized
outlet only one way. If the plug does not fit fully in the outlet, reverse the plug. If it still
does not fit, contact a qualified electrician. DO NOT attempt to defeat this safety
feature.
ELECTRIC POWER:
If the electric circuit is overloaded with other appliances, your toaster may not operate
properly. It should be operated on a separate electrical circuit from other appliances.
SPECIAL SAFETY INSTRUCTIONS
SAVE THESE INSTRUCTIONS
FOR HOUSEHOLD USE ONLY
2
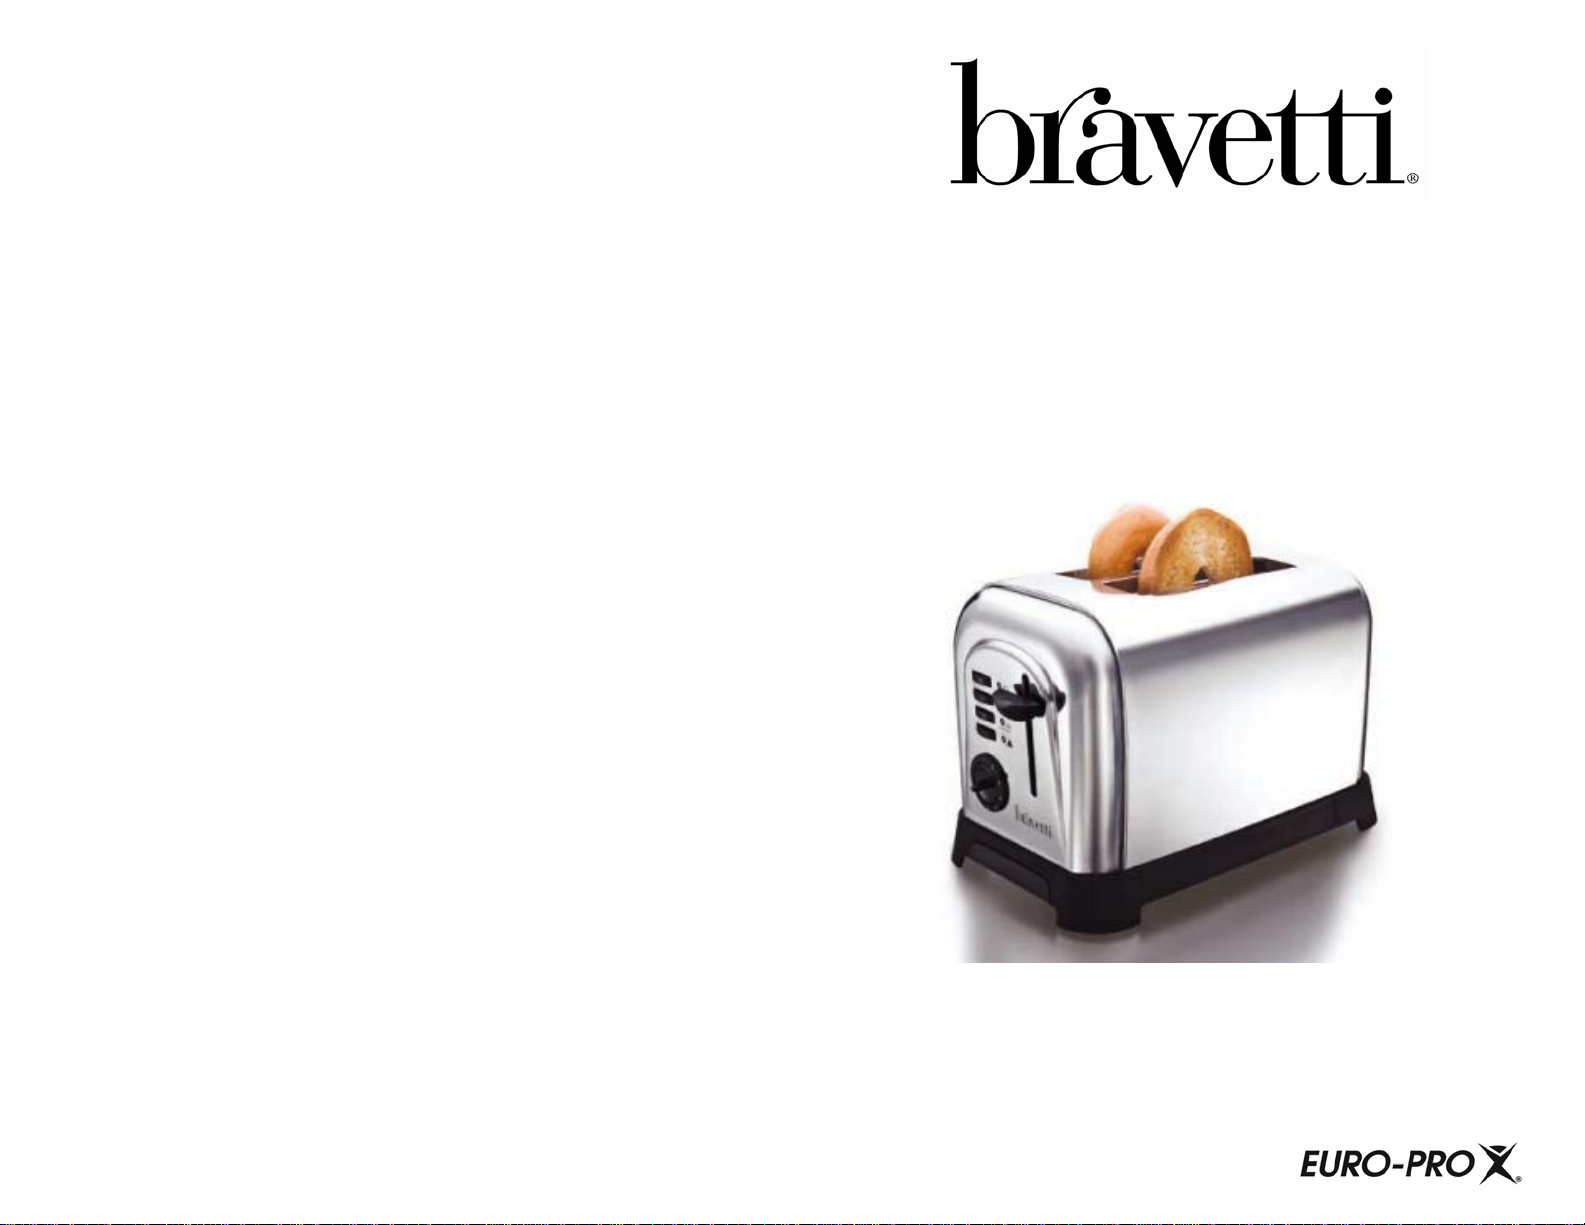
Getting To Know Your Two Slice Toaster
Technical Specifications
Voltage: 120V., 60Hz.
Power: 850 Watts
*Illustrations may differ from actual product.
3
5
CONTROL PANEL
1. Bread Slots
2. Bread Carriage Lever
3. Variable Browning Control Knob
4. Removable Crumb Trays
5. Control Panel
6. Bagel Button
7. Bagel Light
8. Defrost Button
9. Defrost Light
10. Reheat Button
11. Reheat Light
12. Cancel Button
13. Power “On” Light
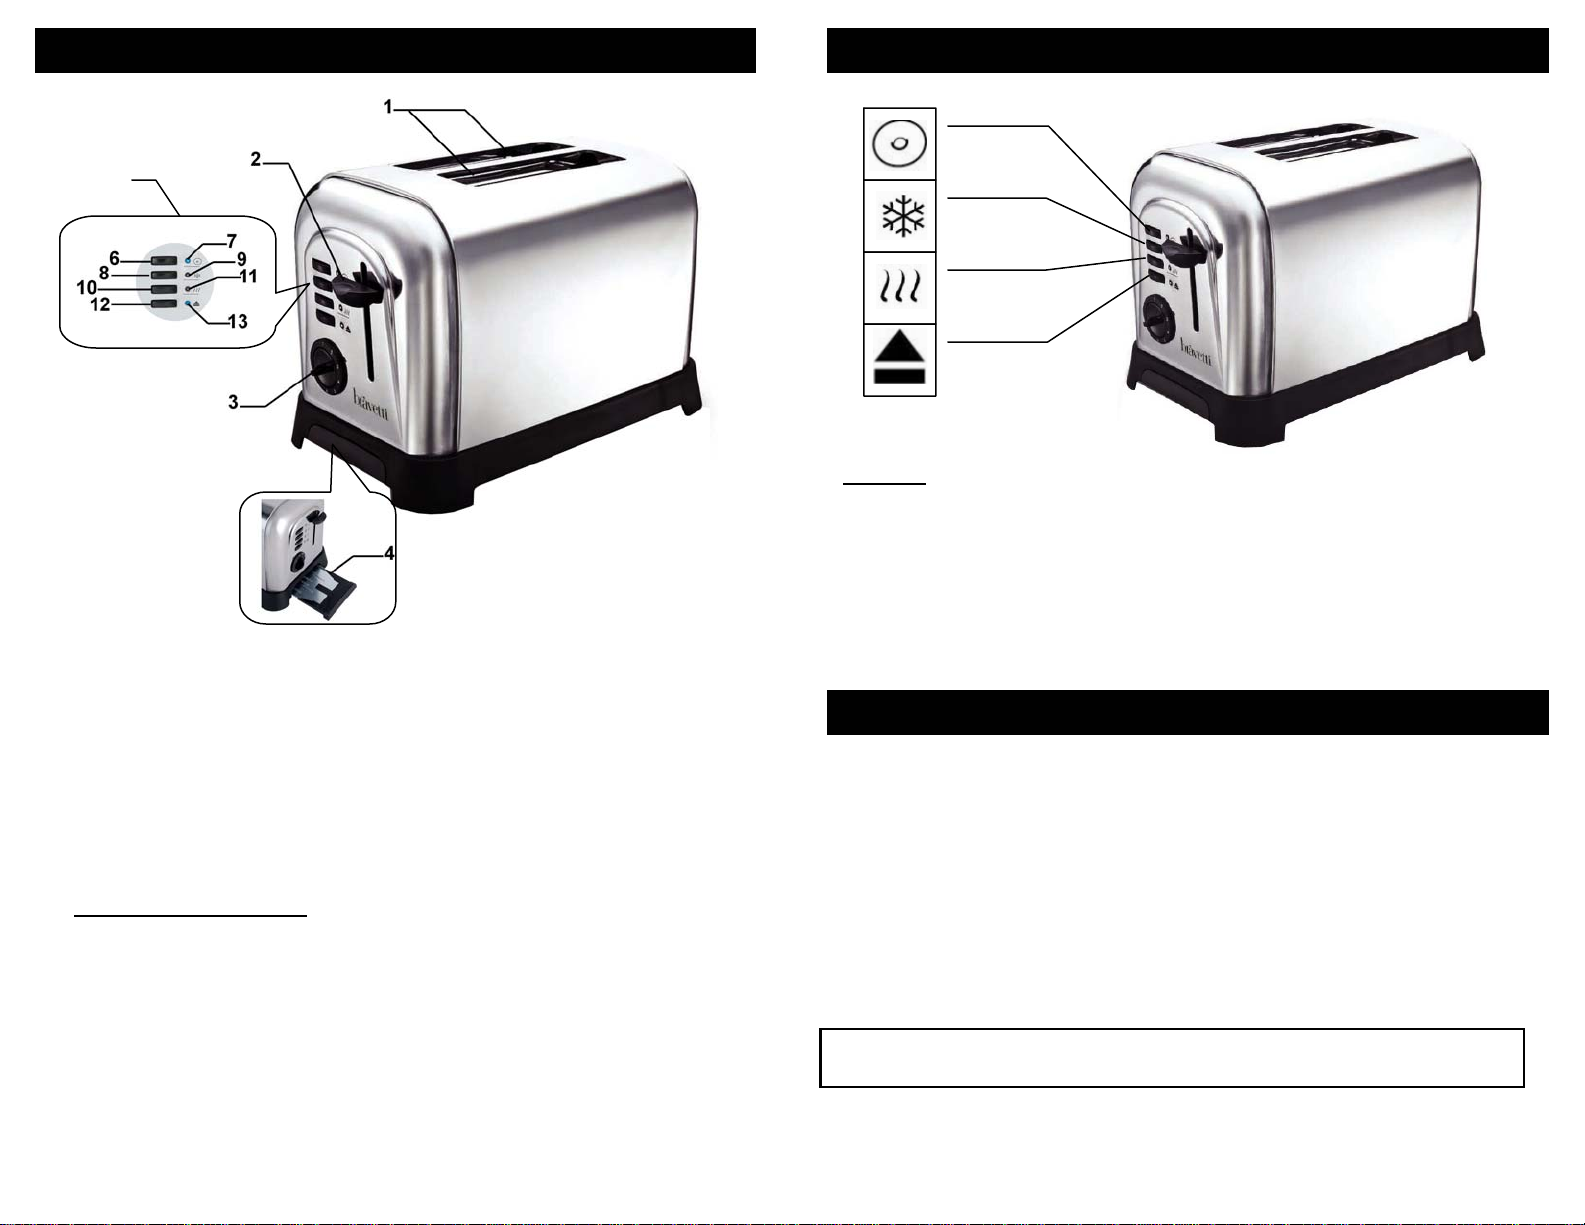
Features
Features
The features on this two slice toaster are:
•Bagel: This cycle assures that the bagel will be toasted darker on the inner side.
•Defrost: This cycle automatically toasts for approximately 20 seconds longer to
assure that the item will be defrosted as well as toasted.
•Reheat: This cycle is a 30-second toasting cycle that assures the item will be
reheated.
•Cancel: To stop a cycle midway through the operation, press the Cancel Button.
Before Using for the First Time
1. Make sure that you have read and understood the IMPORTANT SAFETY
INSTRUCTIONS and the SPECIAL SAFETY INSTRUCTIONS sections.
2. Remove all packing materials from unit. Check inside the bread slots to make sure
that no packaging materials or literature have fallen inside. Make sure crumb tray is
in correct position. See Maintenance and Cleaning section.
3. Using a soft cloth, gently wipe away all the dust particles from the outside of
toaster.
4. In order to remove any possible residues from the manufacturing process, the
toaster should be heated twice at the highest temperature (with the toaster empty).
5. Toaster slots should be empty before you plug into wall outlet.
Note:When using the toaster for the first time, a light smoke may appear. This is
completely harmless and will disappear after a few uses.
4
Bagel
Defrost
Reheat
Cancel

Operating Instructions
How to Use Your Toaster
1. Place unit on a dry, flat surface.
2. Plug cord into any 120 V. 60 Hz.
outlet. The unit may emit an odor
and/or smoke during first few uses
from oils used in manufacturing. This
is normal for a new appliance.
3. The power “On” light will come on for
each function and will turn “Off” when
the function is done or cancelled.
Note: Never operate the toaster without
the removable crumb trays in place. Do
not cover the removable crumb trays or
any other part of the toaster with foil.
Toasting Instructions
1. Set the toast color control knob to the
color of toast desired. For first use, set
control mid-way between light (1) and
dark (6) settings. Toast thin breads on
the lower toast color setting.
2. Insert bread or toaster food into bread
slots, and push down the bread
carriage lever.
Note: Use any slot when toasting single
slice or portion. Use portions that fit freely
into slots. The guides in the bread slots
will hold food upright for uniform toasting.
3. When toast is done, the bread carriage
lever will pop up and the power will
shut off automatically. Lift up on bread
carriage lever for easier removal of
shorter foods i.e. bagels and English
muffins. (Fig. 1)
Convenience Foods Toasting
Today there are many varieties of packaged convenience
foods available, both frozen and non-frozen (shelf-
pastry), that can be toasted in you toaster. Do not leave
toaster unattended when defrosting or toasting
convenience food.
Since toaster foods and individual tastes vary, it is
difficult to recommend the exact toast color control
settings, however, after a little experimentation you will
discover the best setting for your needs. You may also
wish to refer to the heating instructions on food
packaging. For thicker convenience foods, it may be
necessary to adjust the toast color control clockwise for a
longer toasting cycle.
WARNING:NEVER USE METAL UTENSILS TO REMOVE ITEMS FROM
THE TOASTER.
4. To interrupt toasting, press the
cancel button.
Note: Do not allow plastic wrappings
to lay against the toaster while the
toaster is being used. This will result in
melting the plastic onto the outside
surface of your toaster.
Defrosting/Toasting Instructions
1. For first use, set the toast color
control to light (1) setting.
2. Place frozen food in the toaster
slots. Push down on the toast lever
first, and then press the defrost
button. The defrost light will go on.
Note: The defrost/toasting process will
automatically toast for approximately
20 seconds longer to assure that the
item will be defrosted as well as
toasted. Use food that fits freely into
slots. The guides in the bread slots will
hold food upright for uniform toasting.
5
Fig. 1
3. When the food is done, the bread
carriage lever will pop up and the
defrost button will release. The power
will shut off automatically and the
defrost light will go off. The automatic
reset feature returns the toaster to
normal operation after each
defrost/toasting cycle. Lift up on bread
carriage lever for easier removal of
shorter foods i.e. bagels and English
muffins. (Fig. 1)
4. To interrupt toasting, press the cancel
button.
Bagel Instructions
1. For first use, set the toast color control
to light (1) setting.
2. Place bagel halves cut side facing out
in the toaster slots. Push down on the
toast lever first, and then press the
bagel button. The bagel light will go
on.
Note: Use bagels that fit freely into the
slots, just make sure that the cut side
faces out. The guides in the bread slots
will hold the bagel upright for uniform
toasting.
3. When the bagel is done, the bread
carriage lever will pop up and the
bagel button will release. The power
will shut off automatically and the
bagel light will go off. The automatic
reset feature returns the toaster to
normal operation after each bagel
cycle. Lift up on bread carriage lever
for easier removal of smaller foods like
bagels and English muffins. (Fig. 1)
4. To interrupt toasting, press the cancel
button.
Operating Instructions
WARNING:NEVER USE METAL UTENSILS TO REMOVE ITEMS FROM THE
TOASTER.
Reheat Instructions
1. Place food in the toaster slots.
Push down on the toast lever first
and then press the reheat button.
The reheat light will go on.
Note:The reheat process will be a 30-
second toasting cycle to assure that the
item will be reheated. Use any slot
when toasting single slice or portion.
Use portions that fit freely into slots.
The guides in the bread slots will hold
food upright for uniform toasting.
2. When toast is done, the bread
carriage lever will pop up and the
reheat button will release. The
power will shut off automatically and
the reheat light will go off. The
automatic reset feature returns the
toaster to normal operation after
each reheat cycle. Lift up on bread
carriage lever for easier removal of
smaller foods like bagels and
English muffins. (Fig. 1)
3. To interrupt toasting, press the
cancel button.
6

Helpful Hints for Using Your Toaster
Storing Instructions
When storing the toaster, unplug the
toaster from the electrical outlet and let
the unit cool thoroughly. Turn the
toaster on its side and wrap the cord
around the inside base for storing.
(Fig. 2)
4. Be sure to slide the crumb tray back
into position before attempting to
toast again. Do not let food build
up on the crumb tray.
Maintenance & Cleaning Instructions
Tips on Toasting
Please note that when toasting different breads the different moisture levels from one
type to another can result in varying toasting times.
• If bread is slightly dry, use a lower setting than you normally would.
• For very fresh bread or whole wheat bread, use a higher setting than normal.
• Breads with uneven surfaces (such as english muffins) will require a longer toasting
time.
• When toasting raisin or other fruit bread, remove any loose fruit from the surface
before placing into the toaster. This will prevent them from falling into the bottom or
sticking to the guard wires in the slots.
• Sweet bread products (i.e. tea cakes, raisin bread, etc.) brown much quicker than
regular bread, and should be toasted on the lighter settings.
• Thick slices of bread (1/2” to 1” in thickness) may require 2 cycles of toasting.
WARNING: Do not use torn, curled up or misshapen slices of bread as these may
jam the ejection mechanism and could catch fire.
Fig. 2
2. Wipe outside of toaster with a soft,
damp cloth. Polish dry with soft, dry
cloth.
3. Remove the slide-out crumb tray
using a recessed handle in the front
of toaster. (Fig. 3) Shake out
crumbs in toaster over sink. Rinse
crumb tray in water, then dry. If
necessary, use warm soapy water
to wash the crumb tray, then dry
thoroughly before replacing it in the
toaster.
Cleaning Instructions
CAUTION: DO NOT immerse toaster
or plug in water or other liquid.
CAUTION: To avoid damaging the
toaster’s heating elements, NEVER use
any pointed or sharp utensils for
cleaning the inside of the toaster
1. Unplug toaster and allow to cool.
7
CAUTION: DO NOT immerse in water or any other type of liquid.
WARNING: NEVER use metal utensils to remove food from your toaster.
WARNING: Empty the removable crumb trays often. Crumbs that accumulate
in the removable crumb trays could catch on fire if the crumb trays are
not emptied.
Fig. 3
Please complete and return within ten (10) days of purchase. The registration will enable us to contact
you in the event a product defect is discovered. By returning this card you acknowledge to have read
and understood the instructions for use, and warnings set forth in the accompanying instructions.
RETURN TO:
EURO-PRO Operating LLC, 4400 Bois Franc, St. Laurent, Quebec H4S 1A7
________________________________________________________________________________
Appliance Model
________________________________________________________________________________
Date of Purchase Name of store
________________________________________________________________________________
Owner’s name
________________________________________________________________________________
Address City Prov. Postal Code
Model
TT200NB
PRODUCT REGISTRATION CARD
FOR CANADIAN CONSUMERS ONLY
TT200NB
Printed in China 8
ONE (1) YEAR LIMITED WARRANTY
EURO-PRO Operating LLC warrants this product to be free from defects in material and
workmanship for a period of one (1) year from the date of the original purchase, when utilized for
normal household use, subject to the following conditions, exclusions and exceptions.
If your appliance fails to operate properly while in use under normal household conditions within the
warranty period, return the complete appliance and accessories. For Customer Service support, call
1(800) 798-7398 or visit our website at www.euro-pro.com.
If the appliance is found by EURO-PRO to be defective in material or workmanship, EURO-PRO will
repair or replace it free of charge. Proof of purchase date and $ 5.95 to cover the cost of return
shipping and handling must be included. *
The liability of EURO-PRO Operating LLC is limited solely to the cost of the repair or replacement of
the unit at our option. This warranty does not cover normal wear of parts and does not apply to any
unit that has been tampered with or used for commercial purposes. This limited warranty does not
cover damage caused by misuse, abuse, negligent handling or damage due to faulty packaging or
mishandling in transit. This warranty does not cover damage or defects caused by or resulting from
damages from shipping or repairs, service or alterations to the product or any of its parts, which have
been performed by a repair person not authorized by EURO-PRO Operating LLC.
This warranty is extended to the original purchaser of the unit and excludes all other legal and/or
conventional warranties. The responsibility of EURO-PRO Operating LLC if any, is limited to the
specific obligations expressly assumed by it under the terms of the limited warranty. In no event is
EURO-PRO Operating LLC liable for incidental or consequential damages of any nature
whatsoever. Some states/provinces do not permit the exclusion or limitation of incidental or
consequential damages, so the above may not apply to you.
This warranty gives you specific legal rights, and you may also have other rights which vary from
state to state or province to province.
*Important: Carefully pack item to avoid damage in shipping. Be sure to include
proof of purchase date and to attach a tag to item before packing with your name,
complete address and phone number with a note giving purchase information,
model number and what you believe is the problem with item. We recommend you
insure the package (as damage in shipping is not covered by your warranty). Mark
the outside of your package “ATTENTION CUSTOMER SERVICE”. We are
constantly striving to improve our products, therefore the specifications contained
herein are subject to change without notice.
Table of contents
Languages:
Other EUROPRO Toaster manuals


