Euroscreen ENYROOM Sesame 2.1 User manual

Sesame 2.1
Made in Sweden
30 augusti 2023, 10:16 fm
Scan for online support and documents
or visit support.enyroom.se

Thank you for choosing a Euroscreen®to be part of your
AV installation. We hope it will bring you many hours of entertainment
and/or education depending on your preference. Please read through the
manual completely before installation and usage.
Tack för att ni valt en Euroscreen® som en del i er AV-installation. Vi
hoppas den kan ge er många timmar av underhållning och/eller
utbildning, beroende på aktivitet. Läs igenom hela manualen innan
installation och användning.
CAUTION:CAUTION: The installation must be
wired and connected by a certified electrician!
VARNING:VARNING: Installationen måste kopplas
av behörig elektriker!
ENYROOM AB • Västervallvägen 6
SE-302 50 Halmstad Sweden
www.enyroom.se | www.euroscreens.se
3
Installation / Installation
fig 2
Ø 10,5
Ø 10,5
Ø 6,5
Ø 6,5
Ø 10,5
Ø 6,5
fig 1
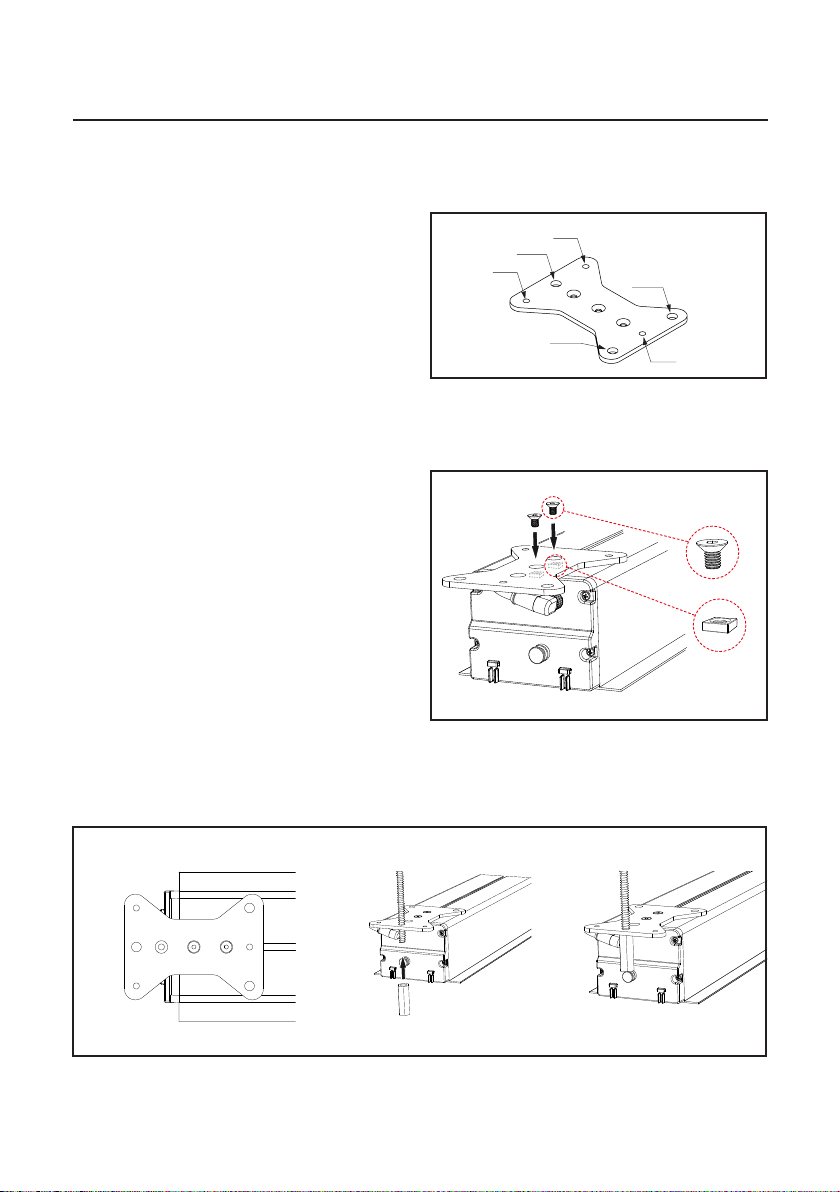
EN:
Fig 1:
Ø 6,5 - Intended for M6 screws.
Ø 10,5 - Intended for M10 threaded rods.
Mount the brackets by inserting the nuts
into the top track of the case and fitting the
screws through the two inner of the
countersunk holes of the bracket (fig 2).
Turn the brackets as it best suits your
installation. Please see following examples
in fig 3 to 5.
SE:
Fig 1:
Ø 6,5 - Avsedd för M6 skruv.
Ø 10,5 - Avsedd för M10 gängstav.
För in fyrkantsmuttrarna i kassettens
toppspår. Skruva fast konsolerna genom de
två inre av de försänkta hålen (fig 2).
Vänd konsolerna så som det passar
installationen bäst. Se följande exempel i
fig 3 till 5.
fig 3
One threaded rod / En gängstång (not included / ingår ej)

4
Two threaded rods / Två gängstänger (not included / ingår ej)
fig 5
Two screws / Två skruvar (not included / ingår ej)
fig 4
fig 7
STOP / STOPP
fig 6
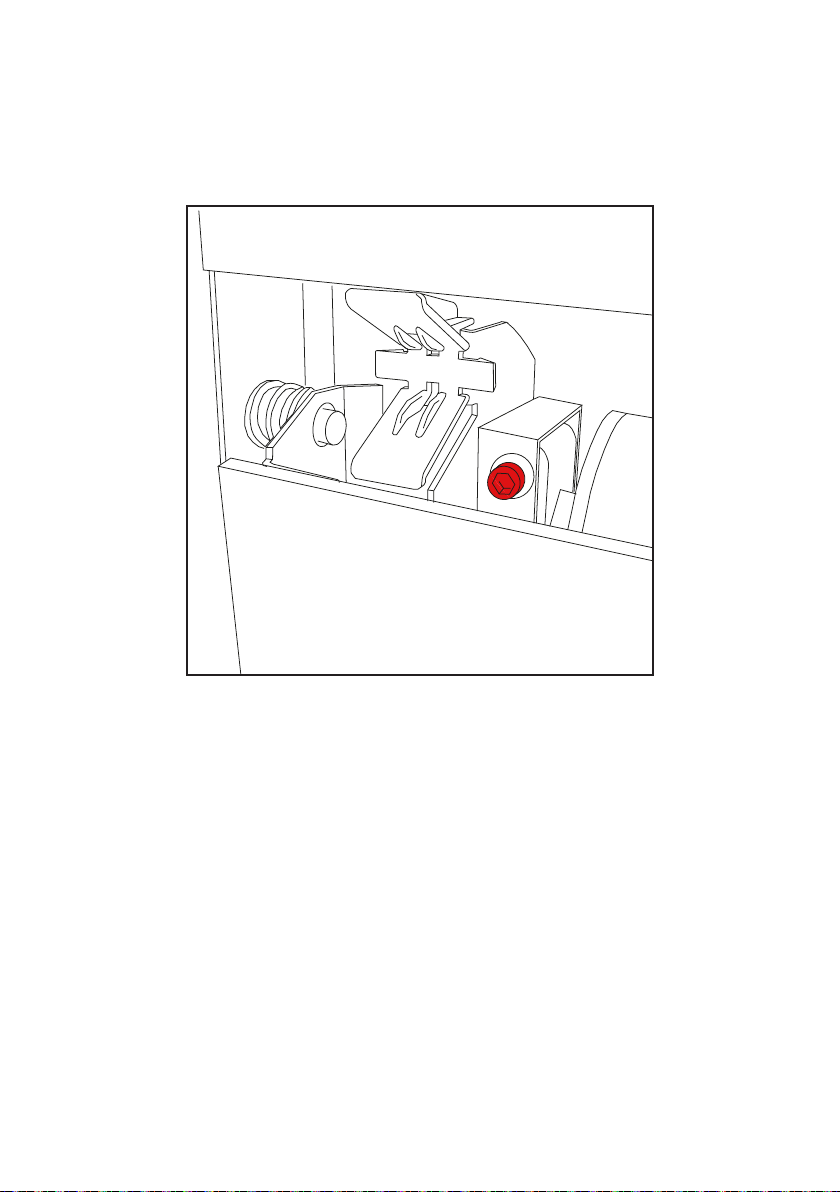
EN:
Install the case in the ceiling (fig 3 to 5).
Finish off by attaching the end cover plates.
Please locate the ”stop” (see fig 6) on the
plates. These come in ”left-” and
”righthandversion” and are switchable,
enabling you to slide them both on, either
towards the front or towards the back,
whichever is the easiest in your installation.
SE:
Installera kassetten i taket (fig 3 till 5).
Avsluta med att sätta dit ändarnas
täckplåtar. Lokalisera stopklackarna, se fig
6. Plåtarna kommer i ”höger” och ”vänster”
utförande men är vändbara, så de kan
föras på antingen framifrån eller bakifrån,
vilket som passar er installation bäst.

5
Features / Funktioner
EN:
This has to be carried out by two people!
a. Remove the end cover plates.
b. Put your hand under the lid, see fig 8.
The lid is hinged and
will not fall to the ground but should not be released
uncontrolled!
c. Pull out or use a tool, ex. screwdriver, the locking pin
marked with red in fig 9 & 10. Release the lock on both sides
simultaneously.
d. Sometimes the dowel guide (marked with yellow in fig 11)
will hook onto the flange. Push it in gently and the lid will open
completely
Opening the lid / Öppna locket
SE:
Detta bör utföras av två personer!
a. Ta bort de båda ändplattorna.
b. Håll handen under locket, se fig 8.
Locket sitter
upphängt i en gångjärnsled och kommer inte att falla till
marken men det bör inte öppnas okontrollerat!
c. Dra ut eller använd ett verktyg, ex skruvmejsel, för att
lossa låssprinten markerad med rött i fig 9 & 10. Detta skall
göras på bägge sidor samtidigt.
d. Ibland hakar bottenprofilsguiden (markerad med gult i
fig 11) i flänsens insida. Tryck försiktigt in guiden och locket
öppnas helt.
fig 9
fig 10
fig 8
fig 11
6
Set height of inner bracket / Justera höjden med innergaveln
fig 13
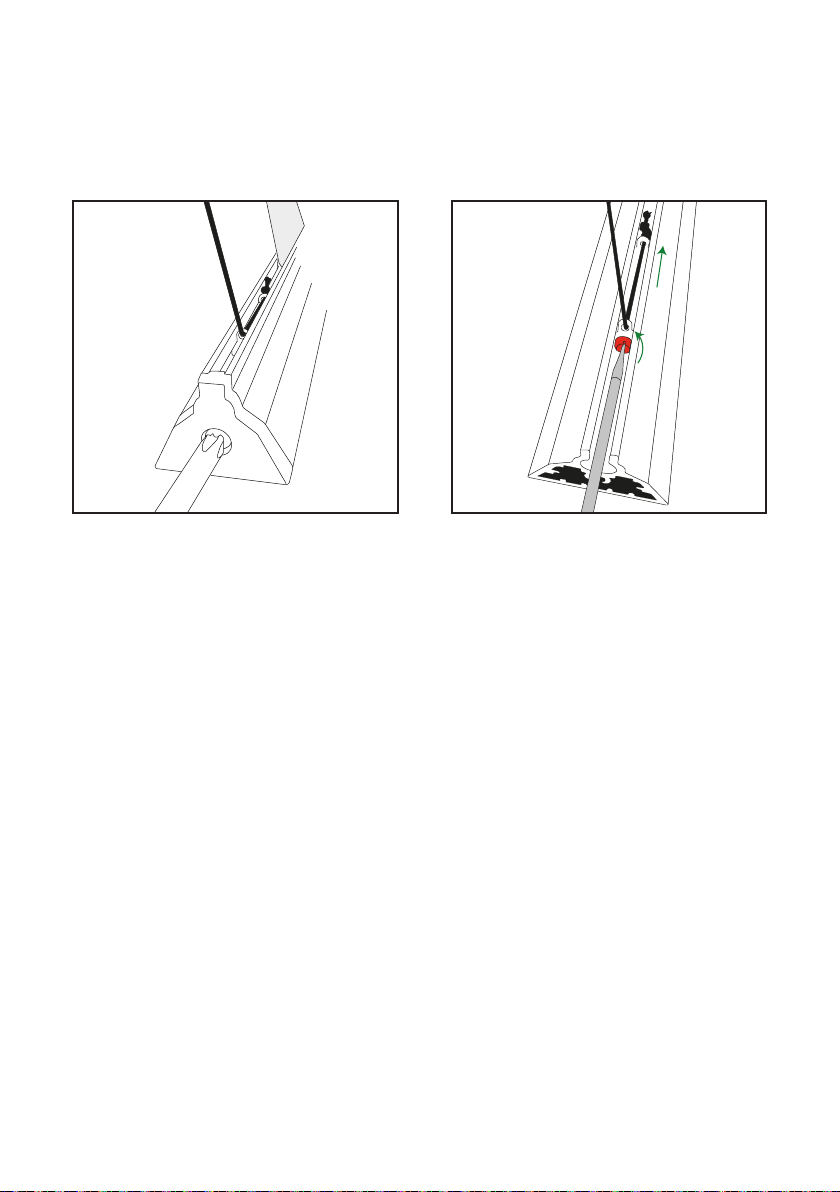
EN:
For fine adjustment of screen level and case closing, the Sesame is equipped with
adjustable inner brackets on both sides. There is a total travel distance of 8mm. These are
set from factory with roughly 4mm in each direction, but may vary slightly.
Turn the adjustment screw, marked with red in fig 13, to set the screen. Turning it
clockwise lowers the screen and vice versa.
SE:
För finjustering av filmduken och hur den stänger, finns på Sesame justerbara innergavlar
på bägge sidor av duken. Total justerhöjd är 8mm. De är satta från fabrik med ungefär
4mm åt vart håll men det kan variera något. Vrid på skruven markerad med rött i fig 13,
för att ställa in duken. Vrid medurs för att sänka duken och vice versa.
7
EN:
a. Unscrew endcap, see fig 14
b. Take out centering distance (small, black plastic tube)
c. Adjust thread with tensioning screw (marked in red in fig 15). Anti-clockwise increases
tension and vice versa.
d. Put distance back and fasten end cap
Adjusting thread tension / Justera trådspänningen
(TabTension only/endast)
SE:
a. Lossa skruven som håller ändstycket, se fig 14
b. Ta ut centreringsbiten (litet, svart plaströr)
c. Justera trådspänningen med justerskruven (markerad med rött i fig 15). Motsols ökar
spänningen och vice versa.
d. Stoppa tillbaka distansen och skruva fast ändstycket.
fig 14 fig 15

REACH
Conformity of regulations
Enyroom AB manufactures AV equipment. Products are controlled and certied by the below listed regulations.
REACH
Registration, evaluation, authorisation and limitation of chemicals. Regulation (EC) No 1907/2006 of the European
Parliament and of the European Council concerning the Registration, Evaluation, Authorisation and Restriction of
Chemicals (REACH). All screen surfaces of Euroscreen®projection screens are approved by the REACH regulation.
ECHA
European Chemicals Agency (ECHA) gathers information on the properties of manufacturers and importers chemical
substances, which will allow their safe handling, and to register the information in a central database.
Euroscreen®projection screens are printed with colours containing the following components:
CAS 1333-86-4, CAS 112-36-7, CAS 96-48-0, CAS 143-24-8, CAS 1559-34-8, CAS 2687-91-4,
CAS 111-90-0, CAS 34590-94-8 and CAS 126-86-3. These are all approved by ECHA.
RoHS
Restriction of Hazardous Substances Directive (RoHS) directive restricts the use of six hazardous materials in the
manufacture of various types of electronic and electrical equipment. All electrical devises used in
Euroscreen®products are RoHS certied.
WEEE
The Waste Electrical and Electronic Equipment Directive (WEEE Directive) is the European Community directive
2002/96/EC on waste electrical and electronic equipment (WEEE) which, together with the RoHS Directive 2002/95/
EC, setting collection, recycling and recovery targets for all types of electrical goods. Applicable Euroscreen®products
are labeled with the WEEE symbol.
FTI
Producers responsibilty for recycling of packaging material is regulated by SFS 2006:1273. The recycling process of
packaging material is handled for its members by a central organization called FTI.
Enyroom AB is a member of FTI.
Declaration of Conformity
Enyroom AB conrms that Euroscreen®Electric meets Machinery Directive 2006/95/EG & EMC Directive 2004/108/EC.
This is an EN61140 Class I product with internal separation instead of protective conductor (EN61140 7.2.2 Note 2).
Euroscreens®are CE-approved.
Lyftkomponenterna till Sesame 2.1 uppfyller kraven i ISO3266 och Maskindirektivet 2006/42/EG.
RoHS
ENYROOM AB
Västervallvägen 6 • SE-302 50 Halmstad, Sweden
www.enyroom.se
A part of ENYROOM AB
www.euroscreens.se
Table of contents
Other Euroscreen Whiteboard manuals

Popular Whiteboard manuals by other brands


Ipevo
Ipevo IW2S quick start guide

i3-TECHNOLOGIES
i3-TECHNOLOGIES i3SIXTY quick start guide

Smart Technologies
Smart Technologies SMART Board 3000i Setup

Smart Technologies
Smart Technologies Hawkeye Installation and user guide

Quartet
Quartet Silhouette Total Erase Easel Assembly instructions

MAUL
MAUL MAULpro 638 09 manual