Eurowater SILEX 1C User manual
D01B-30A-UK1 |January 2017
SILHORKO-EUROWATER A/S Phone +45 86 57 12 22
DK-8660 Skanderborg info@eurowater.com
Denmark www.eurowater.com
Instructions for
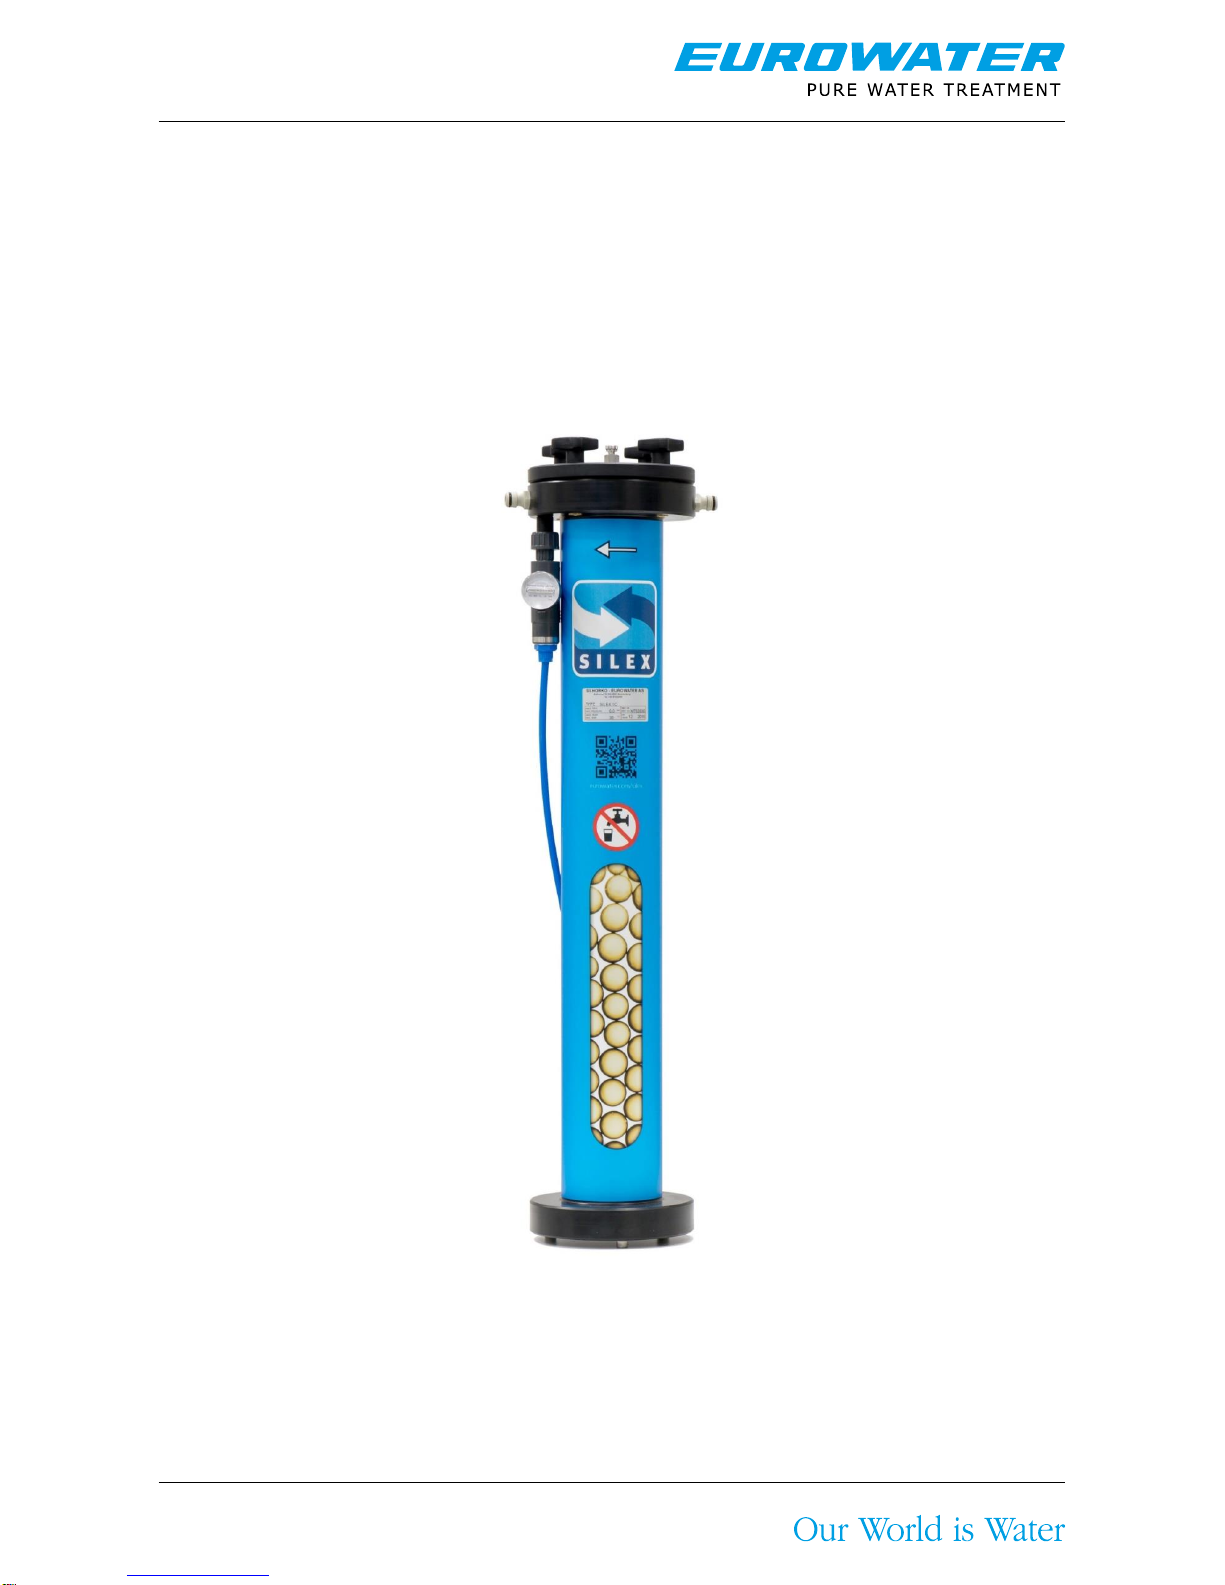
SILEX 1C
Mixed bed cartridge filter
With conductivity sensor |Gravity flow or pressure installation

Instructions |SILEX 1C |D01B-30A-UK1 |January 2017
Page 2| 9
International after sales service
EUROWATER has an international sales and service organization with an experienced staff of engineers
and specially trained service technicians. Our service is fully documented, characterized by a short reaction
time and it is our goal to be easy to work with in all situations. We offer customized service agreements, high
quality consumables and modernizations.
In order to keep your critical systems running EUROWATER offer call-out service for urgent needs, individual
service agreement on preventive maintenance, access to high-quality spare parts and consumables as well
as modernizations in all shapes and sizes.
Spare parts and consumables
We offer a wide range of spare parts, service kits, and consumables. Our service
cars are equipped with a broad range of spare parts, mainly of our own make. We
continuously supply spare parts for more than 25-year-old plants. Read more about
spare parts and consumables in the last chapter.
Rental plants for temporary needs
In case of temporary needs, such as emergency or planned maintenance,
EUROWATER offers a wide range of mobile rental plants, ready for use upon
delivery.
Training
The more you know about your water treatment plant, the better equipped you are to
deal with the routine operations of the plant, thereby minimizing down time. As part
of our commitments to provide a first class service, we offer specialized operator
training for your staff.
Contact
EUROWATER is an international group with subsidiaries in 14 countries
servicing our customers through 23 local offices. Moreover, the company is
represented in most of the other European countries through independent
distributors who are all water treatment specialists.
Find your local sales and service office on our international website:
www.eurowater.com
Service agreements
Consumables
Modernizations
Call-out service

Instructions |SILEX 1C |D01B-30A-UK1 |January 2017
Page 3| 9
Contents
1. Introduction.................................................................................................................................................. 4
1.1. List of figures .......................................................................................................................................... 4
2. General information..................................................................................................................................... 4
2.1. Plant description..................................................................................................................................... 4
2.2. Quality requirements of the untreated water.......................................................................................... 4
2.3. The contents of dissolved salts in the water - conductivity .................................................................... 4
2.4. Storage of a SILEX cartridge.................................................................................................................. 4
2.5. Life.......................................................................................................................................................... 4
3. Installation instructions.............................................................................................................................. 5
3.1. Gravity flow installation........................................................................................................................... 5
3.2. Pressure installation............................................................................................................................... 6
4. Conductivity meter...................................................................................................................................... 7
4.1. Secon V3-10........................................................................................................................................... 7
5. Operating instruction.................................................................................................................................. 8
5.1. Replacing the SILEX cartridge ............................................................................................................... 8
5.2. Handling the exhausted cartridge........................................................................................................... 8
6. Disposing of plant ....................................................................................................................................... 8
7. Consumables and selected spare parts.................................................................................................... 9
7.1. Cartridges and regeneration................................................................................................................... 9
7.2. Spare parts............................................................................................................................................. 9

Instructions |SILEX 1C |D01B-30A-UK1 |January 2017
Page 4| 9
1. Introduction
The instructions are made so that they can be followed section by section. It is recommended to follow the
instructions carefully since any service calls due to faulty installation, plant start, operation or insufficient
maintenance are not covered by our guarantee.
1.1. List of figures
Figure 1 - Gravity flow installation ..................................................................................................................... 5
Figure 2 - Pressure installation.......................................................................................................................... 6
Figure 3 - Conductivity meter Secon V3-10....................................................................................................... 7
2. General information
2.1. Plant description
A complete SILEX plant comprises a tank, a cartridge, and a conductivity meter that continuously indicates
the conductivity of the demineralized water.
The SILEX cartridge contains cation and anion exchange resins with a certain demineralization capacity. At
exhausted capacity the used cartridge is exchanged for a regenerated cartridge. The used cartridge is
returned in the original packing to the address of the regeneration centre:
Here the cartridge will be regenerated and then returned, ready for use.
2.2. Quality requirements of the untreated water
The temperature of the water to be demineralized must not exceed 35°C and must not contain iron,
manganese, oil, or large quantities of organic matter. Common tap water will normally meet these
requirements.
2.3. Dissolved salts in the water - conductivity
The electronic conductivity meter continuously indicates the conductivity of the demineralized water in
µS/cm. The conductivity is a measure of dissolved solids in the water. Lower conductivity means fewer
dissolved solids.
Water type
Conductivity
Distilled water
7-10 µS/cm
Demineralized SILEX water
< 0.1 µS/cm
2.4. Storage of a SILEX cartridge
On account of the ion exchange resins the SILEX cartridge must be stored in a frost-free room. Unused
cartridges must be stored as cool as possible –preferably at refrigerator temperature i.e. 4-8°C. Storage at
higher temperatures adds to the risk of growth of micro-organisms just like the cartridge's ability to produce
water of low conductivity is reduced.
2.5. Life
Cartridges that are stored at refrigerator temperature should be used within six months from the delivery
date. When stored at room temperature the cartridges should be used within three months. It is of greatest
importance for the life of the cartridges that they are stored and exchanged under as sterile conditions as
possible, so that the risk of contamination from the surroundings and the operator is minimized.
Instructions |SILEX 1C |D01B-30A-UK1 |January 2017
Page 5| 9
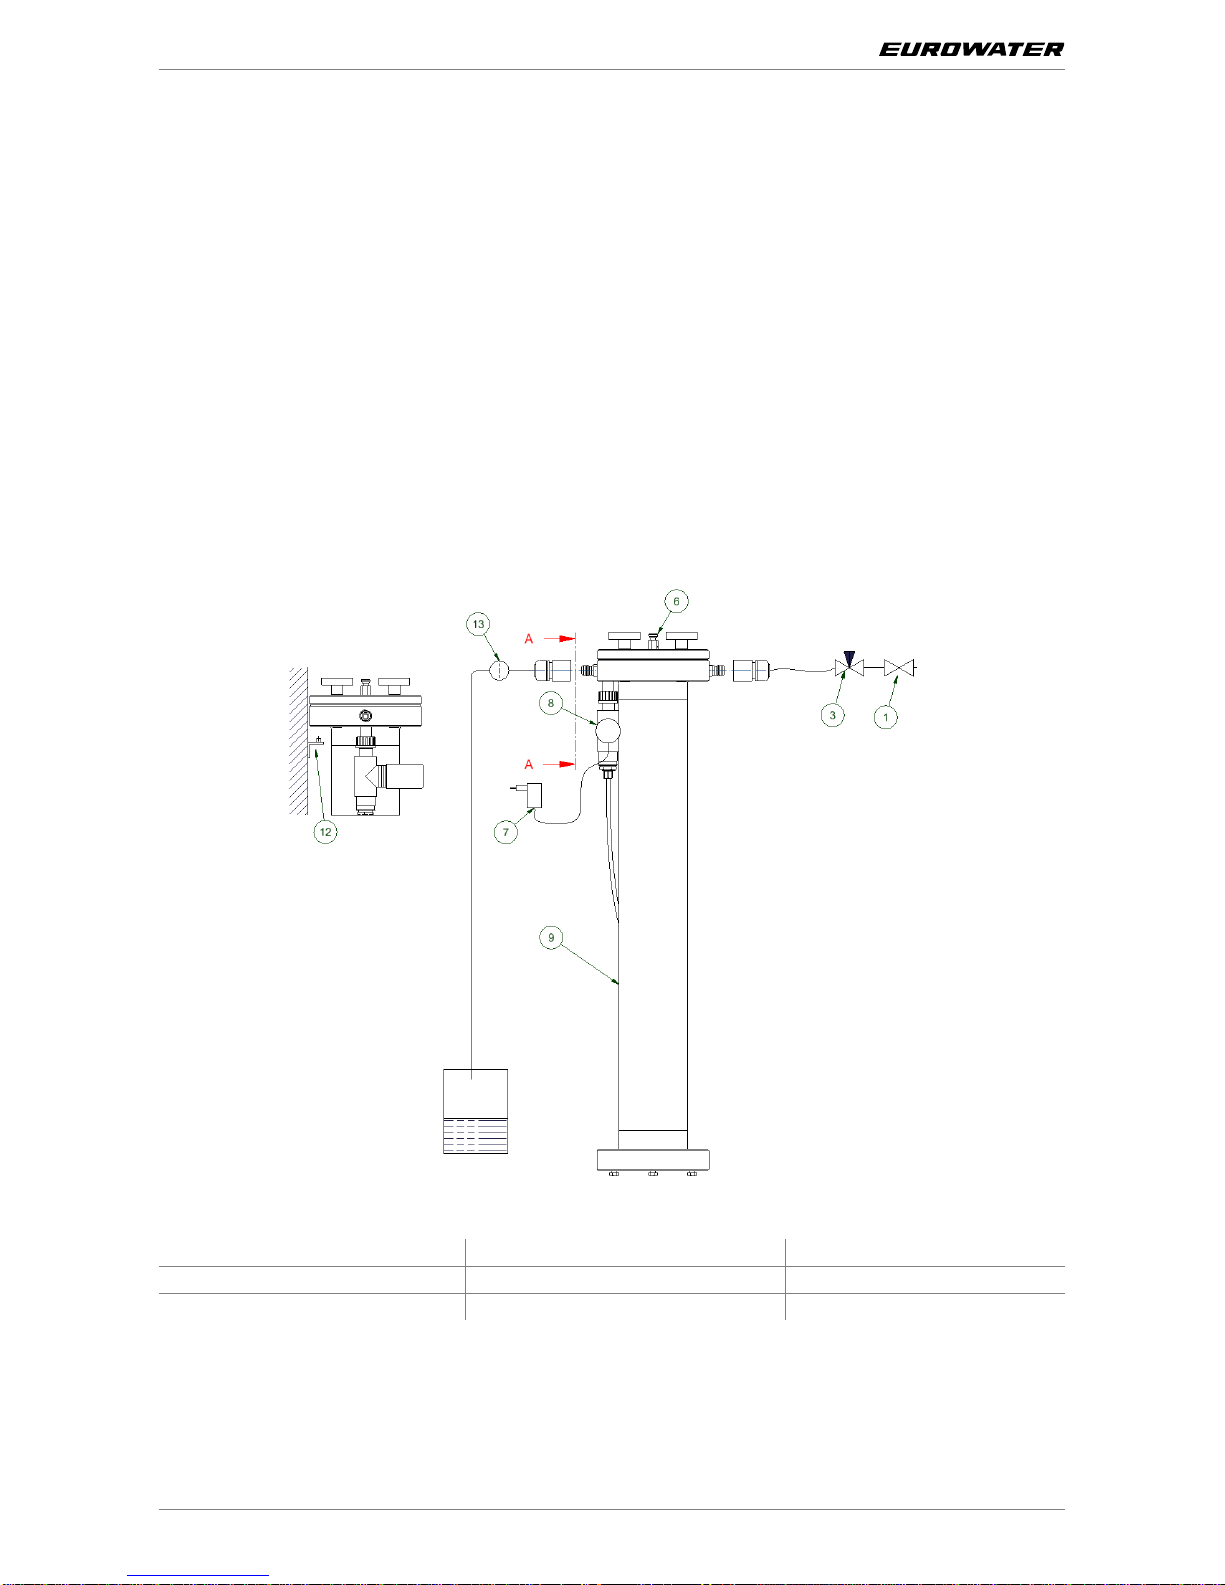
3. Installation instructions
3.1. Gravity flow installation
1. Use the angle fittings supplied to mount the SILEX plant on the wall close to a stop valve. The water
feed to the plant is regulated with the stop valve (pos. 1)
2. The maximum flow must not exceed 2 l per minute. If the flow can increase above this load, install a
valve on the inlet set to a maximum flow of 2 l/min. at maximum mains pressure and lock the valve in
this position (pos. 3).
3. The water is fed through the hose coupling (½") on the right side of the plant. The demineralized
water exits through a hose connected to the coupling on the left side of the plant. This hose must not
be fitted with any closing device and must be of synthetic or other corrosion-resistant material.
4. N.B.: A small and limited discharge of tiny particles (< 0.5 mm diameter) of ion exchange media
cannot be excluded. If such a discharge can harm the subsequent installation in any way, please
install a suitable mechanical filter after the outlet of the SILEX plant (pos. 13).
5. Provide an adjustable non-return valve between the mains piping and the SILEX installation. Check
and follow local regulations.
Figure 1 - Gravity flow installation
1. Stop valve
7. Transformer
12. Angle fittings
3. Regulating valve
8. Conductivity meter
13. Filter
6. Air vent
9. SILEX unit
According to EN 61010-1 item 1.4 the plant is installed under installation category II.
The transformer shall comply with EN 60742.
Table of contents
Popular Water Dispenser manuals by other brands

IBC Water
IBC Water AST0715MP-960 Installation & operating instructions

Lancaster Water Treatment
Lancaster Water Treatment X FACTOR LX15 Series Installation, operating and service manual

Elkay
Elkay EMABF8 Series Installation & use manual

Oasis
Oasis Osmosis Home installation manual

Monarch Water
Monarch Water ULTIMATE MINI AQUA HE install guide

Haier
Haier HLM-109B instruction manual


