EVA Stampaggi SILENCE 9 User manual

INSTRUCTION MANUAL
SILENCE 9
SILENCE 11
EN

TABLE OF CONTENTS
01. PRODUCT DESCRIPTION………………………………………………………………………………………………………………. page 3
02. PRODUCT INSTALLATION..…….……………………………………………………………………………………………………… page 4
03. USING THE PRODUCT……………………………...………………………………………………………………………………….. page 7
04. USER FUNCTIONS……………………………...……………………………………………………………………………………….. page 8
05. ALARMS……………………………...…………………………………………………………………………………………………… page 9
06. INTRODUCTION………………...……………………………...………………………………………………………………………… page 10
07. CONNECTIONS………………………………………...………………………………………………………………………………… page 11
ENGLISH

01. PRODUCT DESCRIPTION
TECHNICAL D AWING
SILENCE 9 / SILENCE 11
TECHNICAL DATA:
Technical data of the appliance:
Dati tecnici dell’apparecchio: SILENCE 9 SILENCE 11
Name:
Designazione:
Nominal heat
output
Potenza termica
nominale
Reduced heat
output
Potenza termica
ridotta
Nominal heat
output
Potenza termica
nominale
Reduced heat
output
Potenza termica
ridotta
Fuel throughput
Consumo orario (kg/h) 1.9 0.7 2.3 0.7
Minimum flue draught requirement
Requisiti minimi del tiraggio del camino (Pa) 12 10 12 10
Flue ga temperature
Temperatura fumi ( C) 147 65 146 55
Flue ga ma flow
Flusso massico dei fumi (g/s) 5.9 2.7 6.1 2.4
Efficiency
Rendimento (%) 90.5 96.0 91.5 97.0
Total heat output
Potenza termica (kW) 8.5 3.3 10.0 3.3
CO emi ion at 13% of O2
Emissioni di CO al 13% di O2 (%) 0.008 0.030 0.012 0.024
Electrical power upply
Potenza elettrica assorbita (W) 370 370 370 370
Rated voltage
Tensione nominale (V) 230 230 230 230
Rated frequency
Frequenza nominale(Hz) 50 50 50 50
ENERGY EFFICIENCY CLASS
Classe di efficienza energetica A+ A+
SILENCE 9 electrical consumption:
electrical consumption and nominal power: 37 W
reduced power electrical consumption: 24 W
Stand-By electrical consumption: 3 W
SILENCE 11 electrical consumption:
electrical consumption and nominal power: 50 W
reduced power electrical consumption: 30 W
Stand-By electrical consumption: 3 W
3 - English

02. INSTALLING THE PRODUCT
02.1 FLUE PIPE
FLUE PIPE SPECIFICATIONS
STOVE SILENCE 9 KW STOVE SILENCE 11 KW
Chimney flue draught 12
Pa Chimney flue draught 12
Pa
Fume temperature 147
°C Fume temperature 146
°C
Maximum flue gas flow rate 5.9
g/s Maximum flue gas flow rate 6.1
g/s
02.2 INSTALLATION
•If the stove is to be installed in rooms where it is surrounded by combustible material (e.g. furniture, wood cladding, etc.), the following minimum clearances
must be complied with:
FLAMMABLE NON FLAMMABLE FLAMMABLE NON FLAMMABLE
STOVE SILENCE 9 KW STOVE SILENCE 9 KW STOVE SILENCE 11 KW STOVE SILENCE 11 KW
EA WALL P = 50
mm
EA WALL P = 50
mm
EA WALL P = 50
mm
EA WALL P = 50
mm
SIDE WALL L = 200
mm
SIDE WALL L = 200
mm
SIDE WALL L = 200
mm
SIDE WALL L = 200
mm
FLOO F = - mm FLOO F = - mm FLOO F = - mm FLOO F = - mm
F ONT = 1000
mm
F ONT = 1000
mm
F ONT = 1000
mm
F ONT = 1000
mm
HANDLING AND UNPACKING
When transporting do not position the product horizontally. Unloading of the product must be performed using suitable lifting means and that have characteristics
that comply with the weight of the stove. The operator must make sure that during offloading and lifting of the stove there are no persons or objects nearby. When
unpacking, avoid damaging the product with cutters or blunt tools. Keep the packaging out of reach of children. Unscrew the screws that secure it to the pallet from
below and place the stove in the dedicated position paying attention to any obstructions that may hinder installation or damage the item.
STOVE INSTALLATION
In compliance with the current regulations for installation, the stove must be installed in a ventilated place with air that is sufficient to ensure correct combustion
and therefore good operation. The room must have a volume no less than 20 m3. In order to ensure good combustion (40m3/h of air) there must be a “combustion
air intake” that reaches an external wall or a wall of an adjacent room with an external air intake (Ø 80mm minimum diameter). The adjacent room must not be a
bedroom or bathroom, or contain any fire risks, such as storerooms, garages, combustible materials stores, etc. These air intakes must be made in such a way as
to avoid being blocked internally or externally, and should be covered with a grille, metal mesh or suitable protection, as long as the minimum diameter is not
reduced.
The stove must not be positioned close to curtains, armchairs, furniture or to other flammable materials.
The stove must not be installed in explosive or potentially explosive environments which may become explosive due to the presence of machinery, materials or
dust that can cause greenhouse gas emissions or which can easily ignite with sparks. Before preparing to install the pellet stove, bear in mind that all finishes or
any beams made of flammable material must be positioned at a safe distance outside the area of irradiation of the stove itself. Bear in mind also that to in order
not to compromise correct operation of the appliance, a recirculation of air inside its housing must be created, which will prevent overheating. This is possible by
respecting minimum distances and by creating ventilation holes.
The fume outlet can be located on the upper side or on the rear side of the stove. You can decide between the rear and the top fume outlet based on the location
of the vent pipe.
THE STOVE DOES NOT WO K IF THE LID OF THE PELLET HOPPE IS OPEN.
02.3 ELECTRICAL CONNECTION
The electrical connection must be performed by qualified personnel who install circuit breakers upstream of the appliance.
Special attention should be paid when the operation is a supplementary action and all equipment must operate as planned.
Avoid installations with electric cables that run close to fume pipes or hot components that are suitably insulated.
The voltage is 230 V while the frequency is 50 Hz.
The electrical system, at the connection point, must be have a ground connection as required by EEC egulation 73/23 and EEC 93/98.
4 - English

02.4 EXTERNAL THERMOSTAT
In this product it is possible to install an external thermostat. This operation may only be performed by authorised personnel. Use a 2-pole cable with everyday
double insulation. Connect the two pins to the connector of the CN7 electronic board pins 7-8. Enabling the external thermostat by bringing to room temperature,
T-ON will be present when the thermostat prompts and T-OF when the thermostat is satisfied. If the thermostat is closed, the appliance works at the set heat output.
If the thermostat is activated, the appliance will work in the MODULAT- state until it is switched off; if it is on STAND-BY, it is active.
02.5 IGNITION
First connect the stove plug to the mains and load the pellet hopper.
Care must be taken not to empty the entire bag at once, but to carry out this procedure slowly so as not to place any pellet dust from the bag into the hopper. If
present, take care not to damage the seal on the pellet hopper door and keep the pellet hopper support surface clean.
The use of poor-quality pellets may result in the stove not reaching its maximum yield due to poor combustion and degradation of the stove itself. Check that the
hopper door is shut fully all the way, otherwise the stove will not work operate.
The ash collection drawer must be closed. A limit switch is included on the door which, if not shut properly, will cut power to the auger and trigger a stove alarm.
Load the pellets and from the main menu perform the INITIAL LOAD, and then turn on the stove.
The burn pot cleaning mechanism is present in the stove. Before loading pellets, the stove engages this cleaning device so that the burn pot is always clean for
the maximum efficiency of the stove. This cleaning phase lasts on average 4 minutes. If all the mechanisms have successfully concluded their cycle following
cleaning, LOAD PELLET, will take place, otherwise an alarm is triggered that will interrupt the ignition phase.
5 - English

03. PRODUCT USE
03.1 RADIO CONTROL
Proper functioning and control adjustment devices
Console
The remote control displays information regarding the operating status of the stove. A variety of data can be displayed and settings carried out according to the
level of access by using the menu. Depending on the selected mode and on their position on the display, the data visualised may acquire different meanings.
PANEL DESC IPTION
Button P1 – Increase:
When in programming mode, use this button to modify/increase the selected menu value. When in working/switched off mode, instead use this button to increase
the room thermostat temperature value or stove heat output.
Button P2 – Decrease:
The button in programming mode modifies/decreases the selected menu value, in work/off mode it decreases the temperature value of the room thermostat or
stove heat output.
Button P3 – ON/OFF release:
Hold this button down for two seconds to manually switch the stove on or off respectively depending on its initial status (switched on or off).
By simply pressing, the remote control display comes on. Should any alarm have blocked the stove, press this button to unlock it and subsequently switch it off.
Button P4 – Confirm
Button P5 – Back
6 - English

03.2 EMERGENCY CONSOLE
The emergency console is used when the remote control does not work or in case of loss of the latter.
Button P1 – ON/OF:
Keeping this button pressed, the stove will switch on or off according to the last settings recorded by the remote control.
Button P2 – heat output increase / decrease:
With this button it is possible to select the stove heat output manually.
03.3 REMOTE CONTROL ASSOCIATION
First ignition and association of the radio remote control to the stove: it is necessary to interface the radio remote control to the emergency display. There are 2
possibilities:
1) With the board off, press the two remote control keys (ok+on-off) until the radio id menu appears. At this point press the “-“ key and the word "NEW"
appears. Press the OK” key and select the desired channel number (“+” and “-“ keys). Turn on the board and press the "OK" key on the remote control
to confirm.
2) With the board on, press the two keys of the remote control (ok+on-off) until the radio id menu appears. At this point, press the "-" key and the word
"NEW" appears. Press the OK” key and select the desired channel number (“+” and “-“ keys). Press the two buttons on the emergency console until all
the LEDs flash.
03.4 MENU
Press the P4 button to access the menu.
It includes several items and levels to access settings and control board programming.
The table below briefly describes the menu structure, focusing in particular on the functions available to users.
LOWER MODE
This menu permits activation or deactivation of room ventilation. It is possible to do this in any power.
CRONO
Sub-menu M3 – 1 – Enable chrono
The menu on the “ENABLE CH ONO” display permits global enabling or disabling of all chronothermostat functions. To enable, press the P1 button. Press
P3 button to confirm.
Sub-menu M3 – 2 – Daily chrono:
Once the “DAILY CH ONO” menu has been selected, daily chrono is enabled using the P1 and P2 buttons. With the P4 button, the possible items can be
scrolled through, including: switch-on time, switch-off time, set stove heat output, room temperature. It is possible to set two operating ranges. The OFF setting
tells the clock to ignore the command. To change use the keys P1 and P2 while to confirm press P3. In each program you will find: Switch-on time, Switch-off
time, Set stove heat output, oom temperature, Days of the week for which the programme is to be active. Monday is 1 and Sunday is 7.
Sub-menu M3 – 3 – Weekly chrono:
The “WEEKLY CH ONO” menu permits enabling/disabling and setting of the weekly chronothermostat functions. The weekly programming function features
4 independent programmes. Moreover, if the time is set to OFF, the time clock ignores the corresponding control. To change use the keys P1 and P2 while to
confirm press P3.
In each program you will find: Switch-on time, Switch-off time, Set stove heat output, oom temperature, Days of the week for which the programme is to be
active. Monday is 1 and Sunday is 7.
7 - English

Sub-menu M3 – 4 – Chrono week-end
It is used to enable/disable and to set the chronothermostat functions on weekends (days 6 and 7, i.e. Saturday and Sunday). To enable, press the P1 and
P2 buttons. Setting the times Start 1 and Stop 1 sets the operating period for Saturday, while Start 2 and Stop 2 are used to set the stove operation for
Sunday.
DATE AND TIME
Use this function to set current time and date. The control board is equipped with a lithium battery guaranteeing the time clock 3/5 year-long autonomy. Set the
current date by pressing OK and the respective arrows to increase or decrease the selected values.
LANGUAGE
Use this command to select one of the languages available. To move to the next language press P1 (increase) to go back, press P2 (decrease) and to confirm
press P4.
SETTINGS
This menu includes:
BUZZE MODE: this is the buzzer on the board. This sub-menu can be used to activate or deactivate the buzzer
ET OILLUMINAZIONE ON: duration of remote control lighting
POWE ON: time the display stays on
LUMINOSITA’: on or off
CONT ASTO: display contrast adjustment
TONI TASTI: activation/deactivation of the remote control key beep
INITIAL LOAD
This function is only available when the stove is OFF and is used to load the auger when the stove is started for the first time when the pellet hopper is empty. After
selecting the menu, press P1. The exhaust blower switches on at the maximum speed and the auger tube (auger tube LED on) starts working. They will switch off
once the period of time indicated on the display has elapsed or after pressing the P3 button.
STATE STOVE
Enter the STOVE STATUS menu, after pressing the P4 button, the display scrolls the status of a number of variables during operation of the stove at work.
USER SETTINGS
This menu permits the pellet drop due to pellet change by a preset percentage to be increased or decreased.
TECHNICAL MENU
This menu item is reserved for the stove installer.
STAND- Y
In this menu it is possible to activate or deactivate the automatic stand-by of the stove. When selected, if the room temperature exceeds the set temperature by
2°C, the stove will automatically switch off and then switch on again when the room temperature drops below 2°C with respect to the set temperature.
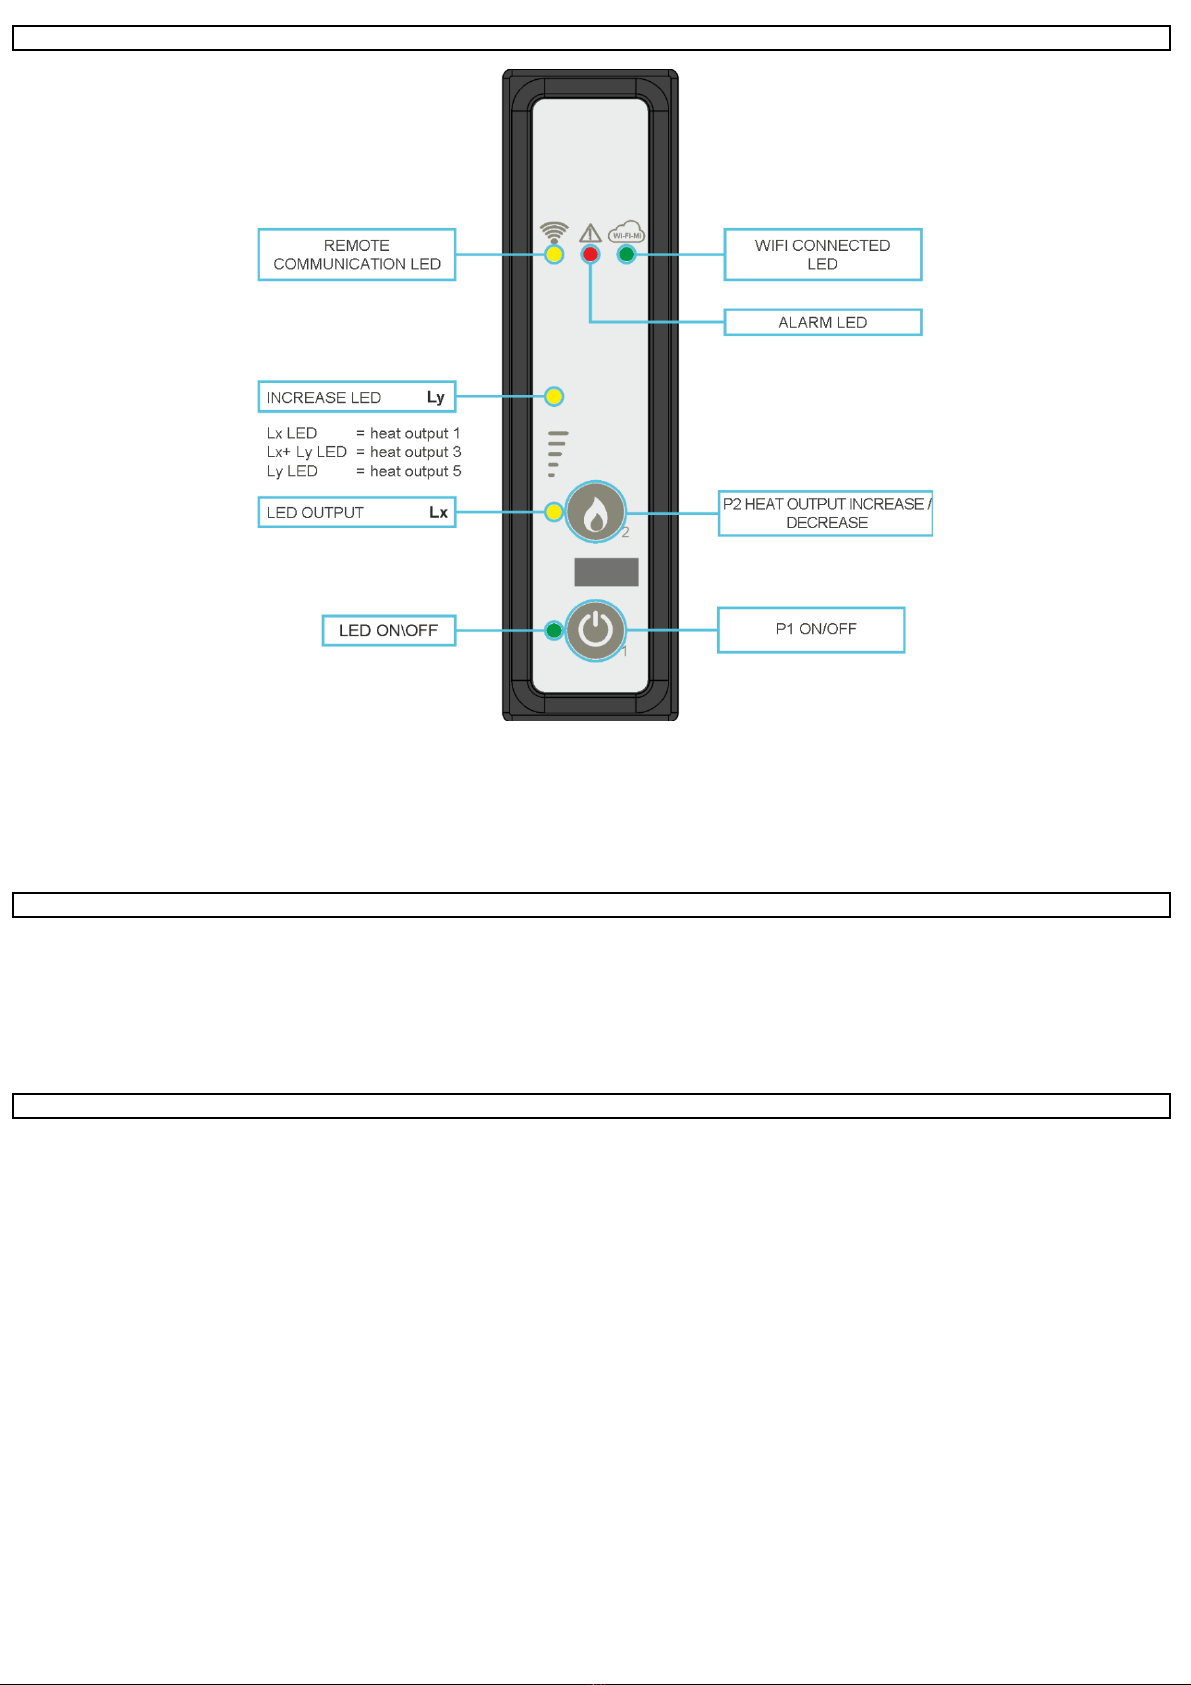
04. USER FUNCTIONS
Standard functioning of a control board properly installed on an air stove is described below with reference to the functions available to users.
Stove ignition
Hold P3 button down for a few seconds to switch on the stove. Ignition is signalled on the display with the wording “CHECK UP”. In these conditions the stove is in
the pre-heating state, the burn pot is cleaned, the glow plug (visible with the glow plug LED) and the fume extraction fan come on.
Any problem detected during the switching-on phase is indicated on the display and the stove goes into alarm status.
Loading with Pellets
After approximately 1 minute, the pellet loading phase begins and the message “LOAD PELLET” appears on the display. During the initial phase, the auger tube
loads the pellets into the burn pot for a fixed amount of time. In the second phase the auger tube turns off, while the speed of the fumes and the glow plug remain
in the previous state. If ignition does not occur after this phase, the auger tube is switched on again and the glow plug remains on.
Fire present
After the temperature of the fumes has reached and exceeded a preset threshold, the system switches to ignition mode and “STABILIZZAZIONE” appears on the
display.
The speed of the fumes is fixed, the auger tube turns on for a fixed time and the glow plug is turned off. Any problem during this phase will cause the control board
to stop and the stove to go into error state.
Stove operational
After the temperature of the fumes has reached and exceeded a given value and has maintained it for at least a predetermined time, the stove goes into work
mode which is the normal working mode. The upper display shows the time and the room temperature and the lower one the set power and the power in which
the stove is found. The heat output can be set by pressing the P2 key and the room temperature can be set by pressing the P1 button. If the fume temperature
reaches a certain set threshold, the air exchanger fan turns on. oom ventilation can be excluded from the BLOWE MODE menu.
After this phase, the stove cleans the burn pot. “Burn pot cleaning” scrolls on the display, the auger is switched on (auger LED on) and the exhaust blower is
switched on. Once the set period of time has elapsed, the stove goes back to the working mode.
Changing set heat output
During normal stove operation (WO K), the heat output can be changed using the P2 button. Press the P2 button again to increase the heat output and the P1
button to decrease it. The display will show the set heat output. To exit the set, wait 5 seconds without performing keyboard operations, or press P3 or P4.
Changing set room temperature
Press P1 button to change the set room temperature. The display shows the set room temperature (SET temperature value). Press P1 (increase) and P2
(decrease) buttons to modify the temperature. The value is saved after approx. 5 seconds and the display goes back to normal. Otherwise, press P3 or P4 to exit.
External thermostat/chrono-thermostat use
If you want to use an external programmable thermostat, connect it to the TE M clamps (connector CN7 pin 7-8).
• External thermostat
• External chrono-thermostat
The stove external thermostat is enabled when the contact is closed with stove on.
Room temperature reaches the set value (SET temperature)
When the set room temperature value is reached, the stove heat output is automatically set to the minimum value. During this phase, “MODULAT-” appears on
the display. If room temperature falls below the set value (Set temperature), the stove will return to “WO K” mode and to the previously set heat output (Set heat
output). If there is an external thermostat and the room temperature has been set to T-e, if the thermostat is open it will begin modulation and if closed, it will return
to the heat output set.
8 - English

Stand-by
When enabled in the menu, the Stand-by function allows the stove to be switched off after complying with the following conditions. It is enabled if, for a certain
time, the room temperature is higher than the set temperature ( oom set) plus a pre-set temperature delta. “OK STBY” appears on the display. At the end of the
set time, the message “COOLING WAIT” appears on the display. In this state, the stove has an auger tube closed (auger tube off) and the heat exchanger switches
off. When the fume temperature reaches a given threshold, the stove enters stand-by mode and the wording “STAND-BY” scrolls across the display. The auger,
heat exchanger and exhaust blower are all switched off.
The stove restarts if the room temperature falls below the set temperature ( oom set) minus the threshold given by the temperature delta.
Stove switch off
Hold P3 button down to switch off the stove. The message “FINAL CLEANING” appears on the display. The auger tube motor stops (the auger tube LED is off)
and the exhaust blower speed is pre-set. The fan of the exchanger (exchanger LED on) remains active until the fume temperature falls below a pre-set value.
After a certain time, if the fume temperature is below a given threshold, the stove switches off and the message “OFF” is displayed.
05 ALARMS
In the event that an operating fault occurs, the board intervenes and signals the occurrence of an irregularity, switching on the alarm LED (alarm LED on) and
emitting acoustic signals.
The possible alarm messages are listed below:
Di play how No. Cau e
BLACK OUT (1) Absence of mains vo tage
SMOKES TEMP. (2) Fume overheating
REG. ENCODER (3) Check fume motor encoder
NO ENCODER (4) Exhaust b ower fau t, not working
FAILED IGNITION (5) Stove does not ignite
CHECK PELLET (6) Shutting down due to insufficient pe ets
THERMIC SEC. (7) Safety thermostat activated
NO DEPRESSURE (8) Depressor activated
AUGER SECURITY (10) The auger tube turns continuous y
DRAW INSUFF- (11) Burn pot or air extraction pipe obstructed
CLEANER FAILURE (12) Burn pot c eaner is b ocked/Firebox door not shut correct y
AUGER ENCODER (13) The board does not read the auger tube encoder. No connection
AUGER TRIAC (14) The auger tube turns continuous y
In case of alarm, the stove is immediately switched off.
Alarm status is reached after a given time, EXCEPT LACK-OUT ALARM, and can be reset by prolonged pressure on button P3. Every time an alarm is cleared,
for safety, a stove shutdown phase is started. The alarm LED (alarm LED on) will remain on and the buzzer, if enabled, will sound intermittently during the entire
alarm phase. Should the alarm not be cleared, the stove will in any case be switched off and the alarm message will remain on the display.
Safety thermostat
If the general safety thermostat detects a water temperature exceeding the trigger threshold, it immediately
switches off the auger tube (to which it is connected in series), while the controller acquires this change in status.
The THERMIC SEC. message is displayed and the system is shut down. Unscrew the black cap on the back of
the stove and press the button to reset the contact.
Negative pressure alarm
This alarm occurs if:
• The flue pipe is non-compliant: the pipe must keep the minimum pressure in Pascals as required by the manufacturer (see TECHNICAL DATA) at both
minimum and maximum heat output.
• The flue pipe or combustion air intake is obstructed.
• The combustion chamber door and/or pallet hopper door are open.
• Excessive dirt inside fume circulation area: empty the ash that is deposited in the part adjacent to the ash drawer compartment.
lack-out Alarm
If a power failure occurs for a certain period of time, the device will go into a LACK-OUT alarm when the power comes back on.
It is necessary to wait for the stove to cool down and then turn it back on.
SERVICE MESSAGE
The stove will display the message SE VICE (or SE ) during operation depending on the number of hours of operation. The wording does not lock operation of
the stove, but non-routine maintenance will be required by an authorised technician, who will reset the service hours.
9 - English

06. INTRODUCTION
The stove requires a simple yet constant cleaning to guarantee top efficiency and proper functioning.
Constant maintenance by a qualified technician is recommended.
The stove should be cleaned before the cold season because it can sometimes get clogged during the summer (by nests for example) preventing exhaust fumes
to flow regularly.
At the beginning of the season and in case of wind, a build-up of residue in the pipe may lead to fires. Should this happen, find below a few pieces of advice to
follow:
• lock air supply to the pipe immediately;
• Throw sand or kitchen salt, and not water, to extinguish fire and coals;
• Keep objects and furniture away from the burning pipe.
TO PREVENT EVEN THIS TYPE OF FAULT, YEARLY CLEANING OF THE FLUE PIPE IS ESSENTIAL TO REMOVE DEPOSITS, NESTS OR OTHER
O STRUCTIONS.
CAUTION:
• USE A DRY CLOTH TO CLEAN THE STOVE EXTERNALLY.
• THE AUGER TU E MUST E COMPLETELY EMPTIED FROM PELLETS WHEN USING THE STOVE FOR THE LAST TIME AT THE END OF THE
SEASON. THE AUGER TU E MUST REMAIN EMPTY TO PREVENT IT FROM ECOMING CLOGGED Y SAWDUST RESIDUES THAT HAVE
SOLIDIFIED DUE TO MOISTURE.
05.2 ROUTINE CLEANING
Each time the stove is switched on, it automatically performs a burn pot cleaning
cycle. If the automatic cleaning has not cleared the holes in the burn pot, it is
necessary to do this using an ash vacuum.
Any cleaning operation must be performed when the stove is completely cold:
• Check daily that there are no residues in the combustion chamber and the
level of the ash pan.
• Empty the ash drawer depending on use and type of pellets approx. every 5
days.
• Vacuum the combustion chamber: check that there are no embers that may
still be lit. In this case your dust vacuum cleaner will catch fire.
• emove the ash inside firebox and on door.
• Clean the glass with a damp cloth or with a ball of damp newspaper dipped in
ash. If the operation is performed with the stove hot there is a risk of the glass
exploding.
CAUTION: USE A DRY CLOTH TO CLEAN THE STOVE EXTERNALLY. DO NOT USE A RASIVE MATERIALS OR PRODUCTS THAT MAY CORRODE OR
LEACH SURFACES.
10 - English

07. CONNECTIONS
CODE
1
CIRCUIT BOARD
951095900
2
BURN POT CLEANER CONTACT
951067700
3
ROOM PROBE
4
EXTERNAL THERMOSTAT
5
FUME PROBE
6
AUGER MOTOR
7
EXCHANGER
8
DEPRESSOR CONTACT
9
SAFETY THERMOSTAT CONTACT
10
DOOR CONTACT
11
BURN POT CLEANER MOTOR
12
FUME FAN
13
SPARK PLUG
11 - English

Eva Stampaggi S.r.l.
Via Cal Longa Z.I.
31028 Vazzola (TV) ITALY
Tel: +39 0438 740433
Fax: +39 0438 740821
I dati e le caratteristiche indicate non impegnano Eva Stampaggi S.r.l., che si riserva il diritto di
apportare le modifiche ritenute opportune senza obbligo di preavviso o di sostituzione.
Tutti i diritti riservati. Vietata riproduzione totale o parziale senza espressa autorizzazione di Eva
Stampaggi S.r.l.
The data and features indicated are in no way binding to Eva Stampaggi S.r.l. The company reserves
the right to make any changes necessary without prior notice or replacement.
All rights reserved. Total or partial reproduction prohibited without the express authorisation of Eva
Stampaggi S.r.l.
Les données et caractéristiques indiquées n’engagent pas Eva Stampaggi S.r.l., qui se réserve le droit
d’apporter les modifications jugées opportunes sans obligation de préavis ou de remplacement.
Tous droits réservés. La reproduction totale ou partielle sans autorisation expresse de Eva Stampaggi
S.r.l. est interdite.
Die angegebenen Daten und Eigenschaften binden das Unternehmen Eva Stampaggi S.r.l. nicht, das
sich das echt vorbehält, ohne zu Vorankündigungen oder Ersetzungen verpflichten zu sein, für
opportun gehaltene Änderungen vorzunehmen.
Alle echte vorbehalten. Der vollständige oder teilweise Nachdruck ist ohne die ausdrückliche
Genehmigung der Eva Stampaggi GmbH nicht gestattet.
Los datos y las características que se indican no son vinculantes para Eva Stampaggi S.r.l. que se
reserva el derecho de efectuar las modificaciones que juzgue oportunas sin previo aviso o
sustituciones.
Todos los derechos están reservados. Prohibida la reproducción total o parcial sin la autorización
expresa de Eva Stampaggi S.r.l.
Os dados e as características indicadas não comprometem a Eva Stampaggi S.r.l., que se reserva o
direito de efetuar as modificações consideradas oportunas sem obrigação de aviso prévio ou de
substituição.
Todos os direitos reservados. É proibida a reprodução total ou parcial sem a autorização expressa da
Eva Stampaggi S.r.l.
831078800 EV. 1.0
Other manuals for SILENCE 9
1
This manual suits for next models
1
Table of contents
Other EVA Stampaggi Stove manuals

EVA Stampaggi
EVA Stampaggi SPC-15 User manual

EVA Stampaggi
EVA Stampaggi SB 80 User manual

EVA Stampaggi
EVA Stampaggi COSTANZA User manual

EVA Stampaggi
EVA Stampaggi EV 14 User manual

EVA Stampaggi
EVA Stampaggi 8KW User manual

EVA Stampaggi
EVA Stampaggi FUTURA User manual

EVA Stampaggi
EVA Stampaggi HYDRO CURVED FRONT 20 KW User manual

EVA Stampaggi
EVA Stampaggi ARIA 30 User manual

EVA Stampaggi
EVA Stampaggi SILENCE 9 User manual

EVA Stampaggi
EVA Stampaggi HYDRO KANTINA 20 User manual